Category: Android Tips N Tricks

  • 3 ways to use a single-1 Gmail id as many-multiple ids! Gmail dot trick (.) and + plus tricks!

    3 ways to use a single-1 Gmail id as many-multiple ids! Gmail dot trick (.) and + plus tricks!

    Heya folks, E-Mail or electronic mail is the most widely used means of communication over the Internet , also its kinda an impression of a person’s online identity. GMail is one such popular e-mail service provided by Google!. But do you know that a single or even one GMail ID can be used as multiple ID’s which we can use to perform multiple sign-ups ! , thus saving the troublesome task of creating multiple e-mail accounts for different accounts on a single site . A single Gmail ID can thus be tweaked to be camouflaged as different or multiple e-mail ID’s . Let’s have a look onto 3 of such best tricks to use a single 1 gmail ID as multiple ones or many ids.

    Assumption :  I will be explaining all the tricks in the article using our default GMail ID for the website – techapple.net @ gmail . com. I will be using this single gmail id to get mails from multiple ids without even creating them!

    Trick # 1 – Gmail dot (.) trick

    • This is one of the most widely used techniques to use a single E-Mail ID to sign-up for multiple accounts .
    • The Gmail dot trick consists of inserting any number of dots (.) or fullstop/period in your gmail ID username to show them as different IDs .
    • Thus, even if you send an email / or request an email on techapplenet @ gmail . com or t.e.c.h.a.p.p.l.e.n.e.t @ gmail . com it will arrive in the same e-mail ID! . (The original one)
    • The sign-up or other websites though treat them as different e-mail accounts, but in Gmail they are one! , so thus you can use a single gmail account id as multiple ones, I use this trick pretty much on signing up for free trial websites which provide freebies based on e-mail IDs.
    • So, Gmail dot trick in short –


    Trick # 2 – GMail plus (+) trick


    Trick # 3 – Using @googlemail.com instead of @gmail.com


    Example of using the above technique –

    We have our Gmail ID registered as [email protected] , you can check how we used each of the above combiation and still received the e-mail on our default ID.

    Sending e-mail to [email protected] instead of [email protected]
    Reception of mail sent to [email protected] on the GMail ID – [email protected]

    Thus, you can use one or even all of the above methods to create multiple email or gmail ids for yourselves on just a single account! . The permutations and combinations possible are infinite! , also If you have queries/suggestions feel free to comment 🙂

  • 3 Best Android Cashback Apps to get Cashbacks for Indian online shopping portals – Flipkart , Amazon.in , Jabong , Myntra etc

    3 Best Android Cashback Apps to get Cashbacks for Indian online shopping portals – Flipkart , Amazon.in , Jabong , Myntra etc

    Cashbacks are the next big thing in the online shopping arena! Cashback is some percentage of money returned after the shopping is done. As Cashbacks are offered after the order is placed, they can be combined in with coupons too! resulting in even more Discounts and further reducing the actual costs of the product. Recently we covered the 3 Best Cashback Websites for Indian e-commerce portals, In this article we will be covering the Best Android Cashback apps or Cash back apps for android – India which provide cashbacks on online purchases made from your phone/mobile!.

    App # 1 – LafaLafa

    LafaLafa App

    Lafalafa leads all the apps in this cashback giving apps arena, and is going to stay for long! because of the exclusive benefits its provides –

    • Get confirmed Cashbacks on each recharges & online shopping done done from the Lafalafa app.
    • Lafalafa also provides product search which you can use to compare the prices of products across different online shopping sites so that you can get the product at the lowest possible prices!.
    • The app has an in-built human assistant which will automatically find out the best deals for the product you’re buying by searching across all online stores. Thus saving your precious time & efforts and even giving you cashback at the same time!
    • Besides, these Lafalafa also provides Free Rs.5 just for installing the app! in addition to each cashback you earn on your Online purchases.
    • You can even redeem your earned Lafalafa Cashback to your bank account as well!.
    • Click here to download Lafalafa app and get free Rs.5

    App # 2 – Coupon Dunia App

    Coupon Dunia App

    The leading Indian Coupon site – Coupon Dunia is now on mobile with its own official app. And not just app, Coupon Dunia now even provides Cashback for shopping via Coupon Dunia!

    Thus, now besides saving by using working coupons you can even earn CD Cashback  in your CD wallet just for shopping & saving via Coupon dunia.

    The CD cashback can also be directly transferred to your bank account and even Paytm!

    Also get instant Free Rs.100  on signing-up on Coupon Dunia using our link .

    Click here to Download Coupon Dunia cashback app from Google Play.


    App # 3 – GoPaisa App

    GoPaisa App
    GoPaisa App

    GoPaisa is yet another Cashback providing app by virtue of which you can earn cashbacks on your online purchases.

    • Like Lafalafa the GoPaisa app provides cashbacks for all major online stores such as Flipkart, Amazon, Paytm etc .
    • The earned Cashback can be redeemed in the form of Recharges, Shopping Vouchers etc.
    • Besides these, GoPaisa app has an attractive referral program as well.
    • Click here to Download GoPaisa App from Google Play.

    These are the current best cashbacks apps available for Indian online shopping portals, if you know more of them feel free to comment!, your views and takes on the cashback apps are also welcome 🙂


  • Xender app-easily transfer data/music from Android to iPhone or iPad (iOS) devices | Transfer data/music from iPhone to Android devices too!

    Xender app-easily transfer data/music from Android to iPhone or iPad (iOS) devices | Transfer data/music from iPhone to Android devices too!

    There are very few or limited options when it comes to transferring data from Android devices to iPhone/iPad , most take the route of using WhatsApp/Dropbox to transfer data from Android to iPhone . Not only it consumes data but is also less speedy, and results in compression/loss of data(as in case of WhatsApp) . Xender for iOS / Android is an awesome app which will solve all your worries! It transfers data from Android to iPhone/iPad using Wi-Fi network but without consuming data!. All you require is to have both the devices connected in a group (i.e have the same Wi-Fi connection) , In-this tutorial We will see transferring data/files/music from Android to iPhone , and transferring data/music from iPhone to android too.

    Note – If you want to transfer data between to and from iPhone/iPad to iPhone/iPad, please refer this article , Also if you’re looking to transfer video/movie to your iPad/iPhone please refer this article to be able to play mkv,avi and other video formats.

    Tutorial to use Xender App for transferring data/music from Android to iPhone and iPhone to Android.

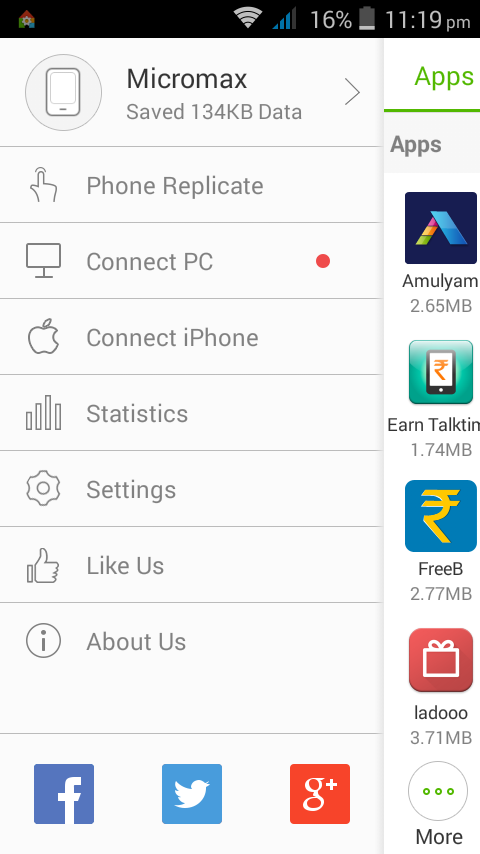
    After tapping on more select the “Connect iPhone” option
    • First of all download and install Xender app on your devices –Click here to Download Xender app from Google Play Store. (Android)

      Click here to Download Xender app from Apple iTunes Store
      . ( iOS ) works on iPad Air 2 , iPad mini too
    • Now , we need to create a group in order to transfer between iPhone and Android so as we can start the transfer, Open the Xender app on Android and select or tap on “more” option. (Its located on the bottom left hand side as shown in alongside image).
    • After tapping on more select the “Connect iPhone” option from the menu .
    • Now , On your iPhone/iPad , Navigate to Settings – > WLAN and connect to the WiFi network starting with “ADY etc….”.
    • Once your iPhone or iOS device gets connected, Open Xender app on your iPhone/iPad and click on the “Connect Phone” Option.
    • That’s it! now just select the data which you want to send , on either of the device Android or on the iPhone, and tap on “Send” . (Check the second image for details)
    • Woah! your music/data will be transferred within seconds! and this is perhaps the only way you can transfer songs/music from Music library of iPhone to Android!

    Note / Update – Many users asked us for method to import songs/music from Xender app to Music library , please read this article to import music/songs from Xender / ShareIt app to default Music player library of iPhone/iPod/iPad.


    Here’s another image which will explain the procedure in a simple way . If you have any doubts/encounter any problems feel free to comment ,and ya Xender app is Free for iOS as well as Android .

    Xender App Android to iPhone music/data transfer
  • Adsense Ads now Visible on Opera Mini – It now displays Adsense Ads too

    Adsense Ads now Visible on Opera Mini – It now displays Adsense Ads too

    Opera Mini is one of the most widely used Mobile browser in the world! Infact one of the top mobile browser present;y . Opera mini had only one drawback – It didn’t use to display or it couldn’t display Adsense Ads/ Ad Units. this was resulting in loss of revenue/ or inability of websites/bloggers as the Ads themselves weren’t displayed on The Mobile/Opera Mini traffic. But, there’s a reason to rejoice – Adsense Ads are now displayed on Opera Mini. i.e Opera Mini now displays Adsense Ads too –

    It brings a lot of many benefits to us bloggers –

    • Higher and increased revenue for Mobile/Tech browser through their blogs/sites. You can check the below screenshot of my site as 16% of my total traffic was from Opera Mini –
    • Opera Mini consists of 16% of total traffic
    • Though, Opera Mini now supports AdSense, I still don’t have much Idea about UC Browser and Adsense Ads Display.
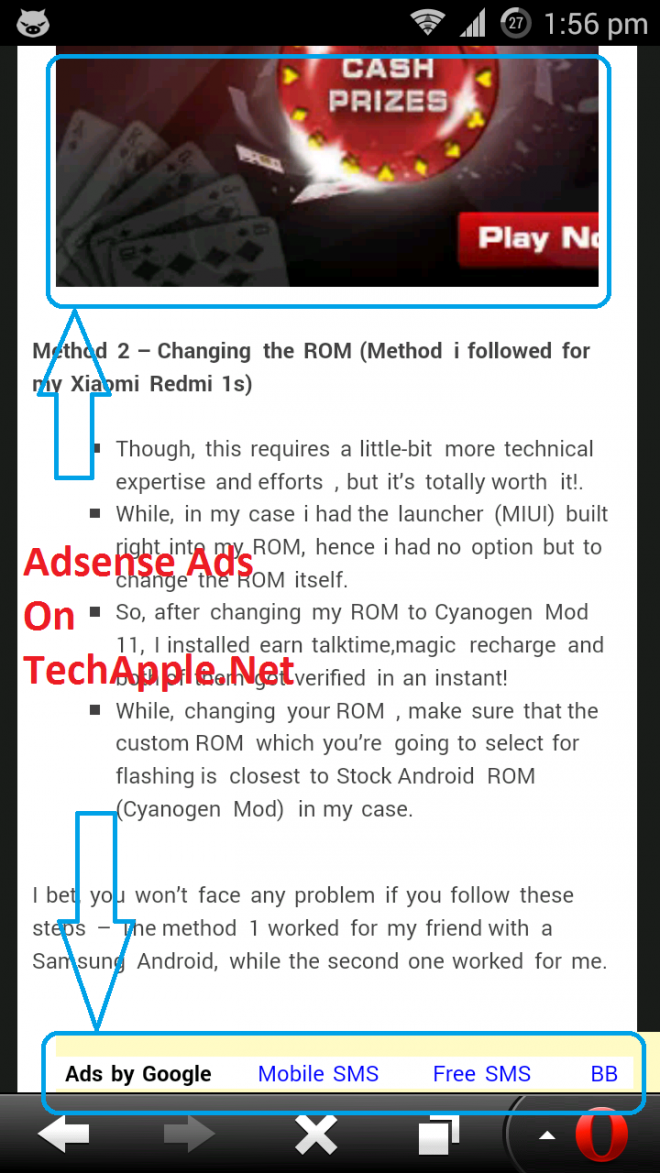
    • You can also  check the below ScreenShot of my Website to check the AdSense units displayed and working in action –
    • AdSense in action with Link unitstoo

    The Above blue highlighted box shows AdSense for Content Ads , while the bottom blue highlighted box shows the AdSense link units as shown in the image alongside.


    Thus, its a good news for we bloggers and site owners as it will enable us to more revenue from our sites 🙂 . Do, comment your views and opinions about this latest update of Adsense + Opera Mini Side.

  • Use Google Chrome browser as MP3/Audio/Video Player on Android/PC !

    Use Google Chrome browser as MP3/Audio/Video Player on Android/PC !

    Recently, i flashed my phone and I was left with literally no external apps , also I didn’t had the apk packages with me and I had to urgently play some MP3 Songs present on my SD Card. I was looking for options, and then i remembered this article which i used to use Google Chrome/Mozilla Firefox as a File explorer cum Media player on PC using “file:///” protocol . So I decided to try my hand with this trick on Android too and it worked! I was able to use Google Chrome as a File explorer + MP3 Player + Video player too! on my Android! . Also this trick works on PC too! so i’ll be mentioning the steps for PC too!

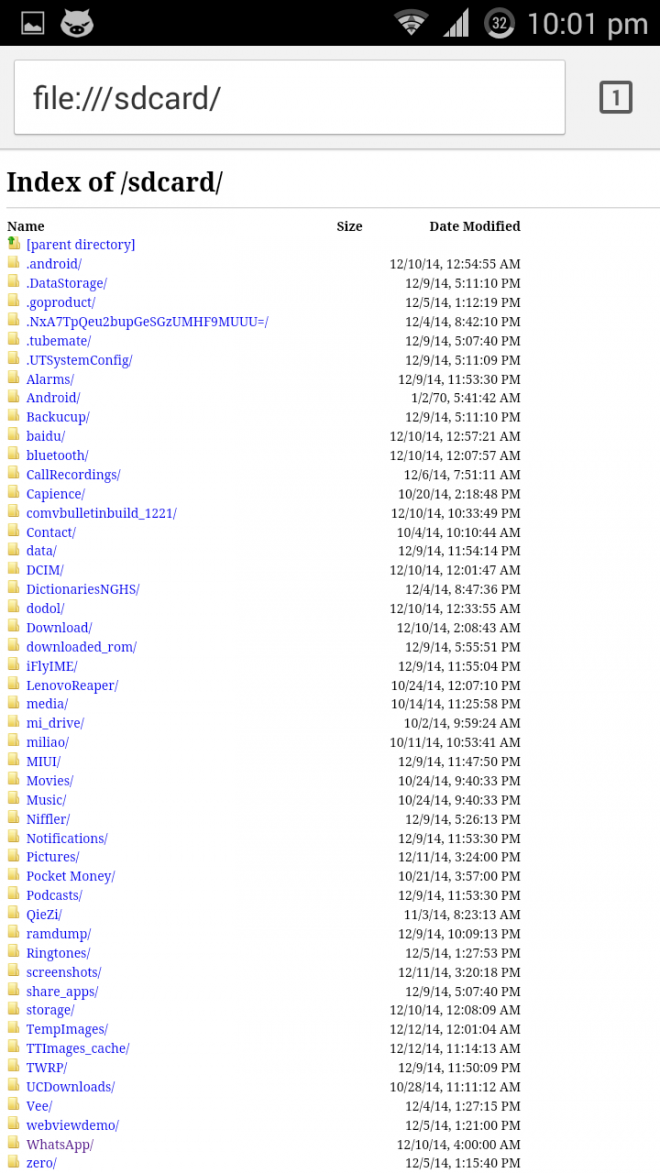
    Google chrome’d File Browser view

    Method to use Google Chrome as MP3/Audio/Video Player on Android

    • First of all Open your Google Chrome browser , you can also use Mozilla Firefox on Android . I tried it and it worked on Firefox too, but other 3rd party browsers like UC browser, Opera Mini and Dolphin browser weren’t able to support our method .
    • Now in the address bar , Type and navigate these locations one – by – one ( Note – I am saying to try all URLs because the File system structure vary from device-to-device depending upon the Android version) .file:///sdcard/
      file://sdcard0/
      file://sdcard1/
      file://storage/

      file://storage/sdcard0/

    • You’ll find that the Browser is able to open / show files on atleast one of these five address locations.
    • Now, click on the folder name to enter it , and browse to the media file you want to open.
    • After reaching the file , Simply Click on it – If its a MP3/Video File it will be played , or if its an image/html file it will be displayed right in your browser!
    • Magical! isn’t it (Check the alongside image for reference) .
    • Note – You can also use this trick to use Google Chrome browser as PDF viewer as Android lacks in-built PDF viewer (Thus, saving your memory required to install PDF viewer on your phone)

    Method for PC Users to use Google Chrome/ Firefox Browser as MP3 / Audio Player on PC (Windows / MAC / Linux )

    • The method is actually the same except you have to enter the URLs like this –

    file://c:/                             (To Access/Open C Drive in windows)

    file://root/                         (For Linux Users)

    file://home/  

    file://Desktop/

    • Now, again one of them will show your folder contents depending upon your OS , Click on the foldername to open the folder and on the media file to play/open it in your Browser 🙂 . It’ll work without any hiccups (You can also use it to view PDF files ).

    The trick is quite simple but I hope, you guys will like it and use it to flaunt your geekiness 🙂 , Signing off with yet another Screenshot of my device using Firefox as the File explorer. If you face any problems or have any doubts/queries feel free to comment 🙂


  • Perform OTP verification on apps which get stuck waiting for verification code/sms [Earn talktime/Magic Recharge]

    Perform OTP verification on apps which get stuck waiting for verification code/sms [Earn talktime/Magic Recharge]

    As, we all know some Android apps require mobile number verification, and they do it by automation i.e by checking the messages directly themselves instead of asking the user to enter the verification code to us. This creates problems on some handsets as the apps simply get stuck on “verifying/waiting for OTP verifcation/password” . Recently, I myself faced such problem with Earn talktime app and Task bucks app stuck on my Xiaomi Redmi 1S. So, i started looking for solutions as i really needed to install the app and couldn’t purchase a new phone for only that thing. here’s what you can do to Perform OTP verification/validation of apps, which get stuck on waiting for verification code/sms.

    Method 1 – Disable all 3rd-party apps which use messaging.

    • Uninstall any third-party apps which use messaging or which can access your messages – Chat-app on Samsung / Hangouts app by Google. (Check the alongside image on how to disable hang-out to use messaging)
    • These read the messages before our desired app can read them, hence the desired app which we are trying to install, cannot read those sms as they are being processed by app / thus causing starvation and inability to verify though the sms is received on our phone.
    • Same is the case with black-list/message filtering apps, these also check the sender/message before our desired app to be installed, which again causes starvation to the app which is waiting for OTP verifation.
    • Some, 3rd-Party launchers/widgets also interfere with the stock messaging features, hence it is recommended to disable them before we request OTP.

    Method 2 – Changing the ROM (Method i followed for my Xiaomi Redmi 1s)

    • Though, this requires a little-bit more technical expertise and efforts , but it’s totally worth it!.
    • While, in my case i had the launcher (MIUI) built right into my ROM, hence i had no option but to change the ROM itself.
    • So, after changing my ROM to Cyanogen Mod 11, I installed earn talktime,magic recharge and both of them got verified in an instant!
    • While, changing your ROM , make sure that the custom ROM which you’re going to select for flashing is closest to Stock Android ROM (Cyanogen Mod)  in my case.

    I bet, you won’t face any problem if you follow these steps – The method 1 worked for my friend with a Samsung Android, while the second one worked for me.

  • Get instant Free Rs.1000 Cash on GoIbibo to book free tickets! Free Flight/bus/train tickets!

    Get instant Free Rs.1000 Cash on GoIbibo to book free tickets! Free Flight/bus/train tickets!

    Hello everyone, yes you read the title correctly! GoIbibo is offering Free Rs.1000  Update – Now Free Rs.500 again Rs.1000 GoCash to new app users who sign-up through referrals! . GoCash is the virtual currency of GoIbibo which can be used to book flights, train tickets and bus reservations too! All you need to claim your Free Rs.1000 is

    • Install the GoIbibo App.
    • Click on Sign-Up.
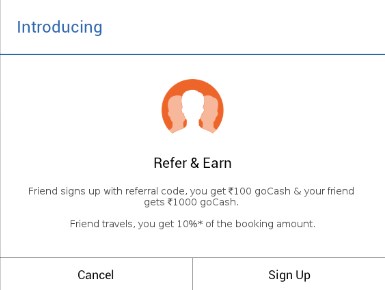
    • While entering Sign-Up details write the referral code as “6077c42” . (The app will ask you to enter referral code to get Rs.1000 GoCash previously it was Rs.1000!) . Note – If you don’t enter the referral code,you won’t get any GoCash (check the alongside screenshot from the app)
    • Now you can use this GoCash to book your hotels, flight tickets ,train & bus tickets etc.
    • Also, to earn more GoCash you can refer your friends too! They in turn will get Rs.1000 GoCash and you’ll get Rs.100  Update – Rs.200 for each referred friend who signs-up.
    • In addition to the above mentioned amount you also get GoCash equivalent to the 10% of any bookings made by your friend! and not to worry your referred friend is not at all charged extra for your commissions.

    F.A.Q

    Q . What is the value of GoCash ?
    Ans.  1 GoCash = 1 INR (1 Rupee)

    Referral Code = 6077c42

    Click here to download GoIbibo App.

    The GoCash you earned can be used to book

    • Flights
    • Train Tickets
    • Bus Trickets
    • Hotels
    • Trips & Tours!

    Now to use GoCash Simply Visit the GoIbibo Website by Clicking here & book hotels & flights .

    UPDATE / Note – If you’re using GoIbibo to book hotels in case you’re travelling to a new city or for a vacation , You can also get Free Instant Rs.500 Cash on MakeMyTrip too! which you can use for booking domestic flights and even hotels too! Click here to get Instant Rs.500 On MakeMyTrip .

    If you’re travelling to another city you might also need to roam around, we also help you to travel inside the visited city for free – by making your taxi and auto-rickshaw rides also FREE – Click here to get your Free Rs.250 Ride on Uber  , also if you want an Ola cab or an auto-rickshaw for Free you can get it too – Click here to get Free Rs.200 worth Auto-rickshaw & cab rides on OLA! Cabs.

    Thus, this really is a very good deal to be missed! What are you waiting for ? Just grab this offer before it ends and keep enjoying with TechApple!

  • Tutorial – How to [show older]/fake “last seen on” in Whatsapp [Hide your online status]

    Tutorial – How to [show older]/fake “last seen on” in Whatsapp [Hide your online status]

    Hey Guys,  many of you guys must be familiar with the “blue ticks” update of whatsapp , though its a welcome feature for some,its not too good for others . same is the case with “last seen on” in whatsapp  , what if we can simultaneously fake last seen whatsapp/show an older last seen on coupled with an option to see blue ticks of others while at the same time hiding ours , sounds interesting isn’t it ? and its easy too! 🙂 with WhatsApp+ , read on the article for the complete easy tutorial to do the same 🙂

    Prerequisites / Requirements –

    • Messages Backup for use in newer WhatsApp and its quite easy too ( Just Go to Settings – > Chat Settings -> Backup Conversations) and that’s it .
    • WhatsApp+ Apk (You can download it by clicking here ).

    Now, as you might have understood this is a different apk of whatsapp, so let’s check out some differences between the WhatsApp normal version and WhatsApp+ version –

    •  Hide Last Seen
    •  Apply and make themes of your choice
    •  Upload PHOTOS and VIDEOS without any compression (High Quality)
    •  Maximum upload size to 30 MB
    •  Change notification bar.
    • We can tabularize the differences as below –
    WhatsApp+’s HIDING Last Seen WhatsApp’s Turning Off Last Seen
    Others Can See your Last Seen (older day and time) Others Can’t see anything in your last seen
    You Can See others last seen (LS) You Can’t see other’s last seen
    Others won’t know if you hide last seen They will know that you’ve turned off your LS
    you can go Online/Offline via Widgets No Such awesomeness available
    Has Much More Other Awesome Features Simple old UI & Features are there
    Hide Last Seen button on main screen Settings/account/privacy/turn off lastseen


    Method / Procedure to Use WhatsApp+

    • Backup your Conversations by  Settings – > Chat Settings -> Backup Conversations) and that’s it .
    • Uninstall your existing WhatsApp.
    • Download and install WhatsApp+ Application. (I have linked to an older version, if it doesn’t work you can download the latest whatsapp+ from osmdroid.net)
    • While installation, you’ll get an option to restore, don’t worry it may take time for some users depending upon the chat backup) .
    • Once the installation is finished , Open Whatsapp+ ,To hide last seen and disable blue ticks click on the menu at the right-hand-side top corner and select “Hide last seen” option and yo!  (Check the image alongside)
    • You’re now online in incognito mode in WhatsApp! you can see other’s last seen and chat without the fear of anyone as others will only see the last seen time as the time when you had disabled it in WhatsApp+ 😛 🙂
    • Do the same menu-step to show/reveal your online status if you want to :).

    I’ve myself tested it and using it , hence in the image its showing “show last seen” instead of “hide last seen”

    Recommended : You can even use Two WhatsApp accounts on a single Android – Click here for tutorial to Officially use 2 WhatsApp numbers on a Single Android.
    Click here to Know on How to Create & Use Fake WhatsApp Account.
    Click here for tutorial to Send any filetype .zip / .rar / .apk files on WhatsApp

    If you face any problems while using it, feel free to ask we will be happy to help 🙂

  • Free Instant Rs.30 Recharge with Vee App! Get Rs.20 for Each Referral!

    Free Instant Rs.30 Recharge with Vee App! Get Rs.20 for Each Referral!

    The Free Recharge bonanza simply doesn’t seem to end on TechApple! as after Apps which give Free Recharges on Installing apps, we brought another unique – TimesCity app which gives instant Rs.50 Recharge simply on signing up! and a Rs.100 Pizza-hut coupon every 2 referrals! After TimesCity , we bring here yet another Exclusive app – Vee which gives Rs.30 Recharge instantly on sign-up and install! also Rs.20 Recharge for each referral! 

    Update – Now instead of Rs.20 you’ll be given Rs.20 Vee coins, which again can be redeemed for Free Recharge, Book My Show vouchers at the rate 1 Vee coin = 1 Rupee

    So before i go onto the features of Vee app and Recharge trick , i  would like you to download the app in the meantime as you will be ready to redeem your first 10.Rs Recharge + Rs.20 bonus by the time you finish reading this article 🙂

    Click here to download the Vee App!

    Method to get your First Rs.10 Recharge

    • Download the app from the above link , Login with your Facebook account! Don’t worry its completely safe , and the app will never ever post anything on your behalf!
    • That’s it after successful log-in you will get a confirmation notification with your first Rs.10 recharge code which can be redeemed on FreeCharge!
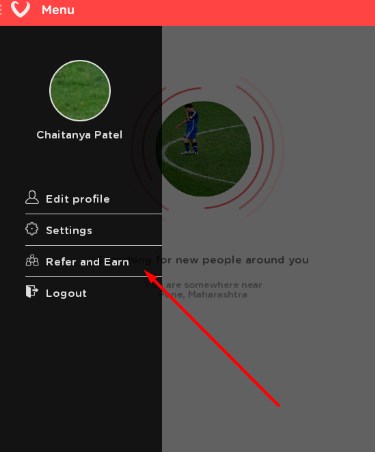
    • If you don’t get the notification even after 5 minutes of opening the app , Go to its Menu (From top-left corner) and click on “Refer and Earn” and click on “redeem” you’ll surely get your code now!

    Method to get Rs.20 Bonus on Sign-Up

    • In the refer and earn menu , enter the code “ktvtiek” into the box besides “earn” and click on Earn ! (Check the next image for details! )
    • Voila! you’ll be Credited Additional Rs.20 Code!
    • You can also share your personal share code to invite your friends to Get Rs.20 Recharge on each referral and Rs.5 on each indirect referral!
    • So,what are you waiting for you can earn Recharges! and ya see the profiles of eligible singles in your locality! who knows if someone likes your profile 🙂 and gets hooked up 😉 Yeah, that’s what the Vee app is meant for – To find and meet interesting peoples!

    Hurry Up!  Free Recharge offer is valid only till 30th November!