Category: Mobile Network Operators

  • Use GoogleWebLight.com to speed up website loading time! & reduce data consumption on your mobile (Android/iOS) and PC too!

    Use GoogleWebLight.com to speed up website loading time! & reduce data consumption on your mobile (Android/iOS) and PC too!

    Many times our cellular data connection’s speed is quite slow be it 2G or 3G , which hampers the loading speed or even simple loading of a website on our mobile devices. Some websites even have some type of ads, which don’t let users view content without clicking on “Skip ad” and some even fail to show the content despite clicking on the ad(e.g mobile.ndtv.com) , or many websites simply put too many images affecting the loading time on our cellphones. All of these combined simply hampers our browsing and reading experience, but not any more – Google light web, or google lite search as its called helps overcome these problems by simply parsing a website’s pages in a mobile-friendly readable format.

    If you’re a webmaster you might have come across traffic from sources such as icl.googleusercontent.com , or googleweblight.com . These are nothing but search traffic with your website optimized for mobile viewing by Google, and you can use the above google URLs to even transcode any other website traffic on your slow/data intensive cellular network to save extra data costs and reduce loading time.

    Method to use GoogleWebLight.com and icl.googleusercontent.com to view optimised websites –

    google light web
    • Simply prepend (write before the actual URL) the following URL strings to load the website in Google optimized mobile format –http://googleweblight.com/?lite_url=http://http://icl.googleusercontent.com/?lite_url=http:// 
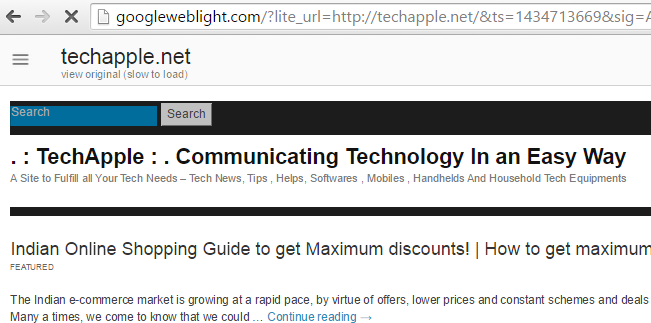
    • For e.g if you want to visit our blog techapple.net through the Google mobile transcoder , simply enter –
      http://googleweblight.com/?lite_url=https://techapple.net
      in your browser and voila! it will load techapple.net in mobile optimized format!. (You can check out the alongside image for url prepend format)
    • Similarly you can use it to view other websites too in mobile optimized format , ex
      http://icl.googleusercontent.com/?lite_url=http://www.firstpost.com ,
      http://googleweblight.com/?lite_url=http://mobile.ndtv.com etc.
    • Thus, you can now save on traffic as well as reduce consumption time on any websites you like to visit .
    • You can also use these transcoders on your Desktop / PC as well as if your visited website loading is very slow , and its taking a high time to load.

    Note – If you are an Android user , you can check out the below tutorial to allow internet access only to selected app & restricting other apps background data to access Internet, thus saving your data consumption – Click here for tutorial to allow access to only selected apps on Android using Android Firewall

    Sadly, https requiring websites aren’t fully supported yet by Google transcoder, nor video/active javascript content ones , but nevertheless its a great tool and way to speed-up loading and if all you’re interested in is reading content, the transcoder makes it a pleasure reading the content of websites. Do feel to comment your views and problems faced while using Google Light web (googleweblight.com) transcoding services.
  • Top 7 Free Disposable/ Temporary Email address providers for Quick Sign-ups and Spam protection

    Top 7 Free Disposable/ Temporary Email address providers for Quick Sign-ups and Spam protection

    All of us hate email spam, and many times our inbox is simply flooded with spam,newletters and useless emails which simply waste our time as well as email space. Also you might have been forced to sign-up on some websites which ask you for your e-mail and don’t let you access the content you want to without entering email address. Or you might simply be requiring the email address for quick sign-up just for validation purposes . In all of above scenarios and many more disposable / temporary email services will come to your rescue . Let’s get a look on what are temporary email address, why should you use them ? and the best disposable email address service providers –

    What are Disposable / Temporary Email addresses?
    In simple words, these are the email addresses which aren’t owned by you, but are public and therefore they don’t require any passwords to access them.

    Why to use Disposable / Temporary emails ?
    We need to use them to protect our primary emails from spam, and from unwanted emails coming in to our inbox.

    The Top 7 Free Temporary email address service providers are as follows –

    No 1 – 10MinuteMail.com

    10MinuteMail

    10MinuteMail is getairmail.com alternative & probably the most easy to use temporary email address service provider. All you need to do is visit 10minutemail.com and it’ll display you your temporary email address which is valid for 10 minutes!. You can then use it to sign-up and receive emails. The address is discarded after 10 minutes however it provides the option to extend the session by 10 minutes unlimited times (until the tab isn’t closed).

    No 2 – Mailinator.com

    Mailinator

    Mailinator is yet another email address service but with a twist, unlike 10minutemail you don’t need to open the website to create a temporary email address for you, but it has been already created! . Whenever signing-up on websites just type in your email address as “yourselectedtext@mailinator.com” , and once you’ve signed up, simply access your email on http://yourselectedtext.mailinator.com . And voila! you’ll find that your e-mail has already arrived! . The only disadvantage of using mailinator is that all email addresses are public and can be accessed by anyone (accidentally if someone else selects the same text you selected). but its very rare. E-Mails are stored for 1 hour before they’re discarded.

    No – 3 Yopmail.com

    YopMail

    Yopmail is just another service like or an alternative to Mailinator, where your email address is already created. And the procedure too is pretty same , while signing-up use “anytexther[email protected]” , and later for accessing the emails you can use the same trick visiting http://anytexthere.yopmail.com . Yopmail is my personal favorite due to the fact it stores the emails for a much longer time as compared to other disposable email address providers.

    No 4 – MintEmail.com

    Mintemail

    Mintemail.com can be classified as an advanced alternative of 10minutemail.com, which gives you a pre-defined address like 10minutemail. But it also has a major advantage that it will update the tab title automatically whenever an email arrives at your temporary email address. Thus, you can work in different tab without having to worry about email address expiration or missing out.

    No – 5 Maildrop.cc

    Maildrop

    Functionality wise maildrop.cc is same as that of mailinator, all the email addresses are pre-created (e.g anything@maildrop.cc) , but to access the emails you need to first visit http://maildrop.cc , and then enter your selected text (e.g anything) to access the mailbox (e.g [email protected]).

    No 6 – Guerillamail.com

    Provides an Inbox as well as a temporary outbox

    Guerillamail.com is a temporary address providing service but with some good additional features which might come in handy. All the above services just provide a temporary ‘inbox’ for receiving incoming emails, but guerillamail.com goes one step ahead and even provides a temporary outbox which can be used to send emails with the same temporary email address. This is really a very handy feature and can be used as a sort of anonymous email with composing as well as receiving facility!

    No 7 – Jetable.org

    Jetable.org

    More than an temporary email address service, Jetable can be described as an Anti-Spam solution and works in a unique way! .Some websites may blacklist temporary email addresses but in such cases Jetable can help you get out , what it does is it first verifies your original email address, and according to your choice it helps you create a temporary email address for a specific time frame (Upto 1 Month) and forwards all the mails coming to that temporary email address to your original email address. Thus, by limiting public access, as well as increasing the temporary email address lifespan it really does a goo job!. Not only that, the temporary address is permanently deleted after its lifespan so no one else can get access to it.

    So, these were the Top 7 Free Temporary / Disposable email address service providers , if you know any good of such services feel free to comment. Also, you might be interested in Simple Tricks to use a Single Gmail address as Multiple ones!


  • 3 ways to use a single-1 Gmail id as many-multiple ids! Gmail dot trick (.) and + plus tricks!

    3 ways to use a single-1 Gmail id as many-multiple ids! Gmail dot trick (.) and + plus tricks!

    Heya folks, E-Mail or electronic mail is the most widely used means of communication over the Internet , also its kinda an impression of a person’s online identity. GMail is one such popular e-mail service provided by Google!. But do you know that a single or even one GMail ID can be used as multiple ID’s which we can use to perform multiple sign-ups ! , thus saving the troublesome task of creating multiple e-mail accounts for different accounts on a single site . A single Gmail ID can thus be tweaked to be camouflaged as different or multiple e-mail ID’s . Let’s have a look onto 3 of such best tricks to use a single 1 gmail ID as multiple ones or many ids.

    Assumption :  I will be explaining all the tricks in the article using our default GMail ID for the website – techapple.net @ gmail . com. I will be using this single gmail id to get mails from multiple ids without even creating them!

    Trick # 1 – Gmail dot (.) trick

    • This is one of the most widely used techniques to use a single E-Mail ID to sign-up for multiple accounts .
    • The Gmail dot trick consists of inserting any number of dots (.) or fullstop/period in your gmail ID username to show them as different IDs .
    • Thus, even if you send an email / or request an email on techapplenet @ gmail . com or t.e.c.h.a.p.p.l.e.n.e.t @ gmail . com it will arrive in the same e-mail ID! . (The original one)
    • The sign-up or other websites though treat them as different e-mail accounts, but in Gmail they are one! , so thus you can use a single gmail account id as multiple ones, I use this trick pretty much on signing up for free trial websites which provide freebies based on e-mail IDs.
    • So, Gmail dot trick in short –


    Trick # 2 – GMail plus (+) trick


    Trick # 3 – Using @googlemail.com instead of @gmail.com


    Example of using the above technique –

    We have our Gmail ID registered as [email protected] , you can check how we used each of the above combiation and still received the e-mail on our default ID.

    Sending e-mail to [email protected] instead of [email protected]
    Reception of mail sent to [email protected] on the GMail ID – [email protected]

    Thus, you can use one or even all of the above methods to create multiple email or gmail ids for yourselves on just a single account! . The permutations and combinations possible are infinite! , also If you have queries/suggestions feel free to comment 🙂

  • 3 Best Android Cashback Apps to get Cashbacks for Indian online shopping portals – Flipkart , Amazon.in , Jabong , Myntra etc

    3 Best Android Cashback Apps to get Cashbacks for Indian online shopping portals – Flipkart , Amazon.in , Jabong , Myntra etc

    Cashbacks are the next big thing in the online shopping arena! Cashback is some percentage of money returned after the shopping is done. As Cashbacks are offered after the order is placed, they can be combined in with coupons too! resulting in even more Discounts and further reducing the actual costs of the product. Recently we covered the 3 Best Cashback Websites for Indian e-commerce portals, In this article we will be covering the Best Android Cashback apps or Cash back apps for android – India which provide cashbacks on online purchases made from your phone/mobile!.

    App # 1 – LafaLafa

    LafaLafa App

    Lafalafa leads all the apps in this cashback giving apps arena, and is going to stay for long! because of the exclusive benefits its provides –

    • Get confirmed Cashbacks on each recharges & online shopping done done from the Lafalafa app.
    • Lafalafa also provides product search which you can use to compare the prices of products across different online shopping sites so that you can get the product at the lowest possible prices!.
    • The app has an in-built human assistant which will automatically find out the best deals for the product you’re buying by searching across all online stores. Thus saving your precious time & efforts and even giving you cashback at the same time!
    • Besides, these Lafalafa also provides Free Rs.5 just for installing the app! in addition to each cashback you earn on your Online purchases.
    • You can even redeem your earned Lafalafa Cashback to your bank account as well!.
    • Click here to download Lafalafa app and get free Rs.5

    App # 2 – Coupon Dunia App

    Coupon Dunia App

    The leading Indian Coupon site – Coupon Dunia is now on mobile with its own official app. And not just app, Coupon Dunia now even provides Cashback for shopping via Coupon Dunia!

    Thus, now besides saving by using working coupons you can even earn CD Cashback  in your CD wallet just for shopping & saving via Coupon dunia.

    The CD cashback can also be directly transferred to your bank account and even Paytm!

    Also get instant Free Rs.100  on signing-up on Coupon Dunia using our link .

    Click here to Download Coupon Dunia cashback app from Google Play.


    App # 3 – GoPaisa App

    GoPaisa App
    GoPaisa App

    GoPaisa is yet another Cashback providing app by virtue of which you can earn cashbacks on your online purchases.

    • Like Lafalafa the GoPaisa app provides cashbacks for all major online stores such as Flipkart, Amazon, Paytm etc .
    • The earned Cashback can be redeemed in the form of Recharges, Shopping Vouchers etc.
    • Besides these, GoPaisa app has an attractive referral program as well.
    • Click here to Download GoPaisa App from Google Play.

    These are the current best cashbacks apps available for Indian online shopping portals, if you know more of them feel free to comment!, your views and takes on the cashback apps are also welcome 🙂


  • Use WhatsApp on web browser online – WhatsApp Web client launched officially! | Official WhatsApp web client

    Use WhatsApp on web browser online – WhatsApp Web client launched officially! | Official WhatsApp web client

    Using WhatsApp on Web browser / Internet browser is now a dream come true! . WhatsApp has now officially launched its Web version for using online on your browser. Now you can easily chat with your WhatsApp account/buddies online directly through your Google Chrome, Mozilla Firefox , Safari or any other Web Browser . (Sadly, As of now its only working on Google Chrome )

    The Official WhatsApp Web Client is now live at the URL – http://web.whatsapp.com

    Note – This is a Beta version and may not be available for all WhatsApp users!

    Procedure/Tutorial for using the WhatsApp Web Version –

    WhatsApp Web


    • WhatsApp web version will authenticate your mobile device and will then load the chat in the opened window. The procedure to use Official WhatsApp client is as follows –
    • Open the URL http://web.whatsapp.com in your browser.
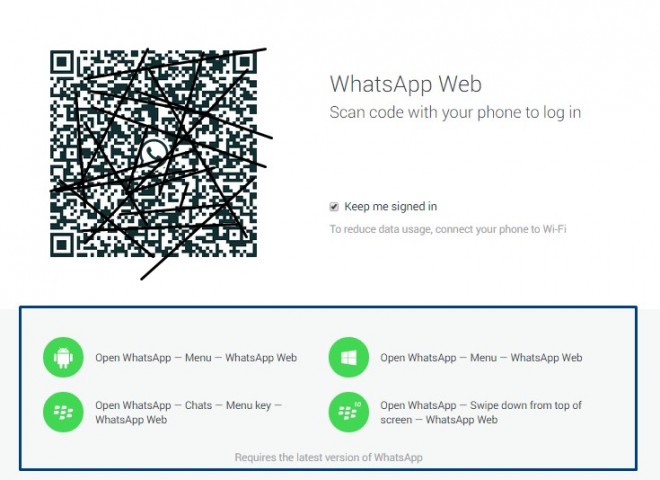
    • Now, you’ll be shown a QR code on the WhatsApp web client page as shown in the alongside image.
    • Now, Open the WhatsApp App on your phone and depending upon your Phone’s Operating System , you can use the below methods to scan the QR code –
    • For  Android phones/devices —-    Open WhatsApp – > Tap on Menu – > Select “WhatsApp Web”.

      WhatsApp menu option for WhatsApp Web (Android)
    • For Windows Phones / Lumia —   Open WhatsApp – > Tap on Menu – > Select “WhatsApp Web”.
    • For Blackberry 10 and Blackberry users follow the instructions in the alongside imageFor iPhone/iOS users — Wait for official update from WhatsApp.Note – Make sure you’re using the latest WhatsApp app on your Mobile Phone.
    • WhatsApp web is a welcome addition to the already existing huge popularity of WhatsApp , overall I found the User-Interface of WhatsApp Official Web Client pretty smooth but not matching the mobile experience .

      WhatsApp Web Client User – Interface
    • Also its necessary for the Phone to always remain connected to the Internet even while using the WhatsApp Web client.
    •  Another thing which hit me was viewing received media wasn’t that great ,(Photos/Videos were being auto-downloaded in the Web version) hopefully they’ll resolve the issue soon.
    • The Web-User interface also doesn’t allow you  to change your WhatsApp DP , or changing your status. But the Chats really do work very fine and with speed! and allow you to upload and send photos/media at good speeds.

    If you encounter any problems, or are unable to use the Official Web version feel free to comment, also do share your views on the Official WhatsApp Web Version for Web Browsers.


    Recommended : You can even use Two WhatsApp accounts on a single Android – Click here for tutorial to Officially use 2 WhatsApp numbers on a Single Android.
     Or if you’re an Android phone user you can even use Parallel space to use 2 or multiple whatsapp, Facebook accounts in the same device – Click here for tutorial to use Parallel Space on android to use multiple Paytm, Facebook messenger accounts.

  • Tutorial – How to disable/Stop YouTube Autoplay of Videos and Playlists in Chrome/Firefox

    One of the most annoying thing present in YouTube is its Autoplay – Its starts playing the video as soon as its get opened, or we click on it. Sometimes, we may need to Stop/Disable YouTube autoplay of videos in order to conserve bandwidth or simply in case where we are stacking up videos in different tabs for viewing . So, here’s the easiest method to Stop YouTube auto play

    Method # 1 – Using SmartVideo for Google Chrome / Firefox

    SmartVideo has the option to stop youtube video initialization
      • Though, SmartVideo for YouTube has many customization options for YouTube, as this post is about stopping/disabling the YouTube auto-play , coming straight to the Point –
      • First of all download the SmartVideo addon/extension depending upon your browser –
        Click here to download SmartVideo for YouTube –  Chrome.
        Click here to download SmartVideo for YouTube for Firefox.
      • Once you’re done with installing the SmartVideo extension, browse to its Preferences by entering these URLs in address bar depending upon the Browser you Use –
      • Enter the following URL for Google Chrome –

    chrome-extension://lnkdbjbjpnpjeciipoaflmpcddinpjjp/options.html

    • Enter the following URL for Mozilla Firefox –

      resource://mytube-at-ashishmishra-dot-in/smartvideo_for_youtube/data/options.html

    Now,  checkmark the option highlighted by Red Rectangular box in the alongside image which shows – “Save Bandwidth, Do not initializw video until I click” .

    You can also open the global preferences, or settings for Smart YouTUbe extension by hovering mouse pointer over any YouTube video which is being played and selecting “Global Preferences” in the drop-down menu.

    That’s it, now open any YouTube video you’ll find that its Not auto playing or initializing and thus serving our purpose 🙂

  • 5 Awesome YouTube extensions to enhance YouTube usage/experience! [Chrome/Firefox]

    5 Awesome YouTube extensions to enhance YouTube usage/experience! [Chrome/Firefox]

    Its almost impossible to find an internet user who hasn’t used YouTube! but sometimes YouTube experience isn’t that great because of Ads, Buffering while loading videos , unrelated comments , or autoplay of videos . So here are the 5 Best & Awesome extensions which will enhance your YouTube experience and make a pleasant viewing!

    Extension # 1 – SmartVideo for YouTube

    SmartVideo for YouTube provides a huge customization

    SmartVideo for YouTube stands tall at No.1 position in our article because of the sheer number of customization options and settings (YouTube video optimization) it provides. SmartVideo is free to use and provides a lot of features such as –

    • Ability to decide/fix the video quality permanently so as to you don’t have to change the video quality everytime.
    • Stop the buffering of videos once paused (Uncheck the option highlighted by purple box).
    • Stop/Disable autoplay of YouTube videos until clicked on the play button.
    • It even has options of Smart Buffering to ensure optimum viewing on slower internet connections.
    • It even shows the time remaining for the video to start playing (Time required to resume playback during the starting/mid-way buffers).

    Click here to download SmartVideo extension for Google Chrome.
    Click here to download SmartVideo extension/addon for Mozilla Firefox.


    Extension # 2 –  ImprovedTube 

    ImprovedTube has an option for controlling PlayBack speed

    I had quite a lot of fun while using this extension – especially by using the Playback Speed option! , it was fun watching dance & listening music in slow-motion or in speed-up 🙂 . Besides, this the ImprovedTube extension also has options for –

    • Changing the Player Size – To cover full browser windows, etc.
    • To pre-define/fix the Video Quality.
    • To hide Video Annotations,Description and hide comments.
    • Changing the Playback Speed.
    • and to disable Auto Play in Videos and Playlists to conserve bandwidth.

    The only drawback of this extension is that once you change the settings in ImprovedTube, it won’t work until you reload the YouTube video tab.

    Click here to download ImprovedTube for Google Chrome.
    Firefox users can use the combination of these two addons to get the same functionalities –
    1. Click here to download No Comments – YouTube for Firefox.
    2. Click here to download YouTube enhancer for Firefox.


    Extension # 3 – Floating YouTube extension + app!

    Floating YouTube – a unique experience

    I was spending a lot of time on YouTube decreasing my productivity, until i found the Floating YouTube extension which allowed me to watch my favorite show simultaneously while i was working on blog! And i found it pretty awesome – The only drawback being it couldn’t play Copyright Music videos of India. I hope the developers will resolve this bug soon. Rest assured the app is awesome! . The app only loads the video in the widget once the URL is input onto it,for automatic playback of video in the widget do use the app in combination with the Floating YouTube extension.

    Click here to download Floating YouTube App.
    Click here to download Floating YouTube extension


    Extension # 4 – Magic Actions for YouTube

    MagicActions for YouTube takes YouTube experience to a higher level!

    Magic Actions for YouTube simply takes your YouTube viewing experience to a higher level , it provides a large set of functionalities some of which include –

    • Applying Color filters to the video (Grey Scale , Sepia , etc ) without reloading (By clicking on the blue-colored highlighted box).
    • Control the video volume by Mouse Wheel! .
    • Instant Screen Capture (Clicking on the button high-lighted by yellow box).
    • Changing the Video window/size & YouTube theme by clicking on the button highlighted by Green Color (The most centered button in the newly obtained button-set on installation).
    • Dimming and changing everything to black/white-on click of a switch besides the YouTube logo (highlighted by pink color in the image).

    Thus, you will find Magic Action more and more interesting, the more you use it.!

    Click here to download Magic Actions for  YouTube for Google Chrome.


    Extension # 5 – Stop Video Download extension

    Stop Video button

    Many times we need to quickly shift tabs to do some important work and the YouTube video continues to consume bandwidth even if the pause button is pressed. In cases like this the Stop Video Download extension comes in handy!

    It adds a neat looking Handy “Stop Button” which can be used to stop the video and to preserve the bandwidth which couldnt have been preserved by the conventional pause button!

    Click here to download Stop Video Download extension for Chrome.


    So, these were the 5 most extensions which i found to be most awesome for enhancing YouTube experience. Feel free to comment if you face any problems or if you know of any such awesome extensions like these

  • Easily Transfer Data from iPhone to iPhone without PC through SHAREit App by Lenovo

    Easily Transfer Data from iPhone to iPhone without PC through SHAREit App by Lenovo

    Hello everyone , one of the biggest visible drawback of the iPhone is its inability to support Bluetooth file transfer . Hence, we face problem while transferring files from iPhone to iPhone – using AirDrop too is an inconvenient option . In this article – I will cover one of the simplest methods to transfer music from iPhone to iPhone without using Computer/PC/Mac by SHAREit App. Not only music, Shareit App by lenovo can also be used to transfer data,documents(PDF, Docx. XLS etc) from iPhone to iPhone. I used it to transfer data from iPhone to iPhone & Android too, however if you need to transfer Music from iPhone to iPhone/Android you will have to use Xender App – Click here for Tutorial on using Xender app.

    Though, many tutorials and methods are available on net I am using SHAREit because it doesn’t require an Internet Connection or a Computer/PC at any stage!

    The various modes of transfer supported by SHAREit App are –

    • Transfer Music/Data from iPhone to iPhone. (directly Share music iPhone to iPhone)
    • Transfer Music/Data from iPhone to iPad.
    • Transfer Music/Data from iPhone to Computer/PC.
    • Transfer Music/Data from iPad to iPhone.
    • Transfer Music/Data from iPad to iPad.
    • Transfer Music/Data from iPad to Computer/PC.

    Instructions/Method to use ShareIt on your iOS Device

    Here I used MyComputer/Laptop as Receiver as i didn’t have a Second iPhone
    • First of all, Download and Install the SHAREit app on both the devices from iTunes Store by clicking here – Click here to Download SHAREit App for iPhone/iPad.
    • Note – Make Sure both your parent device (sender) and child device(receiver) are connected to the same Wi-Fi network , else create a personal hotspot on your parent device and connect the child device to the hotspot before opening the SHAREit app. 
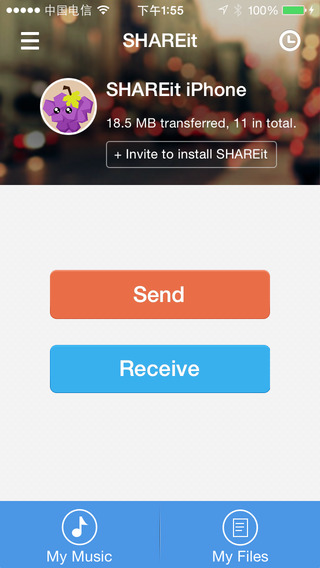
    • Now, Open ShareIt in the device from which you want to transfer the Data (Parent Device) and tap on “Share”.
    • Select the data/music which you want to transfer. Once you’re done with selecting the data – Tap on the “Next” option (button).
    • Open, the device on which you want to Receive the data/Music (Child Device)  and tap on “Receive”.
    • Now, Shift to the sender(parent) device and you’ll see an icon/link in the network radar (As highlighted in the alongside figure) . Simply tap on the device’s Icon to Start the Transfer!
    • If incase , the Child device asks you to confirm the transfer – Click on “Confirm”.
    • That’s it ! You have successfully transfer music iphone to iphone without a Computer/PC . And you have completed the iPhone to iPhone music/data transfer without an Internet Connection! (Share data iphone to iphone).

    I hope, the tutorial was short and easy , if you face any problems/encounter any issues while transferring or using the app feel free to comment.


  • 3 Ways to add/install desktop gadgets for Windows 8/8.1/10 | Gadgets in Windows 8/8.1/10

    3 Ways to add/install desktop gadgets for Windows 8/8.1/10 | Gadgets in Windows 8/8.1/10

    Windows 7 was very cool, and one of the many things of Windows 7 which i liked were – Desktop Gadgets!. They were cool in every way, they showed CPU/Ram Status, News feed, Weather etc and lots of important stuff right on desktop!. So, i tried to add Gadgets in my Windows 8 installation and found these 3 best softwares to install desktop gadgets for windows 8/8.1 or to add gadgets in windows 8/8.1. Though, I have tested them in Windows 10 Technical preview , i hope they’ll work in the final release as well.

    Way # 1 – Desktop Sidebar/Gadgets installer by Gadgetsrevised.com

    Gadgets on Windows 8/8.1 using Desktop Gadgets Installer

    This is perhaps the most simple yet safest way to add Gadgets to your Windows 8/8.1 installation . All the Gadgets, sourcefiles are from Microsoft hence assured of being virus-free.

    Steps to add Gadgets in Windows 8/8.1/10 through Desktop Sidebar installer

    • Download and Install the Desktop Gadgets installer by clicking here. (Just 5 MB in Size)
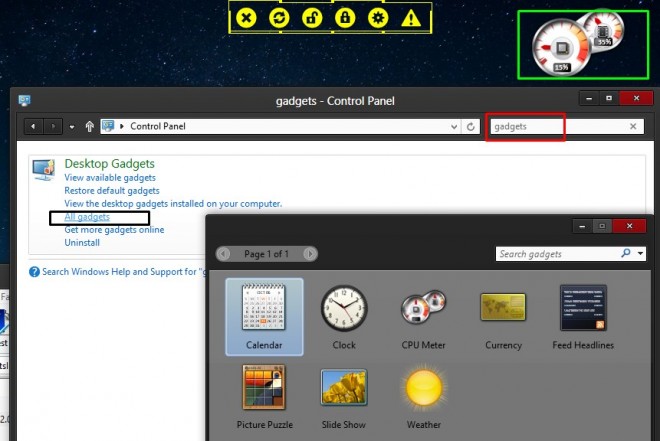
    • Once, you are done with the installation, go to Control Panel.
    • In control panel, Search for “Gadgets” .
    • As shown in the alongside image, Some results for Gadgets will appear – Here select the “All Gadgets” option. (Highlighted in the Black rectangle in the alongside image).
    • In the dialog-box opened, you’ll be shown various Gadgets, Now simply double-click on the Gadget you’ll like to add and voila! it will be added to your desktop!.(Highlighted in the Green Rectangle in the alongside image).
    • This is the most-easiest way to install/add Gadgets on your desktop.


    Way # 2 – 8GadgetPack

    Gadgets on Windows 8 using 8GadgetPack

    8GadgetPack is yet another freeware which allows easy addition of Gadgets in Windows 8/8.1/10 . besides this you can even install 3rd party Gadgets ( .gadget files) with this software likewise in Windows 7!.

    Method to use 8GadgetPack

    • Download and Install 8GadgetPack from here.
    • Once you’re done with installing, launch the “8GadgetPack” from the Start menu, if not executed/run after the installation.
    • Now, Click on the Gadgets you want to be shown, they’ll appear in the Sidebar!
    • You can even disable the Sidebar fence by right-clicking in the blank area of the Sidebar and select “close sidebar” option, the Sidebar will be closed but the Gadgets will still be intact!.

    Way # 3 – Rainmeter

    Rainmeter provides endless Widgets and Gadgets customisability!. There are no limits for the functionality of Rainmeter and customizability provided by it – hence, I have covered them all in this separate – Rainmeter Tutorial – Windows 7/8/8.1/10 .

    Providing just a sleek-peek at what Rainmeter can do –

    Rainmeter!

    I hope, you too will be able to add your favorite gadgets in windows, If you face any problem feel free to comment 🙂