Author: Chaitanya

  • Use WhatsApp on web browser online – WhatsApp Web client launched officially! | Official WhatsApp web client

    Use WhatsApp on web browser online – WhatsApp Web client launched officially! | Official WhatsApp web client

    Using WhatsApp on Web browser / Internet browser is now a dream come true! . WhatsApp has now officially launched its Web version for using online on your browser. Now you can easily chat with your WhatsApp account/buddies online directly through your Google Chrome, Mozilla Firefox , Safari or any other Web Browser . (Sadly, As of now its only working on Google Chrome )

    The Official WhatsApp Web Client is now live at the URL – http://web.whatsapp.com

    Note – This is a Beta version and may not be available for all WhatsApp users!

    Procedure/Tutorial for using the WhatsApp Web Version –

    WhatsApp Web


    • WhatsApp web version will authenticate your mobile device and will then load the chat in the opened window. The procedure to use Official WhatsApp client is as follows –
    • Open the URL http://web.whatsapp.com in your browser.
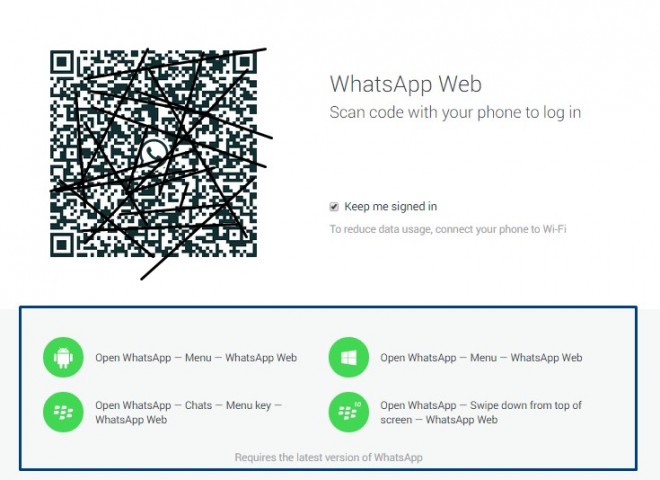
    • Now, you’ll be shown a QR code on the WhatsApp web client page as shown in the alongside image.
    • Now, Open the WhatsApp App on your phone and depending upon your Phone’s Operating System , you can use the below methods to scan the QR code –
    • For  Android phones/devices —-    Open WhatsApp – > Tap on Menu – > Select “WhatsApp Web”.

      WhatsApp menu option for WhatsApp Web (Android)
    • For Windows Phones / Lumia —   Open WhatsApp – > Tap on Menu – > Select “WhatsApp Web”.
    • For Blackberry 10 and Blackberry users follow the instructions in the alongside imageFor iPhone/iOS users — Wait for official update from WhatsApp.Note – Make sure you’re using the latest WhatsApp app on your Mobile Phone.
    • WhatsApp web is a welcome addition to the already existing huge popularity of WhatsApp , overall I found the User-Interface of WhatsApp Official Web Client pretty smooth but not matching the mobile experience .

      WhatsApp Web Client User – Interface
    • Also its necessary for the Phone to always remain connected to the Internet even while using the WhatsApp Web client.
    •  Another thing which hit me was viewing received media wasn’t that great ,(Photos/Videos were being auto-downloaded in the Web version) hopefully they’ll resolve the issue soon.
    • The Web-User interface also doesn’t allow you  to change your WhatsApp DP , or changing your status. But the Chats really do work very fine and with speed! and allow you to upload and send photos/media at good speeds.

    If you encounter any problems, or are unable to use the Official Web version feel free to comment, also do share your views on the Official WhatsApp Web Version for Web Browsers.


    Recommended : You can even use Two WhatsApp accounts on a single Android – Click here for tutorial to Officially use 2 WhatsApp numbers on a Single Android.
     Or if you’re an Android phone user you can even use Parallel space to use 2 or multiple whatsapp, Facebook accounts in the same device – Click here for tutorial to use Parallel Space on android to use multiple Paytm, Facebook messenger accounts.

  • Xender app-easily transfer data/music from Android to iPhone or iPad (iOS) devices | Transfer data/music from iPhone to Android devices too!

    Xender app-easily transfer data/music from Android to iPhone or iPad (iOS) devices | Transfer data/music from iPhone to Android devices too!

    There are very few or limited options when it comes to transferring data from Android devices to iPhone/iPad , most take the route of using WhatsApp/Dropbox to transfer data from Android to iPhone . Not only it consumes data but is also less speedy, and results in compression/loss of data(as in case of WhatsApp) . Xender for iOS / Android is an awesome app which will solve all your worries! It transfers data from Android to iPhone/iPad using Wi-Fi network but without consuming data!. All you require is to have both the devices connected in a group (i.e have the same Wi-Fi connection) , In-this tutorial We will see transferring data/files/music from Android to iPhone , and transferring data/music from iPhone to android too.

    Note – If you want to transfer data between to and from iPhone/iPad to iPhone/iPad, please refer this article , Also if you’re looking to transfer video/movie to your iPad/iPhone please refer this article to be able to play mkv,avi and other video formats.

    Tutorial to use Xender App for transferring data/music from Android to iPhone and iPhone to Android.

    After tapping on more select the “Connect iPhone” option
    • First of all download and install Xender app on your devices –Click here to Download Xender app from Google Play Store. (Android)

      Click here to Download Xender app from Apple iTunes Store
      . ( iOS ) works on iPad Air 2 , iPad mini too
    • Now , we need to create a group in order to transfer between iPhone and Android so as we can start the transfer, Open the Xender app on Android and select or tap on “more” option. (Its located on the bottom left hand side as shown in alongside image).
    • After tapping on more select the “Connect iPhone” option from the menu .
    • Now , On your iPhone/iPad , Navigate to Settings – > WLAN and connect to the WiFi network starting with “ADY etc….”.
    • Once your iPhone or iOS device gets connected, Open Xender app on your iPhone/iPad and click on the “Connect Phone” Option.
    • That’s it! now just select the data which you want to send , on either of the device Android or on the iPhone, and tap on “Send” . (Check the second image for details)
    • Woah! your music/data will be transferred within seconds! and this is perhaps the only way you can transfer songs/music from Music library of iPhone to Android!

    Note / Update – Many users asked us for method to import songs/music from Xender app to Music library , please read this article to import music/songs from Xender / ShareIt app to default Music player library of iPhone/iPod/iPad.


    Here’s another image which will explain the procedure in a simple way . If you have any doubts/encounter any problems feel free to comment ,and ya Xender app is Free for iOS as well as Android .

    Xender App Android to iPhone music/data transfer
  • Xender app : Transfer data/music from iPhone to iPhone by WiFi (Wirelessly)- Xender App for iOS

    Xender app : Transfer data/music from iPhone to iPhone by WiFi (Wirelessly)- Xender App for iOS

    Transferring music from iPhone to iPhone was next to impossible without using a Computer/Mac or an internet connection, but not anymore! Now you can transfer not only data but also music,photos,videos from one iPhone/iPad/iPod to another iPhone/iPad without using a computer directly through Wi-Fi by Xender app for iOS/iPhone/iPad. Xender App for iOS enables wireless data/music transfer by Wi-Fi from iPhone to iPad/iPhone and vice versa. (No Jailbreak required).

    Note – If you want to transfer data from iPhone to android or from android to iPhone, please refer this article .

    How to transfer data/music from iPhone to iPhone by Xender App over Wi-Fi

    • First of all download and install Xender app on both of your iOS devices from the following iTunes Store link for Xender app . Click here to download Xender app from iTunes store.
    • Now we have to connect both the devices over Wi-Fi there are two ways to do so –
      Way # 1 – If both the devices are connected on the same Wi-Fi.
      Way # 2 – Using one device to connect portable hotspot and connecting the second device to the hotspot.
    • Let’s check out the method Way # 1

    Way # 1 – Both devices connected to same WiFi

    Step – 1 for Way # 1 both devices on Same Wi-Fi
    • Open settings – > WLAN connect to the same network as that of your friend, now open the Xender app on both of the devices parent device (sender) as well as child device (receiver).
    • Now in Xender app, Click on “Connect Friends“.
    • Now Select/Click on any photo/image/music which you want to send and click on “send” .
    • You can even use the “Multi-Select” option to select multiple files for sending!.
    • You can even create a group of 5 devices on the Same Wi-Fi to share  same data on multiple devices! simultaneously with blazing speeds!


    Way # 2 Using one device as portable hotspo

    Way # 2 – Step 1 Creating a hotspot and letting your friend connect

    t and connecting second device to it.

    • Go to settings > Cellular and turn on “Cellular Data” (Don’t worry no data will be consumed for transfer – We’re enabling it only for making visible the “Personal Hotspot” option.
    • Now turn on Personal Hotspot in settings.
    • Let your friend connect to the hotspot you created.
    • Open Zender App on both the devices and click on “Connect Friends“.
      • Now Select/Click on any photo/image/music which you want to send and click on “send” .
      • You can even use the “Multi-Select” option to select multiple files for sending!.


    That’s it – The most simple way to transfer data between iPhone/iPad to iPhone/iPad 2/iPod touch . You can even use the replicate phone option to transfer/clone complete phone data.

    Click here to download Xender App from iTunes Store.
    If you encounter any problems/have any queries feel free to ask in comments 🙂


  • Tutorial to install Tizen OS Emulator on Windows 7/8.1/Linux – Works on Mac os too!

    Tutorial to install Tizen OS Emulator on Windows 7/8.1/Linux – Works on Mac os too!

    Today Samsung launched its most awaited Tizen OS Smartphone – Samsung Z1 . Being curious about trying and experiencing new Mobile operating systems, i decided to try it out and found out that there’s no particular direct emulator for Tizen except for its SDK . So here’s a simple tutorial on How to Install Tizen OS emulator on Windows 7/8.1/Linux (Ubuntu / LinuxMint) and Mac OS too!

    Tutorial to install Tizen Emulator from SDK

    • First of all download the appropriate Tizen SDK depending upon your OS from here – https://developer.tizen.org/downloads/tizen-sdk
    • PLATFORM INSTALL MANAGER FILE SIZE MD5 CHECKSUM UPDATED DATE
      Ubuntu® 32bits tizen-sdk_2.3.59_ubuntu-32.bin 5.5M 638cc69e5db33f5a1e11f5897cf96774 Dec 3, 2014
      Ubuntu® 64bits tizen-sdk_2.3.59_ubuntu-64.bin 5.6M c4e9804afc22304d051c7fdb9a16a438 Dec 3, 2014
      Windows® 7 32bits tizen-sdk_2.3.59_windows-32.exe 6.0M 17919642ca8dfacca0a6e076759c8361 Dec 3, 2014
      Windows® 7 64bits tizen-sdk_2.3.59_windows-64.exe 6.0M 641c3b4859d837079c3f54b50042bcc2 Dec 3, 2014
      Mac OS X® (Intel) tizen-sdk_2.3.59_macos-64.dmg 5.7M a7b74bbfd96f40ebd3cc8c7d6cd8c43e Dec 3, 2014
      Mac OS X® (Intel,CLI) tizen-sdk_2.3.59_macos-64.bin 5.5M 8334a0b697dafd815432ac562cc67f01 Dec 3, 2014

      The above iframe is the latest as of Dec 3,2014.

      Now after you’ve downloaded the “Install Manager” (Make sure you’ve downloaded the Install Manager, and not the complete SDK which is in GB’s) , Open it. Now click on install – You will see a window as shown below –

      Only select the Emulator option

      In the next window only select the “Emulator” option and click on Install.

      Now simply click on “Next” until the download starts, once download has started it will ask you to Install Intel Hardware Accelerator (HAXM) on Windows Machine.

      If you’re installing on Windows allow HAXM to get installed, Ubuntu/Linux/Mac users need not to complete this step.

      Now, Installation will get completed, once your installation is completed – Please navigate to the tizen-sdk installation directory and Execute “emulator-manager.exe”.

      Now click on “Add VM” and modify the Virtual Machine/Sensor settings and click on “Confirm”.

      Add a new VM , modify option and click on Confirm – Click on Play button to run the emulator

      Now, Run/execute the emulator by clicking the “Play” button.

      Once the emulator is running, it may some time to execute and start running (Booting the Linux Kernel).

      You can use the hardware key interface provided to handle the emulator as shown in below figure –

      Tizen Emulator hardware key and emulation in action


  • Run Python Scripts – Python Programming on Chrome OS / Chromebooks | Python for Chrome Os

    Run Python Scripts – Python Programming on Chrome OS / Chromebooks | Python for Chrome Os

    Chromebooks and Chrome Os is on the trend, due to the lightning fast speeds, ease of use and lower costs . Same is the case with Python by virtue of its vast possibilities of application in fewer lines of Coding & scripting . Hence, here’s a small tutorial by which you will be able to do Python Programming on Chrome Os itself , as well as run Python Shell in chrome Os itself !. I will be covering two python apps/extensions on Python for Chrome OS , you can use anyone which you like –

    App / Extension # 1 – Python

    Python Shell for Chrome

    This is my favorite app/extension for running Python in Chrome as it provides a complete Python Shell for running and executing the apps . Giving a native Linux feel , the shell is based on the famous NaCl module and provides Python 2.7.7 , which gives platform for more productivity without voiding the warranty . After you install the app , simply Run the app through the Chrome App launcher.

    Click here to download Python for Chrome Os / Chromebooks.


    App / Extension # 2 – Skulpt Interpreter

    Skulpt python interpreter

    Skulpt Python interpreter for Chrome Os is yet another extension which enables Python scripting and programming on your Chromebooks. Though Skulpt Interpreter doesn’t provide you the native experience of python shell , but is powerfully built. and is quite handy too!

    Click here to download Skulpt Interpreter for Chrome OS.

    So, these were the Python tools or extensions for Google Chrome OS, if you know of any other such good app/extension for Python on Chrome feel free to comment .

  • 3 Websites to get hidden Alexa Pro Stats & features for Free! without subscription

    3 Websites to get hidden Alexa Pro Stats & features for Free! without subscription

    There are only a few reliable sites when it comes to comparing the traffic and overall ranking , statistics of a website like alexa,similarweb,quantcast etc. Alexa.com is perhaps the most widely used one as its more widely used, and provides the basic ranking stats of a website for free!. But Alexa free account doesn’t provides deep stats such as Pageviews stats, worldwide trends etc. But you can get those deep stats provided with Alexa Pro Subsciption for Free! by using the following three Websites –

    Website # 1 – StatsCrop.com

    StatsCrop + Alexa API = No need of Alexa Pro!

    Nothing comes close to StatsCrop when it comes to tracking the Alexa Traffic data ! . It also provides the SEO Score and optimisation score of the website , Thus the features and services provided by StatsCrop can be summarised as –

    1. Alexa Traffic
    2. Website Load Time
    3. How to optimize website
    4. Website SEO Score
    5. Website Daily Pageviews

    Tips to view hidden Alexa Pro Stats –

    • Once you have entered the URL into the StatsCrop navigate through the different tabs present in the Traffic Rank Graph to check out your site’s
      1. Traffic Rank with custom time period setting (The custom time setting/interval feature is absent for Alexa free users)
      2.Your website’s Reach.
      3.PageViews and Pageviews/user graph of your website.
      4.Bounce % and Time on Site.
      5.The traffic graph of traffic referred by Organic Search.
    • Click here to visit StatsCrop.com and get all the mentioned Alexa Pro features for Free!

    Website # 2 – AttentionMeter.com

    AttentionMeter.com is yet another website which allows comparison of websites as well as Alexa stats, Quantcast stats, as well as compete stats. Though the primary purpose of AttentionMeter is comparison, but it works with a single website too! . You can view the following Alexa Pro stats for free

    • Daily Reach.
    • Daily Global Rank trend.
    • Daily Pageviews.

    Click here to visit AttentionMeter.com

    Who.is – Traffic Info contains Alexa Pro features

    Website # 3 –  Who.is

    Now who.is is very popular amongst webmasters to track and identify the ownership details of any given/specific domain.but indirectly it provides a peek to the hidden Alexa pro features too! . With details such as Page Visits per one month ,Page Visits for Last three months in addition to the whois details, makes it a very handy website to feature in this list!

    These were some of my findings, if you know of any such Website stats website feel free to comment

  • How I got my Free iPhone 6- Thank you Ladooo! and AirLoyal | Secret Revealed!

    How I got my Free iPhone 6- Thank you Ladooo! and AirLoyal | Secret Revealed!

    Most of the readers of this blog – TechApple might be familiar with the free recharge giving apps , and must be using it to get the Free Recharge for their mobiles. One of such free recharge app which is simply awesome – Ladooo! gave me an iPhone 6 for FREE! , yes an iPhone 6 for Free! , not only just an iPhone 6 but i also ended up earning Rs.1717 for Recharging in the process . I am going to cover the story in detail , but i will also like to mention that this is the 150th Article on TechApple, and in my 100th article, i had shared how i had earned Rs.9000 (9K) Balance.

    My Story on how i got iPhone 6 for Free!

    My pic on the Winners page! 🙂
    • First of all, i would like to Thank – Ladooo! app of AirLoyal ,  and AirLoyal Ltd, who had organised such an awesome contest. A Big big Thank you to you Ladooo! You changed my life!
    • Now, about the contest – Between the period 17th – 24th December 2014 , AirLoyal & Ladooo app had organised a contest “Highest earner of the week wins an iPhone 6 for Free! . Naturally, I decided to participate as it didn’t had an entry fee and i wasn’t losing anything but infact giving me a slight chance.
    • In the contest to win a user had to earn highest within the week by downloading apps, referring friends and complete some very easy offers provided by Ladooo!.
    •  I started downloading some apps through it and personally i felt i had no chance of winning the contest, as it was a Pan-India one, still i decided to give a shot and wrote an article on Ladooo! which proved to be a masterstroke! ( I planned to write an article as Ladoo provides money on referring friends too! and i thought i had a better chance by referring online, besides having an article for a really good app – Ladooo on my blog).
    • How i earned so much ? This question was the one which many people asked me after the winners were announced , so here’s the secret revealed! –
      1. The article I wrote proved to be the main source – It gave me many and maximum referrals amongst all the participants to edge me ahead than others and get me the iPhone!
      2. You can still check out its on the first page of Google for the keyword “ladooo app” the article name is – “Get Free DTH & Mobile Recharge by Ladooo App” .
      3. I also referred all my friends at college to download the app , sometimes i received reactions like “Ye ladooo kya hain ?” , “Free me kuch nahi milega, faltu me mehnat mat kar” ,  “kuch nai milega re, ladooo milega khali” , though some were encouraging ones, but i Kept trying..
    • And Finally , I won as i had referred many many many friends !

    My reactions when I came to know I was the Winner!

    • I was in the college canteen eating samose when i received the call from AirLoyal – Pandurang Sir , they started inquiring me some basic info of mine about my name, number and have i participated etc.. I knew the results of the contest were nearby and as I thought that I had no chance of winning whatsoever, so i happily answered all of them thinking it might be for the verification and records.
    • As i was answering them, I casually inquired them about whether the winner or who the winner was or has it been announced ? and they answered “You’re the Winner!” I was shell-shocked…
    • For sometime, i didn’t knew where i was , I didn’t believe that I had actually Won! 🙂 , But when assured by the Pandurang Sir, I was wished and congratulated by the entire AirLoyal Team! , I felt very much warmth and homeliness in the wish! . I simply cannot write that feeling as it simply cannot be described! I felt i was right there in the AirLoyal office!
    • Suddenly , My friend shook-me and i was back at the college canteen, with a phone in my hand a samosa in the other, the samosa too was looking like an iPhone to me 😉  .
    • The further conversations between me and Sir took place on E-Mail , Pandurang Sir and the entire Airloyal team supported me and answered all of my queries.

    iPhone delivery and other Details –

    • Now, regarding the iPhone delivery and etc . The Phone was ordered on the Same day the result of the contest was announced! , and I expected the delivery within a week or 15 days… But to my surprise Airloyal ordered a brand new iPhone 6 from Flipkart with One-day delivery!!! 
    • My happiness knew no bounds, and i was waiting for it to come, i couldn’t even sleep the other night as I was impatiently waiting for the Wonderful Gift by Ladooo!
    • I am also going to publish a Video of the delivery time, my reactions and everything in detail! Keep watching this space for updates 🙂 .
    • Once again a big THANK YOU! to Airloyal and Ladooo! and last but not the least a Big Really BIG… THANK YOU to all you readers cum friends who made this possible!  You make this blog active, you make me! active… I will really try to work even harder and please you with some interesting stuff! 🙂
  • Droid4X – Free Android simulator for PC Windows & Mac OS X |Best gaming Android emulator for Windows 7/8.1/10

    Droid4X – Free Android simulator for PC Windows & Mac OS X |Best gaming Android emulator for Windows 7/8.1/10

    There was a dearth of good android emulators when it came to Mac OS , and Windows too had limited options when it came to free good android emulators & simulators. Fortunately, the scene is changing with some new entries and one of them is – Droid4X!. Droid4X is the sort of Android simulator designed for Power! , it provides complete power to the users by virtue of its speed! and things such as Complete Root Access. Also Droid 4X is an ideal android emulator for Windows Tablet esp(Lix Tablet PCs) Let’s have a peek onto some features.

    Salient features of Droid4X-

    Droid4X Apk installation
    • Google Play Store comes pre-installed, very few android emulators barely support it without modifications,let alone coming bundled with Google Play. Droid 4X Android emulator support Google Play.
    •  Supports Ctrl + C, Ctrl +V text support between the host Operating System and the guest Android installation (emulator).
    • Zoom In- Out supported through Central mouse – wheel (Scrollbar Zoom-in/out).
    • Best Android emulator when it comes to Gaming!, personally i’ve never encountered an emulator which supports Gaming to such an extent, you can use keyboard as a controller for Android games.
    • Provides in-built app for keyboard  mapping, you can map your screen area, actions, touch-gestures etc to your Keyboard keys, which i’ll be explaining later in the article.

    Click here to download Droid4X Android emulator for Windows 7 /8 / 8.1 / 10.
    Click here to download Droid4X for Mac OS X.

    Here’s a Small Screen-shot tutorial on configuring the Droid4X Keyboard Conrtroller – Mapper

    Droid4X Keyboard Controller Step1
    Droid4x keyboard Controller Step2
    Droid4X Keyboard controller Step3
    Droid4X Keyboard Controller Step 4

    That’s it , I personally loved the Droid 4X Android emulator, do comment problems encountered while installation and any such good emulator which you might be knowing!


  • 4 Ways/Methods to install ipa file (app) on iPhone / iPad / iPod Online + offline methods

    4 Ways/Methods to install ipa file (app) on iPhone / iPad / iPod Online + offline methods

    As, we all know iPhone & iPad both iOS devices pack/store their apps in .ipa file extension. Recently I covered how to backup/extract ipa files of your current iPhone/iPad apps . Now I will cover on how to install these ipa files apps on your iPhone & iPad online as well as offline methods with no Jailbreak required!. However, to install cracked apps on your iPhone or iPod you need to Jailbreak your device, these methods work perfectly for non-cracked apps though

    Method # 1 – Using iTunes.

    iTunes too provides a functionality to directly install ipa apps on your device. Perform the following steps to install ipa apps through iTunes –

    • Connect your Phone to computer and launch iTunes.
    • Drag the app’s .ipa file into iTunes library.
    • Click on Sync and done, that’s it . If the app was earlier backed up from the same device, it would be installed without any fuss.

    Method # 2 – iFunbox

    install ipa through iFunbox

    iFunbox is yet another easy method to install ipa files/apps on your iPhone. Perform the following steps to install Apps on your iPad/iPhone through ifunbox –

    • Download and install ifunbox from i-funbox.com if not already installed.
    • Launch iFunbox and connect your iPhone/iPad/iPod.
    • Now navigate to the File Browser tab as shown in the figure and select “User Applications” (Highlighted in the same figure).
    • Now click on “Install App” button, select the ipa or apmx file of app which you want to install and click on Open!
    • Yo! The app will be installed successfully.

    Method # 3 Online Method : Diawi

    Diawi is a tool for iOS developers to deploy Development and Ad hoc iOS applications or install them directly to the device. Here are the steps to follow to install apps through Diawi –

    0. Open Diawi.com .
    1. Upload the application and its provisioning profile.
    2. Send the link to your testers, clients, friends or even use it yourself. (Either by Mail , WhatsApp etc)
    3. Open the link in Safari on the iOS device and click on install.

    Method # 4 – iTools

    As we’ve mentioned earlier that iTools is probably the best alternative to iTunes, and the tutorial to install apps on iPhone is very similar to the one we used for backing-up /extract ipa files of iPhone/iPod apps.

    • Connect your phone to computer and launch iTools , You can download iTools from the following links –
      Click here to download iTools for Windows 7/8/8.1/10
      Click here to download iTools for Mac OS.
    • After connecting your phone & launching iTools go to  the “Applications” tab on the left hand side.
    • Now, click on the “Install” button.
    • Select the ipa file which you want to install, and click on Open.
    • That’s it your app will be installed successfully!

    So, these are some of the methods which i used to deploy/install ipa apps on my iPhone/iPod .If you encounter any problems or know of another such method feel free to comment