Our browsing activities are constantly tracked and so is our privacy breached , this is done by malicious scripts which run in your web browser while browsing low-quality websites. Now, in order to save users from such tracking Apple included Content Blocker support in Safari browser from its iOS 9 series update. Here’s a tutorial explaining How you can use Presto – A Free Content Blocker app to block ads on Safari browser for iPhone & iPad .
Before we move onto tutorial to use Presto, let us point out some salient features of Presto App –
Presto is able to block ads on Safari Browser and works on iPhone & iPad (iOS 9 or later required).
Lock all banners, pop-ups and video ads . (Blocks YouTube ads on iPhone)
Reduces Data usage consumed while serving ads, thus helps in Saving money.
Get the best privacy protection built with anti-tracking
Block Lists specific language.
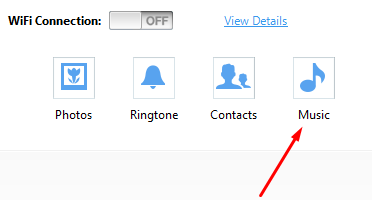
Presto App
So, Presto is a really a good free-feature rich Ad Blocker for iOS, here’s a tutorial on How to configure Presto Content Blocker –
Now, Open the Presto app and tap on “Make Magic Happen” button, as shown in the alongside image.
After tappin on the button you will be shown a tutorial on how to Activate Presto, Here simply tap on the “Go to Settings” button as highlighted below –
Presto Settings
When you tap on “Go to Settings” you will be redirected to the Safari Settings on your iOS Device.
Now Scroll down until you find “Content Blockers” in general tab.Now Tap on Content Blocker as shown below –
Content Blocker iOS9
Now, when you tap on Content Blockers, You will find the “Presto” togggle, simply toggle it to right side to activate the Presto app –
Presto Toggle Active.
That’s it, Now simply launch Safari directly or through the Presto app to enjoy ad-free , tracking free and a pleasing smooth browsing experience in Safari browser on your iPhone or iPad!.
GIF or Graphics Interchange Format images are great fun because they show motion as in Videos but actually are animated Images and hence have a lesser time too. Besides, this unlike Videos gif’s are looped continuously in Browsers and don’t have any Play & Pause button thus giving an infinite loop feeling which makes them even more funny. So, here’s a simple tutorial which will reveal how you can create your own moving photos- GIFs right in your iPhone & iPad –
Tutorial – How to Easily Create Animated GIFs in iPhone & iPad –
GIFMaker App iOS
We will first need an app which will take our photos / images and convert them into GIFs or some which will directly shoot the pic into the GIF format, We tried GIF Maker App by Smuzzal for iOS as its free and it really worked great! Click here to Download GIF Maker App by Smuzzal from Apple iTunes Store.
Once, you have downloaded the GIF Maker App It may ask you permission to access photos & camera – Please “allow” the access to the same to GIF Maker App.
Now, Depending upon your choice Select the GIF Creation Mode – For example, If you want to created moving photos from existing Gallery pics select the normal “GIF” option as highlighted by blue box in the alongside image.
Or, If you want to create a new moving photo / animated GIF from the camera Simply Select the “Shooting GIF” option.
Now, we will be first covering Normal GIF Creation mode & then we will be covering Shooting GIF Option –
Method to create new GIF from Existing Photos –
Once you have selected the normal “GIF” option it will present you with all the photos within your gallery as shown below –
GIF Maker Gallery (Select Photos and tap on Right hand top side)
Now, Select the Photos which you want to have in GIF (You need to select atleast 2 different photos to create a GIF) , Once you’ve selected the Photos , Tap on the “Film man” icon present at the top-right hand side as highlighted by Orange color box in the above image.
Tip – If you select Multiple Photos from a Burst you can use the “Video” Effect in photos else you can select totally different photos e.g – black one & white one to create a Ghost effect.
You can skip forward to Method to Save GIFs as we will just be having a look onto alternate method of getting pics from Camera
Method to create GIF from Camera –
Camera method – The bottom left hand side indicates the number if of pics required
Now in this mode, please allow the app the access to Camera, in the bottom right hand side corner you’ll find a number as highlighted by red box in the alongside image – It indicates the number of Images to be clicked for GIFs . Press on it to adjust the “bear” slider to adjust the number of photos to be taken.
Now, tap on the “blue finger-camera icon” multiple times untill the photo counter becomes zero, then you’ll be shown an option to Save GIFs as shown below – Follow the below Method to Save GIFs from GIF Maker app –
Method to Save GIFs From the GIF Maker App (Common to Gallery photos + camera method) –
Now, once you have clicked on either the man, or camera icon(depending upon the method you selected) it will redirect you to “Edit GIF” pane .
Here you can reduce the speed or photos to be shown per second(frame per second) by using the Edit GIF option present at the bottom highlighted by the Green color, or you can Save the GIF by the “Save”option present at the top-right hand side corner highligted by blue color in the image below –
Edit GIF Pane
Once you’ve tapped on “Save”your GIF will be successfully saved in the Gallery and you’ll be presented with an Image as shown below –
Successfull GIF save by GIF Maker App
Now, Your Gallery will be having a new image –
Please Note – that unlike when you view the GIF in GIF Maker App, The GIF Image in the gallery won’t animate or move and are static, And hence , to make GIFs move you will need to E-Mail and Send the Image to your E-Mail ID and then You can use the animated image on any site as you want.
Uploading the GIF through Safari browser didn’t work in our tests so we used the Default Mail App and it did work as shown below –
Mail GIF on iPhone
You can also view your GIF in your iMessage by sending the GIF to your own number by the Messaging option – and then always visiting the messages to view your favorite GIF being saved and animating in the background as shown below –
Saving GIFs on iPhone by sending to own number
That’s it ! Now you have Successfully created and saved as well as viewed or watch GIFs images in your iPhone! & iPad. Feel free to comment if you face any issues.
Instagram has its largest user base on iOS or iDevices – iPhone, iPod & iPad . many time we need to download photos from our Instagram feed and there aren’t many easy options except to take Screenshot , but those too don’t give the complete Image resolution. But not anymore, Instagrapp app for iOS allows you to download just any Instagram photo or Video on your iDevice in a very easy manner! Keep reading to know on How to easily Download Instagram photos and videos on iPhone using Instagrapp app.
Tutorial to easily Download Pics from Instagram using Instagrapp app –
Once you have downloaded the Instagrapp app, log-on to your Instagram Account via the app and Authorize the app .
After you finish the Authorisation , Instagrapp app will present you with your Instagram feed as shown in the image alongside , Here tap on the image/video you want to Download.
After you tap on anImage or video from your feed, It will be shown in full-view as shown below – . Now Simply tap on the “Save” button to download . That’s it!
Save option in Instagrapp app
The iPhone may ask you a one-time confirmation for allowing “Photos” access to InSave app, Click on “Allow”.
That’s it ! All your Selected Instagram Photos and Videos will now be downloaded on your iPhone !
You can also use the “search” option to browse instagram using Username, and hashtags to search media for the particular search query. The method is really useful for backing up our own photos by searching our own Username as shown below –
Many times, we need to use WhatsApp for sending or receiving messages/media without showing or using our real mobile number or even trick our friends and message without revealing our Identity. Now, by using the following tutorial you will be able to create a fake WhatsApp account with a spoofed U.S.A number in any country, that too will all the normal functioning of WhatsApp . The tutorial will work for Android, and iOS devices (iPhone) too!
Tutorial to create a Fake WhatsApp account with other Spoof Number –
First of all , Install and verify WhatsApp on your phone . (Skip this step if you have WhatsApp already installed & verified on your phone).
After verifying your Vovox navigate to more tab in the app as shown below –
Vovox More Option
Now, Note down your Vovox Number which is highlighted by Blue color.
Now, Open WhatsApp app and navigate to the settings option as shown on the next image –
WhatsApp Settings
Once you are into the settings panel , Open the Change number option as highlighted by blue color –
WhatsApp Change Number
Now, when you are into the Change Number Option inside WhatsApp app, Enter your existing Verified Mobile number in text field of “Old country code and mobile number” and in the second text field , Enter country code as “+1” which is U.S.A country code and type in your new phone number (Vovox Number) obtained in Step.3 (Which we noted down from More option in the Vovox app) .
WhatsApp Change number option
Now, Click on “Done” option present in Whatsapp app’s top right hand side corner , You’ll soon receive a message on your Vovox app with verification code, while at the same time WhatsApp app will be waiting for Verification.
Now, Open the message you received in Vovox app, and then Click/visit the Verification link received in the message as shown below –
WhatsApp Verification Link in Vovox App
That’s it ! Your Whatsapp verification would be completed successfully! & you can now use WhatsApp with a fake/spoof U.S.A number and Enjoy WhatsApp Anonymously!
Recently I needed to transfer some music/songs into my iPhone, and I found that for any song/track which you want to add to the iPhone / iPod it must be synced to the iTunes library. Now we may want to transfer just a song and not have it in Music Library like I wanted or some might need to import only particular Music onto the iDevice without using iTunes (iDevice= iOS devices : iPhone, iPod, iPad) . So, here’s a simple tutorial on how you can copy/transfer music from your Mac/Windows pc-laptop without using iTunes .
Pre-requisites –
This tutorial requires iTunes to be installed on your system, as the newer iOS device drivers can only be installed through iTunes.
Tutorial on how to transfer-copy music soundtrack from Computer/Mac to iPhone / iPod / iPad without iTunes –
First of all connect your iPhone / iPad device to your system , If iTunes automatically opens up & start syncing close it.
Now, Open iTools app, you will see your iOS device in the window, there in click on the “Music” icon / media tab under the device menu as shown below –
iTools Music icon shown only after device recongnized by iTools
Here you will see all the music tracks present inside your device, Now near the menu bar there’s an option labelled “Import” as shown below –
iTools import music option
Now select/click on the Import option.
After you have clicked on the Import option, it will open an Explorer window, here browse & select either manually select the music tracks or you can even select the directories whose music you want to transfer / import (highlighted by Green arrow in the below image)-
iTools Music Import to iPhone / iPad / iPod
Once you are done with selecting the tracks, Click on the Import button.
Wait for a while until the tracks are copied & indexed, and that’s it! Now you can disconnect your iPhone / iPad from the system and enjoy the music right in your music library! totally without iTunes!
If you encounter any problems while using this tutorial feel free to comment.
We had earlier covered a tutorial for Xender app (iOS) which is probably the most easiest & efficient way to import music from other device (Android) to your iPhone / iOS device. A lot of users were really happy with the results of the app, but some also requested that the songs/music to be imported into the default music player from Xender. Though, not easy but it isn’t impossible either so here’s a tutorial to import songs & music from Xender , ShareIt app to the default Music Player library on your iPhone / iOS device.
Tutorial- How to import music songs/music from Xender to Music Library
Pre-requisites :
We will need two different iOS file explorers to transfer files – iBrowse (to extract/export music from iPhone’s or iOS device’s apps document folder) & iTools (to import the music back into the music library of iPhone/iPad) , however you can skip iTools if you plan to import it using iTunes.
Tutorial Part 1 – Exporting the music from app’s document folder to storage
First of all, connect your iOS device/ iPhone to your computer / Mac.
Now open iBrowse app, now browse through to the app’s document folder as shown below –
Navigate to the apps folder in iBrowse as shown below , and open it –
iBrowse app’s folder
Here scroll down to the app’s folder, as we need to copy music from Xender in our case we navigate to the Xender folder in apps & open it –
Navigate and open Xender Folder
Once you open the Xender folder, please browse to the “Documents” folder which is present inside the Xender folder (Navigate and open the Documents sub-directory inside Xender).
Now check for the music/song inside either the”Inbox” or “Other” sub-directories which are present inside the Xender app as shown below –
Inbox directory inside Xender documents directory
Other directory inside the Xender documents directory
In our case the music file was present inside the “other” folder.
Now, Select the music files you want to export and now right-click on them and select the “Export to folder” option as shown below- . (Select a temporary folder on your hard disk where you will be storing music files, later on we will be importing the files in iPhone’s music library.)
Export to folder option – iBrowse
Tutorial Part 2 – Importing the exported music from Part 1 into Music Library
You can directly import the exported music via iTunes onto your Music Library or –
You can open iTools app after connecting your iPhone / iOS device, then navigate to the “media” option selected by maroon color in the figure below –
iTools method to import music into music library
Now, click on the “import” option highlighted by the green color in above figure, herein select the music files/folder to which we exported our music files in Part 1 of this tutorial and click on “Import”.
That’s it! You have now successfully imported music from Xender to Music Player library on your iPhone / iPad & iPod :).
Well, the tutorial is a lengthy one, but this is probably the only way you can do the import without jailbreaking your device, if you encounter any problems while following the tutorial feel free to comment .
Most of the apps which we use, download & store some background data which they fail to delete even if its not useful anymore. This type of data gets accumulated and stored overtime which results in Insufficient memory in our iOS devices – the result iPhone & iPad internal memory full. Also, iOS unlike Android doesn’t give external apps even access to other app’s data,let alone delete it or even use it -. This results in the absence of proper cache cleaning apps for iPhone’s and junk file deleting apps for iOS. But not anymore – Now we can clear app data/cache and even the junk files by the following tutorial –
Tutorial to clear app data/ app cache and delete junk files on iPhone / iPad using MobileGo
Now, once you’ve downloaded MobileGO, install it . (Note – If you’re using Microsoft Windows OS, it might prompt you to download & install iTunes, this step is necessary as declining the same would result in iPhone drivers not being installed and hence no proper iPhone / iPod connection to PC).
After you’ve installed MobileGo, execute the program, now connect your iPhone or iOS device to PC using the USB lightning cable.
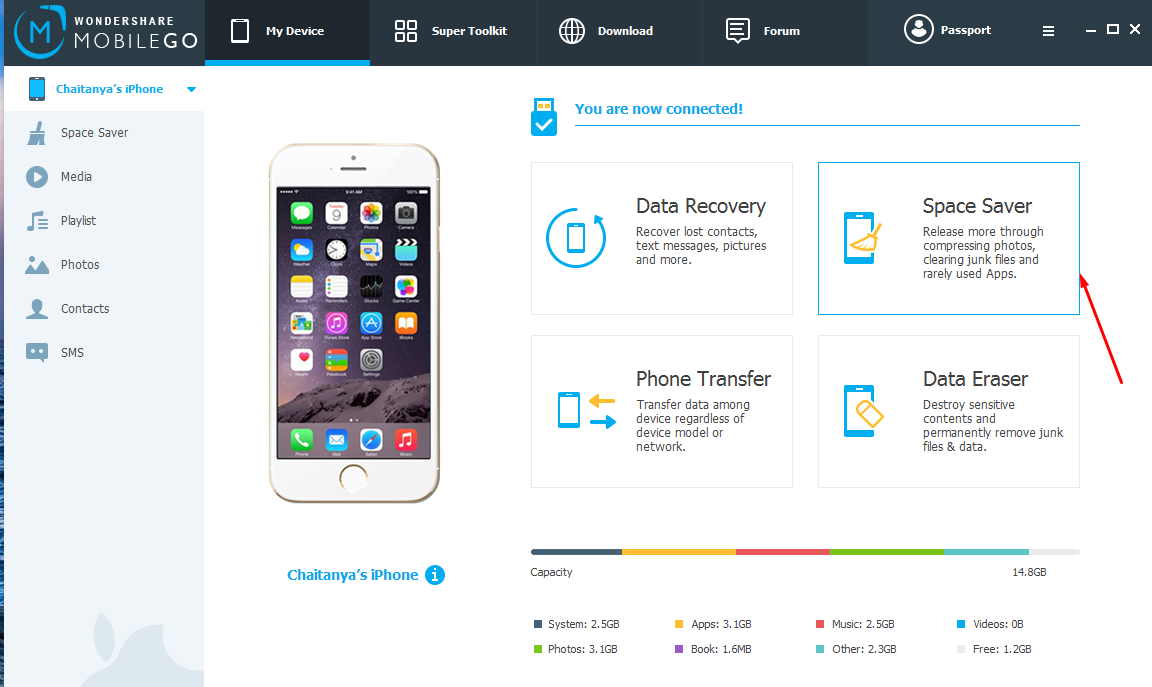
Once you’ve connected your iOS device, MobileGo will automatically connect your device and present you with a dashboard as shown alongside , here click on the “Space Saver” option (as highlighted by red arrow).
Now, it will ask your permission to scan your device for junk files , and cache as shown below – , here click on “Start”. Mobile GO Space Saver Start icon
Now, it will start scanning your device, please wait until your complete device is scanned. (Note : This may take some time depending upon the data present in your iPhone / iPod or iPad).
Once Mobile Go has finished scanning it will ask you to for check-marking the the actions to be performed for space reclaimation , Now just checkmark on the actions you want to perform – “System Junk files”, “App generated junk files” , “photo compressor” .
Now, click on “Resolve” button –
Mobile GO Resolve button
Wait until the process is completed! .
Voila! you’ve now easily and successfully freed-up space in the internal storage memory of your iOS device, that too without Jailbreaking! and without affecting your log-ins/ or affecting security – Keeping it as secured as ever!
If you encounter any problems while using Mobile Go feel free to comment 🙂 .
All the latest flagship devices be it iPhone, iPad or Android devices like Samsung Galaxy S6 etc, now come without external memory expansion (micro sd) slot, hence it becomes necessary to manage the internal phone memory. Also you may need to free-up phone memory if phone says Insufficient space available or for doing some work or for saving data. So, here are 7 Best tips to free up internal phone memory on your Android devices & iPhone , iPad and even iPod . These tips are an easy solution/method to free up phone memory if full on Windows Phone (Lumia) devices too!
With the increasing internet speeds and cloud support integrated by default into apps like Microsoft Office for mobiles, it really makes sense to upload your documents to the cloud, as not only it gives enhanced security if your phone is lost or stolen but it also helps to free up internal phone storage. Same is the case with the photos, uploading them to cloud with services like Google+ photos makes it easier to access and also gives a reliable back-up unlike storage(where the photos are lost if the memory becomes corrupt).
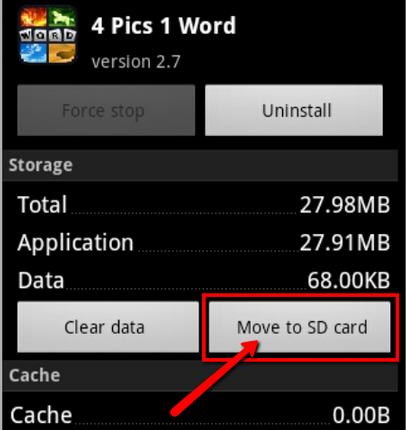
This is one of the most simplest thing we can do to free-up phone memory!. You can uninstall the app’s you don’t use much, or move the apps to SD card, if your phone supports transferring apps to SD card to further free up space on your phone.
Besides, this Factory apps cannot be uninstalled but you can always uninstall their updates in Android which can free up even upto 30mb storage per app e.g Uninstalling Chrome Updates as shown in figure below –
Uninstall Updates
No.5 Compressing Videos –
Like photos, videos too take up a large space on your internal phone storage, hence you can also compress them like images to free up even more space on your phone’s internal memory.
No.6 Deleting WhatsApp media & other app media using File-explorers –
Whatsapp media folder delete Android
Whatsapp is one of the most widely used app on all handheld devices, but using Whatsapp even fills up your internal phone memory as the Whatsapp media (images, videos) are kept intact as it is in Phone memory even after viewing. Thus, we need to manually delete the components of Whatsapp media folder or Whatsapp documents folder in case of iPhones and other iOS devices.
You can use any Android file explorer apps like X-Plore , ES file managers to delete the Whatsapp media folder as shown in image alongside. But for iPhone, iPad and other iOS devices you need to use any of these 5 iPhone file explorers for PC / Mac to delete the folder (as iOS file managers have very restricted privileges due to iOS app restrictions).
No.7 Hardreset / Factory Restore the device
This is the last option which remains to free up phone memory and make it usable . Though this will erase all your personal data and apps, but atleast restoring the phone to factory settings will make the phone more usable!
So, these are some of the best ways to free up/empty the internal phone memory/storage if its full or nearly full and make the phone likeable and usable as before!. If you know of any other good tip or have a recommendation feel free to comment :).
iPhone’s have fixed storage and that’s one of their major drawbacks, and hence it limits the data too which we can carry on our phones . Also we face problems of phone memory full on many of our iOS devices ( iPhones, iPods & iPads) . One of the best things we can do to solve the phone memory full problem is by reduce the photo/image size i.e. optimizing(compressing) our photos without effecting their quality . Compressing photos and images not only enables you to carry your favorite images with you but it also enables you to free up internal storage upto 80%. So here’s one of the best free iOS app to compress photos & images – PhotoShrinker app to compress images and free iPhone internal storage.
Tutorial to compress images using PhotoShrinker iOS app –
Once, you’ve downloaded and opened the app on your device, it will present a gallery of all the photos & pics in your iOS device (iPhone / iPad / iPod).
Now, you can either manually select the photos you want to compress by tapping on them ( Once a photo is selected for compressing it will be marked with a checkmark arrow as highlighted by green arrow in alongside image , repeat for all the images you want to compress).
You can also use the “Select all” option to compress all the images at once .
Now, tap the bottom blue-bar to shrink xyz photos (highlighted by red-arrows in the alongside image).
After you’ve tapped the blue-bar it will ask for your confirmation as shown below (Tap on “Yes” to compress the images) –
Confirmation dialog for Shrink Photos
Once, you click on “Yes”, it will compress / optimize the photo and ask you to delete the original pic to free -up phone storage, here click on “Delete” to delete the photo from the device internal memory .
Permission dialogue to ask before deletion
It may even further ask you to permanently delete the photo from “Recently Deleted” album, you can also delete it from the “Recently deleted” album to successfully free up internal iPhone / iPod / iPad storage/memory.
That’s it now all the photos in your phone are optimized and you have reduced the photo size on iPhone which will save a lot of precious phone memory and Internal storage space on your iOS device – iPhone , iPad and iPods , If you encounter any issues while using the app or face any issues feel free to comment.


![How to Easily Create & View GIF in iPhone & iPad [Animated Images GIFs in iPhone / iPad ]](https://techapple.net/wp-content/uploads/2015/09/tpnMgCg.png)


![How to create a Fake WhatsApp account with Spoof Number on Android / iOS [Using USA Number in any Country!]](https://techapple.net/wp-content/uploads/2015/09/SINcm9t.png)


![PhotoShrinker app to compress photos & free-up iPhone (iOS)/ iPad / iPod storage [free up iPhone internal memory]](https://techapple.net/wp-content/uploads/2015/07/PBdRjRV.png)


