Category: iOS (iPhone + iPad) tutorials

  • How to Play YouTube Music Videos in Background on iPhone & iPad [No Jailbreak]

    How to Play YouTube Music Videos in Background on iPhone & iPad [No Jailbreak]

    YouTube is one of the most popular across the world. The only con is that it doesn’t allow you to play music sounds if you minimize the YouTube app or website or lock your phone screen. In this article, we will cover how you can Play YouTube Music audio in background on your iPhone & iPad without Jailbreaking.

    Tutorial to Play YouTube Videos in Background on iPhone & iPad without Jailbreaking –

    • We will open YouTube in a different web browser : Opera Mini to enable background playback instead of YouTube official app or Safari browser. We will use Opera Mini which is one of the oldest mobile browsers on our iOS device –
      Click here to Download Opera Mini Browser from Apple iOS App Store for iPhone & iPad
    • Now, tap and install Opera Mini browser from Apple App store as shown below –
      Install Opera Mini on iPhone
      Install Opera Mini on iPhone

      Once you have downloaded & installed Opera Mini browser. Navigate and Open the YouTube Website on the Opera Mini browser

    • Here Start playing the playlist or music / song you want to play in Background as shown in following screenshot-
      Start Playing the Song/Music you want to Play in background
      Start Playing the Song/Music you want to Play in background

      Once the song starts playing simply open the iPhone homescreen (app icon screen) or menu. You can even lockscreen if you don’t want to use any other app simultaneously. The music playback will stop for a while, but we will start the playback now by following step.

    • Now once you have locked screen / navigated to menu. Simply swipe up from bottom to the control center on your iPhone or iPad as shown below –
      Swipe up to open Control center and tap on the Play icon to start playing!
      Swipe up to open Control center and tap on the Play icon to start playing!

      Now tap on the Play icon! . The Music or Song will start playing again.

    • Thus, you can now open any other app or even lock your screen to listen the songs in Background .
      Music Playback still continues on Lockscreen or other apps on iPhone
      Music Playback still continues on Lockscreen or other apps on iPhone

      Thus, you can now enjoy youtube song videos even without keeping the YouTube app open. The method works on all iPhones right from iPhone 5S to iPhone XS Max and iPads. (iPhone 5S, iPhone SE, iPhone 6 S, iPhone 7, iPhone 8, iPhone XR, iPhone X and all)

  • How to Transfer or Copy Music from iPhone & iPad to Mac OS X for Free

    How to Transfer or Copy Music from iPhone & iPad to Mac OS X for Free

    Almost all iOS file explorers for Mac OS X are paid or the free versions have limited functionalities. Thus, its difficult to manually browse your iPhone or iPad files and copy them. But, not anymore In this article we present you the Best Free Method to Backup and Transfer music from your iPhone or iPad to your Mac OS X system. The method works on all Mac OS X versions released after Mavericks so it will work naturally on almost all Macs – MacBook Air / Pro / iMac mini etc.

    Tutorial to Copy Files from iPhone , iPad & iPod Touch to Mac OS X –

    This tutorial will let you practically copy any file inside your iOS device. This includes the Music from iTunes Music player as well. Besides, you can even copy app data, contacts anything present on your iPhone / iPad or iPod touch. Let’s look onto the steps of the tutorial one by one –

    1. Download & Install i-Funbox for Mac :
    • We will be using the free iOS file explorer or manager i-Funbox for the tutorial. Thus, we recommend you to Download & install the iFunbox dmg on your Mac from the link below.
      Click here to Download i-FunBox iOS File Explorer for Mac OS X .
    • Now, open the downloaded dmg file by double clicking on it.
    • Now, it will show installation screen as below. Here band drag and drop the iFunbox icon to the Applications folder as shown –
      Drag and Drop iFunbox icon to Applications to Install
      Drag and Drop iFunbox icon to Applications to Install


    • Now launch finder and go to “Applications” folder . Or you can simply launch applications folder by pressing the “Shift + Command + A” keys on your keyboard.
    • Here , Navigate to the iFunbox icon and control + mouse click on the same. Here select the “Open” option from the drop-down menu as shown in the following screenshot.
      Control + Mouse click to open iFunbox app
      Control + Mouse click to open iFunbox app

      It may show a dialog box, with warning as that app is downloaded from Internet, etc . Here please click on the “Open” button.

    2. Connect iPhone / iPad / iPod Touch to Mac OS X –
    • Now, connect your iOS device : iPhone , iPad or iPod touch to your Mac OS X with the USB lightning cable. It will now show up in  left hand pane of i-FunBox as shown in the following screenshot –
      Connected iPhone to iFunbox iOS Explorer
      Connected iPhone to iFunbox iOS Explorer


    3. Accessing iOS Files (File System on iPhone / iPad / iPod touch) –
    • Now on the iFunbox , click on the “Raw File System” option which is at the last as shown in the following screenshot –

      Accessing files on iOS devices (Music)
      Accessing files on iOS devices (Music)
    • Now, in the right hand side pane. Double click and open the “iTunes_Control” folder as shown above.
    4. Transferring : Copy Music from iPhone / iPad to Mac
    • In the next window, you can clearly see the “Music” folder inside the i-FunBox app.
    • Here, simply drag and drop the Music folder where you want to copy or transfer your music files as shown below –
      Drag and Drop to copy files from iOS to Mac OS X
      Drag and Drop to copy files from iOS to Mac OS X

      That’s it! iFunBox will now start copying your Music files from iPhone / iPad / iPod to your Mac OS X device. You can also use the same steps to backup and transfer contact, photos, videos, apps from your iOS device.


  • How to add 5th Row to Keyboard in iPhone & iPad (Upper Number Row)

    How to add 5th Row to Keyboard in iPhone & iPad (Upper Number Row)

    One thing missing from major keyboards for iOS devices is the Upper Number row. The number row is a handy utility which makes typing in numbers easier, especially in Spreadsheets or OTPs. Hence, in this article we show you How to add Number Row to Keyboard on iPhone & iPad which is absent even on popular external keyboards such as SwiftKey, Gboard, TouchPal.

    Tutorial to Add Upper Number Row to iPhone Keyboard & iPad Keyboard –

    In this tutorial we will install a new keyboard with 3D touch & Auto-correct support, which has the number row – QuicKeyboard . The steps to install QuicKeyboard and use number Row are as below –

    • First of all Download & Install the QuicKeyboard app from the link given below –
      Click here to Download QuicKeyboard from Apple iTunes App Store
    • Once you have installed the QuicKeyboard app, we need to activate the QuicKeyboard to display as our keyboard while typing. Thus we need to follow steps required to add External Keyboard as follows –

    Steps to Add External Keyboard to iPhone & iPad –

    • Navigate to the “Settings” and select “General” in the settings tab as shown in the screenshot below –
      Select General Option under Settings App
      Select General Option under Settings App

      Now inside, the General Settings. Navigate downwards or scroll down and tap or select the “Keyboard” option as shown in the following screenshot –

      Scroll Down Tap and Select the Keyboard Option
      Scroll Down Tap and Select the Keyboard Option


    • Inside this Keyboard section, please select the top most option “Keyboards” as shown –
      Select the Keyboards tab to add Keyboard to iPhone & iPad
      Select the Keyboards tab to add Keyboard to iPhone & iPad

      Now, you will see a long list of available keywords available , languages, countries etc. Here Navigate until you find your desired Keyboard . Tap and Select it to add the Keyboard.

    • In our case, it will be “QuicKeyboard” , hence scroll down until you see “QuicKeyboard” in the “THIRD-PARTY KEYBOARDS” section and tap to select it –
      Select Keyboard name below languages to add the Keyboard
      Select Keyboard name below languages to add the Keyboard

      That’s it!. Now we have added the QuicKeyboard to our keyboard on iPhone / iPad.

    • We now simply need to switch the keyboard while typing to use our keyboard.

    Step to Type via Third Party Keyboard on iPhone / iPad – 

    • Simply launch any app where you need to type or use the Keyboard. We will open Messages to switch our typing keyboard.
    • Once you start typing, you will see default iOS keyboard as shown in the below screenshot –
      Tap on the globe icon to switch Keyboard on iOS (iPhone & iPad)
      Tap on the globe icon to switch Keyboard on iOS (iPhone & iPad)

      Here as mentioned simply , tap on the Globe icon to change your keyboard.

    • Congratulations! . Your new keyboard “QuiKeyboard” will open with Number Row (5th Row) as shown below –
      New Keyboard with Number Row for iPhone & iPad
      New Keyboard with Number Row for iPhone & iPad

      Thus, you can now easily type in numbers wherever required. Also, you can use 3D touch to move mouse , long press etc.

      Incase of any queries or difficulties feel free to let us know in the comments section. Works perfectly on iOS 11, iOS 12 devices (iPhone 5S, iPhone 6S Plus, iPhone 7, iPhone 8, iPhone X S Max, and iPhone XR)


  • Top 5 Free PDF Editors for iPhone & iPad to Edit PDF Files easily on iOS [iPhones & iPads]

    Top 5 Free PDF Editors for iPhone & iPad to Edit PDF Files easily on iOS [iPhones & iPads]

    PDF Files are the standard when it comes to sharing documents online. Many times, we receive forms or documents where we need to add data or sign them but are in PDF format. Now, there is a wide misconception that PDF files are uneditable, but it is wrong. PDF Files are editable via PDF editors. The PDF Editors make it easier to edit, sign or annotate the PDF Files. Thus, In this post we compare 5 Best Free PDF Editors for iPhone and iPad , which will let you edit PDF on your iPhones & iPads (iOS Devices).

    Top 5 Free PDF Editor Apps for iOS (iPhone & iPads) –

    1. Xodo PDF Editor 
    Xodo PDF Editor for iPhone & iPad (Easiest to Use)
    Xodo PDF Editor for iPhone & iPad (Easiest to Use)

    Xodo PDF Editor is perhaps the most easiest to use and feature rich PDF Editor for iOS devices. The Best thing we liked about Xodo PDF is its User Interface.

    To Edit PDF inside Xodo PDF Editor all you need to do is,

    1. Open the PDF
    2. long tap on any blank area you want to edit 
    3. select the type of content to add (signature, text, note)
    4. Start writing and editing. Easy!

    Besides being a PDF editor Xodo also lets you –

    • Open & convert Office documents (ppt, xls, docx, xlsx) into PDF Files
    • Create and edit blank PDFs
    • Annotate content, Sign and fill forms

    Click here to Download Xodo PDF Pro from Apple iTunes App Store

    2. ZoomNotes Lite
    ZoomNotes Lite PDF Editor for iPhone
    ZoomNotes Lite PDF Editor for iPhone

    “Looks can be deceiving” that’s what ZoomNotes lite proves with its feature rich app. The first look of the app might suggest you that its being shabbily designed, but in the end it is one of the best and easiest to use PDF Editors for iPhone & iPad. Infact, using it on iPad is very quick and smoother than Xodo PDF.

    To edit PDF inside ZoomNotes lite all you need to do is tap “A” icon from left hand side pane, then simply tap on blank area to start adding text, signature, annotations etc.

    Besides, these it also has a unique easy to use formatting bar which we liked a lot as it enables to change the font face, bold, italic or underline any text you are trying to add.

    Also, the basic icons help to reduce the load making it easier to use on all iPhone models such as iPhone 5, 5S, SE, 6 , iPhone 6 Plus, 6S, 7 , 8 or even iPhone X.

    Click here to Download ZoomNotes Lite PDF Editor for iPhone & iPad from Apple App Store

    3. PDF Max 5
    PDF Max 5 PDF Editor for iOS Devices
    PDF Max 5 PDF Editor for iOS Devices

    PDF Max 5 is the next best when it comes to being the Free PDF Editor for iOS Devices. Its a good alternative to PDF Element, which sadly has gone so bad that its not there in our article anymore.

    To edit PDF inside PDF Max 5, all you need to do is

    1. tap the “yellow” icon we highlighted in the above screenshot
    2. select the type of edit you want to make (Sign, Comment, Annotate, Text, Note)
    3. Then simply tap on that section of PDF where you want to add it, and done!

    Click here to Download PDF Max 5 from iTunes App Store

    4. Foxit MobilePDF 
    Foxit PDF for iPhone & iPad
    Foxit PDF for iPhone & iPad

    Foxit PDF for iOS is a bit disappointing especially comparing it to its Mac or Windows version. Though, Foxit PDF for iOS lets you easily edit the PDF and the User Interface looks attractive, we found the icon based UI a bit confusing.

    But, besides that it has some features which are really useful –

    1. Ability to Open and convert PDFs to Office formats (ppt, docx, xls) and vice versa
    2. Open PDF files and other documents directly from Zip files, or export them to zip files
    3. Connected PDFs cPDFs are supported

    Click here to Download Foxit MobilePDF from Apple iTunes Store

    5. MarkUp – Annotation Expert
    Markup Annotation Expert for PDF - iOS
    Markup Annotation Expert for PDF – iOS

    Markup as the name suggests is great for adding annotations, comments, notes to the PDFs . But full fledged PDF editing is where MarkUp lacks. You can add text to PDF from Markup but you cannot remove existing data from PDF, which other apps are capable e.g Xodo.

    Anyways, incase you are looking for quick annotations, and easy to use light weight app- Markup is just that. However, for full PDF editing experience and removing existing text & image from PDFs we recommend Xodo.

    Click here to Download Markup from iTunes App Store

    Thus, these are currently the Best PDF Editors for iPad and iPhones. These work on almost all older and newer models as well as iOS versions 8 and later. Incase, if you face any issues or have queries feel free to let us know in the comments section below.


  • How to Enable Dark Mode Theme on iPhone & iPads [iOS 10 & Later Supported]

    How to Enable Dark Mode Theme on iPhone & iPads [iOS 10 & Later Supported]

    While using our iPhones and iPads at night we strain our eyes, effecting our sleeping behaviour. Though, most of the iPhones come with “Night Shift” which blunts down the blue color to more warmer colors for Night. The Night Shift still isn’t enough to reduce the strain on our eyes. Hence, in this article we will cover How to enable Dark Mode on iPhones and iPad which will use black color instead of white thus giving a Dark theme on iPhone and iPads.

    Tutorial to enable Dark Theme / Dark Mode on iPhone & iPad –

    We will be using the “Smart Invert” of invert colors feature to accomplish the dark mode. The Dark theme will be applied throughout the device, including all apps such as Photos, Safari, Messaging, WhatsApp, Facebook etc. Also, this mode works on all iOS versions later than iOS 10 . Thus, you can use it on iPhone 5S, SE, 6, 6S Plus, 7, 8, and even iPhone X too.

    You may even want to check how to apply Blue Light filter on your iPhone for Night Reading

    Step by Step Method for using Smart Invert – 

    • Fist of all navigate to “Settings” option on your iPhone and iPad.
    • In the Settings, please navigate and tap on “General”  option as shown in the screenshot below –
      Select General Option inside Settings
      Select General Option inside Settings

      Inside the General settings, Tap and select “Accessibility” options as shown below –

      Select Accessibility Option inside General Settings
      Select Accessibility Option inside General Settings


    • We need to select “Display Accommodations” here , this setting is here which will adjust our Display for the Dark mode theme. Please select Display Accommodations as shown below –
      Tap on Display Accomodations
      Tap on Display Accomodations

      Now the Display Accomodations has various settings like Invert Colors, Auto Brighntness. We will be using “Smart Invert” option inside the Invert colors to change our theme. Hence, Click on “Invert Colors” option here –

      Select Invert Colors Option
      Select Invert Colors Option

      Now, inside the Invert Colors settings. Please find the “Smart Invert” option and turn it On. The Smart Invert option automatically inverts bright colors such as white in apps with black, without changing the real image colors. Toggle the “Smart Invert” option to turn it on as shown below –

      Toggle On Smart Invert for Dark Theme Mode
      Toggle On Smart Invert for Dark Theme Mode
    • Congratulations! You have now enabled the Dark Mode theme on your iPhone or iPad. The Smart Invert is a handy optionWhich results in a beautiful Dark theme mode in iPhone and iPads by managing screen display colours with AI , resulting in a great dark theme as shown below.
      Dark Theme on iPhone & iPad
      Dark Theme on iPhone & iPad

      Thus, you can now use your iPhone and iPads even at night without damaging the eyes. The only con will be that the screenshots you take will be again converted to normal colors when you transfer or upload them. Hence, i had to take the screenshot with my other phone.


  • IOTransfer 2.1 and Everything You Need to Know About the iPhone Transfer Software

    IOTransfer 2.1 and Everything You Need to Know About the iPhone Transfer Software

    Have you ever thought of managing your iPhone or your iPad using your Windows PC? Well, if yes then you need to stick to this article a little longer because today we are going to tell you about one of the best iPhone transfer softwares out there that can allow you to control and manage some of the major contents of your iPhone on the desktop of your PC.

    Here by that software package we are talking about none other than the IOTransfer 2.1 that is so far the best management tool for your iPhone. This software has literally taken the tasks of editing, deleting photos, transferring files including movies, songs and photos to a whole another level. Now, you can spare yourself from the hassle of using a complicated Apple’s Macintosh system because your PC will do all the management of your iPhone.

     Compatibility

    As far as the compatibility is concerned, well, the IOTransfer is compatible with Windows 7, Windows 8 and 8.1 and Windows 10 too. Moreover, it supports all the iPhones, iPads and even the iPod touch with iOS 8.3 or later. In short, if you own an iPhone or any other Apple device then you can easily use this management software without any problem.

    Synchronizing the data between your iPhone and your Pc was never this easy but luckily thanks to technology that we now have an outstanding software that has solved all the problems for us.

    Features of IOTransfer 2.1

    As said earlier, this tool package is so far the best management software that you’ll find on the internet and the best part is that it comes with numerous features that can make the life of an iPhone user easier.  Honestly, transferring the files from and to an iPhone requires a lot of struggle and one has to find several tools and applications to do that but now IOTransfer is out there and it has everything one would wish for.

    The features include;

    One click data transfer:

    You just have to connect your iPhone with your PC and there you go, you will be just one click away from transferring your files from or to your handset.

    image1

     Free Video Downloading

    With Online Video Downloader tool in IOTransfer, you can easily download videos from YouTube, Vimeoand other sites to PC and save to your iPhone or iPad at the same time. Yes you read it right, imagine being able to download the video you like on Youtube just with a single click? Isn’t this amazing?

    image2

    One Click Clean up

    With this amazing software, you will now no longer run out of space on your iPhone because IOTransfer 2.1 comes with a one click clean up feature that clears out all the junk and unwanted data on your phone. It’s easy to get rid of the cached data and the junk files on Android but when it comes to an Apple device, people usually end up deleting their important files and pictures etc just to increase their storage. However, after you download and install the IOTransfer software on your iPhone, you won’t have to go through any issues especially regarding the storage of your phone.

    image3

    Contacts Backup

    With it you don’t need any iTunes or iCloud to back up your data, in fact with this tool package you can easily backup all the contacts, voice messages and even files on your PC and whenever you feel the need to bring them back on your iPhone, you can do that just with a one simple click.

    These are the main features of IOTransfer 2 and honestly, it is one of the best management tool for your iPhone. So, without wasting any further time, get your hands on this outstanding software, we assure you that you won’t be disappointed with the results with which it comes.

  • How to Fix an iPhone / iPad / iPod Stuck on the Black Screen without losing data

    How to Fix an iPhone / iPad / iPod Stuck on the Black Screen without losing data

    Apple is an innovative company that has changed the smartphone industry with the iPhone. Everyone knows that the iPhone is one of the best smartphones in the world, but it has its flaws. One day, you wake up and turn on your device, then you see iPhone black screen?

    There’s nothing to panic because you can reach the nearest Apple store to get your smartphone fixed, but it takes time. Now that your phone will be with Apple for a day or two, then how will you access the data on your phone?

    In many cases, the cost of the Apple service is expensive, which will definitely shake up the budget by the unnecessary, expensive service. So, what’s the second option?

    But, How Will You Recover Your Device & Data?

    Your iPhone black screen can cost your data, but with proper guidance and the right program, you can recover your smartphone without losing any data.

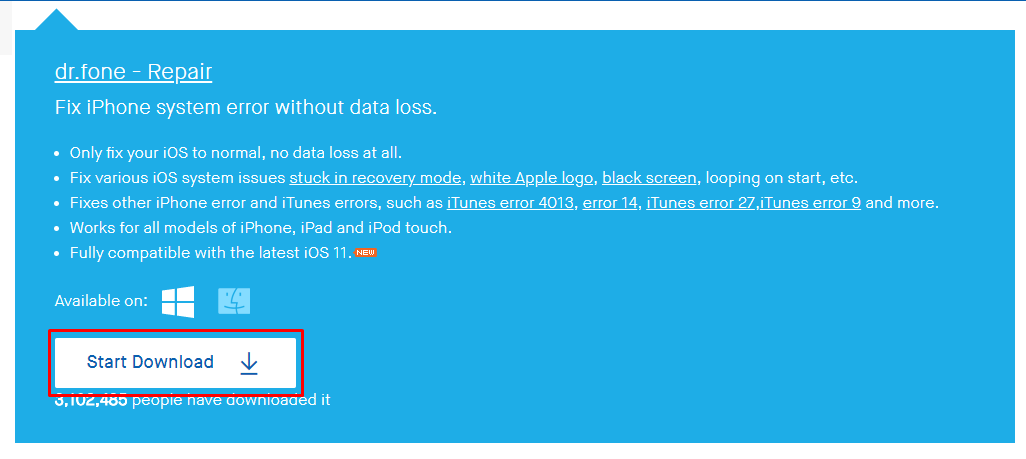
    If you don’t want to lose data, while the smartphone is getting repaired, then you need to get Wondershare dr.fone that comes with inbuilt features to eliminate manual work and give you evident results.

    Follow our steps, and you can get your smartphone working in a matter of minutes.

    First, we recommend you to recover your data first, even if you select Apple store repair process. Backing up your data is essential because even Apple engineers are humans, who can make a mistake that triggers data erasure.

    #1 – Recovering data using dr.fone

    First, you need to have a computer that you have used to connect iPhone before.

    One: Connect your device to the computer via USB.

    Two: Download dr.fone lightweight Windows and Mac program on your PC.

    Three: Once you are done with the installation, and then launch it. Make sure dr.fone detects the program.

    Four: You have to click on the “Recover” option to begin recovering your files.

    image20

    Five: You have the option to select what you want to recover like Contacts, Media, Photo’s, and more.

    image22

    Six: On the left side of the columns, you can select one-by-one to download files manually.

    image21

    Once the scan is complete, you click on “Recover to computer” then you will be able to save into the desired location like Desktop or a folder.

    #2 – Fixing iPhone Black Screen using dr.fone

    For you to fix your iPhone in a matter of minutes, then you must use the computer that you have connected your device to iTunes before.

    As you already know that Apple iTunes is necessary for this process to work and you also make sure that your device connected to that iTunes before.

    One:  We assume that you have already downloaded dr.fone and installed, if not then you can download dr.fone lightweight program.

    image24

    Two: Once installed, launch the program from the menu.

    image23

    Three: Connect your iPhone or iPad to the Windows or Mac PC.

    Four: Make sure that dr.fone detects the device, if not, then you better update or Install Apple drivers.

    Five: Now, you have to click on “Repair,” which uses your iTunes program installed on your PC to connect Apple servers. The Repair option enables you to fix problems like iPhone Black Screen, Stuck on Apple logo, and Recovery mode loop.

    image10

    Six: When you are on this tab, then you are ready to click “Start” and remember, no matter what you should not cancel or unplug your device until the whole procedure is finished.

    image6

    Seven: Follow the instructions to put your device into DFU mode. Nothing to fear when the screen goes black. We have done this a lot of times, so don’t worry about DFU mode.

    image16

    Eight: Using iTunes, the iPhone will get available operating system signed by Apple.

    image13

    Nine: The dr.fone will begin downloading iOS signed by Apple. You have to wait till the download is finished.

    image18

    Ten: Fix iOS to normal status. When the download is complete, click on Fix Now to start repairing your iOS and to get your iOS device to work normally again. Note that if you want to keep your original data, pls remember to click the “Retain native data” option in advance.

    image19

    After the repairing process completes, normally your iPhone, iPad, or iPod Touch will restart into normal mode. If it does not boot normally, you can click on Try Again to try the process again.

    image17

    If we eliminate the downloading time and only focus on process, then it would take roughly fifteen minutes to complete the process.

    Conclusion

    All you need a Windows or Mac with high-speed internet and your problem is resolved. Remember, if the problem is with the hardware, then you have to visit Apple store to get it repaired. Let us know what do you think about it in the comment section below.

  • Track and Manage your Monthly Expenses with My Business Expenses Manager iPhone App

    Track and Manage your Monthly Expenses with My Business Expenses Manager iPhone App

    Managing the business expenses everyday might seem to be a daunting task. No matter how hard you try to log all the expense records, you miss out on many things. My Business Expenses Manager is one of the ultimate applications available for Android and iOS devices that can help you track your business expenditure in managed way. Let’s go through a brief review of its iOS app and learn more about this intuitive app.

    app

    The Introduction to ‘My Business Expenses Manager’ App For iPhone And iPad

    My Business Expenses Manager is a perceptive application that claims to be the best expense manager for your business and daily expenditure. It helps you log all your expenditure and calculate them at the end of the day/week/month. Though it is not available for free, every penny spent on the purchase is totally a worth.

    You just need to fill in the details like name, country, tax rate, mileage charge, opening mileage, and other info, and then save the settings you have made. Now, you can start adding your spending to the app whenever you spend some money.

    image2image3

    Unlike most of the apps of its type, My Business Expenses Manager does what it promises to do. The users can take full control of their business expenditure and manager it wisely. Not only the business expenses, one can also track the routinely expenses using this application.

    What Tasks can the App Handle?

    My Business Expenses Manager is a robust application that requires minimal resources to help the users efficiently manage their expenditure and configure any setting within the app. It is the perfect business partner for the people on a go. It has got a robust set of tools and calculators to handle the following tasks:

    • Calculate the totals of private and business mileage.
    • Determines the running costs per vehicle.
    • Stores photos and date stamps of all receipts.
    • It lists down various payment methods.
    • Reconcile the credit card transactions.
    • Exports the reports files to the accounting software.
    • Search by supplier name or date.
    • Add notes to certain expenses providing more information.
    • Create the lists of describing services from different suppliers and more.

    Highlighting Features of My Business Expenses Manager App

    It provides you with powerful collection of tools to make your life simpler and faster. It not only turns out handy for the business class people, it is a classic app for the people who wish to manage their house expenses. Let’s have a look at some of its features.

    No Clutter in your Pocket

    You need not search down your pockets to gather the receipts that often get misplaced. This app stores all the receipts for you. Just open the app and look through the receipts you have stored within the app. You can capture the photos of your bills and add them with your expense entry in the app.

    image4

    Export Expenses

    It has got a precise built-in support. The real-time reporting in one of the most overrated features of this app. It records every expense which is then stored in single folder. A user can check every folder before exporting. You can even configure the application to export each new expense or export bulk expenses at regular intervals.

    image5

    Integrates Well with Accounting Software

    The CSV file of your expense can be integrated seamlessly with the standard spreadsheet and accounting software. Moreover, when you export data as PDF file from the app, the date stamped receipts are attached and printed automatically in the resulting report.

    Bulk Erase

    Once the delivery of the exported data is confirmed, you can instruct the application to perform the bulk erase of the redundant saved data for freeing up the space to store future expenses.

    Pros

    • Keep track of daily expenditure.
    • Multiple currencies supported.
    • Export expenses as CSV or PDF file.

    Cons

    • We think there should be a direct option to upload the info to cloud in encrypted form so even when the phone is lost we can restore the date to new one.
    Over to You

    If you are looking to manage your business and personal expenditure well, My Business Expenses Manager can turn out to be the best solution. Keep a good track of all your expenses and manage the receipts well with this stunning application.

  • How to Post & Upload 360 Photos to Facebook from Mobile [Android & iOS]

    How to Post & Upload 360 Photos to Facebook from Mobile [Android & iOS]

    360 Degree photos or Full Panoramas is the new trend in the Market. 360 Photos capture the complete view of you, and your surroundings and thus make a good post of sharing your location and photo gang on Social Media. The good news is Facebook does support 360 Photos and has an inbuilt 360 photo viewer through which your friends can view the complete photo by either moving fingers or by rotating their phone. Here’s a tutorial which will let you Upload 360 Photos to Facebook from your mobile [Android as well as iPhone (iOS) ] so that you can reveal the complete beauty and scenario of the Photo –

    Tutorial on How to Upload 360 Photos to Facebook –

    Pre-Requisites :

    • A 360 Degree Photo (Panorama Photo), Copy the Photo from your Camera to your Phone Storage (This step is necessary , for example, I copied my 360 Photo to Phone Storage via WiFi (Theta S 360 Camera).
    • Facebook App (Installed on your Phone). You can even upload photo without Facebook app, but it won’t let you select the Start Screen of the photo hence, using app is highly recommended.
    • Since, we are using the Facebook App, the procedure is common for both Android and iPhone (we will be using Android in our tutorial)

    Tutorial –

    • Once, you have copied the Photo to your Phone Storage. Open the Facebook App, and navigate to Profile.
    • Here, Select “Photo” option as shown in the image below –
      Select Photo Option in the Facebook App
      Select Photo Option in the Facebook App

      It will now open all the Photos in your Phone Gallery, as shown in the image below –

      All Photos in Phone Gallery (Globe Icon in photo thumbnail means 360 Photo)
      All Photos in Phone Gallery (Globe Icon in photo thumbnail means 360 Photo)

      Now, check for the presence of circular “globe” icon inside the thumbnails of the photo (the 360 degree photo you intend to upload – As Facebook automatically detects photo type – Globe icon in thumbnail indicates 360 photo)

    • Now, if you can see the globe icon in thumbnail, its very easy. Simply select the 360 photos you want to upload (Photos with Globe icon) and click on “Done”.
    • The photos will now be uploaded onto the Facebook server , and it will now ask you to swipe to select the sharing or first screen Starting View as shown in the following image –
      Swipe to Select First screen 360 Facebook
      Swipe to Select First screen Starting View 360 Facebook

      Note – First Screen or Starting View is the first thumbnail which is shown in your profile, so make sure you select the best view inside the 360 Photo, so that your friends will be interested in viewing it!!

      (Swipe using your finger inside the photo up, down , left, right to select the best view as first screen.

    • I swiped around the photo and selected the first screen as shown below –
      New First Screen of the Photo!
      New First Screen of the 360 degree Photo!

      Now, type in any caption, text for the photo and tag location and your friends inside it and Once everything is done, we are ready to post.

    • To Upload or Post it on to Facebook, simply tap on the “Post” button in top right hand side corner.
    • Phew! You have successfully uploaded, tagged people and location in a 360 Degree photo on Facebook!.
    • Here’s how it looks like – Check out the below embedded snippet from our Facebook Page and get a feel of our workplace! 🙂

    Note – Currently Facebook Embed doesn’t has a 360 support, click on the post to go to page and view the complete 360 Photo and browse our workplace. Feel free to comment below incase of any problems or difficulties while uploading 360 degree content to Facebook!