Category: featured

  • Indian Online Shopping Guide to get Maximum discounts! | How to get maximum discount on Flipkart,Amazon,Myntra etc

    Indian Online Shopping Guide to get Maximum discounts! | How to get maximum discount on Flipkart,Amazon,Myntra etc

    The Indian e-commerce market is growing at a rapid pace, by virtue of offers, lower prices and constant schemes and deals which are constantly being brought in by existing giant online merchants such as Amazon , Flipkart etc or eithery by new start-ups . Many a times, we come to know that we could have got a product which we recently purchased even more cheaper! and even more discount. So, in order to save from such an afterthought below is an exclusively Indian Online shopping guide to get maximum discounts on online shopping be it flipkart , amazon , paytm or any online merchant.

    Before we start our guide, let us cover the steps in brief which we are going to follow –

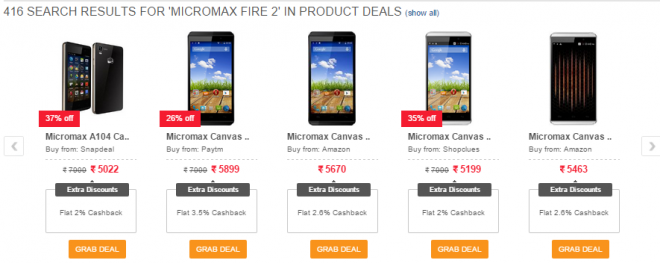
    1. Comparing Prices of the good we want to purchase on all major e-commerce sites using easy to use tools.
    2. Next selecting the best online merchant with lowest price.
    3. Getting Online Shopping coupon for the online shopping site selected .
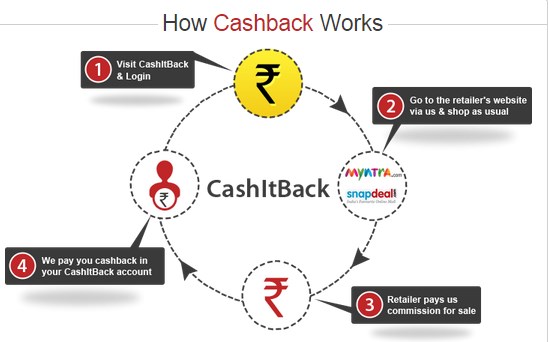
    4. Selecting and using the best Cashback provider for the online shopping site and visiting the product through it.
    5. Applying the sortlisted coupon which we got in Step.2 after being redirected to the online shopping site by Step 4.
    6. Selecting the best eWallet / Payment gateway / Credit or Debit Card to get even more Cashback or Reward Points  in our wallet.

    Now, let us cover each of the above steps –

    Step # 1 – Comparison

    Comparison of Products + Cashback on Cashkaro

    Many a time we simply browse  for a product on our favorite online merchant, without looking for the same on other merchants. The same product may be available for even lesser amount on other site , but opening different sites for a single time can be very much time consuming. So , in order to reduce the time as well as efforts we can use online comparison sites such as CashKaro (CashKaro also provides Free Rs.25 as welcome bonus!), as well as mobile users can achieve the same by using apps such as LafaLafa. Both these services not only provide Online price comparisons but they also provide CashBacks for the same merchants (which is extra discount added later for your purchases – Click here to know more about Cashbacks). Thus by providing you both services for free these help you save a lot of your time and hard earned money.

    Step # 2 – Selecting the online shopping merchant

    Now, select the online shopping website which provides you the product for lowest price . But hold on we aren’t going to shop right now, We may look for extra Coupon Codes which we can add before payment processing as coupons are exclusive of cashbacks .

    Coupons – Discounts before Payment. (Before paying for product)
    Cashbacks – Discounts after Payment. (After paying for product credited in your wallet of cashback providing website).

    Step # 3 – Getting Coupons for the selected shopping merchant

    Getting coupons for online shopping merchant we selected is quite easy. Do note that nowadays, coupon sites are indirectly linking to “deals” pages instead of providing Coupon codes/Promo codes , so do try to get text coupons as much as you can (e.g APP10 , FGTUO14 etc).
    These 5 Best Indian Coupon sites can help you in getting the proper promo or coupon codes. Do note down the coupon code , which we can apply later.

    Step # 4 – Selecting the best CashBack providing service for the product

    Cashback service providers give you cashbacks just for shopping on your desired  online shopping site after visiting through their interface. Cashback have the advantage that they can be clubbed with coupons to get additional discounts! . You can find the best Indian Cashback providing websites here , and if you are a mobile user we have Cashback providing apps available too! which you can find in the article – Best Cashback providing apps for Indian shopping.

    Step # 5 – Applying Coupon code on the online shopping merchant product page after being redirected from Cashback site from Step 4 , Use the Coupon code obtained in Step 2 (if any) and click on apply.

    Step # 6 – Selecting the Best Payment Gateway

    This Step is the most recent one and most unknown, the growing popularity of eWallet or eMoney payment gateway service providers in India has started a competition amongst them. And as a consequence, they’re providing additional cashbacks on every rupee spent through them (e.g You can get Flat 20% extra cashback in addition to Step.4 cashback if you use Oxigen Wallet to purchase articles on eBay.in) .
    Click here to view the eMoney or eWallet service providers in India.

    Thus, We can combine all the above steps to get maximum discount, the above steps can thus be summarized as (Let us consider an example of purchasing an article on eBay.in Let article price be Rs.200 ) :

    Total Discount = Step 1,2 (Lowest price in our example – eBay) + Step 3,5 (Coupon Code : e.g CODE100 to get Flat Rs.100 off before paying) + Step 4 (Cashback provider : Cashkaro 10% cashback = Rs.10) + Step 6 (Cashback by Payment gateway : Oxigen wallet = 20% = Rs.20) ,

    thus total discount now equals = 100+10+20 = 130 !

    (Though you have payed rs.100 but you also have obtained rs.10 in your cashback service site, and rs.20 in your ewallet which are nothing but your savings! which you can redeem to bank or even use for shopping! And yes, Congratulations! as you’ve earned even more discount than others , and as they say –

    Every rupee saved is Every Rupee Earned.

    So, Keep Saving Keep earning! Enjoy even more discounts on your purchases like never before! . If you have any doubts/queries regarding any of the steps feel free to comment .


  • Top 5 best deals & Coupon Sites in India for online shopping! Get best deals,coupons and exclusive discounts!

    Top 5 best deals & Coupon Sites in India for online shopping! Get best deals,coupons and exclusive discounts!

    The Indian e-commerce industry continues to grow at a rapid pace and players such as flipkart , amazon , snapdeal , PayTM etc continue to bring out exclusive deals and offers . But however, due to large number of offers and deals, we really miss some exclusive good-ones as they’re purposefully not made public so as to limit the number of purchasers. In such scenarios, coupons and deals sites come to our rescue. These best deals & coupon websites not only provide us coupons, and discounts on our products but also suggest deals of the day which saves our shopping costs and let us save huge amount! . Some of these, even provide Cashback or additional discounts on your product purchases so that you save even further!

    So, here we bring you the Top or Best 5 Free deals,offers & coupon sites in India which give massive discounts on Online Shopping, as well as provide Flipkart, Amazon , and Paytm coupons etc..

    Website # 1 – MyDala.com

    MyDala

    I give the number 1 rank in this list to MyDala.com simply because it has the most easiest of User-Interface, and it even lets you find the best local deals too depending upon your location. I got some really good deals for restaurants, and cafes in my location , in addition with great online deals for shopping sites such as eBay, Jabong, Myntra etc

    Click here to visit MyDala.com


    Website # 2 – CouponDunia.in

    Coupon Dunia

    Coupon Dunia is another neck-to-neck competitor when it comes to being the best coupons site in India and is no way less than MyDala. I will rank Coupon Dunia as no.1 , but due to better local deals on MyDala it edged ahead though when it comes to online shopping deals and coupons- Coupon Dunia marches ahead of MyDala. Coupon Dunia has one a great UI which makes finding your deals & coupons be it online or offline an easy experience. Also the categorization of online stores on frontpage itself is one thing i really liked .

    Click here to visit CouponDunia.in 


    Website # 3 – CashKaro.com

    CashKaro

    CashKaro.com is my favorite when it comes to final purchasing of a product from an online merchant, as not only it provides discount by coupons , but it also provides cashback. Cashback discount is additional discounts which you can earn after you have made your purchases. Besides, after shopping via cashkaro, the cashback earned can also be redeemed to a bank account, thus making our online shopping deal even more sweeter!. Check out this article to know more about cashback and best cashback sites in India.

    Click here to visit CashKaro.com.


    Website # 4 – DesiDime.com

    DesiDime

    DesiDime is the first website an online shopping insider will go to for checking discounts, available coupon codes, as well as to check out ongoing deals on online merchants. The UI of desidime is really fabulous and makes it very easy to get the coupons/deals which you are looking or searching for. I will really recommend you on filtering the deals/coupons list by merchants, as the number of services for which desidime provides coupons is so large that you’ll simply end up thinking more on “what should i buy ?” , instead of thinking upon “which is the best available discount for xyz product?” 😛 .

    Click here to visit DesiDime.com


    Website # 5 – Flipit.com/in [FlipIt – India]

    FlipIt – India

    FlipIt is a globally acclaimed coupons providing website, which has began its operations in India too via its URL – flipit.com/in . FlipIt being a globally acclaimed brand, doesn’t bombard user with deals, and offers like most Indian sites do, but instead they have kept the User Interface very simple and sleek. You can easily locate your favorite store and get your desired coupons and exclusive deals with minimum fuss. I loved flipit’s UI the most amongst all coupons sites seen by me until now.

    Click here to visit FlipIt India site.

    Besides, Flipit is backed by CupoNation Inc which also runs another popular Indian coupon site- OneIndia! , where you can also get coupons for online shopping for branded stuffs like Adidas which aren’t available elsewhere. Besides getting coupons for branded stuffs we also recommend OneIndia as a reliable source for getting working Paytm Coupons & promo codes. Also, for more niche websites, Udemy coupon code website is a good choice for receiving discounts on online courses

    So, these are some of the best coupons & deals website which i personally use, if you face any issues while using any of them or have any suggestions feel free to comment 🙂


  • 3 ways to use a single-1 Gmail id as many-multiple ids! Gmail dot trick (.) and + plus tricks!

    3 ways to use a single-1 Gmail id as many-multiple ids! Gmail dot trick (.) and + plus tricks!

    Heya folks, E-Mail or electronic mail is the most widely used means of communication over the Internet , also its kinda an impression of a person’s online identity. GMail is one such popular e-mail service provided by Google!. But do you know that a single or even one GMail ID can be used as multiple ID’s which we can use to perform multiple sign-ups ! , thus saving the troublesome task of creating multiple e-mail accounts for different accounts on a single site . A single Gmail ID can thus be tweaked to be camouflaged as different or multiple e-mail ID’s . Let’s have a look onto 3 of such best tricks to use a single 1 gmail ID as multiple ones or many ids.

    Assumption :  I will be explaining all the tricks in the article using our default GMail ID for the website – techapple.net @ gmail . com. I will be using this single gmail id to get mails from multiple ids without even creating them!

    Trick # 1 – Gmail dot (.) trick

    • This is one of the most widely used techniques to use a single E-Mail ID to sign-up for multiple accounts .
    • The Gmail dot trick consists of inserting any number of dots (.) or fullstop/period in your gmail ID username to show them as different IDs .
    • Thus, even if you send an email / or request an email on techapplenet @ gmail . com or t.e.c.h.a.p.p.l.e.n.e.t @ gmail . com it will arrive in the same e-mail ID! . (The original one)
    • The sign-up or other websites though treat them as different e-mail accounts, but in Gmail they are one! , so thus you can use a single gmail account id as multiple ones, I use this trick pretty much on signing up for free trial websites which provide freebies based on e-mail IDs.
    • So, Gmail dot trick in short –


    Trick # 2 – GMail plus (+) trick


    Trick # 3 – Using @googlemail.com instead of @gmail.com


    Example of using the above technique –

    We have our Gmail ID registered as [email protected] , you can check how we used each of the above combiation and still received the e-mail on our default ID.

    Sending e-mail to [email protected] instead of [email protected]
    Reception of mail sent to [email protected] on the GMail ID – [email protected]

    Thus, you can use one or even all of the above methods to create multiple email or gmail ids for yourselves on just a single account! . The permutations and combinations possible are infinite! , also If you have queries/suggestions feel free to comment 🙂

  • 3 Best Indian CashBack Websites to get free Cashback on Flipkart, Amazon.in etc – All Indian e-commerce Online Shopping portals supported

    3 Best Indian CashBack Websites to get free Cashback on Flipkart, Amazon.in etc – All Indian e-commerce Online Shopping portals supported

    We all love shopping isn’t it ? and are always looking for coupons to save even more on our already discounted online purchases. Yes, its possible to even save more on our purchases through cashbacks! . Cashbacks are the next most awesome things to hit Indian online market , Cashback is repayment of a particular percentage of money spent on online purchases in the form of cash! . Here are some advantages of using Cashback sites to avail Cashbacks  –

    • Unlike Coupons, which cannot be applied on exclusive deals , Cashbacks can be applied on anything you shop online even for exclusive deals!
    • Cashbacks can be used in combination with coupons too! thus you can save double!
    • Cashbacks can later be exchanged for Money too! thus , every penny saved is a penny earned! which you can again use for Shopping :P.

    Here are the 3 best free websites or the best Indian Cashback websites on How to get Cashbacks in India or get cashbacks for Flipkart, Amazon.in , Myntra , PayTM, etc

    Cashback Tip! – Whenever you want to purchase/buy online , Buy it after logging-in on to one of these cashback sites to get assured CashBack! and save big on your online purchases (You will later be redirected to the shopping site you selected, thus this step is only for the purpose that it gets saved for giving CashBack! )


    Website # 1 – CashKaro.com

    CashKaro.com Offers

    CashKaro is currently one of the leading CashBack providers in India, and it gives CashBack from a wide range of e-commerce portals! . The CashBack percentage too is very big and large as compared to other CashBack providers (I’ve earned almost 10% Cashback excluding the Coupon discounts). Some salient features of CashKaro are –rp_xfrxEkD.jpg

    • All Major Online shopping portals are supported – Flipkart, Amazon, Snapdeal , Jabong , Myntra etc.
    • Purchase tracking as well as the CashBack crediting to the account too is very fast and accurate!
    • CashBack can be redeemed directly to the Bank account or you can even purchase Shopping Gift Vouchers!
    • Very Secure and Easy to use!

    Click here to Sign-Up on CashKaro and start saving even more!

    Update – If you want to purchase any product/deal which is not exclusive or hot one or not listed on Cashkaro – Use the right hand side bar as shown in this image link to activate cashbacks on any products you purchase.


    Website # 2 – LafaLafa

    LafaLafa gives you extra discounts in addition to any other offers/discounts you use!

    Lafalafa is one of the newest and fastest emerging Cashback providing website in India. It’s probably the easiest to use amongst all the Cashback providing websites I’ve used, and has some salient features like –

    • Enhanced product search across all online shopping merchants, it automatically searches for your product across all online merchants, and provides you the lowest price deal automatically!
    • Bank account / Debit credit card based offers, its the only website which has offers & deals listed according to the Bank accounts. thus, you can always  get the best deal for your existing bank!.
    • Besides, this LafaLafa also provides you great cashbacks on every purchase made through it!
    • Click here to Sign-Up and start saving by using LafaLafa.


    Website # 3 – CouponDunia.Com

    CouponDunia now even provides cashback!

    The famous Coupon site coupondunia.com has now come up with its own Cashback site, which is making the deal even sweeter! . Thus, now not only you can find Coupons for your online purchases but even earn Commissions in your Coupondunia wallet. The Coupondunia wallet then inturn can be used to redeem your savings directly to your Bank account and even Paytm Wallet!

    . Infact sometimes, it even outplays and is a good alternative to CashKaro in return CashBack percentage and margin! . e.g Amazon.in , The procedure of getting CashBack too is same as that of CashKaro –

    • Registering on CashBack Site (CouponDunia.com in this case).
    • Logging on to the Cash-Back site, and browsing through the Stores (offers) .
    • In-order to get CashBack you must visit the online shopping sites (Flipkart,Myntra,Jabong) through one of these sites only . (Visit Store through the CashBack site on which you’ve logged in and want to get CashBack in).

    Click here to SignUp on CouponDunia and get additional discounts!


    So, these were the best tried and tested CashBack websites for Indian shoppers! . Enjoy extra discounts without or in addition with coupons with these awesome cashback sites! after all, Every rupee saved is like a Rupee earned! Happy Shopping!


  • Xender app-easily transfer data/music from Android to iPhone or iPad (iOS) devices | Transfer data/music from iPhone to Android devices too!

    Xender app-easily transfer data/music from Android to iPhone or iPad (iOS) devices | Transfer data/music from iPhone to Android devices too!

    There are very few or limited options when it comes to transferring data from Android devices to iPhone/iPad , most take the route of using WhatsApp/Dropbox to transfer data from Android to iPhone . Not only it consumes data but is also less speedy, and results in compression/loss of data(as in case of WhatsApp) . Xender for iOS / Android is an awesome app which will solve all your worries! It transfers data from Android to iPhone/iPad using Wi-Fi network but without consuming data!. All you require is to have both the devices connected in a group (i.e have the same Wi-Fi connection) , In-this tutorial We will see transferring data/files/music from Android to iPhone , and transferring data/music from iPhone to android too.

    Note – If you want to transfer data between to and from iPhone/iPad to iPhone/iPad, please refer this article , Also if you’re looking to transfer video/movie to your iPad/iPhone please refer this article to be able to play mkv,avi and other video formats.

    Tutorial to use Xender App for transferring data/music from Android to iPhone and iPhone to Android.

    After tapping on more select the “Connect iPhone” option
    • First of all download and install Xender app on your devices –Click here to Download Xender app from Google Play Store. (Android)

      Click here to Download Xender app from Apple iTunes Store
      . ( iOS ) works on iPad Air 2 , iPad mini too
    • Now , we need to create a group in order to transfer between iPhone and Android so as we can start the transfer, Open the Xender app on Android and select or tap on “more” option. (Its located on the bottom left hand side as shown in alongside image).
    • After tapping on more select the “Connect iPhone” option from the menu .
    • Now , On your iPhone/iPad , Navigate to Settings – > WLAN and connect to the WiFi network starting with “ADY etc….”.
    • Once your iPhone or iOS device gets connected, Open Xender app on your iPhone/iPad and click on the “Connect Phone” Option.
    • That’s it! now just select the data which you want to send , on either of the device Android or on the iPhone, and tap on “Send” . (Check the second image for details)
    • Woah! your music/data will be transferred within seconds! and this is perhaps the only way you can transfer songs/music from Music library of iPhone to Android!

    Note / Update – Many users asked us for method to import songs/music from Xender app to Music library , please read this article to import music/songs from Xender / ShareIt app to default Music player library of iPhone/iPod/iPad.


    Here’s another image which will explain the procedure in a simple way . If you have any doubts/encounter any problems feel free to comment ,and ya Xender app is Free for iOS as well as Android .

    Xender App Android to iPhone music/data transfer
  • Xender app : Transfer data/music from iPhone to iPhone by WiFi (Wirelessly)- Xender App for iOS

    Xender app : Transfer data/music from iPhone to iPhone by WiFi (Wirelessly)- Xender App for iOS

    Transferring music from iPhone to iPhone was next to impossible without using a Computer/Mac or an internet connection, but not anymore! Now you can transfer not only data but also music,photos,videos from one iPhone/iPad/iPod to another iPhone/iPad without using a computer directly through Wi-Fi by Xender app for iOS/iPhone/iPad. Xender App for iOS enables wireless data/music transfer by Wi-Fi from iPhone to iPad/iPhone and vice versa. (No Jailbreak required).

    Note – If you want to transfer data from iPhone to android or from android to iPhone, please refer this article .

    How to transfer data/music from iPhone to iPhone by Xender App over Wi-Fi

    • First of all download and install Xender app on both of your iOS devices from the following iTunes Store link for Xender app . Click here to download Xender app from iTunes store.
    • Now we have to connect both the devices over Wi-Fi there are two ways to do so –
      Way # 1 – If both the devices are connected on the same Wi-Fi.
      Way # 2 – Using one device to connect portable hotspot and connecting the second device to the hotspot.
    • Let’s check out the method Way # 1

    Way # 1 – Both devices connected to same WiFi

    Step – 1 for Way # 1 both devices on Same Wi-Fi
    • Open settings – > WLAN connect to the same network as that of your friend, now open the Xender app on both of the devices parent device (sender) as well as child device (receiver).
    • Now in Xender app, Click on “Connect Friends“.
    • Now Select/Click on any photo/image/music which you want to send and click on “send” .
    • You can even use the “Multi-Select” option to select multiple files for sending!.
    • You can even create a group of 5 devices on the Same Wi-Fi to share  same data on multiple devices! simultaneously with blazing speeds!


    Way # 2 Using one device as portable hotspo

    Way # 2 – Step 1 Creating a hotspot and letting your friend connect

    t and connecting second device to it.

    • Go to settings > Cellular and turn on “Cellular Data” (Don’t worry no data will be consumed for transfer – We’re enabling it only for making visible the “Personal Hotspot” option.
    • Now turn on Personal Hotspot in settings.
    • Let your friend connect to the hotspot you created.
    • Open Zender App on both the devices and click on “Connect Friends“.
      • Now Select/Click on any photo/image/music which you want to send and click on “send” .
      • You can even use the “Multi-Select” option to select multiple files for sending!.


    That’s it – The most simple way to transfer data between iPhone/iPad to iPhone/iPad 2/iPod touch . You can even use the replicate phone option to transfer/clone complete phone data.

    Click here to download Xender App from iTunes Store.
    If you encounter any problems/have any queries feel free to ask in comments 🙂


  • Tutorial – How to [show older]/fake “last seen on” in Whatsapp [Hide your online status]

    Tutorial – How to [show older]/fake “last seen on” in Whatsapp [Hide your online status]

    Hey Guys,  many of you guys must be familiar with the “blue ticks” update of whatsapp , though its a welcome feature for some,its not too good for others . same is the case with “last seen on” in whatsapp  , what if we can simultaneously fake last seen whatsapp/show an older last seen on coupled with an option to see blue ticks of others while at the same time hiding ours , sounds interesting isn’t it ? and its easy too! 🙂 with WhatsApp+ , read on the article for the complete easy tutorial to do the same 🙂

    Prerequisites / Requirements –

    • Messages Backup for use in newer WhatsApp and its quite easy too ( Just Go to Settings – > Chat Settings -> Backup Conversations) and that’s it .
    • WhatsApp+ Apk (You can download it by clicking here ).

    Now, as you might have understood this is a different apk of whatsapp, so let’s check out some differences between the WhatsApp normal version and WhatsApp+ version –

    •  Hide Last Seen
    •  Apply and make themes of your choice
    •  Upload PHOTOS and VIDEOS without any compression (High Quality)
    •  Maximum upload size to 30 MB
    •  Change notification bar.
    • We can tabularize the differences as below –
    WhatsApp+’s HIDING Last Seen WhatsApp’s Turning Off Last Seen
    Others Can See your Last Seen (older day and time) Others Can’t see anything in your last seen
    You Can See others last seen (LS) You Can’t see other’s last seen
    Others won’t know if you hide last seen They will know that you’ve turned off your LS
    you can go Online/Offline via Widgets No Such awesomeness available
    Has Much More Other Awesome Features Simple old UI & Features are there
    Hide Last Seen button on main screen Settings/account/privacy/turn off lastseen


    Method / Procedure to Use WhatsApp+

    • Backup your Conversations by  Settings – > Chat Settings -> Backup Conversations) and that’s it .
    • Uninstall your existing WhatsApp.
    • Download and install WhatsApp+ Application. (I have linked to an older version, if it doesn’t work you can download the latest whatsapp+ from osmdroid.net)
    • While installation, you’ll get an option to restore, don’t worry it may take time for some users depending upon the chat backup) .
    • Once the installation is finished , Open Whatsapp+ ,To hide last seen and disable blue ticks click on the menu at the right-hand-side top corner and select “Hide last seen” option and yo!  (Check the image alongside)
    • You’re now online in incognito mode in WhatsApp! you can see other’s last seen and chat without the fear of anyone as others will only see the last seen time as the time when you had disabled it in WhatsApp+ 😛 🙂
    • Do the same menu-step to show/reveal your online status if you want to :).

    I’ve myself tested it and using it , hence in the image its showing “show last seen” instead of “hide last seen”

    Recommended : You can even use Two WhatsApp accounts on a single Android – Click here for tutorial to Officially use 2 WhatsApp numbers on a Single Android.
    Click here to Know on How to Create & Use Fake WhatsApp Account.
    Click here for tutorial to Send any filetype .zip / .rar / .apk files on WhatsApp

    If you face any problems while using it, feel free to ask we will be happy to help 🙂

  • 3 Websites to directly Download Apk from Google Play Store on PC/Mobile with No requirement of Device ID

    3 Websites to directly Download Apk from Google Play Store on PC/Mobile with No requirement of Device ID

    Android is the most widely used Operating System today on Mobile devices, and the default and safest source to get Android apps which are packaged as .apk files is the Google Play Store. But many a times the Google Play runs very very slow , or as it is in case of many devices – its simply absent, so this leaves very less options from where we can download apps which are not modified by 3rd party and are safe and secure. In such cases, we still can download apps from Google Play, by using these sites thus,safeguarding us from malicious/modified apps.You can also use these websites to get back-up of your apps/Download it on PC and preserving them so that you can install the apps from their apk later. Let’s check out the 3 best Websites to directly Download Apk from Google Play store.

    Pre-requisites :

    • Google Play Store URL OR Package Name of the App . For e.g “https://play.google.com/store/apps/details?id=com.whatsapp” is the Google Play URL and the Package name will be “com.whatsapp” 
    • As shown in below figure – The image shows Google Play store URL, and the Blue colored rectangle shows the package name in our case for e.g its “com.whatsapp”
    • Unlike other services which ask for “Device ID” to download Apk’s these sitew require no Device ID‘s at all! and method to download too is very simple 🙂

    Website #1. Evozi Apk Downloader

    Request Update/Force Refetch of Apk file from Evozi Apk Downloader

    Evozi Apk downloader is the first website which i came across which provided the service of directly Downloading Apk files from Google Play Store, And the method to use Evozi Apk Downloader website is very Simple too..

    • Visit the Evozi Apk Downloader Website by clicking here.
    • In the Box labelled “Package name or Google Play URL” Enter either the Google Play URL or Package name of the app which you want to download.
    • No Click on the Blue-colored “Generate Download Link” button, The App will be fetched and A Green button to Download the App/apk will appear below the Blue “Generate Download Link” button.
    • Check the Figure below for Download button example of Evozi Apk Downloader. You can also refer the Figure alongside for advanced option of Evozi to Update Apps and Force Refetch of Apk File indicated by the Red Arrow,and Green rectangle respectively . Besides this you can also request it to fetch Japanese Apps by ticking the option highlighted in Blue box from the image 🙂
      Download button example of Evozi Apk Downloader


    Website #2. ApkLeecher.com

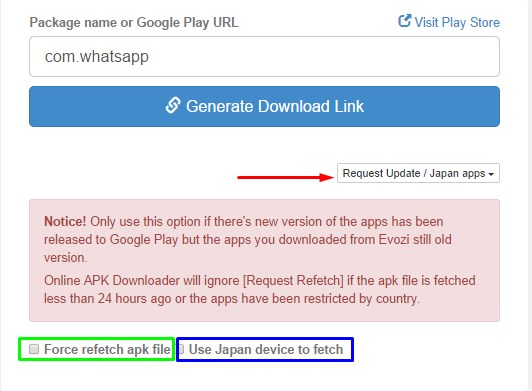
    ApkLeecher.com may be defined as a worthy alternative to Evozi Aok Downloader, it also works in the Same way as that of Evozi, you either have to enter the Package Name, Google Play URL or the App name of the App you want to Download and click on Blue-button “Generate Download Link”

    • After the App gets processed on the Server , you will see a download link for downloading the requested Apk file , as shown in the figure alongside (The Green Arrow indicates the link to Download the Apk)
    • After you click on this link (indicated by green arrow) , Please wait for 5-10 Seconds for the Download of Apk to Start 🙂 .

    Click here to go to ApkLeecher.com

    Website #3.  Downloader-Apk.com

    Downloader-Apk.com is yet another alternative to Evozi Apk Downloader/Apk Leecher and like the previous two the interface too is quite Similar, We simply have to enter the App Package Name or Google Play URL ,and click on the Blue “Generate Download Link” button.

    • After the Apk is available to Download Click on the Green Download Apk button (as indicated by Green Arrow in the Figure alongside).
    • Within 5-10 Seconds , your Requested App’s Apk file download will be Started :). Simple and Easy!

    Click here to go to Downloader-Apk.com

    Bonus Website # apk-dl.com (Suggested by HB)

    apk-dl.com is just another site which enables to download apk from google play store by either its google play store URL, or by simply entering the package name and clicking on Go! button! This website is suggested by our reader HB so a special thanks to him.

    Click here to visit apk-dl.com

    So, these are the 3 Best sites which you can use to directly Download Apk files from Google Play Store thus providing you always the unmodified,Safe and Secured app which you can surely install on your device without any fear of any virus/backdoor trojans,protecting your privacy,activity and your phone 🙂 . If you know of any other such site feel free to comment or if you have any doubts and queries ask us!

  • Yosapp – WhatsApp Web client to use WhatsApp directly on browser – Whatsapp Website UI to access through Web Browser (Chrome/Firefox/Safari/Opera Mini/UC Browser)

    Yosapp – WhatsApp Web client to use WhatsApp directly on browser – Whatsapp Website UI to access through Web Browser (Chrome/Firefox/Safari/Opera Mini/UC Browser)

    My obsession with WhatsApp simply never seems to end, After writing about WhatsApple – WhatsApp client for PC , and 5 WhatsApp protocol supported apps for Firefox OS Phones , i looked around for even more Simpler and unique solutions and came across – Yosapp! and I simply loved this concept ! Its unique and pretty much what i am looking for! –  WhatsApp Web UI! (Use Whatsapp through Website)  .  Yosapp enables a user to use WhatsApp Protocol directly through the Browser 🙂 , it means that, to access WhatsApp through Yosapp there’s no need to download any WhatsApp App/Client whatsoever! All you need to do is Register your account and mobile number on Yosapp site and you’re ready to use it! (You can use WhatsApp on Opera Mini and UC Browser(Ucweb) too! 😛 )

    UPDATE – Yosapp is now DEAD 🙁 , but WhatsApp has now launched its official WhatsApp Web Client – Read about it here.

    Features of Yosapp!

    • WhatsApp Web UI (No need to Download Any WhatsApp Client!).
    • You can Access your WhatsApp account and use it for chatting from literally anywhere, e.g Net cafes,Web-browsers,Mobile browsers etc.
    • You can use it to access Whatsapp for Accessing on Public Computers such as school and college labs 😛
    • Easy Contacts Management – once you add your contacts in the Yosapp site, you can chat with them directly! So, in case you change your mobile Phone or lose your contacts, you have an all-time backup of the contacts.
    • Works on all browsers and accessible from anywhere , its pretty much like GMail, you sign in to your WhatsApp account, check and reply to the chats sent when you were offline, as well as Chat with the friends who are online too :).
    • Attachments sent by users to you can also be viewed and forwarded .
    • OS Independent : As its web-based you can practically use it on any Web-browser IE/Chrome/Firefox/Safari/Opera Mini/UCBrowser and any OS you want Windows/Linux/Android/Mac/Firefox OS/tizen etc and the list goes on and on…
    • Supports Desktop Notifications too 🙂 , if supported by the Browser e.g Chrome.

      UPDATE – Yosapp is now DEAD 🙁 , but WhatsApp has now launched its official WhatsApp Web Client – Read about it here.

    Configuring and using Yosapp too is very easy , simply perform the following steps to Configure and use Yosapp!

    1. Visit the Yosapp site by Clicking here.
    2. Click on the Sign-Up account icon in the Right hand side top corner as shown in below image –
    3. Now you will be shown a Sign-Up Form as shown below – , Please fill in the 10-digit mobile Number and other details and Click on the “Sign-Up” button.
    4. Now , login to your registered account by clicking the “Y” icon , shown at the centre of screen, on left hand-side of Sign-Up form , and click on “Login” button.
    5. As you have registered for first time on Yosapp , it will ask for one-time verification of your Mobile Number either through SMS or by Call, as shown below , here select the Verification method and click on forward arrow button or  “>” (see figure)
    6. Now in the next Step, Enter the Six – digit verification number received on your Mobile, and click Next
    7. Voila! You are ready to use WhatsApp! on your browser, Simply Add a contact through “Add Contact” icon or through “Settings” icon as shown in below figure and start chatting ! 🙂 [ Check the below figure for all Controls and Options 🙂 ]
    8. Note : While adding New Contact, you will see a “CC” option CC stands for Country Code, in that field Enter the Country Code of the Contact

    That’s it 🙂 , you can now log-off and Sign-in again to your Whatsapp/Yosapp account from anywhere PC/Mobile to use WhatsApp! and it won’t ask for Verification too! 🙂

    UPDATE – Yosapp is now DEAD 🙁 , but WhatsApp has now launched its official WhatsApp Web Client – Read about it here.

    Thus, you can now access, your WhatsApp account from anywhere through your Yosapp account, Click here to go to Yosapp! If you have any doubts/queries/suggestions feel free to comment 🙂