Category: featured

  • How to Get Unlimited Free Jio Tunes (Songs as Jio Caller Tunes) on Jio Number!

    How to Get Unlimited Free Jio Tunes (Songs as Jio Caller Tunes) on Jio Number!

    Reliance Jio never ceases to surprise its customers. After giving away free calls for lifetime, ample of Internet data, it has now come up with Unlimited caller tunes for all its customers. Jio tunes plays a song to your caller every time they call, and its completely free of cost. Here’s a simple tutorial which will guide you on how to select any song as your Jio Hello tune for free. You can repeat it unlimited times to get free jio tunes.

    Method to Set up Free Jio Tunes on your Jio Number – 

    • Inorder, to easily browse through the songs and set them as Jio tune by one click . We will use the Jio Music app. Tap and download the Jio Music app from the links below –
      Click here to Download & install Jio Music app for Android from Google Play Store
      iPhone users use the link below – 
      Click here to Download & install Jio Music app for iOS 10, 11 (iPhones) from Apple App Store
    • Now, once you have downloaded the app launch it. Make sure you are connected to Jio Internet, while opening the app to auto sign-in. On the launch screen select the language of your choice and tap on done as shown in the screenshot below –

      Select the language of your song and tap on Done
      Select the language of your song and tap on Done
    • Now, search for your favourite song or movie name, which you want to keep as caller tune as shown in the following image –
      Search for song or movie name to browse to the song to be kept as Jio caller tune (Jio tune)
      Search for song or movie name to browse to the song to be kept as Jio caller tune (Jio tune)

      Now,  tap on the song name to make it play.

    • On the play Screen , tap on the “Set as Jio Tune” option above the play button . Now again confirm your song as Jio caller tune by tapping the “Jio Tune” option as shown in the image below –
      Tap on the Set as Jio Tune Option to set your free Jio Tune
      Tap on the Set as Jio Tune Option to set your free Jio Tune


    • Congratulations! you have now successfully set your Free Jio Tune on your number . You will get a confirmation message on your mobile number. Enjoy your free Jio hello tune!
      Free Jio Tune Confirmation
      Free Jio Tune Confirmation

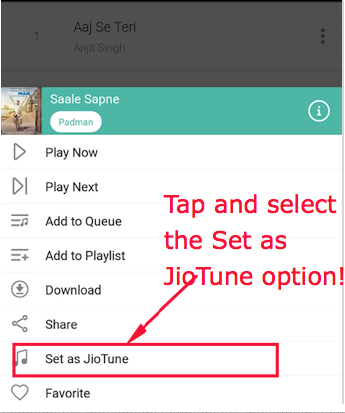
      Update (Alternative Method)  – You can even set your Jio Tune without playing any song by tapping on the “3 dots” besides song name, and selecting “Set as Jio Tune” option as shown below –

      Alternative method to set free Jio tune
      Alternative method to set free Jio tune
      Tap on Set as Jio tune Option
      Tap on Set as Jio tune Option

      Thus! you have now activated free unlimited Jio tunes on your number. Incase, if you face any problems or have any queries feel free to let us know in the comment section below.
     

  • Get Pendrives @ 100 Rs , Free Mobile Cases & Laptop Skins from CashKaro!

    Get Pendrives @ 100 Rs , Free Mobile Cases & Laptop Skins from CashKaro!

    Couple of years back we wrote about cashback websites in India, and how they can really help save more money while shopping online. Today we want to talk about CashKaro is India’s No.1 Cashback, Coupons & Price Comparison website with a comprehensive listing of Latest Deals, Offers, Coupons, Promo Code and Cashback at 1500+ online retailers. They are your one-stop savings destination for all online purchases. Save huge with a wide range of Discount Coupons and Cashback offers on top retailers. You can find working Amazon India Coupons, Flipkart Offers, MakeMyTrip Coupons, Paytm Promo Codes, Dominos Codes, Myntra Sale Offers and more.

    image001Cashback websites like CashKaro work on the affiliate business model. They get paid from the ecommerce retailers for bringing sales to their platform and cashback websites divide their profits with their users.

    Cashback that your earn from CashKaro is real money and can be transferred to your bank account or you can buy an amazon or a flipkart gift voucher.

    CashKaro is the leader of the cashback industry. They have paid more than ₹40cr as Cashback and are funded by India’s most famous industrialist Ratan Tata, who’s also the owner of Jaguar Cars.  They have a dedicated team of 80+ people, their headquarters being in Gurugram, India. image002

    CashKaro.com has recently tied with a Singapore based startup Pritnvenue.com. Printvenue was founded in 2010 and ever since it’s inception, it has introduced a robust collection of customizable electronic items like: Pendrives, Laptopskins, Mobile Covers etc. The reason why we’re excited to share this website with you is because there’s a great offer, specially for Indian users, where they can practically shop from Printvenue for free! Yes, you read it right!

    Any user shops on Printvenue’s website via CashKaro is entitled to get Rs. 400 cashback on Rs. 400 purchase. Not just that, new users who are signing up on CashKaro for the first time will get Rs. 100 as a sign up bonus, just because!

    So you can get

    8 GB Customizable Pen drives for Rs. 599 – Rs. 99 after cashback

    Customizable Mobile cases for  Rs. 499   – Free after cashback

    Customized Laptop skins for  Rs. 499   – Free after cashback

    as well as offering online commercial printing services such as business cards, keychains, pens, custom t-shirts etc.

    unnamed

    The process is fairly simple.

    Firstly, go to CashKaro’s website. Signup if you’re not already an existing user.

    Type the name of the retailer, in this case, Printvenue.

    Click on activate cashback and visit retailer button and voila! your click will get tracked and you will be redirected to the Printvenue’s website.

    Over there you can choose any product you wish to buy and make sure that amount should exceed Rs. 400 excluding delivery. (Free delivery coupon code – “SHIP”).


    When you’re done with your purchase, go back to CashKaro’s website and click on “My Account” tab. It takes maximum of 72 hours for your cashback to track but mostly happens much sooner.

    Over there you will see a link that says “My Earnings”.

    Click on that and it will show you your cashback, in this case Rs. 400 + the Rs. 100  sign up bonus)

    The Cashback is real money and can be transferred to your bank account after it gets approved. It takes 30 days, after the refund policy is over.

    If, however you can’t see your cashback being reflected in your CashKaro account, you simply call their customer service on this number +91 8527264999.

    They would be happy to help you.


    Not just Printvenue, CashKaro has tons of offers where they give 100% cashback to their users. Also, on major brands like Myntra, Jabong, Ajio, Amazon, Flipkart etc.

    So always remember folks, when you shop via CashKaro, YOU GET MORE!

  • How to use Jio 4G Voice App to make VoLTE Calls on iPhone 5s & 5C / iPhone 5 & 4

    How to use Jio 4G Voice App to make VoLTE Calls on iPhone 5s & 5C / iPhone 5 & 4

    Reliance Jio has one of the best mobile data plans in the Indian Telecom market, but it has one drawback – Reliance Jio is a 4G only network and hence requires VoLTE enabled phones to make calls. Now, since all iPhones are single sim devices and considering iPhone 5S, iPhone 5C, iPhone 5 & 4S do not support VoLTE, Jio cannot be used as the primary network for receiving calls. But not anymore, In this article, we will cover how you can use your Jio 4G Sim to make & receive calls on any iPhone, even iPhone 5S using the Jio 4G Voice app.

    How to Dial & Receive Jio 4G Calls on iPhone 5S, 5C (iPhone 5 & 4S) using Jio 4G Voice App –

    Pre-requisites –

    • Jio Sim.
    • JioFi Wireless Router for (only if you’re an iPhone 4S user this is required) else you can directly insert your Jio sim in your iPhone.
    • In case, if you’re using your iPhone 6, 6S, 7, 7S with any other sim and you wish to make calls using Jiofi then also this process will work. Just start from the Step No.2 in below tutorial.
    • Jio4G Voice App – We will be using the Jio4Gvoice app to make & receive calls, the app functions like your normal phone dialer –
      Click here to Download Jio 4G Voice app for iOS (iPhone) from iTunes App Store


    Step – 1  Configuring your Device on the Jio Network (Only for iPhone 5S / 5 / 5C users)

    In this step, we will enable LTE Network for the Jio network, from our phone settings. No need of doing this step, if you’re trying to make or receive calls via JioFi.

    • First, of all insert your Jio sim into your iPhone.
    • Now navigate to Settings – > Mobile Data. Now select the option “Mobile Data Options” as shown in the image below –
      Mobile Data Options Jio iPhone
      Mobile Data Options Jio iPhone

      After you select the “Mobile Data Options”, in the next screen – Tap on “Voice” and select the “LTE” option as shown below –

      Select the LTE Option
      Select the LTE Option

      That’s it! , Now simply restart your iPhone. You will be on the Jio Network.


    Step – 2   Connecting to the Jio Data Network (JioFi + iPhone common step)

    • Now, simply turn on the Mobile Data of your Jio Sim, or if you’re using Jio Hotspot (Jiofi) device connect to Jiofi wifi network.
    • Once, you’re on Jio Internet (via Sim or Jiofi), simply launch the Jio 4G Voice app which we have downloaded from the app store.
    • Click here to Download Jio 4G Voice app for iOS (iPhone) from iTunes App Store
    • It will now, start registering your Jio sim, as shown in the following image –
      Jio4GVoice Registration on iPhone
      Jio4GVoice Registration on iPhone

      It will take some time to register with the Jio Sim, once it is registered automatically it will now take you to the dialer screen as shown in the below image –

      Jio 4G Voice Dialer iPhone
      Jio 4G Voice Dialer iPhone

      Now, on the dialer screen simply dial the number which you want to dial or leave the app as it is (for receiving calls). When you dial a number or select one from contacts, simply click on the “green call button” and your call will be connected as shown –

      Jio Voice Call VoLTE on iPhone 5S using Jio 4G Voice APP
      Jio Voice Call VoLTE on iPhone 5S using Jio 4G Voice APP

      Thus, you can now enjoy any Jio voice calls or even SMS services from Jio on any iPhone via the Jio 4G Voice app.

    Note – Please, make sure you do not close the Jio 4G Voice app else you won’t be able to receive calls on the iPhone 5S and if you are using JioFi M2 device.

  • How to use Kronymous to access Tor Network on Chrome Browser & Google Chrome OS (Chromebooks)

    There is no official Tor bundle released for Google Chrome Operating System or Chromebook, neither does the Tor bundle for Windows, or Mac OS X officially supports Google Chrome Web Browser. Many times we might need to access Tor network either to remain anonymous, or to bypass censorship & access .onion sites. Here’s a simple tutorial on How to use Kronymous to access Tor Network & .onion websites on Google Chrome OS or Google Chrome Web Browser –

    Kronymous Tor Client for Google Chrome OS / Browser
    Kronymous Tor Client for Google Chrome OS / Browser

    Pre-Requisites – 

    Tutorial on How to access Tor on Google Chrome OS / Browser using Kronymous – 

    Step # 1 – Adding a Proxy Profile to Google Chrome for Kronymous

    • After you have installed Kronymous and Proxy Switchy Omega, we must create a proxy profile for Chrome to tunnel through Kronymous. We will be creating a proxy profile using Proxy Switchy Omega for the same –
    • Now , lets create a proxy profile using the following steps –
      1. Click on the “O” icon of “Proxy Switchy Omega” and select “Options” from the drop-down menu as shown in the image below –
        Select Options from the drop down menu
        Select Options from the drop down menu

        Now, in the Proxy options which appears make sure the URL in the address bar is –
        chrome-extension://padekgcemlokbadohgkifijomclgjgif/options.html#/profile/proxy

      2. In the above Proxy Settings profile page, please make the following changes as required –
        1. Change Protocol from “HTTP” to “SOCKS 5”.
        2. Change the server to “127.0.0.1”
        3. Change the Port to “9999″.
        4. Thus, your Proxy settings for Proxy profile must look as shown in below image –
          Proxy Switchy Omega Kronymous Tor Settings for Chrome
          Proxy Switchy Omega Kronymous Settings – Click on Apply Changes


        5. Now Click on “Apply Changes” button as shown in the above image.
      3. Now, the Proxy Part is done. Now lets look onto the Step.2 that is connecting to Kronymous.

    Step # 2 –  Connect to Kronymous

    • Launch the Kronymous app from the Google Chrome App Page or new tab page.
    • It will now show a new window saying “Tor Proxy is not running”etc as shown in the image below – . Click on the “Start Tor Proxy” button to start the Tor Proxy connection as shown below –
      Kronymous - Start Tor Proxy Chrome
      Kronymous – Start Tor Proxy Chrome

      It will now, start connection to the Secure Tor Network.

    • Now, Please wait until the image shows “Bootstrapped 100% : done” as shown in the image below –
      Kronymous Successful Tor Connection
      Kronymous Successful Tor Connection

      The 100% mark indicated that the connection is successfully done.

    Step # 3 – Enabling the Tor Proxy

    • Now, Once you have connected to Tor Network, simply open a new window , Select the “O” Omega  icon as shown in the image below , and select the “proxy” profile which we saved in the Step . 1 –
      Select Proxy profile from Omega icon
      Select Proxy profile from Omega icon

      That’s it , now once you have selected the proxy profile simply enter the website address of any .onion site or you can check the status of your Tor connection by visiting the following URL –
      https://check.torproject.org

    • Voila! you will see the message that you have successfully connected to Tor Network as shown in the image below –
      Successful Tor on Google Chrome OS & Browser
      Successful Tor on Google Chrome OS & Browser

      Thus, you can now securely access .onion websites or bypass censorship while remaining anonymous using Tor on Google Chrome

  • How to Access & open YouTube website in Material Design view!

    How to Access & open YouTube website in Material Design view!

    Google has confirmed that its testing the material design on YouTube. This re-designing of YouTube layout took almost 2 years to come and is currently in Beta. However, You can access this Beta version on your PC or Windows Computer and even Mac OS as well by a few tweaks. Here’s a small guide which will enable you to Access & Open YouTube website in Material Design View .

    Pre-Requisites –

    • Preferably Google Chrome Browser , although We tried and it worked on Chrome & Mozilla Firefox as well.
    • A Simple Extension for editing the Cookies , We recommend Edit this Cookie extension.

    Method to Access YouTube Material Design Website –

    • First of all Download & Install the “Edit This Cookie” extension from Google Chrome Store / Opera Store / Mozilla Add-ons repository from the links below –
      Click here to Download Edit This Cookie extension for Google Chrome
      Click here to Download Edit This Cookie Add-on for Opera.
    • Once you have installed the extension , it will add a cookie icon in the address bar of your browser.
    • Now, either sign-out of all your Google Accounts on your browser, or simply Open a New Incognito Tab.
    • In the incognito window or once signed-out of your account, Navigate to the below YouTube USA URL by clicking the link below.. (The Material design view tweak currently only works on the US URL Below) –
      https://www.youtube.com/?gl=US – Click here to Open the YouTube USA URL
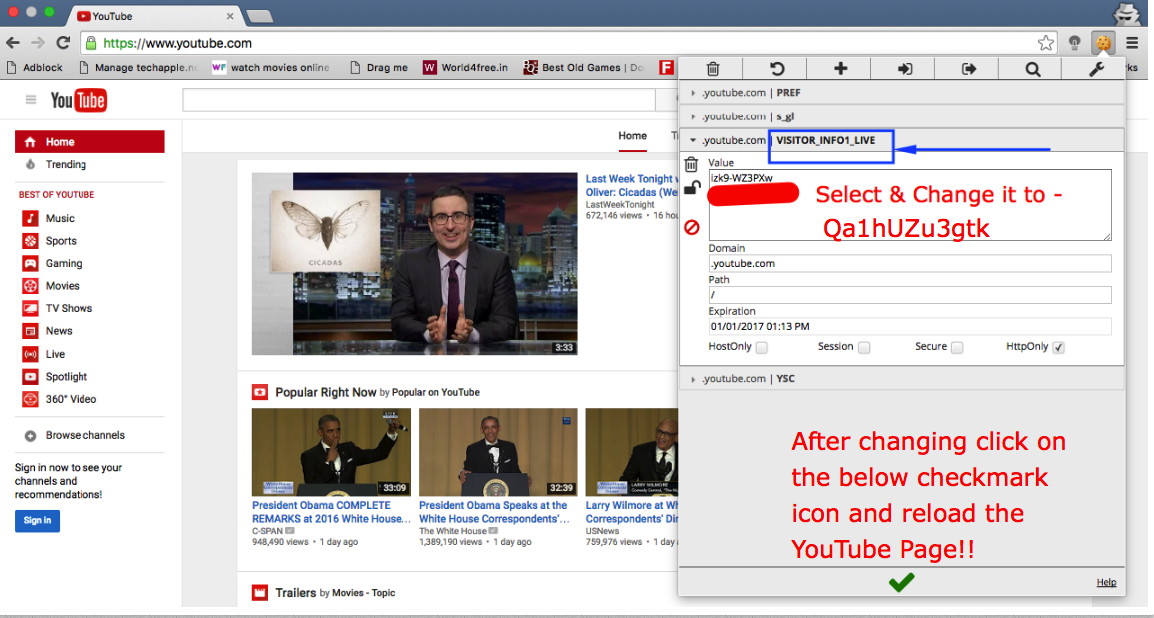
    • Here comes the Main Part.. Once you have opened the YouTube USA Link in incognito window – Click on the “Cookie” button in the right-hand top corner and look for the option labelled “VISITOR_INFO1_LIVE” as shown in the image below –
      YouTube Material design Cookie
      YouTube Material design Cookie

      Here expand the “VISITOR_INFO1_LIVE” option and delete the existing text inside the “Value” box, Replace the text with “Qa1hUZu3gtk” without quotes. It should look like shown in the following image –

    • YouTube VISITOR_INFO1_LIVE
      YouTube VISITOR_INFO1_LIVE

      That’s it ! Now simply “Click on the Checkmark button” at the bottom and reload the YouTube USA Page!

    • Voila! .. You’ll see the New Material Design of YouTube loaded right in your browser.. as shown in the below image –
      YouTube Material Design
      YouTube Material Design

      You can even use options search as search and view the redesigned Channel Pages .. They look absolutely stunning – For example below is the screenshot of IPL 2016 YouTube channel –

      IPL 2016 Material Design Youtube
      IPL 2016 Material Design Youtube


    I Personally, liked the new YouTube design 🙂 , Did you like it ? What are your views ? Do let us know if you face any problems while accessing the new layout.

  • How to create a Fake WhatsApp account with Spoof Number on Android / iOS [Using USA Number in any Country!]

    How to create a Fake WhatsApp account with Spoof Number on Android / iOS [Using USA Number in any Country!]

    Many times, we need to use WhatsApp for sending or receiving messages/media without showing or using our real mobile number or even trick our friends and message without revealing our Identity. Now, by using the following tutorial you will be able to create a fake WhatsApp account with a spoofed U.S.A number in any country, that too will all the normal functioning of WhatsApp . The tutorial will work for Android, and iOS devices (iPhone) too!

    Tutorial to create a Fake WhatsApp account with other Spoof Number –

    • First of all , Install and verify WhatsApp on your phone . (Skip this step if you have WhatsApp already installed & verified on your phone).
    • Now, Install Vovox app for Android or iOS from the following links and complete the verification on Vovox app –
      Click here to download Vovox app for Android from Google Play Store.
      Click here to download Vovox app for iDevice (iPhone) from Apple App – iTunes Store.
    • After verifying your Vovox navigate to more tab in the app as shown below –
      Vovox More Option

      Now,  Note down your Vovox Number which is highlighted by Blue color.

    • Now, Open WhatsApp app and navigate to the settings option as shown on the next image –
      WhatsApp Settings


    • Once you are into the settings panel , Open the Change number option as highlighted by blue color –

      WhatsApp Change Number
    • Now, when you are into the Change Number Option inside WhatsApp app, Enter your existing Verified Mobile number in text field of “Old country code and mobile number” and in the second text field , Enter country code as “+1” which is U.S.A country code and type in your new phone number (Vovox Number) obtained in Step.3 (Which we noted down from More option in the Vovox app) .
    • WhatsApp Change number option

      Now, Click on “Done” option present in Whatsapp app’s top right hand side corner , You’ll soon receive a message on your Vovox app with verification code, while at the same time WhatsApp app will be waiting for Verification.

    • Now, Open the message you received in Vovox app, and then Click/visit the Verification link received in the message as shown below –
      WhatsApp Verification Link in Vovox App


    • That’s it ! Your Whatsapp verification would be completed successfully! & you can now use WhatsApp with a fake/spoof U.S.A number and Enjoy WhatsApp Anonymously!
    • Recommended : You can even use Two WhatsApp accounts on a single Android –
      Click here for tutorial to Officially use 2 WhatsApp numbers on a Single Android. 
      Click here to Know on How to Create & Use Fake WhatsApp Account.
      Click here for tutorial to Send any filetype .zip / .rar / .apk files on WhatsApp
  • 3 Ways to compress images / Photos without losing quality! | Compress png, jpeg images online without affecting quality

    3 Ways to compress images / Photos without losing quality! | Compress png, jpeg images online without affecting quality

    Recently I needed to send some images through gmail (or e-mail them) but i wasn’t able to upload or add them as attachments as they were really bigger in size and hence the uploading failed , also the large number of photos taken over from my iPhone and other digital cameras is simply increasing their data size and thus reducing the available storage. There’s a simple solution for the above problems – Compressing the images, which can help us dave the image inner details as well as reduce their size, So here’s the solution to how to compress images / photos without losing quality !

    3 Best free ways to compress images / photos without losing quality ! –

    Way # 1 – Using Caesium Image compressor

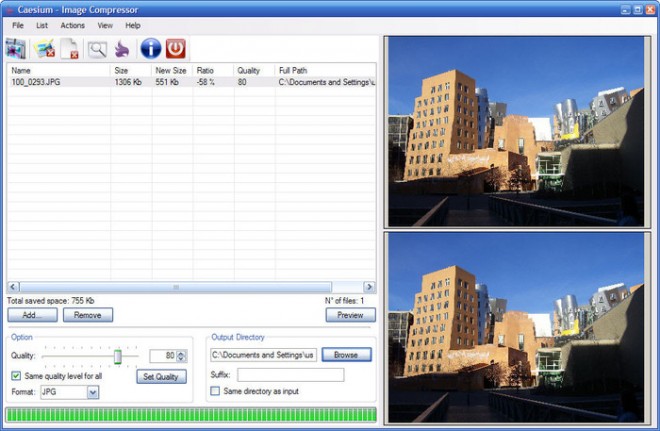
    Caesium free image compressor

    Caesium is a handy app to compress images / photos upto 90% of the original size without affecting the quality. To compress images using caesium add your photos to the list on the program’s interface (or simply drag and drop them) and select the quality you want to keep for them. Once your list is ready, click the Compress button and let Caesium compress it. Once all the photos have been compressed, you can check the results and compare sizes thanks to Caesium’s data and the Preview function.

    Click here to download Caesium app for Windows


    Way # 2 – Using Compressor.io to compress images online on your mobile / Mac

    Compressor.io online image / photo compressor

    For all offline purposes we recommend using Caesium, but when it comes to compressing images on mobile we need to use online tools – Compressor.io is one such online photo compression tool which will help to compress images online. All you need to do is upload images using the “Select File option, and then selecting the compression format. Compressor.io also supports lossy / lossless compression which highly helps in saving minute details of the image being compressed online. Compressor.io supports jpeg,png, svg and gif images compression!

    Click here to visit Compressor.io


    Way # 3 – Using other online images compression websites – TinyJpg.com & TinyPng.com

    Tinypng.com

    Although there are many online image compression utilities available, I highly recommend using tinyjpg.com and tinypng.com , as they support advanced lossy compression which also helps in preserving transparency. TinyPng and Tinyjpg have the best algorithms of image compression and the difference between the original image and the compressed one is not noticeable one ! thus, providing the most accurate defined image that too at reduced size!

    Click here to visit TinyJpg.com compression utility.
    Click here to visit TinyPng.com compression utility.

    So, these are my personal favorite and tested tools used for compressing the images/photos , If you encounter any issues while using the above or know of any other such good utility feel free to comment.

  • How to Configure any gamepad by old Xpadder version on Windows 10 / 7 / 8.1

    How to Configure any gamepad by old Xpadder version on Windows 10 / 7 / 8.1

    Some games are very difficult to play on the normal keyboard + mouse combo and we feel that it would have been better if the game supported gamepads, joysticks. Or by someway we could have been able to simulate keyboard key -press or mouse control simply on our gamepads, which would make playing games much easier! especially the online & DOS based games. Yes its possible to do such actions by a small free utility  – Xpadder v 5.3 , Xpadder lets you simulate keyboard key presss, and mouse actions by mapping the keyboard keypress, and mouse actions to Joystick and Gamepad buttons!. Let’s have a brief look into the following tutorial to configure xpadder for Windows 7/8/8.1/10 –

    Tutorial to configure Xpadder on Windows 10 /  7 / 8.1 (32-bit as well as 64-bit)

    Step 1 – Downloading Xpadder

    • Xpadder used to be free until version 5.3, but now if you try to download it from its official site – xpadder.com, it won’t be for free!. In our tutorial we will be using an older version of Xpadder, which is free to use for playing games with weak or no gamepad support.
    • Click here to download Xpadder free for Windows 7/8/8.1/10 .
    • The above package also contains, sample 3 images which are required for configuring joysticks, and an example mapping profile just incase you’re too lazy to map  keys 🙂

    Step 2 – Installing Xpadder

    • Now, simply install the above linked Xpadder, by clicking next .
    • Make sure your gamepad/joystick is connected to your computer before you open Xpadder.

    Newbie alert –

    Loading bundled in configuration of Xpadder

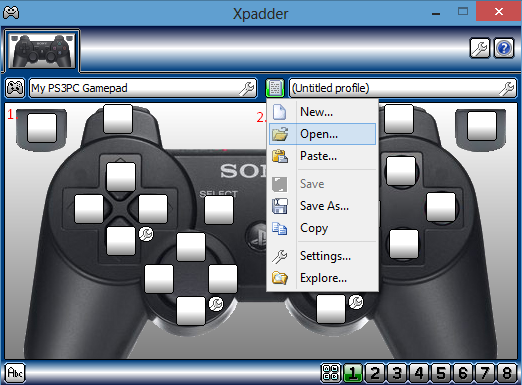
    If you’re new to Xpadder and mapping , or if you were unable to map your controller, you may try opening the bundled-in controller and mapping file which comes with our installer, you can load it by –

    • First click on the “gamepad” icon labelled “1” in the alongside image of Xpadder window, and select the “Open” option , here in select the folder in which you’ve installed our Xpadder and select the controller file present in it.
    • To load key-mapper again click the second icon labelled “2” as shown in the alongside image and use the “open” option for our pre-defined mapping.
    • Or if you think you’re an Hard-core Gamer, and like challenges, or faced any issues while loading the bundled configuration files , or would like to customise with additional options please proceed to Step 3, for manual configuration!


    Step 3 – Configuring Xpadder

    Xpadder compatibility troublesoot
    • Now, when you first try to run Xpadder on your windows, it will give you an Unsupported Windows Version detected error on Windows 8.1 /10 , and here’s the solution for the problem –
    • Simply, right-mouse click on the Xpadder icon, and select the “properties” option. (Click this to view the screenshot).
    • Now, go to compatibilty tab, as shown in the alongside xpadder compatibilty troubleshoot image, and in the section named “Compatibility mode” , select the version as “Windows 7″ and click on apply, and OK. You can also additionally checkmark the “run program as an administrator” option if you encounter any issues later.
    • That’s it, Xpadder is now ready to function, in your latest version of Windows.

    Step – 4 Xpadder overview and adding Joystick image

    • Below is the screenshot of Xpadder , on running now, click on the settings icon which looks like a wrench , to load the xpadder joystick image file as shown below –
      Xpadder wrench icon (joystick image)

      Now , we need to select the appropriate joystick format *.bmp image file for loading onto Xpadder, we have bundled the ones for PS2, and Xbox 360 in the installer itself, however you can have a google search for *.bmp files of the gamepad controller image you have.

    • Now , clicking, on the wrench would open the image selection window – here we need to specify the image file of controller as shown by the labels 1..2.. & 3.. in the following image –
    • Xpadder – selecting controller image file

      Now, after loading the controller image file, you will be shown the controller image in the Xpadder window.

    • Here , select the option “Sticks”  present in the bottom left corner of xpadder window, and now to configure the analog sticks –  click on the first “Enable” option marked by green color in the below image labelled analog configuration , and push the corresponding analogs(whose name is indicated on the pop-up) to the directions shown in the pop-up “left,up,down,right” , do the same for the other analog too (if present) on the controller.

      analog configuration

    Step 5 – Moving the highlight bubbles

    • After you, push the analog on your gamepad, a transparent bubble shapes would appear on the window, drag and drop them to their corresponding controller locations , as shown in this image. (Click here to view bubble drag image)

    Step 6 – Configuring the D-Pad and other Joystick buttons

    • Once, you are done with the analog sticks, configuration – Navigate to the “DPad” option in Xpadder, and “Enable” it, now again press the corresponding Keys (whose name is indicated on the pop-up) on the connected controller/gamepad.

    Step 7 – Adding the Buttons, and placing them

    • Now , click on the “Buttons” option  in the xpadder, and start pressing the buttons of your gamepad – they’ll start appearing in the gamepad image as you press them, Now place them according to the location of the button which you had pressed on the gamepad.
    • Now, in the below mentioned example (image)  – We pressed the “X” button on our controller and it appeared on the place marked by “1” now, we will move its appeared place shown by the maroon arrow, to its original place on the controller shown by blue arrow.
      We pressed “X” we will move the box “1” to “X” position(blue arrow)

      Now, please repeat these steps for all the buttons present on your gamepad and press “OK”.

    • A completely configured controller would look like this –

      Completely configured gamepad controller

    Step 8 – Mapping the Keyboard keys, and mouse actions to Added Analog and buttons.

    • Whoosh! we are done only with half the part yet, after you click on “OK” , you’ll be redirected to the following screen as shown below , here we need to individually click on these “white buttons” and assign the keyboard/mouse actions to them. –
      We have to assign maps to each of these buttons, simply click on any whitebox to start.


    • Clicking on the white button, would open the part of assigning keys – Check the below image carefully for conventions , alternatively you can click on the “wrench icon besides the white-button to select pre-defined mapping, check the below image for manual mapping –
      Manual mapping for white buttons – joystick actions.. (Click on image to view full-size)

      You can assign the mouse-movements to the 4-white buttons of analog , to simulate the mouse movements :).

    • After assigning some functions to the buttons, it would look somewhat like this –
      A demo assignement mapping


    • Voilla! Now, you can check puching your analog , the mouse pointer would also be moving! the way you are pushing it 🙂 ,

    Step 9 – Running the game!

    • Now, simply run the game without closing Xpadder! and play it using your gamepad like a boss! 🙂

    If you, face any issues or encounter any problems feel free to comment 🙂 ,

    Click here to download Xpadder free for Windows 7/8/8.1/10 32 bit & 64-bit.


  • Top 7 Free Disposable/ Temporary Email address providers for Quick Sign-ups and Spam protection

    Top 7 Free Disposable/ Temporary Email address providers for Quick Sign-ups and Spam protection

    All of us hate email spam, and many times our inbox is simply flooded with spam,newletters and useless emails which simply waste our time as well as email space. Also you might have been forced to sign-up on some websites which ask you for your e-mail and don’t let you access the content you want to without entering email address. Or you might simply be requiring the email address for quick sign-up just for validation purposes . In all of above scenarios and many more disposable / temporary email services will come to your rescue . Let’s get a look on what are temporary email address, why should you use them ? and the best disposable email address service providers –

    What are Disposable / Temporary Email addresses?
    In simple words, these are the email addresses which aren’t owned by you, but are public and therefore they don’t require any passwords to access them.

    Why to use Disposable / Temporary emails ?
    We need to use them to protect our primary emails from spam, and from unwanted emails coming in to our inbox.

    The Top 7 Free Temporary email address service providers are as follows –

    No 1 – 10MinuteMail.com

    10MinuteMail

    10MinuteMail is getairmail.com alternative & probably the most easy to use temporary email address service provider. All you need to do is visit 10minutemail.com and it’ll display you your temporary email address which is valid for 10 minutes!. You can then use it to sign-up and receive emails. The address is discarded after 10 minutes however it provides the option to extend the session by 10 minutes unlimited times (until the tab isn’t closed).

    No 2 – Mailinator.com

    Mailinator

    Mailinator is yet another email address service but with a twist, unlike 10minutemail you don’t need to open the website to create a temporary email address for you, but it has been already created! . Whenever signing-up on websites just type in your email address as “yourselectedtext@mailinator.com” , and once you’ve signed up, simply access your email on http://yourselectedtext.mailinator.com . And voila! you’ll find that your e-mail has already arrived! . The only disadvantage of using mailinator is that all email addresses are public and can be accessed by anyone (accidentally if someone else selects the same text you selected). but its very rare. E-Mails are stored for 1 hour before they’re discarded.

    No – 3 Yopmail.com

    YopMail

    Yopmail is just another service like or an alternative to Mailinator, where your email address is already created. And the procedure too is pretty same , while signing-up use “anytexther[email protected]” , and later for accessing the emails you can use the same trick visiting http://anytexthere.yopmail.com . Yopmail is my personal favorite due to the fact it stores the emails for a much longer time as compared to other disposable email address providers.

    No 4 – MintEmail.com

    Mintemail

    Mintemail.com can be classified as an advanced alternative of 10minutemail.com, which gives you a pre-defined address like 10minutemail. But it also has a major advantage that it will update the tab title automatically whenever an email arrives at your temporary email address. Thus, you can work in different tab without having to worry about email address expiration or missing out.

    No – 5 Maildrop.cc

    Maildrop

    Functionality wise maildrop.cc is same as that of mailinator, all the email addresses are pre-created (e.g anything@maildrop.cc) , but to access the emails you need to first visit http://maildrop.cc , and then enter your selected text (e.g anything) to access the mailbox (e.g [email protected]).

    No 6 – Guerillamail.com

    Provides an Inbox as well as a temporary outbox

    Guerillamail.com is a temporary address providing service but with some good additional features which might come in handy. All the above services just provide a temporary ‘inbox’ for receiving incoming emails, but guerillamail.com goes one step ahead and even provides a temporary outbox which can be used to send emails with the same temporary email address. This is really a very handy feature and can be used as a sort of anonymous email with composing as well as receiving facility!

    No 7 – Jetable.org

    Jetable.org

    More than an temporary email address service, Jetable can be described as an Anti-Spam solution and works in a unique way! .Some websites may blacklist temporary email addresses but in such cases Jetable can help you get out , what it does is it first verifies your original email address, and according to your choice it helps you create a temporary email address for a specific time frame (Upto 1 Month) and forwards all the mails coming to that temporary email address to your original email address. Thus, by limiting public access, as well as increasing the temporary email address lifespan it really does a goo job!. Not only that, the temporary address is permanently deleted after its lifespan so no one else can get access to it.

    So, these were the Top 7 Free Temporary / Disposable email address service providers , if you know any good of such services feel free to comment. Also, you might be interested in Simple Tricks to use a Single Gmail address as Multiple ones!