Some games are very difficult to play on the normal keyboard + mouse combo and we feel that it would have been better if the game supported gamepads, joysticks. Or by someway we could have been able to simulate keyboard key -press or mouse control simply on our gamepads, which would make playing games much easier! especially the online & DOS based games. Yes its possible to do such actions by a small free utility – Xpadder v 5.3 , Xpadder lets you simulate keyboard key presss, and mouse actions by mapping the keyboard keypress, and mouse actions to Joystick and Gamepad buttons!. Let’s have a brief look into the following tutorial to configure xpadder for Windows 7/8/8.1/10 –
Tutorial to configure Xpadder on Windows 10 / 7 / 8.1 (32-bit as well as 64-bit)
Step 1 – Downloading Xpadder
- Xpadder used to be free until version 5.3, but now if you try to download it from its official site – xpadder.com, it won’t be for free!. In our tutorial we will be using an older version of Xpadder, which is free to use for playing games with weak or no gamepad support.
- Click here to download Xpadder free for Windows 7/8/8.1/10 .
- The above package also contains, sample 3 images which are required for configuring joysticks, and an example mapping profile just incase you’re too lazy to map keys 🙂
Step 2 – Installing Xpadder
- Now, simply install the above linked Xpadder, by clicking next .
- Make sure your gamepad/joystick is connected to your computer before you open Xpadder.
Newbie alert –

If you’re new to Xpadder and mapping , or if you were unable to map your controller, you may try opening the bundled-in controller and mapping file which comes with our installer, you can load it by –
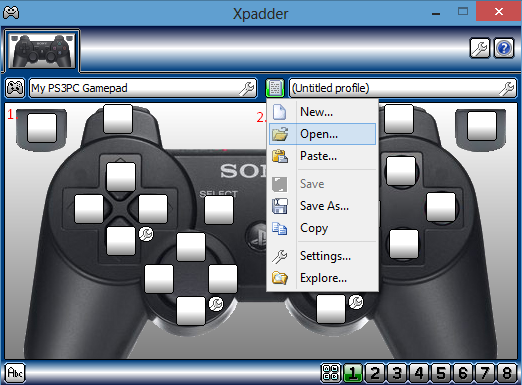
- First click on the “gamepad” icon labelled “1” in the alongside image of Xpadder window, and select the “Open” option , here in select the folder in which you’ve installed our Xpadder and select the controller file present in it.
- To load key-mapper again click the second icon labelled “2” as shown in the alongside image and use the “open” option for our pre-defined mapping.
- Or if you think you’re an Hard-core Gamer, and like challenges, or faced any issues while loading the bundled configuration files , or would like to customise with additional options please proceed to Step 3, for manual configuration!
Step 3 – Configuring Xpadder

- Now, when you first try to run Xpadder on your windows, it will give you an Unsupported Windows Version detected error on Windows 8.1 /10 , and here’s the solution for the problem –
- Simply, right-mouse click on the Xpadder icon, and select the “properties” option. (Click this to view the screenshot).
- Now, go to compatibilty tab, as shown in the alongside xpadder compatibilty troubleshoot image, and in the section named “Compatibility mode” , select the version as “Windows 7″ and click on apply, and OK. You can also additionally checkmark the “run program as an administrator” option if you encounter any issues later.
- That’s it, Xpadder is now ready to function, in your latest version of Windows.
Step – 4 Xpadder overview and adding Joystick image
- Below is the screenshot of Xpadder , on running now, click on the settings icon which looks like a wrench , to load the xpadder joystick image file as shown below –

Xpadder wrench icon (joystick image) Now , we need to select the appropriate joystick format *.bmp image file for loading onto Xpadder, we have bundled the ones for PS2, and Xbox 360 in the installer itself, however you can have a google search for *.bmp files of the gamepad controller image you have.
- Now , clicking, on the wrench would open the image selection window – here we need to specify the image file of controller as shown by the labels 1..2.. & 3.. in the following image –
-

Xpadder – selecting controller image file Now, after loading the controller image file, you will be shown the controller image in the Xpadder window.
- Here , select the option “Sticks” present in the bottom left corner of xpadder window, and now to configure the analog sticks – click on the first “Enable” option marked by green color in the below image labelled analog configuration , and push the corresponding analogs(whose name is indicated on the pop-up) to the directions shown in the pop-up “left,up,down,right” , do the same for the other analog too (if present) on the controller.

analog configuration
Step 5 – Moving the highlight bubbles
- After you, push the analog on your gamepad, a transparent bubble shapes would appear on the window, drag and drop them to their corresponding controller locations , as shown in this image. (Click here to view bubble drag image)
Step 6 – Configuring the D-Pad and other Joystick buttons
- Once, you are done with the analog sticks, configuration – Navigate to the “DPad” option in Xpadder, and “Enable” it, now again press the corresponding Keys (whose name is indicated on the pop-up) on the connected controller/gamepad.
Step 7 – Adding the Buttons, and placing them
- Now , click on the “Buttons” option in the xpadder, and start pressing the buttons of your gamepad – they’ll start appearing in the gamepad image as you press them, Now place them according to the location of the button which you had pressed on the gamepad.
- Now, in the below mentioned example (image) – We pressed the “X” button on our controller and it appeared on the place marked by “1” now, we will move its appeared place shown by the maroon arrow, to its original place on the controller shown by blue arrow.

We pressed “X” we will move the box “1” to “X” position(blue arrow) Now, please repeat these steps for all the buttons present on your gamepad and press “OK”.
- A completely configured controller would look like this –

Completely configured gamepad controller
Step 8 – Mapping the Keyboard keys, and mouse actions to Added Analog and buttons.
- Whoosh! we are done only with half the part yet, after you click on “OK” , you’ll be redirected to the following screen as shown below , here we need to individually click on these “white buttons” and assign the keyboard/mouse actions to them. –

We have to assign maps to each of these buttons, simply click on any whitebox to start. - Clicking on the white button, would open the part of assigning keys – Check the below image carefully for conventions , alternatively you can click on the “wrench“ icon besides the white-button to select pre-defined mapping, check the below image for manual mapping –

Manual mapping for white buttons – joystick actions.. (Click on image to view full-size) You can assign the mouse-movements to the 4-white buttons of analog , to simulate the mouse movements :).
- After assigning some functions to the buttons, it would look somewhat like this –

A demo assignement mapping - Voilla! Now, you can check puching your analog , the mouse pointer would also be moving! the way you are pushing it 🙂 ,
Step 9 – Running the game!
- Now, simply run the game without closing Xpadder! and play it using your gamepad like a boss! 🙂
If you, face any issues or encounter any problems feel free to comment 🙂 ,
Click here to download Xpadder free for Windows 7/8/8.1/10 32 bit & 64-bit.
Leave a Reply