The Size & Quality of Videos are increasing at a rapid rate as compared to the Phone Storage. Thus, Videos now take up a good size of disk space on our Android phones . This imbalance in increase of Video quality doesn’t match the speed of increase of Storage on Android which leads to lesser phone memory available for apps, and internal phone memory becoming full. So, In this tutorial we will cover How you can Compress Videos without losing quality on your Android Phones to free-up more storage.
Tutorial to Compress Videos on Android without losing Quality –
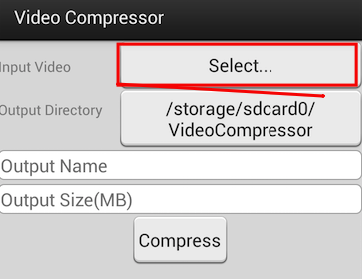
Launch the Video Compressor App from Menu, Not to be confused by its User Interface, the light user-interface elements of the app actually make it function faster as compared to other Video compressing Android apps.
Once you launch the app, In the label named as “Input Video” tap on “Select” as shown in the alongside image.
After you Tap on Select you will be asked to enter the source of the video from where you want to select the video file (We will be using “Gallery” as shown below –
Gallery Option
Browse through the gallery and select the video you want to compress, Once you select a video a “Play” icon will appear on the video as shown below –
Play Icon on the Video
Now, click on the Play icon to select the Video.
Once you have selected the Video, you will be redirected to the App with the File location as shown below –
Enter size & click on Compress
Now simply tap the “Compress” button.
That’s it! your video will start Compressing to the size you specified 🙂 , depending upon your phone hardware this step may take some time.
Now, Once your compression is finished, Please delete the original Video to free-up more space.
You can easily compress Videos from 10mb to 2mb & thus gain extra 8mb each time you delete the original video file!
Flipkart has recently launched its “Flipkart Lite” version which is basically a Web App which let’s you access , open & shop on Flipkart without installing its App! . Thus, Now you will be able to access Flipkart directly by using the Flipkart Lite URL. Not only this, Flipkart’s lite version also works when we are offline, thus allowing us to use Flipkart even if we are offline!. Following are the steps to use the Flipkart Lite URL Version.
Now, considering Google Chrome is present on most of the phone’s we will be using Google Chrome Screenshots, but the same method will work on Opera Browser for Android too.
Steps to Use Flipkart Lite Version –
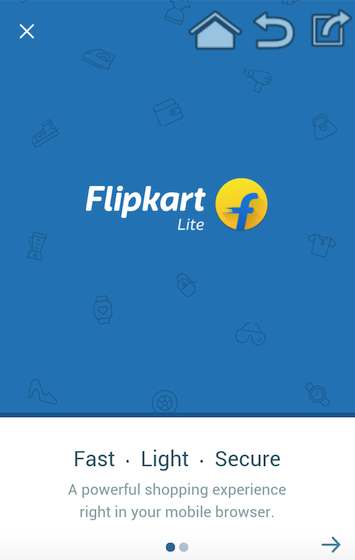
Flipkart Lite Version
Now, considering you have latest Updated Google Chrome or Opera Browser, Open the Below Link URL of Flipkart Lite Version on your latest updated browser.
You can Bookmark the following link for Faster Access – > goo.gl/Pe1DJb
Woah! You will now be navigated to Flipkart Lite web app that too without the app! . Check the alongside Screenshot of Flipkart Lite website.
All in all Flipkart Lite Version is a complete interface for Flipkart including log-in support, category browsing and even Payment as shown below –
Flipkart Lite in Google Chrome
So, Now there’s now no need to keep Flipkart app at all as the Flipkart lite version itself is capable of remembering your account, your cart contents and even your wishlist.
Thus, We highly advise uninstalling the Flipkart app & start using the Flipkart Lite app instead to save even more space on your Mobile device.
A Sample Browse Page on Flipkart Lite Version –
Flipkart Lite Sample
Not to forget, you can even get Notification of offers & discount deals via Chrome API , So literally you miss out on Nothing!
Cellular operators nowadays, have started providing app-specific data packs, or as as add-on to existing Internet packs. Many times, we exhaust our normal Internet data and are left with only add-on app data, for example WhatsApp , Facebook or YouTube data. Thus, whenever we try to use the app data benefits other background apps automatically connect in background and their ping & notifications result in deduction of our main balance. Here’s a simple tutorial to allow internet access only to specific selected apps on Android while restricting internet data to other apps using Android firewall .
Method to Allow internet access to specific apps & restrict internet to other apps on Android –
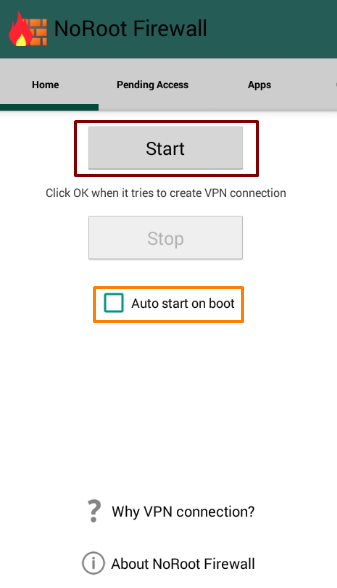
NoRoot Firewall App for Android
First Step would be to install a Firewall app to intercept our network traffic, though most apps require root the NoRoot Firewall app below works even on non-rooted Phones –
Now, once you have installed the firewall app tap on “Start”.
The firewall app will now ask you for one time permission to start a VPN connection, don’t worry this is just a dummy VPN connection with your own IP address , created just to intercept and block unwanted traffic. The VPN service dialog box would look as shown below –
VPN dialog box – NoRoot Firewall
Here “tick or checkmark – I trust this application” option and tap on “OK”.
Now, Simply connect to your internet connection, the data access will be blocked to all apps by default. To allow Internet access to a particular app, Open the app for example WhatsApp and then return to the NoRoot Firewall App.
Navigate to the “Pending Access” tab as shown below , This section will list out all the apps trying to access the internet –
Pending Access Tab
Tap on “Allow” to enable internet to that particular app, and keep other blocking access to internet for other apps.
You can also Stop your Firewall anytime to restore access to internet like before.
This method thus, is highly efficient and useful to prevent access to internet to other apps, thus saving money as well as data.
Our browsing activities are constantly tracked and so is our privacy breached , this is done by malicious scripts which run in your web browser while browsing low-quality websites. Now, in order to save users from such tracking Apple included Content Blocker support in Safari browser from its iOS 9 series update. Here’s a tutorial explaining How you can use Presto – A Free Content Blocker app to block ads on Safari browser for iPhone & iPad .
Before we move onto tutorial to use Presto, let us point out some salient features of Presto App –
Presto is able to block ads on Safari Browser and works on iPhone & iPad (iOS 9 or later required).
Lock all banners, pop-ups and video ads . (Blocks YouTube ads on iPhone)
Reduces Data usage consumed while serving ads, thus helps in Saving money.
Get the best privacy protection built with anti-tracking
Block Lists specific language.
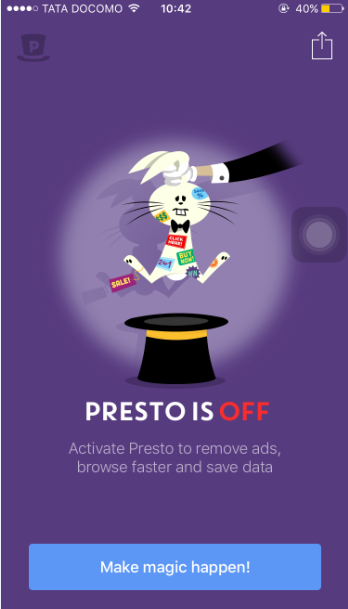
Presto App
So, Presto is a really a good free-feature rich Ad Blocker for iOS, here’s a tutorial on How to configure Presto Content Blocker –
Now, Open the Presto app and tap on “Make Magic Happen” button, as shown in the alongside image.
After tappin on the button you will be shown a tutorial on how to Activate Presto, Here simply tap on the “Go to Settings” button as highlighted below –
Presto Settings
When you tap on “Go to Settings” you will be redirected to the Safari Settings on your iOS Device.
Now Scroll down until you find “Content Blockers” in general tab.Now Tap on Content Blocker as shown below –
Content Blocker iOS9
Now, when you tap on Content Blockers, You will find the “Presto” togggle, simply toggle it to right side to activate the Presto app –
Presto Toggle Active.
That’s it, Now simply launch Safari directly or through the Presto app to enjoy ad-free , tracking free and a pleasing smooth browsing experience in Safari browser on your iPhone or iPad!.
Imagine a scenario where your Android Phone is being mirrored on your Computer Screen and you controlling it via your PC mouse & Keyboard. The mirrored screen enabling you to type faster on your phone using computer keyboard, or you and your friend playing the same game on a single android phone but you using keyboard to play while your friend is using the phone screen. Interesting isn’t it ? , and its easy too! – now you can easily Remote control your Android phone from PC by using the Mobizen App and requires no-root (Rooting not required) . Read on to know procedure to use Mobizen App for remote controlling an Android Phone from your Computer.
Tutorial to Remotely Control an Android Phone from PC / Computer –
Now, you can easily Record Android Screen irrespective whether it is rooted or not, by using a simple app called as Mobizen. Previously, Recording Screen on non-root Android 4.x versions (4.1, 4.2, 4.4) with audio was nearly impossible even using ADB. So, here’s a small yet detailed tutorial which will explain how to record screen in Android without Root (Works on 4.4 kitkat and earlier versions too), last but not the least – the recorded android videos have microphone audio too!
Tutorial to Easily Record Android Screen Without Root –
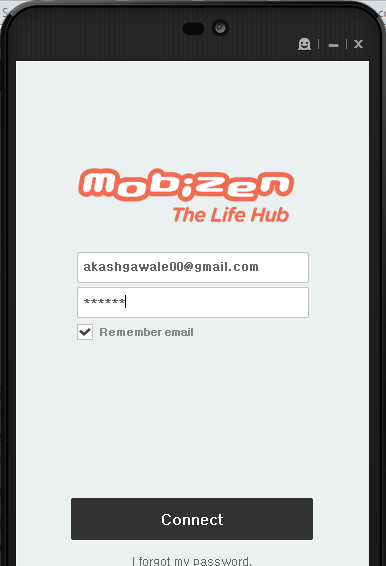
Step.1 Installing And Registering for A Mobizen Account –
Open the Mobizen app, and sign-up for a Mobizen account using your e-mail (free to sign-up).
Now, connect your mobile to your PC and enable USB Debugging.
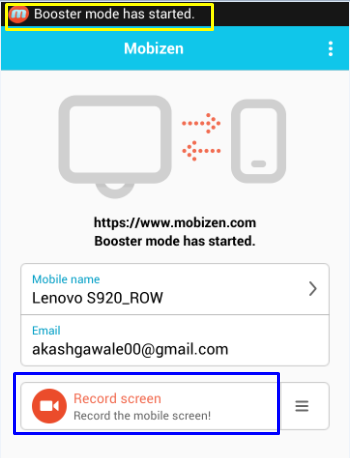
Step.2 Activating Booster Mode + Starting Video Record –
Record Screen using Mobizen App
Once you have enabled USB Debugging, launch the Mobizen App.
You will see a notification of “Booster Mode has Started”, which indicates that Mobizen app is now ready to start recording.
Now, Simply tap on “Record Screen” button to start your recording as shown in the alongside image.
Once you have tapped on the button it will redirect you to your Home Screen, with a floating “m” button as shown in the figure below –
Mobizen Floating Button
Tap on the “m” floating Button.
Tap the Video cam icon to Start Video recording
Now, as you tap on the m button, you will see 3 sub-buttons. simply tap on the “Video camera” button to start your screen Recording!.
Once your Recording has started the “m” button will show a timer which indicates the recorded time (and thus confirms that the recording has started) as shown below –
Video Recording Time
Stop Recording
Step.3 Video Record Controls + Stopping Recording –
Now to stop / pause your currently recorded video, again simply tap on the “m”button while the recording is On and tap on the “Stop” icon as shown in the image alongside.
To View your Recorded Screen Videos Simply tap on the burger icon in the Mobizen app home screen as shown below –
Tap to View Recorded Videos
That’s it ! This is perhaps the only working method to Record your Android Screen with audio from microphone without root on older versions than lollipop, and the method to record Android videos using Mobizen. If you face any problems or have any queries feel free to comment .
Next Update/ Trick – While testing on one of our devices, removing phone once the booster mode started, still recorded the screen.. we even tried closing the app and opening it again to record.. it was still able to record videos.. you may try this on your phone too to enable booster mode once, and then use the phone to directly record until next reboot.
BookMyShow has come up with probably the best Diwali Offer amongst all! . You get Instant Rs.100 For Free in BookMyShow App to book Free Movie Tickets. All you need to do is Download the BookMyShow App and then Sign-Up for BookMyShow Wallet using our Referral code to get your Free Rs.100, and if the ticket cost is less than Rs.100 Your movie ticket will come for free! . So, Here’s how you can get Your Free Rs.100 in BookMyShow Wallet –
Method to Instantly Claim your Free Rs.100 in BookMyShow App –
Once, you have downloaded the BookMyShow app, Click on “Login/Sign-Up” and sign-up for a new account.
Note – (If you’re an exisiting or old user please check the “You” Section for Refer & Earn section to activate your wallet) .
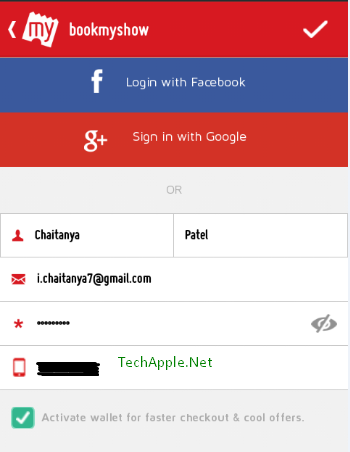
While Signing up for a account make sure you “checkmark or tick the option of activate wallet for faster checkout & cool offers” as our free Rs.100 will be credited in our BookMyShow wallet itself. (Very Important!)
Now, Tap on the ” ƴ “ symbol on the top right hand-side corner to complete your Sign-up!.
Once, you have tapped on the checkmark, it will ask you to Verify your mobile number as shown in the below image –
BookMyShow Wallet Verification
Here enter your mobile number and tap on “Verify” . Now it will verify your number using OTP , please do enter the OTP manually if not automatically detected by the App.
Now, it will ask you to enter Money into wallet , Important – Here select the option “Use your Own Code” or “Coupon Code” and enter any one code from CGBFEGY
VB5QBFZ
T5V76EE
Q36U3E7
GFJF44G as shown in the image below –
Enter Your Code Option in BookMyShow Wallet
. (Important Step!)
Here In the space labelled “Punch in your code” , Now enter any of the coupon codes – CGBFEGY
VB5QBFZ
T5V76EE
Q36U3E7
GFJF44G and tap on Submit as shown below – .
Voila! You have successfully Earned Free Rs.100 in your BookMyShow wallet which can be used to Book Movie Tickets for Free!
You can check the below screenshot for proof (Make Sure that your Ticket amount is below Rs.90) –
BookMyShow Wallet Proof
What do if I forgot to add Coupon code ?
If you forgot to enter the coupon code in above Step, you may go to the “You” tab in BookMyShow app and Navigate to “Refer & Earn” tab, If you’re lucky it will ask you to sign-up for wallet and enter the Promo code. (We strongly advise entering the promocode as soon as you sign-up for BookMyShow wallet ).
Once you enter the Promocode “D7HCK7C”, You’ll be successfully credited with Rs.100 in your BookMyShow BMS Wallet!
How Can i Get My Own Refer Code – ?
Sign-up & Book any Ticket via BookMyShow Wallet to get your own referral code via which you can share the BookMyShow App and earn Rs.100 per each friend referral!
Recently, One of my Android Phone’s hard key buttons stopped working – The hardware keys of Menu, Home & Back below the screen were not operating . This left me looking for some alternatives and I found this easy method to Get back or Enable Home, Menu & Back soft keys on Android phone’s screen. Thus, saving me the costs required to replace the damaged hardware key’s , Here’s how you too can do the same on your Android Phone –
Method to bring Soft Menu & Back Soft keys using Back buttton App for Android (No – Root Required)
Once you have Installed the back button app, when you launch the app it will display you a dialog box asking you to enable Back Button from Settings – > Accessibility – > Back button . Enabling the back button option in Accessibility is compulsory to activate the app, Here’s how you can do it – Go to Settings – > scroll down and tap on Accessibility , there you will see an option for Back Button as shown below –
Back Button Option in Accessibility
Now , tap on the Back Button Option and turn it “On” as shown below by sliding the off switch to right side to make it display On –
Slide to turn it to “ON”
Once you have enabled the back button in accessibility , return to the Back Button app . Now here activate the buttons by sliding the Active toggle to right hand side as shown below –
Active toggle Back Button App
Now, once you have Activated the App, The Soft Key buttons will instantaneously appear on your screen as shown below –
Soft Key buttons on your Screen!
Now, you can customize these buttons as much as you want, you can drag & move them around, or you can lock them upto a particular location.
You can even change their size, their icons, their transparency and play around. Thus, no longer requiring to change the hardware keys. If the app doesn’t work or if you face any issues feel free to comment.
The Nintendo Entertainment System (NES Console) was perhaps the Best source of Joy & Happiness for a 90’s Kid, it was atleast for me and some of the greatest games such as Super Mario Bro’s , Super Contra , Tanks 1990 and many others were available very easily. These NES Games though lack in Graphics, Gameplay as compared to Today’s games but when it comes to giving a competition to the new Games they give a good punch to them be it in Competity Level, or be it Fun & Adventures. So, In this article we bring you the Top 5 Best Free NES Emulators for Windows 7 & 10, so as you can Play NES Games on your Computer without the need of having a NES Console. And ya , not to forget all NES Games are actually 8-bit ROM’s (or max kB’s) and these emulators size anywhere between (1 mB- 5 mB) so in a few mB’s you can get 100’s of games where a typical new game would easily cost few GB’s .
Note : These emulators don’t come in with in-built NES games (ROMs) , so if you need to play any game of your choice , you may need to download ROM for playing on the emulator . NES games roms are freely available on the following links – RomHustler.Net , FreeRoms.Com and you can search on google too for Nintendo or NES roms.
Top 5 Free NES Emulators for Windows 10 / 8.1 / 7 to play Nes Games on PC / Computer
FCEUX Nes Emulator comes with a lot of exciting features, makes your gaming Fun! . FCEUX is pre-loaded with features such as hex editor , Debugging mode, Video recording , Full Screen view, Joy Stick support and so on..
Some Salient Features of FCEUX Emulator are
FCEUX can load files of NES, UNF, NSF, FDS, RAR, ZIP and GZ formats.
Support for various Gamepad , And Joystick controllers.
Input Configuration is provided to set up controllers.
Presets for custom controls are available for your preferences.
It can save any game at any point.
Recording option is available both audio and video.
The Emulator works on any Version of Windows XP and later, we ourselves tested the same on WIndows 8, & Windows 10 64-bit.
Nestopia is one emulator which is handy as well as good. Its very light on resources, has ability to custom resize the game video rendering screen as well as an auto-saver as well so that your game status is automatically saved.
Below are some Salient features of Nestopia –
Cheat code support.
Well-organized interface.
Wide range of options.
Customizable controls.
It can connect external devices.
Simulateously Four players can play a single game via keyboard.
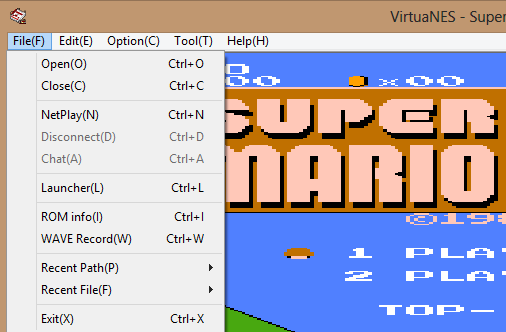
The active development of VirtuaNES stopped wayback in 2007, but it still doesn’t hamper its compatibility nor it needs active development as it still works flawlessly on Windows 7,8 and even Windows 10 too!. Now coming to the features – VirtuaNES is highly customizable with features such as –
External Gamepad & JoyStick Support.
Active Cheat Code Support.
Support editing memory hex locations so that you can even try out new cheats!.
Supports Full-Screen play as well as resized windows adjustment.
Jnes is one of the extensively used NES emulator, It is not only widely used but is also wuite stable. Jnes comes with pack of features, and is probably the only emulator which has an Android App as well, Thus, the large fan following ensures that you get the best features each time-
It supports NES or NSF format in order to load the game.
jNES allows you to use controllers in order to recreate the gaming experience.
jNES NES Emulator allows you to adjust sound by enabling the sound channels that you want to hear.
Now the name of this emulator is really brainy as it conveys what it does in some style. Nintendulator is a NES System emulator written entirely in C++ , which makes the emulation as realistic as possible with great speed! . This emulator impressed us on the following features –
Inbuilt Game Genie support for auto-play.
Inbuilt USB Gamepad support! (Now that’s really cool).
Soft-rest & hard-reset as found on the original console.
So, these are best Nes Emulators because we came across after our trials and choose the best among those. Try them , they all are free to use and go into the past to enjoy those moments!
NOTE : Just in case, If you do not understand any part of the post or tutorial, Do not hesitate to contact us via email or comments.


 .
.
![How to Add Home/Back Soft Button Keys on Android without Root [No Rooting Required]](https://techapple.net/wp-content/uploads/2015/10/ad0DPer.png)