Android has many great features which are hidden from a normal user. One of such feeatures is Developer Options which contain options such as USB Debugging, Enabling fake locations. Though, almost all options present in Android Developer mode are useful, the most widely used and useful option is USB Debugging. USB Debugging allows installation & uninstallation of apps on your Android from computer, Flashing custom ROMs. It also allows usage of ADB & Fastboot which is very useful in troubleshooting problems on your Android. So, here’s a Simple tutorial which will explain you how to enable Developer options & USB Debugging on your Android phone.
Step By Step tutorial to Enable Developer Options & USB Debugging on Android –

- First of all go to your Phone “Settings” menu or option.
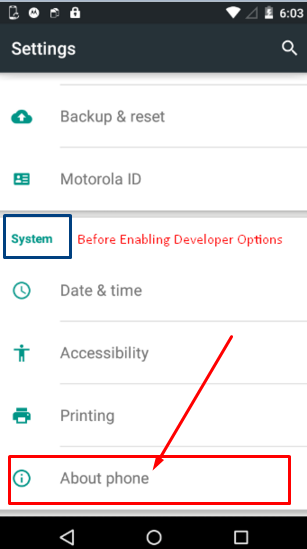
- Now inside your Phone Settings menu , Scroll down until you find “About Phone” option as highlighted in the alongside image. “About Phone” is generally present under the “System” tab.
- Now, Tap on “About Phone” it will show you a menu containing your IMEI Information, Model number, Build number etc as shown in the image below –

Build Number inside About Phone Option - Now Repeatedly Tap on Build Number it will show messages as shown below – “You are xyz steps away from being a developer” .

1 Step away from being a developer - Do it until it displays a message as “You are now a developer” , as shown below –

You are now a developer - Congratulations! , Now you will be able to See a “Developer Options” button inside your Phone settings which was previously hidden to you , It will appear right above “About Phone” option as shown below –

Developer Options Now Visible in your Phone Settings!

Part – 2 . Enable USB Debugging on Your Android –
- Now in order to Enable USB Debugging on your Android , Please enter the newly enabled “Developer Options” option inside the “Phone Settings” .
- Now inside “Developer Options” , Please toggle them “ON” as highlighted by red color in the alongside image.
- Also, Make sure that you “Tick / Checkmark” option next to “USB Debugging” as highlighted by blue color in the image beside.
- That’s it !. You have successfully enable USB Debugging on your Android Phone.
- Now connect your Android phone using USB Cable to any Computer , the appearance of message “USB Debugging Connected” in the notifications slider confirms that the USB Debugging is working successfully.
If you face any issues or encounter any problems while trying to use USB Debugging feel free to comment. We have personally tested and found this method to be working on Android KitKat, Lollipop and even Android Marshmallow version as well.
Leave a Reply