The Size & Quality of Videos are increasing at a rapid rate as compared to the Phone Storage. Thus, Videos now take up a good size of disk space on our Android phones . This imbalance in increase of Video quality doesn’t match the speed of increase of Storage on Android which leads to lesser phone memory available for apps, and internal phone memory becoming full. So, In this tutorial we will cover How you can Compress Videos without losing quality on your Android Phones to free-up more storage.
Tutorial to Compress Videos on Android without losing Quality –
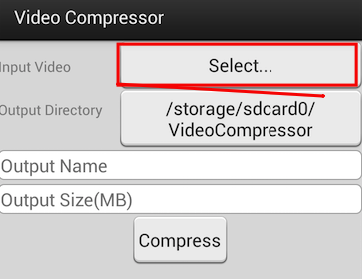
Launch the Video Compressor App from Menu, Not to be confused by its User Interface, the light user-interface elements of the app actually make it function faster as compared to other Video compressing Android apps.
Once you launch the app, In the label named as “Input Video” tap on “Select” as shown in the alongside image.
After you Tap on Select you will be asked to enter the source of the video from where you want to select the video file (We will be using “Gallery” as shown below –
Gallery Option
Browse through the gallery and select the video you want to compress, Once you select a video a “Play” icon will appear on the video as shown below –
Play Icon on the Video
Now, click on the Play icon to select the Video.
Once you have selected the Video, you will be redirected to the App with the File location as shown below –
Enter size & click on Compress
Now simply tap the “Compress” button.
That’s it! your video will start Compressing to the size you specified 🙂 , depending upon your phone hardware this step may take some time.
Now, Once your compression is finished, Please delete the original Video to free-up more space.
You can easily compress Videos from 10mb to 2mb & thus gain extra 8mb each time you delete the original video file!
Flipkart has recently launched its “Flipkart Lite” version which is basically a Web App which let’s you access , open & shop on Flipkart without installing its App! . Thus, Now you will be able to access Flipkart directly by using the Flipkart Lite URL. Not only this, Flipkart’s lite version also works when we are offline, thus allowing us to use Flipkart even if we are offline!. Following are the steps to use the Flipkart Lite URL Version.
Now, considering Google Chrome is present on most of the phone’s we will be using Google Chrome Screenshots, but the same method will work on Opera Browser for Android too.
Steps to Use Flipkart Lite Version –
Flipkart Lite Version
Now, considering you have latest Updated Google Chrome or Opera Browser, Open the Below Link URL of Flipkart Lite Version on your latest updated browser.
You can Bookmark the following link for Faster Access – > goo.gl/Pe1DJb
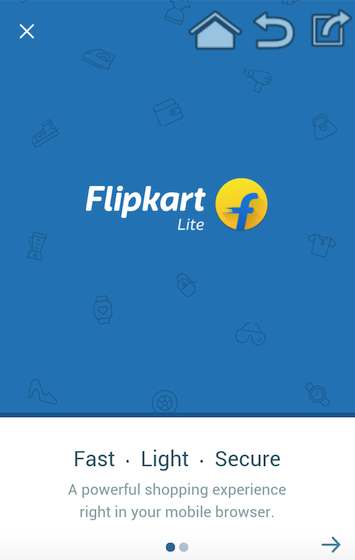
Woah! You will now be navigated to Flipkart Lite web app that too without the app! . Check the alongside Screenshot of Flipkart Lite website.
All in all Flipkart Lite Version is a complete interface for Flipkart including log-in support, category browsing and even Payment as shown below –
Flipkart Lite in Google Chrome
So, Now there’s now no need to keep Flipkart app at all as the Flipkart lite version itself is capable of remembering your account, your cart contents and even your wishlist.
Thus, We highly advise uninstalling the Flipkart app & start using the Flipkart Lite app instead to save even more space on your Mobile device.
A Sample Browse Page on Flipkart Lite Version –
Flipkart Lite Sample
Not to forget, you can even get Notification of offers & discount deals via Chrome API , So literally you miss out on Nothing!
Cellular operators nowadays, have started providing app-specific data packs, or as as add-on to existing Internet packs. Many times, we exhaust our normal Internet data and are left with only add-on app data, for example WhatsApp , Facebook or YouTube data. Thus, whenever we try to use the app data benefits other background apps automatically connect in background and their ping & notifications result in deduction of our main balance. Here’s a simple tutorial to allow internet access only to specific selected apps on Android while restricting internet data to other apps using Android firewall .
Method to Allow internet access to specific apps & restrict internet to other apps on Android –
NoRoot Firewall App for Android
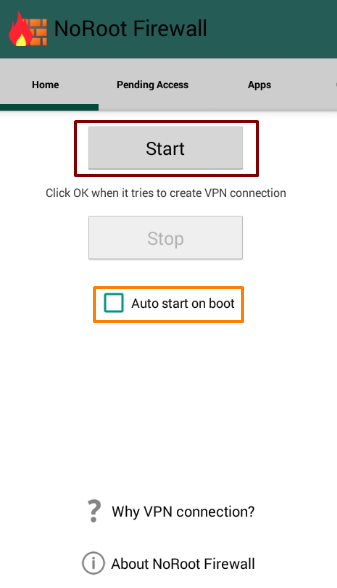
First Step would be to install a Firewall app to intercept our network traffic, though most apps require root the NoRoot Firewall app below works even on non-rooted Phones –
Now, once you have installed the firewall app tap on “Start”.
The firewall app will now ask you for one time permission to start a VPN connection, don’t worry this is just a dummy VPN connection with your own IP address , created just to intercept and block unwanted traffic. The VPN service dialog box would look as shown below –
VPN dialog box – NoRoot Firewall
Here “tick or checkmark – I trust this application” option and tap on “OK”.
Now, Simply connect to your internet connection, the data access will be blocked to all apps by default. To allow Internet access to a particular app, Open the app for example WhatsApp and then return to the NoRoot Firewall App.
Navigate to the “Pending Access” tab as shown below , This section will list out all the apps trying to access the internet –
Pending Access Tab
Tap on “Allow” to enable internet to that particular app, and keep other blocking access to internet for other apps.
You can also Stop your Firewall anytime to restore access to internet like before.
This method thus, is highly efficient and useful to prevent access to internet to other apps, thus saving money as well as data.
Imagine a scenario where your Android Phone is being mirrored on your Computer Screen and you controlling it via your PC mouse & Keyboard. The mirrored screen enabling you to type faster on your phone using computer keyboard, or you and your friend playing the same game on a single android phone but you using keyboard to play while your friend is using the phone screen. Interesting isn’t it ? , and its easy too! – now you can easily Remote control your Android phone from PC by using the Mobizen App and requires no-root (Rooting not required) . Read on to know procedure to use Mobizen App for remote controlling an Android Phone from your Computer.
Tutorial to Remotely Control an Android Phone from PC / Computer –
Now, you can easily Record Android Screen irrespective whether it is rooted or not, by using a simple app called as Mobizen. Previously, Recording Screen on non-root Android 4.x versions (4.1, 4.2, 4.4) with audio was nearly impossible even using ADB. So, here’s a small yet detailed tutorial which will explain how to record screen in Android without Root (Works on 4.4 kitkat and earlier versions too), last but not the least – the recorded android videos have microphone audio too!
Tutorial to Easily Record Android Screen Without Root –
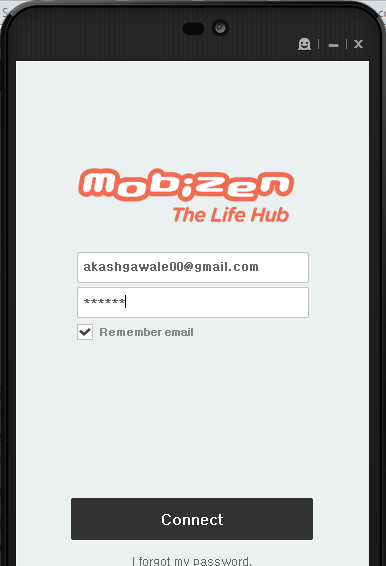
Step.1 Installing And Registering for A Mobizen Account –
Open the Mobizen app, and sign-up for a Mobizen account using your e-mail (free to sign-up).
Now, connect your mobile to your PC and enable USB Debugging.
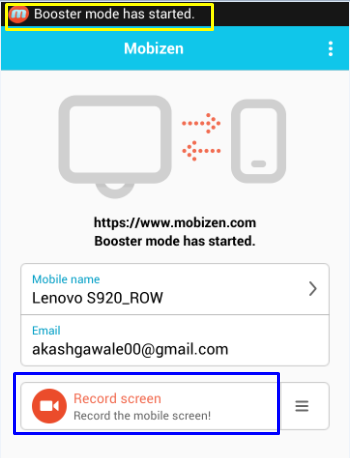
Step.2 Activating Booster Mode + Starting Video Record –
Record Screen using Mobizen App
Once you have enabled USB Debugging, launch the Mobizen App.
You will see a notification of “Booster Mode has Started”, which indicates that Mobizen app is now ready to start recording.
Now, Simply tap on “Record Screen” button to start your recording as shown in the alongside image.
Once you have tapped on the button it will redirect you to your Home Screen, with a floating “m” button as shown in the figure below –
Mobizen Floating Button
Tap on the “m” floating Button.
Tap the Video cam icon to Start Video recording
Now, as you tap on the m button, you will see 3 sub-buttons. simply tap on the “Video camera” button to start your screen Recording!.
Once your Recording has started the “m” button will show a timer which indicates the recorded time (and thus confirms that the recording has started) as shown below –
Video Recording Time
Stop Recording
Step.3 Video Record Controls + Stopping Recording –
Now to stop / pause your currently recorded video, again simply tap on the “m”button while the recording is On and tap on the “Stop” icon as shown in the image alongside.
To View your Recorded Screen Videos Simply tap on the burger icon in the Mobizen app home screen as shown below –
Tap to View Recorded Videos
That’s it ! This is perhaps the only working method to Record your Android Screen with audio from microphone without root on older versions than lollipop, and the method to record Android videos using Mobizen. If you face any problems or have any queries feel free to comment .
Next Update/ Trick – While testing on one of our devices, removing phone once the booster mode started, still recorded the screen.. we even tried closing the app and opening it again to record.. it was still able to record videos.. you may try this on your phone too to enable booster mode once, and then use the phone to directly record until next reboot.
BookMyShow has come up with probably the best Diwali Offer amongst all! . You get Instant Rs.100 For Free in BookMyShow App to book Free Movie Tickets. All you need to do is Download the BookMyShow App and then Sign-Up for BookMyShow Wallet using our Referral code to get your Free Rs.100, and if the ticket cost is less than Rs.100 Your movie ticket will come for free! . So, Here’s how you can get Your Free Rs.100 in BookMyShow Wallet –
Method to Instantly Claim your Free Rs.100 in BookMyShow App –
Once, you have downloaded the BookMyShow app, Click on “Login/Sign-Up” and sign-up for a new account.
Note – (If you’re an exisiting or old user please check the “You” Section for Refer & Earn section to activate your wallet) .
While Signing up for a account make sure you “checkmark or tick the option of activate wallet for faster checkout & cool offers” as our free Rs.100 will be credited in our BookMyShow wallet itself. (Very Important!)
Now, Tap on the ” ƴ “ symbol on the top right hand-side corner to complete your Sign-up!.
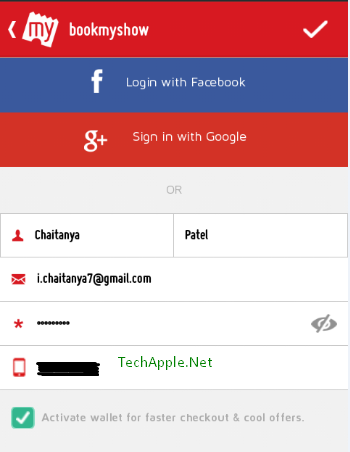
Once, you have tapped on the checkmark, it will ask you to Verify your mobile number as shown in the below image –
BookMyShow Wallet Verification
Here enter your mobile number and tap on “Verify” . Now it will verify your number using OTP , please do enter the OTP manually if not automatically detected by the App.
Now, it will ask you to enter Money into wallet , Important – Here select the option “Use your Own Code” or “Coupon Code” and enter any one code from CGBFEGY
VB5QBFZ
T5V76EE
Q36U3E7
GFJF44G as shown in the image below –
Enter Your Code Option in BookMyShow Wallet
. (Important Step!)
Here In the space labelled “Punch in your code” , Now enter any of the coupon codes – CGBFEGY
VB5QBFZ
T5V76EE
Q36U3E7
GFJF44G and tap on Submit as shown below – .
Voila! You have successfully Earned Free Rs.100 in your BookMyShow wallet which can be used to Book Movie Tickets for Free!
You can check the below screenshot for proof (Make Sure that your Ticket amount is below Rs.90) –
BookMyShow Wallet Proof
What do if I forgot to add Coupon code ?
If you forgot to enter the coupon code in above Step, you may go to the “You” tab in BookMyShow app and Navigate to “Refer & Earn” tab, If you’re lucky it will ask you to sign-up for wallet and enter the Promo code. (We strongly advise entering the promocode as soon as you sign-up for BookMyShow wallet ).
Once you enter the Promocode “D7HCK7C”, You’ll be successfully credited with Rs.100 in your BookMyShow BMS Wallet!
How Can i Get My Own Refer Code – ?
Sign-up & Book any Ticket via BookMyShow Wallet to get your own referral code via which you can share the BookMyShow App and earn Rs.100 per each friend referral!
Recently, One of my Android Phone’s hard key buttons stopped working – The hardware keys of Menu, Home & Back below the screen were not operating . This left me looking for some alternatives and I found this easy method to Get back or Enable Home, Menu & Back soft keys on Android phone’s screen. Thus, saving me the costs required to replace the damaged hardware key’s , Here’s how you too can do the same on your Android Phone –
Method to bring Soft Menu & Back Soft keys using Back buttton App for Android (No – Root Required)
Once you have Installed the back button app, when you launch the app it will display you a dialog box asking you to enable Back Button from Settings – > Accessibility – > Back button . Enabling the back button option in Accessibility is compulsory to activate the app, Here’s how you can do it – Go to Settings – > scroll down and tap on Accessibility , there you will see an option for Back Button as shown below –
Back Button Option in Accessibility
Now , tap on the Back Button Option and turn it “On” as shown below by sliding the off switch to right side to make it display On –
Slide to turn it to “ON”
Once you have enabled the back button in accessibility , return to the Back Button app . Now here activate the buttons by sliding the Active toggle to right hand side as shown below –
Active toggle Back Button App
Now, once you have Activated the App, The Soft Key buttons will instantaneously appear on your screen as shown below –
Soft Key buttons on your Screen!
Now, you can customize these buttons as much as you want, you can drag & move them around, or you can lock them upto a particular location.
You can even change their size, their icons, their transparency and play around. Thus, no longer requiring to change the hardware keys. If the app doesn’t work or if you face any issues feel free to comment.
There are many Screen Recording tools available for Android, and so are Screenshots / Screen capturing tools. Recording Videos on Android become too bulky due to their bigger file size & sometimes Static screenshots aren’t enough especially when you are using them for writing tutorials. Its cases like these where GIFs come to the rescue, their ability to loop static images creates an easy to understand video illusion simultaneously using lesser file-size as that of images. So, here’s a tutorial on How you can Easily Capture Animated GIF Screenshots on Android Phones –
Tutorial to Capture Animated GIF Screenshot on Android Mobiles –
Pre-requisites –
Quickly Grab some static Screenshots whose images you would like to combine into a GIF (You can capture multiple Screenshots using the Volume down key + Power key and save them in Gallery).
Creating GIFs
Graphica App
First of All Download & Install the Graphica Live Photo Maker app from Google Play Store by Clicking the below Link –
Now Open the Graphica app & select the “gallery live photo” option as shown in the image alongside .
Once you click on the Gallery Live Photo, it will open a preview and will ask you to select the photos with which you want to create the GIF as shown below –
Select Photos to create GIF in Graphica Gallery
Here Select the photos using which you intend to create GIF and then click on “Next” button as shown in the above image.
Now, Once you click on Next, it will show you a preview of the GIF , with a Slider attached to it as shown below (Move the Slider button to your right side to slow down the GIF , and to the left incase you want to speed it up)
GIF Slider
Once you are done with adjusting the Speed of GIF, Click on the “Save to Gallery” button.
That’s it! You have successfully captured Animated GIF Screenshot on your Android phone, the GIF is lesser in Size and works very smoothly. If you face any problems while creating GIF feel free to comment, you can also check out the GIF demo below to see how smoothly it works –
The default download manager for Android isn’t upto the mark as it lacks some basic functionalities such as resume support, multi-threaded downloads and other features. Considering, the limited connectivity of Cellular data and their fluctuating speeds we really should use Download managers on our devices so that we can utilize the resume support on downloads incase of lower speeds and in places where the speeds are higher multiple-download threads by download managers can help us to complete our downloads more quickly and efficiently. So, here are the Top 5 Download Managers & Download Accelerators for Android phones which we can use along with our existing/installed browsers (e.g Google Chrome) to increase downloading speed on Android-
Top 5 Download Manager & Accelerator Apps for Android Phones –
Note – Back in Old Symbian days we used to use UC Browser for downloading, but considering the fact that Android devices are much more complex and vulnerable & amidst reports saying UC Browser was leaking user data to Chinese servers, we skipped it and focussed only on “Pure” Download Managers and work easily with any other browsers such as Google Chrome, Firefox for Android etc. To download using these Download Managers simply use Web browsers for surfing and open the Download links in any one of the following as shown in the image alongside –
No. 1. DMA (Download Manager Accelerator for Android) –
Download Manager Accelerator for Android
Not to be mislead by its common name, DMA by Keerby is one of the best Download Manager for Android which we came across, It has the best User Interface (UI) amongst all the download managers, supports resume supported downloads & 3rd Party browsers too.
Besides, the above option, it has features such as-
Auto-retry after download failure
Supports manual specifying of number of threads to be downloaded for each download as well as auto-determine option based upon your speed.
Feature to download only on WiFi connection so that your cellular data isn’t wasted.
No.2 ADM (Advanced Download Manager for Android) –
ADM Download Manager
If you’re looking for a no-fuss light-weight download manager for Android, that will get your Job done look no further than ADM by DimonVideo . ADM provides features such as –
Multi-threading of downloads.
Auto-resume after download failures, Supports various themes so that you can customize ADM.
It also supports download scheduling and also you can import list of links to be downloaded from a txt file on SD card (you can use unlimited night-pack most effectively by using the Download schedule option)
Though TDM works only for direct download links, but its 3rd Party browser integration is probably the best amongst all the Download accelerators .
TDM directly provides the “wedge” and “i” icons which you can use to tweak the download settings such as number of threads, etc and ability to change the download location so that handling downloads is much more easier. Save button simply starts the file download –
Download Accelerator Plus is a compact download manager which is a meagre 1.3 MB in size! , Not to be mistaken by its lesser size it provides all major functions such as
Multi-threaded parallel Downloading of Files.
Supports background downloading even when the screen is locked.
Provides category and time-line sorting of downloaded files so that you can easily locate your downloaded files.
Has a small in-built web browser which helps to download from non-resume supported websites.
Not to be confused with original IDM for Windows, this download manager is highly inspired from the real IDM, and copies most of the features from it . Although, the User Interface is really shabby and needs to be worked upon, the Download Speeds obtained are good and it doesn’t leak user data to servers which makes it enter our list.
Besides this the Download Manager also supports non-resumable link downloads and whose filesize aren’t shown, and allows some features such as ability to set downloaded music files as ringtone etc.


 .
.
![How to Add Home/Back Soft Button Keys on Android without Root [No Rooting Required]](https://techapple.net/wp-content/uploads/2015/10/ad0DPer.png)


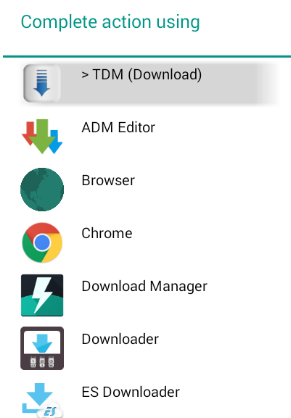
 Note – Back in Old Symbian days we used to use UC Browser for downloading, but considering the fact that Android devices are much more complex and vulnerable & amidst reports saying UC Browser was leaking user data to Chinese servers, we skipped it and focussed only on “Pure” Download Managers and work easily with any other browsers such as Google Chrome, Firefox for Android etc. To download using these Download Managers simply use Web browsers for surfing and open the Download links in any one of the following as shown in the image alongside –


