In our last article we covered installing multiple versions of any app to use multiple accounts using “Parallel Space”. Now, Parallel space is sort of an qemu which will host the apps inside its own space & ram which may hamper performance on low-end Android phones. But there’s a solution to this problem too – App Cloning! App cloning will let you clone apps present on your device & install them.. Thus, you can now use 2 versions of same app easily without even using space of external apps such as Parallel Space, 2 Accounts, 2 Face etc. Thus, enabling easier multiple accounts to apps like facebook, snapchat, paytm , freecharge etc that too without requiring root
How to Clone apps & install the second instance on Android –
First of all Normally download & install the app which you want to clone , and log-on to your first or primary account inside the app.
After you install App Cloner, it will now show a list of all apps installed on your Android phone as shown below –
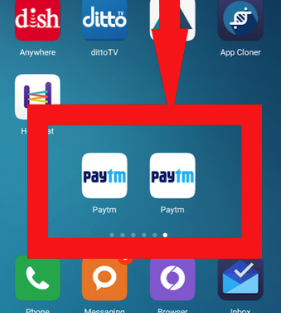
Tap on the App name which you want to clone
It will now show details about the app which will be cloned as shown below, Click on the “checkmark” as shown in below figure to start the cloning process –
Tap on checkmark to start app cloning
Now tap on “OK” in the pop-up box which shows that existing app will be cloned.
It will now start cloning the app as shown in the following image –
App Cloning Paytm app Android
Once the cloning process is finished it will execute the apk & ask you to install it.
Install the apk and voila you now have two versions of same app in your Android phone. Alternatively you can access your apk’s from the “Cloned Apps” section once you open the Apk cloner app and even share the cloned apk’s with your friends too! .
The cloned apk works perfectly same as the normal app and is accessible directly from the app drawer unlike in parallel space where its accessible via app.. Besides, being the original clone app it perfectly functions with all the functions as in the original app .
Cloned Paytm App in Redmi Note 3
If you face any problems or encounter any issues feel free to comment.
Sometimes, We need to use two versions or variants of a particular app on Android. For example, we might want to use two different WhatsApp numbers, Hike, WeChat , Viber or Paytm accounts on a single Android device. But its not possible without installing un-official apps such as GBWhatsApp etc. Besides these unofficial apps being less secure, they are bit buggy too.. So here’s an easy tutorial on How to use Parallel Space for Android to install two or more variants of single app on Android.
How to Run 2 Variants of same app using Parallel Space on Android
Pre-Requisites :
An Android Phone.
A working internet connection.
Tutorial to use two accounts of Paytm, Facebook messenger, WhatsApp, Viber etc on one Android –
Now, after installing the Parallel space app, normally install the app which you want to make second instance in the Phone’s default Play Store app. (For example in our tutorial we will be using the Paytm app).
Now, after normally installing the first instance of app- login to your first account on the app.
Launch the Parallel Space app – It will be show a welcome screen which will look as shown below –
Click on the + icon to add your app to Parallel Space
Click on the “+” icon to add your app to Parallel Space .
Now , you can either “Tap on the shown icons” to install two instances of the previously installed apps. In our case “Paytm” wasn’t shown earlier hence we tapped on “More” option as shown in the image below –
Tap on app icon to install app or click on More for More apps
Now you will be shown the list of apps currently installed on your device as shown in the next image. Here simply tap on the app name to start installing its second instance or variant. (Note – No internet connection is required to download existing available app from the list)
Tap to install the Paytm app
That’s it now, the Parallel Space will start cloning the android app and installing it, later it will appear right inside the Parallel Space as shown below –
S – 1 Parallel Space installing App S – 2 Installed APp
Now simply tap on the icon mentioned in “Step =2 in the above image”to launch the second instance of the same app!!!
Now use the second instance of app normally in parallel space, thus you can now register, login to your second account without requiring to log-out from the first normal app. Enjoy multiple Paytm, hike, Facebook & Messenger accounts with Parallel Space!
Note – The second instance of app is shown as Parallel Space.
What is Parallel Space ?
Parallel Space is sort of an emulator app which emulates storage space on your Android phone so that you can install two or more version variants of any app which do not interfere with each other. Thus enabling you to use two variants and accounts of any app be it WhatsApp, Hike , or even Google Play Store on same device. Thus , you can even use two messenger , wechat accounts in a single device easily!
If you face any issues or problems feel free to comment!
The advent of Oculus VR , & Samsung Galaxy gear has further boosted the VR craze started by Google Cardboard and other VR devices. The popular formats used for watching videos are either SBS (Side By Side 3D) and 360-Degrees. As of now popular media players for Android like MX Player & VLC do not support VR Media Playbacks. So here are the Top 5 Free VR Media Players for Android phones to watch VR Videos. These VR Video Players can not only be used to watch 360 or 3D Videos but you can even watch your 2 D Movies video clips on your VR Glasses by using these VR Players.
Top 5 Free VR Video Players for Android –
App # 1 – VR Gesture Player
Really innovative Gesture Input in VR Gesture Player
When it comes to Virtual Reality its best viewed when it becomes more realistic as possible. VR Gesture Player is one such VR Media player which makes watching videos a great experience.
The most Striking feature of VR Gesture Player is that on open VR Glasses, you can use your hand to control the Videos as shown in the below image –
Control Videos by Hand
Not only does it track your hand gestures but you can even type on it using your hand, and control videos.
Besides, allowing Videos to be controlled by hand gestures, it can even play 2D Videos in Side by Side playback so that you can watch even 2D videos in your VR Glasses.
Besides, being a VR player it can smoothly play 3D Videos & 360 Videos as well.
Different Projections method in VR Player Free for Android
VR Player Free is a free an easy to use VR Player which can play various VR Video formats. You can use it to Play 2D , 3D SBS , 3D Top/Bottom Videos on your Android phone.
Besides being able to play 2D SBS Videos, it can even play 360 degree videos.
Also the various projections methods present in VR Player free such as Sphere , Dome , Cube will give a realistic 360 Degree Imax theater experience right on your Android Phone!
AA VR Cinema is another free alternative VR Cinema player for Android and gives a variety of playback options to play normal as well as 360 3D VR Videos.
The most striking thing about AAA Cinema which we liked the most is its head-tracking technology which works by tracking your head movement drift.
Thus, you can watch VR videos even without Gyroscope sensor if you have AAA VR Cinema app which is simply great.
Not to forget the host of features it provides to watch VR videos on your Android like 180-degree panorama, 360-degree playback which not many apps provide.
VR TV Player free is a similar app to VR Player free but the UI is a bit modest, but the clean and minimalist UI works wonders when it comes to Smoothness in Playback.
Not to mix the minimal User Interface but it provides almost all the important features required to Play VR Videos like projection type : Flat , Dome, Cube , Cylinder.
As well as it supports 2 D Video playback alongwith the 3D VBS, and 360 formats.
The Best feature we found out in our tests was the “Fish eye” mode under the “projection” tab of video we are playing. The Fish eye mode splits any video in such a way that it gives the least concussion or strain to the eyes if the distance between pupillary lens is properly adjusted on VR headset.
The “fish eye” mode really made it great on our small-screen sized android device.
Homido Video Player comes from an VR Headset maker itself and consists of various multiple features.
Not only it can play VR , 2D Videos alongside 360 Side By Side formats, but it even tries to project normal 2D Videos as 360 videos if the option is selected. The result widely depends upon the video type, but we managed to get a real decent 360 degree experience on lesser-resolution 2D Videos.
Besides, this Homido VR Player also contains an inbuilt web browser thus, you can even browse Internet in your VR Glasses or Cardboard.
The method to give inputs to Homido is dependent on Head tracking and thus requires Gyroscope enabled.
Thus, these are the best 5 Free VR Video Players for Google Cardboard & others (Homido VR, Agnus VR, Procus VR, Freefly VR, Galaxy Gear, Oculus VR) on Android which we came across, we will keep updating this list as new apps are launched because VR apps are constantly coming . If you know of any other such good VR Video Player for Cardboard feel free to comment.
Imagine sitting on the cushion of your couch or sofa and controlling your Laptop or Computer via your mobile. And when we say controlling it means full-fledged control including Mouse as well as Keyboard access as well. Sounds great! , Isn’t it ? Yes its possible now due to various WiFi remote apps which are available for Android & iPhone devices. Now there are many such apps and not all of them work flawlessly, here we list down the 3 Best Free Apps which are available for all platforms according to their performance.
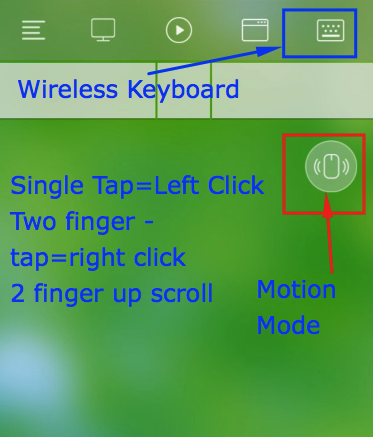
App No . 1 – Remote Mouse –
Remote Mouse
Though this app has a very simple name, but it simply cannot be under-estimated. This small & compact app packs a great performance. You can use Remote Mouse app to –
Use your Mobile Device as a Wireless Mouse / Trackpad.
Use your Mobile Device as a Wireless Keyboard.
Use your Mobile Device as a Media Remote,
Remote Mouse can even open and close programs for you.
In addition, it can even Shut down your machine, and act as a presenter for Powerpoint presentations.
Unified Remote Control is an awesome alternative to remote mouse app, infact it cannot be considered as alternative as its almost as par as remote mouse. Unified Remote even comes with a Linux version so that you can control your mouse pointer on Linux as well by your Android or iPhone.
Alongwith, the Mouse capabilities, Unified Remote even packs in a Wireless Keyboard, App specific keys, media center remote and OS Client specific shortcuts which are not available in even Remote Mouse app.
The reason why we put Unified Remote on the second position is the problem which is faced in connecting the devices, despite both of them being on the same WiFi Network.
Unlike the first two choices there was a stiff competiton for the third spot with the likes of PC Remote Server app, Yooii studios Mouse kit giving a fair challenge. But Ultimate Mouse narrowly marches ahead because of it Bluetooth support, which is absent even in Mobile Remote & Unified Remote apps discussed above.
Now the Bluetooth functionality is a really useful one, but Ultimate Mouse lite server has some disconnection issues which they need to resolve as soon as possible, as the server crashes the remote service as well. Thus, having t0 restart the server for remote access on mobile.
Unified Mouse Lite also has a Linux Version which makes it possible to use on Android as well as iPhone touchscreen as a mouse to Linux machines.
SO, these are the top 3 Free Remote Control apps which will turn your mobile device into a wireless keyboard or a wireless mouse , so that you can control your Desktop, Mac or Laptop with ease ! without even having to touch it! . You can change music, control powerpoint presentations, play games, the possibilities are endles.. If you know of any other good app, do let us know in your comments 🙂
Recently, One of my friends who owns a dual-sim Android devices asked me How to Run two WhatsApp numnbers on his Single Android phone. Now, considering the phone was dual-sim it made real sense. So, here’s a Simple tutorial which will show you how to use two 2 WhatsApp Numbers on a single Android Phone . This method works for single sim devices too and is completely official as we would be using apps present only on Google Play Store only.
Note – For Registering on Official WhatsApp – use the Primary Sim number if you are on a double sim android phone or if you are on a single sim android phone register using the mobile number sim which is currently present inside the Android phone.
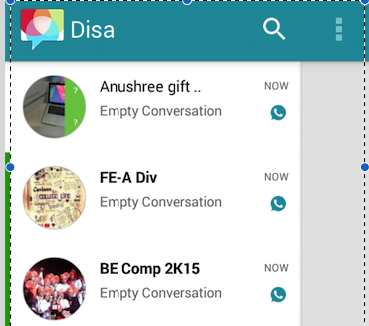
After you have installed Disa.im it will ask you to add a Service, Click on “Add Service” as shown in the image below –
Disa.Im Add Service
Now after you tap on “Add Service”, it will show the list of Services available as shown below –
WhatsApp Plugin Tap to Add to Disa
Once you tap on “WhatsApp Plugin” in Plugin manager, it will now download & install the WhatsApp plugin from the Disa servers. After the plugin is installed, it will ask you to Restart Disa App as shown in the next image. Tap on “Restart Disa”.
The Disa App on Restart would look like below – It will display the message “WhatsApp Settings Needed” now tap on the display message as shown in the image below to get WhatsApp settings –
Tap on the Message to enter settings
Now you will be on the WhatsApp Setup Wizard Screen, It will now ask you to uninstall your original WhatsApp–but please do not uninstall the original WhatsApp on your mobile and Click on”Skip” as shown below –
Click on Skip
Now it will ask you for your Basic information as shown in the image below , Here in Enter your name and Type in your secondary mobile number along with + sign & country code which you want to use for whatsapp as shown below –
Enter mobile number with + sign & country code
Now tap on “Next”.
After you tap on Next , It will ask you for your Verfication method either by “via SMS”or by “via Phone call” . Select your verification method by tapping on it –
Select Verification Method
Now, you will be redirected to “Code” tab as shown in the below image. Here enter the Verification code which you received on the second number which you want to use on WhatsApp and click on “Submit”.
Enter Code & Click on Submit
That’s it! After successfull code verification, You will now be able to use WhatsApp on Disa app too! , Thus whenever you intend to use First Primary number WhatsApp – Use Official WhatsApp version, and for the Second number – Use Disa! –
Second WhatsApp on Disa
Many times, we aren’t able to install an App or APK on our Android phones due to various issues, in such cases neither the Google Play Store, APK Downloading works. The App just simply cannot be installed from your Android. In such cases we can use ADB Android Device Bridge to push our Apps or install them via USB Cable connected to your Computer. The ADB method works on all Android devices and as ADB is available for Windows, Mac OS X and linux the ADB method works on all of them. In this tutorial we will show you How you can Install Android App APKs from Computer by ADB USB Cable Method –
How to Install Android Apps using ADB from Computer (Windows / Mac OS X / Linux) –
Apk file of Android app which you intend to install.
Step.1 Copying the APK file to the ADB Directory
This step is optional if you’re using Compact ADB , But if you are using other ADB Versions such as Minimal ADB & to ben the safer side copy your downloaded app’s apk file to the directory where your “adb.exe” file is located.
Incase of Compact ADB its “C:\Compact ADB & Fastboot”.
Once you have copied the apk into that directory , Open ADB / Command Prompt in “Run as Administrator” with administrative Priveledges.
Step.2 Pushing the APK to the Android Phone
Now, Connect your Android Phone using USB Cable to your computer.
Type in the command “adb devices” and hit the Enter / Return Key.
You will see your Android device listed as shown below –
Android Device listed is unauthorized
Now, we will push our Apk to Android Phone by typing the command “adb install <apk-filename.apk>” inside the console as shown below –
Successfull Installation of Apk
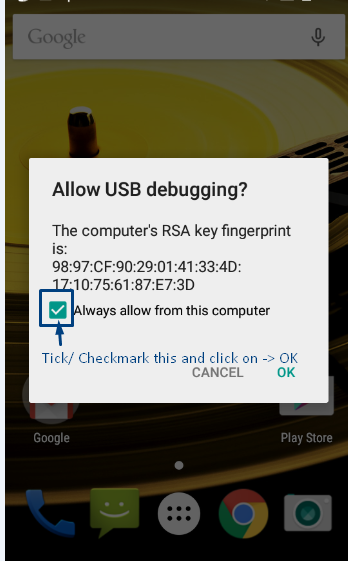
That’s it! Its that simple If you get the “Success” message it means you have successfully installed the App APK on your Android Phone.Update 1 ” : If you’re getting error of “waiting for device” Simply, checkmark the Signature on your Android Phone & Press the “OK” button as shown in the image below –
Verifying Signature
Update 2 : Do make Sure you have the App’s apk in the same directory as that of adb.exe to prevent Apk not found errors.
Geeky Note – Uninstalling Apps Via ADB USB Interface
You can even use the ADB Bridge for uninstalling apps on your Android device which refuse to uninstall by typing the command – “adb uninstall <app-package-name>” as shown in the image below –
Uninstalling App via ADB
Thus , this is one of the simplest way of installing Apk or Apps over USB ADB interface.
Android has many great features which are hidden from a normal user. One of such feeatures is Developer Options which contain options such as USB Debugging, Enabling fake locations. Though, almost all options present in Android Developer mode are useful, the most widely used and useful option is USB Debugging. USB Debugging allows installation & uninstallation of apps on your Android from computer, Flashing custom ROMs. It also allows usage of ADB & Fastboot which is very useful in troubleshooting problems on your Android. So, here’s a Simple tutorial which will explain you how to enable Developer options & USB Debugging on your Android phone.
Step By Step tutorial to Enable Developer Options & USB Debugging on Android –
Settings Menu for USB Developer Options
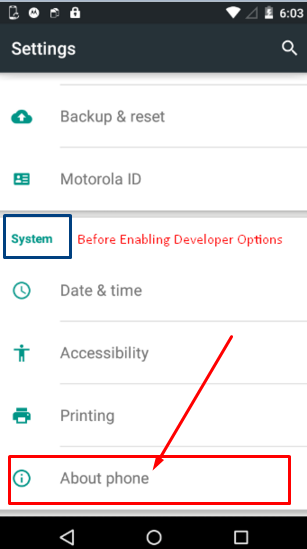
First of all go to your Phone “Settings” menu or option.
Now inside your Phone Settings menu , Scroll down until you find “About Phone” option as highlighted in the alongside image. “About Phone” is generally present under the “System” tab.
Now, Tap on “About Phone” it will show you a menu containing your IMEI Information, Model number, Build number etc as shown in the image below –
Build Number inside About Phone Option
Now Repeatedly Tap on Build Number it will show messages as shown below – “You are xyz steps away from being a developer” .1 Step away from being a developer
Do it until it displays a message as “You are now a developer” , as shown below –
You are now a developer
Congratulations! , Now you will be able to See a “Developer Options” button inside your Phone settings which was previously hidden to you , It will appear right above “About Phone” option as shown below –
Developer Options Now Visible in your Phone Settings!
USB Debugging Option
Part – 2 . Enable USB Debugging on Your Android –
Now in order to Enable USB Debugging on your Android , Please enter the newly enabled “Developer Options” option inside the “Phone Settings” .
Now inside “Developer Options” , Please toggle them “ON” as highlighted by red color in the alongside image.
Also, Make sure that you “Tick / Checkmark” option next to “USB Debugging” as highlighted by blue color in the image beside.
That’s it !. You have successfully enable USB Debugging on your Android Phone.
Now connect your Android phone using USB Cable to any Computer , the appearance of message “USB Debugging Connected” in the notifications slider confirms that the USB Debugging is working successfully.
If you face any issues or encounter any problems while trying to use USB Debugging feel free to comment. We have personally tested and found this method to be working on Android KitKat, Lollipop and even Android Marshmallow version as well.
ADB Android Debug Bridge & FastBoot drivers are required for flashing ROM’s, Changing Recoveries, Installing apps etc. It is very tiresome to install these tools via the default SDK Manager as downloading SDK requires 100 mB of data, while the things we require are of roughly 1mB. So, here’s Compact ADB & Fastboot Android Drivers installer for Windows 7 , 8 , 8.1 & Windows 10 (32 – bit & 64 -bit both supported).
Some, Salient features of our Compact ADB & Fastboot Installer are –
Compact ADB Desktop Icon
One-click single Installer which installs required ADB & Fastboot drivers in split seconds.
No need to manually configure Path, the Installer does it all by itself.
The automatic configuration of environment Variables allows you to use ADB & Fastboot commands in any directory.
Uses the latest tools from Android SDK which work on all Android versions.
The ADB & Fastboot can be used for Adroid Kitkat , Lollipop and Android Marshmallow as well.
Download Compact ADB & Fastboot Installer from Above links.
Double-click to open the Installer & click on “Next” , and finish.
That’s it! your ADB & Fastboot drivers are successfully installed. no need to configure anything.
Optionally you can also launch the shortcut from your desktop to directly type in adb & fastboot commands.
Note!! : Please launch the Desktop Shortcut / or Use ADB “only in Run as Administrator” mode for the proper functioning as shown in the image below –
ADB = Android Device Bridge is a tool used to communicate to your Connected Android device. It can be used to completely browse your Android device via USB Connection, Install & uninstall apps. Reboot into Recovery mode etc.
Fastboot = Fastboot is an alternative recovery protocol which can be used to boot into different recovery modes. CWM & TWRP etc.Besides, these Fastboot is also used for solving Bootloop issues.
Android ADB and Fastboot Drivers are required for many purposes such as installing Custom ROMs, Factory Reset, Troubleshooting device as well as for installing and uninstalling Apps. However, Installing ADB & fastboot drivers on Mac OS X isn’t easy. So, we bring you the Easiest method to Install Android ADB & USB Fastboot drivers on your Mac OS X, so that you can control phone & flash ROM’s directly from your Mac os x device.
Method to Install Android ADB & Fastboot Drivers on Mac OS X –
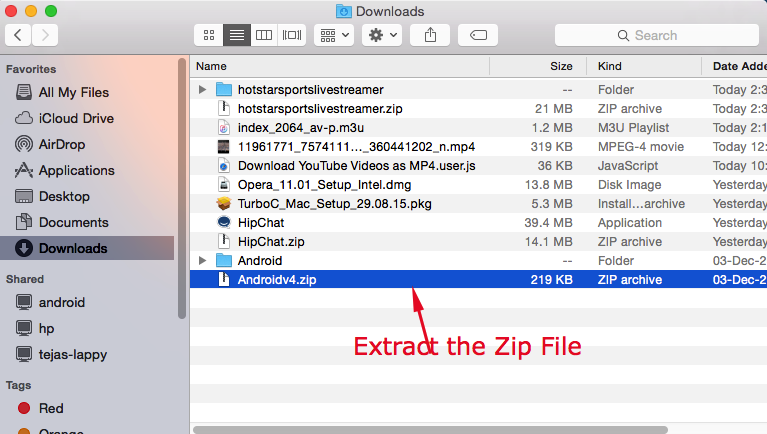
Step.1 Downloading & Extracting the ADB Install Scripts –
Now, Once the above .zip file has been downloaded, extract it to a Folder using Archive manager and open the extracted contents in finder as shown below –
Extract the downloaded Zip file, we have extracted it to Android folder
Search & launch Terminal from Launchpad
Step.2 Opening Terminal & Installing the Script File –
Now launch “Terminal” on your Mac , by Opening “Launchpad” and selecting “Terminal”. Alternatively you can also launch terminal from the utilities folder by pressing the key combination (Shift + Command + U).
Once you have opened Terminal, Switch to the Finder app.
There inside the extracted directory look for the file labelled “ADB-Install-Mac.sh” .
Now, simply drag & drop that file from Finder & app to the Terminal window as shown in the below image –
Drag File ADB-Install-Mac.sh from Finder to terminal window
Now the file name will appear inside the Terminal window.
Hit the “Enter or Return” key.
Once you hit the enter key it will ask you for your Account password as shown below –
Enter your account Password & hit the enter key
Type in your Mac OS X account password and hit the Enter key.
That’s it! Now it will execute the scripts & install the ADB & Fastboot binaries as well as the drivers. After the installation is finished it will wish you a “Nice day”, that’s it now you can run & use ADB and Fastboot on your Mac OS X as shown below –
ADB on Mac OS X
That’s it you have now successfully configured your Mac OS X machine with Android drivers as well as ADB & Fastboot. This method has been tested on Mac OS X Yosemite , Mavericks, El Capitano versions. If you face any problems feel free to comment.


![How to Run 2 variants of same app using Parallel Space on Android Phones [Tutorial]](https://techapple.net/wp-content/uploads/2016/05/paYi7TV.png)


![Top 5 free VR Video Player apps for Android [360 – SBS 3D]](https://techapple.net/wp-content/uploads/2016/02/LOlSR95.png)