Author: Chaitanya

  • How to Enable or Disable Low Power Mode in iPhone & iPad iOS9

    How to Enable or Disable Low Power Mode in iPhone & iPad iOS9

    With the iOS 9 update, Apple introduced a unique Low Power Mode. The Low Power mode helps in increasing battery life by turning off some visual effects, background mail fetch & automatic downloads. Thus, helping to get more juice out of your iPhone & iPad battery. Though, this mode is automatically notified to user once the battery level reaches below 20% but you can use it manually too. Here’s how you can Enable or Disable Low Power Mode on your iPhone or iPad (iOS 9)

    Tutorial to Activate or Deactivate Low Power Mode in iPhone & iPad –

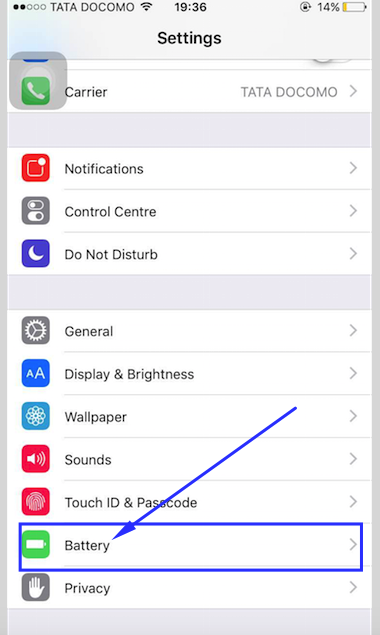
    • Navigate to “Settings” from your App Drawer.
    • Now Scroll down in Settings until you find the “Battery” option as shown below –
      Battery Option under Settings


    • Tap and Open the Battery Settings.
    • Inside Battery Settings, you will find a toggle at the Top right hand side as shown below –
      Low Power Mode Toggle


    • Here, Slide the toggle right to Enable Low Power Mode manually.
    • Or you can Slide the toggle left to Disable Low Power Mode.
    • Please note that this low power option is available only on iOS version 9 & later. (iOS 9.1 supported)
    • If in case you forgot to disable low power mode, there’s nothing to worry as your iPhone & iPad will automatically disable the Low Power Mode on the device, once you have charged your iDevice to more than 80% battery.
    • If incase you intend to Use Low Power Mode even if your battery percentage is greater than 20 percent you can still do it so by performing the above mentioned steps in our article.
    • Thus, you can now enjoy your iDevice without the fear of dropping battery levels.
  • How to Enable & Turn On Data Saver Mode in Chrome Android Version

    How to Enable & Turn On Data Saver Mode in Chrome Android Version

    The amount of Information on the Internet is increasing every milli-second but our Internet Speeds are constant, so is our bundled Internet Cellular Data which is limited. Perhaps, Keeping this in mind and the slow Internet speeds – Google Chrome for Android has come out with a unique Data Saving mode – “Data Saver Mode” which will help you not only save on your Cellular data, but also will increase the Browsing speeds due to lesser data transfer. Here’s a tutorial which will help you to Enable & Turn On Data Saver Mode in Google Chrome for Android.

    Method to Activate Data Saving Mode in Google Chrome –

    • Google Chrome Menu

      Launch & Open the Google Chrome Browser on your Android.

    • Navigate to Menu by clicking on the 3 dots present on the Top-Right hand side. (Check the alongside image).
    • Now, in the drop-down menu select “Settings” as shown in the below image –
      Google Chrome Settings

      Once, you are inside Settings, Scroll down until you find “Data Saver” as shown in the below image –

      Google Chrome Data Saver

      Tap on the “Data Saver” label.

    • Now, in the Data Saver pane, toggle the top right hand side button to turn it “On”, as shown below – 
      Data Saver On


    • That’s it ! You have now successfully activated the Data Saver Mode on Google Chrome for Android. Please note that this Data Saver mode is available only on the latest Google Chrome app, so please Update your Google Chrome app incase the Data Saver option was absent.
    • Enjoy! Faster & Less data intensive internet using Data Saver on Google Chrome. If you face any other queries feel free to comment.
  • How to Compress Videos on Android by Video Compressor App

    How to Compress Videos on Android by Video Compressor App

    The Size & Quality of Videos are increasing at a rapid rate as compared to the Phone Storage. Thus, Videos now take up a good size of disk space on our Android phones . This imbalance in increase of Video quality doesn’t match the speed of increase of Storage on Android which leads to lesser phone memory available for apps, and internal phone memory becoming full. So, In this tutorial we will cover How you can Compress Videos without losing quality on your Android Phones to free-up more storage.

    Tutorial to Compress Videos on Android without losing Quality –

    • Video Compressor Android
      Video Compressor Android

      First of all download & install the Video Compressor App from the link below –
      Click here to Download Video Compressor App from Google Play.

    • Launch the Video Compressor App from Menu, Not to be confused by its User Interface, the light user-interface elements of the app actually make it function faster as compared to other Video compressing Android apps.
    • Once you launch the app, In the label named as “Input Video” tap on “Select” as shown in the alongside image.
    • After you Tap on Select you will be asked to enter the source of the video from where you want to select the video file (We will be using “Gallery” as shown below –
      Gallery Option


    • Browse through the gallery and select the video you want to compress, Once you select a video a “Play” icon will appear on the video as shown below –
      Play Icon on the Video

      Now, click on the Play icon to select the Video.

    •  Once you have selected the Video, you will be redirected to the App with the File location as shown below –
      Enter size & click on Compress

      Now simply tap the “Compress” button.

    • That’s it! your video will start Compressing to the size you specified 🙂 , depending upon your phone hardware this step may take some time.
    • Now, Once your compression is finished, Please delete the original Video to free-up more space.
    • You can easily compress Videos from 10mb to 2mb & thus gain extra 8mb each time you delete the original video file!
    • Click here to Download Video Compressor App from Google Play.
    • For More such tips to increase and free-up Phone Storage – Click here for 7 Best tips to free up internal Phone Storage.


  • How to Access & Open Flipkart Lite Version on your Mobile Phones! (Android / Windows Phones)

    How to Access & Open Flipkart Lite Version on your Mobile Phones! (Android / Windows Phones)

    Flipkart has recently launched its “Flipkart Lite” version which is basically a Web App which let’s you access , open & shop on Flipkart without installing its App! . Thus, Now you will be able to access Flipkart directly by using the Flipkart Lite URL. Not only this, Flipkart’s lite version also works when we are offline, thus allowing us to use Flipkart even if we are offline!. Following are the steps to use the Flipkart Lite URL Version.

    Pre-Requisites – 

    Steps to Use Flipkart Lite Version –

    • Flipkart Lite Version

      Now, considering you have latest Updated Google Chrome or Opera Browser, Open the Below Link URL of Flipkart Lite Version on your latest updated browser.

    • Click this Flipkart Lite Link URL Here to Launch the Flipkart Lite Version. 
      The URL won’t work if your Mobile browser (Chrome / Opera isn’t updated one) If you access the Version on your PC it will redirect you to PC version.
    • You can Bookmark the following link for Faster Access – > goo.gl/Pe1DJb
    • Woah! You will now be navigated to Flipkart Lite web app that too without the app! . Check the alongside Screenshot of Flipkart Lite website.
    • All in all Flipkart Lite Version is a complete interface for Flipkart including log-in support, category browsing and even Payment as shown below –
      Flipkart Lite in Google Chrome

      So, Now there’s now no need to keep Flipkart app at all as the Flipkart lite version itself is capable of remembering your account, your cart contents and even your wishlist.

    • Thus, We highly advise uninstalling the Flipkart app & start using the Flipkart Lite app instead to save even more space on your Mobile device.
    • A Sample Browse Page on Flipkart Lite Version –
      Flipkart Lite Sample

      Not to forget, you can even get Notification of offers & discount deals via Chrome API , So literally you miss out on Nothing!

    • Click this Text to Access & Open Flipkart Lite.
  • How to allow Internet access to Specific App on Android without Root using Android Firewall

    How to allow Internet access to Specific App on Android without Root using Android Firewall

    Cellular operators nowadays, have started providing app-specific data packs, or as as add-on to existing Internet packs. Many times, we exhaust our normal Internet data and are left with only add-on app data, for example WhatsApp , Facebook or YouTube data. Thus, whenever we try to use the app data benefits other background apps automatically connect in background and their ping & notifications result in deduction of our main balance. Here’s a simple tutorial to allow internet access only to specific selected apps on Android while restricting internet data to other apps using Android firewall .

    Method to Allow internet access to specific apps & restrict internet to other apps on Android –

    NoRoot Firewall App for Android
    NoRoot Firewall App for Android
    • First Step would be to install a Firewall app to intercept our network traffic, though most apps require root the NoRoot Firewall app below works even on non-rooted Phones –

    Click here to Download NoRoot Firewall app for Android from Google Play Store.

    • Now, once you have installed the firewall app tap on “Start”.
    • The firewall app will now ask you for one time permission to start a VPN connection, don’t worry this is just a dummy VPN connection with your own IP address , created just to intercept and block unwanted traffic. The VPN service dialog box would look as shown below –
      VPN dialog box – NoRoot Firewall

      Here “tick or checkmark – I trust this application” option and tap on “OK”.

    • Now, Simply connect to your internet connection, the data access will be blocked to all apps by default. To allow Internet access to a particular app, Open the app for example WhatsApp and then return to the NoRoot Firewall App.
    • Navigate to the “Pending Access” tab as shown below , This section will list out all the apps trying to access the internet –
      Pending Access Tab
      Pending Access Tab

      Tap on  “Allow” to enable internet to that particular app, and keep other blocking access to internet for other apps.

    • You can also Stop your Firewall anytime to restore access to internet like before.

    This method thus, is highly efficient and useful to prevent access to internet to other apps, thus saving money as well as data.

  • How to Block Ads on Safari iOS: iPhone or iPad using Presto

    How to Block Ads on Safari iOS: iPhone or iPad using Presto

    Our browsing activities are constantly tracked and so is our privacy breached , this is done by malicious scripts which run in your web browser while browsing low-quality websites. Now, in order to save users from such tracking Apple included Content Blocker support in Safari browser from its iOS 9 series update. Here’s a tutorial explaining How you can use Presto –  A Free Content Blocker app to block ads on Safari browser for iPhone & iPad .

    Before we move onto tutorial to use Presto, let us point out some salient features of Presto App –

    • Presto is able to block ads on Safari Browser and works on iPhone & iPad (iOS 9 or later required).
    • Lock all banners, pop-ups and video ads . (Blocks YouTube ads on iPhone)
    • Reduces Data usage consumed while serving ads, thus helps in Saving money.
    • Get the best privacy protection built with anti-tracking
    • Block Lists specific language.
    Presto App

    So, Presto is a really a good free-feature rich Ad Blocker for iOS, here’s a tutorial on How to configure Presto Content Blocker – 

    • First of all download & install Presto app from the iTunes App Store by clicking below –
      Click here to download Presto Content Blocker from AppStore.
    • Now, Open the Presto app and tap on “Make Magic Happen” button, as shown in the alongside image.
    • After tappin on the button you will be shown a tutorial on how to Activate Presto, Here simply tap on the “Go to Settings” button as highlighted below –
      Presto Settings

      When you tap on “Go to Settings” you will be redirected to the Safari Settings on your iOS Device.

    • Now Scroll down until you find “Content Blockers” in general tab.Now Tap on Content Blocker as shown below –
      Content Blocker iOS9

      Now, when you tap on Content Blockers, You will find the “Presto” togggle, simply toggle it to right side to activate the Presto app –

      Presto Toggle Active.


    • That’s it, Now simply launch Safari directly or through the Presto app to enjoy ad-free , tracking free and a pleasing smooth browsing experience in Safari browser on your iPhone or iPad!.


  • How to Remotely Control an Android Phone from PC / Windows without Root using Mobizen

    How to Remotely Control an Android Phone from PC / Windows without Root using Mobizen

    Imagine a scenario where your Android Phone is being mirrored on your Computer Screen and you controlling it via your PC mouse & Keyboard. The mirrored  screen enabling you to type faster on your phone using computer keyboard, or you and your friend playing the same game on a single android phone but you using keyboard to play while your friend is using the phone screen. Interesting isn’t it ? , and its easy too! – now you can easily Remote control your Android phone from PC by using the Mobizen App and requires no-root (Rooting not required) . Read on to know procedure to use Mobizen App for remote controlling an Android Phone from your Computer.

    Tutorial to Remotely Control an Android Phone from PC / Computer –

    Pre-Requisites : 

    1. An Android phone which you want to control via PC, with Mobizen app installed. You can download Mobizen app from the link below –
      Click here to Download Mobizen App from Google Play Store.
    2. A Windows PC ( Computer – Laptop ) with the Mobizen Client app installed – Check below for Download Link –
      Click here to Download Mobizen for Windows 7/8/10.
    3. Enable USB Debugging / Developer on your Android Phone – Click here for tutorial to enable USB Debugging on Android.

    Step.1 Installing And Registering for A Mobizen Account –

    • Open the Mobizen app, and sign-up for a Mobizen account using your e-mail (free to sign-up).
    • Now, connect your mobile to your PC and enable USB Debugging.
    Mobizen Client

    Step.2 Opening the Mobizen App on PC & logging in –

    • Now, Launch the Mobizen Client on your computer while your phone is connected to computer.
    • Log-in using the e-mail id (account created in Step.1)  & password onto the Desktop client .(As shown in the alongside image).
    • Click on “Connect” .
    • Now, You will see your Phone inside Mobizen client as shown below –
      Phone Mirrored on Computer

      Now simply start clicking using your mouse pointer & keyboard to Start operating your phone! (while its still connected on to the USB)

    • Enjoy! Remotely controlling your Android phone 🙂 . If you face any problems or encounter any issues feel free to comment.
  • How to Record Screen in Android 4.x KitKat without Root

    How to Record Screen in Android 4.x KitKat without Root

    Now, you can easily Record Android Screen irrespective whether it is rooted or not, by using a simple app called as Mobizen. Previously, Recording Screen on non-root Android 4.x versions (4.1, 4.2, 4.4) with audio was nearly impossible even using ADB. So, here’s a small yet detailed tutorial which will explain how to record screen in Android without Root (Works on 4.4 kitkat and earlier versions too), last but not the least – the recorded android videos have microphone audio too!

    Tutorial to Easily Record Android Screen Without Root –

    Pre-Requisites –

    1. An Android phone whose Screen you intend to record , with Mobizen app installed. You can download Mobizen app from the link below –
      Click here to Download Mobizen App from Google Play Store.
    2. Enable USB Debugging / Developer on your Android Phone – Click here for tutorial to enable USB Debugging on Android.

    Step.1 Installing And Registering for A Mobizen Account –

    • Open the Mobizen app, and sign-up for a Mobizen account using your e-mail (free to sign-up).
    • Now, connect your mobile to your PC and enable USB Debugging.

    Step.2 Activating Booster Mode + Starting Video Record –

    • Record Screen using Mobizen App
      Record Screen using Mobizen App

      Once you have enabled USB Debugging, launch the Mobizen App.

    • You will see a notification of “Booster Mode has Started”, which indicates that Mobizen app is now ready to start recording.
    • Now, Simply tap on “Record Screen” button to start your recording as shown in the alongside image.
    • Once you have tapped on the button it will redirect you to your Home Screen, with a floating “m” button as shown in the figure below –
      Mobizen Floating Button

      Tap on the “m” floating Button.

    • Tap the Video cam icon to Start Video recording
      Tap the Video cam icon to Start Video recording

      Now, as you tap on the m button, you will see 3 sub-buttons. simply tap on the “Video camera” button to start your screen Recording!.

    • Once your Recording has started the “m” button will show a timer which indicates the recorded time (and thus confirms that the recording has started) as shown below –

      Video Recording Time
    Stop Recording

    Step.3 Video Record Controls + Stopping Recording –

    • Now to stop / pause your currently recorded video, again simply tap on the “m” button while the recording is On and tap on the “Stop” icon as shown in the image alongside.

    To View your Recorded Screen Videos Simply tap on the burger icon in the Mobizen app home screen as shown below –

    Tap to View Recorded Videos

    That’s it ! This is perhaps the only working method to Record your Android Screen with audio from microphone without root on older versions than lollipop, and the method to record Android videos using Mobizen. If you face any problems or have any queries feel free to comment .

    Next Update/ Trick – While testing on one of our devices, removing phone once the booster mode started, still recorded the screen.. we even tried closing the app and opening it again to record.. it was still able to record videos.. you may try this on your phone too to enable booster mode once, and then use the phone to directly record until next reboot.

  • Get Instant Free Rs.100 in BookMyShow App for Free Movie Tickets | Refer & Earn Rs.100 Per each friend referred!

    Get Instant Free Rs.100 in BookMyShow App for Free Movie Tickets | Refer & Earn Rs.100 Per each friend referred!

    BookMyShow has come up with probably the best Diwali Offer amongst all! . You get Instant Rs.100 For Free in BookMyShow App to book Free Movie Tickets. All you need to do is Download the BookMyShow App and then Sign-Up for BookMyShow Wallet using our Referral code to get your Free Rs.100, and if the ticket cost is less than Rs.100 Your movie ticket will come for free! . So, Here’s how you can get Your Free Rs.100 in BookMyShow Wallet –

    Method to Instantly Claim your Free Rs.100 in BookMyShow App –

    Sign-Up for BookMyShow after Downloading App
    • First of all Download & Install the BookMyShow app from the links below (You’ll need to uninstall existing app if its already installed) –
      Click here to download BookMyShow App from Google Play.
    • Once, you have downloaded the BookMyShow app, Click on “Login/Sign-Up” and sign-up for a new account.
      Note – (If you’re an exisiting or old user please check the “You” Section for Refer & Earn section to activate your wallet) .
    • While Signing up for a account make sure you “checkmark or tick the option of activate wallet for faster checkout & cool offers” as our free Rs.100 will  be credited in our BookMyShow wallet itself. (Very Important!)
    • Now, Tap on the ” ƴ “ symbol on the top right hand-side corner to complete your Sign-up!.
    • Once, you have tapped on the checkmark, it will ask you to Verify your mobile number as shown in the below image –
      BookMyShow Wallet Verification
      BookMyShow Wallet Verification

      Here enter your mobile number and tap on “Verify” . Now it will verify your number using OTP , please do enter the OTP manually if not automatically detected by the App.

    • Now, it will ask you to enter Money into wallet , Important – Here select the option “Use your Own Code” or “Coupon Code” and enter any one code from CGBFEGY
      VB5QBFZ
      T5V76EE
      Q36U3E7
      GFJF44G as shown in the image below –

      Enter Your Code Option in BookMyShow Wallet

      . (Important Step!)

    • Here In the space labelled “Punch in your code” , Now enter any of the coupon codes – CGBFEGY
      VB5QBFZ
      T5V76EE
      Q36U3E7
      GFJF44G and tap on Submit as shown below –
      .
    • Voila! You have successfully Earned Free Rs.100 in your BookMyShow wallet which can be used to Book Movie Tickets for Free!
    • You can check the below screenshot for proof (Make Sure that your Ticket amount is below Rs.90) –

      BookMyShow Wallet Proof

    What do if I forgot to add Coupon code ?

    • If you forgot to enter the coupon code in above Step, you may go to the “You” tab in BookMyShow app and Navigate to “Refer & Earn” tab, If you’re lucky it will ask you to sign-up for wallet and enter the Promo code. (We strongly advise entering the promocode as soon as you sign-up for BookMyShow wallet ).
    • Once you enter the Promocode “D7HCK7C”,  You’ll be successfully credited with Rs.100 in your BookMyShow BMS Wallet!

    How Can i Get My Own Refer Code – ?