Uber is the leading cab and taxi provider on the global front, and recently it has began its operations in India too.. Though, Uber might not have started its services in your city, we highly recommend that you grab your first free ride beforehand, as it has just reduced its first free ride benefits from Rs.600 to Rs.250 , and may be the offer can expire before Uber reaches your city 🙁 , so here’s all you need to do to get your first instant Rs.250 free on Uber!.
Now, once you’ve downloaded Uber, it will ask you to sign-up / register, and link your Paytm wallet.
Once you’ve finished signing-up , Open the Uber app and then go to menu by clicking top-left handside corner and tap on “promotions“
There in enter the promocode – “chaitanyap206ue” and click on “apply” to get instant Free Rs.250 in your Uber account!.
Uber may ask you to create a Paytm wallet if in case it doesn’t exist, or may verify it with an OTP, do complete the OTP verification do get extra Rs.50 , if you’re a new Paytm wallet user!
That’s it , Enjoy your Free Rs.250 and grab it as soon as possible before the offer expires!
Online cab or taxi booking is currently red-hot in the Indian market, but as most of the cities didn’t had their services we weren’t aware of them. Ola cabs is one such online booking app , Ola cabs is one of the fastest expanding taxi and even auto-rickshaw providing apps in India and is expanding its presence in newer cities everyday! . Ola has been in India for more than a year now, and hence they’ve got a good name now in the market and are reducing the promotional benefits. So grab the following offers by Ola cabs referral code / promotional benefits like – Ola cabs First Taxi ride offer or Ola cabs first auto-rickshaw free ride or you can atleast grab the Free Ola Money (the wallet money associated with free rides) as soon as you can! , as even though if Ola isn’t available in your city currently, we never know when the company might stop these promotional offers, and if incase that happens before they reach your city, you’ll regret not having grabbed these offers early . Also Ola even provides paying through Ola money even for auto-rickshaws! , so why to pay for them if you can get it for free –
Steps to get your Ola First Free Taxi / Auto-Rickshaw ride
First of all download and install the Ola cabs app from the following links –
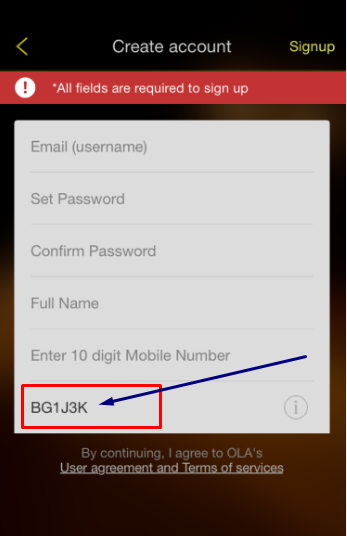
Ola referral code – BG1J3K
Now, Open the Ola cabs app, it will ask you to either sign-up or sign-in.
Now, comes the most important part, the first-free ride benefits are applicable only for referred users – hence , you can fill-up your name,e-mail ID’s and use the referral code as shown in the alongside image or you can input the code as “BG1J3K” to get instant Rs.200!.
You might be tempted to think that its fine to not use Referral code while signing-up on the Ola cabs app, Yes, though its fine not to use refer code for sign-up on ola, BUT not entering any referral code simply won’t give you free ride. Check the below screenshot for the offer proof –
Now, after you’ve successfully signed-up you’ll be having your free ride credits in the “Ola Money” section of ola app! , Enjoy your free ride.
How to use Ola cabs app for booking a ride ?
Booking through Ola cabs app
The procedure to book a cab or an auto-rickshaw through Ola cabs app is pretty simple, just select the type of cab or auto-rickshaw you want to book , and click on the “Ride Now” button (as shown in alongside image). Its that easy !, Ola uses GPS to automatically call the vehicle to your location, hence make sure your navigation is turned on when you use the Ola app.
Want more free rides from Ola ?
Its pretty easy to get some more free rides credits if you’re interested ! . All you have to do is refer your friends to the Ola cabs app using the “Invite & Earn” option present in the top left-hand-side menu.
You either get extra free Ride or Rs.100 Ola Money for every friend referred! , we can also help you by putting your referral code instead of ours – “BG1J3K” , so we all can benefit!
There is a dearth of Android PC suites, or good Android Phone managers when it comes to Mac OS , we too were facing some problems while managing my Android phone on Macbook, until we came across this wonderful tool – Dr.Fone for Android by Wondershare. Wondershare is a well-known brandname, which makes a lot of useful softwares for end users, and Dr.Fone too is very useful, Before we move on to complete review, let us list some salient features of Dr.Fone
Salient Features of Dr.Fone for Android
A complete utility to browse for hidden / unseen photos on your Android . (Many times the photos, and videos on our device don’t get shown in the gallery due to photo hide apps, or due to memory corruption) , Dr.Fone lets you browse all the data in your memory and hence recover them too!
Dr.Fone for Android file recovery software is mainly designed to recover files from Android phones and tablets. It is able to recover text messages, photos, contacts, call history, videos, WhatsApp messages, audio files, and more whether you accidently deleted or lost due to OS crash or ROM flashing. Hence, a very useful tool incase if you lose s0ome Data on your phone.
Method to recover your lost Android data using Dr.Fone –
Enable USB debugging on Android
First of all download and install Dr.Fone on your PC /Mac by downloading it from the above links.
Now, connect your android phone to PC / Mac, make sure that before connecting the phone, the phone’s battery is atleast 20% charged.
Also make sure you’ve enable USB Debugging on your android phone,before you start scanning it, check the alongside screenshot for instructions on how to enable it.
Connecting android to Dr.Fone
Now, once you connect your phone, click on Next. , Now, it will ask you for what type of data would you like to recover e.g Photos, Text Messages, Whatsapp messages,Whatsapp media etc.
Select the ones you want to recover, and click on the “Scan” option.
Dr.Fone will now start scanning for the deleted media / and content types of your phone, and will present you with an option to select which files you want to recover.
As, it provides a preview option Dr.Fone is really very unique as no other Data Recovery for software for Android provides, this option.
Preview pane for message recovery on Dr.Fone
Now, checkmark the files you want to recover and click on the “recover” button . That’s it!
Yes, now you’ve successfully recovered your deleted data on Android! . Thus, saving the extra costs which are taken by Data recovery centres/services, thus Dr.Fone is really a nice friend, which will help you in any emergency problem which is faced by your Android Phone!
Some games are very difficult to play on the normal keyboard + mouse combo and we feel that it would have been better if the game supported gamepads, joysticks. Or by someway we could have been able to simulate keyboard key -press or mouse control simply on our gamepads, which would make playing games much easier! especially the online & DOS based games. Yes its possible to do such actions by a small free utility – Xpadder v 5.3 , Xpadder lets you simulate keyboard key presss, and mouse actions by mapping the keyboard keypress, and mouse actions to Joystick and Gamepad buttons!. Let’s have a brief look into the following tutorial to configure xpadder for Windows 7/8/8.1/10 –
Tutorial to configure Xpadder on Windows 10 / 7 / 8.1 (32-bit as well as 64-bit)
Xpadder used to be free until version 5.3, but now if you try to download it from its official site – xpadder.com, it won’t be for free!. In our tutorial we will be using an older version of Xpadder, which is free to use for playing games with weak or no gamepad support.
The above package also contains, sample 3 images which are required for configuring joysticks, and an example mapping profile just incase you’re too lazy to map keys 🙂
Step 2 – Installing Xpadder
Now, simply install the above linked Xpadder, by clicking next .
Make sure your gamepad/joystick is connected to your computer before you open Xpadder.
Newbie alert –
Loading bundled in configuration of Xpadder
If you’re new to Xpadder and mapping , or if you were unable to map your controller, you may try opening the bundled-in controller and mapping file which comes with our installer, you can load it by –
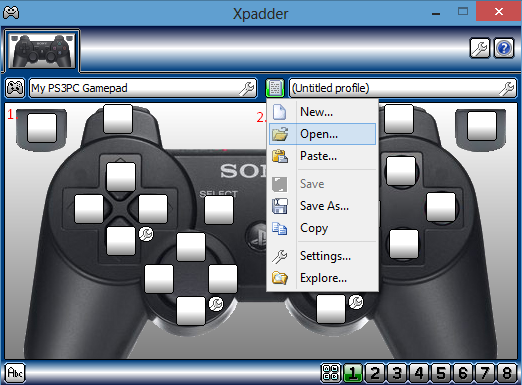
First click on the “gamepad” icon labelled “1” in the alongside image of Xpadder window, and select the “Open” option , here in select the folder in which you’ve installed our Xpadder and select the controller file present in it.
To load key-mapper again click the second icon labelled “2” as shown in the alongside image and use the “open” option for our pre-defined mapping.
Or if you think you’re an Hard-core Gamer, and like challenges, or faced any issues while loading the bundled configuration files , or would like to customise with additional options please proceed to Step 3, for manual configuration!
Step 3 – Configuring Xpadder
Xpadder compatibility troublesoot
Now, when you first try to run Xpadder on your windows, it will give you an Unsupported Windows Version detected error on Windows 8.1 /10 , and here’s the solution for the problem –
Now, go to compatibilty tab, as shown in the alongside xpadder compatibilty troubleshoot image, and in the section named “Compatibility mode” , select the version as “Windows 7″ and click on apply, and OK. You can also additionally checkmark the “run program as an administrator” option if you encounter any issues later.
That’s it, Xpadder is now ready to function, in your latest version of Windows.
Step – 4 Xpadder overview and adding Joystick image
Below is the screenshot of Xpadder , on running now, click on the settings icon which looks like a wrench , to load the xpadder joystick image file as shown below –
Xpadder wrench icon (joystick image)
Now , we need to select the appropriate joystick format *.bmp image file for loading onto Xpadder, we have bundled the ones for PS2, and Xbox 360 in the installer itself, however you can have a google search for *.bmp files of the gamepad controller image you have.
Now , clicking, on the wrench would open the image selection window – here we need to specify the image file of controller as shown by the labels 1..2.. & 3.. in the following image –
Xpadder – selecting controller image file
Now, after loading the controller image file, you will be shown the controller image in the Xpadder window.
Here , select the option “Sticks” present in the bottom left corner of xpadder window, and now to configure the analog sticks – click on the first “Enable” option marked by green color in the below image labelled analog configuration , and push the corresponding analogs(whose name is indicated on the pop-up) to the directions shown in the pop-up “left,up,down,right” , do the same for the other analog too (if present) on the controller.
analog configuration
Step 5 – Moving the highlight bubbles
After you, push the analog on your gamepad, a transparent bubble shapes would appear on the window, drag and drop them to their corresponding controller locations , as shown in this image. (Click here to view bubble drag image)
Step 6 – Configuring the D-Pad and other Joystick buttons
Once, you are done with the analog sticks, configuration – Navigate to the “DPad” option in Xpadder, and “Enable” it, now again press the corresponding Keys (whose name is indicated on the pop-up) on the connected controller/gamepad.
Step 7 – Adding the Buttons, and placing them
Now , click on the “Buttons” option in the xpadder, and start pressing the buttons of your gamepad – they’ll start appearing in the gamepad image as you press them, Now place them according to the location of the button which you had pressed on the gamepad.
Now, in the below mentioned example (image) – We pressed the “X” button on our controller and it appeared on the place marked by “1” now, we will move its appeared place shown by the maroon arrow, to its original place on the controller shown by blue arrow.
We pressed “X” we will move the box “1” to “X” position(blue arrow)
Now, please repeat these steps for all the buttons present on your gamepad and press “OK”.
A completely configured controller would look like this –
Completely configured gamepad controller
Step 8 – Mapping the Keyboard keys, and mouse actions to Added Analog and buttons.
Whoosh! we are done only with half the part yet, after you click on “OK” , you’ll be redirected to the following screen as shown below , here we need to individually click on these “white buttons” and assign the keyboard/mouse actions to them. –
We have to assign maps to each of these buttons, simply click on any whitebox to start.
Clicking on the white button, would open the part of assigning keys – Check the below image carefully for conventions , alternatively you can click on the “wrench“icon besides the white-button to select pre-defined mapping, check the below image for manual mapping –
Manual mapping for white buttons – joystick actions.. (Click on image to view full-size)
You can assign the mouse-movements to the 4-white buttons of analog , to simulate the mouse movements :).
After assigning some functions to the buttons, it would look somewhat like this –
A demo assignement mapping
Voilla! Now, you can check puching your analog , the mouse pointer would also be moving! the way you are pushing it 🙂 ,
Step 9 – Running the game!
Now, simply run the game without closing Xpadder! and play it using your gamepad like a boss! 🙂
If you, face any issues or encounter any problems feel free to comment 🙂 ,
Many a times, we need to identify a song which we are currently listening to.. or may be a song which we know and want to recognize the song name which is currently playing, so that we can download it and add it to our music library, or may be to simply know the Singer Artist of the Song/Music. In all such scenarios we need to identify/ detect or recognise the song & music , following are 3 Best Free Music recognition apps for iOS which can recognise the currently playing songs easily!
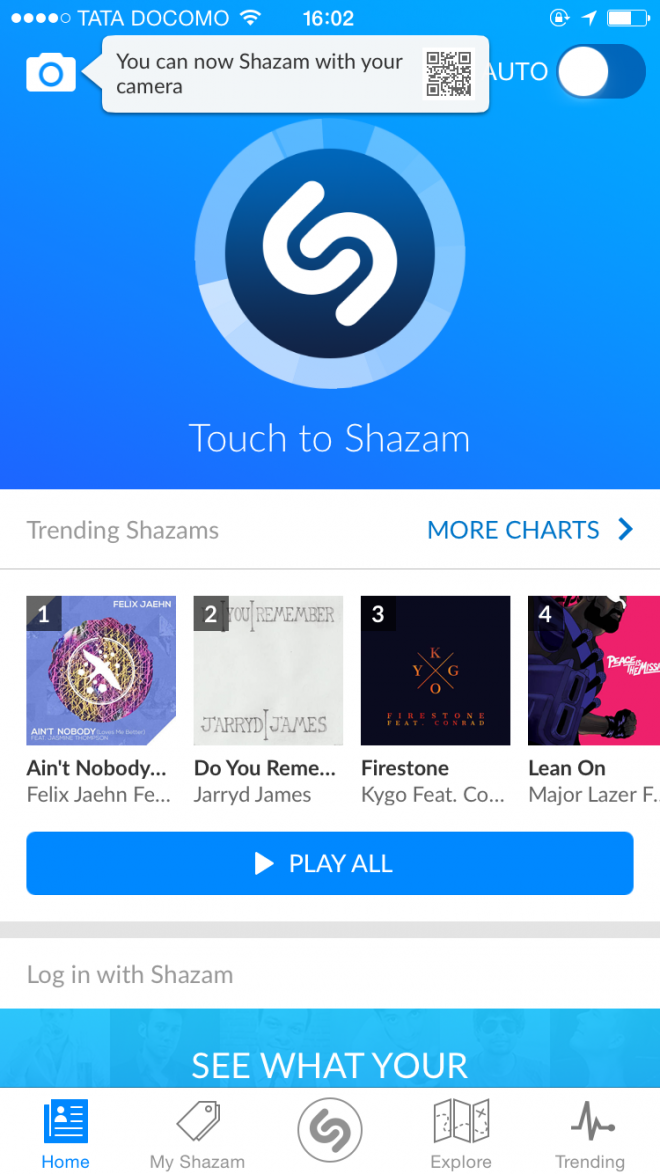
App # 1 – Shazam for iOS – iPhone / iPad
Shazam for iOS
Shazam is the leading app for music detection be it English, or regional songs. Shazam’s directory and ability to identify songs is the highest amongst all the apps we tried out for iOS. To recognise music using Shazam all you need to do is
1. Open Shazam app on your phone.
2. Tap on the “S” icon, which is above the “touch to Shazam” option.
3. Now place your iPhone/iPad microphone near the source playing music, Shazam will automatically record the beats and compare with its server’s music directory and Identify the song for you!.
Besides, these you can now also use your phone Camera to record videos and get your music detected by Shazam app.
Shazam requires a decent internet connection (WiFi/Cellular Data) for its working, so make sure you turn on the internet on your device before using Shazam!.
App # 2 – MusixMatch app (Music ID app for iOS – iPhone / iPad)
MusicID option present in MusixMatch
There was a direct competition between Soundcloud and MusixMatch to be the best alternative to Shazam, but MusixMatch simply races ahead due to some unique features which are absent in Shazam too!
MusixMatch can not only detect the songs which you are hearing from an external source, but it also identifies the ones which are played from the Music .
Not just music identification, MusixMatch even starts showing the lyrics in synchronisation with the Song Stanza! , so it even plays the lyrics of the detected songs for you , in addition to playing songs at the simultaneously (if you called it for device’s internal music library).
For using the external sound recognize function of MusixMatch you need to select the “MusicID” option from the menu, as shown in the alongside screenshot.
The rest of the procedure is similar to that of Shazam for identifying the currently played music/songs. ( You need to tap on the “butterfly” icon after selecting MusicID option to start recording (required for Song identification)).
MusixMatch was able to synchronise with the external music source
Alongside, is an image result of test which we used to detect a regional bollywood song, it even started showing the lyrics in synchronisation with the external music song/source!. The only thing which kept MusixMatch after Shazam was that Shazam was able to recognize more music types and was quicker as compared to MusixMatch.
SoundHound too uses the “S” button to detect songs!
Ideally SoundHound can be classified as a ditto alternative to Shazam, with almost the same set of features as the latter. SoundHound is 3rd in our list because we faced a few glitches with it while trying to identify and detect local music through it., but SoundHound functions really well for English Music (Hollywood).
The procedure to use SoundHound is also similar to Shazam, and so it also requires an internet connection.
Tap the “S” button and place the device’s microphone near to the music playing source, to recognize the song on your iPhone or iPad device.
These are currently the best apps to recognize music/songs , we also tested a few others like “What the Song” (WTS),Genius, soundtracking but didn’t find them worthwhile to be added in this article. If you encounter any problems while using them, or know of any other such good app feel free to comment.
There can be a need to recognize music anytime, sometime we may need to recognize song which which we are listening to..or sometimes we might be tempted to detect a song which we know and looking for How to to recognize the song name which is currently playing, so that we can download it and add it to our music library. Or in some-cases simply to know the Singer Artist of the Song/or currently played Music. In all above cases we need to identify, detect or recognise the song & music and the only thing which can help us out is our Android phones!. Following are 4 Best Free Music recognition apps for Android mobiles which can recognise the currently playing songs easily! be it insource(inside mobile) or external source(speaker) etc.
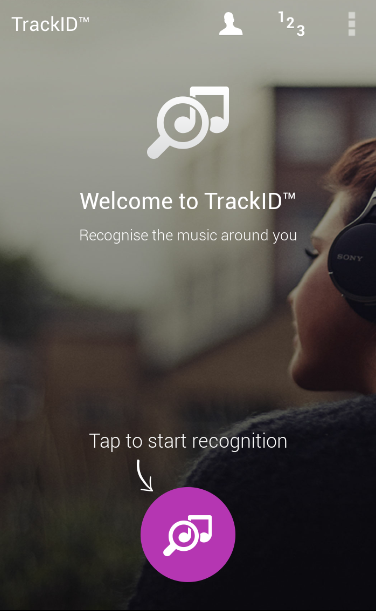
App # 1 – Sony TrackID app for Android
TrackID for music detection by Sony
We simply love this app, and we find it the best amongst all Music recognition apps for android. TrackID is developed by Sony, which is known for its quality products, and this app too isn’t much different . TrackID has a sleek and simple user interface, and just requires a working internet connection.
To recognise music using TrackID, simply turn on your Cellular Data connection,open the TrackID app.
Now tap on the “Music icon“and place your Android phone near the music/song source which you want to detect.
And that’s it , it will automatically record the beats, and compare it with server data and will recognize the song for you!
TrackID gave us the best song identification results in our tests.
Shazam is the leading app for music detection be it English, or regional songs. To recognise music using Shazam all you need to do is
1. Open Shazam app on your phone.
2. Tap on the “S” icon, which is above the “touch to Shazam” option.
3. Now place your Android phone’s microphone near the source playing music, Shazam will automatically record the beats and compare with its server’s music directory and identify the song for you!.
Besides, these you can now also use your phone camera to record videos and get your music detected by Shazam app. Shazam unlike MusixMatch cannot identify songs which are in your phone’s music library – i.e playing and detecting them concurrently on the same device is not supported by Shazam.
Shazam requires a decent internet connection (WiFi/Data connection) for its working, so make sure you turn on the internet on your device before using Shazam!.
App # 3 – MusixMatch app (Music ID app for Android)
MusicID option present in MusixMatch
There was a direct competition between Soundcloud and MusixMatch to be the best alternative to Shazam, but MusixMatch simply races ahead due to some unique features which are absent in Shazam too!
MusixMatch can not only detect the songs which you are hearing from an external source, but it also identifies the ones which are played from the Music .
Not just music identification, MusixMatch even starts showing the lyrics in synchronisation with the Song Stanza! , so it even plays the lyrics of the detected songs for you , in addition to playing songs at the simultaneously (if you called it for device’s internal music library).
For using the external sound recognize function of MusixMatch you need to select the “MusicID” option from the menu, as shown in the alongside screenshot.
The rest of the procedure is similar to that of Shazam for identifying the currently played music/songs. ( You need to tap on the “butterfly” icon after selecting MusicID option to start recording (required for Song identification)).
MusixMatch was able to synchronise with the external music source
Alongside, is an image result of test which we used to detect a regional bollywood song, it even started showing the lyrics in synchronization with the external music song/source!. The only thing which kept MusixMatch after Shazam was that Shazam was able to recognize more music types and was quicker as compared to MusixMatch.
SoundHound too uses the “S” button to detect songs!
Ideally SoundHound can be classified as a ditto alternative to Shazam, with almost the same set of features as the latter. SoundHound is 3rd in our list because we faced a few glitches with it while trying to identify and detect local music through it., but SoundHound functions really well for English Music (Hollywood).
The procedure to use SoundHound is also similar to Shazam, and so it also requires an internet connection.
Tap the “S” button and place the device’s microphone near to the music playing source, to recognize the song on your Android device.
SoundHound also supports the “humming” technology, which means you can simply sing the song yourself into the phone’s microphone and it will detect the song for you!
These are currently the best apps to recognize music/songs for Android , we also tested a few others like Genius but didn’t find them worthwhile to be added in this article. If you face any problems while using them, or know of any other such good app feel free to comment.
Unlike Android, testing Apple iOS apps is a kinda tedious tasks as there are NO emulators available for iOS compared to many Android emulators available for either Windows / Linux or Mac OS X . Hence when it comes to testing iOS apps or be it taking a feel of Apple iOS for iPhone or iPad , there are a very few alternatives. But not anymore, we present you Top 3 iOS emulators which you can use not only to take a feel of iOS , but also test your ipa’s – iPhone or iPad apps online. Being cloud based solutions these emulators work on any operating system – Windows 7/8/8.1 , Linux , Mac OS and even Chrome os too!
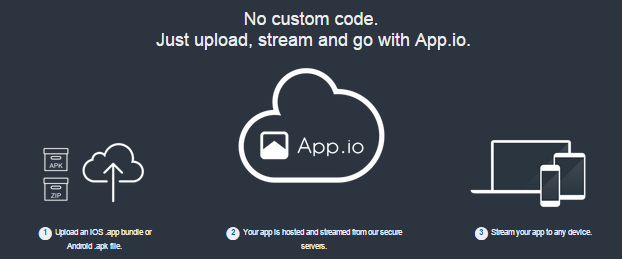
No # 1 – App.io
App.io Process
The most simplest and easy to use amongst them is App.io (Check the alongside screenshot)). All you need to do is upload your iOS .app bundle on App.io , and then it can be streamed from the App.io cloud to any of your devices be it your PC / Mac / Android Phone / Tablet etc. Thus, App.io is a great way to experience iOS apps on Android phones as the apps are streamed from the cloud, hence no extra configuration hardware is required.
App.io offers a free 7-day trial which is enough to get a look and feel of Apple iOS, the keyboard, menus etc. Below is a demo screenshot of eBay app for iOS deployed on the app.io cloud, it works flawlessly with all features! you can yourself check it out on App.io’s homepage.
Appetize.io provides a complete emulated iOS device
Appetize.io is another alternative to app.io which provides iOS & android app deployment on the cloud. And in addition to app deployment Appetize also provides a free live iOS demo which can be used by everyone to have a complete peek into iPhone 4/5s/6 as well as Nexus 5. However, you cannot install any app in the demo emulated device. If you want to test a particular iOS app or .ipa you can upload it using the upload option on the Appetize site, and yo! your emulated iOS app link will be emailed to you 🙂
Personal take – I really like the appetizer iPhone 6 demo, though it was sluggish at first but later it gave a complete hand-on on iOS , highly recommended for users who want to have a feel of Apple iOS for iPhone. Appetizer now has a demo device of iPad available too!
No 3 – Xamarin Testflight
Xamarin – TestFlight
We weren’t able to test this solution personally like we were able to as in case of app.io and appetize.io . However, being tied-up with Apple, Xamarin Testflight also gives a platform to deploy your apps and test them.
So, to be frank there is really no offline software or solution available which can be termed as a complete apple iOS emulator, however we found Appetizer.io to be the closest one can get just to handle and get the feel Apple iOS for iPhone and iPad and run their own apps. App.io also gives a similar solution but has a 7 day free trial and needs to be payed for later..
Recently one of our posts experienced a major spike in traffic and we wanted to check out the source/medium of that particular blog article. Neither the default WordPress stats by JetPack, nor any other stats manager were able to track it. And after the recent update Google hides the search keyword for most keywords and hence we were unable to distinguish the source of traffic generation of that particular article. We tried playing around in Google Analytics and finally succeeded in finding the below mentioned method on how to successfully track the incoming traffic source/medium of any article on your blog .
Method to track / finding out the traffic source or medium of any selected blog post/article using Google Analytics for free –
Pre-requisites –
Google Analytics to be integrated with your blog, there are tons of articles on the web which can guide on this, as well as a host of WordPress plugins.
Blogger users can easily integrate it by adding the google analytics gadget to their blog.
Method –
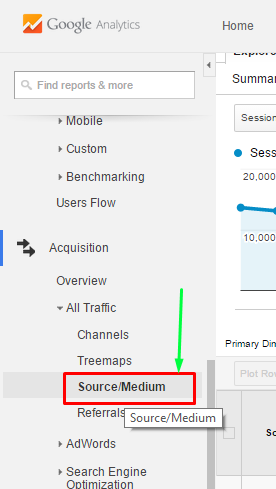
Acquisiton – Google Analytics
Log-in to your Google Analytics account, and open the Dashboard.
Now in the left hand side menu pane, click on the “Acquisitions” option, and select the option marked as “Source/Medium” as shown in the alongside figure.
Now, you’ll be presented with all the source/medium of traffic of your blog, now we need to filter it to fulfill our purpose . Now, in the tab option labelled “Primary Dimension” , click on “Other / the arrow mark” and type in & select “Landing Page” .(As shown in below figure)
Selecting Primary Dimension – Landing Page Google Analytics
Now, the traffic will be listed according to the landing page, but we need to know the source or the medium too for the traffic so now click on the “Secondary dimension” drop down box , and type-in to select the “Source or Source/Medium” option, as shown in the below figure –
Secondary Dimension – Source Google Analytics
Done, Now you can see your traffic report of your blog with urls of article and the referring source/medium to it. If incase the Article isn’t visible you can increase the row size to 50,100,500 to show more articles and use “Ctrl+f” to find traffic details for your desired post.
This is a pretty useful trick for us to confirm whether our article is indexed and is receiving organic search traffic, however you can also use it to analyse which medium works more effectively for you so that you can target promoting on it even more.
If you face any problems or have any queries feel free to comment. This article is a testing article for blogging tips & tutorials section on TechApple as we want opinions of our readers whether should we start adding more blogging tips & tricks tutorials on TechApple! including SEO tips, or whether we should do it separately!
The inbuilt codec playback support in GNU Linux is limited, many times we need to install codecs just for viewing a single video of a particular format as the video simply won’t play . If you have many videos of different format then installing codecs for all of them becomes a tedious task. Also sometimes, you may need to transfer a video to your handheld device or mobile phone, that too becomes a problem if the codecs mismatch. There’s a simple solution to the aforesaid problems though, why not simply convert them to a particular format which is supported by Operating system/device by using Video converters ? And these Top 7 free video converters for Linux mentioned below will help you on how to convert videos in Linux the easy way –
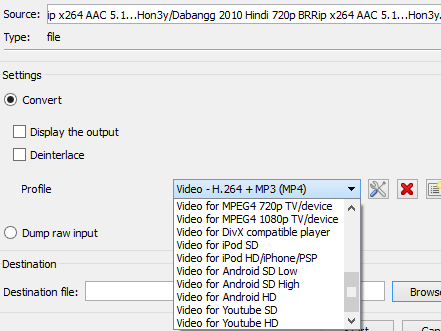
App # 1 – VLC
Using VLC’s video conversion
Not to get confused, but yes the very powerful VLC media player by VideoLAN, also doubles up as an audio/video converter for Linux. The reason why we placed VLC at the top is its easy availability for almost any GNU Linux distribution, hence installing VLC won’t be a big hiccup for users. Also, many distros such as Linux Mint come with VLC preinstalled anyway, with all the codecs and offcourse it doubles up as a Media player too . The procedure to convert videos using VLC too is pretty easy and is as follows –
Go to Media — > Convert/Save — > Now, in the file tab add your source video/audio file which you intend to convert.
After Adding your file, click on the small “down arrow” mark on the Convert/Save button and Select “Convert”.
Now,specify the conversion format in the “Profile” drop down as shown in the alongside image, Specify the destination file to save the convert file.
Click on “Start”, Your video/audio conversion will be started! and after conversion the converted file will be available in the destination source.
Though, at the time of writing this post Handbrake was available only for Ubuntu, but its rapid development promises its upgrade for other linux distributions too. HandBrake is a feature reach Video converter with exclusive feature of preview window, which can help you to preview videos before converting in addition to supporting various formats and codecs for video conversion.
Not to get confused by its name WinFF is actively developed for and works in Linux too!, its basically a front-end for ffmpeg, and is very powerful. WinFF allows easy conversions from / to desired video formats in Linux. Although, readymade download packages aren’t yet available but you can easily install them from repository depending upon your GNU Linux distribution as mentioned below –
True to its name FF Multi Converter is a multipurpose converter which can convert audio, video as well as images in Linux. It can convert from / to between all popular encoding formats and uses ffmpeg for audio/video files, unoconv for document files and ImageMagick for image file conversions. The Front-end is what which makes is standout as it removes the need to remember command line commands for conversions using ffmpeg etc.
Transmageddon is a video converter/ transcoder app for Linux and Unix systems built using GStreamer. It supports many formats as its input and can generate a very large host of output files depending upon the User’s choice. Transmaggedon is available in RPM package too which makes it an ideal video converter for Fedora.
Though, there has been only a single version of Format Junkie that too in 2012, but its user base remains intact. All because of its hasslefree user interface, and speedy conversions. Expect Format Junkie to perform smooth conversion between video formats released prior to 2012, however it may struggle to perform conversions with newer codecs.
DamnVid ceases to impress us, although its our favorite when it comes to windows but its incompatibility with newer linux versions pushes it upto No.7 in this list of video converters. There’s no looking for other solutions/app for video conversion even for professional users, if you get DamnVid running. Although, the default packages of DamnVid Linux won’t work anymore on newer Linux kernels, but you can always use Wine! to run the windows version of DamnVid on your Linux.
And , if you don’t wish to install wine for a single app, here’s a Portable compact version of DamnVid for you which works on newer Linux distros too! –
So, these were some of the Best Free Video converters available for Ubuntu/Fedora/Arch and other distributions of Linux, if you know of any other good one or incase you encounter any problems feel free to drop a comment :).