Many times, we need to use WhatsApp for sending or receiving messages/media without showing or using our real mobile number or even trick our friends and message without revealing our Identity. Now, by using the following tutorial you will be able to create a fake WhatsApp account with a spoofed U.S.A number in any country, that too will all the normal functioning of WhatsApp . The tutorial will work for Android, and iOS devices (iPhone) too!
Tutorial to create a Fake WhatsApp account with other Spoof Number –
First of all , Install and verify WhatsApp on your phone . (Skip this step if you have WhatsApp already installed & verified on your phone).
After verifying your Vovox navigate to more tab in the app as shown below –
Vovox More Option
Now, Note down your Vovox Number which is highlighted by Blue color.
Now, Open WhatsApp app and navigate to the settings option as shown on the next image –
WhatsApp Settings
Once you are into the settings panel , Open the Change number option as highlighted by blue color –
WhatsApp Change Number
Now, when you are into the Change Number Option inside WhatsApp app, Enter your existing Verified Mobile number in text field of “Old country code and mobile number” and in the second text field , Enter country code as “+1” which is U.S.A country code and type in your new phone number (Vovox Number) obtained in Step.3 (Which we noted down from More option in the Vovox app) .
WhatsApp Change number option
Now, Click on “Done” option present in Whatsapp app’s top right hand side corner , You’ll soon receive a message on your Vovox app with verification code, while at the same time WhatsApp app will be waiting for Verification.
Now, Open the message you received in Vovox app, and then Click/visit the Verification link received in the message as shown below –
WhatsApp Verification Link in Vovox App
That’s it ! Your Whatsapp verification would be completed successfully! & you can now use WhatsApp with a fake/spoof U.S.A number and Enjoy WhatsApp Anonymously!
A lot of ISPs, offices, colleges etc block the utorrent P2P protocol or are filtering the same, hence most times the torrent downloads are very slow or simply they don’t download at all. A Simple solution to this problem is caching torrents online and then downloading the torrent with IDM via HTTP protocol by torrent leeching sites. So, below are the Top 15 Free torrent leeching sites which will help you to download torrents via IDM.
Advantages of Downloading torrents via Torrent Leech Sites –
Download torrents even if torrent traffic is blocked in your network, thus bypass torrent filter.
No need to keep your machine powered on , just add your torrent file/magnet link to leech, and it will automatically leech for you.
The torrent health doesn’t matter, thus you can even download torrents with lesser seeds.
You can download torrents via IDM with Resume support!
The ISP cannot detect the torrent traffic.
The top 15 Free Torrent leech sites are as follows –
BitPort.io is a torrent leeching service which we highly recommend, and there are various reasons for it such as – Bitport.io enables caching of torrents onto its high speed servers, so that you can download them even without a torrent client.
Besides these you can even stream your cached torrents directly on the browser and on any device. Thus you can now stream & enjoy your movies on mobile or laptop anywhere without even downloading them! thus saving time !
Zbigz.com is perhaps the leader when it comes to online torrent leeching websites and is based upon cloud network. All you need to do is either upload your .torrent file or torrent URI Magnet link and click on the “Go” button, then after the caching is completed you can easily click the “zip” button to start downloading, you can either sign-up or you may even use the zbigz service without sign-up.
A great alternative to Zbigz is FileStream.me , FileStream.me is perhaps even better than Zbigz.com when it comes to features, besides normal http based download, filestream.me even provides secure HTTPS protocol download, which no ISP can sniff out , besides it also gives the option of selecting individual files out of a torrent which can be zipped and downloaded.
Direct-torrents.com is one of the easiest to use free torrent leeching services and can also be classified as a filestream.me alternative. All you need to do is Enter your .torrent URL or Magnet link and click on download, then below you just need to click the filename to start downloading!
Furk.Net is yet another Zbigz alternative site to downloads torrents over HTTP , Although Furk.Net is invite only, but Furk.Net invites are easily available . Furk.Net also provides direct VLC Player streaming of video files in your torrent, besides allowing you to download them as zip.
MyFastFile.com is yet another free torrent leeching website and is also easy to use as direct-torrents.com. All you need to do is either enter your Torrent URL or its Magnet link to start your torrent leech, else you can also upload your .torrent file using the “Fetch Torrent Option”, Besides allowing you to download torrents over http on IDM, myfastfile also allows you to stream them on VLC, as well as it supports many other file hosting websites too!
Premiumize.me is yet another free torrent downloading website which also provides a Free Seedbox in addition to torrent leech! . Once you finish signing-up on Premiumize.me , Visit https://www.premiumize.me/downloader to start leeching your torrent either by uploading it to the service or by using magnet link as shown in alongside figure.
Hive.im is not basically a torrent leech site, but it can be used as one as it allows remote fetching. All you need to do is go to add files option, now click on the “+” sign, and select the option “web links”, Now if you paste or add a magnet link of a torrent here, it fetches the files inside the torrent, right into your private storage on Hive.im (Check the below screenshot for more detail) –
ZZLbox.com’s Features are same as that of Furk.net , also it allows you to preview/view screenshots of any video torrent you cache on it, and it also doesn’t require any invites!
Similar in functionality like Zbigz.com, but the only downside is that its in russian language, however you can use Google Translate to translate the website into English.
No.14 – JustSeed.it: This website is also like Fuge.it- a torrent seedbox, but the User interface isn’t too great and user-friendly .
No.15 – BtCloud.io : BtCloud.io is also a good alternative torrent leeching website, but the torrent file size limit is very low and supports torrent size only upto 1GB . Hence we will recommend to use this only during dire situations.
So, these were Free Torrent Leeching Websites, We hope they will help you to easily get your favorite torrents downloaded if the traffic is filtered, feel free to comment any good website you know 🙂
Recently I needed to transfer some music/songs into my iPhone, and I found that for any song/track which you want to add to the iPhone / iPod it must be synced to the iTunes library. Now we may want to transfer just a song and not have it in Music Library like I wanted or some might need to import only particular Music onto the iDevice without using iTunes (iDevice= iOS devices : iPhone, iPod, iPad) . So, here’s a simple tutorial on how you can copy/transfer music from your Mac/Windows pc-laptop without using iTunes .
Pre-requisites –
This tutorial requires iTunes to be installed on your system, as the newer iOS device drivers can only be installed through iTunes.
Tutorial on how to transfer-copy music soundtrack from Computer/Mac to iPhone / iPod / iPad without iTunes –
First of all connect your iPhone / iPad device to your system , If iTunes automatically opens up & start syncing close it.
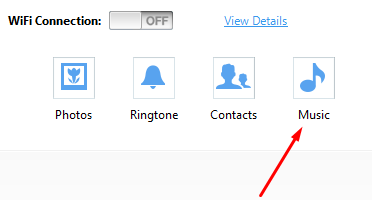
Now, Open iTools app, you will see your iOS device in the window, there in click on the “Music” icon / media tab under the device menu as shown below –
iTools Music icon shown only after device recongnized by iTools
Here you will see all the music tracks present inside your device, Now near the menu bar there’s an option labelled “Import” as shown below –
iTools import music option
Now select/click on the Import option.
After you have clicked on the Import option, it will open an Explorer window, here browse & select either manually select the music tracks or you can even select the directories whose music you want to transfer / import (highlighted by Green arrow in the below image)-
iTools Music Import to iPhone / iPad / iPod
Once you are done with selecting the tracks, Click on the Import button.
Wait for a while until the tracks are copied & indexed, and that’s it! Now you can disconnect your iPhone / iPad from the system and enjoy the music right in your music library! totally without iTunes!
If you encounter any problems while using this tutorial feel free to comment.
We had earlier covered a tutorial for Xender app (iOS) which is probably the most easiest & efficient way to import music from other device (Android) to your iPhone / iOS device. A lot of users were really happy with the results of the app, but some also requested that the songs/music to be imported into the default music player from Xender. Though, not easy but it isn’t impossible either so here’s a tutorial to import songs & music from Xender , ShareIt app to the default Music Player library on your iPhone / iOS device.
Tutorial- How to import music songs/music from Xender to Music Library
Pre-requisites :
We will need two different iOS file explorers to transfer files – iBrowse (to extract/export music from iPhone’s or iOS device’s apps document folder) & iTools (to import the music back into the music library of iPhone/iPad) , however you can skip iTools if you plan to import it using iTunes.
Tutorial Part 1 – Exporting the music from app’s document folder to storage
First of all, connect your iOS device/ iPhone to your computer / Mac.
Now open iBrowse app, now browse through to the app’s document folder as shown below –
Navigate to the apps folder in iBrowse as shown below , and open it –
iBrowse app’s folder
Here scroll down to the app’s folder, as we need to copy music from Xender in our case we navigate to the Xender folder in apps & open it –
Navigate and open Xender Folder
Once you open the Xender folder, please browse to the “Documents” folder which is present inside the Xender folder (Navigate and open the Documents sub-directory inside Xender).
Now check for the music/song inside either the”Inbox” or “Other” sub-directories which are present inside the Xender app as shown below –
Inbox directory inside Xender documents directory
Other directory inside the Xender documents directory
In our case the music file was present inside the “other” folder.
Now, Select the music files you want to export and now right-click on them and select the “Export to folder” option as shown below- . (Select a temporary folder on your hard disk where you will be storing music files, later on we will be importing the files in iPhone’s music library.)
Export to folder option – iBrowse
Tutorial Part 2 – Importing the exported music from Part 1 into Music Library
You can directly import the exported music via iTunes onto your Music Library or –
You can open iTools app after connecting your iPhone / iOS device, then navigate to the “media” option selected by maroon color in the figure below –
iTools method to import music into music library
Now, click on the “import” option highlighted by the green color in above figure, herein select the music files/folder to which we exported our music files in Part 1 of this tutorial and click on “Import”.
That’s it! You have now successfully imported music from Xender to Music Player library on your iPhone / iPad & iPod :).
Well, the tutorial is a lengthy one, but this is probably the only way you can do the import without jailbreaking your device, if you encounter any problems while following the tutorial feel free to comment .
Hello everyone, its been quite a while we haven’t came up with an instant free recharge article on our blog. Well the wait is over hereby we bring you one of the easiest method to get Instant Free Rs.50 Paytm cash trick without any promocode right in your wallet! , which you can use for instant free recharge of rs.50 or for purchasing goods on Paytm. Follow the below steps to claim your Free Rs.50 Paytm wallet cash by Matchify app!
Method to get your Free Rs.50 Paytm Cash by Matchify app –
Now, it will ask you for Facebook authorization , now log on to your facebook profile and authorize the app, don’t worry its completely safe and infact it uses Facebook to find perfect matches for you! .
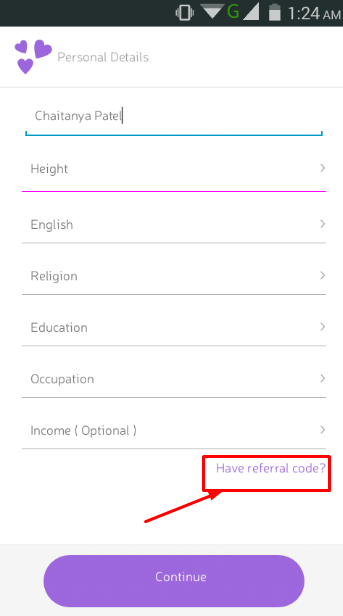
Once the app is authorized, it will ask you for your name , age, occupation , income etc, At the bottom you will see an option labelled “have referral code” as highlighted in the alongside figure.
Now tap on this highlighted have referral code option and enter the referral code as “1S2RLR1″ to get instant Rs.50 cash in your wallet once you verify your mobile number by OTP.
Note : if you don’t Enter any referral code, you won’t be able to get the instant Rs.50 Paytm cash in your Paytm wallet we recommend using our referral code – 1S2RLR1 as shown below –
Matchify app referral code
Trick to earn unlimited Free Paytm Cash from Matchify app –
Matchify app also allows you to earn extra free unlimited Paytm cash by referring your friends.
It gives you as well as the friend you referred Rs.50 Paytm cash to both of you each Now Rs.10 to the one who refers friends!.Thus, you can refer unlimited friends to earn unlimited Paytm cash in your wallet!
Proof –
You can check the below screenshot for the payment proof –
If you face any queries feel free to comment , we would be happy to help you out!
Many times we get bored of the existing games on our android phones and need to try some new games, Or some simply don’t haven any games installed on their devices. So be it for passing some time or for some geeky minds wanting to explore here are 2 hidden or we can say secret games which are present on each & every Android phones . These games are present by default and do not require any installation, here’s a method by which you can play & enjoy these games on your devices –
Game # 1 – Android Version game –
Navigating to About Phone in settings
This may sound weird, but yes there’s a hidden/secret game right in the “Settings” panel of your android phone! , and it varies for each device based upon the Android version installed . While Android Lollipop has the most intriguing game inspired from “Flappy Bird” , the android version games of Jellybean & Android Kitkat are also worth giving a try! , Here’s how you can play them –
Open the “Settings” pane of your Android device , now navigate right upto the bottom-most setting you can see labelled as “About Phone” as shown in the figure above. (pointed by red arrow).
Now, tap on the “About phone” option, to open it.
Once, you’re into the About phone menu, repeatedly tap on the “Android version”to launch the hidden game! (as shown in figure below )-
Repeatedly tap on Android version
Depending upon your Android version you may see animation of either Jellybean, Kitkat or Lollipop.
Here , long-tap or double tap on either the “Jellybean” , or Kitkat or “Lollipop” logo to start playing the game! , You will see either of the three games –
Android Jellybean game – If your android version is Jellybean it will open a game as shown below, your aim in this game is to drag and swipe all the jellybeans on the screen so that no Jellybean is left on the screen! –
touch and Swipe the jellybeans to throw them away offscreen!
Or Android Kit-Kat game – the moto of this game is to tap the biggest same-colors tiles to remove them and again empty the screen (I found this game the most boring of them all) –
Android Kitkat game, to tap on the biggest tiles
Or Android Lollipop game – This is the game I loved the most, the aim of this game is to pass the Android mascot through the hanging lollipop’s without touching them! . Tapping the screen makes the mascot goes up else the android mascot is always falling down due to gravity, make sure you tap at the correct time so as you don’t touch the lollipops! –
Android Lollipop game!
Now, this was regarding the default android version games, they may not entice you much, but I am sure the next game will!
Secret / Hidden Game # 2 – Google Chrome Dinosaur game!
Google Chrome Dinosaur game
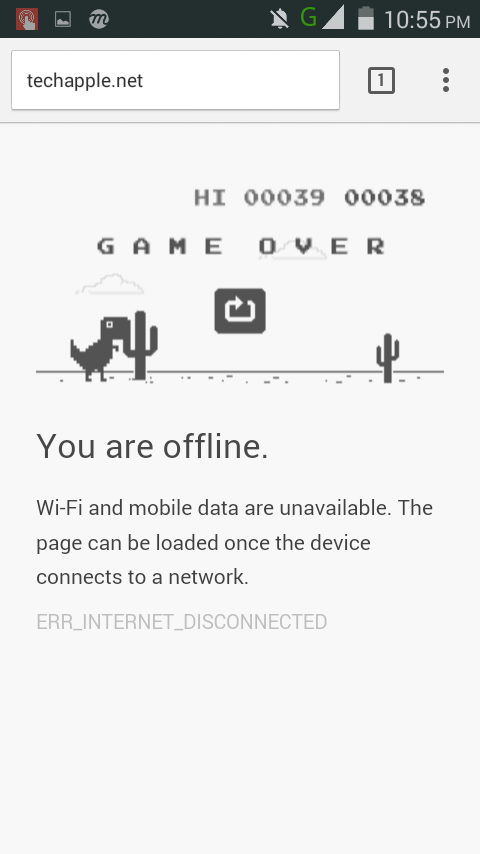
You may have met this Google Chrome dinosaur before, well Google has intentionally placed this dinosaur so that you can play with it, whenever there is a problem with the Internet connection. To be honest, this game reminded me of playing Mario in my childhood, here’s how you can play it –
Make sure your Cellular data or Wifi connection is turned off or disconnected.
Now, Open Google Chrome browser on your phone, and try to access or open any website, you’ll meet a dinosaur as shown in the image alongside.
Now, simply tap on the dinosaur to start the game! , the ground below the dinosaur will start moving!.
All you have to do to play this game is to tap the screen to make the dinosaur jump over the obstacles like cactus plant which is planted on the ground!.
The Scores will automatically increase proportionally to the number of obstacles avoided , and playing the game is a fun 🙂 –
Google Chrome Dinosaur game on Android
Considering, Each & every Google Android device since the Android Kitkat 4.4 has Google Chrome inbuilt, you can flaunt that your browser too has an in-built game inside it!
So, these are 2 hidden/secret games present in Android, although not as good as the other games available on playstore, but they don’t require any installation either! Do give them a try and feel free to comment your opinion and views on the same.
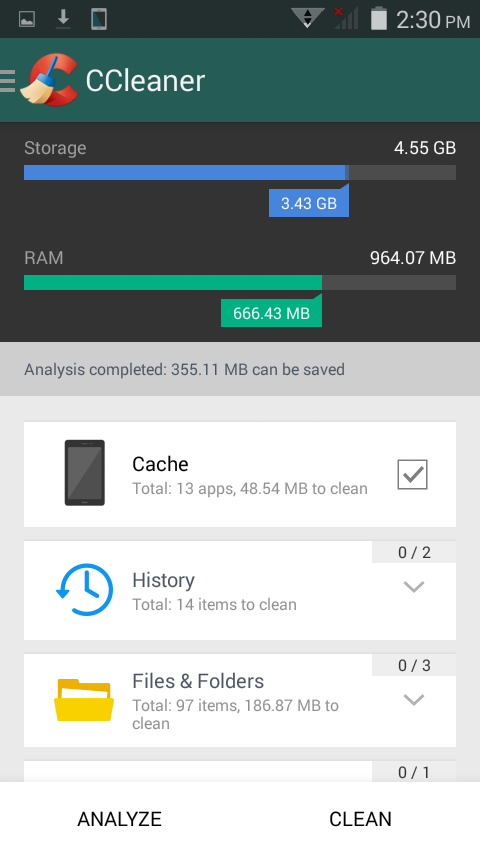
Internal app cache & junk data files simply hog the internal phone storage memory on Android devices, making the device slower and hang a lot. Also the pile-up of junk files results in lower storage memory for storing your data – images, media, music and even apps!. Here’s an easy and foolproof solution to clean and clear up internal app cache on Android phones using CCleaner app . CCleaner app is a leading software for PC to clear cache & delete junk files and now it’s available for Android too –
How to clear internal app cache & delete junk files on Android –
After, you’ve installed the CCleaner app , it will show you a graphical chart of your phone storage, Now to start cleaning junk files the app first needs to analyze which of the data is cache and junk .
So for ding this, please checkmark the components you want to get rid of like Cache,History etc (as shown in alongside image) , NowTap on the “Analyze” button to start the data analysis process, it can take on maximum upto a couple of minutes for the app to analyze the data which is junk and can be cleaned .
After the analyze process is completed, Simply tap on the “Clean” button.
That’s it you’ve easily got rid of the junk files and internal app cache which were causing your phone to lag, and phone memory to become lessor on space.
Travelling to another city ? need to book accommodation / hotels ? look no further as now Oyo Rooms! is offering Free Rs.500 Oyo Money, for each new sign-ups / new accounts made by referrals. Oyo Money is a virtual cash which can be used to book rooms on the Oyo Money app, and if you’ve a lot of friends. You can also earn Rs.200 per each friend referral to literally book the hotel rooms for FREE! , as Oyo Rooms hotels are really cheaper and offer great value for money with prices starting as low as Rs.999 per day (which means you’re already getting Flat 50% discount even if you do not invite anyone 🙂 ).
Method to claim your Free Rs.500 on Oyo Rooms –
First of all download the Oyo Rooms Application from the following link –
Oyo Rooms referral code
After you’ve downloaded the app, it will ask you to sign-up , Now enter your mobile number , name , E-mail ID and Referral code.
Note – Though the referral code field is optional, keeping it blank won’t give you Free Rs.500 , Enter the referral code as CHAI-DLHPER to get your Free Rs.500 (As shown in the Image alongside).
Now tap on continue button, The app will now send an OTP message and will verify your mobile number.
Using the referral code – CHAI-DLHPER Oyo rooms would instantly credit you Rs.500 in your Oyo Money account, which you can easily use to book your Oyo hotel rooms for great discounts and even for FREE! if you can refer many friends.
The free Oyo Money Scheme is valid only for referral installs, and has no expiry limits so you can book rooms anytime you want.
UPDATE / Note – If you’re using OyoRooms to book hotels in case you’re travelling to a new city or for a vacation , You can also get Free Instant Rs.500 Cash on MakeMyTrip too! which you can use for booking domestic flights as well as hotels too! Click here to get Instant Rs.500 On MakeMyTrip
Most of the apps which we use, download & store some background data which they fail to delete even if its not useful anymore. This type of data gets accumulated and stored overtime which results in Insufficient memory in our iOS devices – the result iPhone & iPad internal memory full. Also, iOS unlike Android doesn’t give external apps even access to other app’s data,let alone delete it or even use it -. This results in the absence of proper cache cleaning apps for iPhone’s and junk file deleting apps for iOS. But not anymore – Now we can clear app data/cache and even the junk files by the following tutorial –
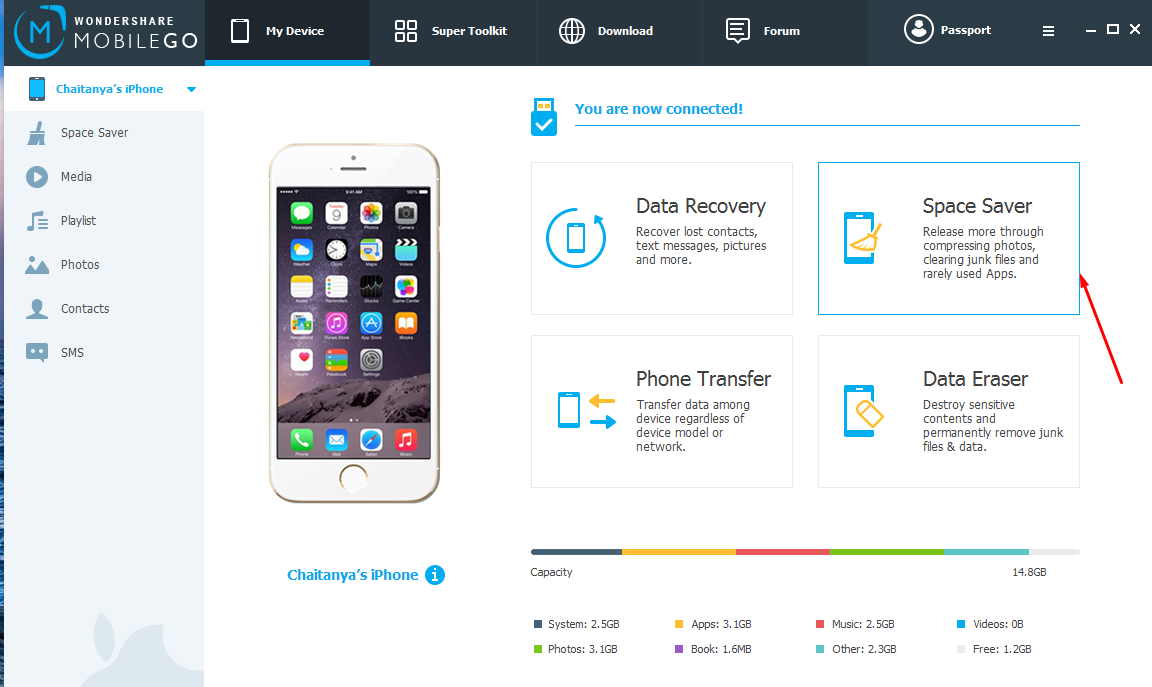
Tutorial to clear app data/ app cache and delete junk files on iPhone / iPad using MobileGo
Now, once you’ve downloaded MobileGO, install it . (Note – If you’re using Microsoft Windows OS, it might prompt you to download & install iTunes, this step is necessary as declining the same would result in iPhone drivers not being installed and hence no proper iPhone / iPod connection to PC).
After you’ve installed MobileGo, execute the program, now connect your iPhone or iOS device to PC using the USB lightning cable.
Once you’ve connected your iOS device, MobileGo will automatically connect your device and present you with a dashboard as shown alongside , here click on the “Space Saver” option (as highlighted by red arrow).
Now, it will ask your permission to scan your device for junk files , and cache as shown below – , here click on “Start”. Mobile GO Space Saver Start icon
Now, it will start scanning your device, please wait until your complete device is scanned. (Note : This may take some time depending upon the data present in your iPhone / iPod or iPad).
Once Mobile Go has finished scanning it will ask you to for check-marking the the actions to be performed for space reclaimation , Now just checkmark on the actions you want to perform – “System Junk files”, “App generated junk files” , “photo compressor” .
Now, click on “Resolve” button –
Mobile GO Resolve button
Wait until the process is completed! .
Voila! you’ve now easily and successfully freed-up space in the internal storage memory of your iOS device, that too without Jailbreaking! and without affecting your log-ins/ or affecting security – Keeping it as secured as ever!
If you encounter any problems while using Mobile Go feel free to comment 🙂 .
![How to create a Fake WhatsApp account with Spoof Number on Android / iOS [Using USA Number in any Country!]](https://techapple.net/wp-content/uploads/2015/09/SINcm9t.png)


![Top 15 Free Torrent leech sites to download torrents on IDM [Download torrent over HTTP Protocol]](https://techapple.net/wp-content/uploads/2015/08/GQMv4ys.png)


 A great free torrent leeching website with very few limitations, Seeedr is very promising and provides various features such as


![Get Instant Free Rs.500 Money to book hotel on Oyo Rooms! app [Also Get Rs.700 per referral]](https://techapple.net/wp-content/uploads/2015/07/aC1ZR2o.png)