There was a dearth of good android emulators when it came to Mac OS , and Windows too had limited options when it came to free good android emulators & simulators. Fortunately, the scene is changing with some new entries and one of them is – Droid4X!. Droid4X is the sort of Android simulator designed for Power! , it provides complete power to the users by virtue of its speed! and things such as Complete Root Access. Also Droid 4X is an ideal android emulator for Windows Tablet esp(Lix Tablet PCs) Let’s have a peek onto some features.
Salient features of Droid4X-
Droid4X Apk installation
Google Play Store comes pre-installed, very few android emulators barely support it without modifications,let alone coming bundled with Google Play. Droid 4X Android emulator support Google Play.
Supports Ctrl + C, Ctrl +V text support between the host Operating System and the guest Android installation (emulator).
Zoom In- Out supported through Central mouse – wheel (Scrollbar Zoom-in/out).
Best Android emulator when it comes to Gaming!, personally i’ve never encountered an emulator which supports Gaming to such an extent, you can use keyboard as a controller for Android games.
Provides in-built app for keyboard mapping, you can map your screen area, actions, touch-gestures etc to your Keyboard keys, which i’ll be explaining later in the article.
That’s it , I personally loved the Droid 4X Android emulator, do comment problems encountered while installation and any such good emulator which you might be knowing!
Its almost impossible to find an internet user who hasn’t used YouTube! but sometimes YouTube experience isn’t that great because of Ads, Buffering while loading videos , unrelated comments , or autoplay of videos . So here are the 5 Best & Awesome extensions which will enhance your YouTube experience and make a pleasant viewing!
Extension # 1 – SmartVideo for YouTube
SmartVideo for YouTube provides a huge customization
SmartVideo for YouTube stands tall at No.1 position in our article because of the sheer number of customization options and settings (YouTube video optimization) it provides. SmartVideo is free to use and provides a lot of features such as –
Ability to decide/fix the video quality permanently so as to you don’t have to change the video quality everytime.
Stop the buffering of videos once paused (Uncheck the option highlighted by purple box).
Stop/Disable autoplay of YouTube videos until clicked on the play button.
It even has options of Smart Buffering to ensure optimum viewing on slower internet connections.
It even shows the time remaining for the video to start playing (Time required to resume playback during the starting/mid-way buffers).
ImprovedTube has an option for controlling PlayBack speed
I had quite a lot of fun while using this extension – especially by using the Playback Speed option! , it was fun watching dance & listening music in slow-motion or in speed-up 🙂 . Besides, this the ImprovedTube extension also has options for –
Changing the Player Size – To cover full browser windows, etc.
To pre-define/fix the Video Quality.
To hide Video Annotations,Description and hide comments.
Changing the Playback Speed.
and to disable Auto Play in Videos and Playlists to conserve bandwidth.
The only drawback of this extension is that once you change the settings in ImprovedTube, it won’t work until you reload the YouTube video tab.
I was spending a lot of time on YouTube decreasing my productivity, until i found the Floating YouTube extension which allowed me to watch my favorite show simultaneously while i was working on blog! And i found it pretty awesome – The only drawback being it couldn’t play Copyright Music videos of India. I hope the developers will resolve this bug soon. Rest assured the app is awesome! . The app only loads the video in the widget once the URL is input onto it,for automatic playback of video in the widget do use the app in combination with the Floating YouTube extension.
MagicActions for YouTube takes YouTube experience to a higher level!
Magic Actions for YouTube simply takes your YouTube viewing experience to a higher level , it provides a large set of functionalities some of which include –
Applying Color filters to the video (Grey Scale , Sepia , etc ) without reloading (By clicking on the blue-colored highlighted box).
Control the video volume by Mouse Wheel! .
Instant Screen Capture (Clicking on the button high-lighted by yellow box).
Changing the Video window/size & YouTube theme by clicking on the button highlighted by Green Color (The most centered button in the newly obtained button-set on installation).
Dimming and changing everything to black/white-on click of a switch besides the YouTube logo (highlighted by pink color in the image).
Thus, you will find Magic Action more and more interesting, the more you use it.!
Many times we need to quickly shift tabs to do some important work and the YouTube video continues to consume bandwidth even if the pause button is pressed. In cases like this the Stop Video Download extension comes in handy!
It adds a neat looking Handy “Stop Button” which can be used to stop the video and to preserve the bandwidth which couldnt have been preserved by the conventional pause button!
Click here to download Stop Video Download extension for Chrome.
So, these were the 5 most extensions which i found to be most awesome for enhancing YouTube experience. Feel free to comment if you face any problems or if you know of any such awesome extensions like these
Android emulators/simulators are largely required to run Android apps & games on PC (Windows 7/8/8.1/10) . However, choosing the correct Android emulator might become a daunting task, as if not selected properly they can really slow down your Computer (e.g Duos M) . So, here we bring you the best 7 Android emulators for your PC – Windows 7/8/8.1/10 which you can use to run android on computer
Gaming on Nox App Player with Keyboard mapping for touch input!
Nox App Player is our preferred Android emulator to play Android games on PC / Computer (Windows 10 & 7), or to try out new android apps due to its speed.
Nox App Player is fast, plus provides lots of features such as –
One-click root hide / unhide (disable or enable root)
Ability to specify the CPU Processor & Ram size! which is great for gamers & app-testers to check resource usage.
Besides, these Nox even provides Keyboard mapping for touch input. Thus, you can specify the areas where touch is to be simulated, on pressing a keyboard key! (Awesome thing for gamers)
Plus, it even has an inbuilt GPS controller setting, by which you can even play GPS required games such as Pokemon Go directly inside Nox App Player. –>
KO Player is the latest entrant in this list & is a great android emulator especially when it comes to playing Android games on your Computer / PC. KO Player provides a host of great features in its android emulator such as –
Keyboard to Touch Mapping
Crisp Display on Bigger screens due to HD Resolution
Ability directly record your Android emulation screen & save it as a video. Thus, enabling you to share your Gameplay easily.
Besides, you can run multiple accounts of various simultaneously
Since, it is made for gaming KO Player does require a good amount of RAM & graphics memory
Andy OS lets you chat through whatsapp directly on Desktop
AndyRoid is one of its own kind Android Emulator for Windows 7/8/8.1/10 . It supports some unique features which aren’t supported by any other android emulators out there such as –
Using your phone as remote control while playing games!.
ARM support, You can directly install apps in your andy emulator through your host’s desktop browser!.
As Andy is based upon VirtualBox , It doesn’t require any dedicated Graphics card to function smoothly and works well even on Intel HD Graphics.
Andyroid is very similar and may be classified as an advanced alternative to Genymotion as both of them require VirtualBox to be installed on the system. The newest version seems to have a keylogger or some shady thing. Hence, we have given the link of the older version.
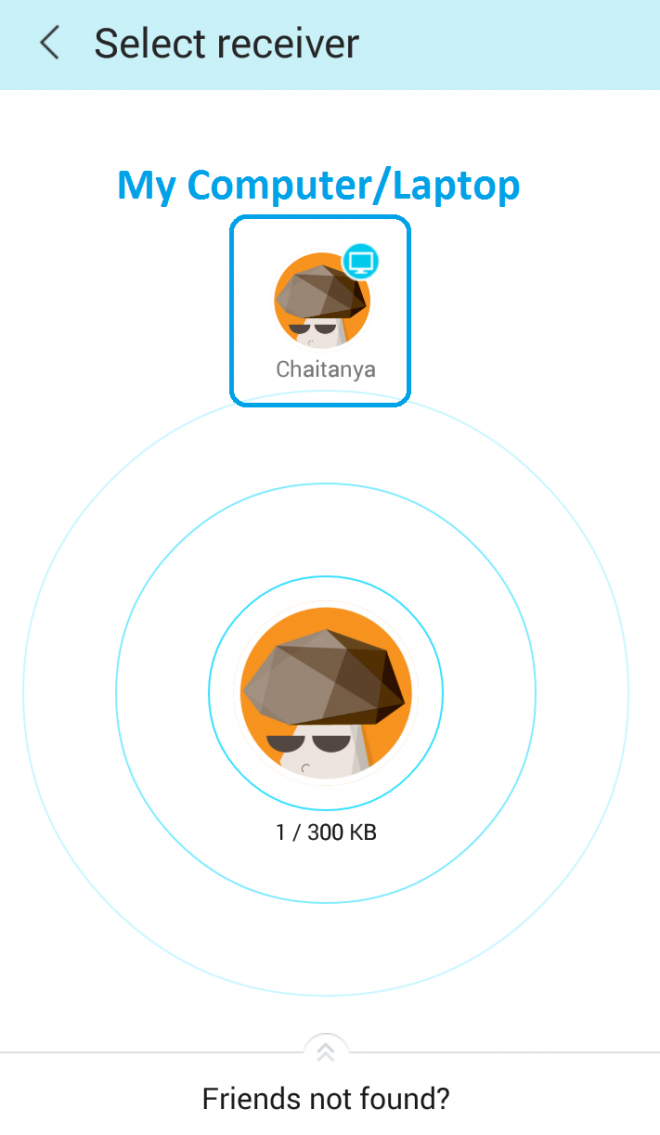
Droid4X is perhaps its the most interesting emulators mentioned in this article. Droid4X is designed for real Power! in the hands of user, and its features too point to the same . Droid4X has some salient features such as –
Emulator # 6 – Windroy – The Android emulator with a Windows Kernel!
Windroy on Windows 7
Windroy is perhaps the most unique Emulators present in this article because of the fact – It completely runs using the Windows Kernel!
Windroy doesnt require any external Virtualbox support. Like bluestacks, also its quite light-weight and handy to use!. You just have to take care that the directory path wherein you install Windroy must not contain Spaces.
GenyMotion is another advanced Android Emulator for PC , and may be classified as a worthy alternative to/of Bluestacks. GenyMotion has advanced features like OpenGL, and hardware aceleration support. Its built on the x86 Architecture and hence is faster as compared to BlueStacks.
So, these were the top 7 free android emulators for PC/windows , If you know of some other one do comment 🙂 , also feel free to ask any questions regarding them
Many a time we need to copy data/music stored in our iPad/iPhone to PC , but due to the limited functionality of iTunes its not possible to do that. But in some scenarios it becomes very necessary to have a backup of our favourite songs/music on our Computer , or may be some important data & documents. So, here are the 3 Methods/Ways to Copy or Transfer data/music/songs from iPhone/iPod to Computer/Mac (Transfer Music from iPhone to PC/Computer) . I have personally tested these methods on Windows 7/8.1 but they’ll work on Mac too!
Way # 1 – Using iTools for Windows / Mac OS
Pre-requisites –
This tutorial requires iTunes to be installed on your system, as the newer iOS device drivers can only be installed through iTunes.
Now, to export / copy or to transfer songs from your iPhone to Computer follow these steps –
First of all connect your iPhone / iPad device to your system , If iTunes automatically opens up & start syncing close it.
Now, Open iTools app, you will see your iOS device in the window, there in click on the “Music” icon / media tab under the device menu as shown below –
iTools Music icon shown only after device recongnized by iTools
Here you will see all the music tracks present inside your device here Please Checkmark the songs you want to copy, Now near the menu bar there’s an option labelled “Export“ as shown below –
Click on the “Export” button , It will ask you for path where you want to copy the selected tracks, select the folder and click on “OK”.
That’s it you’ve successfully copied music from your iPhone to your Macbook or Computer-laptop.
Download and install this – ShareIt app for iPhone/iPad by lenovo on your iPhone/iPad (iOS device) ShareIt app now doesn’t support music transfer but however you can transfer other data!.
Now, download and install this ShareIt app for PC on your Windows 7/8/8.1/10.
Now, open the ShareIt app on your device, tap on “Send”. Now, select the files/music/songs/documents you want to transfer/copy and click on ‘Next‘.
After finishing the previous step, Open the ShareIt app on PC – Now, Click on “Receive” option.
Shift again to your device (iPad/iPhone)- It will ask Now you’ll see your PC/Laptop’s WiFi id in the radio network range in the app – “Click on the circle/network id” to start the transfer!.
That’s it! you have successfully transferred your data/music from your iPad to computer.
Way # 3 – Using DropBox
This is the most simple method , but the only constraint is that it requires an Internet Data connection unlike the previous two methods .
Transferring files from an iOS device iPod, iPhone or iPad to PC is a really cumbersome task as iTunes provides support only for PC to iDevice (iPhone/iPad) and not vice versa. Many times we need to copy the files/data from our iPhone/iPad to PC/Mac and it becomes a difficult task as all iTunes allows us to do is sync/create a backup and its very difficult to explore that backup too. Plus due to lack of native file managers for iPhone & iPad – We bring you 5 Free iOS (iPad/iPhone) iPod File explorers for Mac OS/Windows which will allow to do such Device – iPad/iPhone to PC file transfers! that too without Jailbreaking (No Jailbreak) your device,thus not compromising on your device’s warranty. These apps can also be used as default iOS file manager app for iPhone & iPad too –
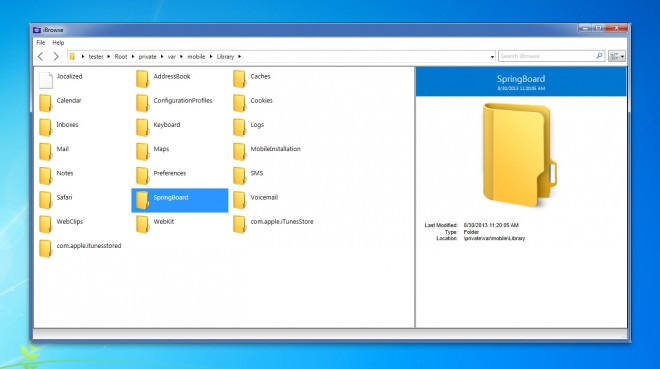
iBrowse was the first software I tried and it worked with a bang even on iOS 8. I was able to browse all iPhone files and folders on my iPhone and explore even the app data files present on my iPhone like whatsapp images,media etc . To export any file (iPhone/iPad to PC file transfer) all you have to do is –
Navigate to the folder/desired file you want to export . ( believe me this is the most daunting task! ).
Now select it by left-clicking on mouse , now right-click on the selected file .
Select the “export” option , select the destination folder where you want to save the file in the popped-up explorer window.
Hit on “OK” and that’s it! your file will be exported to PC!
Thus, you have successfully completed your iPhone to PC file transfer!
iFunBox is yet another smart File Manager cum App Manager for your iOS device. iFunBox may be defined as an alternative to iBrowse but it has additional features such as App Management –
You can uninstall/remove apps present on your iPhone/iPod/iPad.
You can even install apps from .ipa files to your device from your PC. (The installation is safe as the apps are installed in a safe “sandbox”).
Also you can batch install apps and manage your device apps and games with ease.
iTools is yet another awesome software for iOS users, infact it can be said as the best alternative to iTunes. iTools not only just allows you to Browse and copy files of your Apple device, but it also even allows to backup ipa applications as well as install them directly. It also features an inbuilt iPhone ringtone maker as well. To browse files on your iOS device Simply connect your device to Computer , Open iTools and click on the “FileSystem” option as shown in the figure.
iMazing as the name suggests is an amazing piece of Software , actually it would have been on the first position if this list was prepared based upon functionality, but the list is based upon the free features hence this position.
iMazing allows you to browse and view the contents of your phone in a really easy manner. As shown in the iMazing image you can transfer data from iPhone/iPod/iPad to PC by a simple click – “Copy to PC” option presented after right-clicking on the file.
iMazing also offers the ability to copy data from the apps’ documents folder the folder where apps store their data on the device.
You can also backup your documents,contacts and messages using iMazing.
Windows 7 was very cool, and one of the many things of Windows 7 which i liked were – Desktop Gadgets!. They were cool in every way, they showed CPU/Ram Status, News feed, Weather etc and lots of important stuff right on desktop!. So, i tried to add Gadgets in my Windows 8 installation and found these 3 best softwares to install desktop gadgets for windows 8/8.1 or to add gadgets in windows 8/8.1. Though, I have tested them in Windows 10 Technical preview , i hope they’ll work in the final release as well.
Way # 1 – Desktop Sidebar/Gadgets installer by Gadgetsrevised.com
Gadgets on Windows 8/8.1 using Desktop Gadgets Installer
This is perhaps the most simple yet safest way to add Gadgets to your Windows 8/8.1 installation . All the Gadgets, sourcefiles are from Microsoft hence assured of being virus-free.
Steps to add Gadgets in Windows 8/8.1/10 through Desktop Sidebar installer
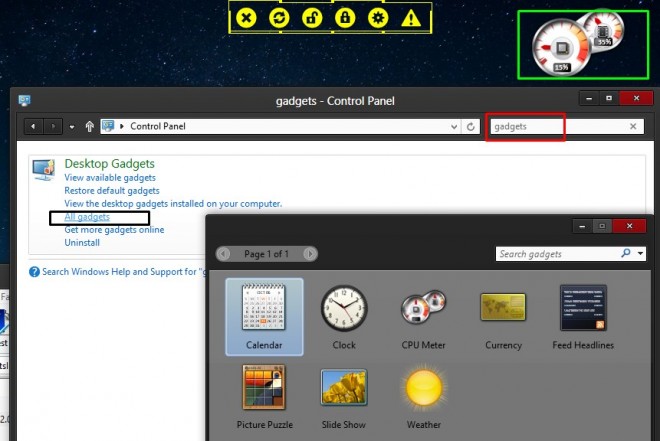
Once, you are done with the installation, go to Control Panel.
In control panel, Search for “Gadgets” .
As shown in the alongside image, Some results for Gadgets will appear – Here select the “All Gadgets” option. (Highlighted in the Black rectangle in the alongside image).
In the dialog-box opened, you’ll be shown various Gadgets, Now simply double-click on the Gadget you’ll like to add and voila! it will be added to your desktop!.(Highlighted in the Green Rectangle in the alongside image).
This is the most-easiest way to install/add Gadgets on your desktop.
Way # 2 – 8GadgetPack
Gadgets on Windows 8 using 8GadgetPack
8GadgetPack is yet another freeware which allows easy addition of Gadgets in Windows 8/8.1/10 . besides this you can even install 3rd party Gadgets ( .gadget files) with this software likewise in Windows 7!.
Once you’re done with installing, launch the “8GadgetPack” from the Start menu, if not executed/run after the installation.
Now, Click on the Gadgets you want to be shown, they’ll appear in the Sidebar!
You can even disable the Sidebar fence by right-clicking in the blank area of the Sidebar and select “close sidebar” option, the Sidebar will be closed but the Gadgets will still be intact!.
Way # 3 – Rainmeter
Rainmeter provides endless Widgets and Gadgets customisability!. There are no limits for the functionality of Rainmeter and customizability provided by it – hence, I have covered them all in this separate – Rainmeter Tutorial – Windows 7/8/8.1/10 .
Providing just a sleek-peek at what Rainmeter can do –
Rainmeter!
I hope, you too will be able to add your favorite gadgets in windows, If you face any problem feel free to comment 🙂
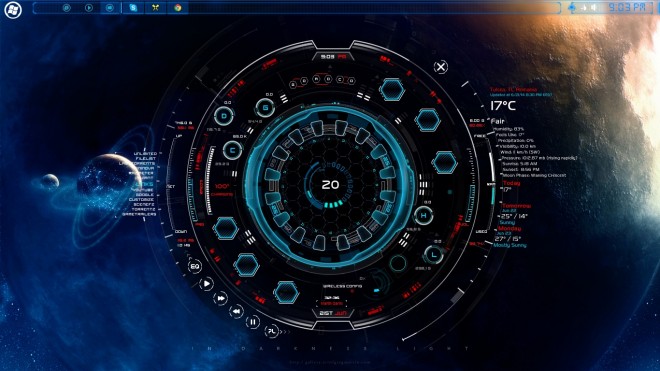
Recently I wrote about the simplest and safest way to apply custom themes in Windows 7/8/8.1 , taking the desktop customisation to next level is Rainmeter . Rainmeter simply takes desktop customization to the jarvis level (Ironman reference 😛 ) , below is an easy tutorial to Customize desktop in Windows 7/8/8.1/10 using Rainmeter !
Before i go onto the tutorial I’ll like to flaunt what Rainmeter can actually do , Simply check out the image below –
Your desktop can look like this!And even like this! ala Spaceship!
Isn’t it looking cool ? Click here to view the larger image (higher resolution) , all this is possible by Rainmeter – A simple desktop customisation software which can customise your desktop/laptop like never before!
Features of Rainmeter –
Simple, and light Desktop Customisation software with widgets support!. (Just 2 Mb size)
While installing Rainmeter do keep an eye to install the normal one and not the Portable versionm there’s no need of configuring anything just keep on clicking “next”.
Once you’re done with installing, run Rainmeter, if not automatically opened by the system.
Now, you’ll see the default rainmeter skin “illustro” and some gadgets on your desktop , here simply right-click on the widget and check/uncheck the widgets you want to see as shown in the alongside figure –
Tutorial to install custom skins in Rainmeter –
This was all about installing Rainmeter, but you’ll like your desktop to look much like the images shown earlier in this post – here’s how you can do it –
Once you have downloaded the .rmskin file from the above site,all you have to do is double-click on the .rmskin file.
Rainmeter will then notify you of installing the skin & its associated plugins, simply click on install and yo!
If your desired skin doesn’t get applied you can still manually apply it by the check marking its widgets as shown in the figure below –
That’s it for this article , there will be an advanced customization article if the readers demand for it 🙂 , By the way here’s how my Desktop looks like now – http://prntscr.com/5df2fd (You too can flauntyour desktop in comments 🙂 )
Microsoft Windows is currently the most widely used Operating System in this world, but many of the Windows users are unaware of the OS’s features one of such feature is personalisation . Though many are familiar with personalizing the wallpaper, screensavers etc but you can even personalize the toolbar , task-bar, icons , sounds and even the ‘–‘ minimize and the close ‘X‘ buttons!. all you need to do is have the proper ‘theme’ or themepack . But the downside is that Windows by default supports only the themes available on official Microsoft site . This limitations can be removed by using UxStyle which is perhaps the safest way to apply Custom themes to windows.
Why you should install custom/3rd party themes or themepacks on Windows ?
The best graphics and animations are available which are absent in Official Windows themes.
Refreshing new sounds which can be used to impress anyone who uses or sees your PC/Laptop.
Cool new icons.
Easy on eyes and lesser on memory requirements.
Can be easily bundled with other 3rd-party launchers.
Now, about UxStyle – its a tiny software which loads during the windows boot-up and enables the application of 3rd party or custom themes to any windows installation. Though there are many other tools such as “UXtheme Ultra patcher” but they modify the system files hence are risky. UxStyle simply starts and shuts off without changing the system files hence is the Best tool for applying themes!
Tutorial to install Custom/3rd Party themes using UxStyle –
First of all download and install the UxStyle for your Windows version –
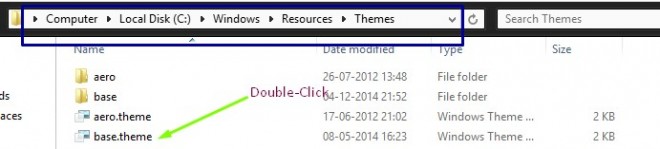
Now, once you download the themes from above site,you will get a zip file or folder , Now simply copy the contents of .zip or folder to the “C:\Windows\Resource\Themes” folder for Windows 7/8/8.1/10.
Once you have done copying , you can directly double click on the “.theme” file which you want to apply , or you can even apply it from the “personalize” option by pressing right-clicking on any blank space in the desktop(wallpaper) and selecting the “personalise option/”
That’s it simple,easy and safe too ! as we haven’t modified any system files . If you face any kind of issues/queries while applying themes do comment .
Many times we come across scenarios where we look for backward compatibility in order to run Legacy/Old Software’s on our Newer PCs or OSs . or may be we need to Run the 32-bit or 16-bit Software’s on our Newer Machines . e.g Installing Windows 7 Software on Windows 8, Installing Windows Xp Software on Windows 8.1 etc,installing 32 bit software on 64 bit os . This Compatibility Guide will cover all these Compatibility issues.
Compatibility Issue 1 : 16-bit Softwares on 64-bit OS (e.x Old Dos Games and Softwares on New Windows 7/8/8.1 64bit OS)
This Compatibility constraint is the most widely experienced and most searched after Compatibility issue , while running the Old Native DOS based games and apps, on 64bit OS these app simply do not get executed and display a warning message such as “This app can’t run on your PC” . The solution / fix to this problem is pretty simple – Using DosBox to mount and run these old 16bit apps, infact the apps Run as smoothly as if they were Running on Native environment e.x Windows 95/98, such is the high quality emulation provided by Dosbox. I searched and searched throughout the Internet for DosBox alternatives, but the closest thing i found similar to DosBox is DosBox Itself! . To run your Software through Dosbox, simply install the Turbo C installer from this Post ,Now drag and drop your .exe which is to be opened on the DosBox.exe icon present in the “C:\TurboC4\Techapple.Net” folder, and your 16bit app will directly Run in 64 bit Windows!
Compatibility Issue 2 : Older Operating System Software on Newer OS (Windows XP or Windows 7 software installation on Windows 8/8.1)
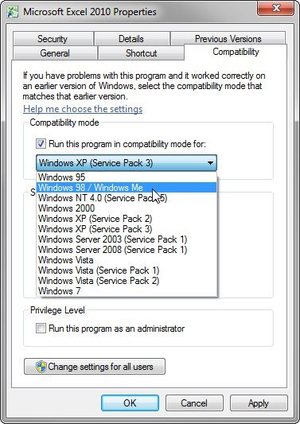
This is another big Compatibility issue faced by most of Us, and the Solution too is quite Simply according to the Problem . If you are facing the error while launching the setup file, simply Right-click the .exe file, or a shortcut to the .exe file, and select Properties. Click the Compatibility tab. Then check Run this program in compatibility mode for and select an appropriate option according to the OS it was built for. Then try launching the Setup again , it should get installed 🙂 Check the alongside image for more details. Or if it’s giving the problems after installing try the above mentioned Compatibility method along with the “Run as Administrator” which appears after right clicking on the Icon . i.e Executing the program as Administrator. You can also add the tick in the Checkbox in the Compatibility tab to enable “Run as Administrator” Option.
Compatibility Issue 3 : Installing Running 32-bit Software in 64 bit
Generally, all the 32-bit software work well by default in 64-bit Operating Systems , but some legacy Softwares give errors, or simply won’t function properly 🙁 . The reason behind one is quite trivial One – All the 32-bit Softwares are installed in the directory “Program Files(x86)” And they are simply tuned and designed to work with their directory as “Program Files” so the solution here is quite simple, At the installation time simply change/edit the installation directory to “Program Files” along with the generated installation directory and as i found out here while installing VB6 on windows 8.1 , It will work like magic! along with the above mentioned Run as Administrator/Compatibilty Tweak 🙂
I was able to solve all my Compatibility issues using the above 3 Tweaks, and yes if the Old Beast can still run on Newer Machines so why should we replace it 🙂 ? .And if even all the above 3 fail we always have the Option of Virtual Machine and installing OS on it which though lengthy always works, so Enjoy your favourite legacy and Old Softwares with the above mentioned tricks, and if in case Some Software still doesn’t run simply Comment, we would be glad to help!


![5 Awesome YouTube extensions to enhance YouTube usage/experience! [Chrome/Firefox]](https://techapple.net/wp-content/uploads/2014/12/3U3lPTT-660x624.jpg)


![Top 7 Free Android Emulators for PC (2020) – Windows 10 [64-bit & 32-bit] | Run Android apps on Computer PC/Laptop](https://techapple.net/wp-content/uploads/2014/12/Android-Emulator.jpg)


 Now, Download any of the Windows themes or 3rd Party themes you want to apply. Here are some sites from which you can download themes –
 This is another big Compatibility issue faced by most of Us, and the Solution too is quite Simply according to the Problem . If you are facing the error while launching the setup file, simply