Category: Tech News And Updates

Latest Tech News And Updates

  • 7 Best Free VPNs for Chrome -7 free VPN Apps/Extensions for Chrome OS/Chrome browser/Google Chromebooks

    7 Best Free VPNs for Chrome -7 free VPN Apps/Extensions for Chrome OS/Chrome browser/Google Chromebooks

    Many times, we need to access sites which we don’t have access to.. Or simply we need to bypass the censorship imposed by the network administrator. Also, there are some sites which have restricted region/country access e.g hulu – U.S.A . (hulu is accessible only in USA) . In all the above mentioned scenarios and many more all of these limitations can be bypassed/overcome by VPN services . What’s more ? VPNs also encrypt your traffic and hide your identity , keeping you totally anonymous šŸ™‚ . So, VPNs are really very useful services! and here we present you the Best 7 Free VPN services (apps/extensions) for Google Chrome Browser/Chromebooks i.e VPN for chrome OS.

    Another advantage of using VPN services directly in Chrome is to overcome the technical hurdles faced while configuring the VPN clients such as Open VPN , PPTP etc šŸ™

    No.1 – Dot VPN

    Dot VPN is another similar service to ZenMate and provides access to restricted websites as well as VoIP applications, and its free to use too! Some of the unique features of Dot VPN are as mentioned –

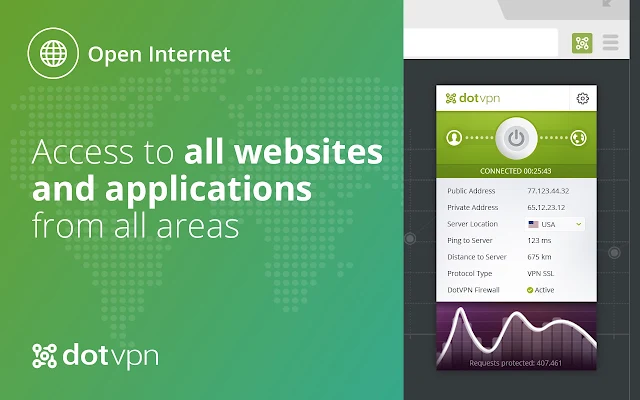
    • Anonymous Internet-surfing
    • Access to all websites
    • Virtual change of location
    • High speed connection without connection dropping
    • Safety when accessing public Wi-Fi points (Wi-Fi and Hacker Protection)

    Click here to Download Dot VPN from the Chrome App Store


    No.2 – Gom Web VPN for Chrome

    Gom- Web VPN for Google Chrome is yet another Chrome exclusive VPN service provider, it doesn’t require any 3rd Party application for the VPN services except its Google Chrome extension and is quite effective too!

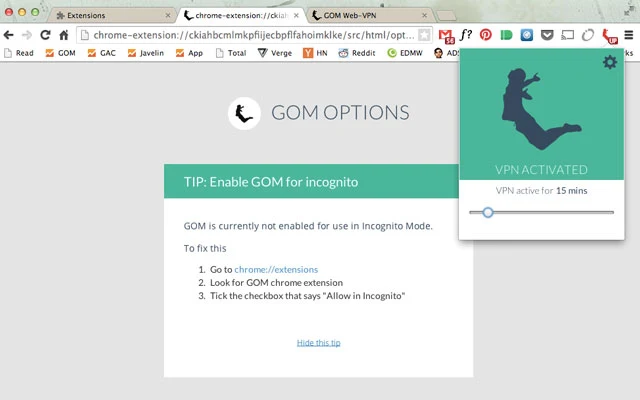
    The service is free Free for Trial period and features of Gom VPN include –

    • Access blocked content.
    • Surf privately with encryption (even with non-secure sites);
    • Enjoy faster page load times (GOM uses Google’s SPDY technology).
    • Ā No need for network configuration / 3rd party app install.

    Click here to Download Gom Web VPN from Chrome Store.
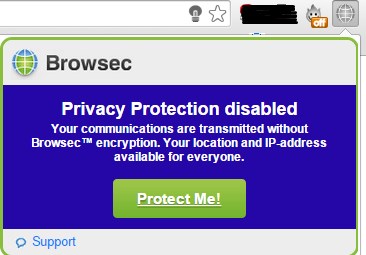
     

    No.3 – Ā Browsec

    Browsec encrypts your traffic and routes it through Browsec’sĀ secure cloud network. No one will be able to identify, track you or sniff your traffic.

    • Ā Visit Facebook and twitter from work, read whatever you want.
    • Ā Privacy. Hide your real location from the sites you visit.
    • Ā Netflix, Hulu, Spotify, Pandora, SoundCloud and so on — music and video services restricted to a few countries are now accessible to you too.
    • Personally, i found it much speedier as compared to other extensions i tested šŸ™‚

    You can start Browsec by clicking on the tab icon and clicking on “Protect Me”Ā button as shown in the image alongside

    Click here to download Browsec Extension for Chrome.
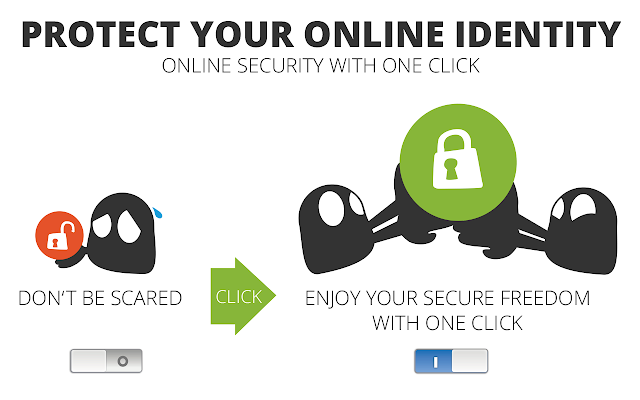
     

    No.4Ā – ZenMate!Ā 

    ZenMate is Ā was perhaps the best and first Chrome-exclusive VPN , but now it isn’t since it started is premium services. It started it operations on Chrome and was the first app/extension providing VPN services only based on the Chrome Engine and without any OS(Win/Linux/Mac) support. hence, it is able to run on Chrome OS too!.

    Features of ZenMate –

    • Encrypts and protects your browser traffic
    • Hides your real location and activity
    • Access any website from anywhere
    • For free and just a few clicks away!
    • Also it provides Encryption,Speed,Data Compression and blocks Harmful Sites.

    Configuring and using Zenmate too is very easy as 1..2…3… 1.Download….2.Sign-Up….3.Activate by a simple button.. šŸ™‚

    Click here to download ZenMate for Google Chrome from Chrome App Store.

    Note : –Ā You can get a free ZenMate Premium account if you sign-up via our link below –
    Click here to Sign-Up for ZenMate Premium for Free!

    ZenMate premium gives you a higher level of security which is not matched by any other Chrome VPN yet


    No.5 – Hola Engine – Hola Better Internet

    Hola is one of Ā the most famous unblocking/proxy extensions for Chrome, and it has now added the VPN type services too..

    Hola is easier to use and moderately good in speed! however, you need to install both the hola app as well as the extension to use the hola services on Google Chrome.

    How to use Hola:
    1. Install the extension
    2. Go to a website that is blocked
    3. Press the Hola extension icon (top right of browser)
    4. Choose the country that you would like to browse from
    … and enjoy your liberated Internet!

    Click here to Download Hola! Better Internet from Chrome Store.


    No . 6 – Cyberghost VPN-Proxy for Chrome


    Cyberghost is the leading name when it comes to VPN service providers, especially Free VPN Service Providers. and true to its name, Cyberghost has launched its VPN cum proxy extension for Google chrome.

    Personally, i found the extension to be slower as compared to the other VPNs mentioned in this article , but ocverall the trustworthy name in VPN industry and getting the Job done features Cyberghost in this list.

    Click here to Download Cyberghost VPN extension from Chrome Store.


    No.7 – Breakwall VPN

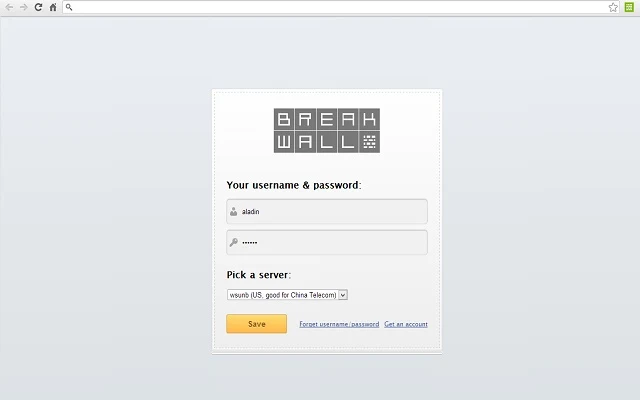
    Breakwall VPN is perhaps the fastest of all VPNs but its not completely free šŸ™ , it offers a Free Trial though, hence it just makes to this list, as this is one such service whose trial service is too Ā good to be missed .

    You can create a trial account with Breakwall and add the password received in your mailbox to the extension, anc click on connect. that’s it , The speed and the service provided by Breakwall is really awesome except for the trial!

    Also, it consists of BBC- iPlayer mode, by virtue of which you can access BBC iPlayer in countries where its blocked.

    Click here to Download Breakwall VPN from Google Chrome Store.


    So, these were the Best free VPN services among the ones we tested, if you know of any such good services feel free to comment šŸ™‚

  • ARChon Android Emulator for Google Chrome OS/Linux/Windows and Mac|Install and Run Android Apps in Chrome

    ARChon Android Emulator for Google Chrome OS/Linux/Windows and Mac|Install and Run Android Apps in Chrome

    ARChon is the first Android Emulator which is supported on Google Chrome OS! It works on Google Chrome browser too and thus can be used on Windows , Linux as well Mac OS too!! It uses the default Android Runtime Package for running the Android apps however, sooner we expect that Google will officially launch support for Android apps on Chrome! till then, we can use ARChon as it does the job pretty decently .Archon Android emulatorĀ will also Run Android Apk in Chrome OS / Chromebooks.

    Pre-requisites :

    • Google Chrome browser with an Internet Connection.
    • ARChon Runtime Package/Extension installed on Google Chrome .
    • A Modified .apk Android App package for testing Purpose (e.g we will be using 2048 Game Apk for this purpose , You can download 2048 from here).

    Method :Ā 

    • First of all , download the runtime which is appropriate for your system:
    Runtime Download
    ARChon 1.2 – Intel x86 Chrome 64-bit / Chrome OS 64-bit (OSX: Use this in Chrome Canary) BitBucket :: MirrorMD5:d77b468339cc512e121c003cc97715db
    ARChon 1.2 – Intel x86 Chrome 32-bit / Chrome OS 32-bit (OSX: Use this in Chrome Stable) (Win7 32-bit: Use something like Chrome Beta 38.0.2125.77 beta-m) BitBucket :: MirrorMD5:9c9844e2591a27d952098581011a2bce
    ARChon 1.2 – ARM (i.e ARM-based Chromebooks) BitBucket :: MirrorMD5:3d6955c7702baf1e1d16a000d9f67b10
    • Unzip it into a folder ,Now load it as an unpacked extension, as shown in the image below

    Ā For loading Unpacked extensions you will need to enable Developer Mode in Google Chrome you can do it by going toĀ Settings – > Extensions -> Check mark the Developer ModeĀ And Select the Folder where you just extracted the Archron Engine. (You can check the screenshots in this post šŸ™‚ )

    • Once you have loaded the extension , please enable itĀ by checking the Enable optionĀ besides the extension name .
    • Now extract the android Apk package which is converted into Chrome OS compatible into another folder and Load that too as an extension in Google Chrome (You can try with the above linked 2048 Game link).
    • Once you have loaded the game as an unpacked extension, it too will be shown with other extensions, now simply click on launch as shown in the imageĀ below-
    • Now once you Ā have clicked on Launch Your Desired Android App will be loaded! as shown below – Amazing isn’t it ?

    Drawbacks –

    • The Default Android Apk files do not work directly they need to be converted first into Chrome Compatible Apk’s which you can be created by an app mentioned here.
    • This is a proof of concept. You can run up to 4 Android applications right now with the regular runtime. Read the multiple apps manualĀ to load more than one application at a time. To load unlimited number of apps read the ARChon runtime guide.

    I personally found this very unique and interesting , do comment your views and problems which you face while installing / running the apps . I am always happy to help šŸ™‚

  • How to transfer contacts from Windows Phone to Android without PC by PhoneSwappr

    How to transfer contacts from Windows Phone to Android without PC by PhoneSwappr

    Hello everyone, recently I purchased A new Android Phone for Myself – Xiaomi Redmi 1S , and i wanted to transfer contacts from my existing Nokia Lumia 520 to my new Android Phone but the Windows Phone simply didn’t allow to transfer contacts using bluetooth šŸ™ Also the methods available on net were either too bulky or they required PC access šŸ™ . Hence, i started looking around for some alternatives to transfer contacts from windows phone to android and found this one as the best and most reliable –Ā PhoneSwappr App!Ā All i did was installing the app on my Windows Phone and Android and the rest was easy! because of the Simple User Interface.

    Features of PhoneSwappr

    • Supports transfer of Contacts from Windows Phone to Android/iPhone as well as vice versa .
    • Stores the Contacts from your device on the Cloud for 7 days, providing you enough time to store the contacts.
    • All the contacts are encrypted with a security key which is only given to you.
    • The App can be installed on Multiple devices thus, allowing download of contacts to multiple devices where a large number of contacts need to be shared between two or more phones.
    • No need of any registration/Account Sign-Up! šŸ˜› šŸ˜€

    Tutorial

    • First of All download and install the appropriate PhoneSwappr version on your Phones, depending upon their OS.
      Click here to Download PhoneSwappr for Windows Phone.
      Click here to Download PhoneSwappr for Android.
    • Now, First of all Install the application on both the phones šŸ™‚ , After you install it Open the App on your Old Phone/ Phone from which contacts have to be retrieved , You’ll see a Screen like this –
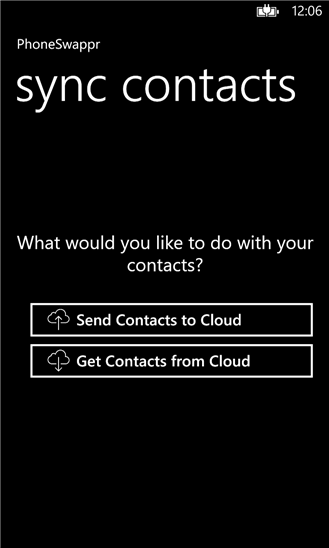
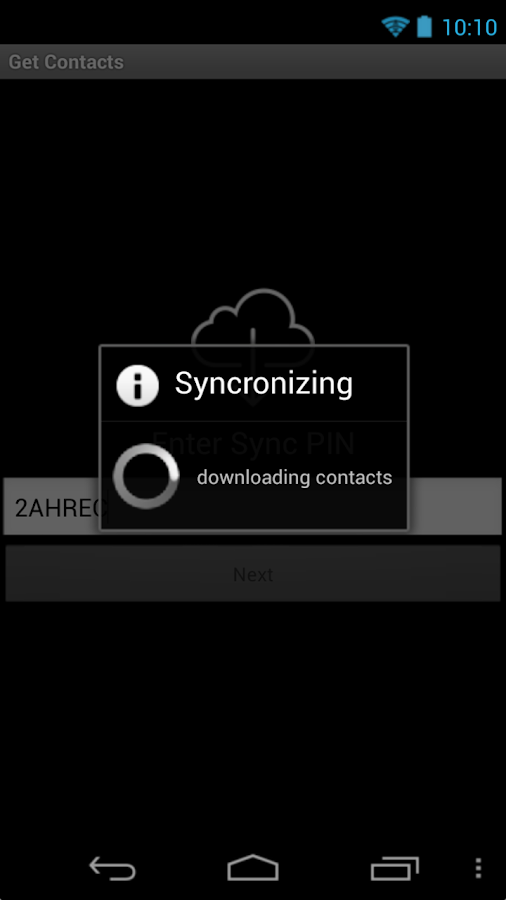
    • Here select the Option “Send Contacts to Cloud”Ā  All your contacts will start gettingĀ uploaded to the Cloud, and once all the contacts are uploaded you will be shown an image with the key/pin as shown below. (Please Note down this Pin as we will use it later to retrieve our contacts ).
    • Now Ā open the PhoneSwappr app on your New phone and select the option “Get contacts from the Cloud”.Ā Here’ s please enter the Pin which we have noted down earlier to start the contacts download! . It will start downloading contacts as shown below – and once it gets downloaded you will be presented with a completion screen as shown below –

    That’s it! šŸ™‚ You have now transferred contacts among your devices in quick-time with total ease that too for FREE! I hope you liked this article and it helped you out of trouble šŸ™‚

  • Yosapp – WhatsApp Web client to use WhatsApp directly on browser – Whatsapp Website UI to access through Web Browser (Chrome/Firefox/Safari/Opera Mini/UC Browser)

    Yosapp – WhatsApp Web client to use WhatsApp directly on browser – Whatsapp Website UI to access through Web Browser (Chrome/Firefox/Safari/Opera Mini/UC Browser)

    My obsession with WhatsApp simply never seems to end, After writingĀ about WhatsApple – WhatsApp client for PC , and 5 WhatsApp protocol supported apps for Firefox OS Phones , i looked around for even more Simpler and unique solutions and came across – Yosapp! and I simply loved this concept ! Its unique and pretty much what i am looking for! –Ā Ā WhatsApp Web UI!Ā (Use Whatsapp through Website)Ā Ā .Ā  Yosapp enables a user to use WhatsApp Protocol directly through the Browser šŸ™‚ , it means that, to access WhatsApp through Yosapp there’sĀ no need to download any WhatsApp App/Client whatsoever! All you need to do is Register your account and mobile number on Yosapp site and you’re ready to use it! (You can use WhatsApp on Opera Mini and UC Browser(Ucweb) too! šŸ˜› )

    UPDATE – Yosapp is now DEAD šŸ™ , but WhatsApp has now launched its official WhatsApp Web Client – Read about it here.

    Features of Yosapp!

    • WhatsApp Web UI (No need to Download Any WhatsApp Client!).
    • You can Access your WhatsApp account and use it for chatting from literally anywhere, e.g Net cafes,Web-browsers,Mobile browsers etc.
    • You can use it to access Whatsapp for Accessing on Public Computers such as school and college labs šŸ˜›
    • Easy Contacts Management – once you add your contacts in the Yosapp site, you can chat with them directly! So, in case you change your mobile Phone or lose your contacts, you have an all-time backup of the contacts.
    • Works on all browsers and accessible from anywhere , its pretty much like GMail, you sign in to your WhatsApp account, check and reply to the chats sent when you were offline, as well as Chat with the friends who are online too :).
    • Attachments sent by users to you can also be viewed and forwarded .
    • OS Independent :Ā As its web-based you can practically use it on any Web-browser IE/Chrome/Firefox/Safari/Opera Mini/UCBrowser and any OS you want Windows/Linux/Android/Mac/Firefox OS/tizen etc and the list goes on and on…
    • Supports Desktop Notifications too šŸ™‚ , if supported by the Browser e.g Chrome.

      UPDATE – Yosapp is now DEAD šŸ™ , but WhatsApp has now launched its official WhatsApp Web Client – Read about it here.

    Configuring and using Yosapp too is very easy , simply perform the following steps to Configure and use Yosapp!

    1. Visit the Yosapp site by Clicking here.
    2. Click on the Sign-UpĀ account icon in the Right hand side top corner as shown in below image –
    3. Now you will be shown a Sign-Up Form as shown below – , Please fill in the 10-digit mobile Number and other details and Click on the “Sign-Up”Ā button.
    4. Now , login to your registered account by clicking the “Y” icon , shown at the centre of screen, on left hand-side of Sign-Up form , and click on “Login”Ā button.
    5. As you have registered for first time on Yosapp , it will ask for one-time verification of your Mobile Number either through SMS or by Call, as shown below , here select the Verification method and click on forward arrow button or Ā “>” (see figure)
    6. Now in the next Step, Enter the Six – digit verification number received on your Mobile, and click Next
    7. Voila! You are ready to use WhatsApp! on your browser, Simply Add a contact through “Add Contact” icon or through “Settings”Ā icon as shown in below figure and start chatting ! šŸ™‚ [ Check the below figure for all Controls and Options šŸ™‚ ]
    8. Note :Ā While adding New Contact, you will see a “CC” option CC stands for Country Code, in that field Enter the Country Code of the Contact

    That’s it šŸ™‚ , you can now log-off and Sign-in again to your Whatsapp/Yosapp account from anywhere PC/Mobile to use WhatsApp! and it won’t ask for Verification too! šŸ™‚

    UPDATE – Yosapp is now DEAD šŸ™ , but WhatsApp has now launched its official WhatsApp Web Client – Read about it here.

    Thus, you can now access, your WhatsApp account from anywhere through your Yosapp account, Click here to go to Yosapp!Ā If you have any doubts/queries/suggestions feel free to comment šŸ™‚


  • 3 Ways to find & Detect Font of Website or in a Webpage

    3 Ways to find & Detect Font of Website or in a Webpage

    Recently I was browsing through the Line friendconverter site and i really liked the font name, and wanted to add it to my PC . but i had to search around a bit hence thought of writing an article on finding the font of website so as TechApple blog users need not to roam around for doing the same. so here are the Best 3 Methods to find font of website which i found better šŸ™‚ .

    Method I : WhatFont Chrome Extension

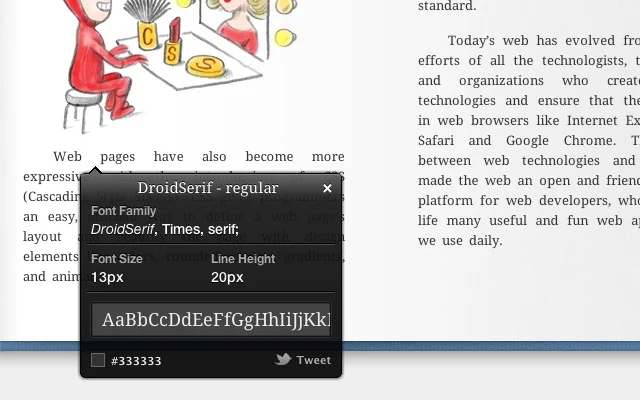
    This is my most preferred method and me being lazy loved it .Ā All you need to do for finding the font of website is –

    • First of all, install the WhatFont Chrome extension and hover the mouse pointer over the text part of the website whose Font you want to find .
    • Whatfont will display a box showing the Fontface name, Family, Ā Size as shown in the alongside Image.
    • Incase if it doesn’t show up Simply click on the “f?” buttonĀ on the addon – bar and perform the Hover method . Easiest way !

    Click here to download the WhatFont Chrome Extension


    Method II : Using Font Finder Add-OnĀ for Firefox
    Not all users will be using Google Chrome, Firefox users too have an addon for Firefox – Font finder which can be used to detect Fonts on the Website which is currently visited. For detecting font using Font Finder

    • Select the text of which Font is to be found and right click on it.
    • An image similar to one shown alongside appears , select the option “Analyze Selection” and you will be shown a dialog box showing the Font Name, Size, details etc that too in flash seconds.

    Click here to download the Font Finder Add-On for Firefox


    Method III : Using the Bookmarklet – Fount by Artequalswork

    The above discussed methods work for either Chrome or Firefox, it may happen that you are a Safari or IE or any other Browser user and you want to detect the font of the website, so there’s a solution available for other browser users too – A bookmark is provided by Artequalswork – Fount which will help in finding the font.

    All you have to do is add their bookmarklet to the bookmark bar, navigate to the website of which font is to be detected or determined , and click on the Fount bookmarkĀ , and magic! it will show the Font face name,family as well as the size! and it works on all Browsers – Safari, Google Chrome, Mozilla Firefox, IE 8+ .

    Click here to visit the add Bookmarklet page of Fount

    Note :Ā In-case if you want to detect / Identify font present in an image, you can read the postMethods to detect font fromĀ ImageĀ 

    These were the easy methods to detect the Fonts used on a website , while most of the time these tools will work , if however if they don’t work we can use the methods used by developers for Font detection purpose – Firebug and Webkit.Ā I will be writing an article with detailed instructions on using the same , but mostly the above tools will save the day ! šŸ™‚ . If you have any doubts/queries do comment also if you know of any other such tool or method feel free to comment, we will really appreciate it šŸ™‚

  • Cloudflare Review : It really saves bandwidth and Boosts up Page Speed! Highly Recommended- Cloudflare CDN

    Cloudflare Review : It really saves bandwidth and Boosts up Page Speed! Highly Recommended- Cloudflare CDN

    Recently, i was looking for ways to increase the speed of my WordPress blog,while searching i came across this thing – Cloudflare CDN and i decided to apply it on my blog, and to my surprise the results were amazing! Cloudflare not only did increase my Page Speed but also it saved a hell lot of Bandwidth required by my Server/hosting . Indirectly it saved the day! for me, So here’s a Real User experience or Cloudflare review.

    Review of Cloudflare – Unique FeaturesĀ 

    Free and Amazing CDN which increases Speed –Ā Cloudflare is one of those only few CDN or Content Delivery Networks which provides its services for free! The Content Delivery Networks help in increasing the Speed by providing a sort of “online cache”.Thus saving the time and resources required forĀ executing the scripts on the server , instead they are run once and are cached thus saving the resources and reducing the loading time :).

    Cloudflare Saves a Lot of Bandwidth! –Ā This may not be of much importance for Big site owners, but for small self-hosted blogs like mine,Bandwidth is an important factor – As completion of bandwidth quota will simply make the site unavailable and negatively impacting the SEO. The Cloudflare CDN stores the basic page cache on its server thus ensuring the Server resources and Bandwidth are conserved most of the time,ensuring proper Resource utilization.

    Site is always online and Positive SEO Impact –Ā Due to Cloudflare’s always Online Technology, your site is assured of being always Up in the Cloudflare’s cache thus preventing the SEO penalties due to the Bouncing links/Server unavailability at the same time ensuring Users will always get their required content .

    Protecting against Bots / DDoS and other type of attacks [Threat Control] –Ā Cloudflare CDN Network also protects from Blacklisted IP addresses which are known to produce Spam, thus preventing you from Spam . The Cloudflare Servers act as a shield when hackers attack your site through the methods and provides an effective Protection against threats such as DDoS,hotlinking,and Bandwidth leech etc.

    Awesome Cloudflare Apps –Ā Besides providing protection,increasing speeds of page loading,and conserving bandwidth the Cloudflare CDN provides a gallery of awesome apps which you can add to your site,which can add additional functionalities and may even generate extra revenue for you . For e.g Cloudflare Apps – Slider,Infolinks,Viglink can easily be added to earn extra income from site without annoying the visitors . Besides these there are also additional utility apps available such as Dome9,CrowdCurity,CodeGuard,Instaflare,Google Webmasters etc Just to name a few.

    Besides these the Cloudflare also contains an inbuilt Dashboard for Site Analytics which you can use to monitor the visitors,their location etc . And as these elements do not use any Scripts like Google Analytics/Awstats/Jetpack they are even more accurate and precise giving you an exact view of the Website Performance and Bounce rates. Regarding the Adsense things its still Up-And-Down so i am yet unable to figure out whether it increased my earnings or not. But one thing is for sure,it did increase my Rankings :).

    So , Cloudflare is simply a boon for bloggers, infact the Bandwidth of my blog would have been over had it not for Cloudflare! as it saved 70% of my Bandwidth šŸ™‚ . If you still have any doubts and queries regarding Cloudflare do comment, we would be happy to answer them šŸ™‚

  • Whatsapple – unOfficial Whatsapp Client for PC | Use Whatsapp On PC without Android emulators!

    Whatsapple – unOfficial Whatsapp Client for PC | Use Whatsapp On PC without Android emulators!

    Whatsapp is the most leading app being downloaded on the Apple iStore,Google Play Store and Nokia store , thus its one of the most leading medium of communication and instant messaging. but many people still cannot afford those smartphones or may want to use whatsapp on PC /Windows/Linux/Mac , though there are workarounds such as installing an android emulator (e.x bluestacks,andy) and using whatsapp on it, its quite RAM and resource heavy plus it doesn’t satisfy the ease of PC . hence to overcome all these limitations, We came up with an unOfficial Whatsapp client –Ā Whatsapple!

    Without wasting time, let me pen down the features of Whatsapple

    • Whatsapple is an easy to install and configure unofficial client of whatsapp for PC built on the base of Pidgin Messenger.
    • It provides all the features of Whatsapp,such as file upload/download, Individual Chat as well as GroupChat etc on PC.
    • Now, you can view the shared videos and photos/images directly on your PC.as well as Upload Videos/Photos(Images) to the chats directly from the PC!
    • All the Default Smileys of Official Whatsapp App are Supported, thus you can view the Smileys send as well as send emoticons to the Chat šŸ™‚ .
    • As Whatsapple doesn’t require any Android emulator its blazing fast! and light on your PC šŸ™‚ . Thus, any PC right from Windows XP to the latest Windows 8.1 all can run it :).
    • You can add unlimited contacts, no need of any complex emulator things like bluestacks,andy etc.
    • No limit of bandwidth or memory as is the case with phones, the big memory pool of PC practically ensures you will never run out of Memory for storing messages,logs ,photos,videos anything.
    • The Whatsapple client will never hang in most cases irrespective of how many messages arrive simultaneously.
    • And ya, the Installation size is just 10Mb which is even lesser than the apk file size of Whatsapp šŸ˜›

    Prerequisites –

    • Windows OS , Ā and .Net Framework 4.0 Installed ( Required for Generation of Password Only )

    Procedure to Install and Use Whatsapple

    First of all Download and Install the Whatsapple Client – Whatsapp for PC from hereĀ . , Also get your Whatsapp Password from this link –Ā https://davidgf.net/whatsapp/pwd.html

    We will need an Whatsapp Username and Password , as we all know whatsapp username is the mobile number with the Country Code ,

    • e.x for an mobile number in India , the Username will be Ā “91XXXXXXXXXX” where XXXXXXXXXX is the 10 digit mobile number .
    • For the password, we will need to Generate it one time as Whatsapp requires one time Registration , So first for Generating the Whatsapp Password Open the “Whatsapp Password Generator” from the Desktop.
    • Now, Enter the Mobile Number and click on “RequestĀ Code” button as shown in figure below.
    • Now ,you will receive a confirmation code on the mobile number , Now enter the verification Code received in the text box next to Code and click on “Confirm Code”Ā Button.
    • Now a dialog box appears showing you the Whatsapp Password and asking you to write it down,but don’t write it down, click on ‘OK’ and Now copy the Generated Password from the “Step 3″ Area of the Whatsapp Password Generator /WARP .
    • Now, once you have obtained the Username and Password Launch the main “Whatsapple for PC”Ā  Main exe from the desktop .
    • Here, click on Add and add the Username and Password we generated in the Window, you can tick the “remember password” option while adding so as to there’s no need of generating password everytime . Check the figure shown above for details.
    • Now click on add,after the account is added click on close! and voila! you will be logged in and can use Whatsapp on PC for Chatting.

    Method to Chat with a New Number or add Contact Name –

    • Click onĀ BuddiesĀ then selectĀ New Instant MessageĀ , Now Give your friend’s phone number with country code and Ā Click on theĀ OKĀ button. And you can Chat with him/her.

    Use WhatsApp on PC laptop free

    To add a Contact Name to a Number

    • Click onĀ BuddiesĀ ,Navigate toĀ Add BuddyĀ , Here please enterĀ your friend’s phone number with country code and provide other details > Click onĀ AddĀ button.

    Use WhatsApp on PC laptop free

    To Upload or send a File/Photo/Image/Video :Ā Use the send File / Upload Media option present in the “File” Menu of the Live Chat Window , of the Contact or Group to which you want to send the File .

    Thus, this is i guess by far the most easy,and efficient and Simple way to use Whatsapp on PC .

    Click here to download the Whatsapple Client for PC for WindowsĀ (XP/7/8/8.1) all supported.

    If you have any doubts/queries/suggestions feel free to comment šŸ™‚

    Solution to theĀ Server closed the connection Problem –Ā Solved by our reader Ā Steve

    Login to Whatsapple – Whatsapp for PC than go to > Accounts>Manage Accounts > Click on your accoun.Than Modify Account>than go to Advance tab change on the server instead of ā€œAndroid-2.11.151-443″ enter ā€œAndroid-2.31.151-443″ Ā  that’s it.

    Update : Ā People who still cannot get Whatsapp working can try running it on Firefox by referring this article .

  • Remote URL Upload to Upload files on Dropbox/Google Drive/OneDrive/Box.com|Easiest way to cache files and transfer between hosts

    Remote URL Upload to Upload files on Dropbox/Google Drive/OneDrive/Box.com|Easiest way to cache files and transfer between hosts

    Many a times we need to download from sites which either do not come with resume download support, orĀ the filesĀ simply don’t get downloaded on our devices. we may also encounter cases where the server speeds are quite slow and we need to download from a faster server.In all the above cases the problem can be solved by Remote URL UploadĀ by virtue of which we can upload files stored on remote(other) urlsĀ to Our cloud storage (Dropbox,Google Drive,Box.Com). Not only this but we can also use it to sync our cloud storage such as Box,Dropbox,Copy etc by getting their direct links as mentioned in the tutorial here.

    The Remote URL feature is also useful in bypassing filtering where downloading restrictions are placed , we thus, can remote upload our files by their download links to either of the Cloud hosts and download from the cloud servers ! . thus, bypassing the network restrictions šŸ™‚ .

    Procedure to perform Remote URL Uploading to upload files on Dropbox/GoogleDrive/OneDrive/Box.com

    • First of all sign-up on any of the cloud storage providers to get your own storage space , Keep your account details ready šŸ™‚ we will be needing those šŸ™‚
    • Now, Copy/get the Download Link / URL of the file which you want to upload on the host .
    • Navigate to this site : ctrlq.org/saveĀ .Ā  This is an awesome site created by the Digital Inspiration Network, and is based on filepicker.io API , filepicker has no free plans and has Bandwidth limits even for Paid accounts šŸ™ but this awesome API bypasses all of them šŸ˜›


    • In the box titled “FILE URL” Please paste the copied/upload file URL, and now click on the respective Cloud storage button option from the Save to menu, where you want the remote file to be uploaded.
    • After clicking on the button, an option such as connect to “<Cloud storage name>” appears, click on connect and authorise the inkfilepicker or filepicker.io app and allow it the required permissions to upload the file .
    • Now in the text box type the name by which you want to save your file in storage and click on “Save as”Ā button as shown in the figure below –
    • Within , split seconds the file will be Uploaded to your cloud storage which you can now share,download,embed etc. šŸ™‚
    • Thus, you have successfully bypassed network restrictions and uploaded remote URL file to your server and now can download it with full speeds.

    This is a great feature especially for online synchronization between storage and securing the files . It also helps in bypassing the network restrictions/server load . Thanks to Digital Inspiration and Filepicker.io API for providing such a great service for free !

    Update :Ā Another service called as storagemadeeasy does the same task of Remote URL Upload, not only that but Storagemadeeasy also provides personal free storage for storing and sharing files online ! It can also perform the task of moving files from one cloud storage to another without even the requirement of download links šŸ™‚ . Just sign up on storagemadeeasy, and add the cloud storage accounts, and now use the normal copy-paste method to copy and move files between the Cloud storage Providers , easy šŸ™‚ . Click here to visit StoragemadeeasyĀ .

  • 3 Sites to get Google Drive Direct Link/s of Files and Documents |3 Google Drive permalink sites

    3 Sites to get Google Drive Direct Link/s of Files and Documents |3 Google Drive permalink sites

    Hello , in my previous posts i had covered 5 File hosting/cloud storage sites which had hot linking support . Also i had covered the methods to get direct links of files stored on Dropbox and copy.com too , Now sharing the same to get Hotlinks from Google drive files or Google Drive Direct Link. Hot Linking or direct linking is very useful while sharing links through Mail / Blogs as its simply enable a single click to start downloading thus saving the users time and efforts to download a file while at the same time saving from those annoying ads.

    Prerequisites – Ā Google Drive sharable URL

    • The file/document which is to be used for generating direct URL must not be created in Google Drive/docs, if its created in Google Docs then please download and re-upload the same to the Google Drive
    • The file you are trying to generate direct URL for must be sharable . The method to get the Sharable URL is as below –

    Method to get Google Drive Share URL for generating Direct Links

    Step 1:Ā Go on to Google Drive and right click the file that you want to share.
    Now move your mouse over “Share…” and then click on the “Share..” that appears.
    Ā 
    Step 2:Ā On the window that comes up, click the “Change…” link beside the part that
    says “Who has access”.
    Ā 
    Step 3:Ā Set it to “Public on the web” or “Anyone with the link” and hit save.
    Step 4:Ā Now copy the “Link to share”. This is your sharing URL. Paste it in to the text box
    above and then create your direct link. Enjoy!
    Now , we are ready to get the Direct Link/URL for our Google Drive Files –

    Sites to get Direct link/URL from Google Drive

    WeĀ have ourselves created a Tool – CloudLinker which will do the same – Click here to Use Online Cloud Linker – Direct Download Link / Permalink Generator.

    Site # 1 – Google Drive Direct Link Generator

    This is probably the most efficient and easy to use amongst all the Google drive Permalink sites, as guessed from the Screenshot its quite easy to use too , We just have to enter the Sharing URL and click on the “Create Direct Link” button, and that’s it ! The direct URL will be generated in the Output Link which we can copy and share as a Direct Download Link .

    Click here to visit the Google Drive Direct Link Generator site


    Site # 2 – gdURL.com

    This is yet another site to generate Google Drive direct links – and is quite easy to use , we just have to enter the Google Drive Sharing URL and click on Generate Permalink buttonĀ  and the Permalinks will be generated. Also this site contains advanced features such as

    • Allows Multiple Sharing URL’s to be entered thus the generation of Multiple Direct Links :).
    • Supports direct Google Drive Connect so that the files can be navigated and the Direct links can be generatedĀ from the Drive browser itself thus saving the extra efforts of copying the Sharing URL.

    Click here to go to gdURL.com

    Site # 3 – gdriveurl.com

    gdriveurl.com is one more site which performs the generation of google drive direct links, it also includes extra features which are useful such as mydrive but for the annoying ads they degrade the overall experience of the site, and hence ranked third in this article .

    It also supports multiple Google Drive permalinks generation,a handy site overall šŸ™‚

    Click here to go to gdriveurl.com

    Note – Sometimes incase of Big files / Google Drive is unable to scan the file for viruses before download and may display a download page,but this is rare and occurs for big files download only. I hope you found this article useful, Thank you for reading and please do like and share this post so that all can enjoy these awesome features šŸ™‚