Category: Mobile Network Operators

  • Tutorial – How to [show older]/fake “last seen on” in Whatsapp [Hide your online status]

    Tutorial – How to [show older]/fake “last seen on” in Whatsapp [Hide your online status]

    Hey Guys,  many of you guys must be familiar with the “blue ticks” update of whatsapp , though its a welcome feature for some,its not too good for others . same is the case with “last seen on” in whatsapp  , what if we can simultaneously fake last seen whatsapp/show an older last seen on coupled with an option to see blue ticks of others while at the same time hiding ours , sounds interesting isn’t it ? and its easy too! 🙂 with WhatsApp+ , read on the article for the complete easy tutorial to do the same 🙂

    Prerequisites / Requirements –

    • Messages Backup for use in newer WhatsApp and its quite easy too ( Just Go to Settings – > Chat Settings -> Backup Conversations) and that’s it .
    • WhatsApp+ Apk (You can download it by clicking here ).

    Now, as you might have understood this is a different apk of whatsapp, so let’s check out some differences between the WhatsApp normal version and WhatsApp+ version –

    •  Hide Last Seen
    •  Apply and make themes of your choice
    •  Upload PHOTOS and VIDEOS without any compression (High Quality)
    •  Maximum upload size to 30 MB
    •  Change notification bar.
    • We can tabularize the differences as below –
    WhatsApp+’s HIDING Last Seen WhatsApp’s Turning Off Last Seen
    Others Can See your Last Seen (older day and time) Others Can’t see anything in your last seen
    You Can See others last seen (LS) You Can’t see other’s last seen
    Others won’t know if you hide last seen They will know that you’ve turned off your LS
    you can go Online/Offline via Widgets No Such awesomeness available
    Has Much More Other Awesome Features Simple old UI & Features are there
    Hide Last Seen button on main screen Settings/account/privacy/turn off lastseen


    Method / Procedure to Use WhatsApp+

    • Backup your Conversations by  Settings – > Chat Settings -> Backup Conversations) and that’s it .
    • Uninstall your existing WhatsApp.
    • Download and install WhatsApp+ Application. (I have linked to an older version, if it doesn’t work you can download the latest whatsapp+ from osmdroid.net)
    • While installation, you’ll get an option to restore, don’t worry it may take time for some users depending upon the chat backup) .
    • Once the installation is finished , Open Whatsapp+ ,To hide last seen and disable blue ticks click on the menu at the right-hand-side top corner and select “Hide last seen” option and yo!  (Check the image alongside)
    • You’re now online in incognito mode in WhatsApp! you can see other’s last seen and chat without the fear of anyone as others will only see the last seen time as the time when you had disabled it in WhatsApp+ 😛 🙂
    • Do the same menu-step to show/reveal your online status if you want to :).

    I’ve myself tested it and using it , hence in the image its showing “show last seen” instead of “hide last seen”

    Recommended : You can even use Two WhatsApp accounts on a single Android – Click here for tutorial to Officially use 2 WhatsApp numbers on a Single Android.
    Click here to Know on How to Create & Use Fake WhatsApp Account.
    Click here for tutorial to Send any filetype .zip / .rar / .apk files on WhatsApp

    If you face any problems while using it, feel free to ask we will be happy to help 🙂

  • ARChon Android Emulator for Google Chrome OS/Linux/Windows and Mac|Install and Run Android Apps in Chrome

    ARChon Android Emulator for Google Chrome OS/Linux/Windows and Mac|Install and Run Android Apps in Chrome

    ARChon is the first Android Emulator which is supported on Google Chrome OS! It works on Google Chrome browser too and thus can be used on Windows , Linux as well Mac OS too!! It uses the default Android Runtime Package for running the Android apps however, sooner we expect that Google will officially launch support for Android apps on Chrome! till then, we can use ARChon as it does the job pretty decently .Archon Android emulator will also Run Android Apk in Chrome OS / Chromebooks.

    Pre-requisites :

    • Google Chrome browser with an Internet Connection.
    • ARChon Runtime Package/Extension installed on Google Chrome .
    • A Modified .apk Android App package for testing Purpose (e.g we will be using 2048 Game Apk for this purpose , You can download 2048 from here).

    Method : 

    • First of all , download the runtime which is appropriate for your system:
    Runtime Download
    ARChon 1.2 – Intel x86 Chrome 64-bit / Chrome OS 64-bit (OSX: Use this in Chrome Canary) BitBucket :: MirrorMD5:d77b468339cc512e121c003cc97715db
    ARChon 1.2 – Intel x86 Chrome 32-bit / Chrome OS 32-bit (OSX: Use this in Chrome Stable) (Win7 32-bit: Use something like Chrome Beta 38.0.2125.77 beta-m) BitBucket :: MirrorMD5:9c9844e2591a27d952098581011a2bce
    ARChon 1.2 – ARM (i.e ARM-based Chromebooks) BitBucket :: MirrorMD5:3d6955c7702baf1e1d16a000d9f67b10
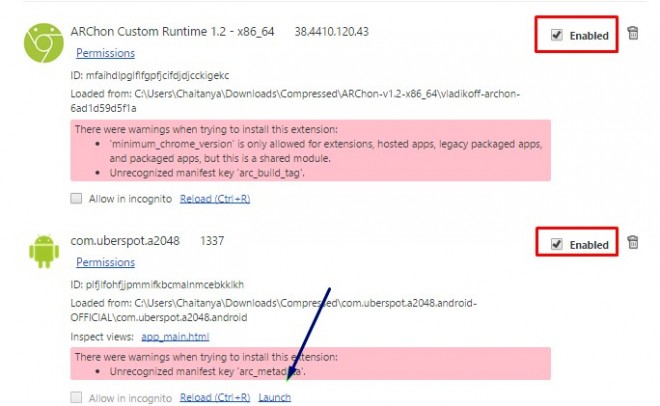
    • Unzip it into a folder ,Now load it as an unpacked extension, as shown in the image below

     For loading Unpacked extensions you will need to enable Developer Mode in Google Chrome you can do it by going to Settings – > Extensions -> Check mark the Developer Mode And Select the Folder where you just extracted the Archron Engine. (You can check the screenshots in this post 🙂 )

    • Once you have loaded the extension , please enable it by checking the Enable option besides the extension name .
    • Now extract the android Apk package which is converted into Chrome OS compatible into another folder and Load that too as an extension in Google Chrome (You can try with the above linked 2048 Game link).
    • Once you have loaded the game as an unpacked extension, it too will be shown with other extensions, now simply click on launch as shown in the image below-
    • Now once you  have clicked on Launch Your Desired Android App will be loaded! as shown below – Amazing isn’t it ?

    Drawbacks –

    • The Default Android Apk files do not work directly they need to be converted first into Chrome Compatible Apk’s which you can be created by an app mentioned here.
    • This is a proof of concept. You can run up to 4 Android applications right now with the regular runtime. Read the multiple apps manual to load more than one application at a time. To load unlimited number of apps read the ARChon runtime guide.

    I personally found this very unique and interesting , do comment your views and problems which you face while installing / running the apps . I am always happy to help 🙂

  • 3 Websites to directly Download Apk from Google Play Store on PC/Mobile with No requirement of Device ID

    3 Websites to directly Download Apk from Google Play Store on PC/Mobile with No requirement of Device ID

    Android is the most widely used Operating System today on Mobile devices, and the default and safest source to get Android apps which are packaged as .apk files is the Google Play Store. But many a times the Google Play runs very very slow , or as it is in case of many devices – its simply absent, so this leaves very less options from where we can download apps which are not modified by 3rd party and are safe and secure. In such cases, we still can download apps from Google Play, by using these sites thus,safeguarding us from malicious/modified apps.You can also use these websites to get back-up of your apps/Download it on PC and preserving them so that you can install the apps from their apk later. Let’s check out the 3 best Websites to directly Download Apk from Google Play store.

    Pre-requisites :

    • Google Play Store URL OR Package Name of the App . For e.g “https://play.google.com/store/apps/details?id=com.whatsapp” is the Google Play URL and the Package name will be “com.whatsapp” 
    • As shown in below figure – The image shows Google Play store URL, and the Blue colored rectangle shows the package name in our case for e.g its “com.whatsapp”
    • Unlike other services which ask for “Device ID” to download Apk’s these sitew require no Device ID‘s at all! and method to download too is very simple 🙂

    Website #1. Evozi Apk Downloader

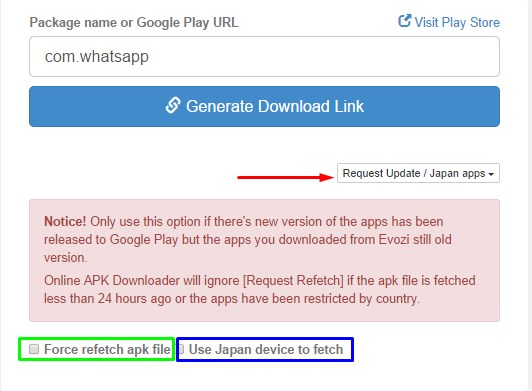
    Request Update/Force Refetch of Apk file from Evozi Apk Downloader

    Evozi Apk downloader is the first website which i came across which provided the service of directly Downloading Apk files from Google Play Store, And the method to use Evozi Apk Downloader website is very Simple too..

    • Visit the Evozi Apk Downloader Website by clicking here.
    • In the Box labelled “Package name or Google Play URL” Enter either the Google Play URL or Package name of the app which you want to download.
    • No Click on the Blue-colored “Generate Download Link” button, The App will be fetched and A Green button to Download the App/apk will appear below the Blue “Generate Download Link” button.
    • Check the Figure below for Download button example of Evozi Apk Downloader. You can also refer the Figure alongside for advanced option of Evozi to Update Apps and Force Refetch of Apk File indicated by the Red Arrow,and Green rectangle respectively . Besides this you can also request it to fetch Japanese Apps by ticking the option highlighted in Blue box from the image 🙂
      Download button example of Evozi Apk Downloader


    Website #2. ApkLeecher.com

    ApkLeecher.com may be defined as a worthy alternative to Evozi Aok Downloader, it also works in the Same way as that of Evozi, you either have to enter the Package Name, Google Play URL or the App name of the App you want to Download and click on Blue-button “Generate Download Link”

    • After the App gets processed on the Server , you will see a download link for downloading the requested Apk file , as shown in the figure alongside (The Green Arrow indicates the link to Download the Apk)
    • After you click on this link (indicated by green arrow) , Please wait for 5-10 Seconds for the Download of Apk to Start 🙂 .

    Click here to go to ApkLeecher.com

    Website #3.  Downloader-Apk.com

    Downloader-Apk.com is yet another alternative to Evozi Apk Downloader/Apk Leecher and like the previous two the interface too is quite Similar, We simply have to enter the App Package Name or Google Play URL ,and click on the Blue “Generate Download Link” button.
    • After the Apk is available to Download Click on the Green Download Apk button (as indicated by Green Arrow in the Figure alongside).
    • Within 5-10 Seconds , your Requested App’s Apk file download will be Started :). Simple and Easy!

    Click here to go to Downloader-Apk.com

    Bonus Website # apk-dl.com (Suggested by HB)

    apk-dl.com is just another site which enables to download apk from google play store by either its google play store URL, or by simply entering the package name and clicking on Go! button! This website is suggested by our reader HB so a special thanks to him.

    Click here to visit apk-dl.com

    So, these are the 3 Best sites which you can use to directly Download Apk files from Google Play Store thus providing you always the unmodified,Safe and Secured app which you can surely install on your device without any fear of any virus/backdoor trojans,protecting your privacy,activity and your phone 🙂 . If you know of any other such site feel free to comment or if you have any doubts and queries ask us!

  • Yosapp – WhatsApp Web client to use WhatsApp directly on browser – Whatsapp Website UI to access through Web Browser (Chrome/Firefox/Safari/Opera Mini/UC Browser)

    Yosapp – WhatsApp Web client to use WhatsApp directly on browser – Whatsapp Website UI to access through Web Browser (Chrome/Firefox/Safari/Opera Mini/UC Browser)

    My obsession with WhatsApp simply never seems to end, After writing about WhatsApple – WhatsApp client for PC , and 5 WhatsApp protocol supported apps for Firefox OS Phones , i looked around for even more Simpler and unique solutions and came across – Yosapp! and I simply loved this concept ! Its unique and pretty much what i am looking for! –  WhatsApp Web UI! (Use Whatsapp through Website)  .  Yosapp enables a user to use WhatsApp Protocol directly through the Browser 🙂 , it means that, to access WhatsApp through Yosapp there’s no need to download any WhatsApp App/Client whatsoever! All you need to do is Register your account and mobile number on Yosapp site and you’re ready to use it! (You can use WhatsApp on Opera Mini and UC Browser(Ucweb) too! 😛 )

    UPDATE – Yosapp is now DEAD 🙁 , but WhatsApp has now launched its official WhatsApp Web Client – Read about it here.

    Features of Yosapp!

    • WhatsApp Web UI (No need to Download Any WhatsApp Client!).
    • You can Access your WhatsApp account and use it for chatting from literally anywhere, e.g Net cafes,Web-browsers,Mobile browsers etc.
    • You can use it to access Whatsapp for Accessing on Public Computers such as school and college labs 😛
    • Easy Contacts Management – once you add your contacts in the Yosapp site, you can chat with them directly! So, in case you change your mobile Phone or lose your contacts, you have an all-time backup of the contacts.
    • Works on all browsers and accessible from anywhere , its pretty much like GMail, you sign in to your WhatsApp account, check and reply to the chats sent when you were offline, as well as Chat with the friends who are online too :).
    • Attachments sent by users to you can also be viewed and forwarded .
    • OS Independent : As its web-based you can practically use it on any Web-browser IE/Chrome/Firefox/Safari/Opera Mini/UCBrowser and any OS you want Windows/Linux/Android/Mac/Firefox OS/tizen etc and the list goes on and on…
    • Supports Desktop Notifications too 🙂 , if supported by the Browser e.g Chrome.

      UPDATE – Yosapp is now DEAD 🙁 , but WhatsApp has now launched its official WhatsApp Web Client – Read about it here.

    Configuring and using Yosapp too is very easy , simply perform the following steps to Configure and use Yosapp!

    1. Visit the Yosapp site by Clicking here.
    2. Click on the Sign-Up account icon in the Right hand side top corner as shown in below image –
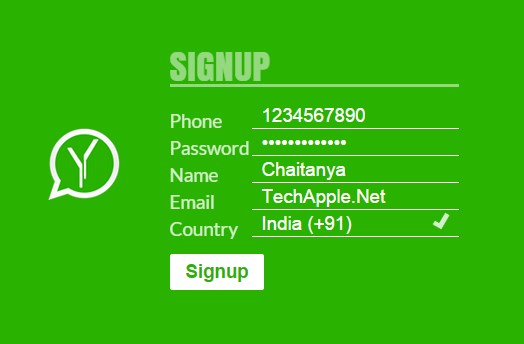
    3. Now you will be shown a Sign-Up Form as shown below – , Please fill in the 10-digit mobile Number and other details and Click on the “Sign-Up” button.
    4. Now , login to your registered account by clicking the “Y” icon , shown at the centre of screen, on left hand-side of Sign-Up form , and click on “Login” button.
    5. As you have registered for first time on Yosapp , it will ask for one-time verification of your Mobile Number either through SMS or by Call, as shown below , here select the Verification method and click on forward arrow button or  “>” (see figure)
    6. Now in the next Step, Enter the Six – digit verification number received on your Mobile, and click Next
    7. Voila! You are ready to use WhatsApp! on your browser, Simply Add a contact through “Add Contact” icon or through “Settings” icon as shown in below figure and start chatting ! 🙂 [ Check the below figure for all Controls and Options 🙂 ]
    8. Note : While adding New Contact, you will see a “CC” option CC stands for Country Code, in that field Enter the Country Code of the Contact

    That’s it 🙂 , you can now log-off and Sign-in again to your Whatsapp/Yosapp account from anywhere PC/Mobile to use WhatsApp! and it won’t ask for Verification too! 🙂

    UPDATE – Yosapp is now DEAD 🙁 , but WhatsApp has now launched its official WhatsApp Web Client – Read about it here.

    Thus, you can now access, your WhatsApp account from anywhere through your Yosapp account, Click here to go to Yosapp! If you have any doubts/queries/suggestions feel free to comment 🙂


  • How to Quickly Identify or detect font from Image online! using these Websites | Detect & Identify font present in Image

    How to Quickly Identify or detect font from Image online! using these Websites | Detect & Identify font present in Image

    Previously, i had covered the method on how to detect Font present in a Website/Webpage , however it may happen you see a beautiful Image/banner/photo and might like to use the font present in it , but Image editors on opening fail to detect such texts present/embedded in Image 🙁 . In such cases too, there are tools which will help us to find the embedded text as well as detect the font from it! 🙂  let’s have a look on how to identify/detect font present inside image online! detect font from image online using two websites 🙂

    Website 1. – WhatFontis.com

    WhatFontis.com is an awesome and easy to use website which helps in detecting the font from the image .

    • All you have to do is either upload the image through the computer/mobile by clicking the “Browse” button , or simply specify the direct Image URL and click on “Continue”  button. You will be redirected to  a page shown alongside.
    • Any detected text will be automatically highlighted , Now you have to enter the text which is present in the highlighted portion in the blank box alongside each image .
    • If the highlighted portion doesn’t contain any text or is a combination leave it blank .
    • Once you are done with all the images,  Click on the “Continue” button present at the bottom of the page.
    • Now you will be redirected to a new page and voila! All the fonts of the text present in the image will be shown  🙂 .

    Thus, the font from the image were successfully identified and detected , that too without  the need of any additional bloatware(software) or any hardware device (OCR) etc 🙂 Really useful for guys like me who love to experiment with new fonts :).

    We also, have an alternative to WhatFontIs which is covered later in this post, till then you can give a try to WhatFontIs here.


    Website 2. MyFonts – What the Font

    WhatTheFont tool provided by myfonts.com is yet another easy to use website which helps to detect Font from an Image. The Method to detect font too is very similar to WhatFontIs –
    • Select the Image from computer/mobile by clicking the “choose file” button, or directly specify the direct image URL of the image of which font is to be detected .
    • After entering either of them,click on the “Continue” button, you will be asked to enter the text from various highlighted portions of the image.
    • Now enter the text which is present in the highlighted portion in the blank box alongside each image.
    • If the highlighted portion doesn’t contain any text or is a combination leave it blank .

    Once you are done with all the images,  Click on the “Continue” button present at the bottom of the page.

    Thus, the procedure is almost exactily similar to WhatFontIs .  but the results of both sites can be different! and in most cases the sites will get the Job done 🙂 .

    Click here to visit WhatTheFont – MyFonts.com

    So, these are the methods to detect font from an image online. However if you know of any better method , do share with us under comments, and we will duly publish it with your name , after all sharing it is improving it!  . If you have any doubts/queries do leave a comment behind ,we will be glad to help 🙂

  • 5 Best Free Calling Apps to phone call Mobiles/landlines in India without Internet! | Make free calls using these Free Call apps

    5 Best Free Calling Apps to phone call Mobiles/landlines in India without Internet! | Make free calls using these Free Call apps

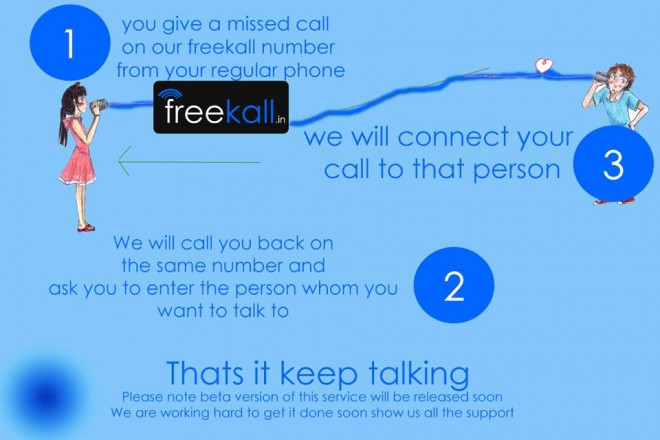
    In my last post , I had covered the 10 best apps to get Free Recharge , considering it you will be enjoying the high balance currently, we would like to make your Phone even more “Smart” by enabling free calls to any Indian Mobile /Land-lines that too without internet! Though there exist boasts of apps such as Viber,WeChat,Facebook messenger which enable free calls but they are on-net,which require the receiver too to have an active internet connection for the Call to take place. What if , the call takes place offline 🙂 without the need of Internet Connection ?  Sounds, Amazing isn’t it? Keep on reading to know the best 5 Free Calling Apps to make calls without Internet connection required.

    App No 1.-  WhatsCall


    WhatsCall free calls for Android & iPhone
    WhatsCall free calls for Android & iPhone

    WhatsCall! is an awesome app that let’s you make Free Calls to any Mobile/Landline in this world!The best thing about WhatsCall is the called person isn’t required to have the WhatsCall app/Internet Connection! . It’s more than sufficient if only you have WhatsCall app Installed on your device the call will still suffice.

    • WhatsCall offers daily 100 credits for simply logging onto the app! (Credits are used to make free calls via app)
    • It also offers 1000 Credits per referred friend/invite.
    • You can also earn credits by watching videos, downloading apps, playing games & completing tasks.
    • Which means, you can earn about 4500 plus credits each month for free! without having to pay for a single credit :).
    • The WhatsCall credits can later be used to make FREE Calls through the WhatsCall app.
    • for example, the charge for calls made to India cost 80-140 credits per minute which tallies to around 70 Minutes of Free Call!
      while the charge for USA Calls is 30 Credits per minute which account to Over 250 Minutes of Free Calls per Month!
    • Not to forget WhatsCall even provides Unlimited Free WhatsCall to WhatsCall Calls , which don’t require any credits 🙂
    • Click here to Download WhatsCall!


    App No 2 – Libon!

    Libon is yet-another VoIP (Voice over Internet Protocol) Calling app, which provides free calls to its users! Features of the Libon App are –

    • Free Unlimited Libon – to -Libon Calls.
    • Free 30 Minutes Per month to Non-Libon users (Users on Mobiles/Landlines with no internet Connection/Libon)
    • You can also get Free 60 Minutes per month by referring friends.
    • We get 5 Minutes per every friend referred!

    Click here to download Libon


    App No 3. – Nanu

    Nanu is the latest entry in this segment of free calling and it provides Free Unlimited Nanu to Nanu (On-Net calls) and 15 Mins/week Nanu to non-nanu (Offline calls) which can be used to make calls to the mobiles or landlines and they need not to be connected to the Internet! which is the best thing 🙂

    Besides India, Nanu also provides services to Argentina, Australia, Austria, Brazil, Canada, China, Columbia, Cyprus, Denmark, France, Germany, Greece, Hong Kong, Hungary, India, Ireland, Israel, Italy, Kazakhstan, Korea South, Malaysia, Malta, Mexico, Netherlands, New Zealand, Norway, Peru, Poland, Portugal, Puerto Rico, Romania, Russia, Singapore, Slovakia, Spain, Sweden, Switzerland, Thailand, United Kingdom, United States, Venezuela 🙂 thus you can use your non-Nanu minutes to save on the ISD Costs  🙂 isn’t it amazing 🙂 ?

    Click here to download Nanu from the PlayStore.


    App No 4. Dingaling

    Dingaling is another free-calling app /VoIP provider, Dingaling is the only app that lets you make FREE local, long-distance, and international dialed calls over Wifi, 2G*, 3G*, and 4G* networks— even to people who don’t have the app!.

    Dingaling provides –

    • FreeUnlimited Dingaling calls to mobile/landlines.
    • Our current free call locations include: Australia, Canada, China, Denmark, India, France, Germany, Hong Kong, Hungary, Ireland, Mexico, New Zealand, Puerto Rico, Singapore, Thailand, Sweden, South Korea, the UK, the USA. More free calling area codes and countries coming soon!.
    • Dingaling provides 1hours and 30minutes calling to countries with a daily limit of 10 minutes per day.

    Click here to download Dingaling


    App No 5. – GET Rewards! – Powered by m-AdCall

    This is possibly the most popular app because of the sheer number of users who have tested,verified and use this app on their Tata Docomo Connections, and now its available for All Indian Telecom Operators!  but with a twist, Tata Docomo and Reliance GSM Customers get the Free call (duration : 2-min to 4-min) directly through the App! while other Operators users get 10.Rs Free Recharge on viewing 40 Ads. It may sound uncatchy for other Operator users, but to be on the secure side this app will always pay and your efforts won’t go wasted 🙂 . Some unique features of the app are –

    • No internet connection required on the Receiver side 🙂
    • Only need is to watch a simple 15~20 Second Ad to place a call or get Credits !
    • Works on Wi-Fi connection too ! thus adding and saving your Balance in ++.


    So these were the best Free Calling apps to make Free Calls to Indian Mobiles/Landlines, will update it as i discover new apps 🙂 . If you know of any such good app or have any doubts/queries feel free to comment ! 🙂

  • 3 Ways to find & Detect Font of Website or in a Webpage

    3 Ways to find & Detect Font of Website or in a Webpage

    Recently I was browsing through the Line friendconverter site and i really liked the font name, and wanted to add it to my PC . but i had to search around a bit hence thought of writing an article on finding the font of website so as TechApple blog users need not to roam around for doing the same. so here are the Best 3 Methods to find font of website which i found better 🙂 .

    Method I : WhatFont Chrome Extension

    This is my most preferred method and me being lazy loved it . All you need to do for finding the font of website is –

    • First of all, install the WhatFont Chrome extension and hover the mouse pointer over the text part of the website whose Font you want to find .
    • Whatfont will display a box showing the Fontface name, Family,  Size as shown in the alongside Image.
    • Incase if it doesn’t show up Simply click on the “f?” button on the addon – bar and perform the Hover method . Easiest way !

    Click here to download the WhatFont Chrome Extension


    Method II : Using Font Finder Add-On for Firefox
    Not all users will be using Google Chrome, Firefox users too have an addon for Firefox – Font finder which can be used to detect Fonts on the Website which is currently visited. For detecting font using Font Finder
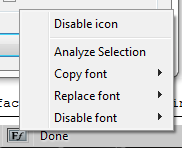
    • Select the text of which Font is to be found and right click on it.
    • An image similar to one shown alongside appears , select the option “Analyze Selection” and you will be shown a dialog box showing the Font Name, Size, details etc that too in flash seconds.

    Click here to download the Font Finder Add-On for Firefox


    Method III : Using the Bookmarklet – Fount by Artequalswork

    The above discussed methods work for either Chrome or Firefox, it may happen that you are a Safari or IE or any other Browser user and you want to detect the font of the website, so there’s a solution available for other browser users too – A bookmark is provided by Artequalswork – Fount which will help in finding the font.

    All you have to do is add their bookmarklet to the bookmark bar, navigate to the website of which font is to be detected or determined , and click on the Fount bookmark , and magic! it will show the Font face name,family as well as the size! and it works on all Browsers – Safari, Google Chrome, Mozilla Firefox, IE 8+ .

    Click here to visit the add Bookmarklet page of Fount

    Note : In-case if you want to detect / Identify font present in an image, you can read the postMethods to detect font from Image 

    These were the easy methods to detect the Fonts used on a website , while most of the time these tools will work , if however if they don’t work we can use the methods used by developers for Font detection purpose – Firebug and Webkit. I will be writing an article with detailed instructions on using the same , but mostly the above tools will save the day ! 🙂 . If you have any doubts/queries do comment also if you know of any other such tool or method feel free to comment, we will really appreciate it 🙂

  • 3 Ways to Get Free Mobile Recharge/talktime for Lumia/Windows Phone/Other Phone users [Lumia 510/520/525/620/630/820 etc]

    Hello friends ,  in my last post I had shared the Best 10 apps to get free talktime/recharge on your android smartphone or pc , but its not necessary that all might own an Android Phone or PC , also majority of Lumia and Windows Phones have a good user base in India, so here’s a post dedicated to all Non-Android phone users by virtue of which they can earn their free mobile recharge on Lumia/Windows Phone/Other Phones.

    Update – The Best App for free recharge and earning money online is Roz Dhan –Please click here to know about RozDhan and claim your Free Rs.25!

    1. Mcent  :  Unlike Android Phone users Windows Phone and other phone users have no option but to refer their friends and earn the Recharges , and the best service offering Top-Up for bonus is Mcent.  It provides upto Rs.50! per referred friend and thus is highly recommended for Windows Phone users as everything referrals,top-up can be managed using the mcent.com website which can be opened in any browser.

    Click here to Sign-Up for Mcent

    2.Amulyam : Amulyam.in is one of those great websites which offer moneey/talktime for completing the offers, these offers can easily be completed through web browser 🙂 also if an android user you can even earn additional talktime by installing apps. Amulyam has an awesome referral program by which you can earn Rs.3 per referred friend :).

    Click here to go to Amulyam

    3.Hike : hike! messenger available for windows phone was the first app to offer Free Recharges! and still it continues to offer them . Using hike’s Refer friend function you can earn upto Rs.20 per referral and redeem your recharge as soon as your hike Wallet reaches the threshold of  Rs.50.

    Click here to Download hike!

    Update – Get additional discounts on Flipkart by downloading the new Flipkart app for iOS/ Windows Phone by clicking here.

    These are some of the methods which can be used by Windows phone and Lumia users to earn free mobile recharge/talktime , if you have any doubts/queries or if you know more of such tricks feel free to comment ! we will like to hear and answer you 🙂


  • Install/Run Old 16-bit/32-bit Software on 64-bit PC/OS | Compatibility Guide – Install Windows 7 Software on Windows 8/8.1

    Install/Run Old 16-bit/32-bit Software on 64-bit PC/OS | Compatibility Guide – Install Windows 7 Software on Windows 8/8.1

    Many times we come across scenarios where we look for backward compatibility in order to run Legacy/Old Software’s on our Newer PCs or OSs . or may be we need to Run the 32-bit or 16-bit Software’s on our Newer Machines . e.g Installing Windows 7 Software on Windows 8, Installing Windows Xp Software on Windows 8.1 etc,installing 32 bit software on 64 bit os . This Compatibility Guide will cover all these Compatibility issues.

    Compatibility Issue 1 : 16-bit Softwares on 64-bit OS (e.x Old Dos Games and Softwares on New Windows 7/8/8.1 64bit OS)

    This Compatibility constraint is the most widely experienced and most searched after Compatibility issue , while running the Old Native DOS based games and apps, on 64bit OS these app simply do not get executed and display a warning message such as “This app can’t run on your PC” . The solution / fix to this problem is pretty simple – Using DosBox to mount and run these old 16bit apps, infact the apps Run as smoothly as if they were Running on Native environment e.x Windows 95/98, such is the high quality emulation provided by Dosbox. I searched and searched throughout the Internet for DosBox alternatives, but the closest thing i found similar to DosBox is DosBox Itself! . To run your Software through Dosbox, simply install the Turbo C installer from this Post ,Now drag and drop your .exe which is to be opened on the DosBox.exe icon present in the “C:\TurboC4\Techapple.Net” folder, and your 16bit app will directly Run in 64 bit Windows!

    Compatibility Issue 2 :  Older Operating System Software on Newer OS (Windows XP or Windows 7 software installation on Windows 8/8.1)

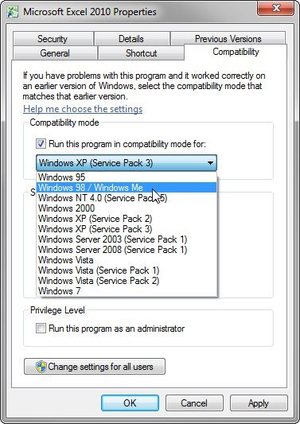
    This is another big Compatibility issue faced by most of Us, and the Solution too is quite Simply according to the Problem . If you are facing the error while launching the setup file, simply Right-click the .exe file, or a shortcut to the .exe file, and select Properties. Click the Compatibility tab. Then check Run this program in compatibility mode for and select an appropriate option according to the OS it was built for. Then try launching the Setup again , it should get installed 🙂  Check the alongside image for more details. Or if it’s giving the problems after installing try the above mentioned Compatibility method along with the “Run as Administrator” which appears after right clicking on the Icon . i.e Executing the program as Administrator. You can also add the tick in the Checkbox in the Compatibility tab to enable “Run as Administrator” Option.

    Compatibility Issue 3 : Installing Running 32-bit Software in 64 bit

    Generally, all the 32-bit software work well by default in 64-bit Operating Systems , but some legacy Softwares give errors, or simply won’t function properly 🙁 . The reason behind one is quite trivial One – All the 32-bit Softwares are installed in the directory “Program Files(x86)” And they are simply tuned and designed to work with their directory as “Program Files”  so the solution here is quite simple, At the installation time simply change/edit the installation directory to “Program Files” along with the generated installation directory and as i found out here while installing VB6 on windows 8.1 , It will work like magic! along with the above mentioned Run as Administrator/Compatibilty Tweak 🙂


    I was able to solve all my Compatibility issues using the above 3 Tweaks, and yes if the Old Beast can still run on Newer Machines so why should we replace it 🙂 ? .And if even all the above 3 fail we always have the Option of Virtual Machine and installing OS on it which though lengthy always works, so Enjoy your favourite legacy and Old Softwares with the above mentioned tricks, and if in case Some Software still doesn’t run simply Comment, we would be glad to help!