Blog

  • Tutorial – Installing/Setup VirtualBox on Linux [Ubuntu/LinuxMint/Fedora/OpenSUSE/ArchLinux etc]

    Tutorial – Installing/Setup VirtualBox on Linux [Ubuntu/LinuxMint/Fedora/OpenSUSE/ArchLinux etc]

    VirtualBox is the most widely used Virtual Machine emulator today, be it Windows or MAC OS or Linux . The Widespread availability of VirtualBox for all Platforms is its plus point , it allows to run and install multiple guest Operating on our base [host] OS without the need of formatting or dual-booting . VirtualBox is also required by loads of third-party tools such as Android Emulators,Machine renderers as the basic dependency layer . The installation process of VirtualBox on Linux can become tedious at times, we will try to simplify it as much as possible in this post.

    Installing VirtualBox on Linux

    •  The easiest method to install virtualBox on linux is by downloading the .deb or .rpm packages available corresponding to your distro from the VirtualBox Downloads page from here –> [LinuxMint users should select Ubuntu based packages as LinuxMint packages are similar to Ubuntu]
    • https://www.virtualbox.org/wiki/Linux_Downloads.
    • If you are facing problems on which distro or build , you should download – Simply Navigate to  – System Settings -> Details and you’ll see the OS type , as shown in the figure –  
    • Now, double click the .deb or .rpm package downloaded.
    • Now depending upon your OS type, it will either open the default package manager of your system, “e.x Ubuntu App Center fot Ubuntu” where in you have to click install or it will directly  start installling !
    • If incase, the default packages provided by VirtualBox don’t work for you, you can even install VirtualBox through terminal by if yum is your default package manager, you can even use terminal to install by typing the command  –
      yum install VirtualBox-4.3
    • Or if you are Ubuntu/LinuxMint/any other Ubuntu based distro user, you can use
      sudo apt-get install virtualbox”  to install VirtualBox.
    • Thus,  you have installed VirtualBox on your Machine, if the above discussed methods don’t work for you, please comment with the error code, we will be happy to help you out! 🙂 and get VirtualBox installed .
  • Tutorial – Install/Setup Genymotion Android Emulator on Linux [Ubuntu/LinuxMint/Fedora/ArchLinux]

    Tutorial – Install/Setup Genymotion Android Emulator on Linux [Ubuntu/LinuxMint/Fedora/ArchLinux]

    In our previous post, we had discussed about the Best 5 Android emulators for Linux . Many asked us for installation instructions for installing Genymotion on Linux, so we have come up with this tutorial to install Genymotion – the present-best Android emulator for Linux. I have tried and tested this tuorial for Ubuntu and LinuxMint but it should work for all Linux distributions

    Tutorial for Installation/Setup of Genymotion on Linux –

      1. Genymotion requires VirtualBox to be installed on your Linux System for it to run , To learn/install VirtualBox on your machine, you can read the post about it present here . Procedure to Install VirtualBox on Linux .
      2. Now, for Deploying Android Machines on Genymotion we need an account on genymotion cloud, which can be freely obtained by signing up at this Genymotion Cloud Sign-up URL.
      3. Now , first we have to download Genymotion , After Signing up, please logon to the Genymotion site and Download the Genymotion machine renderer from here , depending upon the Linux distro and build you are using [32 or64 bit].
      4. Now go to the Terminal on your Linux by menu or by typing “Ctrl+Alt+T”.
      5. Now in the Terminal , Navigate to the Directory where the downloaded Genymotion image is present [Let’s consider the image downloaded is present in the Downloads folder] , Now type these commands in the terminal.
      6. cd ~/Downloads/

        chmod +x genymotion-2.1.0_x64.bin

        ./genymotion-2.1.0_x64.bin
        
        
      7. Now, Genymotion will be installed as shown in the figure below
      8. Now , run Genymotion from the VirtualBox or from the Menu. Alternatively, you can run it from the terminal by executing
        /home/handbook/Downloads/genymotion/genymotion


    1. Now Genymotion pops up, there login with the Genymotion account we registered earlier,and click on Create New Virtual Device or the “Add”  button.
    2. You will see various Android Images listed as follows , select the one you want to emulateand click Next
    3. The Android image , will now be downloaded to the machine and saved for future use, after its downloaded , Just select the Android image which is present on your system and click the “Play”  button.
    4. Your desired Android Image will be implemented , Now you can Play Games, Install Whatsapp etc and do anything with your Own Linux Device right on your PC :).

    I hope , the tutorial was clean and clear, however if you face any issues/encounter any problems, Please do comment we would be glad to help :).

  • Flex for Windows- Lex and Yacc(Bison) Installer for Windows 7/8.1/10  32-bit & 64-bit

    Flex for Windows- Lex and Yacc(Bison) Installer for Windows 7/8.1/10 32-bit & 64-bit

    Hello friends, recently we were introduced to lex and yacc parsers in our syllabus, but the introduction to lex and yacc [flex and bison] was made in linux environment . Personally, I didn’t felt necessary to Install the Complete Linux OS on my Laptop just because to have gcc/lex/yacc libraries which are a mere 30 MB size , and to allocate 10GB Disk Space + RAM[in Virtual Machine] to Linux is something which i am not very Fond of 🙁 . After searching on Sourceforge, I came across the MinGW [ Win 32 Port of cc/gcc/g++] and the GNU-Win32 ports of flex[lex] and bison[yacc] respectively. So in order to make it easy to use and install i Packaged all of them into a single one click installer – Flex for Windows 7/8/10

    Contents / Salient Features of Flex Windows

    • In-built GCC/G++/cc Libraries of LinuxThe Flex Windows Package contains inbuilt Gcc And g++ libraries [c and c++ compilers] which are ported to windows officially by MinGW and are actively developed by the Linux Open Source Community
    • Lex and Yacc Package Binaries  :  The package contains the latest updated versions of Lex and yacc binaries [flex and bison] which are developed by their developers . The original binaries are included as-it-is in the package so as to ensure smooth and error free compilation and build of your Programs.
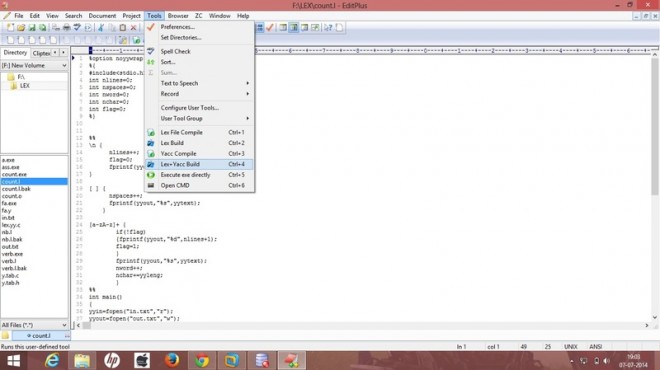
    • Pre-Configured EditPlus IDEThe package also contains EditPlus IDE which contains pre-defined Blank templates for the Lex/Yacc/C/C++/Java Files, thus each time you want to type a program you can simply use the New Lex / New Yacc template, and the basic code will be inserted thus saving your time and efforts to type :P.
    • The EditPlus IDE also contains user Commands for Lex Compile,Yacc Compile,Lex Build , Lex+Yacc Build, Band for Execute. thus, saving your time to type complete commands like “lex abc.l” or cc lex.yy.c  y.tab.c -o <object file>” blah blah..” you can simply click the Buttons according to the function you wanna perform and the command will be executed, the command itself will insert the filename,parameters etc 🙂 Amazing! isn’t it ? And to top it off the IDE will capture the command output , errors if any will be shown in the IDE window itself ,thus you can easily change the code,save and compile in split seconds making it easy and pretty much like Geany/Eclipse/Netbeans 🙂
    • If it still doesn’t impress you , you still can open CMD and compile and build the hard-old-fashioned way 🙂
    • No need to Set PATH variables , the PATH variables , for the gcc/lex/yacc are added by the installer itself, thus saving the efforts required to set PATH 🙂
    • Single installer , works on all version of Windows., here’s a Snapshot of the Flex for Windows in Action

    Download : Click here to download Flex for Windows 7/8/8.1/10/XP 32-bit || 64-bit

    Download Mirror #1 :  Click here to download Flex for Windows 7/8/8.1/10/XP 32-bit || 64-bit from Mirror # 1

    Update : For those who are facing errors with Bison/yacc Package in Flex for Windows can also install Lex/Yacc on Ubuntu/LinuxMint easily by referrig this article.

    Cautions/Precautions to be taken :

    • Make Sure you install the Package in any folder except “Program Files” / “Program Files (x86)” The Package won’t work if installed in Program Files.
    • The Windows Lex Version requires “%option noyywrap” ,  Please make sure this option is present , before you compile Programs.
    • The “-ll” and “-ly” arguments won’t work in Windows as they are not required in Windows Environments.
    • If the IDE Lags/Code doesn’t respond on compile command , Please re-run the FlexIDE as “Run as Administrator” .

    Method to Run Programs through IDE

    • Some users have reported difficulty using the package for running the programs or giving the inputs, hence we are simplifying the instructions to run the programs below. In some cases you may find that the program terminates after executing after getting inouts from console if compiled and executed through IDE, In such cases the CMD way is recommended for executing .

    Case 1 : Only lex Programs need to be run and built and executed

    • Click the compile lex button in the IDE.
    • Click the build lex button.
    • Click on Execute .

    Alternate way through CMD 

    • Click on Execute CMD directly button in the IDE.
    • Compile the Lex File by typing the command lex <filename>.l
    • Build the Lex File by gcc/cc command in the CMD e.g gcc lex.yy.c -o <executable name for program>
    • Execute the program by typing <executable name for the program>.exe
    • The -o <executable name for program>  parameter is optional, you can skip the said parameter by directly building by gcc lex.yy.c
      and then directly execute your program by typing a.exe

    Case 2 : Both Lex and Yacc Programs together have to be linked and Compiled – Executed

    • Compile the yacc program by the compile yacc button from the IDE.
    • Compile the Lex program by compile lex button.
    • Build the program by clicking the “lex-yacc” build button.
    • Click on Execute button.

    Alternate way through CMD

    • Click on the Execute CMD button in the IDE.
    • Compile Yacc file by typing command yacc -dy <filename.y>
    • Compile the Lex File by typing the command lex <filename>.l
    • Build the Lex File by gcc/cc command in the CMD e.g gcc lex.yy.c y.tab.c -o <executable name for program>
    • Execute the program by typing <executable name for the program>.exe
    • The -o <executable name for program>  parameter is optional, you can skip the said parameter by directly building by gcc lex.yy.c y.tab.c
      and then directly execute your program by typing a.exe

    The binaries are provided as it is , so they cannot contain any errors, However if you face any errors/problems while installing or running, do comment 🙂 we will try to solve it . If you have any doubts/suggestions do leave them behind in comments 🙂

    UPDATE : All yacc fixed in this new version — New Update to sequence for Activations by Maria —

    “select the name.l -> click on Lex Compile -> click on Lex Build ->
     
    -> select name.y -> click on Yacc Compile – click on Lex + Yacc Build ->
     
    -> click Execute exe directly or Open CMD (typing the name)”
  • 3 Best Apps to Record Screen in Linux|Capture Screen Videos / Screencast in Linux easily! Ubuntu,Fedora,LinuxMint,ArchLinux etc

    3 Best Apps to Record Screen in Linux|Capture Screen Videos / Screencast in Linux easily! Ubuntu,Fedora,LinuxMint,ArchLinux etc

    Recently, i had to record some tutorials on my linux machine, but i found out that there are only a few rare options to record screencasts [screen videos ]in Linux / Ubuntu [LinuxMint is based on Ubuntu] , hence i came up with these three Best and Awesome apps to record screen linux . These apps are easy to use and easy to  install as well plus they work on all major linux distros such as Ubuntu/LinuxMint/Fedora/ArchLinux etc. Let’s have a look on each one of them one by one.

    App 1 . Kazam Screencaster


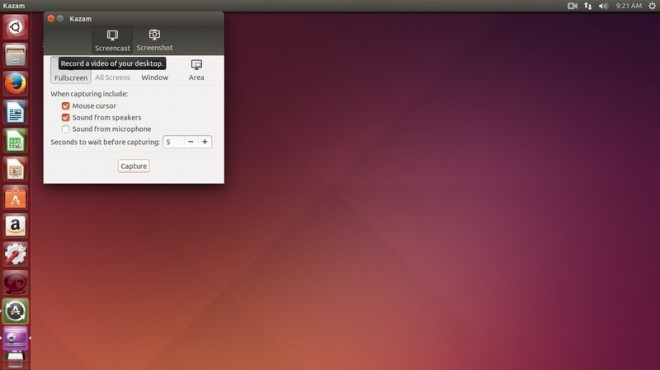
    This app may be called as the best screencast recorder or Screen video Recorder for Linux ! I  found out some really interesting features of the app such as

    • Kazam is really very easy to install and setup .It is available on almost all linux repositories i tested it from Ubuntu 11.04 to Ubuntu 14.10 . Simply type the “sudo apt-get install kazam” if you are using Ubuntu based distro such as Ubuntu/LinuxMint/etc or “pacman kazam” or any package get command according to your distro , kazam will be surely there!
    • It also enables to select the area to be recorded be it a particular window/particular screen area or complete screen! Kazam allows it all.
    • Its really lightweight and works superbly on my Virtual Machine too.
    • You can check out the Download Instructions[Steps]/Working Demo / Tutorial for Kazam here.

    App 2. Simple Screen Recorder


    SimpleScreen Recorder is yet another fantastic App for recording screencasts on Ubuntu , it allows easy recording and is based on qt , thus works very smoothly , some of its unique features include

    • Record OpenGL apps directly, without any extra required codecs/filters.
    • Automatically reduces frame rate on slow computers.
    • Pause/Resume the Video recording anytime.
    • Optional audio recording , if audio is not the Priority.
    • Specify the Codecs / Encoding to be Used for Recording the video.
    • Not only this, but the main app lets you keep an eye on the increasing file size, memory size,frame rate,time,thus enhancing the usability !

    To install SimpleScreenRecorder on your Linux/Ubuntu enter the following commands in the Terminal

    sudo add-apt-repository ppa:maarten-baert/simplescreenrecorder
    sudo apt-get update && sudo apt-get install simplescreenrecorder


    If you are using Fedora or any other distros you can get the Pre-built builds from here .

    App 3 . RecordMyDesktop


    This app “RecordMyDesktop” is yet another Free Screen Recorder / Screencasting app for Linux , It also supports recording the Screen in various Video Formats and sizes as well as window recording . The App also supports pausing and resuming the recording of Screencast ., but the only drawback was its lag on the Virtual Machine, thus indicating its more hardware dependent , but overall its another small size tool which can be used for Recording Screen.

    RecordMyDesktop can be downloaded from the Default app Directory / App Center of Ubuntu/Arch/Fedora. If not available,you can use the command
    “sudo apt-get install recordmydesktop” from the terminal to download and install RecordMyDesktop

    Besides these three you can also use tools such as “DemoRecorder – Linux”[Adware], “Xvidcap” [Works on 32bit Distros Only],”VLC”,”ffmpeg”[lag in UI] to capture the ScreenVideos or Screencasts but because of the Bracketed Cons i don’t recommend them,If you encounter any problem while downloading/installing/using any of the apps mentioned, feel free to comment 🙂 and also if you know of another screencaster app for Linux, Do let us know !

  • Prevent Google from tracking Search-Using non https Google Search [Non SSL Version]

    Prevent Google from tracking Search-Using non https Google Search [Non SSL Version]

    Many sites today track users without their consent and store data, hence privacy of users is a major concern. Google too does the same way and tracks our previous search queries,visited links to track our usage and improve the search results . But many times it can happen that we may want to hide our search query from google or stop it from tracking our usage. Also sometimes we may want to use the old non-https or non SSL version of Google Search to search our query especially in case of slower network connections. This post covers the very same on How to prevent Google from tracking our search without having to log out or make changes to our Google profile/Account settings , And using non https Google SSL encryption.

    The Method to use Google without https and without traceability is very easy , though there are many users using 3rd party services like ducduckgo or startpage.com but i won’t recommend them,as they themselves are slower and their server processing despite using google results make them even more slower..Let us now browse the methods to prevent google from recording the search results.

    Method I —– Using Google Server IP

    Yeps, this is the most simple Method to use Google and gain access to Google search results without letting google track and using SSL , you can get the Geo-Specific Google Server IP for your location too, The Process is very Simple as follows

    • Open Command Prompt [For Windows users] or Terminal [For Linux and Mac users] and simply type the command “ping google.com” and hit enter, you will get a message as “pinging google.com (google server ip) with xx data” check the below screenshot for information.
    • Here the IP contained in the brackets is the Google Server IP , now simply enter this IP in your browser and hit enter ! and voila !
    • You are now able to access Google without https and without traceability , you can yourself check that even if you are logged on/signed in on “google.com” you are logged off/signed out on the Google Server IP Page :). Thus preventing the Google Server from tracking you and your search 🙂
    • Also, you can check for previously searched queries, they always disappear 🙂 Check the below Screenshot for live demo of the same –>
    • As you can see in the above Screenshot i have used the Google IP from the ping command and using it for searching , The Google Server IP which i used was 173.194.36.38 , you can obtain yourself IP or can use anyone from the range 173.194.36.1 to 173.194.116.255 , tested by me i.e total 80*255 IPS but may be the number is even more  🙂 You can try urself and get your own Google Server IP  for personal use 😛

    Method 2 – Appending ?nord=1 at end of Google Search

    • This is yet another method for using non https version of Google Search but unlike the previous method it doesn’t completely prevent Google from tracking your results.
    • But this method is quite useful especially in slower network connections or restricted networks where https doesn’t work properly . You can visit the non-https version of ?nord by Visiting here – http://www.google.com/?nord=1

    So ,these are some tweaks of the World’s Number 1 Ranked site, which many and many of them might not know and which can be used to enjoy the Google Search experience 🙂 , If you have any doubts/queries/suggestions feel free to contact us or comment below 🙂

  • Bank Swift Code not available-Solution for receiving AdSense Payment in India | Adsense Payment Settings for Swift-BIC

    Recently, Google has launched Adsense payment by Wire transfer in India to Indian Adsense Publisher Accounts, and has completely ditched the old cheque payment system,thus now there’s no need to wait at homes waiting for cheques 🙂 . although the wire transfer or Electronic Fund Transer [EFT] guarantees quick and easy money transfer to publishers , it requires filling of SWIFT-BIC code which is not available for every Bank in India especially the Rural ones and small branches . Thus causing Payment Problems to the Publishers , but we at TechApple have come up with unique solution to the problem of Bank Swift Code Not Available .

    Solution / Settings for receiving Adsense Payment in India even if SWIFT Code Not available

    • First of all , Fill Up all the details in the Payment settings page except Swift code , it consists of simple fields such as Account holder Name , Account Number and IFSC Code, Make sure that you fill in only your branch’s IFSC Code and your Correct Account Number . The Payment settings will look like these —
    • You can use the site MyIFSCCode to find the IFSC Code of your Bank branch . Make sure you copy the correct IFSC Code as each Bank branch in India has its separate and distinct IFSC Code.
    • Now, regarding the SWIFT-BIC ,  First of all Please visit the site http://www.theswiftcodes.com/india/ and find out whether your Bank Branch has SWIFT Code or not , if its present simply enter the Obtained Swift Code , else
    • Simply fill in the Nearest Bigger Branch Swift Code of the Same Parent Bank as that of yours, if the SWIFT-Code of your Branch is not available .. e.g if your Account is in SBI , then look for the Swift Code of  nearest SBI branch only ..
    • Else if you still cannot find the Swift code of your nearest branch , you can use any of these default SWIFT-BIC codes as per your branch
    • Allahabad Bank- ALLAINBBTDM
    • Andhra Bank- ANDBINBB
    • Axis- AXISINBB002
    • Bank of Baroda- BARBINBBXXX
    • Bank of India- BKIDINBBNRI
    • Bank of Maharashtra- MAHBINBB
    • HSBC- HSBCINBB
    • ICICI- ICICINBBCTS
    • Oriental Bank of Commerce- ORBCINBBIBD
    • Punjab National Bank- PUNBINBBISB
    • State Bank of India- SBININBBFXD
    • United Bank of India- UTBIINBBXXX

    Now, some of you might think that using the above method is risky and like that, but in Indian Banking System SWIFT Code is used only to perform Foreign currency to Rupee conversion . and hence using any of the Parent branch SWIFT Code ensures the SWIFT Code bank branch being used as a bridge to convert and transfer money to our Local branch which uses the IFSC Code and then to our Accounts located in the IFSC Code branch , thus ensuring proper funds transfer of our hard earned Money through Adsense 🙂

    Here’s the proof of the same – My Payment received on my Bank Account 🙂

    If you have any doubts/queries feel free to ask us by comments 🙂 Happy Earning!

  • 3 Ways to Download Sound from Soundcloud legally – Easily Download Soundcloud Music,Songs to mp3 on Mobile/PC/Mac Online

    3 Ways to Download Sound from Soundcloud legally – Easily Download Soundcloud Music,Songs to mp3 on Mobile/PC/Mac Online

    Soundcloud has simply revolutionised the way music artists share their work . Soundcloud has enabled easy interaction between music artists and listeners,thus it is used widely for sharing sound,music . By default Soundcloud itself legally supports downloading of sound and music from its site but many are unaware of it , so Let’s have a look on 3 Ways to download Sound from Soundcloud.

    Method 1 . From official/original Soundcloud site

    The Soundcloud site itself has the features of downloading the music/sound if allowed/permitted by the Sound artist or Sound Uploader , The Method for downloading from official site is quite simple, you simply have to click the “Down” button as shown in the images below – There may be two cases depending upon the date when the music was uploaded , the images below cover both the cases

    Case 1 –  Distinct visible downward arrow

    Case 2 – Embedded Downward arrow

    Method 2 . Using Websites to download from soundcloud 

    Sometimes it may happen that the above official method of downloading from soundcloud doesn’t work in such scenarios we can use websites and browser tools to download from soundcloud , one of such site is soundcloud-download.com , using it is very simple .

    • Just copy the unique soundcloud URL for the particular music/sound/song from soundcloud.
    • Now paste the copied soundcloud URL in the URL box of the sound cloud download site .
    • And now click the Download Button .!  and your music will start downloading . The below image shows the example of using soundcloud-download.com to download from Soundcloud


    Besides this, there are soundcloud-download.com alternatives sites like Sounddrain.com and Soundflush.com which too can be used for downloading mp3 from soundcloud. The method from downloading from these sites is same as mentioned earlier .

    Method 3. Using Browser extensions

    If the first method didn’t work for you , or either you feel tired to copy the URLs every time you need to download, you can simply install these Soundcloud Downloader browser extensions , and it will automatically add a download button to each Soundcloud Sound you are browsing too . Just click the button and download will start, making the job easier 🙂

    Soundcloud Downloader extension for Google Chrome

    Install this Soundcloud Download extension for Google Chrome and the download button will be available for tracks which you browse on soundcloud as shown below.This extensions supports Soundcloud Playlist download too , thus saving the time and required to download multiple tracks. Soundcloud downloader Google Chrome extension screenshot


    SoundCloud downloader Firefox Extension

    The Soundcloud downloader extension is available for firefox users too, you can add it to your Firefox from Addons store by Clicking here . Check the below image for the screenshot of the Firefox extension


    So these are the methods to download from Soundcloud, feel free to share this post and if you face any difficulties feel free to comment 🙂

  • 5 Best Android Emulators for Mac OS X to Run Android Apps [2019] | Run and install Android apps on your Mac OS X , Macbook Air/Pro

    5 Best Android Emulators for Mac OS X to Run Android Apps [2019] | Run and install Android apps on your Mac OS X , Macbook Air/Pro

    What are Android Emulators for Mac ? Why do you need them ?

    Android Emulators are software which let you install Android apps and games on your Mac . Thus, enabling you to run apps and play games made for Android on your system. Considering, the vast number of productive apps and great games for Android, it increases the amount of activities you can do on your Mac. As using it, you can even run Android apps in addition to apps made for your Mac OS X system.

    5 Best Android Emulators for Mac OS X –

    1. Bluestacks AppPlayer Android Emulator
      • Bluestacks emulator for Mac OS
        Bluestacks emulator for Mac OS

        Bluestacks AppPlayer is probably the Best Android Emulator for Mac OS because it uses the unique “LayerCake” technology which allows android OS apps to be emulated and run without requiring an external Virtual Desktop Application such as Virtual Box or Vmware.

    Bluestacks for Mac OS X Features & Drawbacks
    Features Drawbacks
    • Inbuilt Manager to browse and install apps inside the Emulator
    • Gaming performance needs to be improved. Some games face lag

    • Double click on any apk file in Mac OS X to install in Bluestacks

    • Snapchat and Pokemon Go do not work

    • Push Notifications support from Bluestacks to Mac, thus enabling use of Chat apps

    • Free version may show some ads

    • Camera support, thus upload live videos to Android app from Mac Camera


    2. Nox Emulator for Mac OS X
    Nox Android Emulator for Mac
    Nox Android Emulator for Mac
      • Nox is a great emulator for Mac and Mac OS X and is the best suited for playing games without fuss.


    Nox Emulator for Mac OS X Features & Drawbacks
    Features Drawbacks
    • Drag and Drop to install APK
    • Difficult to transfer files between Nox and the Mac OS X system

    • Inbuilt Screen Capture and 60Fps Video Recording Support

    • Camera Module doesn’t work , so cannot use Camera based apps (Video Call)

    • Assign Macro and Keyboard mapping to play touch games via Keyboard

    • The Mac version is less frequently updated compared to Windows version

    • Smooth Video Streaming on Streaming Apps


    NOTE – 
    You might want to check out this new emulator which runs directly inside Google Chrome BrowserARChon! Android Emulator., thus it will work on Mac too!

    3. Andy OS
    ANDY Emulator Gameplay
      • Andy OS by Andyroid.net is another great Android Emulator for Mac OS , but it requires Virtual Box to be preinstalled on the MAC. 
      • You can also use your phone as a controller for controlling / playing the games, the picture alongside explains it 🙂


    Andy OS for Mac Pro’s & Cons
    Pros Cons
    • Directly launch the apps installed in Emulator from OS X Launchpad
    • Resource Heavy, long-time usage may heat up your system

    • OpenGL Acceleration for Better Graphics

    • Camera Module doesn’t work , so cannot use Camera based apps (Video Call)

    • Camera & Microphone Supported

    • Uses Old Android Version

    Update : You might love it to check out the New Firefox OS on PC – Click here to Configure Firefox OS Emulator on your Mac


    4. Genymotion
    Genymotion Live on MAC
    • One of the most striking features of Genymotion is unlike other Android Emulators it allows us to change the type of android device as well as android version we are using!!
    • This is a great feature and allows us to select a particular device as well as particular Android version which we want to emulate.
    • It also supports configuring the amount of resources e.g RAM ,harddisk to be allocated to the Android device is possible! Great feature if your are limited on hardware resources.
    • Directly supports networking through ethernet /Wi-Fi , emulates your connected connection directly so you can use internet directly in your emulated android.
    • ADB Support and it also supports OpenGL hardware acceleration so you can use your Android device fullscreen and play Games on your MAC!
    • Also supports drag and drop file transfer to the emulated SD Card 🙂 , supports Gyroscope,Light and accelerometer sensors too.
    • You need an account on Genymotion Cloudto Download and deploy Genymotion android device .


    5. Xamarin Android Player for MAC
    • Xamarin is yet another android emulator with variety of devices supported, it supports OpenGL, and virtualizes a device instead of emulating it. 
    • This Virtualization increases speed of the emulator to a great extent!
    • Click here to download Xamarin Android Player for Mac.
    • The Configuration/installation instructions for Xamarin on Mac OS can be found here .


    So these were the Best 5 Android Emulators for Mac OS , besides these there are other options available too such as the Android SDK (Official) Emulator ,AndroVM , AndroLite but configuring official Android SDK is a tedious task and other two didn’t interest me much , you can check them out too..

    Hope you liked this post, if you have any doubts/queries/suggestions feel free to comment!

  • 5 Best Android Emulators for Linux | Run Android Apps on Linux Ubuntu,LinuxMint,Fedora,ArchLinux,OpenSUSE,Mageia,CentOS etc

    5 Best Android Emulators for Linux | Run Android Apps on Linux Ubuntu,LinuxMint,Fedora,ArchLinux,OpenSUSE,Mageia,CentOS etc

    Hey Guys, as you know the Smartphone market is dominated by Android OS – which itself is an operating system designed / based on the linux kernel , but unfortunately the Android Emulators for Linux itself are quite less as compared to windows counterparts 🙁 . so let’s have a look on the 5 best  Android Emulators for Linux to run android apps and play android games on Linux -Ubuntu,LinuxMint,Fedora,ArchLinux etc

    1. Genymotion 


    Genymotion – This is probably the Best Android emulator when it comes to Linux Platform due to some unique abilities present only in genymotion, Features of Genymotion are —

    • It allows us to easily Download pre-configured Android Images of various Android Versions and various Android device images such as Nexus 7,Galaxy S2,Galaxy S3 etc directly on our emulator.
    • It also allows us to configure the amount of resources e.g RAM ,harddisk to be allocated to the Android device / Emulator. Great feature if  limited on hardware resources.
    • Genymotion directly supports networking through ethernet /Wi-Fi , emulates your connected connection directly so it use internet directly in the emulated android.
    • ADB Support and it also supports OpenGL hardware acceleration so  your Android device works fullscreen and thus enhancing your experience while playing android games on your Linux!
    • It Also supports drag and drop file transfer to the emulated SD Card 🙂 , supports Gyroscope,Light and accelerometer sensors too.
    • You need an account on Genymotion Cloud – to Download and deploy Genymotion android device —
    • Click here to register on Genymotion site and download Genymotion for Linux [32 bit as well as 64bit].Note – Oracle Virtual Box must be installed on your Machine for Genymotion to work! , installing Virtual Box On Linux is covered at the end of this post 🙂
    • Installation instructions for installing Geanymotion on Ubuntu/Archlinux are available here.

    2.Andro VM


    AndroVM is the Parent Project of genymotion – nevertheless it still works and works awesomely! and the best thing about Andro VM is that the android machine is deployed offline on your PC unlike Genymotion where it is deployed on your PC through cloud, thus you can use Andro VM to install Android Emulator on your linux even offline

    • another striking feature of Andro VM is that it supports hardware OpenGL rendering through Virtual Box.
    • Virtual Box must be installed on your Linux OS for Andro VM to run , check end of the post for Virtual Box installation tutorial .
    • AndroVM supports Net Sharing from guest to host , the internet sharing as well as Installation tutorial for Andro VM is available here at their blog — > Click here for AndroVM installation tutorial
    • AndroVM can be downloaded for both 32bit and 64-bit Linux Kernels from here –> Click here to download Andro VM Virtual Box image for Linux.

    3. Andy Android Emulator by Andyroid.net – Andy OS

    • Although, yet in Beta at the time of writing this article – ANDY OS Android Emulator is pretty much exciting and the best Android emulator for Linux ., being a beta tester i have the access to pre-release features of ANDY , hence i have given it the 3rd place, it  could easily been the first one though!
    • Features of ANDY emulator include Google Play Store support inbuilt, none of the emulator has this feature inbuilt even for Windows builds!
    • Multi-Touch support 🙂 the word explains it all !
    • Use your phone as a controller for controlling / playing the games, the picture alongside explains it 🙂
    • Access the installed apps directly from the Desktop environment!
    • OpenGL hardware acceleration, Camera and Microphone all features supported!
    • You can download the beta version for Linux or the Windows build for Andy from here –> The link will automatically redirect you depending on your OS —
    • Click here to download / Get ANDY OS!

    You might want to check out this new emulator which runs directly inside Google Chrome BrowserARChon! Android Emulator.


    4. Official Android SDK – Android Emulator / AVDs

    • The  Official Android SDK/ Android emulator by Google, has a lot of fans though not me 😛 and is used by default by mostly anyone who wants to develop apps for Android
    • This Android emulator supports all the functions including SD Card support, file transfer et
    • It also supports physical keypad which none of the Android emulators support !!
    • Being developed by Google Engineers you are assured of the quality of product and safety!
    • The Setup of this emulator is the thing which doesn’t impress me much though 🙁
    • An easier setup guide to install the Official Android Emulator can be read here .
    • The required SDK / ADT bundle for Android emulator and plugins can be downloaded from this Google’s Official Page .

    5. Jar of Beans – Wine Compatible!

    • Although Jar Of Beans was developed as an Android Emulator which was Portable for Windows ,it can be run through Wine.
    • It has all the basic support such as APK install, SD Card supports and supports installation of Play Store too..
    • but already Wine being a kind of Emulation environment we wont encourage usage of Jar of Beans on Linux
    • For using Jar of beans for Linux, extract the exe contents of the Jar of Beans.exe file which can be downloaded from here –> , and then by runnint the jarofbeans.exefile with wine .
    • Click here to download Jar of Beans from Google Drive

    Installing VirtualBox on Linux

    • As, we mentioned we need to install virtual box on linux before using Genymotion/AndroVM/ANDY , the eaiest method to install virtualBox on linux is
    • Installing the dependencies by executing  “sudo apt-get install dkms”  in terminal , and then by executing
      sudo apt-get install virtualbox-4.3″ in the terminal! that’s it virtual box will be installed !
    • If it doesn”t get installed you may want to check out this Article.

    Update : You might love it to check out the New Firefox OS on PC – Click here to Configure Firefox OS Emulator on your Linux 

    If you have any doubts/queries/suggestions  Feel free to Comment , we will try our Best to Please you Thanks!