Blog

  • Whatsapple – unOfficial Whatsapp Client for PC | Use Whatsapp On PC without Android emulators!

    Whatsapple – unOfficial Whatsapp Client for PC | Use Whatsapp On PC without Android emulators!

    Whatsapp is the most leading app being downloaded on the Apple iStore,Google Play Store and Nokia store , thus its one of the most leading medium of communication and instant messaging. but many people still cannot afford those smartphones or may want to use whatsapp on PC /Windows/Linux/Mac , though there are workarounds such as installing an android emulator (e.x bluestacks,andy) and using whatsapp on it, its quite RAM and resource heavy plus it doesn’t satisfy the ease of PC . hence to overcome all these limitations, We came up with an unOfficial Whatsapp client – Whatsapple!

    Without wasting time, let me pen down the features of Whatsapple

    • Whatsapple is an easy to install and configure unofficial client of whatsapp for PC built on the base of Pidgin Messenger.
    • It provides all the features of Whatsapp,such as file upload/download, Individual Chat as well as GroupChat etc on PC.
    • Now, you can view the shared videos and photos/images directly on your PC.as well as Upload Videos/Photos(Images) to the chats directly from the PC!
    • All the Default Smileys of Official Whatsapp App are Supported, thus you can view the Smileys send as well as send emoticons to the Chat 🙂 .
    • As Whatsapple doesn’t require any Android emulator its blazing fast! and light on your PC 🙂 . Thus, any PC right from Windows XP to the latest Windows 8.1 all can run it :).
    • You can add unlimited contacts, no need of any complex emulator things like bluestacks,andy etc.
    • No limit of bandwidth or memory as is the case with phones, the big memory pool of PC practically ensures you will never run out of Memory for storing messages,logs ,photos,videos anything.
    • The Whatsapple client will never hang in most cases irrespective of how many messages arrive simultaneously.
    • And ya, the Installation size is just 10Mb which is even lesser than the apk file size of Whatsapp 😛

    Prerequisites –

    • Windows OS ,  and .Net Framework 4.0 Installed ( Required for Generation of Password Only )

    Procedure to Install and Use Whatsapple

    First of all Download and Install the Whatsapple Client – Whatsapp for PC from here . , Also get your Whatsapp Password from this link – https://davidgf.net/whatsapp/pwd.html

    We will need an Whatsapp Username and Password , as we all know whatsapp username is the mobile number with the Country Code ,

    • e.x for an mobile number in India , the Username will be  “91XXXXXXXXXX” where XXXXXXXXXX is the 10 digit mobile number .
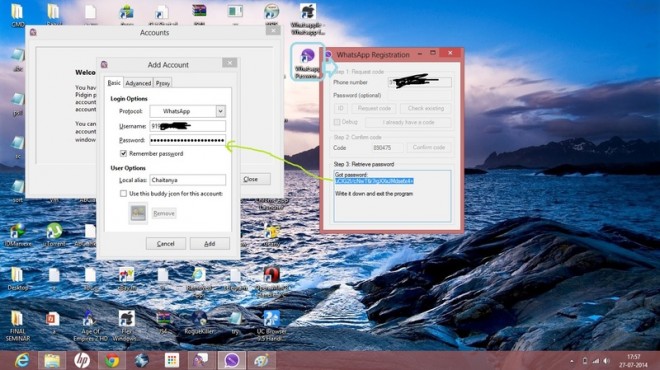
    • For the password, we will need to Generate it one time as Whatsapp requires one time Registration , So first for Generating the Whatsapp Password Open the “Whatsapp Password Generator” from the Desktop.
    • Now, Enter the Mobile Number and click on “Request Code” button as shown in figure below.
    • Now ,you will receive a confirmation code on the mobile number , Now enter the verification Code received in the text box next to Code and click on “Confirm Code” Button.
    • Now a dialog box appears showing you the Whatsapp Password and asking you to write it down,but don’t write it down, click on ‘OK’ and Now copy the Generated Password from the “Step 3″ Area of the Whatsapp Password Generator /WARP .
    • Now, once you have obtained the Username and Password Launch the main “Whatsapple for PC”  Main exe from the desktop .
    • Here, click on Add and add the Username and Password we generated in the Window, you can tick the “remember password” option while adding so as to there’s no need of generating password everytime . Check the figure shown above for details.
    • Now click on add,after the account is added click on close! and voila! you will be logged in and can use Whatsapp on PC for Chatting.

    Method to Chat with a New Number or add Contact Name –

    • Click on Buddies then select New Instant Message , Now Give your friend’s phone number with country code and  Click on the OK button. And you can Chat with him/her.

    Use WhatsApp on PC laptop free

    To add a Contact Name to a Number

    • Click on Buddies ,Navigate to Add Buddy , Here please enter your friend’s phone number with country code and provide other details > Click on Add button.

    Use WhatsApp on PC laptop free

    To Upload or send a File/Photo/Image/Video : Use the send File / Upload Media option present in the “File” Menu of the Live Chat Window , of the Contact or Group to which you want to send the File .

    Thus, this is i guess by far the most easy,and efficient and Simple way to use Whatsapp on PC .

    Click here to download the Whatsapple Client for PC for Windows (XP/7/8/8.1) all supported.

    If you have any doubts/queries/suggestions feel free to comment 🙂

    Solution to the Server closed the connection Problem – Solved by our reader  Steve

    Login to Whatsapple – Whatsapp for PC than go to > Accounts>Manage Accounts > Click on your accoun.Than Modify Account>than go to Advance tab change on the server instead of “Android-2.11.151-443″ enter “Android-2.31.151-443″   that’s it.

    Update :  People who still cannot get Whatsapp working can try running it on Firefox by referring this article .

  • Remote URL Upload to Upload files on Dropbox/Google Drive/OneDrive/Box.com|Easiest way to cache files and transfer between hosts

    Remote URL Upload to Upload files on Dropbox/Google Drive/OneDrive/Box.com|Easiest way to cache files and transfer between hosts

    Many a times we need to download from sites which either do not come with resume download support, or the files simply don’t get downloaded on our devices. we may also encounter cases where the server speeds are quite slow and we need to download from a faster server.In all the above cases the problem can be solved by Remote URL Upload by virtue of which we can upload files stored on remote(other) urls to Our cloud storage (Dropbox,Google Drive,Box.Com). Not only this but we can also use it to sync our cloud storage such as Box,Dropbox,Copy etc by getting their direct links as mentioned in the tutorial here.

    The Remote URL feature is also useful in bypassing filtering where downloading restrictions are placed , we thus, can remote upload our files by their download links to either of the Cloud hosts and download from the cloud servers ! . thus, bypassing the network restrictions 🙂 .

    Procedure to perform Remote URL Uploading to upload files on Dropbox/GoogleDrive/OneDrive/Box.com

    • First of all sign-up on any of the cloud storage providers to get your own storage space , Keep your account details ready 🙂 we will be needing those 🙂
    • Now, Copy/get the Download Link / URL of the file which you want to upload on the host .
    • Navigate to this site : ctrlq.org/save .  This is an awesome site created by the Digital Inspiration Network, and is based on filepicker.io API , filepicker has no free plans and has Bandwidth limits even for Paid accounts 🙁 but this awesome API bypasses all of them 😛


    • In the box titled “FILE URL” Please paste the copied/upload file URL, and now click on the respective Cloud storage button option from the Save to menu, where you want the remote file to be uploaded.
    • After clicking on the button, an option such as connect to “<Cloud storage name>” appears, click on connect and authorise the inkfilepicker or filepicker.io app and allow it the required permissions to upload the file .
    • Now in the text box type the name by which you want to save your file in storage and click on “Save as” button as shown in the figure below –
    • Within , split seconds the file will be Uploaded to your cloud storage which you can now share,download,embed etc. 🙂
    • Thus, you have successfully bypassed network restrictions and uploaded remote URL file to your server and now can download it with full speeds.

    This is a great feature especially for online synchronization between storage and securing the files . It also helps in bypassing the network restrictions/server load . Thanks to Digital Inspiration and Filepicker.io API for providing such a great service for free !

    UpdateAnother service called as storagemadeeasy does the same task of Remote URL Upload, not only that but Storagemadeeasy also provides personal free storage for storing and sharing files online ! It can also perform the task of moving files from one cloud storage to another without even the requirement of download links 🙂 . Just sign up on storagemadeeasy, and add the cloud storage accounts, and now use the normal copy-paste method to copy and move files between the Cloud storage Providers , easy 🙂 . Click here to visit Storagemadeeasy .

  • AndroVM Configuration Tutorial

    Here is a small tutorial to help you setting-up AndroVM with hardware accelerated OpenGL rendering, using VirtualBox.
    I will assume that you already have VirtualBox installed and working.

    Step 1 - VBox Network Preferences

    Network Adapter

    To run with hardware acceleration, as for using the ADB with AndroVM, you’ll need an “Host Only” network adapter. To create one, open VirtualBox, get to the “File” menu, “Preferences…”, “Network”.

    Don’t forget to enable DHCP Server for this network adapter.
    Step 2 – Host Only Adapter Configuration

    Importing VM

    Now, you can import the VM into VirtualBox. Just double-click on the OVA file, or use “File” menu, “Import Appliance”.
    It can be a good idea to rename the VM into something more friendly.

    Step 3 - Importing OVA

    Setting-up VM

    Step 4 - VM Parameters

    By default, AndroVM has its first network adapter set to disable. Go to the VM network settings and set it to “Host Only Adapter”

    Step 5 - Network Adapter 1

    Then, start the VM. Now, you’ve got a fully functional software-rendered AndroVM. Now, open the AndroVM Config app, and check the box to enable hardware OpenGL.

    Step 6 - AndroVM Config

    Note that you might see the VM IP on the top off the app. This is the Management IP. You can adb connect this IP.
    If there’s no IP address, then you won’t be able to use hardware OpenGL. Verify your host-only adapter configuration.
    Click on the “Save” button, The VM will restart.

    Spet 7 - VM Reboot

    The VM will stay in that state. Now it’s time to run the AndroVMplayer.

    AndroVMplayer

    The AndroVMplayer is a software used to display the VM content and manage its events. It won’t work if the VM is not running !
    Open a command line interpreter, get to the AndroVMplayer directory, and type :
    AndroVMplayer [width] [height] [density]

    Step 8 - AndroVMplayer

    Wait a few seconds, and the Android boot animation will appear in the AndroVMplayer.

    Typical problems

    STEP 8: THE ANDROVMPLAYER BLOCKS ON “WAITING FOR CONNECTION FROM VM”

    • If the VM shows a Management IP, try to connect to the VM through adb. If it doesn’t work, then turn off your firewall
    • If the VM doesn’t show a Management IP, the your network adapter is not well configured

    THE VM DISPLAYS “INIT: UNTRACKED PID XXXX”

    • It means that the VM is waiting for the AndroVMplayer. Just launch it !
  • 3 Sites to get Google Drive Direct Link/s of Files and Documents |3 Google Drive permalink sites

    3 Sites to get Google Drive Direct Link/s of Files and Documents |3 Google Drive permalink sites

    Hello , in my previous posts i had covered 5 File hosting/cloud storage sites which had hot linking support . Also i had covered the methods to get direct links of files stored on Dropbox and copy.com too , Now sharing the same to get Hotlinks from Google drive files or Google Drive Direct Link. Hot Linking or direct linking is very useful while sharing links through Mail / Blogs as its simply enable a single click to start downloading thus saving the users time and efforts to download a file while at the same time saving from those annoying ads.

    Prerequisites –  Google Drive sharable URL

    • The file/document which is to be used for generating direct URL must not be created in Google Drive/docs, if its created in Google Docs then please download and re-upload the same to the Google Drive
    • The file you are trying to generate direct URL for must be sharable . The method to get the Sharable URL is as below –

    Method to get Google Drive Share URL for generating Direct Links

    Step 1: Go on to Google Drive and right click the file that you want to share.
    Now move your mouse over “Share…” and then click on the “Share..” that appears.
     
    Step 2: On the window that comes up, click the “Change…” link beside the part that
    says “Who has access”.
     
    Step 3: Set it to “Public on the web” or “Anyone with the link” and hit save.
    Step 4: Now copy the “Link to share”. This is your sharing URL. Paste it in to the text box
    above and then create your direct link. Enjoy!
    Now , we are ready to get the Direct Link/URL for our Google Drive Files –

    Sites to get Direct link/URL from Google Drive

    We have ourselves created a Tool – CloudLinker which will do the same – Click here to Use Online Cloud Linker – Direct Download Link / Permalink Generator.

    Site # 1 – Google Drive Direct Link Generator

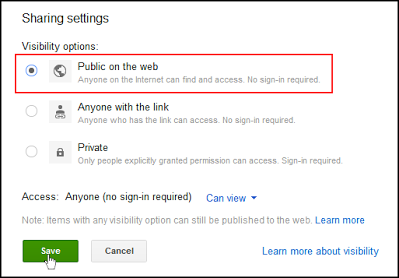
    This is probably the most efficient and easy to use amongst all the Google drive Permalink sites, as guessed from the Screenshot its quite easy to use too , We just have to enter the Sharing URL and click on the “Create Direct Link” button, and that’s it ! The direct URL will be generated in the Output Link which we can copy and share as a Direct Download Link .

    Click here to visit the Google Drive Direct Link Generator site


    Site # 2 – gdURL.com

    This is yet another site to generate Google Drive direct links – and is quite easy to use , we just have to enter the Google Drive Sharing URL and click on Generate Permalink button  and the Permalinks will be generated. Also this site contains advanced features such as

    • Allows Multiple Sharing URL’s to be entered thus the generation of Multiple Direct Links :).
    • Supports direct Google Drive Connect so that the files can be navigated and the Direct links can be generated from the Drive browser itself thus saving the extra efforts of copying the Sharing URL.

    Click here to go to gdURL.com

    Site # 3 – gdriveurl.com

    gdriveurl.com is one more site which performs the generation of google drive direct links, it also includes extra features which are useful such as mydrive but for the annoying ads they degrade the overall experience of the site, and hence ranked third in this article .
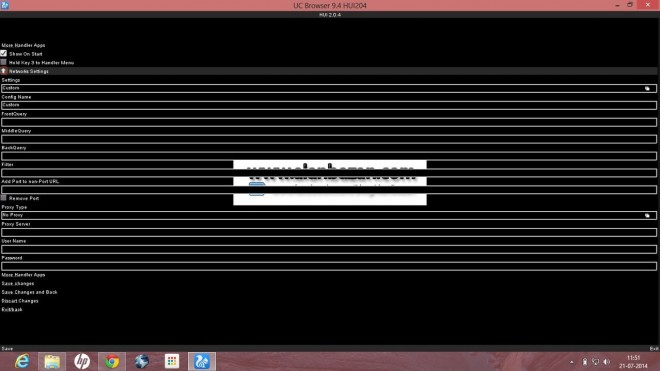
    It also supports multiple Google Drive permalinks generation,a handy site overall 🙂

    Click here to go to gdriveurl.com

    Note – Sometimes incase of Big files / Google Drive is unable to scan the file for viruses before download and may display a download page,but this is rare and occurs for big files download only. I hope you found this article useful, Thank you for reading and please do like and share this post so that all can enjoy these awesome features 🙂

  • UC Browser 9.4 Handler PC |Use UC Browser on PC without any Android/Java emulator|UC Web Handler setup for PC Windows 7/8/8.1/Windows XP

    UC Browser 9.4 Handler PC |Use UC Browser on PC without any Android/Java emulator|UC Web Handler setup for PC Windows 7/8/8.1/Windows XP

    Hello everyone,  in my last post i had written about Opera Mini for PC with Handler UI , many users then asked me for UC Browser for PC with Handler support, so here’s it, which many requested for – UC Browser PC – Windows7/8/8.1/9/XP with Handler UI . Although UC Browser HD is available for Windows 8/8.1 devices there’s a big difference between the featureset of this UC Browser and the Windows Appstore UC Browser HD such as

    Features of UC Browser 9.4 for PC

    • Handler UI for applying network tweaks .
    • UC Browser boasts of the Best Download Manager, so its Ideal for Downloading big files.
    • In-built Night Mode for Dim-Light browsing.
    • Pages are Optimised and Rendered by the UC Servers, thus reducing the Data Usage.
    • Advanced Network Settings,UI settings present.
    • Single Click installer/Setup works on All version of Windows 7/8/8.1/9.
    • No need of any external Java/Android emulator.
    • Pages are rendered with blazing fast speeds,compared to UC Browser HD.

    Requirements : Java Run-time Environment or JRE must be installed on your System, if not installed,you can download and Install the JRE which can be downloaded from this URL .

    Procedure : After you have downloaded and installed the JRE , Download the UC Browser for PC Setup from here, and install it . After installing just Double click the UC Browser icon and enjoy your favorite browser on your PC. [ You may need to save the settings upon your first Run as shown in the figure below]

    Now, here you can simply hit save and click continue or change the Pinger settings/Handler Settings and continue to using your UC Browser :).

    Note : Press “Ctrl+O” anytime while using to navigate to the Settings.The Same Settings are used to configure Proxy settings by using (Ctrl + O).

    The JRE based UC Browser 9.4 Handler for PC can be downloaded from here –

    Click here to Download UC Browser 9.4 Handler PC – TechApple.Net


    If you have any doubts, queries or suggestions do comment 🙂

  • Use Google Chrome as Calculator,Metric Converter | Hidden Functions of Google Chrome Browser still widely unknown

    Use Google Chrome as Calculator,Metric Converter | Hidden Functions of Google Chrome Browser still widely unknown

    I was just casually browsing on the Internet, then instead of typing ‘.’ in an IP address i accidentally tped ‘*’ and to my astonishment,i was much shocked on the Result, Google Chrome quickly generated the Product of the two numbers for me 🙂 . On further trial and error experiments i found out Google Chrome could be used as a really quick Calculator and Metric Converter . which can be used to save and simplify our work , Let’s check it out how –

    Procedure to Use Google Chrome as a Calculator 

    • Its really quite simple, simply type in your desired expression using the normal ‘+’ , ‘*’ ,’-‘ etc operators in the address bar and it shall return you the results . I have tested the operators (+,-,/,*,%) you can try more of them and tell me the results.
    • Here’s an example operation( “85*48/8+6-2”) and with the result(“514”) it returned in the below image – 

    Similarly Google Chrome Browser can also be used as a Metric Converter too as follows

    • Simply type in your Unit in address bar as shown below – (I typed in “5 feet” in address bar and it showed me the equivalent metres in Output)
    • Also it supports conversions from one Metric to other metric Systems too as shown in the figure I typed (“5 feet in inches”) in address bar and it rightly returned me the Corresponding inches

    Thus , Google Chrome contains this awesome functionality of an inbuilt-calculator cum Metric converter which can be pretty much time saving,especially in cases such as analytics saving the time required to navigate from one window to other . Also this trick is also quite good to show-off or impress folks with your geeky knowledge 🙂 .

    And before i conclude, here’s one more –

    we have explored a widely unknown dimensioon of Google Chrome,if you know more of such dimensions, do let us know by the comments 🙂 . Thank you!

  • Opera Mini PC Handler | Opera Mini for PC without any Any Android Emulator with Downloading Support

    Opera Mini PC Handler | Opera Mini for PC without any Any Android Emulator with Downloading Support

    Opera Mini is the most widely used browser for mobile devices ,and boasts of some unique features.Using Opera Mini on PC can be more than handy or useful for PC users too such as

    • It uses Opera servers to cache and display the web pages, thus, the servers act as a proxy and helps to unblock sites such as facebook etc, if they are blocked on the Network.
    • The server caching also enables Data Compression which uses Data usage by almost 80% thus reducing the Data Usage as well as increasing the browsing speed manifolds 🙂
    • Handler menu can be used to change/modify various network headers and parameters.
    • JavaScript,Ajax-script etc are run/executed on the server side and thus this helps in speedy browsing on lower configuration PCs without the fear of System hang.

    Method to Run/Install Opera Mini Handler on PC

    Method #1 . Using JRE + Opera Mini for PC by Alan Bazan

    Requirements : Java Run-time Environment or JRE must be installed on your System, if not installed,you can download and Install the JRE which can be downloaded from this URL .

    Procedure : After you have downloaded and installed the JRE , Download the Opera Mini for PC Setup from the download links, and install it . After installing just Double click the Opera Mini icon and enjoy your favorite browser on your PC. [ You may need to save the settings upon your first Run as shown in the figure below]

    Now, here you can simply hit save and click continue or change the Pinger settings/Handler Settings and continue to using your Opera Mini :).

    Note : Press “Ctrl+O” anytime while using to navigate to the Settings.The Same Settings are used to configure Proxy settings by using (Ctrl + O).

    The JRE based Opera Mini PC Browser can be downloaded from here —

    Click here to Download Opera Mini 8.1 Handler PC – TechApple.Net
    Click here to Download Opera Mini 7 PC – TechApple.Net

    Mirror Links :

    Click here to Download Opera Mini 8.1 Handler PC – TechApple.Net
    Click here to Download Opera Mini 7 PC – TechApple.Net

    Method #2. Using Opera Mini directly in Google Chrome/Firefox/Web Browser

    Yes, you can use Opera Mini in your browser too, that too without Installing , by following these Simple steps —

    Requirements : Install JRE  or Java Runtime Environment on your system . If JRE is already installed please Skip this.

    Now Navigate to the URL : http://demo.opera-mini.net/public/ on your Browser and Opera Mini will start Loading right on your browser! No need of installing it 😛 . Sometimes, the JRE may show security error in such cases please Go to Configure Java in your System , and Reduce the Security to Medium as shown in the Figure below(You can also see the Opera Mini running in the Background 🙂 ) –

    Thus, these are some of the Most easy methods to Run / Install Opera Mini on PC , if Any doubts/queries/suggestions feel free to comment 🙂

  • Best apps to Record Screen in Chrome OS | Easily Record Screen Videos/Screencasts in Google Chrome/Chromebooks

    Best apps to Record Screen in Chrome OS | Easily Record Screen Videos/Screencasts in Google Chrome/Chromebooks

    Recently,the number of Chrome OS users/ Chromebook users is on the upward trend, and there may be many scenarios where one needs to record screen or screencasts of Chrome OS . As Google Chrome OS is based on the Linux but it doesn’t readily support external apps installation other than those from its Appstore here we  bring you the Best apps to Record Screen Chrome Browser/Chrome OS and works on Chromebooks too .

    App # 1 . Screencastify (Screen Video Recorder)

    Screencastify is a simple video recorder app for Chrome with minimum and easy to use User-Interface . All you need to do is install the App ,and rest can be easily be guessed from the User Interface itself .

    Method to use Screencastify to record videos/Screencasts

    • First of all install the Screencastify app by downloading it from the Google Chrome store from here .
    • Now you will see a filmstrip icon on your browser bar, simply click on it and you will see a box as shown in the figure below –
    • Here you can configure various options such as screensize to be recorded / source of Audio Output which is to be recorded ( You can either use your Microphone or the Speaker Output too! )
    • After you are done after configuring these simple options, Simply hit the “Start Recording” button.
    • When you are done with the recording press the “Stop Recording” button.
    • Now, we can either save this Screencast / Video to Local Disk (Hard disk) for Later viewing or either we can Upload it to youtube/Google drive 🙂 as shown in the figure below. (We have selected “Save to Disk” support , the option on the right is for Uploading online .)
    • That’s it . We have successfully recorded Screencast/Video on our Chrome OS/Browser.


    App # 2 . TechSmith SnagIT

    This is yet another , awesome app for recording Screencasts for Linux and it comes in with an in-built Media Library +Media Player too ! which can be used for playing or viewing the Screencasts!

    Method to use SnagIt to record Screencasts/ Videos

    • First of all download and install the SnagIt app from the Chrome store by clicking here .
    • Now start the App from either the Apps tab or the App Launcher. A window similar to the below image appears on your screen –
    • Select the “New Screen Recording” option, Now a window asking to select the Screen to record appears, you can either select the Desktop or select the tab which is to be recorded. as shown below .
    • Now select the screen and click on share , The Screen will start getting recorded . You can Stop recording/sharing by clicking the Stop Sharing button.
    • Once you , Click on Stop Sharing, your video will be synced, after sync you can either view it in the Media Library of the App or Upload it to Youtube! / Google Drive.
    • Besides, Screencasting SnagIt also adds option for adding Notes,Markers to the Video thus reducing the need of a Video Editor , it also supports adding of Visuals.
    • You can take Screenshots too with this app . proving it to be a Multi-tasker. The Appstore page mentions that it requires the SnagIt extension too to be installed, but it worked fine for me without the extension. If it gives you error while using the Extension can be downloaded from here.
    • Edit : The Extension allows/adds additional facility to the App such as selecting a particular ScreenArea/portion to be recorded , as well as configuring Audio capture / output options . So it’s a plus situation if the extension is installed as shown below – (with an additional browser bar icon) 🙂

    Thus, these are the awesome apps/extensions which help to record screen videos/screen casts in Google Chrome OS . If you encounter any problems/ or know of any other App do let us know by comments 🙂 Thank you!

  • Procedure to create Wifi Hotspot on Linux |Creating Wireless Access point on Linux [Ubuntu/LinuxMint/Fedora/OpenSUSE]

    Procedure to create Wifi Hotspot on Linux |Creating Wireless Access point on Linux [Ubuntu/LinuxMint/Fedora/OpenSUSE]

    Many times, we need to share our Internet Connection to our mobile devices/other laptops or gadgets, but we do not have a wifi router or wireless access point at our disposal. In such cases we can use our PC/laptop itself as a wireless access point to share the internet connection to other devices, and its free and doesn’t require any extra hardware too. while Windows OS contains softwares such as connectify.me,virtual router which do the same, Linux on the  other hand has fewer alternatives, one of those alternatives is : hotspotd by prahladyeri@github . Lets have a look on how to create wifi hotspot linux . I have personally tested this on Ubuntu and LinuxMint but it should work on most linux distros.

    Hotspotd is a small daemon to create a wifi hotspot on linux, it works by creating a virtual NAT (Network address transation) table between your connected device and the internet using linux iptables.

    Requirements/Pre-requisites for using hotspotd to create access point

    • dnsmasq (typically pre-installed on most linux distributions).
    • hostapd for AP provisioning.

    hostapd must be installed for hotspotd to be installed, you can install hostapd by running these commands in the terminal —

    For Ubuntu based terminal command issudo apt-get install hostapd

    And for RHEL based distros

    terminal command : yum install hostapd

    hostapd install is quick in process and will get processed in 2 seconds maximum :)shown in the figure below – .

    Now after you have installed hostapd , we need to install our hotspot app – hotspotd

    Installation of hotspotd –

    To install hotspotd, just follow these steps: , type them one by one in the terminal :

    First of all we will download the hotspotd package from wget command –

    wget https://github.com/prahladyeri/hotspotd/raw/master/dist/hotspotd-0.1.tar.gz


    Now,we uncompress the tar file and navigate to the extract directory –

    tar xvf hotspotd-0.1.tar.gz
    cd hotspotd-0.1/
    

    Here, in this installation directory we give the setup command from the terminal by —

    sudo python setup.py install


    If everything goes fine, hotspotd will be installed successfully 🙂

    Using the Hotspot

    To start hotspot:

    sudo hotspotd start

    To stop hotspot:

    sudo hotspotd stop

    The first time you run hotspotd, it will ask you for configuration values for SSID, password, etc. Thus enhancing the security of your hotspot and giving you more customizable options to play with 🙂

    Alternatively, you may also run:

    sudo hotspotd configure

    Precutionary Measures / Troubleshooting

    • Make sure all dependencies (hostapd, dnsmasq and python 2.7) are installed.
    • hotspotd creates the NAT by manipulating iptables rules. So if you have any other firewall software that manipulates the iptables rules (such as the firewalld on fedora), make sure you disable that.
    • To create a hotspot, your wifi must support AP mode. To find that out, use this process:
      • Find your kernel driver module in use by issuing the below command:lspci -k | grep -A 3 -i network(example module: ath9k)
      • Now, use the below command to find out your wifi capabilities (replace ath9k by your kernel driver):modinfo ath9k | grep depend
      • If the above output includes “mac80211” then it means your wifi card will support the AP mode.

    Rejoice, Now you  can use and share your Internet Connection on as many devices as you want  🙂 also, you can create a wifi hub for Gaming too 🙂 , If any doubts/queries/suggestions feel free to comment 🙂