Recently, Facebook announced an update which will let you upload or set short videos or GIF Images as Profile Pictures or we can say Profile Videos. It announced this update along with other major new features such as ability to set temporary profile pictures (which expire after a certain period) , Also allowing users to Select upto 5 featured photos which can showcased at the top of profile. Besides, this there’s also an option to write short one-line bio’s for public in the new update. So here’s a method on how you can Add / Set Facebook profile Video or set profile picture as video or GIF on Facebook !
Method to Set Profile Videos or Video Profile Pictures on Facebook –
Note – Please Note that this feature is currently launched only in specific regions (U.K & California) & Facebook is gradually rolling out this feature across all its users . Also the Method currently works only on the Facebook App (iOS – iPhone / iPad & Android ) and the PC Website currently doesn’t has this feature (We will be updating this article as soon as the updates are available) .
Tutorial to Set Facebook Profile Video on iOS (iPhone / iPad App) –
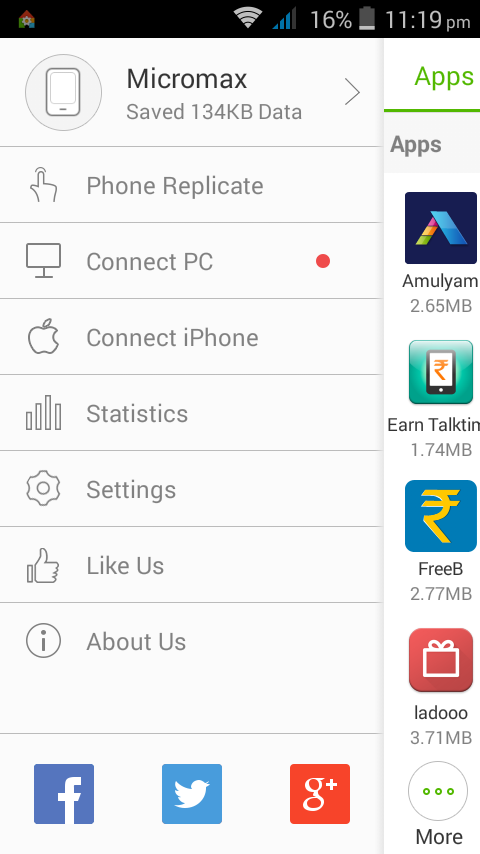
First of all log-on to your Facebook account on Mobile app , Now in the bottom-right hand side bar you will find an option “More” as shown in the image below –
Tap on the More Option
Tap on the “More” option.
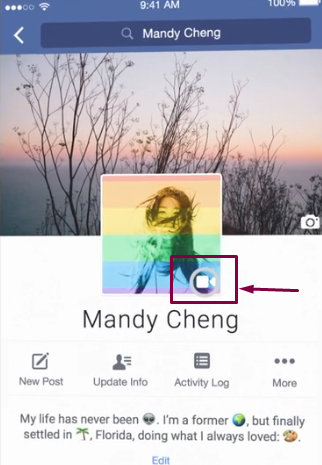
Once you Tap on the “More” option, it will redirect you to your profile (If you can see your profile picture aligned at the centre, it means you are the lucky one to get this Creative update 🙂 ).
Now tap on your current profile picture , If Facebook Video is activated for your profile you’ll see an icon (flashing between camera & video on your profile pic) as shown in the figure below (highlighted by maroon color) –
Flashing Icon on the Profile Picture
Now, Simply tap this “Camera/Video flashing icon” .
Now, in the menu that appears you will either see a message “Coming soon” or a message to “Take/Upload Profile Video” as shown in the image below –
Upload Profile Video Option on Facebook
If you can see the message to Take / Upload Profile Video, Tap on it to Record or Select the Video depending upon the choice you selected.
Note – If you see the Coming Soon message, it means you need to wait a little more… Till then you can show your creative side, by Uploading an Animated GIF which will automatically animate or play on Facebook using the Graphica App for Android , or else if you are on Desktop / Computer – You can check out this tutorial to upload a GIF on Facebook.
Now, you can either record a new Profile Video (Upto 7 Seconds length) or select & upload an existing GIF Image or a Video which is to be set as Profile Video.
That’s it ! You have successfully updated your new Creative Facebook Profile Video.
Observations –
Currently, you can Set/update Profile Video only from the Facebook mobile app, however the changes are visible on the Facebook desktop / PC website version too!.
Gratitude –
We Specially Thank & Hat-Tip to Molly McHugh and her Wired.com Tutorial for giving us the permission to link and use her image in our article! .
The Facebook profile Video will be loading automatically for Desktop Users and it will appear to them as shown in the following figure –
Profile Video View on Facebook PC Version – Molly McHugh
Recently, Facebook has started autoplaying Videos & GIFs without user content in its news feed which is a bit odd, considering your feed suddenly stops playing videos resulting in distractions. Not only does the facebook autoplay distracts from the news feed, but it also consumes your Data/bandwidth which is precious. But to our choice, We can disable & stop Facebook autoplay of Videos by the following easy methods –
Steps to Disable AutoPlay of Videos on Facebook PC Version –
Now,you will see many options, Select the tab “Auto-Play Videos you will see the a drop-down box with label as”Default” activated, Click on it and Select the option “Off” as shown in the option below –
Disable Facebook Auto-Play Videos
That’s it once you Click on Off (It will be highlighted and when active it will replace the earlier “Default” option which was highlighted earlier) return to your news feed, Your Facebook Auto-play will be stopped!.
Method 2 – Manual Fix
Facebook Down Arrow – Settings
First of All Log-on to your Facebook account and then look for the “Down” arrow at the Top-Right Hand Side (The arrow which you use to log-out from Facebook). Click on the “Down” arrow.
Now, Select or click on the “Settings” option which is right there above the Logo-out option.
Once you Enter the Settings Page, Look out for the “Videos” option in the right-hand side pane , Its present right at the end as shown in the Image below –
Facebook Videos Settings
Click on the “Videos” option to enter its settings, and there you’ll find options such as Video Default Quality, and Auto-Play Videos .
Now, in the Option “Auto-Play Videos you will see the a drop-down box with label as”Default” activated, Click on it and Select the option “Off” as shown in the option below –
Disable Facebook Auto-Play Videos
That’s it once you Click on Off, return to your news feed, Your Facebook Auto-play will be stopped!
Steps to Disable Facebook Autoplay on Facebook App / Mobile Site (The Method will work to disable Facebook autoplay on Facebook Android app as well as iPhone / iPad app too!)
First of all Open the Facebook App, and click on the “Hamburger” icon at the right hand side as shown in the image below –
Facebook Hamburger icon
Now Scroll-down among the options until you find the “App Settings” option as highlighted above.
Now tap on “App Settings” to enter it , And now Tap on the “Videos Play Automatically” option shown below (By Default its On, We need to Disable it) Tap on the Videos Play automatically option —
Videos play automatically
Now, it will show a pop-up with options such as “On”, “Wi-Fi only” and “Off” as shown below – Please select the “Off” option –
Tap on the Off option/select it
That’s it! You have successfully stop facebook autoplay of videos.
Many times, we lose the photo we uploaded to Instagram may be due to loss of device or some other reason. And hence you may want to download & save your own uploaded Instagram photos & videos to a local drive, or Back-Up your Instagram account and its data . Here’s one of the most easiest methods on How to Backup & Download your own Instagram account data using Instaport.me. This method can be used to back-up your Instagram account and downoad own photos on Android phones, iPhone , iPad as well as Computer / Mac too
Method to Back-Up & Download your own Instagram Photos using Instaport.me
Instaport.me allows you to back-up your Instagram account on Android, iPhone & Computer too
Instaport.me is an online service which will automatically fetch all your uploaded Instagram photos & videos so that you can easily download them from your browser on any device. Thus, instaport.me can be used on any device – Android, iPhone & any Computer / Mac too.
To use instaport.me First of all Sign-in with your Instagram account and authorize the app as shown in the image below –
Instaport.me before login
Once, you log0n to Instaport, the option 2 will turn active as shown below –
Successfully Sign-in from Instaport.me , Now here select the “Export Options” like all my photos, or the Last xyz photos and click on “Start export” button. Instaport.me will now start downloading your photos in Step.3 and once it has fetched all the photos & videos from your account it will present you with the Download options as shown below –Download Option- Instaport.me
Simply Click on either the “Donate & Download” button or the “Download only” button to start your Download —
That’s it! You have now successfully downloaded & back-up your own Instagram account photos & Videos.
Online cab or taxi booking is currently red-hot in the Indian market, but as most of the cities didn’t had their services we weren’t aware of them. Ola cabs is one such online booking app , Ola cabs is one of the fastest expanding taxi and even auto-rickshaw providing apps in India and is expanding its presence in newer cities everyday! . Ola has been in India for more than a year now, and hence they’ve got a good name now in the market and are reducing the promotional benefits. So grab the following offers by Ola cabs referral code / promotional benefits like – Ola cabs First Taxi ride offer or Ola cabs first auto-rickshaw free ride or you can atleast grab the Free Ola Money (the wallet money associated with free rides) as soon as you can! , as even though if Ola isn’t available in your city currently, we never know when the company might stop these promotional offers, and if incase that happens before they reach your city, you’ll regret not having grabbed these offers early . Also Ola even provides paying through Ola money even for auto-rickshaws! , so why to pay for them if you can get it for free –
Steps to get your Ola First Free Taxi / Auto-Rickshaw ride
First of all download and install the Ola cabs app from the following links –
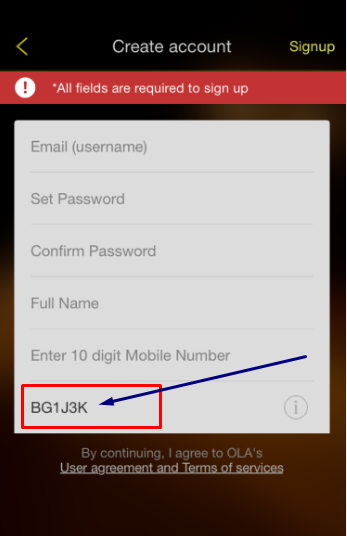
Ola referral code – BG1J3K
Now, Open the Ola cabs app, it will ask you to either sign-up or sign-in.
Now, comes the most important part, the first-free ride benefits are applicable only for referred users – hence , you can fill-up your name,e-mail ID’s and use the referral code as shown in the alongside image or you can input the code as “BG1J3K” to get instant Rs.200!.
You might be tempted to think that its fine to not use Referral code while signing-up on the Ola cabs app, Yes, though its fine not to use refer code for sign-up on ola, BUT not entering any referral code simply won’t give you free ride. Check the below screenshot for the offer proof –
Now, after you’ve successfully signed-up you’ll be having your free ride credits in the “Ola Money” section of ola app! , Enjoy your free ride.
How to use Ola cabs app for booking a ride ?
Booking through Ola cabs app
The procedure to book a cab or an auto-rickshaw through Ola cabs app is pretty simple, just select the type of cab or auto-rickshaw you want to book , and click on the “Ride Now” button (as shown in alongside image). Its that easy !, Ola uses GPS to automatically call the vehicle to your location, hence make sure your navigation is turned on when you use the Ola app.
Want more free rides from Ola ?
Its pretty easy to get some more free rides credits if you’re interested ! . All you have to do is refer your friends to the Ola cabs app using the “Invite & Earn” option present in the top left-hand-side menu.
You either get extra free Ride or Rs.100 Ola Money for every friend referred! , we can also help you by putting your referral code instead of ours – “BG1J3K” , so we all can benefit!
We all love to shop, don’t we? , although most of us use Cash-On-Delivery [COD] as a method of payments, but we get even more discounts! or earn even more cashbacks if we use eWallets, which are soon becoming the new heroes in the e-c0mmerce industry as a medium to get even more discounts! . Simply saying, these eWallets service providers offer you more value for your money each time you transact online through it , some of the Salient features of these e-Wallet services are as –
Get extra cash credits greater than the amount you paid for adding money to these Wallets.
Get Flat % of discounts whenever you purchase by these wallets (e.g Flat 20% off on BookMyShow if paid using PayUMoney)
Get extra cashbacks in % of amount for every amount spent through the wallets (e.g 20% Cashback in addition to discounts on shopping on PayTm wallet).
They also provide Buyer protection,so that your money is completely refunded in case of any complaint / failed transactions.
Also, you get reward points for each transactions wherein you can exchange them for exciting gifts !
They also provide option for securely storing your Card details, thus providing you additional security at the same time reducing your work to type in Credit or Debit Card numbers each time you intend to transact online.
So the current Top 5 eWallet providers in India to get maximum discounts are as below –
PayU Money is probably the first eWallet service in the Indian market and provides some exclusive discounts on online transactions such as (Flat 20% off on BookMyShow on Wednesday tickets) . It also provides great discounts on FoodPanda.in and other retail stores too! . PayU keeps on updating its mainsite with exclusive deals & offers every week!
Pockets is the newest entry amongst the ewallet services, but being a product of ICICI Bank and its powerful back-end it has quite a lot of interesting offers stacked up . Besides using as a gateway to Pay for online purchases, you can even use Pockets to accept money using either mobile number/e-mail ID. Thus, acting as a digital savings account. You can also add money to your Pockets wallet using Cards/ Net Banking as well as you can redeem/withdraw your money held in your Pockets wallet to your Bank account at nominal costs.
Although, Paytm started off as an online recharge site providing coupons, it has come a long way to have its own shopping portal , and full of deals. You’re never short of deals on the Paytm site, and it has a large number of deals and paytm coupons running on for bus booking/travels to electronics purchases to home decor and garments too! . Paytm wallet can be used to store your cash which can be later used to purchase goods on Paytm shopping portal or a large number of merchants who accept payments by Paytm wallet. You’ll surely get cashbacks if you shop using PayTm wallet! . PayTM wallets can also be used to accept/receive money from others, and the money in Paytm wallet can also be redeemed into Bank account as well!
Oxigen Wallet is not accepted as widely as the previous 3 ones, but not to underestimate its power, Oxigen Wallet provides flat discounts, and cashbacks on sites where no other services are able to (e.g eBay.in) . Thus, its quite handy to have it, incase if the above eWallet , eMoney services are not supported by your online merchant.
MobiKwik is yet another eMoney service provider in India, but it mainly deals with offers on Recharges, It has its present on other online merchants too but in our tests, those merchants were already covered by one or more of the service providers we discussed above, and neither was there much difference between the discounts/cashbacks provided between MobiKwik and them, nevertheless it still makes it way in due to the Recharge Cashbacks offers provided by it.
So , these are some of the Top eWallet or eMoney service providers in India, by using or virtue of which you can get even more discounts from online merchants on your shopping! . If you know more or other of such providers feel free to comment :).
Recently we wrote about the 3 Best Indian Cashback sites – and the first one amongst those is CashKaro.com,We could have written about CashKaro there itself, but it deserves an article because not only the savings, but even the earning opportunity it provides! . We will complete each aspect in detail, let’s look onto them one by one –
Update – I have saved over Rs. 50,000 [ Half a lakh! ] until now just from CashKaro! as shown in the screenshot below –
My Savings on Online Shopping from CashKaro crossed half lakh !
You too can save even more on your online shopping by following the steps mentioned below –
3 Easy Steps on How to earn or get CashBack
CashKaro steps
1. Visit and Login on CashKaro.
2. Visit the retailer via CashKaro.
3. Shop & automatically earn CashBack!
Now, you must be thinking on how can CashKaro afford to provide cash on purchases which weren’t even made from their site ? The answer to this question goes like this –
CashKaro Working
Thus, CashKaro gets money from the retailers as they have the affiliate tie-up and then it pays you in return! .
Update – If you want to purchase any product/deal which is not exclusive or hot one or not listed on Cashkaro – Use the right hand side bar as shown in this image link to activate cashbacks on any products you purchase.
You can redeem your CashBack on CashKaro site directly in your Bank account by Bank account transfer!
Earning opportunity on CashKaro by referral-
CashKaro provides you extra 10% of your referred friend’s earned CashBack! . Don’t worry your friend’s CashBack won’t be reduced at all, this is an extra token from CashKaro from their own earnings and not your friends!
The procedure too is very simple all you have to do is –
1. Log-In on CashKaro.com
2. Click on Refer and Earn.
3. Copy your unique link and start referring your friends in anyway you like!
Click here to Sign-Up on CashKaro! , also feel free to share your experiences, doubts and queries in comments ! Cash Karo, and Ash Karo 🙂 Happy Savings!
There are very few or limited options when it comes to transferring data from Android devices to iPhone/iPad , most take the route of using WhatsApp/Dropbox to transfer data from Android to iPhone . Not only it consumes data but is also less speedy, and results in compression/loss of data(as in case of WhatsApp) . Xender for iOS / Android is an awesome app which will solve all your worries! It transfers data from Android to iPhone/iPad using Wi-Fi network but without consuming data!. All you require is to have both the devices connected in a group (i.e have the same Wi-Fi connection) , In-this tutorial We will see transferring data/files/music from Android to iPhone , and transferring data/music from iPhone to android too.
Now , we need to create a group in order to transfer between iPhone and Android so as we can start the transfer, Open the Xender app on Android and select or tap on “more” option. (Its located on the bottom left hand side as shown in alongside image).
After tapping on more select the “Connect iPhone” option from the menu .
Now , On your iPhone/iPad , Navigate to Settings – > WLAN and connect to the WiFi network starting with “ADY etc….”.
Once your iPhone or iOS device gets connected, Open Xender app on your iPhone/iPad and click on the “Connect Phone” Option.
That’s it! now just select the data which you want to send , on either of the device Android or on the iPhone, and tap on “Send” . (Check the second image for details)
Woah! your music/data will be transferred within seconds! and this is perhaps the only way you can transfer songs/music from Music library of iPhone to Android!
Here’s another image which will explain the procedure in a simple way . If you have any doubts/encounter any problems feel free to comment ,and ya Xender app is Free for iOS as well as Android .
TodaySamsung launched its most awaited Tizen OS Smartphone – Samsung Z1 . Being curious about trying and experiencing new Mobile operating systems, i decided to try it out and found out that there’s no particular direct emulator for Tizen except for its SDK . So here’s a simple tutorial on How to Install Tizen OS emulator on Windows 7/8.1/Linux (Ubuntu / LinuxMint) and Mac OS too!
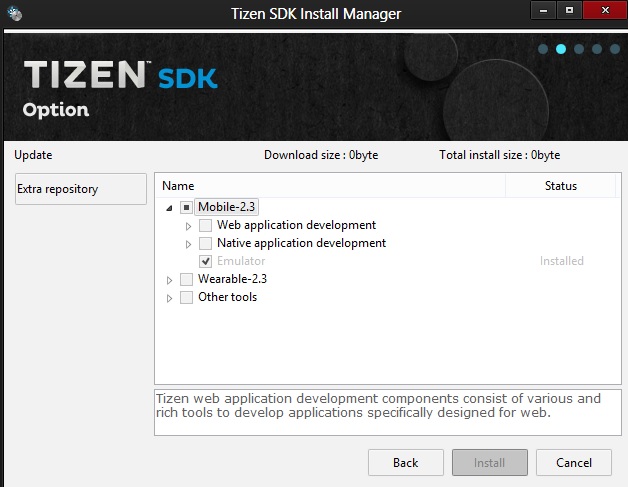
Now after you’ve downloaded the “Install Manager” (Make sure you’ve downloaded the Install Manager, and not the complete SDK which is in GB’s) , Open it. Now click on install – You will see a window as shown below –
Only select the Emulator option
In the next window only select the “Emulator” option and click on Install.
Now simply click on “Next” until the download starts, once download has started it will ask you to Install Intel Hardware Accelerator (HAXM) on Windows Machine.
If you’re installing on Windows allow HAXM to get installed, Ubuntu/Linux/Mac users need not to complete this step.
Now, Installation will get completed, once your installation is completed – Please navigate to the tizen-sdk installation directory and Execute “emulator-manager.exe”.
Now click on “Add VM” and modify the Virtual Machine/Sensor settings and click on “Confirm”.
Add a new VM , modify option and click on Confirm – Click on Play button to run the emulator
Now, Run/execute the emulator by clicking the “Play” button.
Once the emulator is running, it may some time to execute and start running (Booting the Linux Kernel).
You can use the hardware key interface provided to handle the emulator as shown in below figure –
Tizen Emulator hardware key and emulation in action
Recently, i received a called from this so-called NGO – Relief Trust India (Website : www.relieftrustindia.org) to donate some amount for the treatment of a child – Shivam . But, the way the guy was literally pleading me to donate and his insistence to remain on call until i donated the funds, plus the emotional attyachar and tone of his voice – raised doubts in my mind – so I did a quick search on the internet and found that Relief Trust India is a scam and Please Do not donate . Here’s the complete review and analysis with valid proofs –
Proof 1 – Case Shivam
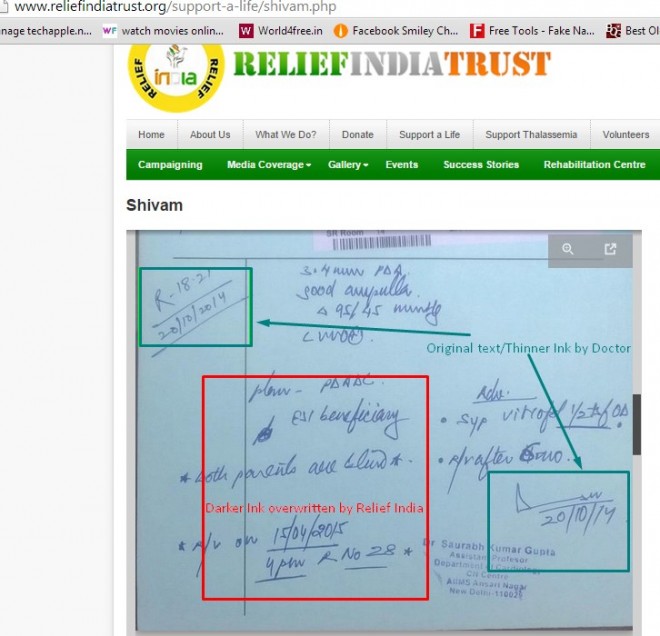
The volunteer ‘nitish’ asked me to donate some funds for a child named “Shivam” who is being treated at AIIMS , so i checked out his Support a life information or “profile” on their site. I mentioned “profile” because it was designed to look like that . And i noticed two inks on the diagnosis papers . Not to mention that the diagnosis papers were way outdated ! and not only that these guys even edited the Doctor’s papers to increase the “duration” to which they could use the profile as shown in figure –
And even if this wasn’t enough i tried to check out the AIIMS website to verify the patient’s identity – and found this Official AIIMS policy on donation .
Now, to test whether they were really an NGO, I called them again and said i was donating money to the child through Official AIIMS Website.and that literally brought the volunteer into tears! . he was just begging to pay through the Relief India Trust website, also
He requested me to enter his name in the “Volunteer Name” during Payment through Relief India Trust, when I inquired for the reason – he wasn’t able to give me proper answer (Clearly this Volunteer Name was his Commission and hence the pleading) .
Proof 2 – Changing NGO Address and Fake Registration Number
After all this, i decided to dig deep into this organisation and found another article by Vishnu Gopal which showed that this was a Scam . while reading through the article I found out the NGO changed its address and had used a fake registration number on its site – “3696” ,hence i did a search on the Government of India – NGO Portal – http://ngo.india.gov.in/ngo_search1_ngo.php and as I expected – It didn’t point to Relief India Trust! .Here are both of the images of Relief India Trust – Previous as well as current –
Previous Relief India Trust image with Fake Registration NumberThe Current Relief India Trust with changed address
Proof 3 – Using Money power to get Registered (But Nothing can escape Computer)
Not only these guys Scam people but they have become quite powerful themselves to bribe the Government officials, and get their fake NGO Registered with a fake date . Check the below screenshot for the reference – Though the Date of Registration is “18-02-2011” but the Computer generated Unique ID shows “DL/2014/0081349″ . I don’t think its very difficult to guess what “2014” stands for in “DL/2014/0081349″ It stands for year when the NGO was registered/added to the database. Also, do check out the disparities between the Registration ID(544) and Unique ID(0081349) .
They have also got themselves featured in newspapers like Indian express,TOI etc . But those are the “paid” news ,sponsored by Relief India themselves
Do Note down the NGO’s Chairman Name – Vikrant Vikram Singh! I will be revealing him and his all gimmicks in my next proof –
Proof No 4 – Vikrant Vikram Singh and his gimmicks
I being a webmaster decided to check the whois for relieftrustindia.org site, and when i checked it to my surprise i found this so-called chairman of the NGO had 17 domains under him , and i came to know about their future plans too – The Chief functionary of the NGO – Mr.Uttam Kumar also features in this scam! . Let’s have a look on the domains under Vikrant Vikram Singh
The domains highlighted by
Maroon colored box – reliefindiatrust.org and reliefindiatrust.com are the ones used for scamming people through fake NGOs
Green colored box – Older/previous site of the NGO from where the scam started (You can check out ritrehab.org)
The Blue colored box –stands for Accordpro.com – its a Call-centre company ( Now I came to know how the Volunteers were able to make calls for such long durations and with such high frequencies)
Pink colored box – denote the future scamming scheme of these guys by gaining sympathies from mother love (really cheap 🙁 )
Naturally, its impossible for an NGO to venture and invest into so many domains as internet domains obviously don’t come free of cost , neither do calls and sms!
Proof No 5 – Very few/No recent Success stories and Older stories present on site
The Relief India Trust guys have very few recent data or stories available on their site, and most of the “profiles” on their site are either faked or duplicated with some random old real stories pushed between them. Its their way of being on the safer side, and these guys have huge money they even buy some poor parents to hand-over their case data in lieu of posting them as a story . In fact , If you notice and study all the stories properly most of them have used a “Same Standard diagnosis sheet” format and the same are shown to you when you ask them for proofs – Click here to download/view the samples shown (Thanks again to Vishnu Gopal)
I also had asked the volunteer for the proof of “last payment” done by the NGO , he said he will mail me and noted my e-mail address but the e-mail never came.
Proof No 6 – A Doctor himself called at the AIIMS /Hospital and found that the patient was already “cured”
Here’s what a doctor who was interested to know the history of the patient came to know when he called the hospital –
Proof No 7 – An Ex-Employee of the Fake firm himself reveals the data on the firm’s working –
Every guy/girl is given a “DATA”, an A-4 sized sheet that consists of 30
contacts of “DONORS”.
They have to call on this number and try to convince (i.e. force) them by
whatever means to get money from them in the name of donation.
These “DATA”s usually has donors of south Indian cities, so as to invite less trouble.
Everyday, these people get around 6 “Data” sheets. (which makes it roughly around 130-150 calls being made by one person in a day)
After the first 15 days, out of the selected 30, only 5-8 unlucky people are left behind to continue working in this shit-hole.
If a ‘donor’ donates an amount of Rs 1000 or more, the caller gets 10% of that amount on spot as “INCENTIVE”.
I hope – these reasons/evidences are valid enough to catch these “fake NGOs / Scam people” please do not entertain such NGOs . The photos/blog posts/articles everything on their site is “fake” and is like the ‘sets’ of a movie, only for show-off e.g Motherconcern scam etc .
Lets STOP these Guys who try to touch our deep emotions and heart for some money , and which simply “Sell Trust , Humanity and Human Nature for some cheap money :'( “


![How to- Disable Facebook AutoPlay of Videos on PC & App Site [Disable AutoPlay on Facebook App / Website]](https://techapple.net/wp-content/uploads/2015/10/BJ85Gju.png)


![How to- Backup & Download own Instagram Photos/Account [Back up Your Instagram Account]](https://techapple.net/wp-content/uploads/2015/09/rGH1hgV.png)