Category: Google News And Updates

All News and Updates Related To Google

  • Use GoogleWebLight.com to speed up website loading time! & reduce data consumption on your mobile (Android/iOS) and PC too!

    Use GoogleWebLight.com to speed up website loading time! & reduce data consumption on your mobile (Android/iOS) and PC too!

    Many times our cellular data connection’s speed is quite slow be it 2G or 3G , which hampers the loading speed or even simple loading of a website on our mobile devices. Some websites even have some type of ads, which don’t let users view content without clicking on “Skip ad” and some even fail to show the content despite clicking on the ad(e.g mobile.ndtv.com) , or many websites simply put too many images affecting the loading time on our cellphones. All of these combined simply hampers our browsing and reading experience, but not any more – Google light web, or google lite search as its called helps overcome these problems by simply parsing a website’s pages in a mobile-friendly readable format.

    If you’re a webmaster you might have come across traffic from sources such as icl.googleusercontent.com , or googleweblight.com . These are nothing but search traffic with your website optimized for mobile viewing by Google, and you can use the above google URLs to even transcode any other website traffic on your slow/data intensive cellular network to save extra data costs and reduce loading time.

    Method to use GoogleWebLight.com and icl.googleusercontent.com to view optimised websites –

    google light web
    • Simply prepend (write before the actual URL) the following URL strings to load the website in Google optimized mobile format –http://googleweblight.com/?lite_url=http://http://icl.googleusercontent.com/?lite_url=http:// 
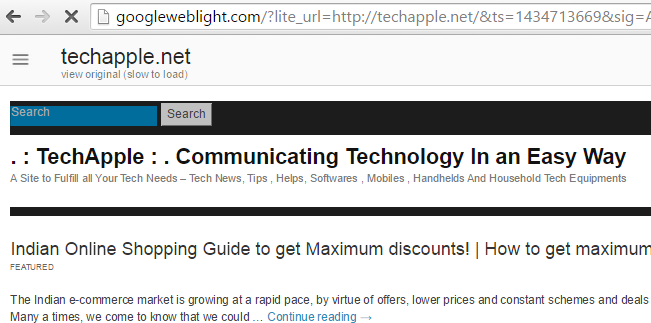
    • For e.g if you want to visit our blog techapple.net through the Google mobile transcoder , simply enter –
      http://googleweblight.com/?lite_url=https://techapple.net
      in your browser and voila! it will load techapple.net in mobile optimized format!. (You can check out the alongside image for url prepend format)
    • Similarly you can use it to view other websites too in mobile optimized format , ex
      http://icl.googleusercontent.com/?lite_url=http://www.firstpost.com ,
      http://googleweblight.com/?lite_url=http://mobile.ndtv.com etc.
    • Thus, you can now save on traffic as well as reduce consumption time on any websites you like to visit .
    • You can also use these transcoders on your Desktop / PC as well as if your visited website loading is very slow , and its taking a high time to load.

    Note – If you are an Android user , you can check out the below tutorial to allow internet access only to selected app & restricting other apps background data to access Internet, thus saving your data consumption – Click here for tutorial to allow access to only selected apps on Android using Android Firewall

    Sadly, https requiring websites aren’t fully supported yet by Google transcoder, nor video/active javascript content ones , but nevertheless its a great tool and way to speed-up loading and if all you’re interested in is reading content, the transcoder makes it a pleasure reading the content of websites. Do feel to comment your views and problems faced while using Google Light web (googleweblight.com) transcoding services.

  • 3 ways to use a single-1 Gmail id as many-multiple ids! Gmail dot trick (.) and + plus tricks!

    3 ways to use a single-1 Gmail id as many-multiple ids! Gmail dot trick (.) and + plus tricks!

    Heya folks, E-Mail or electronic mail is the most widely used means of communication over the Internet , also its kinda an impression of a person’s online identity. GMail is one such popular e-mail service provided by Google!. But do you know that a single or even one GMail ID can be used as multiple ID’s which we can use to perform multiple sign-ups ! , thus saving the troublesome task of creating multiple e-mail accounts for different accounts on a single site . A single Gmail ID can thus be tweaked to be camouflaged as different or multiple e-mail ID’s . Let’s have a look onto 3 of such best tricks to use a single 1 gmail ID as multiple ones or many ids.

    Assumption :  I will be explaining all the tricks in the article using our default GMail ID for the website – techapple.net @ gmail . com. I will be using this single gmail id to get mails from multiple ids without even creating them!

    Trick # 1 – Gmail dot (.) trick

    • This is one of the most widely used techniques to use a single E-Mail ID to sign-up for multiple accounts .
    • The Gmail dot trick consists of inserting any number of dots (.) or fullstop/period in your gmail ID username to show them as different IDs .
    • Thus, even if you send an email / or request an email on techapplenet @ gmail . com or t.e.c.h.a.p.p.l.e.n.e.t @ gmail . com it will arrive in the same e-mail ID! . (The original one)
    • The sign-up or other websites though treat them as different e-mail accounts, but in Gmail they are one! , so thus you can use a single gmail account id as multiple ones, I use this trick pretty much on signing up for free trial websites which provide freebies based on e-mail IDs.
    • So, Gmail dot trick in short –


    Trick # 2 – GMail plus (+) trick


    Trick # 3 – Using @googlemail.com instead of @gmail.com


    Example of using the above technique –

    We have our Gmail ID registered as [email protected] , you can check how we used each of the above combiation and still received the e-mail on our default ID.

    Sending e-mail to [email protected] instead of [email protected]
    Reception of mail sent to [email protected] on the GMail ID – [email protected]

    Thus, you can use one or even all of the above methods to create multiple email or gmail ids for yourselves on just a single account! . The permutations and combinations possible are infinite! , also If you have queries/suggestions feel free to comment 🙂

  • Tutorial – How to disable/Stop YouTube Autoplay of Videos and Playlists in Chrome/Firefox

    One of the most annoying thing present in YouTube is its Autoplay – Its starts playing the video as soon as its get opened, or we click on it. Sometimes, we may need to Stop/Disable YouTube autoplay of videos in order to conserve bandwidth or simply in case where we are stacking up videos in different tabs for viewing . So, here’s the easiest method to Stop YouTube auto play

    Method # 1 – Using SmartVideo for Google Chrome / Firefox

    SmartVideo has the option to stop youtube video initialization
      • Though, SmartVideo for YouTube has many customization options for YouTube, as this post is about stopping/disabling the YouTube auto-play , coming straight to the Point –
      • First of all download the SmartVideo addon/extension depending upon your browser –
        Click here to download SmartVideo for YouTube –  Chrome.
        Click here to download SmartVideo for YouTube for Firefox.
      • Once you’re done with installing the SmartVideo extension, browse to its Preferences by entering these URLs in address bar depending upon the Browser you Use –
      • Enter the following URL for Google Chrome –

    chrome-extension://lnkdbjbjpnpjeciipoaflmpcddinpjjp/options.html

    • Enter the following URL for Mozilla Firefox –

      resource://mytube-at-ashishmishra-dot-in/smartvideo_for_youtube/data/options.html

    Now,  checkmark the option highlighted by Red Rectangular box in the alongside image which shows – “Save Bandwidth, Do not initializw video until I click” .

    You can also open the global preferences, or settings for Smart YouTUbe extension by hovering mouse pointer over any YouTube video which is being played and selecting “Global Preferences” in the drop-down menu.

    That’s it, now open any YouTube video you’ll find that its Not auto playing or initializing and thus serving our purpose 🙂

  • 5 Awesome YouTube extensions to enhance YouTube usage/experience! [Chrome/Firefox]

    5 Awesome YouTube extensions to enhance YouTube usage/experience! [Chrome/Firefox]

    Its almost impossible to find an internet user who hasn’t used YouTube! but sometimes YouTube experience isn’t that great because of Ads, Buffering while loading videos , unrelated comments , or autoplay of videos . So here are the 5 Best & Awesome extensions which will enhance your YouTube experience and make a pleasant viewing!

    Extension # 1 – SmartVideo for YouTube

    SmartVideo for YouTube provides a huge customization

    SmartVideo for YouTube stands tall at No.1 position in our article because of the sheer number of customization options and settings (YouTube video optimization) it provides. SmartVideo is free to use and provides a lot of features such as –

    • Ability to decide/fix the video quality permanently so as to you don’t have to change the video quality everytime.
    • Stop the buffering of videos once paused (Uncheck the option highlighted by purple box).
    • Stop/Disable autoplay of YouTube videos until clicked on the play button.
    • It even has options of Smart Buffering to ensure optimum viewing on slower internet connections.
    • It even shows the time remaining for the video to start playing (Time required to resume playback during the starting/mid-way buffers).

    Click here to download SmartVideo extension for Google Chrome.
    Click here to download SmartVideo extension/addon for Mozilla Firefox.


    Extension # 2 –  ImprovedTube 

    ImprovedTube has an option for controlling PlayBack speed

    I had quite a lot of fun while using this extension – especially by using the Playback Speed option! , it was fun watching dance & listening music in slow-motion or in speed-up 🙂 . Besides, this the ImprovedTube extension also has options for –

    • Changing the Player Size – To cover full browser windows, etc.
    • To pre-define/fix the Video Quality.
    • To hide Video Annotations,Description and hide comments.
    • Changing the Playback Speed.
    • and to disable Auto Play in Videos and Playlists to conserve bandwidth.

    The only drawback of this extension is that once you change the settings in ImprovedTube, it won’t work until you reload the YouTube video tab.

    Click here to download ImprovedTube for Google Chrome.
    Firefox users can use the combination of these two addons to get the same functionalities –
    1. Click here to download No Comments – YouTube for Firefox.
    2. Click here to download YouTube enhancer for Firefox.


    Extension # 3 – Floating YouTube extension + app!

    Floating YouTube – a unique experience

    I was spending a lot of time on YouTube decreasing my productivity, until i found the Floating YouTube extension which allowed me to watch my favorite show simultaneously while i was working on blog! And i found it pretty awesome – The only drawback being it couldn’t play Copyright Music videos of India. I hope the developers will resolve this bug soon. Rest assured the app is awesome! . The app only loads the video in the widget once the URL is input onto it,for automatic playback of video in the widget do use the app in combination with the Floating YouTube extension.

    Click here to download Floating YouTube App.
    Click here to download Floating YouTube extension


    Extension # 4 – Magic Actions for YouTube

    MagicActions for YouTube takes YouTube experience to a higher level!

    Magic Actions for YouTube simply takes your YouTube viewing experience to a higher level , it provides a large set of functionalities some of which include –

    • Applying Color filters to the video (Grey Scale , Sepia , etc ) without reloading (By clicking on the blue-colored highlighted box).
    • Control the video volume by Mouse Wheel! .
    • Instant Screen Capture (Clicking on the button high-lighted by yellow box).
    • Changing the Video window/size & YouTube theme by clicking on the button highlighted by Green Color (The most centered button in the newly obtained button-set on installation).
    • Dimming and changing everything to black/white-on click of a switch besides the YouTube logo (highlighted by pink color in the image).

    Thus, you will find Magic Action more and more interesting, the more you use it.!

    Click here to download Magic Actions for  YouTube for Google Chrome.


    Extension # 5 – Stop Video Download extension

    Stop Video button

    Many times we need to quickly shift tabs to do some important work and the YouTube video continues to consume bandwidth even if the pause button is pressed. In cases like this the Stop Video Download extension comes in handy!

    It adds a neat looking Handy “Stop Button” which can be used to stop the video and to preserve the bandwidth which couldnt have been preserved by the conventional pause button!

    Click here to download Stop Video Download extension for Chrome.


    So, these were the 5 most extensions which i found to be most awesome for enhancing YouTube experience. Feel free to comment if you face any problems or if you know of any such awesome extensions like these

  • 7 Best Free VPNs for Chrome -7 free VPN Apps/Extensions for Chrome OS/Chrome browser/Google Chromebooks

    7 Best Free VPNs for Chrome -7 free VPN Apps/Extensions for Chrome OS/Chrome browser/Google Chromebooks

    Many times, we need to access sites which we don’t have access to.. Or simply we need to bypass the censorship imposed by the network administrator. Also, there are some sites which have restricted region/country access e.g hulu – U.S.A . (hulu is accessible only in USA) . In all the above mentioned scenarios and many more all of these limitations can be bypassed/overcome by VPN services . What’s more ? VPNs also encrypt your traffic and hide your identity , keeping you totally anonymous 🙂 . So, VPNs are really very useful services! and here we present you the Best 7 Free VPN services (apps/extensions) for Google Chrome Browser/Chromebooks i.e VPN for chrome OS.

    Another advantage of using VPN services directly in Chrome is to overcome the technical hurdles faced while configuring the VPN clients such as Open VPN , PPTP etc 🙁

    No.1 – Dot VPN

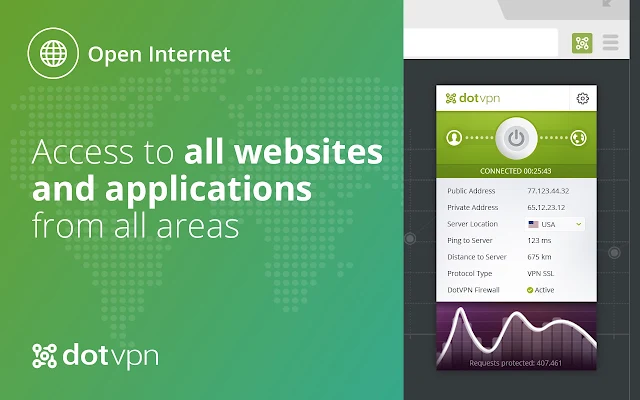
    Dot VPN is another similar service to ZenMate and provides access to restricted websites as well as VoIP applications, and its free to use too! Some of the unique features of Dot VPN are as mentioned –

    • Anonymous Internet-surfing
    • Access to all websites
    • Virtual change of location
    • High speed connection without connection dropping
    • Safety when accessing public Wi-Fi points (Wi-Fi and Hacker Protection)

    Click here to Download Dot VPN from the Chrome App Store


    No.2 – Gom Web VPN for Chrome

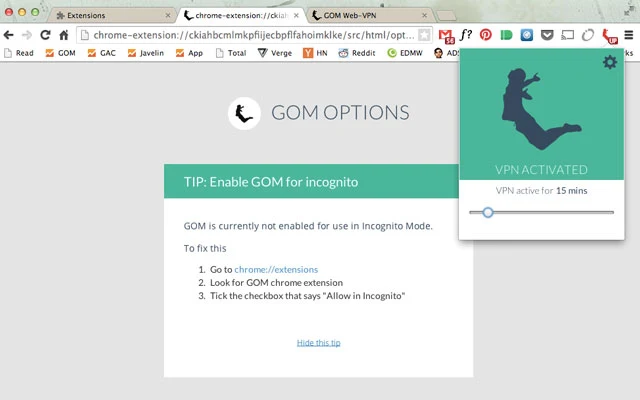
    Gom- Web VPN for Google Chrome is yet another Chrome exclusive VPN service provider, it doesn’t require any 3rd Party application for the VPN services except its Google Chrome extension and is quite effective too!

    The service is free Free for Trial period and features of Gom VPN include –

    • Access blocked content.
    • Surf privately with encryption (even with non-secure sites);
    • Enjoy faster page load times (GOM uses Google’s SPDY technology).
    •  No need for network configuration / 3rd party app install.

    Click here to Download Gom Web VPN from Chrome Store.


    No.3 –  Browsec

    Browsec encrypts your traffic and routes it through Browsec’s secure cloud network. No one will be able to identify, track you or sniff your traffic.

    •  Visit Facebook and twitter from work, read whatever you want.
    •  Privacy. Hide your real location from the sites you visit.
    •  Netflix, Hulu, Spotify, Pandora, SoundCloud and so on — music and video services restricted to a few countries are now accessible to you too.
    • Personally, i found it much speedier as compared to other extensions i tested 🙂

    You can start Browsec by clicking on the tab icon and clicking on “Protect Me” button as shown in the image alongside

    Click here to download Browsec Extension for Chrome.


    No.4 – ZenMate! 

    ZenMate is  was perhaps the best and first Chrome-exclusive VPN , but now it isn’t since it started is premium services. It started it operations on Chrome and was the first app/extension providing VPN services only based on the Chrome Engine and without any OS(Win/Linux/Mac) support. hence, it is able to run on Chrome OS too!.

    Features of ZenMate –

    • Encrypts and protects your browser traffic
    • Hides your real location and activity
    • Access any website from anywhere
    • For free and just a few clicks away!
    • Also it provides Encryption,Speed,Data Compression and blocks Harmful Sites.

    Configuring and using Zenmate too is very easy as 1..2…3… 1.Download….2.Sign-Up….3.Activate by a simple button.. 🙂

    Click here to download ZenMate for Google Chrome from Chrome App Store.

    Note : – You can get a free ZenMate Premium account if you sign-up via our link below –
    Click here to Sign-Up for ZenMate Premium for Free!

    ZenMate premium gives you a higher level of security which is not matched by any other Chrome VPN yet


    No.5 – Hola Engine – Hola Better Internet

    Hola is one of  the most famous unblocking/proxy extensions for Chrome, and it has now added the VPN type services too..

    Hola is easier to use and moderately good in speed! however, you need to install both the hola app as well as the extension to use the hola services on Google Chrome.

    How to use Hola:
    1. Install the extension
    2. Go to a website that is blocked
    3. Press the Hola extension icon (top right of browser)
    4. Choose the country that you would like to browse from
    … and enjoy your liberated Internet!

    Click here to Download Hola! Better Internet from Chrome Store.


    No . 6 – Cyberghost VPN-Proxy for Chrome


    Cyberghost is the leading name when it comes to VPN service providers, especially Free VPN Service Providers. and true to its name, Cyberghost has launched its VPN cum proxy extension for Google chrome.

    Personally, i found the extension to be slower as compared to the other VPNs mentioned in this article , but ocverall the trustworthy name in VPN industry and getting the Job done features Cyberghost in this list.

    Click here to Download Cyberghost VPN extension from Chrome Store.


    No.7 – Breakwall VPN

    Breakwall VPN is perhaps the fastest of all VPNs but its not completely free 🙁 , it offers a Free Trial though, hence it just makes to this list, as this is one such service whose trial service is too  good to be missed .

    You can create a trial account with Breakwall and add the password received in your mailbox to the extension, anc click on connect. that’s it , The speed and the service provided by Breakwall is really awesome except for the trial!

    Also, it consists of BBC- iPlayer mode, by virtue of which you can access BBC iPlayer in countries where its blocked.

    Click here to Download Breakwall VPN from Google Chrome Store.


    So, these were the Best free VPN services among the ones we tested, if you know of any such good services feel free to comment 🙂

  • Whatsapple – unOfficial Whatsapp Client for PC | Use Whatsapp On PC without Android emulators!

    Whatsapple – unOfficial Whatsapp Client for PC | Use Whatsapp On PC without Android emulators!

    Whatsapp is the most leading app being downloaded on the Apple iStore,Google Play Store and Nokia store , thus its one of the most leading medium of communication and instant messaging. but many people still cannot afford those smartphones or may want to use whatsapp on PC /Windows/Linux/Mac , though there are workarounds such as installing an android emulator (e.x bluestacks,andy) and using whatsapp on it, its quite RAM and resource heavy plus it doesn’t satisfy the ease of PC . hence to overcome all these limitations, We came up with an unOfficial Whatsapp client – Whatsapple!

    Without wasting time, let me pen down the features of Whatsapple

    • Whatsapple is an easy to install and configure unofficial client of whatsapp for PC built on the base of Pidgin Messenger.
    • It provides all the features of Whatsapp,such as file upload/download, Individual Chat as well as GroupChat etc on PC.
    • Now, you can view the shared videos and photos/images directly on your PC.as well as Upload Videos/Photos(Images) to the chats directly from the PC!
    • All the Default Smileys of Official Whatsapp App are Supported, thus you can view the Smileys send as well as send emoticons to the Chat 🙂 .
    • As Whatsapple doesn’t require any Android emulator its blazing fast! and light on your PC 🙂 . Thus, any PC right from Windows XP to the latest Windows 8.1 all can run it :).
    • You can add unlimited contacts, no need of any complex emulator things like bluestacks,andy etc.
    • No limit of bandwidth or memory as is the case with phones, the big memory pool of PC practically ensures you will never run out of Memory for storing messages,logs ,photos,videos anything.
    • The Whatsapple client will never hang in most cases irrespective of how many messages arrive simultaneously.
    • And ya, the Installation size is just 10Mb which is even lesser than the apk file size of Whatsapp 😛

    Prerequisites –

    • Windows OS ,  and .Net Framework 4.0 Installed ( Required for Generation of Password Only )

    Procedure to Install and Use Whatsapple

    First of all Download and Install the Whatsapple Client – Whatsapp for PC from here . , Also get your Whatsapp Password from this link – https://davidgf.net/whatsapp/pwd.html

    We will need an Whatsapp Username and Password , as we all know whatsapp username is the mobile number with the Country Code ,

    • e.x for an mobile number in India , the Username will be  “91XXXXXXXXXX” where XXXXXXXXXX is the 10 digit mobile number .
    • For the password, we will need to Generate it one time as Whatsapp requires one time Registration , So first for Generating the Whatsapp Password Open the “Whatsapp Password Generator” from the Desktop.
    • Now, Enter the Mobile Number and click on “Request Code” button as shown in figure below.
    • Now ,you will receive a confirmation code on the mobile number , Now enter the verification Code received in the text box next to Code and click on “Confirm Code” Button.
    • Now a dialog box appears showing you the Whatsapp Password and asking you to write it down,but don’t write it down, click on ‘OK’ and Now copy the Generated Password from the “Step 3″ Area of the Whatsapp Password Generator /WARP .
    • Now, once you have obtained the Username and Password Launch the main “Whatsapple for PC”  Main exe from the desktop .
    • Here, click on Add and add the Username and Password we generated in the Window, you can tick the “remember password” option while adding so as to there’s no need of generating password everytime . Check the figure shown above for details.
    • Now click on add,after the account is added click on close! and voila! you will be logged in and can use Whatsapp on PC for Chatting.

    Method to Chat with a New Number or add Contact Name –

    • Click on Buddies then select New Instant Message , Now Give your friend’s phone number with country code and  Click on the OK button. And you can Chat with him/her.

    Use WhatsApp on PC laptop free

    To add a Contact Name to a Number

    • Click on Buddies ,Navigate to Add Buddy , Here please enter your friend’s phone number with country code and provide other details > Click on Add button.

    Use WhatsApp on PC laptop free

    To Upload or send a File/Photo/Image/Video : Use the send File / Upload Media option present in the “File” Menu of the Live Chat Window , of the Contact or Group to which you want to send the File .

    Thus, this is i guess by far the most easy,and efficient and Simple way to use Whatsapp on PC .

    Click here to download the Whatsapple Client for PC for Windows (XP/7/8/8.1) all supported.

    If you have any doubts/queries/suggestions feel free to comment 🙂

    Solution to the Server closed the connection Problem – Solved by our reader  Steve

    Login to Whatsapple – Whatsapp for PC than go to > Accounts>Manage Accounts > Click on your accoun.Than Modify Account>than go to Advance tab change on the server instead of “Android-2.11.151-443″ enter “Android-2.31.151-443″   that’s it.

    Update :  People who still cannot get Whatsapp working can try running it on Firefox by referring this article .

  • 3 Sites to get Google Drive Direct Link/s of Files and Documents |3 Google Drive permalink sites

    3 Sites to get Google Drive Direct Link/s of Files and Documents |3 Google Drive permalink sites

    Hello , in my previous posts i had covered 5 File hosting/cloud storage sites which had hot linking support . Also i had covered the methods to get direct links of files stored on Dropbox and copy.com too , Now sharing the same to get Hotlinks from Google drive files or Google Drive Direct Link. Hot Linking or direct linking is very useful while sharing links through Mail / Blogs as its simply enable a single click to start downloading thus saving the users time and efforts to download a file while at the same time saving from those annoying ads.

    Prerequisites –  Google Drive sharable URL

    • The file/document which is to be used for generating direct URL must not be created in Google Drive/docs, if its created in Google Docs then please download and re-upload the same to the Google Drive
    • The file you are trying to generate direct URL for must be sharable . The method to get the Sharable URL is as below –

    Method to get Google Drive Share URL for generating Direct Links

    Step 1: Go on to Google Drive and right click the file that you want to share.
    Now move your mouse over “Share…” and then click on the “Share..” that appears.
     
    Step 2: On the window that comes up, click the “Change…” link beside the part that
    says “Who has access”.
     
    Step 3: Set it to “Public on the web” or “Anyone with the link” and hit save.
    Step 4: Now copy the “Link to share”. This is your sharing URL. Paste it in to the text box
    above and then create your direct link. Enjoy!
    Now , we are ready to get the Direct Link/URL for our Google Drive Files –

    Sites to get Direct link/URL from Google Drive

    We have ourselves created a Tool – CloudLinker which will do the same – Click here to Use Online Cloud Linker – Direct Download Link / Permalink Generator.

    Site # 1 – Google Drive Direct Link Generator

    This is probably the most efficient and easy to use amongst all the Google drive Permalink sites, as guessed from the Screenshot its quite easy to use too , We just have to enter the Sharing URL and click on the “Create Direct Link” button, and that’s it ! The direct URL will be generated in the Output Link which we can copy and share as a Direct Download Link .

    Click here to visit the Google Drive Direct Link Generator site


    Site # 2 – gdURL.com

    This is yet another site to generate Google Drive direct links – and is quite easy to use , we just have to enter the Google Drive Sharing URL and click on Generate Permalink button  and the Permalinks will be generated. Also this site contains advanced features such as

    • Allows Multiple Sharing URL’s to be entered thus the generation of Multiple Direct Links :).
    • Supports direct Google Drive Connect so that the files can be navigated and the Direct links can be generated from the Drive browser itself thus saving the extra efforts of copying the Sharing URL.

    Click here to go to gdURL.com

    Site # 3 – gdriveurl.com

    gdriveurl.com is one more site which performs the generation of google drive direct links, it also includes extra features which are useful such as mydrive but for the annoying ads they degrade the overall experience of the site, and hence ranked third in this article .

    It also supports multiple Google Drive permalinks generation,a handy site overall 🙂

    Click here to go to gdriveurl.com

    Note – Sometimes incase of Big files / Google Drive is unable to scan the file for viruses before download and may display a download page,but this is rare and occurs for big files download only. I hope you found this article useful, Thank you for reading and please do like and share this post so that all can enjoy these awesome features 🙂

  • Use Google Chrome as Calculator,Metric Converter | Hidden Functions of Google Chrome Browser still widely unknown

    Use Google Chrome as Calculator,Metric Converter | Hidden Functions of Google Chrome Browser still widely unknown

    I was just casually browsing on the Internet, then instead of typing ‘.’ in an IP address i accidentally tped ‘*’ and to my astonishment,i was much shocked on the Result, Google Chrome quickly generated the Product of the two numbers for me 🙂 . On further trial and error experiments i found out Google Chrome could be used as a really quick Calculator and Metric Converter . which can be used to save and simplify our work , Let’s check it out how –

    Procedure to Use Google Chrome as a Calculator 

    • Its really quite simple, simply type in your desired expression using the normal ‘+’ , ‘*’ ,’-‘ etc operators in the address bar and it shall return you the results . I have tested the operators (+,-,/,*,%) you can try more of them and tell me the results.
    • Here’s an example operation( “85*48/8+6-2”) and with the result(“514”) it returned in the below image – 

    Similarly Google Chrome Browser can also be used as a Metric Converter too as follows

    • Simply type in your Unit in address bar as shown below – (I typed in “5 feet” in address bar and it showed me the equivalent metres in Output)
    • Also it supports conversions from one Metric to other metric Systems too as shown in the figure I typed (“5 feet in inches”) in address bar and it rightly returned me the Corresponding inches

    Thus , Google Chrome contains this awesome functionality of an inbuilt-calculator cum Metric converter which can be pretty much time saving,especially in cases such as analytics saving the time required to navigate from one window to other . Also this trick is also quite good to show-off or impress folks with your geeky knowledge 🙂 .

    And before i conclude, here’s one more –

    we have explored a widely unknown dimensioon of Google Chrome,if you know more of such dimensions, do let us know by the comments 🙂 . Thank you!

  • Prevent Google from tracking Search-Using non https Google Search [Non SSL Version]

    Prevent Google from tracking Search-Using non https Google Search [Non SSL Version]

    Many sites today track users without their consent and store data, hence privacy of users is a major concern. Google too does the same way and tracks our previous search queries,visited links to track our usage and improve the search results . But many times it can happen that we may want to hide our search query from google or stop it from tracking our usage. Also sometimes we may want to use the old non-https or non SSL version of Google Search to search our query especially in case of slower network connections. This post covers the very same on How to prevent Google from tracking our search without having to log out or make changes to our Google profile/Account settings , And using non https Google SSL encryption.

    The Method to use Google without https and without traceability is very easy , though there are many users using 3rd party services like ducduckgo or startpage.com but i won’t recommend them,as they themselves are slower and their server processing despite using google results make them even more slower..Let us now browse the methods to prevent google from recording the search results.

    Method I —– Using Google Server IP

    Yeps, this is the most simple Method to use Google and gain access to Google search results without letting google track and using SSL , you can get the Geo-Specific Google Server IP for your location too, The Process is very Simple as follows

    • Open Command Prompt [For Windows users] or Terminal [For Linux and Mac users] and simply type the command “ping google.com” and hit enter, you will get a message as “pinging google.com (google server ip) with xx data” check the below screenshot for information.
    • Here the IP contained in the brackets is the Google Server IP , now simply enter this IP in your browser and hit enter ! and voila !
    • You are now able to access Google without https and without traceability , you can yourself check that even if you are logged on/signed in on “google.com” you are logged off/signed out on the Google Server IP Page :). Thus preventing the Google Server from tracking you and your search 🙂
    • Also, you can check for previously searched queries, they always disappear 🙂 Check the below Screenshot for live demo of the same –>
    • As you can see in the above Screenshot i have used the Google IP from the ping command and using it for searching , The Google Server IP which i used was 173.194.36.38 , you can obtain yourself IP or can use anyone from the range 173.194.36.1 to 173.194.116.255 , tested by me i.e total 80*255 IPS but may be the number is even more  🙂 You can try urself and get your own Google Server IP  for personal use 😛

    Method 2 – Appending ?nord=1 at end of Google Search

    • This is yet another method for using non https version of Google Search but unlike the previous method it doesn’t completely prevent Google from tracking your results.
    • But this method is quite useful especially in slower network connections or restricted networks where https doesn’t work properly . You can visit the non-https version of ?nord by Visiting here – http://www.google.com/?nord=1

    So ,these are some tweaks of the World’s Number 1 Ranked site, which many and many of them might not know and which can be used to enjoy the Google Search experience 🙂 , If you have any doubts/queries/suggestions feel free to contact us or comment below 🙂