Category: Mac OS X Zone

  • Top 3 NES Emulators for Mac OS X to Play NES Games on MacBook / iMac

    Top 3 NES Emulators for Mac OS X to Play NES Games on MacBook / iMac

    With the launch of Nintendo classic, the retro games of 90s ala Super Mario Bro’s, Konami Contra, and Track & Field are back into fashion. Considering Nintendo’s supply issues not all of you may get a hand on the Nintendo Classic, but yes, you can still enjoy all the features of a Nintendo Classic system by emulating the NES Games on your Mac OS X (MacBook Air, Pro, iMac, etc.mBs). Here are the top 3 Best NES emulators for Mac OS X which will let you enjoy your favorite NES games on your Mac –

    Note- We only provide links to legal emulators you need to own ROMs of Games (.NES game roms) inorder to play games, a simple google search with the game name and NES will render you the game roms to be used inside the emulators.

    Top 3 Best NES Emulators for Mac OS X to Play NES Games –

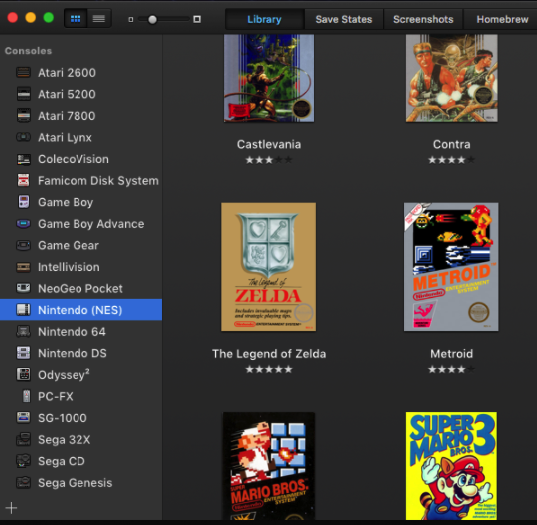
    NES Emulator # 1 – OpenEmu

    OpenEmu for Mac has ability to emulate NES as well as more
    OpenEmu has the ability to emulate NES as well as more

    OpenEmu is one emulator which will solve all your emulation worries on your Mac OS X.

    It comes bundled in with not only Classic NES Emulation libraries such as FCEUX & Nestopia, but it can also emulate NES, GBA, Sega and lot of old gaming consoles.

    Some Salient Features of OpenEmu can be classified as –

    • Free & Easy to install.
    • Comes inbuilt with many console emulation codes.
    • Gamepad Controller / Joystick support! – This is perhaps the best part as you can simply plug in your Joystick/gamepad and start playing your ROM on the game controller (totally console style!)
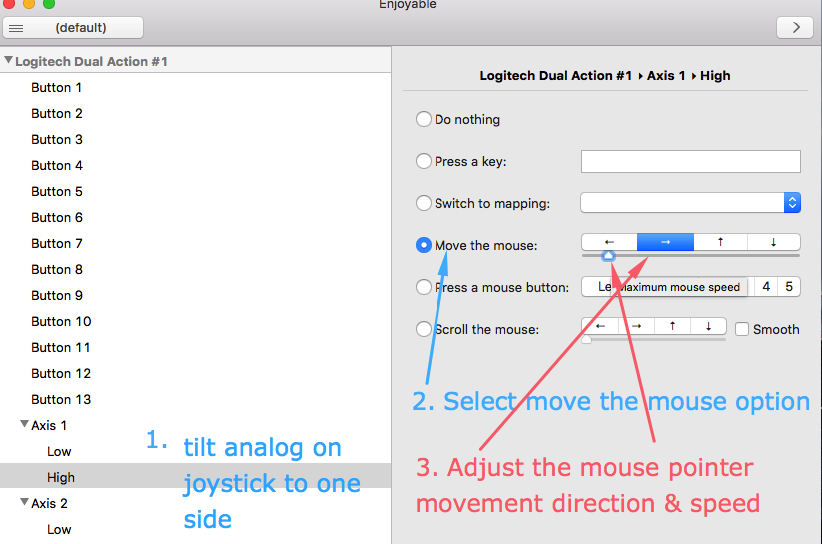
    • Incase you want to play via joystick or gamepad simply navigate to “OpenEmu” -> Preferences -> Controls and change input type from Keyboard to JoyStick.  (Click here for Screenshot)
    • Later map the joystick buttons and start playing!

    Click here to Download OpenEmu for Mac OS X (Compatible with all versions Sierra, El Capitan, Mavericks, Mountain Lion, etc.)


    NES Emulator # 2 – Nestopia

    Nestopia NES Emulator for Mac OS X
    Nestopia NES Emulator for Mac OS X

    Though OpenEmu is excellent, it sometimes takes time to load and needs to be clicked on “Reopen” to launch it. But no such problem exists with Nestopia. Nestopia is a simple, lightweight yet powerful free NES Emulator for Mac OS X.

    As Nestopia is concentrated only on NES Games emulation, it offers some extra features such as –

    • Ability to save game progress and start from the last save.
    • You can tweak the game ROMs to perform some non-game functions 🙂
    • Nestopia also has Zapper light gun support just like the Nintendo Classic.
    • FDS Emulation (Fabicom Disk Space)

    Click here to Download .dmg file app of Nestopia for Mac OS X (10.5 & later)
    Click here for tutorial to install .dmg apps on Mac (if you’re looking for method to install .dmg files on Mac OS X)


    NES Emulator # 3 – RockNes

    This is a PowerPC Application based NES Emulator for running NES Games on older Mac OS versions such as Snow Leopard and earlier. It can also be run on Mac OS X Lion using Rosetta, but cannot be run on the latest Mac OS X versions at all.

    So incase, if you’re using an Old version of Mac OS RockNes is the NES emulator to be used.

    Click here to Download .dmg file of RockNES

    So , these are the Top 3 Best NES Emulators for Mac OS X which will let you relive your childhood gaming memories that too at some MBs as the game size is very small as compared to modern games. If in case you have any problems using any of the above emulators, feel free to comment

  • How to Change or Remove Startup App Programs in Mac OS X [Remove Items from Startup]

    How to Change or Remove Startup App Programs in Mac OS X [Remove Items from Startup]

    Many apps or softwares upon installing automatically start-up each time when you restart & login or reboot into your Mac OS X. Some of these apps simply increase the loading time or startup time of your Mac system. Here’s a simple tutorial which will help you to change or remove apps which start up automatically in Mac OS X, read on below for method to change or remove items while starting Mac OS X.

    Tutorial – How to Change or Remove Start up Apps & Programs in Mac OS X –

    • Inorder to remove or prevent apps or programs from automatically starting up, we need to remove them from Settings or System Preferences, so first of all launch the “System Preferences” from Spotlight or from the bottom dock bar of your Mac system as shown below –
      System Preferences Mac OS X Dock bar
      System Preferences Mac OS X Dock bar

      Now, the System Preferences window will open up as shown below , Please click on the “Users & Groups” icon as highlighted –

      Select Users & Groups
      Select Users & Groups


    • Once you enter Users & Groups section, it will now show a list of all users registered on your Macbook / iMac mini system as shown below –
      Users registered in Mac OS X
      Users registered in Mac OS X

      Here, select the user for which you want to change the startup items or apps.

    • In the next stem, besides the highlighted “password” option, select the “Login items” option –
      Login Items Option Mac OS X
      Login Items Option Mac OS X

      It will now, show a list of all currently present Startup apps or programs which automatically start up when you log on to your Mac.

    • To Remove or Change any app from automatically starting up from your next login, select the name of the app by clicking in the “checkmark” box , and then Click on the Minus sign button below the app list window as shown –
      Remove Start up app Mac OS X
      Remove Start up app Mac OS X


    • That’s it ! the app will now disappear from the list and won’t start up automatically from your next log-in to your Mac OS X.

    The method works fine on all newer Mac OS X versions Mavericks, Yosemite , Mountain Lion, Snow leopard, El Capitan and even Mac OS X Sierra too. Incase if it doesn’t work for you feel free to comment in the article.

  • How to Configure any Gamepad / Joystick Controller on Mac OS X Free App

    How to Configure any Gamepad / Joystick Controller on Mac OS X Free App

    Using a Gaming controller or Gamepad on Mac OS X to play games isn’t easy. Mac OS X doesn’t support Xbox 360 (XInput) Controllers, while it does support Direct Input Gamepad & Joysticks PS4, PS2 , PS3 very few games actually support them. So, here’s an easy tutorial which will let you configure any gamepad or Joystick to play literally any game on your Mac OS X (MacBook Pro / iMac / Mac Mini) by emulating keypress (keyboard) and mouse-movements directly from your game controller.

    Tutorial to Configure any Gamepad Joystic on Mac OS X to Play any Game –

    Step # 1 – Downloading & Installing Enjoyable Gamepad controller app –

    • Inorder to play games which do not support Joystick input we need to emulate & map keyboard key press & mouse movements to our Gamepad / Joystick. The best & free app to map joystick to keyboard on Mac is Enjoyable, which lets you perform every bit of button press / mouse – emulation for your controller on Mac OS X .

      Click here to Download Enjoyable gamepad controller app for Mac OS X 

      Since, Enjoyable comes as an external app, you will need to open the .app file by “ctrl+click” on the Enjoyable app file, You can see the following link for more details on How to install external source apps on Mac OS X

    • Now, once you have installed the app , launch or open the Enjoyable app.

    Step – 2 Connecting & Mapping the Joystick controller buttons & analog

    • Now, connect your Joystick or PS2/PS3 gamepad controller once you have launched the Enjoyable app. It will now automatically detect your Joystick or Gamepad controller as shown in the image below –
      Gamepad detected in Enjoyable App
      Gamepad detected in Enjoyable App

      Now, once your gamepad is detected – You will see all the available buttons & analog controls available on your gamepad as shown in the image above. Now we need to map keystrokes & mouse movements to your gamepad.

    • To assign Keyboard keys & mouse movements to your controller
      1.  First press any key or button on your gamepad , The corresponding button pressed will now be reflected inside Enjoyable app as shown in the below image –
        Button Pressed highlighted in Enjoyable
        Button Pressed highlighted in Enjoyable

        Now, in the corresponding right hand side pane, By default “Do Nothing” option is selected , Change it to “Press a Key” for Keyboard key assignment , or to “Move the Mouse” for mouse movement. We will be using Press a Key option in our example for mapping joystick buttons.

      2. Now, after changing the option from Do nothing, to Press a key – The box will be highlighted by blue color as shown in the above image. Here, simply press the keyboard key you want to assign to the joystick button on your keyboard. In our example, we assigned the “S” keyboard input from W, A, S , D to our joystick button which looks like below –
        S key input assigned to Joystick button
        S key input assigned to Joystick button


      3. Similarly, press a new different button on your joystick or gamepad controller and assign the corresponding keyboard keys to emulate. Repeat the Steps for all joystick buttons except the analog controller.
    • To  Mouse pointer movements to Controller – Analog
      1. Now, to assign movements to analog controller, simply start by tilting your analog stick on your gamepad joystick to one side. The corresponding high or low value will now be shown on the Enjoyable app as shown in the below image –
        Configuring mouse using Analog input Enjoyable on Mac OS X
        Configuring mouse using Analog input Enjoyable on Mac OS X

        Here again change the value from “Do Nothing” to “Move the mouse” as shown in the above image.

      2. Now, give the direction you want the mouse pointer to move, when you tilt the corresponding analog stick, (Shown as step 3 in the previous image).
      3. Adjust the speed with which you want to move pointer.
      4. Now, repeat the steps 1,2,3 again but remember to tilt the the analog in different direction to map the inputs.
    • Once, you have finished assigning all the inputs , Simply press the ” > “ sign as shown in the below image (highlighted by red color) to start the mapping emulation –
      "Start
      button” class=”size-medium” /> Start the Joystick mapping by clicking > button

      Once mapping is started it will show a bold joystick sign on the topbar as highlighted by “blue box” in the above image.

    • That’s it! You can now enjoy any game with your gamepad controller or joystick even if the game doesn’t support it . The app and method works for all Mac OS X versions such as Mavericks, Mountain Lion, Snow Leopard , Yosemite , El Capitan as well as Sierra too!
    • Feel free to comment if you face any issues or encounter any problems
  • How to Clear Cache,Cookies for all Browsers on Mac OS X for Free using CCleaner App

    How to Clear Cache,Cookies for all Browsers on Mac OS X for Free using CCleaner App

    Browser Cookies, Cache & app caches start accumulating in the System as soon as you start using respective app or Browser. The Cookies & cache files not only decrease the available free storage on your system, but also slow down your system causing the app , browser or system to hang many times. The browser cache also contains your saved sessions “remember me” Thus, periodically clearing browser cache files & cookies is highly recommended for security purpose too. Here’s a complete tutorial on How to Clear cache files & cookies for all browsers for free on Mac OS X using CCleaner app

    Tutorial to Clear Cache & Cookies for any Browser on Mac OS X by CCleaner –

    • CCleaner is a leading app for windows to clear cache & temporary files. Besides, it can also be used as an uninstaller app for Mac OS X. Thus, we will be using it to clear cache & cookies.
    • First of all, Please download & install CCleaner app for Mac OS X from the link below –Click here to Download CCleaner app (.dmg) for Mac OS X .
      Here’s a simple tutorial on How to install .dmg app on Mac OS X.
    • Now after you have installed CCleaner app by dragging and dropping the CCleaner app by dragging & dropping icon on Applications folder, please launch the app.
    • Make sure that the “Cleaner” option from the left menu app is selected, app will show a window with the “Mac OS X” & “Applications” tab as shown in the image below –
      Mac OS X App Cache Clear
      Mac OS X App Cache Clear

      Now, select the app name & options which you want to be deleted – e.g Browser Cache, Browser Cookies & tap on the “Analyze” button

    • The app will now analyze the system for temporary cache files & cookies for the previously selected app which can be deleted to free up space, without any compromise on the system performance and functioning.
    • After the analysis is completed, it will now show a list of files which can be deleted and the amount of space which can be freed up as shown in the image below –
      CCleaner for Mac OS X (Browser cache & cookies)
      CCleaner for Mac OS X (Browser cache & cookies)

      Here on the analysis complete page , Click on the “Run Cleaner” button as highlighted in the above button to start the cleaning process.

    • That’s it! You have now successfully cleared cookies, & cache files for any browser or app on Mac OS X for Free!
      Successful Cleaning of Browser Cache & Cookies on Mac OS X
      Successful Cleaning of Browser Cache & Cookies on Mac OS X

      Making your system faster and even increasing available free storage!

    Thus, CCleaner is a very utility free app to clean cache, cookies on Mac OS X. Though there are many such clear cookies app but very few are free & are as functional as CCleaner. Enjoy a faster Mac OS X (Sierra, Mountain Lion, Snow Leopard,Yosemite, El Capital etc)

  • 3 Best Free Uninstaller Apps for Mac OS X for Software Removal

    3 Best Free Uninstaller Apps for Mac OS X for Software Removal

    Mac OS X is very neat when it comes to uninstalling or removing apps – Simply dragging an app icon to trash bin icon uninstalls the app. However, not all files related to an app are deleted or removed when you uninstall an app.

    This results in waste of storage space and may reduced speed for your Macbook / iMac mini. In order to avoid these problems, it is recommended to uninstall apps from Mac OS X using app uninstaller or software removers.

    So here are the Top 3 Best Free Uninstaller apps for Mac OS X to uninstall all type of apps – .dmg, .pkg apps & remove the softwares.

    Top 3 Best Free Uninstaller apps for Mac OS X to uninstall apps for Software Removal


    App Uninstaller for Mac # 1 – CCleaner App 

    CCleaner by Piriform is a very neat app to free-up storage space on your Mac OS X device by deleting and clearing cache & temp files.

    CCleaner comes in with app uninstaller too, to remove an app via CCleaner –

    1. Navigate to “Tools” option from left hand menu pane.
    2. Select the “Uninstall” pane.
    3. Here select the name of Application which you want to install from the app list , and then click on the “Uninstall button”.
    4. That’s it you’re app will be uninstalled.

    This is perhaps the most convenient way to clean up storage on your Mac OS X and uninstalling apps –

    Click here to Download App (.dmg file) CCleaner Free Version for Mac OS X  .
    Here’s an easy tutorial on How to install app from .dmg file on Mac OS X


    App Uninstaller for Mac # 2 – App Cleaner (Free)

    App Cleaner for Mac OS X
    App Cleaner for Mac OS X

    App Cleaner is perhaps the most oldest of mac uninstaller apps and is available for all Mac OS X versions 10.4 & later. It has been tested and found to be working on Mavericks, Snow Leopard, Mountain Lion, El Capitan, as well as Sierra too.

    To uninstall any app using App Cleaner – simply launch AppCleaner app and then drag & drop the icon of app you want to install into App Cleaner window to Uninstall app!.

    That’s it! you’re app and all its traces of files will be uninstalled.

    Click here to Download App Cleaner free for Mac OS X 10.10 & later.

    Click here to Download App Cleaner free for Mac OS X 10.6 – 10.9.

    Click here to Download App Cleaner free for Mac OS X 10.4 & 10.5.


    App Uninstaller for Mac # 3 –  App Trap for Mac OS X 

    App Trap for Mac OS X
    App Trap for Mac OS X

    Instead of classifying as a stand-alone uninstaller , App Trap for Mac can be categorised into a useful uninstaller plugin.

    App Trap attaches itself into “System Preferences” – > Users – > “Login Items” , and needs to be enabled.

    When enabled from the settings , the next time you try uninstalling an app from Mac OS X by dragging app into Trash bin. It will ask you to delete additional trace files which are not necessary as shown in the alongside image.

    Thus, effectively completely uninstalling the App from your Mac OS X device – MacBook Pro/Air / iMac (Mini) etc.

    Click here to Download App Trap for Mac OS X


    So, these are the Top 3 Best Free Mac Uninstaller apps which will help you to completely uninstall or remove an app from Mac OS X. If you know of any other such app or encounter any problems while using these feel free to comment. Working fine on Mountain Lion, El Capitan, High Sierra, Mavericks


  • How to Merge or Combine Multiple PDFs for Free on Mac OS X (Join Many PDFs into a Single One)

    How to Merge or Combine Multiple PDFs for Free on Mac OS X (Join Many PDFs into a Single One)

    Many times we need to combine or merge multiple PDFs into a single one, but are unable to do so due to the different PDF page orientations or types of PDF Files. Here’s an easy tutorial on How to combine or merge Multiple PDF files into a single one on Mac OS X for Free using PDF Merger Mac . The app is small , easy to use and works on all Mac OS – Mountain Lion, Snow Leopard, Mavericks, El Capitan & Sierra too!

    Pre-Requistes : 

    • Although, you can use Preview app to merge multiple PDFs on Mac, but it doesn’t work all the time. So, we use a small free app – PDF Merger Mac :
      Click here to Download PDF Merger Mac app for Mac OS X ( .dmg file) 
    • Now, install the .dmg file of app by opening, it & dragging the PDF merger Mac icon onto Applications icon as shown in the image below –
      PDF Merger Mac OS X
      PDF Merger Mac OS X

      Alternatively, you can check out this tutorial on How to install .dmg app file on Mac OS X , if you face any problems while installing app on your MacBook Air / Pro or iMac.

    How to Merge multiple pdfs into one using PDF Merger App –

    1. Once, you have successfully installed and launched the PDF Merger App, first of all we need to add the PDF files we need to Merge or combine.  To Add files –  You can either drag & drop the PDF files to Merge  or Click on “Add” button and then select the PDF files to merge as shown in the image below –
      Step 1 - Add Files to PDF Merger Mac
      Step 1 – Add Files to PDF Merger Mac


    2. Step 2 –  Now, after adding the files to the App – We need to decide the order in which we have to combine. Inorder to decide the order, select the file which you want to move & click on the Move Up / Move Down” button to decide the order as shown in the image below –
      Decide the Order of Merge by Move Up / Move Down
      Decide the Order of Merge by Move Up / Move Down

      Thus, you can even customize the order for combining the PDFs.

    3. Step 3 – Deciding output path & file name – Now, we need to decide the file name & output path of the PDF by using the “Combine PDFs to”  option as shown in the image below –
      Combine PDFs to Option for PDF Merge Mac
      Combine PDFs to Option for PDF Merge Mac


      1. First specify the path & file name of PDF file as shown in the above image.
      2. Then click on the “Save” button to save the path.
    4. Now, once you have entered the filename & location after clicking on “Save” button , Simply click on “Start Now” button as shown in the image below –
      Click on Start Now button to Start Combining PDFs
      Click on Start Now button to Start Combining PDFs

      That’s it ! you have successfully Combined multiple PDFs into one on your Mac OS X . If you face any problems or encounter any issues feel free to comment.

  • MacPaw CleanMyMac 3 Review : Efficient Cleaner for Mac OS X

    MacPaw CleanMyMac 3 Review : Efficient Cleaner for Mac OS X

    Mac OS X is very lean and fast, But however lean or fast the Operating System is its still bound to get some junk files which need to be removed. These junk files not only take up space on your hard-drive, but they even slow down your system. In this article we will be reviewing MacPaw’s Clean My Mac 3 for Mac OS X . We have tested this on Mac OS X Mountain Lion, Mavericks & Sierra too. Here’s a detailed CleanMyMac 3 review –

    Method of Reviewing –

    How to clean up Mac OS X using Clean My Mac ?

    • After installing & running CMM app , it greeted with the interface as shown in the image below –
      Clean My Mac 3 Mac OS X
      Clean My Mac 3 Mac OS X

      It was prompting us, to click the Scan button, so to start the process Click on the “Scan” button as highlighted in the above figure.

    • Now, it will start scanning your system for cache memory, dump files , system junk & iTunes junk and will show how much area can be freed up by clearing each of the above places as shown in the figure below –
      Scanning Result of Clean My Mac 3
      Scanning Result of Clean My Mac 3

      which in our case was “4.86 GB!” which is a really big amount of junk data.

    • Now Simply , Click on “Clean” button and yo! All your Junk files and unwanted data is removed within split seconds.
    • Thus, Clean My Mac was able to clean up our hard-drives and was able to recover 5 GB of disk space out of 150 GB which is really a good ratio.
    • Click here to Download .dmg for Clean My Mac 3 for Mac OS X Mountain Line, Mavericks & Sierra.

    Final Take – Clean My Mac 3 performed the cleaning tasks efficiently and it did recover a good amount of Disk Space for us, besides that it even contains a Disk file Shredder which really permanently deletes a file instead of temporary removal (file-deleted by shredder cannot be recovered by file recovery software) and thus is a good security practice.

    The version we used for review was paid and was sponsored by MacPaw and you can get Clean My Mac 3 by purchasing from here.,

  • How to Access & open YouTube website in Material Design view!

    How to Access & open YouTube website in Material Design view!

    Google has confirmed that its testing the material design on YouTube. This re-designing of YouTube layout took almost 2 years to come and is currently in Beta. However, You can access this Beta version on your PC or Windows Computer and even Mac OS as well by a few tweaks. Here’s a small guide which will enable you to Access & Open YouTube website in Material Design View .

    Pre-Requisites –

    • Preferably Google Chrome Browser , although We tried and it worked on Chrome & Mozilla Firefox as well.
    • A Simple Extension for editing the Cookies , We recommend Edit this Cookie extension.

    Method to Access YouTube Material Design Website –

    • First of all Download & Install the “Edit This Cookie” extension from Google Chrome Store / Opera Store / Mozilla Add-ons repository from the links below –
      Click here to Download Edit This Cookie extension for Google Chrome
      Click here to Download Edit This Cookie Add-on for Opera.
    • Once you have installed the extension , it will add a cookie icon in the address bar of your browser.
    • Now, either sign-out of all your Google Accounts on your browser, or simply Open a New Incognito Tab.
    • In the incognito window or once signed-out of your account, Navigate to the below YouTube USA URL by clicking the link below.. (The Material design view tweak currently only works on the US URL Below) –
      https://www.youtube.com/?gl=US – Click here to Open the YouTube USA URL
    • Here comes the Main Part.. Once you have opened the YouTube USA Link in incognito window – Click on the “Cookie” button in the right-hand top corner and look for the option labelled “VISITOR_INFO1_LIVE” as shown in the image below –
      YouTube Material design Cookie
      YouTube Material design Cookie

      Here expand the “VISITOR_INFO1_LIVE” option and delete the existing text inside the “Value” box, Replace the text with “Qa1hUZu3gtk” without quotes. It should look like shown in the following image –

    • YouTube VISITOR_INFO1_LIVE
      YouTube VISITOR_INFO1_LIVE

      That’s it ! Now simply “Click on the Checkmark button” at the bottom and reload the YouTube USA Page!

    • Voila! .. You’ll see the New Material Design of YouTube loaded right in your browser.. as shown in the below image –
      YouTube Material Design
      YouTube Material Design

      You can even use options search as search and view the redesigned Channel Pages .. They look absolutely stunning – For example below is the screenshot of IPL 2016 YouTube channel –

      IPL 2016 Material Design Youtube
      IPL 2016 Material Design Youtube


    I Personally, liked the new YouTube design 🙂 , Did you like it ? What are your views ? Do let us know if you face any problems while accessing the new layout.

  • Top 3 Free Finder alternative File Managers for Mac OS X

    Top 3 Free Finder alternative File Managers for Mac OS X

    Finder is the default File Manager for Mac OS X , but we found some of the features inside finder a bit cumbersome such as automatic extraction of zip files while trying to open them, lack of rar files support. So here are the Top 3 Free Finder alternatives – File Browser and File Explorers for Mac OS X which will make your work easier and experience smoother .

    Top 3 Free File Managers for Mac OS X –

    File Manager # 1 –  Commander One

    Commander One – Browsing RAR Archives

    Commander One is one of the most powerful file explorer for Mac OS X and is a great alternative to Finder. Besides containing the essential features such as ability to browse files inside the Mac OS X , it also contains some salient features such as –

    • Dual Pane file navigation (Very useful features as you can browse two file paths simultaneously) in a single window.
    • Ability to preview the contents of zip files, so that unlike finder you can only extract the required content of zip file to a folder, thus saving Hard disk space.
    • Ability to Extract & Preview Rar archives.
    • Besides these Commander One even supports MTP file management & transfer which isn’t supported by default by Mac OS X.
    • Thus, If you have an Android device you can easily browse and transfer files in MTP mode on Mac OS X using Commander One. This feature is even more essential for Windows Phones as well.
    • Also Commander One even supports cloud storage navigation such as Dropbox, Amazon S3 in its pro version but normal users are fine without that.
    • Works on Mac OS X El Capitan as well without any external dependencies required.

    Click here to Download Commander One .dmg app for Mac OS X.

    Please Click here For tutorial on How to Install .dmg files on Mac OS X


    File Manager # 2 – Moroshka File Manager for Mac OS X

    Moroshka File Manager

    Moroshka file manager is another great alternative to finder or commander one. Infact we found Moroshka File Manger more user friendly than Commander One, and feature rich as well. Some of the features we liked the most are –

    • Dual Pane File Manager with a Chrome like tab interface so that you can navigate to multiple locations within a single window itself.
    • Besides these Moroshka File Manager also comes in with a rar archive extractor and previewer. (Green Box in alongside Image).
    • One of the most striking and powerful feature we liked about Moroshka File Manager is its “Quick Look” option.
    • The “Quick Look” option allows you to easily view Microsoft Office documents such as .pptx or .xls even without installing the Microsoft Office app.
    • Though, its not possible to edit the Microsoft Office files its ability to view them despite being only 4 mB in size in worth noting.

    Click here to Download .dmg of Moroshka File Manager app for Mac OS X. 

    Click here to Download & Install Moroshka File Manager from Mac App Store.


    File Manager # 3 – Files Lite for Mac OS X

    Files Lite App for Mac OS X
    Files Lite App for Mac OS X

    Files Lite is yet another easy to use File Explorer for Mac OS X. The best thing about Files Lite is it makes navigating to your files a much easier task due to its dual list view, We found it the most easiest of all apps we tested to browse and navigate through the files.

    Besides this, the Quick View of excel spreadsheets and presentations already make it a great alternative to finder.

    Some of the features such as Batch Rename, Calculate Checksum are limited to pro and not available in the lite version. But the lite version nevertheless will get the job done for most normal Mac OS X and MacBook Air & Pro users.

    Click here to Download Files Lite app from iTunes Mac App Store.

    So, These are the Top 3 Free Finder alternatives for Mac OS X or Alternative File explorers for Mac OS X, which are compatible even with the latest Mac OS X updates (Mountain Lion, Yosemite , Mavericks & El Capitan too). We didn’t mention Total Commander as it provides a free trial only for first 30 days. If you face any problems while using them or face any issues feel free to comment.