ADB Android Debug Bridge & FastBoot drivers are required for flashing ROM’s, Changing Recoveries, Installing apps etc. It is very tiresome to install these tools via the default SDK Manager as downloading SDK requires 100 mB of data, while the things we require are of roughly 1mB. So, here’s Compact ADB & Fastboot Android Drivers installer for Windows 7 , 8 , 8.1 & Windows 10 (32 – bit & 64 -bit both supported).
Some, Salient features of our Compact ADB & Fastboot Installer are –
Compact ADB Desktop Icon
One-click single Installer which installs required ADB & Fastboot drivers in split seconds.
No need to manually configure Path, the Installer does it all by itself.
The automatic configuration of environment Variables allows you to use ADB & Fastboot commands in any directory.
Uses the latest tools from Android SDK which work on all Android versions.
The ADB & Fastboot can be used for Adroid Kitkat , Lollipop and Android Marshmallow as well.
Download Compact ADB & Fastboot Installer from Above links.
Double-click to open the Installer & click on “Next” , and finish.
That’s it! your ADB & Fastboot drivers are successfully installed. no need to configure anything.
Optionally you can also launch the shortcut from your desktop to directly type in adb & fastboot commands.
Note!! : Please launch the Desktop Shortcut / or Use ADB “only in Run as Administrator” mode for the proper functioning as shown in the image below –
ADB = Android Device Bridge is a tool used to communicate to your Connected Android device. It can be used to completely browse your Android device via USB Connection, Install & uninstall apps. Reboot into Recovery mode etc.
Fastboot = Fastboot is an alternative recovery protocol which can be used to boot into different recovery modes. CWM & TWRP etc.Besides, these Fastboot is also used for solving Bootloop issues.
The Nintendo Entertainment System (NES Console) was perhaps the Best source of Joy & Happiness for a 90’s Kid, it was atleast for me and some of the greatest games such as Super Mario Bro’s , Super Contra , Tanks 1990 and many others were available very easily. These NES Games though lack in Graphics, Gameplay as compared to Today’s games but when it comes to giving a competition to the new Games they give a good punch to them be it in Competity Level, or be it Fun & Adventures. So, In this article we bring you the Top 5 Best Free NES Emulators for Windows 7 & 10, so as you can Play NES Games on your Computer without the need of having a NES Console. And ya , not to forget all NES Games are actually 8-bit ROM’s (or max kB’s) and these emulators size anywhere between (1 mB- 5 mB) so in a few mB’s you can get 100’s of games where a typical new game would easily cost few GB’s .
Note : These emulators don’t come in with in-built NES games (ROMs) , so if you need to play any game of your choice , you may need to download ROM for playing on the emulator . NES games roms are freely available on the following links – RomHustler.Net , FreeRoms.Com and you can search on google too for Nintendo or NES roms.
Top 5 Free NES Emulators for Windows 10 / 8.1 / 7 to play Nes Games on PC / Computer
FCEUX Nes Emulator comes with a lot of exciting features, makes your gaming Fun! . FCEUX is pre-loaded with features such as hex editor , Debugging mode, Video recording , Full Screen view, Joy Stick support and so on..
Some Salient Features of FCEUX Emulator are
FCEUX can load files of NES, UNF, NSF, FDS, RAR, ZIP and GZ formats.
Support for various Gamepad , And Joystick controllers.
Input Configuration is provided to set up controllers.
Presets for custom controls are available for your preferences.
It can save any game at any point.
Recording option is available both audio and video.
The Emulator works on any Version of Windows XP and later, we ourselves tested the same on WIndows 8, & Windows 10 64-bit.
Nestopia is one emulator which is handy as well as good. Its very light on resources, has ability to custom resize the game video rendering screen as well as an auto-saver as well so that your game status is automatically saved.
Below are some Salient features of Nestopia –
Cheat code support.
Well-organized interface.
Wide range of options.
Customizable controls.
It can connect external devices.
Simulateously Four players can play a single game via keyboard.
The active development of VirtuaNES stopped wayback in 2007, but it still doesn’t hamper its compatibility nor it needs active development as it still works flawlessly on Windows 7,8 and even Windows 10 too!. Now coming to the features – VirtuaNES is highly customizable with features such as –
External Gamepad & JoyStick Support.
Active Cheat Code Support.
Support editing memory hex locations so that you can even try out new cheats!.
Supports Full-Screen play as well as resized windows adjustment.
Jnes is one of the extensively used NES emulator, It is not only widely used but is also wuite stable. Jnes comes with pack of features, and is probably the only emulator which has an Android App as well, Thus, the large fan following ensures that you get the best features each time-
It supports NES or NSF format in order to load the game.
jNES allows you to use controllers in order to recreate the gaming experience.
jNES NES Emulator allows you to adjust sound by enabling the sound channels that you want to hear.
Now the name of this emulator is really brainy as it conveys what it does in some style. Nintendulator is a NES System emulator written entirely in C++ , which makes the emulation as realistic as possible with great speed! . This emulator impressed us on the following features –
Inbuilt Game Genie support for auto-play.
Inbuilt USB Gamepad support! (Now that’s really cool).
Soft-rest & hard-reset as found on the original console.
So, these are best Nes Emulators because we came across after our trials and choose the best among those. Try them , they all are free to use and go into the past to enjoy those moments!
NOTE : Just in case, If you do not understand any part of the post or tutorial, Do not hesitate to contact us via email or comments.
Whatsapp is the most leading app being downloaded on the Apple iStore,Google Play Store and Nokia store , thus its one of the most leading medium of communication and instant messaging. but many people still cannot afford those smartphones or may want to use whatsapp on PC /Windows/Linux/Mac , though there are workarounds such as installing an android emulator (e.x bluestacks,andy) and using whatsapp on it, its quite RAM and resource heavy plus it doesn’t satisfy the ease of PC . hence to overcome all these limitations, We came up with an unOfficial Whatsapp client – Whatsapple!
Without wasting time, let me pen down the features of Whatsapple –
Whatsapple is an easy to install and configure unofficial client of whatsapp for PC built on the base of Pidgin Messenger.
It provides all the features of Whatsapp,such as file upload/download, Individual Chat as well as GroupChat etc on PC.
Now, you can view the shared videos and photos/images directly on your PC.as well as Upload Videos/Photos(Images) to the chats directly from the PC!
All the Default Smileys of Official Whatsapp App are Supported, thus you can view the Smileys send as well as send emoticons to the Chat 🙂 .
As Whatsapple doesn’t require any Android emulator its blazing fast! and light on your PC 🙂 . Thus, any PC right from Windows XP to the latest Windows 8.1 all can run it :).
You can add unlimited contacts, no need of any complex emulator things like bluestacks,andy etc.
No limit of bandwidth or memory as is the case with phones, the big memory pool of PC practically ensures you will never run out of Memory for storing messages,logs ,photos,videos anything.
The Whatsapple client will never hang in most cases irrespective of how many messages arrive simultaneously.
And ya, the Installation size is just 10Mb which is even lesser than the apk file size of Whatsapp 😛
Prerequisites –
Windows OS , and .Net Framework 4.0 Installed ( Required for Generation of Password Only )
We will need an Whatsapp Username and Password , as we all know whatsapp username is the mobile number with the Country Code ,
e.x for an mobile number in India , the Username will be “91XXXXXXXXXX” where XXXXXXXXXX is the 10 digit mobile number .
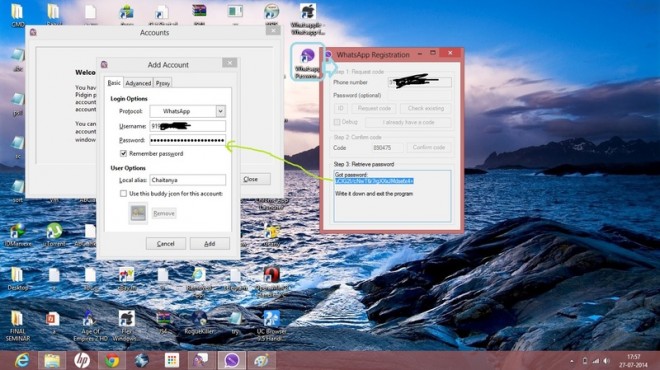
For the password, we will need to Generate it one time as Whatsapp requires one time Registration , So first for Generating the Whatsapp Password Open the “Whatsapp Password Generator” from the Desktop.
Now, Enter the Mobile Number and click on “Request Code” button as shown in figure below.
Now ,you will receive a confirmation code on the mobile number , Now enter the verification Code received in the text box next to Code and click on “Confirm Code” Button.
Now a dialog box appears showing you the Whatsapp Password and asking you to write it down,but don’t write it down, click on ‘OK’ and Now copy the Generated Password from the “Step 3″ Area of the Whatsapp Password Generator /WARP .
Now, once you have obtained the Username and Password Launch the main “Whatsapple for PC” Main exe from the desktop .
Here, click on Add and add the Username and Password we generated in the Window, you can tick the “remember password” option while adding so as to there’s no need of generating password everytime . Check the figure shown above for details.
Now click on add,after the account is added click on close! and voila! you will be logged in and can use Whatsapp on PC for Chatting.
Method to Chat with a New Number or add Contact Name –
Click on Buddies then select New Instant Message , Now Give your friend’s phone number with country code and Click on the OK button. And you can Chat with him/her.
To add a Contact Name to a Number
Click on Buddies ,Navigate to Add Buddy , Here please enter your friend’s phone number with country code and provide other details > Click on Add button.
To Upload or send a File/Photo/Image/Video : Use the send File / Upload Media option present in the “File” Menu of the Live Chat Window , of the Contact or Group to which you want to send the File .
Thus, this is i guess by far the most easy,and efficient and Simple way to use Whatsapp on PC .
If you have any doubts/queries/suggestions feel free to comment 🙂
Solution to the Server closed the connection Problem – Solved by our reader Steve
Login to Whatsapple – Whatsapp for PC than go to > Accounts>Manage Accounts > Click on your accoun.Than Modify Account>than go to Advance tab change on the server instead of “Android-2.11.151-443″ enter “Android-2.31.151-443″ that’s it.
Update : People who still cannot get Whatsapp working can try running it on Firefox by referring this article .
Hello everyone, in my last post i had written about Opera Mini for PC with Handler UI , many users then asked me for UC Browser for PC with Handler support, so here’s it, which many requested for – UC Browser PC – Windows7/8/8.1/9/XP with Handler UI . Although UC Browser HD is available for Windows 8/8.1 devices there’s a big difference between the featureset of this UC Browser and the Windows Appstore UC Browser HD such as
Features of UC Browser 9.4 for PC
Handler UI for applying network tweaks .
UC Browser boasts of the Best Download Manager, so its Ideal for Downloading big files.
In-built Night Mode for Dim-Light browsing.
Pages are Optimised and Rendered by the UC Servers, thus reducing the Data Usage.
Advanced Network Settings,UI settings present.
Single Click installer/Setup works on All version of Windows 7/8/8.1/9.
No need of any external Java/Android emulator.
Pages are rendered with blazing fast speeds,compared to UC Browser HD.
Requirements : Java Run-time Environment or JRE must be installed on your System, if not installed,you can download and Install the JRE which can be downloaded from this URL .
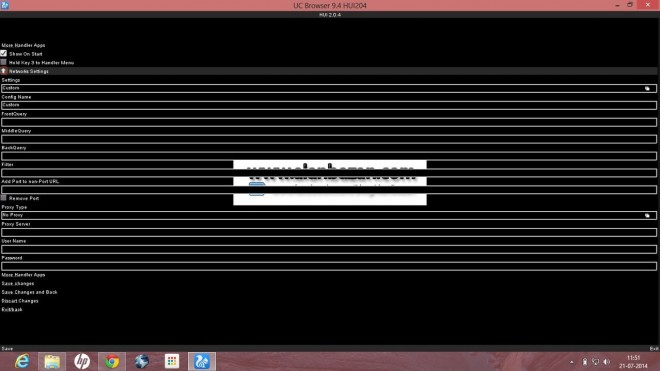
Procedure : After you have downloaded and installed the JRE , Download the UC Browser for PC Setup from here, and install it . After installing just Double click the UC Browser icon and enjoy your favorite browser on your PC. [ You may need to save the settings upon your first Run as shown in the figure below]
Now, here you can simply hit save and click continue or change the Pinger settings/Handler Settings and continue to using your UC Browser :).
Note : Press “Ctrl+O” anytime while using to navigate to the Settings.The Same Settings are used to configure Proxy settings by using (Ctrl + O).
The JRE based UC Browser 9.4 Handler for PC can be downloaded from here –
Opera Mini is the most widely used browser for mobile devices ,and boasts of some unique features.Using Opera Mini on PC can be more than handy or useful for PC users too such as
It uses Opera servers to cache and display the web pages, thus, the servers act as a proxy and helps to unblock sites such as facebook etc, if they are blocked on the Network.
The server caching also enables Data Compression which uses Data usage by almost 80% thus reducing the Data Usage as well as increasing the browsing speed manifolds 🙂
Handler menu can be used to change/modify various network headers and parameters.
JavaScript,Ajax-script etc are run/executed on the server side and thus this helps in speedy browsing on lower configuration PCs without the fear of System hang.
Method to Run/Install Opera Mini Handler on PC
Method #1 . Using JRE + Opera Mini for PC by Alan Bazan
Requirements : Java Run-time Environment or JRE must be installed on your System, if not installed,you can download and Install the JRE which can be downloaded from this URL .
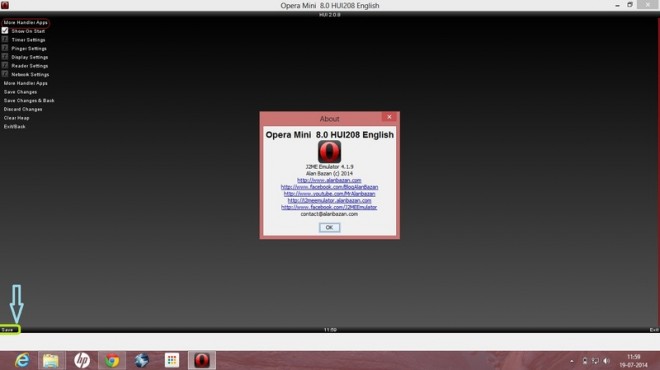
Procedure : After you have downloaded and installed the JRE , Download the Opera Mini for PC Setup from the download links, and install it . After installing just Double click the Opera Mini icon and enjoy your favorite browser on your PC. [ You may need to save the settings upon your first Run as shown in the figure below]
Now, here you can simply hit save and click continue or change the Pinger settings/Handler Settings and continue to using your Opera Mini :).
Note : Press “Ctrl+O” anytime while using to navigate to the Settings.The Same Settings are used to configure Proxy settings by using (Ctrl + O).
The JRE based Opera Mini PC Browser can be downloaded from here —
Method #2. Using Opera Mini directly in Google Chrome/Firefox/Web Browser
Yes, you can use Opera Mini in your browser too, that too without Installing , by following these Simple steps —
Requirements : Install JRE or Java Runtime Environment on your system . If JRE is already installed please Skip this.
Now Navigate to the URL : http://demo.opera-mini.net/public/ on your Browser and Opera Mini will start Loading right on your browser! No need of installing it 😛 . Sometimes, the JRE may show security error in such cases please Go to Configure Java in your System , and Reduce the Security to Medium as shown in the Figure below(You can also see the Opera Mini running in the Background 🙂 ) –
Thus, these are some of the Most easy methods to Run / Install Opera Mini on PC , if Any doubts/queries/suggestions feel free to comment 🙂
Hello friends, recently we were introduced to lex and yacc parsers in our syllabus, but the introduction to lex and yacc [flex and bison] was made in linux environment . Personally, I didn’t felt necessary to Install the Complete Linux OS on my Laptop just because to have gcc/lex/yacc libraries which are a mere 30 MB size , and to allocate 10GB Disk Space + RAM[in Virtual Machine] to Linux is something which i am not very Fond of 🙁 . After searching on Sourceforge, I came across the MinGW [ Win 32 Port of cc/gcc/g++] and the GNU-Win32 ports of flex[lex] and bison[yacc] respectively. So in order to make it easy to use and install i Packaged all of them into a single one click installer – Flex for Windows 7/8/10
Contents / Salient Features of Flex Windows
In-built GCC/G++/cc Libraries of Linux : The Flex Windows Package contains inbuilt Gcc And g++ libraries [c and c++ compilers] which are ported to windows officially by MinGW and are actively developed by the Linux Open Source Community
Lex and Yacc Package Binaries : The package contains the latest updated versions of Lex and yacc binaries [flex and bison] which are developed by their developers . The original binaries are included as-it-is in the package so as to ensure smooth and error free compilation and build of your Programs.
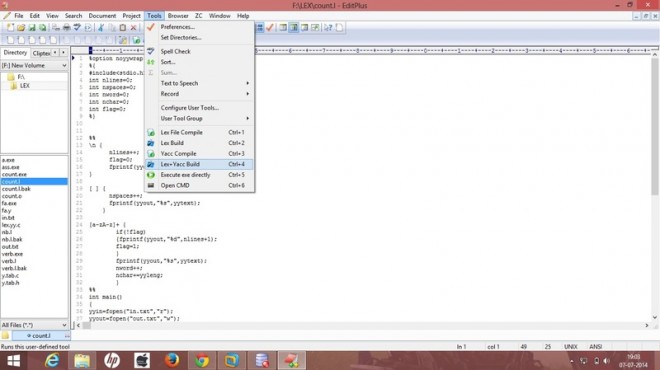
Pre-Configured EditPlus IDE : The package also contains EditPlus IDE which contains pre-defined Blank templates for the Lex/Yacc/C/C++/Java Files, thus each time you want to type a program you can simply use the New Lex / New Yacc template, and the basic code will be inserted thus saving your time and efforts to type :P.
The EditPlus IDE also contains user Commands for Lex Compile,Yacc Compile,Lex Build , Lex+Yacc Build, Band for Execute. thus, saving your time to type complete commands like “lex abc.l” or cc lex.yy.c y.tab.c -o <object file>” blah blah..” you can simply click the Buttons according to the function you wanna perform and the command will be executed, the command itself will insert the filename,parameters etc 🙂 Amazing! isn’t it ? And to top it off the IDE will capture the command output , errors if any will be shown in the IDE window itself ,thus you can easily change the code,save and compile in split seconds making it easy and pretty much like Geany/Eclipse/Netbeans 🙂
If it still doesn’t impress you , you still can open CMD and compile and build the hard-old-fashioned way 🙂
No need to Set PATH variables , the PATH variables , for the gcc/lex/yacc are added by the installer itself, thus saving the efforts required to set PATH 🙂
Single installer , works on all version of Windows., here’s a Snapshot of the Flex for Windows in Action
Make Sure you install the Package in any folder except “Program Files” / “Program Files (x86)” The Package won’t work if installed in Program Files.
The Windows Lex Version requires “%option noyywrap” , Please make sure this option is present , before you compile Programs.
The “-ll” and “-ly” arguments won’t work in Windows as they are not required in Windows Environments.
If the IDE Lags/Code doesn’t respond on compile command , Please re-run the FlexIDE as “Run as Administrator” .
Method to Run Programs through IDE
Some users have reported difficulty using the package for running the programs or giving the inputs, hence we are simplifying the instructions to run the programs below. In some cases you may find that the program terminates after executing after getting inouts from console if compiled and executed through IDE, In such cases the CMD way is recommended for executing .
Case 1 : Only lex Programs need to be run and built and executed
Click the compile lex button in the IDE.
Click the build lex button.
Click on Execute .
Alternate way through CMD
Click on Execute CMD directly button in the IDE.
Compile the Lex File by typing the command lex <filename>.l
Build the Lex File by gcc/cc command in the CMD e.g gcc lex.yy.c -o <executable name for program>
Execute the program by typing <executable name for the program>.exe
The -o <executable name for program> parameter is optional, you can skip the said parameter by directly building by gcc lex.yy.c
and then directly execute your program by typing a.exe
Case 2 : Both Lex and Yacc Programs together have to be linked and Compiled – Executed
Compile the yacc program by the compile yacc button from the IDE.
Compile the Lex program by compile lex button.
Build the program by clicking the “lex-yacc” build button.
Click on Execute button.
Alternate way through CMD
Click on the Execute CMD button in the IDE.
Compile Yacc file by typing command yacc -dy <filename.y>
Compile the Lex File by typing the command lex <filename>.l
Build the Lex File by gcc/cc command in the CMD e.g gcc lex.yy.c y.tab.c -o <executable name for program>
Execute the program by typing <executable name for the program>.exe
The -o <executable name for program> parameter is optional, you can skip the said parameter by directly building by gcc lex.yy.c y.tab.c
and then directly execute your program by typing a.exe
The binaries are provided as it is , so they cannot contain any errors, However if you face any errors/problems while installing or running, do comment 🙂 we will try to solve it . If you have any doubts/suggestions do leave them behind in comments 🙂
UPDATE : All yacc fixed in this new version — New Update to sequence for Activations by Maria —
“select the name.l -> click on Lex Compile -> click on Lex Build ->
-> select name.y -> click on Yacc Compile – click on Lex + Yacc Build ->
-> click Execute exe directly or Open CMD (typing the name)”
Hello Friends, recently while searching on the internet i came across this thing called as Borland Turbo Pascal 7.0 which is an IDE cum Compiler for running and compiling Pascal language .pas files, Although pascal is taken to be one of the dead programming languages, Pascal is still used widely for education purposes due to its similarities with C and easier to understand programming structures and flows. but as Turbo Pascal 7 doesn’t work on 64bit OS such as Windows 7/8/8.1 and it works small window in 32bit OS , i have created this installer — > Turbo Pascal 7 for Windows 7|8|8.1 by TechApple.Net
Salient Features of this installer are
Easy to use , and user friendly Borland Turbo Pascal 7 is used and that too runs fullscreen!
World’s most preferred Simple Pascal Language Compiler..that too on a single click installer !!
Works On All Versions of Windows, Windows 98,Windows 2000,Windows XP,Windows 7 [64 bit as well as 32 bit] As Well as Windows 8 and 8.1 too [both 64bit and 32 bit]
No need of installing DoSBoX and configuring or mounting anything! Everything right from DosBox to running turbo Pascal is built-in and the installer processes it automatically!
Thus , everything is automatic bundled in a single installer!
Useful For Students as well as Teachers and Professionals.
You can save the program directly within it,and open it next time From the Software itself for editing/Use.
You can Change the Units and TPDU Directories from the IDE if you want to..
Hello Guys, recently i had to submit a seminar report in my college, but it was to be written in LaTeX.. Now what is LaTeX ?
LaTeX is a document preparation system and document markup language,used for preparing standard documents,which are preformatted , in an efficient and easy manner..
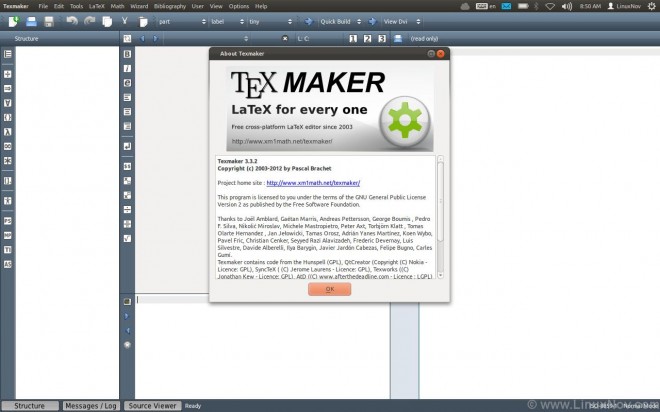
So Now for installing LateX on windows it was quite difficult as it required a separate latex compiler,a separate IDE etc,and also the information regarding which compiler to be used,which IDE/editor should be used etc,is very scarce..so using the Best LaTeX Compiler available : MiKTeX, Best LaTeX editor : TeXMaker and various other simple tools required for Preparing LateX, we created TiCTeX : An All in One LaTeX Bundle cum installer with inbuilt MiKTeX,TeXMaker IDE/EditorTiCTeX has the following Components inbuilt in it
MiKTeX : The Best Compiler with all the Libraries required for LateX Document creation.
TeXMaker : The Best,efficient and most widely used editor cum compiler for writing and creation of Latex documents,with inbuilt PDF Viewer.
Asymptote : used for photoand diagram related functions and viewing.
GhostScript : An Engine for rendering and viewing .ps and .pdf File formats.
GSViewer : A viewer for viewing the .ps and .pdf File Types.
although when it comes to Linux OS Geany IDE performs the Task Beautifully..!! also it uses the inbuilt gcc/g++ libraries but these Geany doesn’t run like that in Windows OS due to missing libraries..
also you must have liked to use Geany as a C/C++ Compiler in Windows, so here’s the Solution
Geany CP : A customised Geany Installer as a C/C++ Language Compiler for Windows
Here are some of its Salient Features
Popular Geany IDE as a C/C++ Compiler on Windows..That too a Single Click Installer
No Need Of Installing Linux Thingy..every component is built-in 😀
Includes The minGW Libraries used by Linux i.e gcc/g++ library inbuilt 😉
No need to Alter The Environment Variables / System / Path.. The Installer Does that all itself 🙂
One CLick Installer : Geany + MinGW + System Variables.. All you have to do is simply Run The Compiler and Code your desired source 😀
Works on Any Version Of Windows [Windows 98,XP + Windows 7 and Windows 8 too] both 32 bit and 64 bit Environments
Install,it using the Normal next,next method and run it from the Shortcut on the Desktop
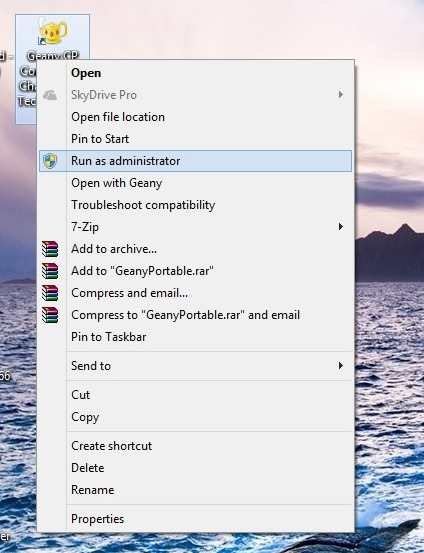
Important Note :Windows 7 and Windows 8,users must Run it as an Administrator, you can do this by right clicking on the Geany icon and selecting Run as Administrator option..[Shown in this screenshot–>
Geany Run as Administrator Option for Windows 7/Windows 8
Enjoy !! Happy Programming 😀 with Geany as C Compiler on Windows


![Turbo Pascal 7 for Windows 7 /8.1 & Windows 10 [32bit-64bit] FullScreen Single Installer](https://techapple.net/wp-content/uploads/2014/04/tp7-1-660x371.jpg)