Category: Android Arena

  • How to change Android ID,SSN & Device ID on Android Phones

    How to change Android ID,SSN & Device ID on Android Phones

    CPI apps, Refer & Download to earn Free Recharge apps or be it any Android app, they track your Identity & Installs on some primary factors like Android ID , Device ID , Sim Serial Number (SSN), and Sim Subscriber ID . So, changing the above parameters may give you extra exclusive benefits with increased downloads. Hence, In this article We will be covering the method to change Android ID, Device ID and SSN easily and securely on Android phones.

    Pre-requisites

    • We highly recommend that your Android device should be rooted, As the rooting methods vary from device to device we won’t be able to cover them up in this article (You can google for your device name + root for available methods for your device) .
    • We will be using 3 apps for this purpose – Xposed Framework , Device ID app (to check whether the changes have been applied to) , and DonkeyGuard app.
    • The method we will be discussing changes the Android ID for a particular app only and hence your original IMEI remains intact thus is perfectly legal too 🙂 .

    Tutorial on How to Change the Android ID , SSN & Device ID on Android Phones 

    • First of all root your android phone , and then Install the Xposed framework from the below URL –
      Click here to Download Xposed Framework v2.7  apk for Android devices .
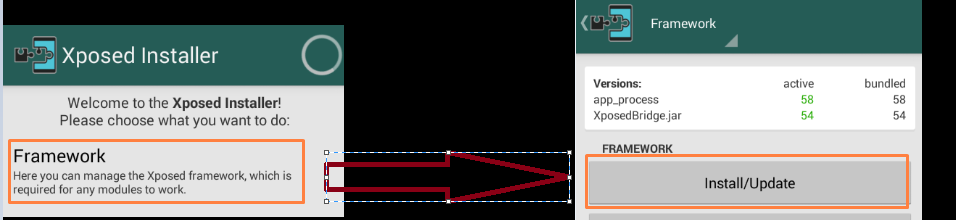
      Xposed Framework is a set of exclusive tools which add additional functionalities to Android.
    • Now, Once you have Installed Xposed Framework, Open the app if it asks for sudo/su/root permissions tap on Ok to grant it.

      Now, We need to Install/Update the Xposed framework for doing the same Open the Xposed App -> Go to “Framework” -> Tap on Install/Update .
      (As shown in the Figure Below , It may ask you to reboot your phone, allow it to reboot or reboot manually if it doesn’t reboot automatically).

      Installing Xposed Framework on Android


    • Coming to the changing Android ID & Device ID first, you might like to have to have a look on the current Parameters, you can see them by Simply downloading the Evozi Device ID app a which can be downloaded from link below –
      Click here to Device ID app from Google Play Store.
    • Android ID, etc Before Changing

      Once, you have downloaded the Device ID app, Open it to see the existing values for Android ID, Device ID etc (You can take a screenshot which we will use later to verify, for e.g Check the alongside Screenshot for my existing values before changing the mentioned parameters red box).

    • Now, for Changing these values we need DonkeyGuard App, which can be downloaded from the below link –
      Click here to Download DonkeyGuard App from Google Play Store.
    • Now, before Launching the DonkeyGuard App , We need to activate the DonkeyGuard Module in Xposed App , To do so Open the Xposed App -> Go to “Modules” -> CheckMark the “DonkeyGuard” Module , and reboot phone if prompted.
    • Now coming to the Main part , Open the DonkeyGuard App and scroll-down to the app’s for which parameters you wish to change (we will be using the same Device ID app in our example) and now tap on “Settings” option as highlighted in the image below –
      DonkeyGuard Settings

      Now, one you tap on Settings , It will be presenting you with the parameters which can be modified, Tap on “Identity” Option .

    • In the “Identity” pane you will be able to see the different options which can be edited for the particular app , Simply Tap on the “Pencil” icon to edit the values, for e.g we will be changing the “Android ID” as shown in the below Image –
      Changing Android ID

      You can manually type in Android ID or assigning a Random Android ID , tap on “Random” and then tap on “Save” to Save Changes , Click on the “Save” icon on the top-right-hand side corner to save the Changes. (you can do the same for other options as well).

    • Now We will re-open the Device ID app to confirm whether the values have been applied or not , Check the Screenshot below for confirmation –
      New Values

      Thus, as seen from above we have successfully changed the Android Device ID, SSN successfully! on the Android Device .

    Tips for more downloads & Referral app earnings 

    • Change / give the same Android ID , parameters first for Earning App.
    • Give the same parameters for the Google play store app, and to the new app downloaded before opening the new downloaded app!.
    • That’s it ! Your referrals would be successful.
  • Get Instant Free Rs.500 in MakeMyTrip.com to Book hotels & Flights at lowest discounted Prices!

    Get Instant Free Rs.500 in MakeMyTrip.com to Book hotels & Flights at lowest discounted Prices!

    Its raining discounts during this festive season when it comes to Hotel accommodation providers , First with GoIbibo, Second with Oyo Rooms and now its MakeMyTrip.com who is providing Free Instant Rs.500 for each new app download . This Instant money can be used not only for hotel bookings, but it can also be used for domestic & International flight bookings too! , And to top the cake with cherry this instant money can also be clubbed with existing coupon codes and offers. Additionally, you can also earn Rs.1000 per each friend using the Refer & Earn program So, If you plan & utilise this offer wisely enough – You can travel, and stay too for FREE!

    Method to claim your Free Rs.500 Instantly on MakeMyTrip App on Android / iPhone (iOS) –

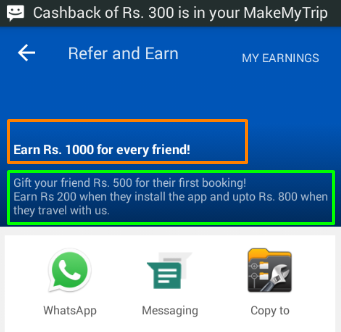
    • First of all You need to download the MakeMyTrip app from the following link (uninstall the app if its already installed)-
      Click here to download MakeMyTrip app .
    • Now, Simply Sign-Up with a New MakeMyTrip account to get your Free Rs.500 Instantly in your account (No E-Mail or Mobile number verification required).
    • You can also earn more MakeMyTrip Money in your account by using MMT’s refer & earn program , Simply go to app Menu and then select “Refer and Earn” option.
    • Now, copy your referral link and Send it to your Friends to get upto Rs.1000 per each friend referral.

    MMT Money FAQ

    • The Validity of the MakeMyTrip money is for 90 days from the date of issue.
    • The MakeMyTrip money / ecash can be used for booking limits upto –
    • Domestic Flights – Rs.1000 per booking
      International Flights – Rs.2000 per booking
      Domestic Hotels – Rs.2000 per booking
      International Hotels – Rs.2000 per booking
    • UPDATE –  You can also use The Coupon / E-Coupon code : “MMTGO” to get Flat 45% off on Dmestic Hotel Bookings on Make My Trip , thus you can use the coupon + Rs.500 cash combo to get Hotels worth upto Rs.1000 for Free!!
    • Maximum cash that you can earn from the referral program is Rs.10000 , but you can always create multiple accounts so that your complete trip is Free!
    • Hurry! grab the offer before it ends! – Click here to Download the MakeMyTrip app now!


  • 3 Best Ways to Download Instagram Photos on Android or PC – Computer

    3 Best Ways to Download Instagram Photos on Android or PC – Computer

    Instagram is a hub of  outstanding photos and video content, sometimes you might want to download and save a particular photo or video of Instagram so that you can view them later offline on your device. So, here are the 3 Best Ways to Download / save Instagram Photos  on Android or Computer. These methods can be used to Batch Downloads Instagram pics as well, particularly the app method hence we will be discussing the App method first, and then the PC Methods.

    Method – 1 Using InstaSave app for Android

    Tutorial to download Instagram pics InstaSave App on Android –

    InstaSave app – Selecting Photos
    • First of all, Install the InstaSave app for Android from below link –
      Click here to download Insta Save app for Android from Google Play Store.
    • After, you have downloaded InstaSave app, log-in to your Instagram account from InstaSave app.
    • Once, you log-on to InstaSave app, it will show you a feed of your photos which you want to save , just tap on all the photos you want to save as shown in the alongside image. (It allows you to Batch download as well).
    • Now, once you’ve selected the images or photos which you want to download/save on your device , Click on the “Save” icon as highlighted by green color in the below figure – , It will prompt you with the location where the images are to be saved as shown –
      InstaSave icon + Download prompt

      Click on “Yes” and, you have now successfully downloaded Instagram Images on your Android device.

    Method 2 – Download Instagram Photos on PC (Computer) Windows and Android by Instagrabbr.com

    • Instagrabbr.com

      This method works on PC as well as on Android devices, and it doesn’t requires Instagram login too, provided you know the Username of whose photo you want to download.

    • To download Using Instagrabbr, First of all Visit the Instagrabbr.com Website.
    • Now, In the text field enter the Instagram username of whose photos you need to download and click on “Search” as shown in alongside figure.
    • Once you click on search it will display all the public photos associated with the typed in Username as below –
      Click on the photo to open it full-sized

      Now, here in Click on any photo to Open it in full-sized window.

      Save Image button Instagrabbr
    • Here Scroll-down below to the bottom of Image, and Click on the “Save Image” button as shown alongside!. That’s it you have successfully downloaded the Instagram Photos on PC (Windows – Google Chrome in screenshots) or Android.


    Method – 3 Copying Instagram Share URL and downloading via Dinsta.com

    • Getting Share Link in Instagram

      This method requires you to have the Share URL of the Instagram pic you intend to download , you can get The Share URL of an image by simply –

    • Open the photo whose Share URL you want to copy inside the Instagram app, and now tap the 3 dots highlighted by green color in the alongside image, and then by touching the “Copy Share URL” highlighted by blue color in the same image.
    • That’s it Your share URL is now copied, If you’re using Instagram on PC or Computer, simply copy the Image URL from the Google Chrome/Mozilla Firefox address bar, once you open an Instagram.com photo by clicking it –
      Getting Instagram share URL in Google Chrome


    • Now, once you have obtained the Sharing URL , Visit Dinsta.com  on your Android device / Windows PC.
    • On Dinsta, Enter Instagram URL eg. https://instagram.com/p/m7SaJFIhyB/ & Press Go..
    • You’ll see a download button below the Image, click on it and start downloading!!


    That’s it these are the 3 Best Methods which you can use to Download Instagram photos on your Android Phone or PC .


  • How to create Photo Album on Facebook Mobile Site & App (Android & iOS – iPhone)

    Creating a photo album and uploading photos to the album on Facebook mobile version or app isn’t as easy as and simple as it is on Facebook PC version website. It involves a bit of navigation, so here’s an easy tutorial which will help you to create Album on Facebook mobile version and upload photos to the album on your mobile device/tablet . Part 1 of the tutorial deals with uploading photos to the touch version of Facebook and the same method will work for creating album on Facebook Android app and iOS app as well.

    Tutorial to create Photo Album on Facebook from Mobile version / app

    Part 1 – Create Album on Facebook mobile app (Android & iOS) and touch version .

    • Facebook Menu

      Once you log-on to the facebook , navigate to the top-hand-side profile menu in the app/ touch website as shown in the figure alongside.

    • Now click on the “Photos” option, as highlighted by green color.
    • After clicking on Photos, it will present you with an option to create an album as shown below-
      Create Album option on Facebook

      After clicking on Create Album option, it will ask you to enter details such as Album name, Album description,Location etc .

    • Enter the album details and click on “Save” button shown below to save your Facbeook photo Album.
      Facebook Album save button


    That’s it you have successfully created a facebook album on your touch device.


    Part – 2 Create a Facebook Album on Non-touch device

    • Facebook non-touch profile

      Open Facebook on your Mobile , and navigate to the Profile Option as shown in the alongside figure (Red arrow – Step.1)

    • Now, in the Facebook profile pane, click on “Photos” highlighted by Blue color in the same alongside image(Step.2)
    • Now, here in select the “Create New Album” option as shown below –
      Create New album on facebook mobile version

      After you click on Create new album option, it will ask you to fill out Album name, description and location.

    • Enter the above details, and click on “Save”, and the Photo Album will be created on Facebook.

    This is how, you can create a Photo Album on facebook right on your Android, iPhone or any mobile device. Check out this space to see how to add photos to any existing facebook album via mobile.


  • How to create a Fake WhatsApp account with Spoof Number on Android / iOS [Using USA Number in any Country!]

    How to create a Fake WhatsApp account with Spoof Number on Android / iOS [Using USA Number in any Country!]

    Many times, we need to use WhatsApp for sending or receiving messages/media without showing or using our real mobile number or even trick our friends and message without revealing our Identity. Now, by using the following tutorial you will be able to create a fake WhatsApp account with a spoofed U.S.A number in any country, that too will all the normal functioning of WhatsApp . The tutorial will work for Android, and iOS devices (iPhone) too!

    Tutorial to create a Fake WhatsApp account with other Spoof Number –

    • First of all , Install and verify WhatsApp on your phone . (Skip this step if you have WhatsApp already installed & verified on your phone).
    • Now, Install Vovox app for Android or iOS from the following links and complete the verification on Vovox app –
      Click here to download Vovox app for Android from Google Play Store.
      Click here to download Vovox app for iDevice (iPhone) from Apple App – iTunes Store.
    • After verifying your Vovox navigate to more tab in the app as shown below –
      Vovox More Option

      Now,  Note down your Vovox Number which is highlighted by Blue color.

    • Now, Open WhatsApp app and navigate to the settings option as shown on the next image –
      WhatsApp Settings


    • Once you are into the settings panel , Open the Change number option as highlighted by blue color –

      WhatsApp Change Number
    • Now, when you are into the Change Number Option inside WhatsApp app, Enter your existing Verified Mobile number in text field of “Old country code and mobile number” and in the second text field , Enter country code as “+1” which is U.S.A country code and type in your new phone number (Vovox Number) obtained in Step.3 (Which we noted down from More option in the Vovox app) .
    • WhatsApp Change number option

      Now, Click on “Done” option present in Whatsapp app’s top right hand side corner , You’ll soon receive a message on your Vovox app with verification code, while at the same time WhatsApp app will be waiting for Verification.

    • Now, Open the message you received in Vovox app, and then Click/visit the Verification link received in the message as shown below –
      WhatsApp Verification Link in Vovox App


    • That’s it ! Your Whatsapp verification would be completed successfully! & you can now use WhatsApp with a fake/spoof U.S.A number and Enjoy WhatsApp Anonymously!
    • Recommended : You can even use Two WhatsApp accounts on a single Android –
      Click here for tutorial to Officially use 2 WhatsApp numbers on a Single Android. 
      Click here to Know on How to Create & Use Fake WhatsApp Account.
      Click here for tutorial to Send any filetype .zip / .rar / .apk files on WhatsApp
  • Top 15 Free Torrent leech sites to download torrents on IDM [Download torrent over HTTP Protocol]

    Top 15 Free Torrent leech sites to download torrents on IDM [Download torrent over HTTP Protocol]

    A lot of ISPs, offices, colleges etc block the utorrent P2P protocol or are filtering the same, hence most times the torrent downloads are very slow or simply they don’t download at all. A Simple solution to this problem is caching torrents online and then downloading the torrent with IDM via HTTP protocol by torrent leeching sites. So, below are the Top 15 Free torrent leeching sites which will help you to download torrents via IDM.

    Advantages of Downloading torrents via Torrent Leech Sites –

    • Download torrents even if torrent traffic is blocked in your network, thus bypass torrent filter.
    • No need to keep your machine powered on , just add your torrent file/magnet link to leech, and it will automatically leech for you.
    • The torrent health doesn’t matter, thus you can even download torrents with lesser seeds.
    • You can download torrents via IDM with Resume support!
    • The ISP cannot detect the torrent traffic.


    The top 15 Free Torrent leech sites are as follows –


    Recommended – BitPort.io

    BitPort.io

    BitPort.io is a torrent leeching service which we highly recommend, and there are various reasons for it such as – Bitport.io enables caching of torrents onto its high speed servers, so that you can download them even without a torrent client.

    Besides these you can even stream your cached torrents directly on the browser and on any device. Thus you can now stream & enjoy your movies on mobile or laptop anywhere without even downloading them! thus saving time !

    Click here to Visit BitPort.io


    No.1 – Zbigz.com

    Zbigz

    Zbigz.com is perhaps the leader when it comes to online torrent leeching websites and is based upon cloud network. All you need to do is either upload your .torrent file or torrent URI Magnet link and click on the “Go” button, then after the caching is completed you can easily click the “zip” button to start downloading, you can either sign-up or you may even use the zbigz service without sign-up.

    Click here to visit Zbigz.com


    No.2 – FileStream.me

    FileStream.me

    A great alternative to Zbigz is FileStream.me , FileStream.me is perhaps even better than Zbigz.com when it comes to features, besides normal http based download, filestream.me even provides secure HTTPS protocol download, which no ISP can sniff out , besides it also gives the option of selecting individual files out of a torrent which can be zipped and downloaded.

    Click here to Sign-Up on FileStream.me


    No.3 – Seedr.CC

    A great free torrent leeching website with very few limitations, Seeedr is very promising and provides various features such as

    • Provides online Streaming of torrents too.
    • Magnet URI Upload
    • Zip & Download a single file if torrent has multiple files

    Seedr.cc has a very easy to use Interface and is really worth giving a try!

    Click here to visit Seedr.cc


    No.4 – direct-torrents.com

    Direct-Torrents.com

    Direct-torrents.com is one of the easiest to use free torrent leeching services and can also be classified as a filestream.me alternative. All you need to do is Enter your .torrent URL or Magnet link and click on download, then below you just need to click the filename to start downloading!

    Click here to visit Direct-torrents.com


    No.5 – Furk.Net

    Furk.Net

    Furk.Net is yet another Zbigz alternative site to downloads torrents over HTTP , Although Furk.Net is invite only, but Furk.Net invites are easily available . Furk.Net also provides direct VLC Player streaming of video files in your torrent, besides allowing you to download them as zip.

    Click here to visit Furk.Net


    No.6 MyFastFile.com

    MyFastFile.com

    MyFastFile.com is yet another free torrent leeching website and is also easy to use as direct-torrents.com. All you need to do is either enter your Torrent URL or its Magnet link to start your torrent leech, else you can also upload your .torrent file using the “Fetch Torrent Option”, Besides allowing you to download torrents over http on IDM, myfastfile also allows you to stream them on VLC, as well as it supports many other file hosting websites too!

    Click here to visit MyFastFile.com


    No.7 Premiumize.me

    Premiumize.me

    Premiumize.me is yet another free torrent downloading website which also provides a Free Seedbox in addition to torrent leech! . Once you finish signing-up on Premiumize.me , Visit https://www.premiumize.me/downloader  to start leeching your torrent either by uploading it to the service or by using magnet link as shown in alongside figure.

    Click here to visit Premiumize.me


    No.8 Hive.im

    Hive.im

    Hive.im is not basically a torrent leech site, but it can be used as one as it allows remote fetching. All you need to do is go to add files option, now click on the “+” sign, and select the option “web links”, Now if you paste or add a magnet link of a torrent here, it fetches the files inside the torrent, right into your private storage on Hive.im (Check the below screenshot for more detail) –

    Hive.im

    Click here to visit Hive.im


    Now, besides these 8 sites we discussed above, you can also use the 7 free torrent leeching sites below to get your torrents downloaded over HTTP –

    No.9 – Bytebx.com

    ByteBX

     ByteBX’s User interface is really simple to use, only downside is max torrent size limit is 100 mb for Free Users.

    Click here to visit ByteBX.


    No.10 – Zzlbox.com

    ZZLBox

     ZZLbox.com’s Features are same as that of Furk.net , also it allows you to preview/view screenshots of any video torrent you cache on it, and it also doesn’t require any invites!

    Click here to visit ZZLbox.com


    No.11 – Bruzzy.com

    Bruzzy.com

    Similar in functionality like Zbigz.com, but the only downside is that its in russian language, however you can use Google Translate to translate the website into English.

    Click here to visit Bruzzy.com


    No.12 – Zxcfiles.net

    ZXCFiles.net

    A good torrent leech with torrent leech support upto 10 GB, only downside is torrent caching is a bit slow.

    Click here to visit ZXCFiles.net


    No.13 – Fuge.It 

    Fuge.it

     This website is basically a Torrent SeedBox website, but you can also use it for leeching torrents, it provides torrent leech upto 5Gb Size.

    Click here to Visit Fuge.it


    No.14 – JustSeed.it : This website is also like Fuge.it- a torrent seedbox, but the User interface isn’t too great and user-friendly .

    No.15 – BtCloud.ioBtCloud.io is also a good alternative torrent leeching website, but the torrent file size limit is very low and supports torrent size only upto 1GB . Hence we will recommend to use this only during dire situations.

    So, these were Free Torrent Leeching Websites, We hope they will help you to easily get your favorite torrents downloaded if the traffic is filtered, feel free to comment any good website you know 🙂


  • How to play 2 Hidden-Secret games present in every Android phone!

    How to play 2 Hidden-Secret games present in every Android phone!

    Many times we get bored of the existing games on our android phones and need to try some new games, Or some simply don’t haven any games installed on their devices. So be it for passing some time or for some geeky minds wanting to explore here are 2 hidden or we can say secret games which are present on each & every Android phones . These games are present by default and do not require any installation, here’s a method by which you can play & enjoy these games on your devices –

    Game # 1 – Android Version game –

    Navigating to About Phone in settings

    This may sound weird, but yes there’s a hidden/secret game right in the “Settings” panel of your android phone! , and it varies for each device based upon the Android version installed . While Android Lollipop has the most intriguing game inspired from “Flappy Bird” , the android version games of Jellybean & Android Kitkat are also worth giving a try! , Here’s how you can play them –

    • Open the “Settings” pane of your Android device , now navigate right upto the bottom-most setting you can see labelled as “About Phone” as shown in the figure above. (pointed by red arrow).
    • Now, tap on the “About phone” option, to open it.
    • Once, you’re into the About phone menu, repeatedly tap on the “Android version” to launch the hidden game! (as shown in figure below )-
      Repeatedly tap on Android version

      Depending upon your Android version you may see animation of either Jellybean, Kitkat or Lollipop.

    • Here , long-tap or double tap on either the “Jellybean” , or Kitkat or “Lollipop” logo to start playing the game! , You will see either of the three games –
    • Android Jellybean game – If your android version is Jellybean it will open a game as shown below, your aim in this game is to drag and swipe all the jellybeans on the screen so that no Jellybean is left on the screen! –
      touch and Swipe the jellybeans to throw them away offscreen!


    • Or Android Kit-Kat game – the moto of this game is to tap the biggest same-colors tiles to remove them and again empty the screen (I found this game the most boring of them all) –

      Android Kitkat game, to tap on the biggest tiles
    • Or Android Lollipop game – This is the game I loved the most, the aim of this game is to pass the Android mascot through the hanging lollipop’s without touching them! . Tapping the screen makes the mascot goes up else the android mascot is always falling down due to gravity, make sure you tap at the correct time so as you don’t touch the lollipops! –
      Android Lollipop game!


    Now, this was regarding the default android version games, they may not entice you much, but I am sure the next game will!


    Secret / Hidden Game # 2 – Google Chrome Dinosaur game!

    Google Chrome Dinosaur game

    You may have met this Google Chrome dinosaur before, well Google has intentionally placed this dinosaur so that you can play with it, whenever there is a problem with the Internet connection. To be honest, this game reminded me of playing Mario in my childhood, here’s how you can play it –

    • Make sure your Cellular data or Wifi connection is turned off or disconnected.
    • Now, Open Google Chrome browser on your phone, and try to access or open any website, you’ll meet a dinosaur as shown in the image alongside.
    • Now, simply tap on the dinosaur to start the game! , the ground below the dinosaur will start moving!.
    • All you have to do to play this game is to tap the screen to make the dinosaur jump over the obstacles like cactus plant which is planted on the ground!.
    • The Scores will automatically increase proportionally to the number of obstacles avoided , and playing the game is a fun 🙂  –
      Google Chrome Dinosaur game on Android


    • Considering, Each & every Google Android device since the Android Kitkat 4.4 has Google Chrome inbuilt, you can flaunt that your browser too has an in-built game inside it!

    So, these are 2 hidden/secret games present in Android, although not as good as the other games available on playstore, but they don’t require any installation either! Do give them a try and feel free to comment your opinion and views on the same.

  • How to clear app cache & delete junk files easily on Android using CCleaner app

    How to clear app cache & delete junk files easily on Android using CCleaner app

    Internal app cache & junk data files simply hog the internal phone storage memory on Android devices, making the device slower and hang a lot. Also the pile-up of junk files results in lower storage memory for storing your data – images, media, music and even apps!. Here’s an easy and foolproof solution to clean and clear up internal app cache on Android phones using CCleaner app . CCleaner app is a leading software for PC to clear cache & delete junk files and now it’s available for Android too –

    How to clear internal app cache & delete junk files on Android –

    • Checkmark + Analyze on CCleaner app on Android

      First of all download & install the CCleaner app for Android from the below link –
      Click here to download CCleaner app for Android from Google Play Store.

    • After, you’ve installed the CCleaner app , it will  show you a graphical chart of your phone storage, Now to start cleaning junk files the app first needs to analyze which of the data is cache and junk .
    • So for ding this, please checkmark the components you want to get rid of like Cache,History etc (as shown in alongside image) , Now Tap on the “Analyze” button to start the data analysis process, it can take on maximum upto a couple of minutes for the app to analyze the data which is junk and can be cleaned .
    • After the analyze process is completed, Simply tap on the “Clean” button.
    • That’s it you’ve easily got rid of the junk files and internal app cache which were causing your phone to lag, and phone memory to become lessor on space.
  • Get Instant Free Rs.500 Money to book hotel on Oyo Rooms! app [Also Get Rs.700 per referral]

    Get Instant Free Rs.500 Money to book hotel on Oyo Rooms! app [Also Get Rs.700 per referral]

    Travelling to another city ? need to book accommodation / hotels ? look no further as now Oyo Rooms! is offering Free Rs.500 Oyo Money, for each new sign-ups / new accounts made by referrals. Oyo Money is a virtual cash which can be used to book rooms on the Oyo Money app, and if you’ve a lot of friends. You can also earn Rs.200 per each friend referral to literally book the hotel rooms for FREE! , as Oyo Rooms hotels are really cheaper and offer great value for money with prices starting as low as Rs.999 per day (which means you’re already getting Flat 50% discount even if you do not invite anyone 🙂 ).

    Method to claim your Free Rs.500 on Oyo Rooms –

    • First of all download the Oyo Rooms Application from the following link –
      Oyo Rooms referral code

      Click here to download the Oyo Rooms app for Android Phones & iOS devices (iPhone and iPad). 

    • After you’ve downloaded the app, it will ask you to sign-up , Now enter your mobile number , name , E-mail ID and Referral code.
    • Note –  Though the referral code field is optional, keeping it blank won’t give you Free Rs.500 , Enter the referral code as CHAI-DLHPER to get your Free Rs.500 (As shown in the Image alongside).
    • Now tap on continue button, The app will now send an OTP message and will verify your mobile number.
    • Using the referral code – CHAI-DLHPER Oyo rooms would instantly credit you Rs.500 in your Oyo Money account, which you can easily use to book your Oyo hotel rooms for great discounts and even for FREE! if you can refer many friends.
    • The free Oyo Money Scheme is valid only for referral installs, and has no expiry limits so you can book rooms anytime you want.
    • Check below for Rs.500 Oyo Money screenshot –
      Free Instant Rs.500

      UPDATE / Note – If you’re using OyoRooms to book hotels in case you’re travelling to a new city or for a vacation , You can also get Free Instant Rs.500 Cash on MakeMyTrip too! which you can use for booking domestic flights as well as hotels too! Click here to get Instant Rs.500 On MakeMyTrip