One of the best features of Android Nougat and Oreo is that they support Apps to be split into two screens thus enabling you to use two apps simultaneously. However, not all apps support Split-screen mode by default, here’s a simple tutorial which will let you use Apps into Split Screen mode if the app doesn’t support Split Screen.
Tutorial to Use any App into Split-Screen Mode even if the App doesn’t support it –
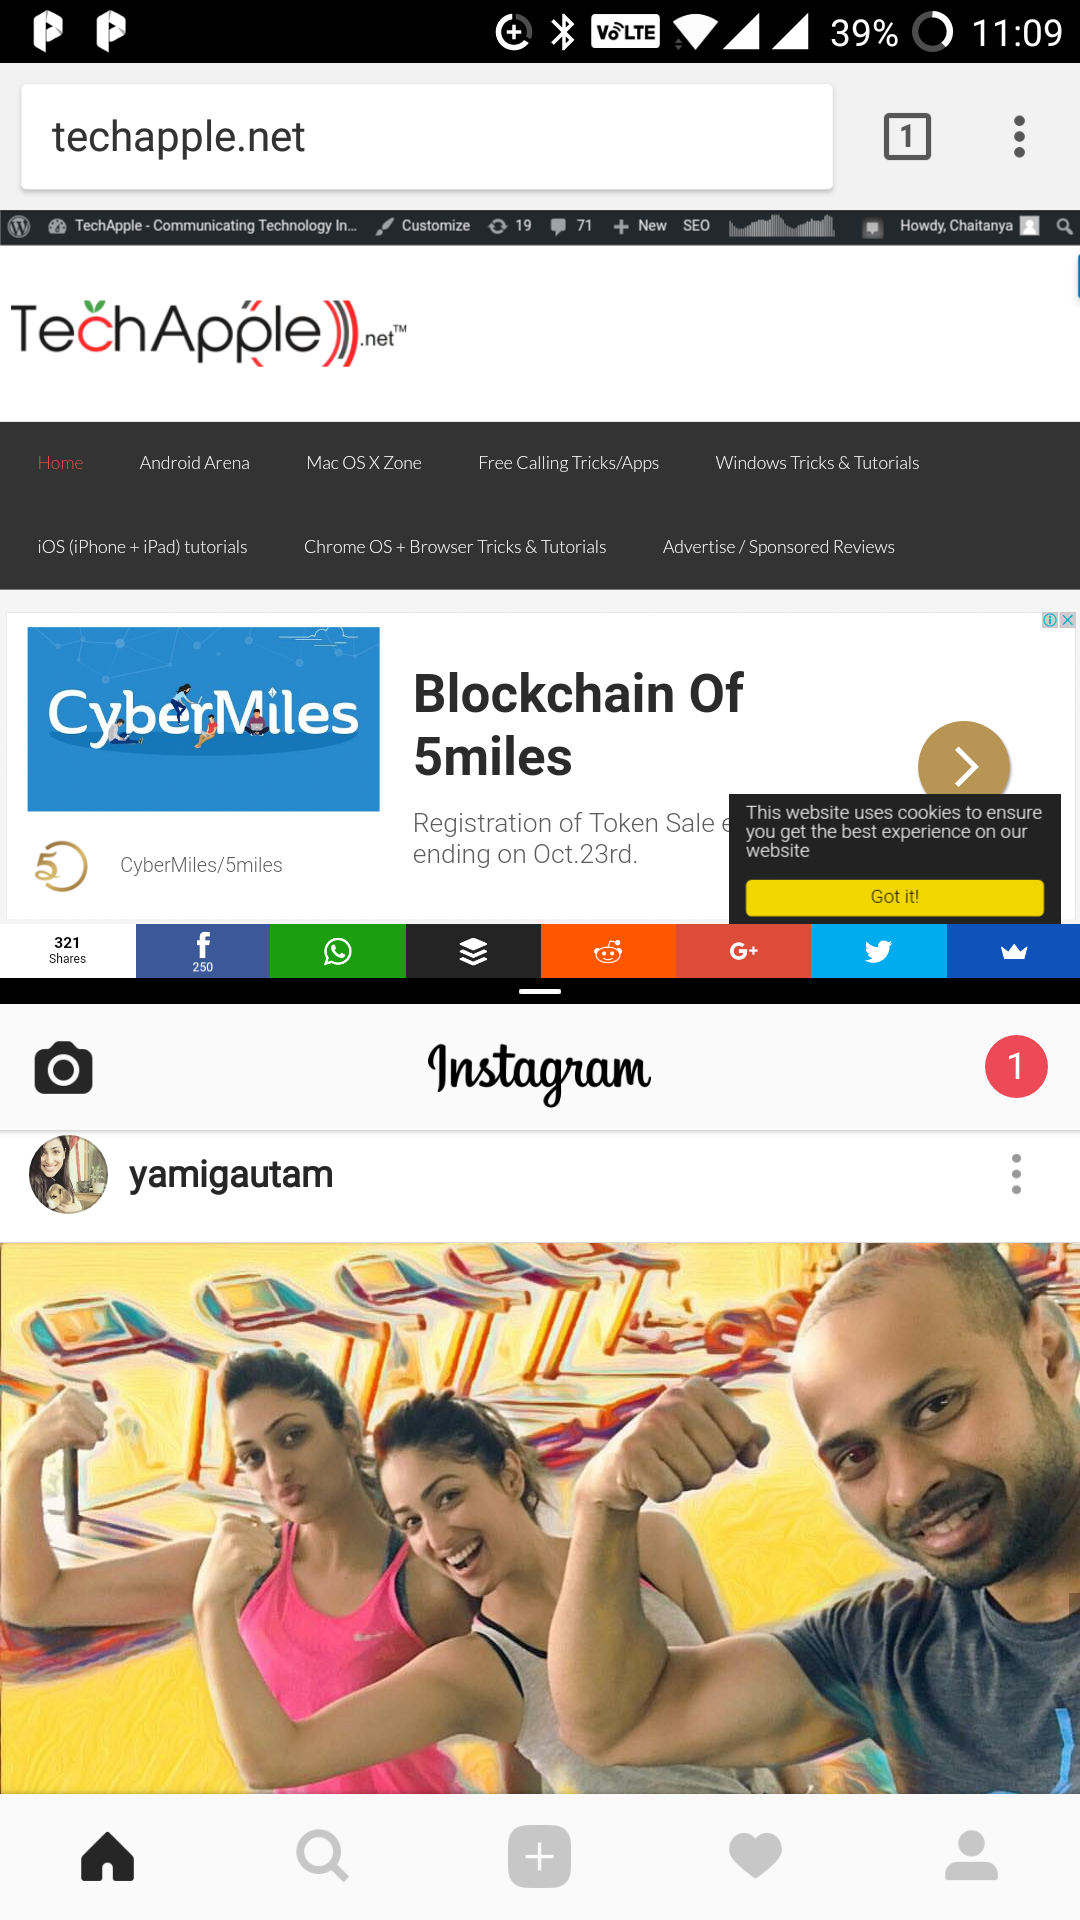
For our tutorial, we will be using “Instagram” app which doesn’t support Split Screen and the Chrome browser.
Now, as we aren’t changing any Developer options or are neither rooting the phone. We will need to “Clone” the non-split screen app into “Parallel Space” app.
Step 1 – Clone the Non-Split supported app into Parallel Space –
Once you have downloaded the Parallel Space, it will ask you to Clone app, here select the “non-split supported app”, in our case we selected “Instagram” as shown in the image below –
Select the Non Split Support app and Add to Parallel Space
That’s it, now you can add more apps which you may want to use in Split screen and which doesn’t support if required.
Step 2 – Using the Split Screen –
Now first launch , the app which supports split screen . In our example it will be “Chrome” . Once you launch the app. Now, long press the “Intents” or “the recent apps” button as its know.
The Chrome will now collapse into a half-screen as shown in the following image –
Chrome in Split Screen Mode
Now, launch the Parallel Space app , from the launcher or menu visible below. It will load itself into the lower half as shown below
Parallel Space & Chrome Split Screen
Now, in the bottom Parallel Space menu, tap on the app you want to launch in split screen which wasn’t supported earlier. i.e “Instagram” in our case –
Tap or Add any non split supported app into Parallel Space
Wow! , earlier non-supported split screen app. Will now load and work flawlessly with Split Screen mode too as we can confirm from the image below –
Instagram in Split Screen View even if it doesn’t support it
Thus, you can now use any app or play any game in Split screen such as Clash of Clans, Pokemon Go even if they don’t support it by default.
Incase, if you face any issues or have some queries feel free to let us know in the comment section.
Youtube is one of the most-used web services and is the single-largest video consumption platform across the World. One of the only bad things about Youtube are its inappropriate ads, sometimes they are totally irrelevant or sometimes they ruin your Video or Music experience. Here we share you 3 Simple Methods which will block all youtube ads on Android, be it Youtube app or Website in Chrome.
Top 3 Ways to Block Youtube Ads in Android (Remove Skippable as well as non-skippable ads)
Method # 1 – Use an Adblock enabled Browser
Adblock Browser can block Ads on Youtube too!
This is one of the most favourite and simple methods to block ads in Youtube. Incase, if you are not loyal to the Youtube app, you can simply install an adblock enabled browser and browse the Youtube mobile site through it.
This will help you not only save your data, but it will automatically Block Youtube ads.
This Method is the most simple to use, and can be easily used by anyone.
This method is more suitable for more advanced users, or users who like viewing Youtube videos inside the Youtube App.
The Process is fairly simple, but gives more control over all the ads in all the apps in your Phone. Thus, allowing you to block all ads inside all apps in your Phone.
It consists, of installing DNS 66 – A DNS Based Adblocker, Configuring it. And starting it before your Youtube session.
This is the most riskiest of the methods, as this involves installing external Youtube Modded APKs which may hamper your device.
Since, the app apk can malicious we won’t recommend you to try this method. However, if you are still curious to try it. You can refer this XDA Thread or install third-party Youtube apks such as OG Youtube.
That’s it! We have covered all the 3 methods to block Youtube ads in your Phone, incase if you encounter any issues or have another cool method, we will like to hear you 🙂
In-app & Pop-up ads are a necessary evil, as they sponsor the free price of any app. But, sometimes the app ads are very much overdone and the pop-up ads are followed by vibration ads, and then sticky ads and the ads never seem to end. Also, the extra data consumed by the ads and malware advertised put our phone’s security at high risk. So, in order to avoid all this We bring you How to Block Popup and Inapp ads in all Apps on Android so that you can enjoy your favorite games and apps without ads.
How to Block and Stop Pop Up & In App Ads on All apps in Android Phone (No Root Required) –
Pre-Requisites –
An Android phone which allows “Installation from Unknown Sources” . To enable it navigate to “Settings – > Security – > Installation from unknown Sources” and toggle it “ON” as shown in the Screenshot below –
Enable Installation from Unknown Sources
Now, We will need to install an Adblocker app – We will use “DNS 66″ for this purpose because its Free, based on DNS and hence doesn’t consume more battery either. Unlike Other VPN based adblockers such as AdGuard which consume a lot of battery . Click here to Download DNS 66 .Apk file for installing the DNS 66 App.
Tutorial to Set-Up DNS 66 App in Android (One-time Procedure) –
Considering, that you have installed the DNS 66 App from the link given above. Launch the DNS 66 App. It will show you a screen as shown below –
First Screen of DNS 66
Now “Toggle On” watch Connection and “Toggle Off” iPv6 support section from the above screen. And Navigate to the “Hosts” Tab as shown below –
In the “Hosts” tab – “Turn On” Filter Hosts and “hp Hosts Ad & Tracking Servers” as shown in the following image .
Turn On hp Hosts Ad & Tracking Server
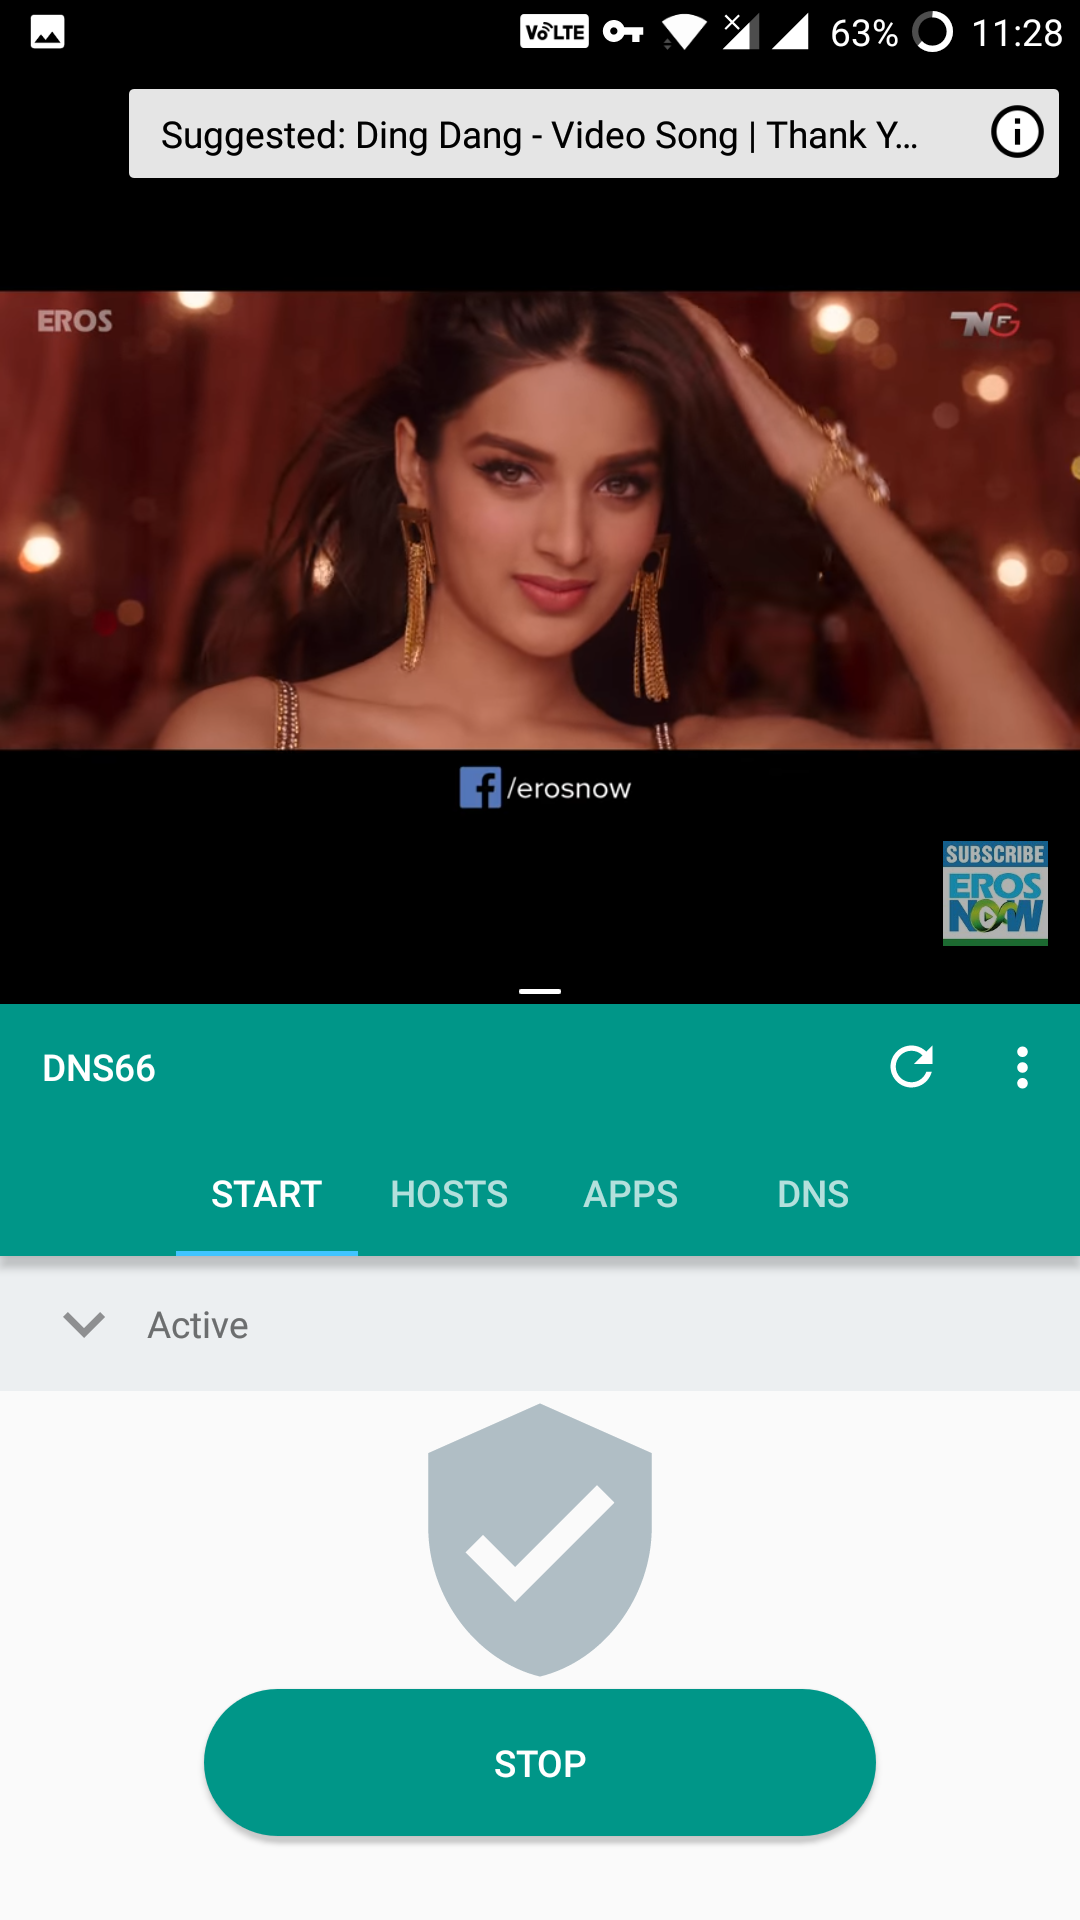
Once you turn on hp Hosts ad servers , it will show a shield as opposed to blank shield. The enabled shield is shown below –
Ad Blocking Active
Now again navigate to “Start” tab and click on the “Start” button as shown in the below image –
Click on the Start Button to Start AdBlock
It may ask you for permission to start AdBlocking. Do not worry this is just a dummy VPN connection and your Speed won’t be compromised at all. infact, it will be faster since the Ad servers DNS won’t be resolved. (Its only a one-time process)
Click on OK (One-time Process)
That’s it ! Your DNS 66 App Setup is Complete ! .
From , next time Simply Start or Stop your Pop-up & In-apps Adblocker from the “Green Start or Stop” button on start screen. No need of repeating full procedure again 🙂
Start or Stop System Adblock by Single Button
Blocked Ads in all Apps on Android –
Once you’re VPN is up and running , You can now Open any app, and browse anything . No Ads will be shown anywhere ever!.
Ad free experience on Google Chrome!
Enjoy the Ad-free experience across all apps on your Android.
Incase if you face missing Hosts file error, please refresh the app by clicking on the reload icon as shown –
Reload Icon for Hosts
Feel free to Comment any issues or Queries if the Ads aren’t blocked in the comment section below .
Bokeh Mode or Background blur got more popular with the iPhone 7 Plus which allowed users to focus on the subject with a blur on the background in its Portrait mode. With the New Dual Camera lens Smartphones coming around like Honor 8 Pro, OnePlus 5, the bokeh effect is becoming even more popular. There’s literally no need to purchase a new phone just for the sake of getting the Background Blur effect, in this tutorial we will show How you can Capture Dual Camera-like Bokeh effect photos with Background Blur on your existing single lens / single camera Smartphone.
Tutorial to Capture Bokeh Effect / Dual Camera like Photos on Single Camera Phones Android –
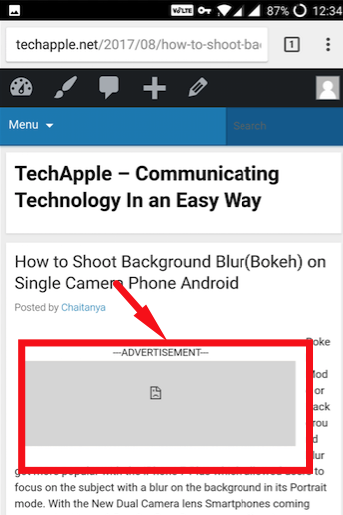
To simulate Bokeh effect or lens blur, we will be using the Google Camera App for Android. We cannot capture Background blur or Portrait mode photos with the Stock camera app.
Once you have installed the Google Camera app from the above links, launch the app. It will now show a shoot mode screen as shown below –
Swipe from left to right to bring the Options panel
Here Swipe from left to right to show all the shooting options available, as shown in the image above. In the options, available Tap and select the “Lens Blur” option as shown in the image below –
Select the Lens Blur Option in Google Camera
Once, you select the Lens Blur Option , it will show you a small tutorial on How to use the Lens Blur option to capture Bokeh effect photos as shown in the following image –
Here click on the “OK, Got It” button. Thus, basically all you need to do is select the Lens Blur Options, and then shoot the “Object” you want to focus on while raising your phone in an angle. Let’s see how it works –
In the Lens Blur capture screen, first tap the capture button as shown in the figure below –
Click on the Capture Button
Now , Keep on raising your phone until the indicator shown below is full. Be as slow as possible while raising the phone, so that your focus on the object remains constant. Try not to be too fast neither too slow . Check the below screenshot for Indicator –
Indicator Box of Google Camera Lens Blur
Slowly raise the phone until the above image highlighted box goes upwards as shown in the next image –
Indicator Box going upwards
This takes a lot of time to get used to, hence we recommend practicing it on a stationary object before moving onto moving objects. We tried this on our Deodorant can and once we finished the tilt mode. It started focusing our captured photo as shown below –
Processing the Captured Tilt Image
At first, you might think that it hasn’t captured the bokeh background blur, but please wait until the image has been processed. Wait until the “Processing image” marker finishes.
Wow! You’re in for a surprise, the Google Camera will now display your captured Bokeh and it will look absolutely stunning as shown in the following image
Bokeh Effect on Single Lens Redmi Note 3 ? Done!!
As seen in the above image the image looks stunningly beautiful and at par with the OnePlus 5 Depth effect or iPhone 7 Plus mode! . Besides, you can even change the refocus by the highlighted option.
So, this is how your Normal Single camera phone also can take beautiful bokeh background blur pictures just like Dual lens camera phones. Incase, if you have any queries or are unable to use the app feel free to comment below!
Capturing Packets or Sniffing URLs may sound a bit of hacking related stuff, but it isn’t. Capturing Network Packets may help you analyze why is your Data Pack running out, or which apps keep sending data in the background without your consent so that you can stop using them and enhance your Phone Security. Besides, Capturing packets will also help you get that streaming link of a stream, download links which again open up more possibilities to optimize your Cellular or Wifi data usage on your phone. So in this tutorial, we will show you How you can Sniff URLs or Capture Packet Data on your Android with No Root Priveledges required.
How to Capture Packet Data Network Packets on Android
Pre-Requisites :
An Android phone with either PIN / Pattern / Fingerprint lock activated . (This is required to Sniff HTTPS requests) without this active the app won’t be able to sniff HTTPS Packets.
After downloading the Packet Capture App from the above Play Store link, install and Open it.
It will now ask you for permission to install SSL Certificate as shown in the image below –
Packet Capture Install Certificate SSL
Here tap on “Install Certificate” option, it will now ask you permissions to save the certificate . Click on the “OK” button in the pop-up box that prompts out as shown in the following image –
Click on OK Button
Now, the SSL capture Certificate will be successfully installed to your Phone. It will now redirect you to the main app screen. Note – The Certificate Installation is only a one-time step required, until you uninstall the app. So no need to install certificates multiple times!
To start the Packet capture, Simply launch Packet Capture app and tap on the “Triangle (green) icon” as shown below –
Tap the icon to Start Packet Capture on Android
Now, it will ask you to set-up a VPN (If its your first capture), here simply tap on “OK” to allow it to create a VPN connection –
Allow VPN Connection to Packet Capture Android
It will now start capturing Packets in a date_time format on the main screen. To stop capturing packets simply tap on the “Stop” red square icon as shown –
Press to Stop Packet Captures
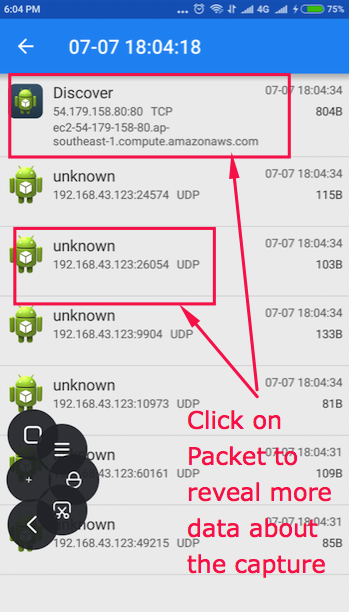
Phew! You can now access the captured packets data by tapping on the filename on mainscreen –
Listing out the Captured Packets Data
Simply tap on the file name to reveal the packet data. It will show you a list of all the packets data sent or received by your device.
To reveal more information about the data e.g URL, type of request, Hex etc click on the logged packets as shown in the image below –
Packet Capture Logs Android
Thus, you can now successfully capture packet data, sniff URLs on your Android phone . Plus, it will also help you keep a track whether the recently installed apps are causing more data usage etc.
Turbo Pascal is one of the most used Pascal being used today, despite it being the oldest one. Now, Turbo Pascal was originally meant to be run on DOS PCs , but today’s Smartphones are no less than PCs and can even get DOS running without any lags. So, in article we will show you – How to easily install & use Turbo Pascal on your Android phone or tablet so you can code & execute programs on the run.
Tutorial to install & use Turbo Pasca; on Android KitKat , lollipop, Marshmallow & Nougat (4.4 , 5.1 ,6.0 , 7.0)
Now, since turbo Pascal is based on DOS we will require a dos emulator, to emulate dos environment for running it.
Though, there are many dos emulators – DOSBox available on the Play store we will be using – Magic DoxBox Free as it is very easy to configure turbo pascal within it.
Step . 1 – Configuring Dos Box & Turbo Pascal (Only a one-time setup process) –
First of all download & extract the turbo pascal binary zip files into a folder on your device as shown in the image below –
Turbo Pascal Directory
Now as we extracted the zip files into Internal Storage – > Download. The Tp Directory files are accessible at “Internal Storage\Download\Tp” . Thus, the “internalstorage\download\” is our path
Now, once you have downloaded & installed Magic Doxbox free app, launch the app it will show a welcome screen, click on ‘x’ to close the message screen.
In the next black screen – click on the “+” icon to add new game, then select the “New game” option as shown in the image below –
Magic DosBox add New Game
The Configuration screen will now ask for the title, and the path of the game (which is Turbo Pascal in our case). Here, we need to specify the path where we have kept our binaries. On this screen Click on “choose” as shown on the following photo –
Path for Turbo Pascal Android
Now, navigate using the folder view until the choose folder option shows the folder “TP“ in the location where you extracted the TP.zip files.
Once you see the folder “TP” as shown in the below image , simply tap on “Checkmark” or “✓” sign. Do not click or open the TP folder, as shown below –
The Turbo Pascal icon will now be shown in the black screen as shown below – That’s it you have now completed the one-time set up process .
One time process completed
Now, for running Turbo Pascal for subsequent uses , simply click on the Turbo Pascal icon inside Magic Doxbox app. Here, you will seeDOSBoxosbox black screen as shown in the image below .
Here, we need to type the Turbo pascal binary path to execute turbo pascal, incase if your keyboard doesn’t appear – Please press the back key of your Phone! & select the keyboard as shown in the image below –Select Keyboard after back-button if keyboard doesn’t appear automatically
Now, on the black screen we need to type in the Turbo C path to execute it , to execute Turbo C file please enter the following commands one by one on the black screen –
Type in “cd tp” (hit the enter or return / new line key on keyboard)
Now type in “cd bin” (hit the enter or return / new line key on keyboard)
type “turbo” (hit the enter or return / new line key on keyboard)
It will look like below –
Commands to Open Turbo Pascal on Dosbox Black Screen
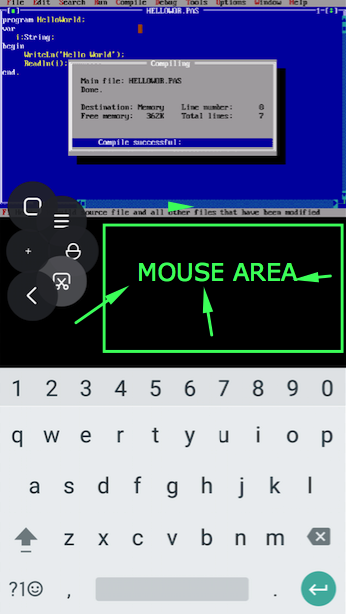
That’s it!! your Turbo Pascal will now be launched & opened! 🙂 .. You can now access all functions of keyboard, mouse & start programming of Pascal right on your android device as shown below –
Turbo Pascal on Android with Mouse & Keyboard
It feels really awesome & geeky to do programming on your android, and is pretty smooth too! , especially the mouse pointer area and mouse movement as shown in the image above Also the best part is that this works totally without SD card or memory card, so will work on all android phones!
Rest all functions of Turbo Pascal work really smoothly. In case if you face any issues or encounter any errors feel free to contact us! Happy Programming!
There is a limit on number of transactions that can be done via a Savings bank account, multiple transactions via the same debit card may cause extra charges & deduct money from your account which isn’t desired.
Also, many online shopping portals come up with cashback & discount offers for a specific bank account, which we may not have and we may need to avail that offer. Yes, you can avail cashback offers for bank cards even if you don’t have an account! – its possible via VCCs or Virtual Credit Cards (virtual Debit Cards offered by apps) . Also these cards support international transactions which isn’t allowed by Indian bank, these virtual prepaid cards can come to your rescue here too! . Here, we look on to the Top 10 Free VCCs or Virtual Credit card service providers in India –
Note – You can thus have use your single bank account, to fund these cards and thus enjoy benefits for offers available for all the vcc card providing bank customers!
Virtual Card Service # 1 – FreeCharge –
FreeCharge Virtual Card
FreeCharge is perhaps the only mobile wallet from our top mobile wallets in India to have a Prepaid Virtual Card service attached to it. Thus, the Virtual credit card of freecharge extends its functionality and makes it easier to use anywhere on any website.
The Virtual card of Freecharge is powered by MasterCard – Yes Bank and thus can also be used to get any cashback offers which are running for mastercard or Yes Bank card holders.
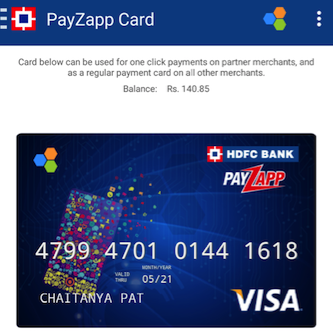
HDFC is one bank which always comes up with loads of offers by tie-up with online e-commerce stores, while maintaining HDFC account is a difficult task, but getting an HDFC virtual card VCC isn’t .
Now, you can easily get a Prepaid virtual credit Card from HDFC bank by downloading and installing the Payzapp app.
Once you download and register with your mobile number it will automatically create an HDFC card for you. Thus, you can now enjoy any cashback offer which was running for HDFC bank customers 🙂
Virtual Card Service # 4 – DigiPurse by Union Bank
Prepaid VISA Card by Union Bank of India
Digipurse is a UPI payment app or mobile wallet made by Union bank of India, you can easily register your mobile number with the DigiPurse app and get a mobile wallet along with a Prepaid Visa Card powered by Union Bank of India
Though there aren’t much offers running for Union Bank of India customers, you can always use the card to store money & use for online transactions, so that the number of default transactions to your own bank’s debit card are reduced.
IDBI Bank too provides a prepaid virtual debit card service which you can use to pay for your online purchases as well as avail many discount offers run for IDBI Customers.
You must load atleast Rs.1 to your Payapt wallet after registering your mobile number, to view your Prepaid m-Visa Virtual Card.
Slonkit is basically a money-management app, which gives you insights so that you can track your purchases as well as efficiently manage them, but it comes with a Prepaid virtual card too.
You can use your Slonkit card to purchase online via entering the details and you can even request an offline Slonkit card inorder to use it offline at POS / e-POS merchants.
Slonkit card is powered by DCB Bank, and thus can be used to avail offers for DCB Bank customers.
Virtual Card Service # 8 Digibank by DBS Bank India
Digibank app by DBS acts like a mobile wallet and a card
Digibank is a unique service by DBS Bank – You can register your mobile number & get a Digibank e-wallet with a VISA virtual Debit card.
Thus, you can load money into your digibank wallet & then use your VISA virtual card while you shop online.
The best thing about Digibank is that you can easily convert your Digibank wallet into a free-bank account anytime, and you don’t even need to visit the bank.
Yes Pay is another way except FreeCharge to get a Yes Bank card.
The Virtual Debit Card (VDC) by Yes Pay is powered by MasterCard and can be used for all your online purchases and get the discounts meant exclusively for Yes Bank customers.
Besides, Yes Pay also works a UPI Payment app for Paying via UPI in India
Zeta classifies as a Virtual Debit card (VDC) with dynamic pin, which is really a unique feature.
You can have unique pins generated for your Virtual card via the Zeta app.
Also you can get your prepaid Virtual Mastercard powered by RBL Bank for offline transactions.
The offline card can be used to pay at any e-POS machines and has the dynamic pin feature, thus you need not worry on remembering or saying pin publicly as you can generate new PINs for new transactions.
Thus, these are the various prepaid virtual credit or VCCs card providers in India, earlier ICICI too used to issue virtual credit cards VCCs via its Pockets app, but recently they have stopped doing so. Incase if you face any problems or have any doubts feel free to comment below 🙂
Its not possible to share files of any file format from WhatsApp as it doesn’t support transfer of all file formats. But many times, we may need to send a .zip , .rar , .apk or .psd any other file format via WhatsApp and its possible too by using a very simple trick! . So, here we present you a simple method which will let you send any files from your Android phone or tablet via WhatsApp .
How to Send any filetype or fileformat .rar , .apk , .zip , .psd etc from WhatsApp in Android –
Unlike other methods which require you to use external tools & services to host your files, our method will work without any external tool & service , all you need is WhatsApp, a file explorer .
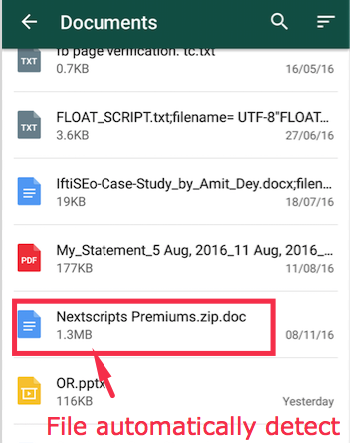
First of all open your file explorer and navigate to the .zip / .rar / .apk or any other external file format file which you wish to send. In our case we will be sending the file “NextScripts Premium.zip” as shown in the below image –
Now, once you have navigated to the file which you want to send, simply select the file & tap the rename option in the file explorer as shown in the following image –
Select file to send & tap on the Rename option
In the rename option, please add the .doc extension after the .zip extension to make the filename appear as xyzfilename.originalextension.doc , In our example it will be “Nextscripts Premium.zip.doc” after rename , as shown in the below image –
Add .doc to the file extension you want to send
Now, Click on OK to save the rename changes to the file.
Once, you have done saving the rename, changes open the WhatsApp app. And navigate to the chat window of the person or group where you want to send your .zip / .rar / or .apk file as shown in the following image –
Click on the attachment pin & then select the document option
Here in the chat window, please select the “attachment pin”, and then select the “document” option to open the select file window.
In the select file window which appears, our renamed file will automatically be visible on the viewer as shown in the next image. Simply select the filename to send the file to the specified contact / group .
Select file to send to the Person/group in whatsapp
That’s it your file will now be automatically sent to the person you intend to send ! as shown in the following images –
Flie successfully sent
File Successfully Received
On the receiver side, to open & use the .zip / .apk file, please again open File explorer .
Then navigate to the WhatsApp Media directory – incase of non-SD card phone, its present in Internal storage . While in the case of external SD card present its present on the external card.
Here, you can see your downloaded .zip / .rar or .apk file inside the “documents folder of whatsapp” , as shown in the below image –
Downloaded file in Documents folder
Please ask the recipient to rename the file extension to remove .doc
That’s it! you have now securely shared & sent non-supported file type via WhatsApp!. Incase of any doubts and difficulties feel free to comment.
Turbo C or C++ is the oldest & the first IDE or C, C++ compiler used by a student while learning or trying to learn C Programming. Though, Turbo C++ is quite old and not much used now, it still is a big part when it comes to learning programming. Here’s a simple tutorial which will show you How to easily install & use Turbo C / C++ on your Android phone or tablet so you can code & execute programs on the run.
Tutorial to install & use Turbo C / C++ on Android KitKat , lollipop, Marshmallow & Nougat (4.4 , 5.1 ,6.0 , 7.0)
Now, since turbo c is based on DOS we will require a dos emulator, to emulate dos environment for running it.
Though, there are many dos emulators – dosbox available on the Play store we will be using – Magic DoxBox Free as it is very easy to configure turboc with it .
Step . 1 – Configuring Dos Box & Turbo C (Only a one-time setup process) –
First of all download & extract the turbo c binary zip files into a folder on your device as shown in the image below –
Extract Turbo C zip into a folder on your phone
Now, once you have downloaded & installed Magic Doxbox free app , launch the app it will show a welcome screen , click on ‘x’ to close the message screen.
In the next black screen – click on the “+” icon to add new game, then select the “New game” option as shown in the image below –
Magic DosBox add New Game
The Configuration screen will now ask for the title, and the path of the game (which is Turbo C in our case). Here, we need to specify the path where we have kept our binaries. On this screen Click on “choose” as shown on the following photo –
Select Choose Option on the Configuration screen
Now, navigate using the folder view until the choose folder option shows the folder “TC” in the location where you extracted the Turbo C.zip files.
Once you see the folder “TC” as shown in the below image , simply tap on “Checkmark” or “✓” sign. Do not click or open the TC folder , as shown below –
The Turbo C icon will now be shown in the black screen as shown below – That’s it you have now completed the one-time set up process .
One-time turbo c set up process completed
Step.2 – Running Turbo C & launching directly for subsequent uses –
Now, for running Turbo C for subsequent uses , simply click on the Turbo C icon inside Magic Doxbox app. Here, you will see the dosbox black screen as shown in the image below .
Here, we need to type the Turbo c binary path to execute turbo c, incase if your keyboard doesn’t appear – Please press the back key of your Phone! & select the keyboard as shown in the image below –Select Keyboard after back-button if keyboard doesn’t appear automatically
Now, on the black screen we need to type in the Turbo C path to execute it , to execute Turbo C file please enter the following commands one by one on the black screen –
Type in “cd tc” (hit the enter or return / new line key on keyboard)
Now type in “cd bin” (hit the enter or return / new line key on keyboard)
type “tc” (hit the enter or return / new line key on keyboard)
It will look like below –
Commands to open Turbo C on dosbox black screen
That’s it!! your Turbo C will now be launched & opened! 🙂 .. You can now access all functions of keyboard , mouse & start programming of C or c plus plus right on your android device as shown below –
Turbo C on Android with Mouse & Keyboard
It feels really awesome & geeky to do program on your android, and is pretty smooth too! , especially the mouse pointer area and mouse movement as shown in the image above Also the best part is that this works totally without SD card or memory card, so will work on all android phones!
Rest all functions of Turbo c including graphics too work really smoothly! . Incase if you face any issues or encounter any errors feel free to contact us! Happy Programming!