Blog

  • Fire.Onion : Easiest way to use Tor on Android (Access .onion Tor Websites)

    Fire.Onion : Easiest way to use Tor on Android (Access .onion Tor Websites)

    A lot of Websites are hidden from Search engines or are kept secret from spying agencies using .onion domain extension. Now, these .onion domain network is known as Tor and is completely an encrypted network. Thus, due to this encryption these secret or .onion websites are not directly accessible on public internet. Thus, You will need to connect to Tor network to access these sites. Besides, Tor even helps you to bypass censorship and protects you from spying & tracking too! . Following is a tutorial on the Easiest way on How to use Tor on Android to open or access .onion websites (lollipop, marshmallow, nougat) using Fire.Onion Tor browser-

    Easiest Tutorial on How to access or Open Tor Network .onion websites on Android by Fire.Onion browser  – 

    • The official method to open or access the tor network using Orbot & Orfox for Android is quite complex as it requires two separate apps to work, and even if one app is at fault your network is not secured.
    • So, in order to overcome these issues we use Fire.Onion tor browser for Android which has an inbuilt-tor connection maker + browser , thus doing all the work in a single app.
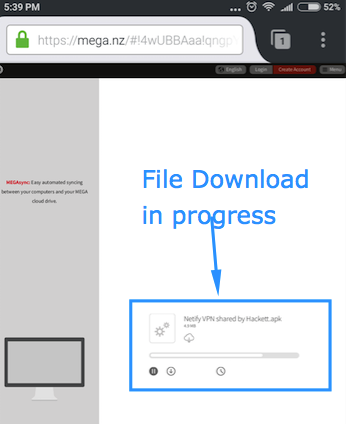
      Click here to Download Fire.Onion browser for Android from Google Play Store
    • After you have downloaded and installed the app. launch the app, it will now automatically start connecting to Tor network as soon as you launch it! as shown in the image below –
      Fire.Onion Android Tor Connection
      Fire.Onion Android Tor Connection

      Please wait for a while until it gets connected.

    • Voila! as soon as it gets connected it will automatically open the “Duck Duck Go” online search provider’s .onion website as shown in the image below –
      .onion website access on Fire.onion Android
      .onion website access on Fire.onion Android

      That’s it thus, you can now easily access all .onion & secret web websites as well as bypass censorship using Tor network by using Fire.onion Browser on Android.

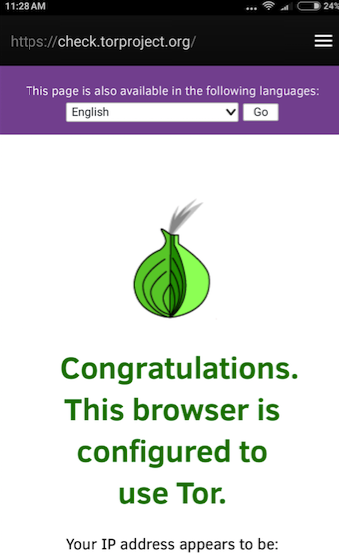
    • Note If in case you might be worried about your privacy or security, you are behind Tor’s secure network on Fire.onion browser – You can visit https://check.torproject.org to verify your connection security on Fire.onion which successfully worked for us as shown in the following image –
      Successful Tor Connection on Android
      Successful Tor Connection on Android

      Thus, this is perhaps the most secure & easiest method to access .onion websites on Android phones, The official method isn’t easy while the Tor Proxy sites don’t work for all .onion websites e.g Official facebook Tor address http://facebookcorewwwi.onion doesn’t work with tor proxies but it does work with Fire.Onion, hence we widely promote the Fire.onion one. Incase if you face any difficulties or have any doubts feel free to comment!

  • MacPaw CleanMyMac 3 Review : Efficient Cleaner for Mac OS X

    MacPaw CleanMyMac 3 Review : Efficient Cleaner for Mac OS X

    Mac OS X is very lean and fast, But however lean or fast the Operating System is its still bound to get some junk files which need to be removed. These junk files not only take up space on your hard-drive, but they even slow down your system. In this article we will be reviewing MacPaw’s Clean My Mac 3 for Mac OS X . We have tested this on Mac OS X Mountain Lion, Mavericks & Sierra too. Here’s a detailed CleanMyMac 3 review –

    Method of Reviewing –

    How to clean up Mac OS X using Clean My Mac ?

    • After installing & running CMM app , it greeted with the interface as shown in the image below –
      Clean My Mac 3 Mac OS X
      Clean My Mac 3 Mac OS X

      It was prompting us, to click the Scan button, so to start the process Click on the “Scan” button as highlighted in the above figure.

    • Now, it will start scanning your system for cache memory, dump files , system junk & iTunes junk and will show how much area can be freed up by clearing each of the above places as shown in the figure below –
      Scanning Result of Clean My Mac 3
      Scanning Result of Clean My Mac 3

      which in our case was “4.86 GB!” which is a really big amount of junk data.

    • Now Simply , Click on “Clean” button and yo! All your Junk files and unwanted data is removed within split seconds.
    • Thus, Clean My Mac was able to clean up our hard-drives and was able to recover 5 GB of disk space out of 150 GB which is really a good ratio.
    • Click here to Download .dmg for Clean My Mac 3 for Mac OS X Mountain Line, Mavericks & Sierra.

    Final Take – Clean My Mac 3 performed the cleaning tasks efficiently and it did recover a good amount of Disk Space for us, besides that it even contains a Disk file Shredder which really permanently deletes a file instead of temporary removal (file-deleted by shredder cannot be recovered by file recovery software) and thus is a good security practice.

    The version we used for review was paid and was sponsored by MacPaw and you can get Clean My Mac 3 by purchasing from here.,

  • WhatsCall Review : Free Worldwide calls without Sim Card via App over WiFi Internet Connection to any phone

    WhatsCall Review : Free Worldwide calls without Sim Card via App over WiFi Internet Connection to any phone

    Recently I was in International roaming, and had to call the roaming country’s phone number but my sim didn’t had any outgoing over there in the foreign country. But still I was able to call over the Hotel Wifi only because of WhatsCall App, I had it verified and it was neatly able to call a local number over Wifi for me. So, here comes the WhatsCall review -an app which gives Free Worldwide calls over wifi to any phone or mobile number.

    Salient Features of WhatsCall – 

    • WhatsCall review
      WhatsCall : Free Global worldwide calls

      WhatsCall lets you call any landline or mobile number over your WiFi or internet connection totally for free!.

    • It does so by charging you on WhatsCall credits which can be earned easily by using the WhatsCall app itself no money required!.
    • There are lots of easy ways to earn Free WhatsCall credits –
    • Thus, its really one app which will be really handy, as it will help you to call online to offline phone incase you run out of balance / talktime.

    Review & Pre-requisites –

    • First of all download & install the WhatsCall app from the link below –
      Click here to Download WhatsCall app.
    • Now, since it requires mobile number verification, Please enter your mobile number and verify using the verification code sent on it.
    • WhatsCall is ready!

    How to place a free call via WhatsCall ?

    Since, I didn’t had the screenshots ready on my foreign trip, i tried to simulate and create the same scenario –  Local offline phone calls over internet using WiFi with Airplane mode on!

    Now, since AirPlane mode ensured my phone won’t be receiving any signals, I connected to WhatsCall over Internet using Wifi and then started calling from the dialling screen as shown below –

    WhatsCall over wifi to local phone
    WhatsCall Dialing Screen
    • On the dial screen, as shown in the above image – Select the Country which you want to call.
    • Type in the mobile number whom you want to call.
    • Press the call button.
    • That’s it ! now wait for some time, until your call is magically connected over the internet connection to non-internet number , as shown in the below image –
      Live call to offline number over wifi internet
      Live call to offline number over wifi

      Call Quality of the app is awesome : Infact the normal mobile calls over Wifi sometimes show distortion on Docomo, Jio but WhatsCall did a good job!. The Clasrity depends on your internet connection though, it requires a decent internet connection.

  • How to change Camera Shutter Speed in Android by Camera FV-5 Lite Free app

    How to change Camera Shutter Speed in Android by Camera FV-5 Lite Free app

    Android Smartphone camera’s have come a long-way to be able to compete with point & shoot camera’s. The Phone cameras however, lack a bit when it comes to competing with low/mid-range DSLRs due to absence of many customisation options present in DSLR’s such as lenses, panning, zoom, Exposure ratio , shutter time and many more. Now, changing the shutter speed helps you capture a lot of creative photo’s especially the motion one’s such as blurring motion, or panning (blurring non-motion things) and many more. Here’s a simple tutorial on How you can change the Shutter speed on your Android phone for free using Camera FV 5 lite app

    Tutorial to Change Camera Shutter Speed in Android by Camera FV-5 Lite App

    • Changing the camera’s shutter speed is not enabled by default in many stock camera app’s and very few support them for free, one of them is Camera FV5 Lite, so we need to download and install the app.
      Click here to Download & install Camera FV5 lite App from Google Play.
    • Now, after you have downloaded and installed the app, launch the fv 5 lite app, it will show you with a shooting screen as shown in the below image –
      change shutter speed android
      Click on the P icon to change shutter speed in Camera FV5

      Now, as shown in the above image tap on the “P” icon in the left hand side bar to change the shutter speed type.

    • After you tap on the “P” icon it will show you with the field labelled “Program Mode” as shown in the image below –
      Tap or Select the S Program Mode
      Tap or Select the S Program Mode

      Here tap or select the “S” program mode.

    • After you select the Program mode by tapping on “S”, it will now ask you to select the shutter speed as shown in the image below –
      change exposure shutter speed android
      Select your desired Exposure (Shutter speed)

      Here tap and select any of the values, you want the shutter to remain open.

    • Now, you after selecting the shutter speed, you will again be redirected to shoot screen as shown below, here simply focus by touching the area on screen. and to capture photo click on the “shoot” button as shown –
      Click the camera icon to shoot
      Click the camera icon to shoot


    • That’s it ! you have easily changed the camera exposure shutter speed on your Android Smart phone ala DSLR!
    • Note – Increasing the shutter time captures motion, and causes the shutter to remain open for a longer time which generally blurs the motion . Since the normal hand cannot remain stable for 1 second, it may blur the image hence usage of tripod or any stable base for phone is highly recommended!
  • How to Download from Mega on Android without Mega App (Mega.Co.nz Cloud)

    How to Download from Mega on Android without Mega App (Mega.Co.nz Cloud)

    Mega.co.nz is a leading cloud storage provider which allows users to easily upload and share files into their secure cloud. Although Mega is a good service , it comes with a few limitations. One of them is that the files stored and shared via Mega.co.nz cannot be easily downloaded on mobile devices or Android phones without their own Mega.co.nz app. But not anymore, here’s a simple tutorial which will enable you to easily download files from Mega cloud on android without installing Mega App.

    Tutorial to Download from Mega Cloud on Android Phones – 

    • For this tutorial we strictly recommend using Mozilla Firefox browser or any Web browser which supports HTML 5 . (Google Chrome too will work sometimes, but it also hinders page elements our success ratio with Firefox is 100%)
      Click here to Download Mozilla Firefox for Android.
    • Now, simply visit the Mega URL or file link which you want to download on the Web Browser (Firefox / Chrome).
    • It will now show you a page showing this file can’t be downloaded in mobile browser as shown in the below image –
      Mega.co.nz download in Android
      Click on the 3 dots to access settings

      On this page, tap on the “3 dots” in the top right hand side corner to access the browser settings menu. It will open the settings menu as shown in the following image –

      Tap on Request Desktop Site Mega
      Tap on Request Desktop Site
    • Here Checkmark the option “Request Desktop Site”  and tap on the “reload icon” as shown in the image below –
      Tap on the reload icon to reload page
      Tap on the reload icon

      The site will now be reloaded, into your browser into a PC or Computer like user interface as shown in the next image –

      Mega.Co.nz PC version in Mobile
      Mega.Co.nz PC version in Mobile


    • Here, simply Click on the grey-colored “Download” button as highlighted in the previous image! .. It will now start downloading the file as shown below –
      Mega Download in android without app
      Download in progress from Mega

      Once the complete file is downloaded it will now ask you with a Dialog Box to save the downloaded file as shown –

      Here select the download option and your file will be now be saved into the Downloads folder!

    • That’s it !! you have now successfully downloaded files from Mega without downloading its app. Do comment if you encounter any issues or any problems. I will be happy to help 🙂
  • How to add Sound Equalizer on Windows 10/7 (PC & Laptop)

    How to add Sound Equalizer on Windows 10/7 (PC & Laptop)

    Equalizer is one of the essentials when it comes to Music lovers and audiophiles , but sadly Windows 10 or be it any Windows 7 , or 8.1 none of them comes with an inbuilt Equalizer. Many times you might want to use Equalizer on YouTube, Spotify or be it any game or application on Windows. So, here’s an easy method which will add a default system-wide Sound equalizer so that the direct audio stream is equalizer enabled thus adding Sound equalizer to Windows 10 & iTunes or any app installed in it.

     Tutorial – Method on How to add Sound Equalizer on Windows 10 , Windows 8.1 & 7 (System-wide)

    Pre-Requisites – 

    1. Your Computer or laptop must have audio drivers installed & working.
    2. A Working internet connection.
    3. A user account to install apps with administrator priveledges.

    Method to install the Equalizer and front end for it –

    • We are going to use “Equalizer APO” for installing the system-wide equalizer and then a front end to control the equalizer presets.
    • So, first of all Download & Install Equalizer APO according to your System OS from the links below –

      Click here to Download Equalizer APO for Windows 10 / 7 / 8.1 (32-bit Variants)
        

      Click here to Download Equalizer APO for Windows 10 / 7 /8.1 (64-bit Variants)

    • After you have downloaded the above software, while installing it will ask you to select the Playback devices as shown in the image below –
      Selecting Playback devices on Equalizer APO Windows 10
      Selecting Playback devices on Equalizer APO Windows 10

      here select the audio playback devices where in you want to use Equalizer , Headphones / Speakers etc (You can even select all of them)

    • After selecting the playback devices , Click on the “OK” button.
    • Equalizer APO will now be installed on your System and it will be rebooted (restart the windows operating system)
    • Once , you computer or laptop is restarted, we will now control the Equalizer by a front-end named as “PC Equalizer – GUI” . So you need to Download & Install PC Equalizer GUI from the link below –Click here to Download PC Equalizer GUI for Windows 7/8.1/10 
    • Now, once you have installed PC Equalizer GUI it will ask you permissions to write to configuration file, allow it by “Click Yes”.-
      PC Equalizer GUI for Windows 7/8.1/10
      PC Equalizer GUI for Windows 7/8.1/10


    • Now, in PC Equalizer you can easily change the default Equalizer presets , such as “Bass, Party , Jazz , Rock , Soft, Classical , noise-reduction ” from the drop-down menu as shown in the image below –
    • Changing Equalizer in Windows 10
      Changing Equalizer in Windows 10

      Thus, you have now successfully changed the default audio output Equalizer in your Windows 10 / 7 / 8.1 computer or laptop.

    • Besides, changing equalizer treble, vocals you can even change the audio output stream to mono or stereo adjust highs and lows. Also boost sound output using the app!
    • Thus, you can enjoy replica franck muller watches equalizer enabled sound on any app iTunes, Spotify, Chrome directly on Windows 10 or 7 or 8.1 using this tutorial.

    If you face any issues feel free to comment.

  • How to Capture long Scrolling screenshot of chats in Android & MIUI

    How to Capture long Scrolling screenshot of chats in Android & MIUI

    Recently I wanted to capture my WhatsApp chats with a friend, but unfortunately there was no option to capture complete chat at once as it didn’t fit in a single screen. Now, to overcome I started looking for options and found one using “Stitch & Share” app. Read on below for the complete method on How to Capture long big scrolling screenshots in Android & MIUI . Besides this method works on all famous android versions such as 4.4 kitkat , 5.1 lollipop and 6.0 marshmallow too

    Tutorial to capture Capture big & long scrolling screenshot of chats in Android –

    • In this tutorial we are going to “stitch” the captured screenshots , so first capture a sample screenshot which you want to start with
      (Note – Incase you don’t know the method to take a screenshot try the combination of volume down + power key simultaneously) 

      Now after you have captured your first screenshot, Please scroll down and take another screenshot.
      Note – Please make sure the last message of the first screenshot is again repeated in your next screenshot. Thus overlapping the texts as shown in the example images below –

      First Screenshot (Last message highlighted by box to repeated)

      The last message of first screenshot is to be repeated as shown in the next image below –

      last message repeated in next screenshot

      Now using this message repetition technique capture as many screenshots you intend to stitch into a single one.

    • Now inorder to stitch them up, Download & install “Stitch and Share” screenshot app from Google Play from the link below –
      Click here to Download Stitch & Share Screenshot app from Google Play Store.
    • Once you have installed the app it will now prompt you with two options as shown in the below image –
      Big Long scrolling screenshot in Android
      Select Add Screenshot in Big Screenshot app


    • Now from the file gallery window which opens, select the most recent screenshots which you have taken and want to stitch and tap on OK.
    • Now in the preview window, tap on the “plus +” icon to append the next screenshot as shown in the image below –
      Tap on Plus to add second, third screenshot for stitching

      Note – In MIUI , you will need to select screenshots one by one by tapping on OK to add one screenshot and again adding second by same method

      • The Screenshots you added will automatically be stitched! as shown in the below image –
        Successfully stitched screenshot!

        That’s it ! Thus all of your chat is now combined into a single long big screenshot. Tap on the Green arrow highlighted by “blue arrow in the above image” to export your chat!

    • That’s it ! you have now saved your entire chat conversation into a single big long screenshot. Do let me know if you face any problems or encounter any issues.
  • How to Read/Write to NTFS disks on USB OTG in Android No Root [Enable NTFS Mount without rooting]

    How to Read/Write to NTFS disks on USB OTG in Android No Root [Enable NTFS Mount without rooting]

    Android OS’s USB OTG drivers by default do not support NTFS  filesystem format to browse or read files from NTFS storage disks such as external Hard-drives (HDDs) & Thumb-drives. Hence, any external hard drive or USB pen-drive formatted by NTFS file system isn’t mounted on Android. Although, external file explorers such as ES File Explorer let you browse through NTFS disks but they cannot write files to it. So, here’s a working method which will let you read as well as write to OTG connected NTFS hard-drives/pen-drives on Android that too without rooting –

    How to / Method – Read & Write to External NTFS (external Hard-drives & Pen-drives) on Android [No Root] 

    Pre-Requisites –

    Tutorial –

    • After installing Total Commander & UMS Plugin, please connect your external ntfs hard-drive or pen-drive via USB OTG on Android.
    • It won’t be visible in file explorer by default, infact in MIUI showed us “USB storage has blank or unsupported file system” , If you encounter any such error message please ignore and proceed further.
    • Now Open Paragon UMS Plugin app , it will ask permission to access USB Storage, click on “OK” as shown in the below image to allow it access –
      Paragon USB NTFS Plugin
      Paragon USB NTFS Plugin

      Once you tap on OK it will show you a screen with details of your storage name and its status as shown below –

      Paragon UMS Plugin Enable Write Mode
      Paragon UMS Plugin Enable Write Mode

      As shown in the above image “checkmark” the “Enable Write Mode” option after the drive is visible.

    • Now, we need to Open Total Commander, In previous Android versions v4.4 Kitkat and below launching Total Commander from Paragon UMS directly enabled writing to connected NTFS storage devices.
    • But for Android Lollipop 5.0, 5.1 and later Marshmallow 6.0 , you need to clear the UMS plugin app from task manager and open it again before launching Total Commander app else it throws error such as “cannot copy or move file”.
    • On MIUI its fairly simple as shown below –
      Close all apps in task manager

      After closing all apps via task manager , Now open UMS Plugin app followed by Total commander app.

    • In total commander app you will now see an icon with label “Paragon_UMS” label as shown in the below image –

      Write & Browse via Paragon_UMS in Total Commander
      Write & Browse via Paragon_UMS in Total Commander
    • That’s it now you can easily copy-paste and move files from Phone Storage memory to NTFS drive via USB OTG via Total Commander without rooting your phone!
    • If Total Commander shows blank contents of your ntfs storage drive, please close all apps again and again open total commander. If still problem persists, please try unmounting the drive in Paragon_UMS plugin and mounting it again.
    • Before Removing or ejecting your NTFS Drive, Please make sure you unmount it in Paragon_UMS.
    • That’s it You can now easily transfer contents from phone memory to external hard-drive or from NTFS pendrive to phone without rooting it.
    • If you face any problems while using the plugin, feel free to comment!
  • Top 3 Free Internet Recharge apps which give Free Data Pack in India

    Top 3 Free Internet Recharge apps which give Free Data Pack in India

    Its been sometime we wrote about the free recharge apps which give free recharge for downloading apps and completing offers. We guess you might earned a good amount of talktime by using the apps mentioned in the linked article, but now we bring you sometime which is even more sweeter! – Free Internet Apps for India which give free internet data pack to all operators in India. So, read on below to find out how you can get free internet packs on Airtel, Idea, Reliance , Jio , Tata docomo , Aircel or basically any mobile operator –

    Top 3 Free Internet giving Recharge apps in India –

    App No.1 – Databack 

    DataBack free internet app
    DataBack free internet app

    Databack is our favorite amongst all the free internet recharge apps as unlike other apps it gives you free internet credits even if you use the target apps over WiFi. Plus, it has Internet refund offers for almost all popular apps such as Facebook, WhatsApp , TrueCaller etc too..

    How to get Free Internet data via Databack –

    • First of all download Databack app from the link below –
      Click here to Download Databack app for Android from Google Play 
    • Now, once you have downloaded and installed Databack launch the app. Make sure your internet connection is active(preferably cellular data 2G/3G).
    • It will show you with Databack offers as shown in the screenshot alongside.
    • Now simply tap on any of the icons of app and click on “Use” to start getting your data refund. For example, if you want to get data refund for your PayZapp usage – Launch databack app and tap on “Use” from inside databack app next to PayZapp .
    • Your desired app will be launched and a green strip will appear confirming your data refund is active as shown below –
      Data refund Active Payzapp - Databack app
      Data refund Active Payzapp – Databack

      That’s it now keep using the app it will automatically add data consumed into your databack account, which you can use to redeem your free internet data in India.

      Note- You will get your data refund of WhatsApp, Facebook only if you open the WhatsApp / Facebook app via Databack app . You won’t get any data refund for using them directly.

    •  Besides, you can even invite your friends to install the Databack app as you will get Free 5Mb per each friend referral!
    • Click here to Download Databack app for Android from Google Play


    App No.2 Earnbytes app by Earn Talktime

    Earnbytes App by Earn Talktime
    Earnbytes App by Earn Talktime

    Earn talktime is a trusted and old name since the complete free recharge app came into force. Now, Earntalktime has built an inbuilt feature into app called “Earnbytes” . Earnbytes lets you earn data simply by launching your desired apps like WhatsAp, Hike, Facebook via its own interface.

    However, unlike Databack earnbytes doesn’t offer data refund for App usage over WiFi connection. But, its still a worthy alternative to Databack app as it has some offers which are absent on Databack.

    The Method to get your Free internet is pretty simple same as of databack-

    Click here to Download Earntalktime app 


    App No.3 Gigato

    Gigato free internet pack
    Gigato free internet pack

    Gigato is yet another free internet giving app , which hosts some different offers which are absent on Databack or Earnbytes.

    We however, didn’t find the ones for the apps which we commonly use the most e.g WhatsApp, Hike hence we placed it at the third position.

    But if any of the previous two doesn’t have a data refund offer for any app, and Gigato has it you are still in profit for getting free internet data.

    Click here to Download Gigato from Google Play.


    So, these are the current Best 3 Free Internet Data recharge giving apps in India which give you free internet packs for using app. If you face any issues, or know of any other such good app feel free to comment.