Category: Windows Tricks and Tutorials

  • Bitdefender Internet Security 2017 – A Complete Security Suite for your Device

    Bitdefender Internet Security 2017 – A Complete Security Suite for your Device

    Bitdefender is not a new player in the world of internet security solutions. It has been providing the best security solutions since 2001. If you are in search of the best security suite for your device then Bitdefender Internet Security 2017 is the one to come to your rescue. It is the latest security solution developed by Bitdefender to protect your system against malware, ransomware, and other aggressive attacks by third-party applications. Let us explore more about it below.

    About Bitdefender Internet Security 2017

    From the antivirus protection and internet security to the total security of multi-devices, Bitdefender has never disappointed its users. It is using the same malware scanning technology, sharing a compact interface, and has a minimal impact on the system’s performance. Bitdefender Internet Security 2017 is the latest security suite launched by Bitdefender for its old and new users. It can turn out to be a cost-effective solution for the users looking to aid their devices with a trusted security shield.

    internet security

    Learning about the Features of Bitdefender Internet Security 2017

    You first need to download and install the software on your device to discover what’s new in this security solution by Bitdefender.

    secure

    After the installation is completed, you will be asked to create an account with Bitdefender. Fill in the details carefully and signup for the account.

    protected

    Quick Scan

    You can click on the ‘Quick Scan’ option for scanning your device against any malware quickly. It will detect any active threats and help you in resolving any issues.

    scanning 1scanning 2

    Vulnerability Scan

    It will find all the vulnerabilities that might let malware to infect your system. It checks for the files that need update and are at risk to be attacked by malware.

    vulnerabilities

    • You can click on ‘View Modules’ to discover more options.

    view modemode 2

    Firewall

    Bitdefender Internet Security 2017 has an inbuilt firewall to provide extra protection to your network from any intruders trying to enter into your system through your network.

    • Go to Firewall settings and turn on the ‘Block Port Scans in Network’ option.

    network options

    • Go to ‘Adapters’ and turn on the Stealth Mode and Generic. This might slow down your internet speed a bit.

    speed bit

    Antivirus

    Bitdefender Internet Security 2017 has integrated the antivirus along it to provide an added protection to your device.

    • Click on ‘Antivirus’ option.

    options to check

    • The on-access scanning and active threat control is switched to ‘on’ by default.

    switched on

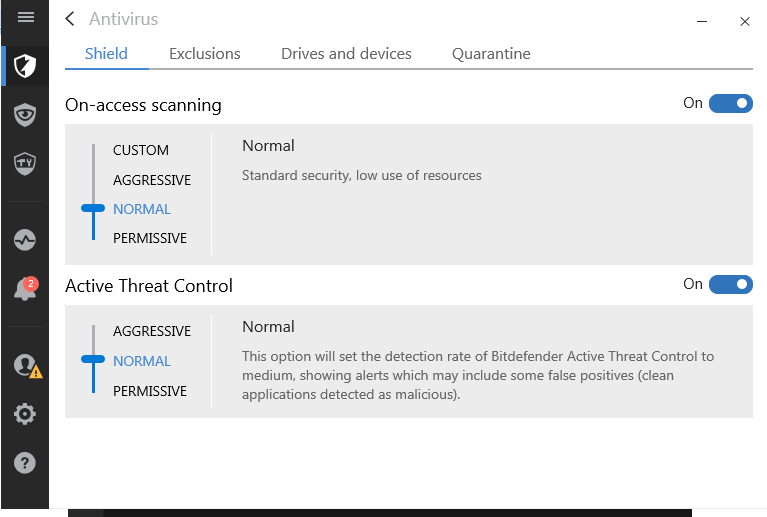
    • You can add the list of files and folders that you want to exclude from the scanning process in the ‘Exclusions’ option.

    exclude option

    • The ‘Drives and Devices’ option helps you to manage the scanning of CD/DVD devices, USB devices, and other devices mapped to your network drives.

    auto scan

    • You can add the files/folders that you want to be rescanned after the virus definitions have been updated. Go to ‘Quarantine’ option and add the desired files/folders to it. Do not forget to turn on the option. Quarantined files can be resubmitted for further analysis.

    shield

    Ransomware Protection

    The ransomware protection makes it easy to place your sensitive documents under a special protection from malicious encryption programs which may demand the ransom on the personal files.

    • Click on ‘Ransomware Protection’ option.

    trusted option

    • It is ‘off’ by default. You need to turn it on.

    shield

    • Now, you can choose to add or remove the files/folders from the list. In this way, you can easily protect the personal files from getting encrypted and held for the ransom.

    Safepay & Parental Advisor

    Bitdefender’s secure Safepay browser is optimized to deliver a good browsing, shopping, and banking experience. Its password manager comes handy at times of filling the credit card details automatically.

    • Go to ‘Privacy’ option.

    privacy

    • Click on ‘Safepay’ option to proceed with secure browsing.
    • The ‘Parental Advisor’ option is tailored for the parents who want to keep an eye over the activity of their kids.

    Monitor the Activities on your Device

    You can click on ‘Activity’ option to monitor the things happening on your device. Bitdefender will be activated as soon as you turn on your device and will keep a track of all the activities on your device, protecting it from malware and viruses.

    devicesprotection

    You can click on ‘Security report’ to get the reports for whole week.

    reports

    Pricing

    Bitdefender Internet Security 2017 is the most affordable security suite that helps you to stay safe and keep your device malware free. You can use it simultaneously on 3 devices under one subscription plan.

    Pros

    • Added Ransomware protection & in-built firewall
    • Low impact on the system
    • Affordable Pricing

    Cons

    • No online storage or VPN
    The Bottom Line

    Bitdefender Internet Security 2017 is surely the most secure and most powerful antivirus suite one can use for different devices. The effective malware protection, ransomware protection, secure-browsing, in-built firewall, and a number of exclusive features ensure that your devices and privacy are in good hands. You must try it today!

  • Top 5 Best GBA Game Boy Advance Emulators for PC Windows 10 / 8.1/7 [Computer / Laptop]

    Top 5 Best GBA Game Boy Advance Emulators for PC Windows 10 / 8.1/7 [Computer / Laptop]

    Game Boy Advance or GBA is one of the best Retro Gaming consoles and has some great games such as Pokemon Red (Standard Edition), The Legend of Zelda, Super Mario Kart etc. Now you can enjoy and play your favorite or any of the Game Boy Advance games on PC / Laptop using Game Boy Advance emulators. Many of the emulators do not support newer versions of Windows such as Windows 10, 8.1 and even Windows 7. So, here are the Top 5 Best GBA Emulators for PC / Computer or laptop with Windows 10, 8.1, 7 compatibility and sound support.

    Top 5 Best GBA Emulators for PC – Computer or Laptop

    GBA Emulator # 1 – mGBA

    mGBA GBA Emulator for PC Windows 10
    mGBA GBA Emulator for PC Windows 10

    mGBA is one of the fastest lag-free GBA emulators for Windows and will let you play you your favorite Game Boy Advance game on your PC or laptop.

    Besides emulating GBA game ROMs mGBA has some salient features such as –

    • Multi-player multi-window support.
    • Solar Sensors support
    • Game overrides and ROM patch support
    • Cheat code support

    Click here to Download mGBA Game Boy Advance Emulator for PC / Windows 10 / 8.1 /7


    GBA Emulator # 2 – VisualBoy Advance

    VisualBoy Advance GBA Emulator for Windows 10 / 7 / 8.1
    VisualBoy Advance GBA Emulator for Windows 10 / 7 / 8.1

    VisualBoy advance is another great GBA emulator for Windows PCs or Laptop and works flawlessly on Windows 10 , 7  or Windows 8.1 [all 32-bit & 64-bit] variants.

    VisualBoy Advance has some unique features such as –

    • JoyPad or Gamepad support (Play GBA games on PC with Joystick)
    • Cheats support.
    • Save & loading game support.
    • Ability to record Gameplay into videos or screenshots

    Click here to Download Visual Boy Advance GBA Emulator for Computer or Laptop 


    GBA Emulator # 3 – No$GBA Emulator

    No$GBA Emulator for Windows 7/8.1/10
    No$GBA Emulator for Windows 7/8.1/10

    No$GBA or No Cash GBA as it is known is another powerful GBA Emulator for Windows 10 / 8.1 /7.  Besides GBA it can even emulate NDS games thus enabling it to use it as a two in one emulator.

    To play Game Boy Advance game on Windows via No$GBA , navigate to File – > Cartridge menu (Files.lst) and here select the NDS game ROM which you want to play.

    Besides, No Cash GBA also has gamepad or Joystick support to play Game Boy Advance games.

    Click here to Download No$ Cash GBA Emulator for Windows 10 / 8.1 / 7


    GBA Emulator # 4 – Higan GBA Emulator

    Higan GBA Emulator for Laptop / Computer
    Higan GBA Emulator for Laptop / Computer

    Higan is a multi-emulator system which has support for Nintendo famicom, super famicom, game boy color as well game boy Advance emulation support.

    Besides emulating the gaming console, you can even specify custom BIOS rom so that you can even emulate Sega Master System, Mega Drive and even Game Gear.

    The GBA emulation game color reproduction is really good, however the sound is a bit laggy.

    Click here to Download Higan GBA Emulator for Laptop Computer or PC


    GBA Emulator # 5 – BoyCott Advance 

    Unlike the above mentioned GBA emulators which work on Windows 10 , 7 or newer versions,Boycott Advance is GBA Emulator for Windows XP , Vista and older versions .

    We managed to play it on new Windows using Compatibility settings, however it freezed on a number of occassions e.g while entering a Pokecenter in pokemon.

    Click here to Download BoyCott Advance Game Boy Advance Emulator

    Thus , these are the Best Game Boy Advance or GBA emulators for PC / Computer with Gamepad or Joystick support. To Play Game Boy Advance games, you will need Game ROMs which you can download from sites like Romhustler.net as these do not come with any game packaged. Incase if you face any problems feel free to comment.

  • Top 3 Nintendo DS / NDS Emulators for PC – Windows 10 / 7 to Play NDS Games on Computer

    Top 3 Nintendo DS / NDS Emulators for PC – Windows 10 / 7 to Play NDS Games on Computer

    Nintendo DS or NDS is one of the best selling handheld gaming consoles ever by Nintendo. Some of its game titles such as Mario Kart, Pokemon Black are still worth a decent gaming session due to their attractive gameplay. For the solution of How to play Nintendo DS Games on PC – We bring you the Top 3 Free Nintendo DS / NDS Emulators for PC .

    3 Best Nintendo DS / NDS Emulators for PC (Working on Windows 10 too) 

    NDS Emulator # 1 – DeSmuME

    DeSmuME NDS Emulator for PC
    DeSmuME NDS Emulator for PC

    DeSmuME is perhaps the best Nintendo DS emulator for your PC or Laptop. It can emulate and play Nintendo NDS games at ease, with microphone and sound emulation. Amongst all the emulators we tried our hand at DeSmuME had the best sound reproduction for ROMs & games.

    Besides, these DeSmuME has some great features such as –

    • Ability to Save games & load saved game states.
    • Cheat codes support.
    • External Gamepad and Joystick support.

    Click here to Download DeSmuME NDS emulator for Windows 10 / 7 / 8.1 (64-bit)

    Click here to Download DeSmuME NDS emulator for Windows 10 / 7 / 8.1 (32-bit)


    NDS Emulator # 2 – No$GBA (No Cash GBA)

    No$GBA Nintendo DS Emulation on Windows 10
    No$GBA Nintendo DS Emulation on Windows 10

    Not to be confused by its name, No$GBA is a really capable DS emulator for windows. Though primarily made for GBA it can run NDS games like Pokemon Black with ease..

    The only concern about No$GBA is its loading of ROM which isn’t visible at first.

    To play Nintendo DS game on Windows via No$GBA , navigate to File – > Cartridge menu (Files.lst) and here select the NDS game ROM which you want to play.

    The Emulator is very quick and supports gamepad too, its just sometimes the audio becomes unfiltered on switching between other apps to Nocash GBA.

    Click here to Download No$GBA Nintendo DS emulator for Windows 7/8.1 & Windows 10


    NDS Emulator # 3 – DuoS DSEMU

    DuoS DSEMU NDS Emulator for PC
    DuoS DSEMU NDS Emulator for PC

    DuoS DSEMU is altogether a different and very easy to use DS emulator. It has no User interface to open or load a ROM in order to save memory. All you need to do is right click on your games .nds ROM file and open with the DuoS DSEMU , or you can set file associations for the same.

    So , next time whenever you double click on the ROM it will instantly load inside the emulator.

    Unlike the above two emulators, DuoS doesn’t support gamepad or joysticks, but its really very fast and compatible with almost all Windows versions .

    Click here to Download DuoS DSEMU NDS emulator for PC / Windows 10 / 8.1 /7 


    So, these are the best NDS Emulators to play Nintendo DS games on your Pc or computer without owning the console, however you need to own the game or ROM for the Nintendo DS game you wish to play inside the emulator. A simple google search for NDS ROM plus game or sites like romhustler.net can help you get your desired NDS game.


  • Best Free 4K Video Downloader | An Easy Way To Download Any Video

    Best Free 4K Video Downloader | An Easy Way To Download Any Video

    4K Video Downloader is a free tool which can be used in downloading videos from some widely used sites like Facebook, Flicker, Youtube, etc. It can download videos in various video and audio formats along with subtitles. It also downloads videos in some high-quality formats. Various features are needed to be discussed about it, and we will discuss it in below part of this post.

    4K Video Downloader | Features

    media grabber

    4k Video Downloader is highly rated 4K company product which is available for almost all platforms it supports Mac, Windows, and Ubuntu. Now before moving further let us highlight some of its key features.

    1) 4k Video Downloader makes it users to download HQ videos and audio from some famous sites. It supports some sites like Vimeo, Youtube, SoundCloud, Flickr, Facebook and DailyMotion.

    2) It download videos in some HQ formats like HD 1080p, HD 720p or 4K and it even supports 8K videos.

    3) It downloads videos and audios in some widely used videos and audios formats like MP4, MKV, M4A, MP3, FLV, 3G. It can also download playlist in .m3u format.

    4) It can also be used in downloading subtitles if they are available.

    5) It also downloads 360 degrees videos, and users can actually see different angles in videos by dragging the mouse to see different angles.

    6) 4K Video Downloaders comes with some useful features for YouTube lover. Users can download entire videos playlist through one click, and it also downloads new videos of subscribed YouTube video channels.

    7) Smart Mode option is also there to save a lot of time user. It can be used to preselect the format and other properties of videos.

    Downloading a 360 degree YouTube video.

    Let us give a quick demo in which we are using 4K Video Downloader for Windows to download 360 videos from YouTube.

    1) Using 4K Video Downloader is quite simple and doesn’t require many efforts in understanding the working. Just open the browser and open the video in YouTube. And after that copy the URL of that video.

    racing sound

    2) After copying the URL of the video open the 4K Video Downloader software and you will get the following screen and just paste the link.

    paste the link

    3) After that system will ask for the format of the video. Choose that format according to your requirements.

    auto grabber

    4) Choose the Video format, destination folder and start the download.

    5) Within few seconds video will be downloaded in the destination folder. Open the folder and play the video.

    windows 10 media6) You can always adjust the smart mode through which you can pre-set the properties of the videos.

    7) Use can also change some preference setting of the tool just by clicking on preference option, and you will get the following screen on your system.

    settings and preference

    8) Use the tool yourself to explore more about its working.

    Ending Up

    We have to wrap up here, and before going, we would like to tell some pros and cons of 4K Video Downloader to our readers. Read all points carefully and then take discussion accordingly.

    Pro:

    1) The tool is light and smoothly runs on the system without affecting the performance of the system. The videos download speed is good and video downloading starts within few seconds only.

    2) It has elegant and clean and easy to use interface. Anybody can start using it within first use without wasting any time on understanding its functionality.

    3) 4K Video Downloader can download videos in various high-quality formats, and even it supports 360 degrees videos which is excellent for a free tool.

    4) The subtitle download feature is missing in most of the software of the same type even in the case of paid tools also.

    5) Automatic subscribed channels videos download and whole playlist downloads these two features are new and yes very exciting.

    Cons:

    We haven’t found any drawback of this free software yet.

    Final Thought

    If you are looking for video downloading software through which you can download videos from famous sites like YouTube, Facebook, Flicker, etc. then 4K Video Downloader is for you only. Use it to download videos from net and share videos with your friends.

  • Windscribe VPN Review | Best Free Way To Access Any Blocked Content

    Windscribe VPN Review | Best Free Way To Access Any Blocked Content

    blocked contentWelcome all to our new post, and in this post, we are going to review a VPN service called Windscribe. Windscribe is a simple to use VPN service which is available for almost all types of devices like Desktop, Mobiles and Routers in fact it is available for browsers only. Windscribe has many features at very affordable price, and its pack starts from $ 7.50 per month. In fact, users can also go for the free version. We will discuss this in details in later in the post. First of all, let us explore what we can do with Windscribe.

    Features of Windscribe

    Windscribe is a VPN service which provides some basic features of VPN to its customers. Let us highlight some of its key features.

    1. Basic VPN Services: It provides some basic VPN services like:

    a. Access Blocked Content: Users can access Blocked content through it. Now users don’t have to worry about their favorite content on the internet if they are traveling abroad.
    b. Security over Insecure Network: Users can use Windscribe to browse the internet safely over insecure network connections like public wifi, etc. Public networks are highly prone to Spying agencies and hackers.
    c. Encrypted Files Transfer: Data are send and received in a secure manner through encryption hence there is no fear of threat confidentiality.

    2. Support: As it mentioned above it is available for all types of platforms like:

    a. Desktop/ Laptop:Windows, Mac, and Linux.
    b. Browser: Google Chrome, Opera, and Firefox.
    c. Phone: Android, iOS, and Blackberry.
    d. Router: DD-WRT, Tomato Inside, and Flash Router.

    3. For Desktop

    a. Users will get full VPN client security for their system. Windscribe will protect all activities like browsing, email, Skype, etc.
    b. Firewall option is available which protects the exposure of home IP address if Windscribe service is unavailable at the moment.

    4. For Browser
    a. For Browsers, users will get fully protection to their privacy from annoying ads and location trackers.
    b. The Secure link is also available in the browser extension of Windscribe which can help in detecting harmful sites.

    You can also visit this video for more idea about the working and use of Windscribe.

    The interface of Windscribe?

    In this part of the post, we are going to share some snaps of Windscribe for Windows. Have a look at these snaps carefully.

    1. First of all, you have to create an account.
    2. After that, you have to do login.
    3. You will get the following screen after login.

    login screen4. As you can see, you can select the location of the servers. In free version users will get servers in only eight countries whereas in paid version servers in more than 40 countries are available. You can also see that in free version users will get only two GB free data instead of 10 GB if the email id is not verified.

    free data5. Users can also adjust preference settings too. Here is a snap of it.

    options6. Pricing

    Have a look at below snap for the idea about the pricing of the service.

    free and premium pricingAs you can see users can opt for free version but in free version, fewer numbers of servers are available whereas in paid versions more servers are available.

    Final Words

    We have provided sufficient points supporting Windscribe VPN service but still if you have any doubts in your mind, please read below pros and cons which we noticed while using it.

    Pros:

    1. Its free version is available in which users can get ten GB of data limit which is good for a free service.
    2. 40+ countries servers are available which are located in almost all part of the globe.
    3. The bandwidth of the Windscribe is also very good. And we didn’t notice any considerable slowdown in browsing speed.
    4. Available for wide range of devices and platforms.
    5. Some features like the firewall, secure link, etc are unique and helpful in maintaining privacy.

    Cons:

    1. It is not available for windows phone.

    Guys, try it free version and share your experience with us through like, comments and share. In case of any doubts you can contact us through contact us options. Thank you all.

  • Best Online Password Manager | Passwork Review

    Best Online Password Manager | Passwork Review

    lock key

    In today’s scenario password management services are very much required by everyone from an individual to a big company. Everyone wants an efficient way to store password and to do so we all uses password management services like Passwork, 1Password, etc. And in this post, we are going to review Passwork and are going to tell how it is useful for everyone.

    Concept of Passwork

    How Passworks ? What is the idea behind Passwork? Well, we are going to answer this question in this part of the post. It is a team password manager for companies which provide an efficient and secure way to store and share passwords among company employees. Through it, company head can keep track and manage password access.

    It is just like an online data sharing platform in which users (not all only permitted one) can access their data. In Passwork also, data are stored in a well-structured manner so that every user can use it easily.

    To get more idea about this password management service watch below video.

    https://www.youtube.com/watch?v=lBzsP4urcew

    Features of Passwork

    Let us highlight some of its key features among our readers.

    1. It is a password management service for all. From an ordinary person to big organization everyone can use it.
    2. Advanced security features like data encryption ( to store data in an encrypted way), one-time shareable link, etc. are provided by Passwork.
    3. The company head has whole control over password management of organizations as he/she can track history of password use, updates, etc. The whole power is in the hand of the head of the group not in the hands of employees. And this ensures that password management system works smooth if any employee leaves the company.
    4. Users can host Passwork on their own servers which make it more transparent and open source.
    5. The company also provide API to its users so that they can get integrated or develop their own Passwork Client.
    6. It is available for Websites, apps, browsers, desktop OS like Windows, etc.

    To get more idea about its features have a look at below snap which we have taken from its official website.

    features

    Why is Passwork the best online password manager ?

    If you want to know why Passwork is a better password management service, then please read below points carefully.

    comparison

    A Quick View of the Interface of the Passwork.

    We are giving a quick view of the interface of the Passwork so that our readers can easily understand its working.

    1. First of all, users have to create an account on it. Demo version ( can be created from their website) is also provided and initially it is free.
    2. After that users will get the following screen.

    adding the security

    3. Users can create groups and users can also create different subfolders and can store different passwords in it. Users can store passwords in following way.

    token

    5. After storing password, users can share a password with other members by adding them in a group.

    group share
    6. We are using a shareable link to invite members to the group instead of sending direct invitation to each employee. Have a look at below snap to get more idea about it.

    link generation

    Final Words

    Before wrapping the post, we are giving some pros and cons which we experienced while using this password management service.

    Pros:

    1. The interface of the Passwork is very simple and easy to use. Anyone can use it easily without any difficulties.
    2. It is also providing free demo version for three months ( special offers for a limited period).
    3. Its algorithms are open to all and API is also provided by the company so that anyone can integrate with Passwork quickly.
    4. It is available in both version Client server hosted and Self server hosted.

    Cons:

    Though this service is easy to use, but still some more tutorials should be available for regular users so that they can easily understand the working of Passwork password manager.

    As you all can see numbers of pros are too high as compared to the number of cons and because of this you can try it once. Passwork is providing free demo to its new users, and you should try it. Use Passowork and share your experience with other readers and send us your experience with them through like, comments and share.

  • How to add Sound Equalizer on Windows 10/7 (PC & Laptop)

    How to add Sound Equalizer on Windows 10/7 (PC & Laptop)

    Equalizer is one of the essentials when it comes to Music lovers and audiophiles , but sadly Windows 10 or be it any Windows 7 , or 8.1 none of them comes with an inbuilt Equalizer. Many times you might want to use Equalizer on YouTube, Spotify or be it any game or application on Windows. So, here’s an easy method which will add a default system-wide Sound equalizer so that the direct audio stream is equalizer enabled thus adding Sound equalizer to Windows 10 & iTunes or any app installed in it.

     Tutorial – Method on How to add Sound Equalizer on Windows 10 , Windows 8.1 & 7 (System-wide)

    Pre-Requisites – 

    1. Your Computer or laptop must have audio drivers installed & working.
    2. A Working internet connection.
    3. A user account to install apps with administrator priveledges.

    Method to install the Equalizer and front end for it –

    • We are going to use “Equalizer APO” for installing the system-wide equalizer and then a front end to control the equalizer presets.
    • So, first of all Download & Install Equalizer APO according to your System OS from the links below –

      Click here to Download Equalizer APO for Windows 10 / 7 / 8.1 (32-bit Variants)
        

      Click here to Download Equalizer APO for Windows 10 / 7 /8.1 (64-bit Variants)

    • After you have downloaded the above software, while installing it will ask you to select the Playback devices as shown in the image below –
      Selecting Playback devices on Equalizer APO Windows 10
      Selecting Playback devices on Equalizer APO Windows 10

      here select the audio playback devices where in you want to use Equalizer , Headphones / Speakers etc (You can even select all of them)

    • After selecting the playback devices , Click on the “OK” button.
    • Equalizer APO will now be installed on your System and it will be rebooted (restart the windows operating system)
    • Once , you computer or laptop is restarted, we will now control the Equalizer by a front-end named as “PC Equalizer – GUI” . So you need to Download & Install PC Equalizer GUI from the link below –Click here to Download PC Equalizer GUI for Windows 7/8.1/10 
    • Now, once you have installed PC Equalizer GUI it will ask you permissions to write to configuration file, allow it by “Click Yes”.-
      PC Equalizer GUI for Windows 7/8.1/10
      PC Equalizer GUI for Windows 7/8.1/10


    • Now, in PC Equalizer you can easily change the default Equalizer presets , such as “Bass, Party , Jazz , Rock , Soft, Classical , noise-reduction ” from the drop-down menu as shown in the image below –
    • Changing Equalizer in Windows 10
      Changing Equalizer in Windows 10

      Thus, you have now successfully changed the default audio output Equalizer in your Windows 10 / 7 / 8.1 computer or laptop.

    • Besides, changing equalizer treble, vocals you can even change the audio output stream to mono or stereo adjust highs and lows. Also boost sound output using the app!
    • Thus, you can enjoy replica franck muller watches equalizer enabled sound on any app iTunes, Spotify, Chrome directly on Windows 10 or 7 or 8.1 using this tutorial.

    If you face any issues feel free to comment.

  • How to Access & open YouTube website in Material Design view!

    How to Access & open YouTube website in Material Design view!

    Google has confirmed that its testing the material design on YouTube. This re-designing of YouTube layout took almost 2 years to come and is currently in Beta. However, You can access this Beta version on your PC or Windows Computer and even Mac OS as well by a few tweaks. Here’s a small guide which will enable you to Access & Open YouTube website in Material Design View .

    Pre-Requisites –

    • Preferably Google Chrome Browser , although We tried and it worked on Chrome & Mozilla Firefox as well.
    • A Simple Extension for editing the Cookies , We recommend Edit this Cookie extension.

    Method to Access YouTube Material Design Website –

    • First of all Download & Install the “Edit This Cookie” extension from Google Chrome Store / Opera Store / Mozilla Add-ons repository from the links below –
      Click here to Download Edit This Cookie extension for Google Chrome
      Click here to Download Edit This Cookie Add-on for Opera.
    • Once you have installed the extension , it will add a cookie icon in the address bar of your browser.
    • Now, either sign-out of all your Google Accounts on your browser, or simply Open a New Incognito Tab.
    • In the incognito window or once signed-out of your account, Navigate to the below YouTube USA URL by clicking the link below.. (The Material design view tweak currently only works on the US URL Below) –
      https://www.youtube.com/?gl=US – Click here to Open the YouTube USA URL
    • Here comes the Main Part.. Once you have opened the YouTube USA Link in incognito window – Click on the “Cookie” button in the right-hand top corner and look for the option labelled “VISITOR_INFO1_LIVE” as shown in the image below –
      YouTube Material design Cookie
      YouTube Material design Cookie

      Here expand the “VISITOR_INFO1_LIVE” option and delete the existing text inside the “Value” box, Replace the text with “Qa1hUZu3gtk” without quotes. It should look like shown in the following image –

    • YouTube VISITOR_INFO1_LIVE
      YouTube VISITOR_INFO1_LIVE

      That’s it ! Now simply “Click on the Checkmark button” at the bottom and reload the YouTube USA Page!

    • Voila! .. You’ll see the New Material Design of YouTube loaded right in your browser.. as shown in the below image –
      YouTube Material Design
      YouTube Material Design

      You can even use options search as search and view the redesigned Channel Pages .. They look absolutely stunning – For example below is the screenshot of IPL 2016 YouTube channel –

      IPL 2016 Material Design Youtube
      IPL 2016 Material Design Youtube


    I Personally, liked the new YouTube design 🙂 , Did you like it ? What are your views ? Do let us know if you face any problems while accessing the new layout.

  • Trinus VR : Stream Windows 10/PC Screen to VR Android Phone

    Trinus VR : Stream Windows 10/PC Screen to VR Android Phone

    Virtual Reality is the new big thing in Video Gaming arena, due to its ability to give a very realistic experience as well as native Head-Tracking support. The most basic aspect to experiencing Virtual Reality is the ability to See or view the screen inside the VR device (VR Headsets) using our Smartphone. Not all the games are made for VR and hence they don’t support it by default so do majority of the PC Games. So, Here’s a small tutorial which will enable you to stream normal 2D Videos , Normal Computer Games to your Android Smartphone by using Trinus VR app .

    Tutorial to Stream Windows 10/7/8.1 Screen to Android (Mirror & convert Normal video to VR) –

    Pre-Requisites –

    • The Trinus VR Windows 7/8.1/10 Server installed on the Computer / Laptop . Download it from the link below –
      Click here to Download Trinus VR Server App for Windows 7/8.1/10 (32-bit & 64-bit)
    • The Trinus VR Lite Client App installed on your Android Smartphone (VR Device) –
      Click here to Download Trinus VR lite App from Google Play Store.
    • Both the Server & Client should be connected to the same network i.e –
      Connect both the Computer / Laptop and Android Mobile to the Same WiFi Router
      OR
      Connect your Android Phone via USB Data Cable to the computer / pc after you enabled USB Tethering on the Android device. (You will find the USB Tethering Option inside the “Settings – > Mobile Networks -> Tethering & Portable Hotspot” option.

    Tutorial –

    • After you have installed the Trinus VR Server and Client app on the respective devices, Start first the Server App on the Computer, Then Launch the Trinus VR Client app on the Android.
    • Now the Server and client will try to connect to each other based upon the type of connection . Now either select the Type A Method (WiFi) or the Type B (USB) Method to get the devices connected.

    Type (A) Connection using the Same WiFi Network –

    • If you’re using the WiFi mode of connection, Please open the Trinus VR App on Server (computer) and Client(android phone).
    • Now, Press the start button on Server and wait until it detects the client automatically. If it doesn’t detect the client automatically copy the IP address as shown in the below client screenshot –
      Copy the Client IP Address

      Now select the “IP” option on the Computer and Enter the IP address of the client as shown below on the Trinus VR Computer app –

      Enter the Client IP Address

      Now click on the “OK” button . The Trinus logo will now be “Blue (Violet) instead of the Previous Gray.

      Tap to Start Server
    • Congratulations! You have now successfully streamed your Normal Windows Screen to your Android Phone in VR Format. Simply navigate your mouse to change the screen streamed to your Android Phone.


    Method (B) Using USB Tethering & Cable – 

    • First of All Enable USB Tethering on your Android by navigating to “Settings – > Networks – > Tethering & Hotspot” And enable USB tethering on your android device as shown in the Image below –
      USB Tethering Enabled on Android

      Now after enabling the USB Tethering on Android, Connect your Android device using USB to your Computer / Laptop using USB and Launch the Trinus VR Computer (Server) App.

    • Now after launching the Server app, open the Trinus VR Client App on Mobile , You’ll see “USB Detected” Option  as shown in the below image –
      USB Detected on Trinus VR

      Now simply Tap on the “Black” trinus logo to turn it “Blue” !

    • Voila! Congratulations! your PC Display is now mirrored to your VR device & Android phone!


    Final Take =

    • Trinus VR Functions really great and tracks the head movements as well if your Phone has Gyroscope sensor enabled. It also has options for Fake 3D and further Customizations according to the VR Google Cardboard you are using as shown below –
      Trinus VR Settings Windows 10
      Trinus VR Settings Windows 10

      Here’s how it followed the Mouse and even mirrored Google Chrome in VR to my Android device –

      Computer Screen in VR Android
      Computer Screen in VR Android

      Overall Playing Computer Games on VR was a really fascinating experience so was watching 3D movies. And as Trinus VR works with Google Cardboard or any other VR headsets thus no need of Oculus Rift! whatsoever.

    • If you face any problems while using Trinus feel free to comment.