Sometimes, we need to run or play a game which doesn’t support our xbox 360,ps2,ps3 gamepads or our gaming joysticks on computer, or sometimes just to simplify things and game playing, as playing using the normal keyboard + mouse combo can become tedious and boring too. Just imagine using an analog control (stick) and moving it instead of using the normal combination of A,S,D,Z,W to move the object or character , and using another stick to change the view 🙂 , sounds interesting ? isn’t it , well indeed it is! , so following are 3 best free gamepad controller softwares which will help you to easily map keyboard inputs to mouse and thus get an edge playing the game!
Though Xpadder isn’t free we have a good free alternative game controller software another free alternative to xpadder – JoyToKey . JoyToKey helps to configure advanced controls and functionalities to gamepad buttons/analogs , with acceleration and vibration support. Click here to view advanced JoyToKey configuration tutorial to control your gamepad on PC.
Software # 3 – Xbox360ce
Xbox360ce
Using Xbox 360 controller on PC becomes more easy if you’re using Xbox360ce, xbox360ce helps you use any controller on your pc / computer by assigning and mapping vaarious keyboard / mouse actions to gamepad buttons, and then generates the xinput.dll files, these xinput files then have to be copied to the game directory, before running the game executables. After copying the .dll files, execution of game let’s the inputs be given to the game directly from the gamepad controller! , Click here to for a detailed xbox360ce tutorial.
So these are the best 3 free gamepad controller softwares to control game pad / joystick on PC / Computers for Windows 7 / 8.1 /10 , If you know of any good other such controllers, or face any problems while using them feel free to comment
Recently we wrote about configuring gamepad on your pc using an old version of Xpadder, but you may want to use the latest software for controlling your gamepad /joystick on pc , or you may want to tweak some extra settings or have extra configuration options to use your gamepad / joystick on pc for some games. In all above cases, and many more JoyToKey comes to the rescue, JoyToKey is another great tool to configure and use your Xbox 360 , PS2 , PS3 , PS4 and nintendo remote wii controllers on PC . Here’s a brief JoyToKey tutorial which will introduce and help you to configure JoyToKey for using gaming controllers gamepads on your Windows 7/8.1/10 PC/laptop.
JoyToKey Tutorial for configuring gamepad on PC –
JoyToKey on Windows tutorial
First of all, connect your gamepad/joystick to your PC / Laptop and install the Gamepad drivers.
Now, download JoyToKey by clicking here, and extract it to a folder where you want to keep JoyToKey (JoyToKey doesn’t require installation, its extract and run app).
After you have extracted JoyToKey, connect your gamepad controller/joystick to computer and now run the JoyToKey.exe executable.
You’ll be shown a window as shown in the alongside image, now press any key/push any anaolog on your gamepad. It will be highlighted in yellow as highlighted in the alongside image.
Mapping Keyboard input / mouse controls using JoyToKey
Now, once you’ve seen the highlighted labels, you can start mapping your keyboard inputs /mouse controls to the gamepad buttons and analog , To do this follow the below steps –
Simply start double-left clicking by mouse on the Joystick 1 elements – Stick 1 <- , Button 1, Button 2 . or you can even manually select each element and click on “Edit button assignment” .
Once you select the button/stick on the gamepad profile , it will ask you for its corresponding keyboard input /mouse control – , Now if you want to assign keyboad input , select the keyboard label on the top and enter the corresponding keyboard stroke to be mapped to the joystick button as shown below –
Keyboard mapping in JoyToKey
Similary, you can also assign mouse control options, by selecting the sunction category as “Mouse” , and then selecting the mouse pointer / cursor controll by assigning the pointer option values as shown in the below figure – (The cursor movement if pushed to left minus or negative indicates left mouse movement and to right indicates right hand side movement, similarly for top (positive) and bottom (negative) , You can also checkmark the corresponding mouse click options highlighted by green color to simulate mouse clicks on your gamepad).
JoyToKey mouse mapping
Click on “OK” to confirm your keyboard / mouse input mapping to gamepad / joystick.
That’s it after mapping all the inputs, you can click on ok to save your gamepad profile, similarly you can configure the second joystick too on JoyToKey, i.e use and coonfigure two gamepads/ joysticks on same computer to simulate keyboard/mouse which wasn’t supported by Xpadder.
Voila! its done, configuring JoyToKey is rather easy and you can now start beating the game boss by playing the game easily by your gamepad!
Some games are very difficult to play on the normal keyboard + mouse combo and we feel that it would have been better if the game supported gamepads, joysticks. Or by someway we could have been able to simulate keyboard key -press or mouse control simply on our gamepads, which would make playing games much easier! especially the online & DOS based games. Yes its possible to do such actions by a small free utility – Xpadder v 5.3 , Xpadder lets you simulate keyboard key presss, and mouse actions by mapping the keyboard keypress, and mouse actions to Joystick and Gamepad buttons!. Let’s have a brief look into the following tutorial to configure xpadder for Windows 7/8/8.1/10 –
Tutorial to configure Xpadder on Windows 10 / 7 / 8.1 (32-bit as well as 64-bit)
Xpadder used to be free until version 5.3, but now if you try to download it from its official site – xpadder.com, it won’t be for free!. In our tutorial we will be using an older version of Xpadder, which is free to use for playing games with weak or no gamepad support.
The above package also contains, sample 3 images which are required for configuring joysticks, and an example mapping profile just incase you’re too lazy to map keys 🙂
Step 2 – Installing Xpadder
Now, simply install the above linked Xpadder, by clicking next .
Make sure your gamepad/joystick is connected to your computer before you open Xpadder.
Newbie alert –
Loading bundled in configuration of Xpadder
If you’re new to Xpadder and mapping , or if you were unable to map your controller, you may try opening the bundled-in controller and mapping file which comes with our installer, you can load it by –
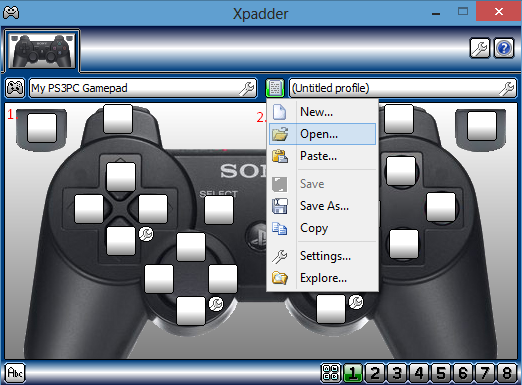
First click on the “gamepad” icon labelled “1” in the alongside image of Xpadder window, and select the “Open” option , here in select the folder in which you’ve installed our Xpadder and select the controller file present in it.
To load key-mapper again click the second icon labelled “2” as shown in the alongside image and use the “open” option for our pre-defined mapping.
Or if you think you’re an Hard-core Gamer, and like challenges, or faced any issues while loading the bundled configuration files , or would like to customise with additional options please proceed to Step 3, for manual configuration!
Step 3 – Configuring Xpadder
Xpadder compatibility troublesoot
Now, when you first try to run Xpadder on your windows, it will give you an Unsupported Windows Version detected error on Windows 8.1 /10 , and here’s the solution for the problem –
Now, go to compatibilty tab, as shown in the alongside xpadder compatibilty troubleshoot image, and in the section named “Compatibility mode” , select the version as “Windows 7″ and click on apply, and OK. You can also additionally checkmark the “run program as an administrator” option if you encounter any issues later.
That’s it, Xpadder is now ready to function, in your latest version of Windows.
Step – 4 Xpadder overview and adding Joystick image
Below is the screenshot of Xpadder , on running now, click on the settings icon which looks like a wrench , to load the xpadder joystick image file as shown below –
Xpadder wrench icon (joystick image)
Now , we need to select the appropriate joystick format *.bmp image file for loading onto Xpadder, we have bundled the ones for PS2, and Xbox 360 in the installer itself, however you can have a google search for *.bmp files of the gamepad controller image you have.
Now , clicking, on the wrench would open the image selection window – here we need to specify the image file of controller as shown by the labels 1..2.. & 3.. in the following image –
Xpadder – selecting controller image file
Now, after loading the controller image file, you will be shown the controller image in the Xpadder window.
Here , select the option “Sticks” present in the bottom left corner of xpadder window, and now to configure the analog sticks – click on the first “Enable” option marked by green color in the below image labelled analog configuration , and push the corresponding analogs(whose name is indicated on the pop-up) to the directions shown in the pop-up “left,up,down,right” , do the same for the other analog too (if present) on the controller.
analog configuration
Step 5 – Moving the highlight bubbles
After you, push the analog on your gamepad, a transparent bubble shapes would appear on the window, drag and drop them to their corresponding controller locations , as shown in this image. (Click here to view bubble drag image)
Step 6 – Configuring the D-Pad and other Joystick buttons
Once, you are done with the analog sticks, configuration – Navigate to the “DPad” option in Xpadder, and “Enable” it, now again press the corresponding Keys (whose name is indicated on the pop-up) on the connected controller/gamepad.
Step 7 – Adding the Buttons, and placing them
Now , click on the “Buttons” option in the xpadder, and start pressing the buttons of your gamepad – they’ll start appearing in the gamepad image as you press them, Now place them according to the location of the button which you had pressed on the gamepad.
Now, in the below mentioned example (image) – We pressed the “X” button on our controller and it appeared on the place marked by “1” now, we will move its appeared place shown by the maroon arrow, to its original place on the controller shown by blue arrow.
We pressed “X” we will move the box “1” to “X” position(blue arrow)
Now, please repeat these steps for all the buttons present on your gamepad and press “OK”.
A completely configured controller would look like this –
Completely configured gamepad controller
Step 8 – Mapping the Keyboard keys, and mouse actions to Added Analog and buttons.
Whoosh! we are done only with half the part yet, after you click on “OK” , you’ll be redirected to the following screen as shown below , here we need to individually click on these “white buttons” and assign the keyboard/mouse actions to them. –
We have to assign maps to each of these buttons, simply click on any whitebox to start.
Clicking on the white button, would open the part of assigning keys – Check the below image carefully for conventions , alternatively you can click on the “wrench“icon besides the white-button to select pre-defined mapping, check the below image for manual mapping –
Manual mapping for white buttons – joystick actions.. (Click on image to view full-size)
You can assign the mouse-movements to the 4-white buttons of analog , to simulate the mouse movements :).
After assigning some functions to the buttons, it would look somewhat like this –
A demo assignement mapping
Voilla! Now, you can check puching your analog , the mouse pointer would also be moving! the way you are pushing it 🙂 ,
Step 9 – Running the game!
Now, simply run the game without closing Xpadder! and play it using your gamepad like a boss! 🙂
If you, face any issues or encounter any problems feel free to comment 🙂 ,
Hello everyone , one of the biggest visible drawback of the iPhone is its inability to support Bluetooth file transfer . Hence, we face problem while transferring files from iPhone to iPhone – using AirDrop too is an inconvenient option . In this article – I will cover one of the simplest methods to transfer music from iPhone to iPhone without using Computer/PC/Mac by SHAREit App. Not only music, Shareit App by lenovo can also be used to transfer data,documents(PDF, Docx. XLS etc) from iPhone to iPhone. I used it to transfer data from iPhone to iPhone & Android too, however if you need to transfer Music from iPhone to iPhone/Android you will have to use Xender App – Click here for Tutorial on using Xender app.
Though, many tutorials and methods are available on net I am using SHAREit because it doesn’t require an Internet Connection or a Computer/PC at any stage!
The various modes of transfer supported by SHAREit App are –
Transfer Music/Data from iPhone to iPhone. (directly Share music iPhone to iPhone)
Transfer Music/Data from iPhone to iPad.
Transfer Music/Data from iPhone to Computer/PC.
Transfer Music/Data from iPad to iPhone.
Transfer Music/Data from iPad to iPad.
Transfer Music/Data from iPad to Computer/PC.
Instructions/Method to use ShareIt on your iOS Device
Here I used MyComputer/Laptop as Receiver as i didn’t have a Second iPhone
Note – Make Sure both your parent device (sender) and child device(receiver) are connected to the same Wi-Fi network , else create a personal hotspot on your parent device and connect the child device to the hotspot before opening the SHAREit app.
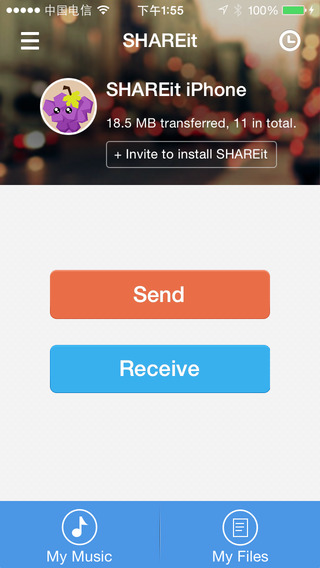
Now, Open ShareIt in the device from which you want to transfer the Data (Parent Device) and tap on “Share”.
Select the data/music which you want to transfer. Once you’re done with selecting the data – Tap on the “Next” option (button).
Open, the device on which you want to Receive the data/Music (Child Device) and tap on “Receive”.
Now, Shift to the sender(parent) device and you’ll see an icon/link in the network radar (As highlighted in the alongside figure) . Simply tap on the device’s Icon to Start the Transfer!
If incase , the Child device asks you to confirm the transfer – Click on “Confirm”.
That’s it ! You have successfully transfer music iphone to iphone without a Computer/PC . And you have completed the iPhone to iPhone music/data transfer without an Internet Connection! (Share data iphone to iphone).
I hope, the tutorial was short and easy , if you face any problems/encounter any issues while transferring or using the app feel free to comment.
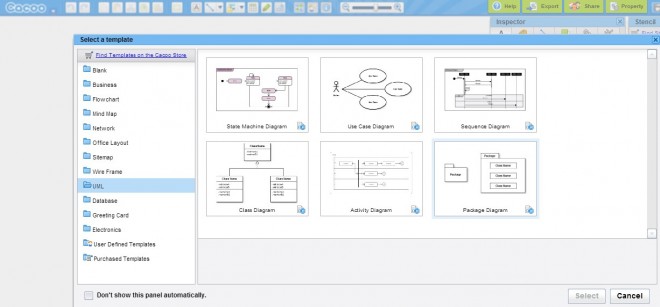
UML (Uniform Modelling Language) Diagrams are a vital component of Software Engineering/Documentation. I recently came to knew about this thing,as the documentation/UML diagrams presented by me were rejected by the university as they had been hand-made through Paint/MS-Word. After searching around for much time – I came across these online UML diagram tools and created diagrams using them and my diagrams were finally approved!. So, lets check out these Free yet awesome things – 5 Best Websites/Apps to create uml diagrams online.
Cacoo Diagram creator is the website/tool which i liked the most for creating UML diagrams online. Caccoo not only suports
UML diagrams, but it also supports
Network diagrams,
mind maps, site maps and
flowcharts too.
All UML diagram consituents such as Use Case diagrams, Sequence diagrams, Class diagrams, Activity diagrams, Package diagrams etc are supported by cacoo.
You can Export your created diagrams in multiple formats! . (Check this image for export formats supported by cacoo)
Cacoo’s free account itself got my complete project documentation work done, and cacoo supports educational purposes too! –
GenMyModel is yet another free and awesome tool to create flowcharts, UML diagrams online . You can directly skip the sign-up process and login with your G+ account.
GenMyModel provides inbuilt project management even for Free Users, and it supports major UML modelling features such as
Class diagrams.
Activity diagrams.
Use case diagrams.
Object diagrams.
Sequence diagrams.
Its user-interface too is very easy to use and efficient –
Draw.io is the tool which is perhaps quite-easy to use among all the tools/websites in this article. The only thing is that draw.io takes a time to get a little used-to.
There is no explicit “UML diagrams” category in draw.io .
UML diagram templates are present in the “Software design” templates in draw.io .
You can directly click on the template and start modifying itQ Thus, saving the time required t create UML diagrams
This tool was the most-widely used tool in my class, to create UML diagrams.
Generally Bonus content arent;t that good! but here the Bonus content is perhaps even better than the original article content. Creately is the tool I loved the most, but its free version only allows 5 Public diagrams , and hence had to write it in bonus.
Creately is very easy to use, efficient and light-yet beautiful User Interface.
Creately is the only UML tool who provides revison history of diagrams/projects.
So, if you require less than 5 diagrams/or if you can create multiple accounts – Creately is surely the way to go ahead!
These, were the Best 5 Free Online UML diagram creators – Do comment your favourite one, and if you face any problems while using any of these – We will be happy to help you out 🙂
Android is the most widely used Operating System today on Mobile devices, and the default and safest source to get Android apps which are packaged as .apk files is the Google Play Store. But many a times the Google Play runs very very slow , or as it is in case of many devices – its simply absent, so this leaves very less options from where we can download apps which are not modified by 3rd party and are safe and secure. In such cases, we still can download apps from Google Play, by using these sites thus,safeguarding us from malicious/modified apps.You can also use these websites to get back-up of your apps/Download it on PC and preserving them so that you can install the apps from their apk later. Let’s check out the 3 best Websites to directly Download Apk from Google Play store.
Pre-requisites :
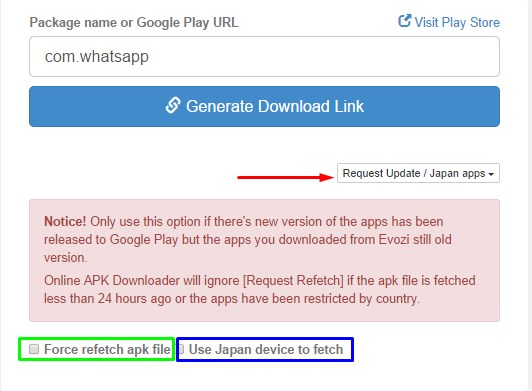
Google Play Store URL OR Package Name of the App . For e.g “https://play.google.com/store/apps/details?id=com.whatsapp” is the Google Play URL and the Package name will be “com.whatsapp”
As shown in below figure – The image shows Google Play store URL, and the Blue colored rectangle shows the package name in our case for e.g its “com.whatsapp”
Unlike other services which ask for “Device ID” to download Apk’s these sitew require no Device ID‘s at all! and method to download too is very simple 🙂
Request Update/Force Refetch of Apk file from Evozi Apk Downloader
Evozi Apk downloader is the first website which i came across which provided the service of directly Downloading Apk files from Google Play Store, And the method to use Evozi Apk Downloader website is very Simple too..
Visit the Evozi Apk Downloader Website by clicking here.
In the Box labelled “Package name or Google Play URL” Enter either the Google Play URL or Package name of the app which you want to download.
No Click on the Blue-colored “Generate Download Link” button, The App will be fetched and A Green button to Download the App/apk will appear below the Blue “Generate Download Link” button.
Check the Figure below for Download button example of Evozi Apk Downloader. You can also refer the Figure alongside for advanced option of Evozi to Update Apps and Force Refetch of Apk File indicated by the Red Arrow,and Green rectangle respectively . Besides this you can also request it to fetch Japanese Apps by ticking the option highlighted in Blue box from the image 🙂
Download button example of Evozi Apk Downloader
ApkLeecher.com may be defined as a worthy alternative to Evozi Aok Downloader, it also works in the Same way as that of Evozi, you either have to enter the Package Name, Google Play URL or the App name of the App you want to Download and click on Blue-button “Generate Download Link”
After the App gets processed on the Server , you will see a download link for downloading the requested Apk file , as shown in the figure alongside (The Green Arrow indicates the link to Download the Apk)
After you click on this link (indicated by green arrow) , Please wait for 5-10 Seconds for the Download of Apk to Start 🙂 .
Downloader-Apk.com is yet another alternative to Evozi Apk Downloader/Apk Leecher and like the previous two the interface too is quite Similar, We simply have to enter the App Package Name or Google Play URL ,and click on the Blue “Generate Download Link” button.
After the Apk is available to Download Click on the Green Download Apk button (as indicated by Green Arrow in the Figure alongside).
Within 5-10 Seconds , your Requested App’s Apk file download will be Started :). Simple and Easy!
apk-dl.com is just another site which enables to download apk from google play store by either its google play store URL, or by simply entering the package name and clicking on Go! button! This website is suggested by our reader HB so a special thanks to him.
So, these are the 3 Best sites which you can use to directly Download Apk files from Google Play Store thus providing you always the unmodified,Safe and Secured app which you can surely install on your device without any fear of any virus/backdoor trojans,protecting your privacy,activity and your phone 🙂 . If you know of any other such site feel free to comment or if you have any doubts and queries ask us!
Recently , my laptop had gone under the screws as its LCD screen had been damaged and I duly replaced it from the Service center, but later as I found out it was extra bright and even the minimum brightness of the same was too bright and was hurting eyes . So , I searched for some Software alternatives for the same to reduce the extra brightness to reduce it below minimum! I found 3 screen dimming apps for Android which are mentioned here and found these 5 Free tools to Dim Screen brightness on PC / Computer / Mac – these all are lightweight and work like charm! (absolutely essential for freaks like me who do most of their work during Night saving the eyes! ) , Let’s have a look one by one on all of them –
App No 1. Monitor Bright by Jockersoft (Windows 7/XP/8.1/9)
Monitor Bright by Jockersoft
Monitor Bright by Jockersoft is a small tool/utility which does the job as promised! and that too quite efficiently! and for a surprise its just of mere 18 kB size! . The exe requires .Net Framework 2.0 installed which is almost already installed on all recent Windows Systems released after Windows Vista, so its as simple as Download,Extract and Run! . After executing you will see a small icon in the taskbar which can be used for configuring the brightness as shown alongside You can set your brightness reduction % in any values between (0-100) [Higher the value you select more dimmer the screen will be ] 🙂
App No 2. Pangolin Screen Brightness (PangoBright) (Windows XP/Vista/7/8/8.1)
Pangolin Screen Brightness is another great utility for Reducing Screen Brightness , and it too performs its functions as promised , and the upside is unlike Monitor Bright, Pangolin Screen Brightness doesn’t even require the .Net framework and is a simple 118 Kb – Single .exe file with No need of Installation. Simply execute and it will start working! No Configuration and installation hassles 🙂 , after executing it will minimize itself to the taskbar, you can right-click on the “P” icon and it will show a configuration menu as shown alongside which you can use to configure Screen brightness ! Simple and Easy !
Although, Flux doesn’t actually reduce the Screen brightness, but it really does make working at night a full of pleasure and soothing experience! and protects from the harsh brightness! . Flux works in a unique way – Let me explain in short –
Our Screen are somewhat made to light as the sun , but looking at the sun at night would do nothing except harming your eyes 🙁 . Keeping this in mind, flux automatically adjusts the color tone (Colors scchema) of the screen according to the Day time so as to you get the optimum color experience and believe me – The Night experience i got from flux simply mesmerized me 😀 . hence , included it in this list. besides this flux has inbuilt movie mode so as shadows , colors are preserved and you can even customise it according to your conveniences plus its free! A must have for Night – Folks!
App No 4. Dimmer by NelsonPires.com (Windows XP/Vista/7/8/8.1)
Dimmer was the first app which i used to dim my screen brightness, and it functions well except for the fact that the Taskbar isn’t dimmed 🙁 , except this the app is really great as its just 12 kB in size, consumes less resources and is light. Dimmer requires .Net framework to be installed and is simple to use, Just download, Extract and use. Opening the Dimmer.exe automatically dims screen brightness and minimizes itself to the taskbar , you can right-click on the taskbar icon and click on configure – and now manually slide the slider depending upon the level of screen brightness required! and it features live preview so you can watch the opacity level as the slider slides.. thus enhancing the precision :).
Brightness Control for Mac is a freeware app which can be used to dim the screen brightness without tweaking the system. Besides this, it also provides a slider so as you can see live preview of the Screen brightness which you want to maintain 🙂 , also quitting the app too is quite easy, simply press the ‘Esc’ button on the keyboar or you can use the Restore button present in the app itself to revert to original settings 🙂 . Easy and efficient and free too!
Requirements : Mac OS X 10.2 and later
So, these are the useful apps which can be used to protect the precious eyes from extra brightness and strong colors, if you know of some such awesome apps feel free to comment , you can also ask your doubts/queries in the comments section.
Previously, i had covered the method on how to detect Font present in a Website/Webpage , however it may happen you see a beautiful Image/banner/photo and might like to use the font present in it , but Image editors on opening fail to detect such texts present/embedded in Image 🙁 . In such cases too, there are tools which will help us to find the embedded text as well as detect the font from it! 🙂 let’s have a look on how to identify/detect font present inside image online! detect font from image online using two websites 🙂
WhatFontis.com is an awesome and easy to use website which helps in detecting the font from the image .
All you have to do is either upload the image through the computer/mobile by clicking the “Browse” button , or simply specify the direct Image URL and click on “Continue” button. You will be redirected to a page shown alongside.
Any detected text will be automatically highlighted , Now you have to enter the text which is present in the highlighted portion in the blank box alongside each image .
If the highlighted portion doesn’t contain any text or is a combination leave it blank .
Once you are done with all the images, Click on the “Continue” button present at the bottom of the page.
Now you will be redirected to a new page and voila! All the fonts of the text present in the image will be shown 🙂 .
Thus, the font from the image were successfully identified and detected , that too without the need of any additional bloatware(software) or any hardware device (OCR) etc 🙂 Really useful for guys like me who love to experiment with new fonts :).
We also, have an alternative to WhatFontIs which is covered later in this post, till then you can give a try to WhatFontIs here.
WhatTheFont tool provided by myfonts.com is yet another easy to use website which helps to detect Font from an Image. The Method to detect font too is very similar to WhatFontIs –
Select the Image from computer/mobile by clicking the “choose file” button, or directly specify the direct image URL of the image of which font is to be detected .
After entering either of them,click on the “Continue” button, you will be asked to enter the text from various highlighted portions of the image.
Now enter the text which is present in the highlighted portion in the blank box alongside each image.
If the highlighted portion doesn’t contain any text or is a combination leave it blank .
Once you are done with all the images, Click on the “Continue” button present at the bottom of the page.
Thus, the procedure is almost exactily similar to WhatFontIs . but the results of both sites can be different! and in most cases the sites will get the Job done 🙂 .
So, these are the methods to detect font from an image online. However if you know of any better method , do share with us under comments, and we will duly publish it with your name , after all sharing it is improving it! . If you have any doubts/queries do leave a comment behind ,we will be glad to help 🙂
Recently I was browsing through the Line friendconverter site and i really liked the font name, and wanted to add it to my PC . but i had to search around a bit hence thought of writing an article on finding the font of website so as TechApple blog users need not to roam around for doing the same. so here are the Best 3 Methods to find font of website which i found better 🙂 .
Method II : Using Font Finder Add-On for Firefox Not all users will be using Google Chrome, Firefox users too have an addon for Firefox – Font finder which can be used to detect Fonts on the Website which is currently visited. For detecting font using Font Finder
Select the text of which Font is to be found and right click on it.
An image similar to one shown alongside appears , select the option “Analyze Selection” and you will be shown a dialog box showing the Font Name, Size, details etc that too in flash seconds.
Method III : Using the Bookmarklet – Fount by Artequalswork
The above discussed methods work for either Chrome or Firefox, it may happen that you are a Safari or IE or any other Browser user and you want to detect the font of the website, so there’s a solution available for other browser users too – A bookmark is provided by Artequalswork – Fount which will help in finding the font.
All you have to do is add their bookmarklet to the bookmark bar, navigate to the website of which font is to be detected or determined , and click on the Fount bookmark , and magic! it will show the Font face name,family as well as the size! and it works on all Browsers – Safari, Google Chrome, Mozilla Firefox, IE 8+ .
These were the easy methods to detect the Fonts used on a website , while most of the time these tools will work , if however if they don’t work we can use the methods used by developers for Font detection purpose – Firebug and Webkit. I will be writing an article with detailed instructions on using the same , but mostly the above tools will save the day ! 🙂 . If you have any doubts/queries do comment also if you know of any other such tool or method feel free to comment, we will really appreciate it 🙂


![JoyToKey Tutorial to configure Gamepad on PC Windows 7/8.1/10 [Windows Installed Laptop/Computer]](https://techapple.net/wp-content/uploads/2015/06/Screenshot_19-660x468.jpg)


 LucidChart is a wodely-known online diagrams creation site, but only a few know that it can be used to create UML diagrams too!


 ApkLeecher.com may be defined as a worthy alternative to Evozi Aok Downloader, it also works in the Same way as that of Evozi, you either have to enter the Package Name, Google Play URL or the App name of the App you want to Download and click on Blue-button “Generate Download Link”
 Downloader-Apk.com is yet another alternative to Evozi Apk Downloader/Apk Leecher and like the previous two the interface too is quite Similar, We simply have to enter the App Package Name or Google Play URL ,and click on the Blue “Generate Download Link” button.


 Pangolin Screen Brightness is another great utility for Reducing Screen Brightness , and it too performs its functions as promised , and the upside is unlike Monitor Bright, Pangolin Screen Brightness
 Dimmer was the first app which i used to dim my screen brightness, and it functions well except for the fact that the Taskbar isn’t dimmed 🙁 , except this the app is really great as its just 12 kB in size, consumes less resources and is light. Dimmer requires .Net framework to be installed and is simple to use, Just download, Extract and use. Opening the Dimmer.exe automatically dims screen brightness and minimizes itself to the taskbar , you can right-click on the taskbar icon and click on configure – and now manually slide the slider depending upon the level of screen brightness required! and it features live preview so you can watch the opacity level as the slider slides.. thus enhancing the precision :).
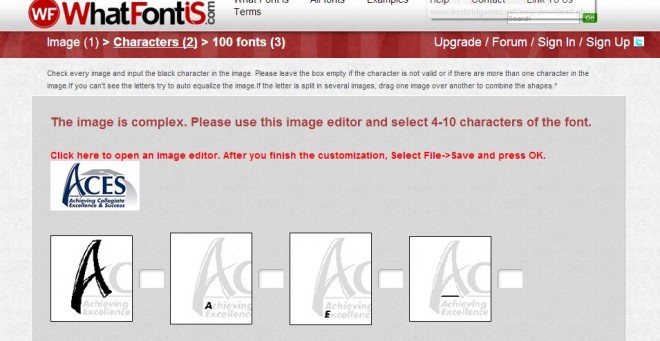
 WhatFontis.com is an awesome and easy to use website which helps in detecting the font from the image .
 WhatTheFont tool provided by myfonts.com is yet another easy to use website which helps to detect Font from an Image. The Method to detect font too is very similar to WhatFontIs –
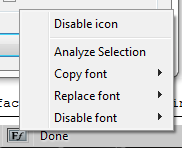
 This is my most preferred method and me being lazy loved it . All you need to do for finding the font of website is –
 Not all users will be using Google Chrome, Firefox users too have an addon for Firefox – Font finder which can be used to detect Fonts on the Website which is currently visited. For detecting font using Font Finder