Category: Tricks & Tips

  • Opera Mini PC Handler | Opera Mini for PC without any Any Android Emulator with Downloading Support

    Opera Mini PC Handler | Opera Mini for PC without any Any Android Emulator with Downloading Support

    Opera Mini is the most widely used browser for mobile devices ,and boasts of some unique features.Using Opera Mini on PC can be more than handy or useful for PC users too such as

    • It uses Opera servers to cache and display the web pages, thus, the servers act as a proxy and helps to unblock sites such as facebook etc, if they are blocked on the Network.
    • The server caching also enables Data Compression which uses Data usage by almost 80% thus reducing the Data Usage as well as increasing the browsing speed manifolds 🙂
    • Handler menu can be used to change/modify various network headers and parameters.
    • JavaScript,Ajax-script etc are run/executed on the server side and thus this helps in speedy browsing on lower configuration PCs without the fear of System hang.

    Method to Run/Install Opera Mini Handler on PC

    Method #1 . Using JRE + Opera Mini for PC by Alan Bazan

    Requirements : Java Run-time Environment or JRE must be installed on your System, if not installed,you can download and Install the JRE which can be downloaded from this URL .

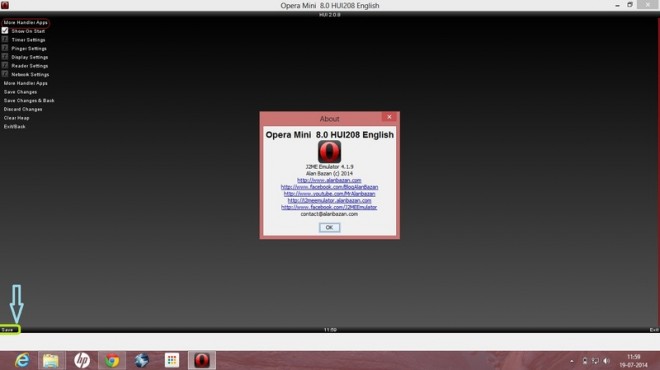
    Procedure : After you have downloaded and installed the JRE , Download the Opera Mini for PC Setup from the download links, and install it . After installing just Double click the Opera Mini icon and enjoy your favorite browser on your PC. [ You may need to save the settings upon your first Run as shown in the figure below]

    Now, here you can simply hit save and click continue or change the Pinger settings/Handler Settings and continue to using your Opera Mini :).

    Note : Press “Ctrl+O” anytime while using to navigate to the Settings.The Same Settings are used to configure Proxy settings by using (Ctrl + O).

    The JRE based Opera Mini PC Browser can be downloaded from here —

    Click here to Download Opera Mini 8.1 Handler PC – TechApple.Net
    Click here to Download Opera Mini 7 PC – TechApple.Net

    Mirror Links :

    Click here to Download Opera Mini 8.1 Handler PC – TechApple.Net
    Click here to Download Opera Mini 7 PC – TechApple.Net

    Method #2. Using Opera Mini directly in Google Chrome/Firefox/Web Browser

    Yes, you can use Opera Mini in your browser too, that too without Installing , by following these Simple steps —

    Requirements : Install JRE  or Java Runtime Environment on your system . If JRE is already installed please Skip this.

    Now Navigate to the URL : http://demo.opera-mini.net/public/ on your Browser and Opera Mini will start Loading right on your browser! No need of installing it 😛 . Sometimes, the JRE may show security error in such cases please Go to Configure Java in your System , and Reduce the Security to Medium as shown in the Figure below(You can also see the Opera Mini running in the Background 🙂 ) –

    Thus, these are some of the Most easy methods to Run / Install Opera Mini on PC , if Any doubts/queries/suggestions feel free to comment 🙂

  • Best apps to Record Screen in Chrome OS | Easily Record Screen Videos/Screencasts in Google Chrome/Chromebooks

    Best apps to Record Screen in Chrome OS | Easily Record Screen Videos/Screencasts in Google Chrome/Chromebooks

    Recently,the number of Chrome OS users/ Chromebook users is on the upward trend, and there may be many scenarios where one needs to record screen or screencasts of Chrome OS . As Google Chrome OS is based on the Linux but it doesn’t readily support external apps installation other than those from its Appstore here we  bring you the Best apps to Record Screen Chrome Browser/Chrome OS and works on Chromebooks too .

    App # 1 . Screencastify (Screen Video Recorder)

    Screencastify is a simple video recorder app for Chrome with minimum and easy to use User-Interface . All you need to do is install the App ,and rest can be easily be guessed from the User Interface itself .

    Method to use Screencastify to record videos/Screencasts

    • First of all install the Screencastify app by downloading it from the Google Chrome store from here .
    • Now you will see a filmstrip icon on your browser bar, simply click on it and you will see a box as shown in the figure below –
    • Here you can configure various options such as screensize to be recorded / source of Audio Output which is to be recorded ( You can either use your Microphone or the Speaker Output too! )
    • After you are done after configuring these simple options, Simply hit the “Start Recording” button.
    • When you are done with the recording press the “Stop Recording” button.
    • Now, we can either save this Screencast / Video to Local Disk (Hard disk) for Later viewing or either we can Upload it to youtube/Google drive 🙂 as shown in the figure below. (We have selected “Save to Disk” support , the option on the right is for Uploading online .)
    • That’s it . We have successfully recorded Screencast/Video on our Chrome OS/Browser.


    App # 2 . TechSmith SnagIT

    This is yet another , awesome app for recording Screencasts for Linux and it comes in with an in-built Media Library +Media Player too ! which can be used for playing or viewing the Screencasts!

    Method to use SnagIt to record Screencasts/ Videos

    • First of all download and install the SnagIt app from the Chrome store by clicking here .
    • Now start the App from either the Apps tab or the App Launcher. A window similar to the below image appears on your screen –
    • Select the “New Screen Recording” option, Now a window asking to select the Screen to record appears, you can either select the Desktop or select the tab which is to be recorded. as shown below .
    • Now select the screen and click on share , The Screen will start getting recorded . You can Stop recording/sharing by clicking the Stop Sharing button.
    • Once you , Click on Stop Sharing, your video will be synced, after sync you can either view it in the Media Library of the App or Upload it to Youtube! / Google Drive.
    • Besides, Screencasting SnagIt also adds option for adding Notes,Markers to the Video thus reducing the need of a Video Editor , it also supports adding of Visuals.
    • You can take Screenshots too with this app . proving it to be a Multi-tasker. The Appstore page mentions that it requires the SnagIt extension too to be installed, but it worked fine for me without the extension. If it gives you error while using the Extension can be downloaded from here.
    • Edit : The Extension allows/adds additional facility to the App such as selecting a particular ScreenArea/portion to be recorded , as well as configuring Audio capture / output options . So it’s a plus situation if the extension is installed as shown below – (with an additional browser bar icon) 🙂

    Thus, these are the awesome apps/extensions which help to record screen videos/screen casts in Google Chrome OS . If you encounter any problems/ or know of any other App do let us know by comments 🙂 Thank you!

  • 3 Best Apps to Record Screen in Linux|Capture Screen Videos / Screencast in Linux easily! Ubuntu,Fedora,LinuxMint,ArchLinux etc

    3 Best Apps to Record Screen in Linux|Capture Screen Videos / Screencast in Linux easily! Ubuntu,Fedora,LinuxMint,ArchLinux etc

    Recently, i had to record some tutorials on my linux machine, but i found out that there are only a few rare options to record screencasts [screen videos ]in Linux / Ubuntu [LinuxMint is based on Ubuntu] , hence i came up with these three Best and Awesome apps to record screen linux . These apps are easy to use and easy to  install as well plus they work on all major linux distros such as Ubuntu/LinuxMint/Fedora/ArchLinux etc. Let’s have a look on each one of them one by one.

    App 1 . Kazam Screencaster


    This app may be called as the best screencast recorder or Screen video Recorder for Linux ! I  found out some really interesting features of the app such as

    • Kazam is really very easy to install and setup .It is available on almost all linux repositories i tested it from Ubuntu 11.04 to Ubuntu 14.10 . Simply type the “sudo apt-get install kazam” if you are using Ubuntu based distro such as Ubuntu/LinuxMint/etc or “pacman kazam” or any package get command according to your distro , kazam will be surely there!
    • It also enables to select the area to be recorded be it a particular window/particular screen area or complete screen! Kazam allows it all.
    • Its really lightweight and works superbly on my Virtual Machine too.
    • You can check out the Download Instructions[Steps]/Working Demo / Tutorial for Kazam here.

    App 2. Simple Screen Recorder


    SimpleScreen Recorder is yet another fantastic App for recording screencasts on Ubuntu , it allows easy recording and is based on qt , thus works very smoothly , some of its unique features include

    • Record OpenGL apps directly, without any extra required codecs/filters.
    • Automatically reduces frame rate on slow computers.
    • Pause/Resume the Video recording anytime.
    • Optional audio recording , if audio is not the Priority.
    • Specify the Codecs / Encoding to be Used for Recording the video.
    • Not only this, but the main app lets you keep an eye on the increasing file size, memory size,frame rate,time,thus enhancing the usability !

    To install SimpleScreenRecorder on your Linux/Ubuntu enter the following commands in the Terminal

    sudo add-apt-repository ppa:maarten-baert/simplescreenrecorder
    sudo apt-get update && sudo apt-get install simplescreenrecorder


    If you are using Fedora or any other distros you can get the Pre-built builds from here .

    App 3 . RecordMyDesktop


    This app “RecordMyDesktop” is yet another Free Screen Recorder / Screencasting app for Linux , It also supports recording the Screen in various Video Formats and sizes as well as window recording . The App also supports pausing and resuming the recording of Screencast ., but the only drawback was its lag on the Virtual Machine, thus indicating its more hardware dependent , but overall its another small size tool which can be used for Recording Screen.

    RecordMyDesktop can be downloaded from the Default app Directory / App Center of Ubuntu/Arch/Fedora. If not available,you can use the command
    “sudo apt-get install recordmydesktop” from the terminal to download and install RecordMyDesktop

    Besides these three you can also use tools such as “DemoRecorder – Linux”[Adware], “Xvidcap” [Works on 32bit Distros Only],”VLC”,”ffmpeg”[lag in UI] to capture the ScreenVideos or Screencasts but because of the Bracketed Cons i don’t recommend them,If you encounter any problem while downloading/installing/using any of the apps mentioned, feel free to comment 🙂 and also if you know of another screencaster app for Linux, Do let us know !

  • Prevent Google from tracking Search-Using non https Google Search [Non SSL Version]

    Prevent Google from tracking Search-Using non https Google Search [Non SSL Version]

    Many sites today track users without their consent and store data, hence privacy of users is a major concern. Google too does the same way and tracks our previous search queries,visited links to track our usage and improve the search results . But many times it can happen that we may want to hide our search query from google or stop it from tracking our usage. Also sometimes we may want to use the old non-https or non SSL version of Google Search to search our query especially in case of slower network connections. This post covers the very same on How to prevent Google from tracking our search without having to log out or make changes to our Google profile/Account settings , And using non https Google SSL encryption.

    The Method to use Google without https and without traceability is very easy , though there are many users using 3rd party services like ducduckgo or startpage.com but i won’t recommend them,as they themselves are slower and their server processing despite using google results make them even more slower..Let us now browse the methods to prevent google from recording the search results.

    Method I —– Using Google Server IP

    Yeps, this is the most simple Method to use Google and gain access to Google search results without letting google track and using SSL , you can get the Geo-Specific Google Server IP for your location too, The Process is very Simple as follows

    • Open Command Prompt [For Windows users] or Terminal [For Linux and Mac users] and simply type the command “ping google.com” and hit enter, you will get a message as “pinging google.com (google server ip) with xx data” check the below screenshot for information.
    • Here the IP contained in the brackets is the Google Server IP , now simply enter this IP in your browser and hit enter ! and voila !
    • You are now able to access Google without https and without traceability , you can yourself check that even if you are logged on/signed in on “google.com” you are logged off/signed out on the Google Server IP Page :). Thus preventing the Google Server from tracking you and your search 🙂
    • Also, you can check for previously searched queries, they always disappear 🙂 Check the below Screenshot for live demo of the same –>
    • As you can see in the above Screenshot i have used the Google IP from the ping command and using it for searching , The Google Server IP which i used was 173.194.36.38 , you can obtain yourself IP or can use anyone from the range 173.194.36.1 to 173.194.116.255 , tested by me i.e total 80*255 IPS but may be the number is even more  🙂 You can try urself and get your own Google Server IP  for personal use 😛

    Method 2 – Appending ?nord=1 at end of Google Search

    • This is yet another method for using non https version of Google Search but unlike the previous method it doesn’t completely prevent Google from tracking your results.
    • But this method is quite useful especially in slower network connections or restricted networks where https doesn’t work properly . You can visit the non-https version of ?nord by Visiting here – http://www.google.com/?nord=1

    So ,these are some tweaks of the World’s Number 1 Ranked site, which many and many of them might not know and which can be used to enjoy the Google Search experience 🙂 , If you have any doubts/queries/suggestions feel free to contact us or comment below 🙂

  • Bank Swift Code not available-Solution for receiving AdSense Payment in India | Adsense Payment Settings for Swift-BIC

    Recently, Google has launched Adsense payment by Wire transfer in India to Indian Adsense Publisher Accounts, and has completely ditched the old cheque payment system,thus now there’s no need to wait at homes waiting for cheques 🙂 . although the wire transfer or Electronic Fund Transer [EFT] guarantees quick and easy money transfer to publishers , it requires filling of SWIFT-BIC code which is not available for every Bank in India especially the Rural ones and small branches . Thus causing Payment Problems to the Publishers , but we at TechApple have come up with unique solution to the problem of Bank Swift Code Not Available .

    Solution / Settings for receiving Adsense Payment in India even if SWIFT Code Not available

    • First of all , Fill Up all the details in the Payment settings page except Swift code , it consists of simple fields such as Account holder Name , Account Number and IFSC Code, Make sure that you fill in only your branch’s IFSC Code and your Correct Account Number . The Payment settings will look like these —
    • You can use the site MyIFSCCode to find the IFSC Code of your Bank branch . Make sure you copy the correct IFSC Code as each Bank branch in India has its separate and distinct IFSC Code.
    • Now, regarding the SWIFT-BIC ,  First of all Please visit the site http://www.theswiftcodes.com/india/ and find out whether your Bank Branch has SWIFT Code or not , if its present simply enter the Obtained Swift Code , else
    • Simply fill in the Nearest Bigger Branch Swift Code of the Same Parent Bank as that of yours, if the SWIFT-Code of your Branch is not available .. e.g if your Account is in SBI , then look for the Swift Code of  nearest SBI branch only ..
    • Else if you still cannot find the Swift code of your nearest branch , you can use any of these default SWIFT-BIC codes as per your branch
    • Allahabad Bank- ALLAINBBTDM
    • Andhra Bank- ANDBINBB
    • Axis- AXISINBB002
    • Bank of Baroda- BARBINBBXXX
    • Bank of India- BKIDINBBNRI
    • Bank of Maharashtra- MAHBINBB
    • HSBC- HSBCINBB
    • ICICI- ICICINBBCTS
    • Oriental Bank of Commerce- ORBCINBBIBD
    • Punjab National Bank- PUNBINBBISB
    • State Bank of India- SBININBBFXD
    • United Bank of India- UTBIINBBXXX

    Now, some of you might think that using the above method is risky and like that, but in Indian Banking System SWIFT Code is used only to perform Foreign currency to Rupee conversion . and hence using any of the Parent branch SWIFT Code ensures the SWIFT Code bank branch being used as a bridge to convert and transfer money to our Local branch which uses the IFSC Code and then to our Accounts located in the IFSC Code branch , thus ensuring proper funds transfer of our hard earned Money through Adsense 🙂

    Here’s the proof of the same – My Payment received on my Bank Account 🙂

    If you have any doubts/queries feel free to ask us by comments 🙂 Happy Earning!

  • 3 Ways to Download Sound from Soundcloud legally – Easily Download Soundcloud Music,Songs to mp3 on Mobile/PC/Mac Online

    3 Ways to Download Sound from Soundcloud legally – Easily Download Soundcloud Music,Songs to mp3 on Mobile/PC/Mac Online

    Soundcloud has simply revolutionised the way music artists share their work . Soundcloud has enabled easy interaction between music artists and listeners,thus it is used widely for sharing sound,music . By default Soundcloud itself legally supports downloading of sound and music from its site but many are unaware of it , so Let’s have a look on 3 Ways to download Sound from Soundcloud.

    Method 1 . From official/original Soundcloud site

    The Soundcloud site itself has the features of downloading the music/sound if allowed/permitted by the Sound artist or Sound Uploader , The Method for downloading from official site is quite simple, you simply have to click the “Down” button as shown in the images below – There may be two cases depending upon the date when the music was uploaded , the images below cover both the cases

    Case 1 –  Distinct visible downward arrow

    Case 2 – Embedded Downward arrow

    Method 2 . Using Websites to download from soundcloud 

    Sometimes it may happen that the above official method of downloading from soundcloud doesn’t work in such scenarios we can use websites and browser tools to download from soundcloud , one of such site is soundcloud-download.com , using it is very simple .

    • Just copy the unique soundcloud URL for the particular music/sound/song from soundcloud.
    • Now paste the copied soundcloud URL in the URL box of the sound cloud download site .
    • And now click the Download Button .!  and your music will start downloading . The below image shows the example of using soundcloud-download.com to download from Soundcloud


    Besides this, there are soundcloud-download.com alternatives sites like Sounddrain.com and Soundflush.com which too can be used for downloading mp3 from soundcloud. The method from downloading from these sites is same as mentioned earlier .

    Method 3. Using Browser extensions

    If the first method didn’t work for you , or either you feel tired to copy the URLs every time you need to download, you can simply install these Soundcloud Downloader browser extensions , and it will automatically add a download button to each Soundcloud Sound you are browsing too . Just click the button and download will start, making the job easier 🙂

    Soundcloud Downloader extension for Google Chrome

    Install this Soundcloud Download extension for Google Chrome and the download button will be available for tracks which you browse on soundcloud as shown below.This extensions supports Soundcloud Playlist download too , thus saving the time and required to download multiple tracks. Soundcloud downloader Google Chrome extension screenshot


    SoundCloud downloader Firefox Extension

    The Soundcloud downloader extension is available for firefox users too, you can add it to your Firefox from Addons store by Clicking here . Check the below image for the screenshot of the Firefox extension


    So these are the methods to download from Soundcloud, feel free to share this post and if you face any difficulties feel free to comment 🙂

  • 5 Free File Hosting/Sharing Cloud Storage Sites with Direct/Hot Link Support | CloudLinker v2.0 Direct Link Maker

    5 Free File Hosting/Sharing Cloud Storage Sites with Direct/Hot Link Support | CloudLinker v2.0 Direct Link Maker

    Hey Guys, as you know canonical is shutting down its Ubuntu One Cloud Storage so i was looking for alternative file sharing sites which allowed hot/direct linking and gave permealinks for files and found these 5 Free File Hosting sites with direct linking /hot link support

    1. Dropbox 

    Yes, your favourite Cloud-Storage / Dropbox.com Supports Direct Link / Hot Link on Files Uploaded to it, it can be easily done by modifying the shared / Download URL by tweaking it a bit, Head on to this Post to know the trick in detail, Trick to Obtain Direct Link of Dropbox file in short in this trick we are simply replacing “www.dropbox.com” with “dl.dropboxusercontent.com” and that’s it, and for simpler purposes You can use our all in one multi Direct Link Maker – CloudLinker v2.0 to Generate DirectDownload/Share URLs for hosts.Files stored on Dropbox account remain active as long as the account is not deleted!

    2.Ge.tt

    Ge.tt is a new Entry in the Cloud Storage Family, but its easily and quickly leaving its competitors behind and taking the lead. After you upload your file through drag and drop or by file uploader on ge.tt , or you get a shared download page URL for a file uploaded on ge.tt , simply right click on the highlighted “Download” Link and Copy the URL/Copy Link Address, it will be the direct Download URL for your file,as shown in the figure -> Ge.tt Direct Download Link Trick –>


    3.Copy.Com

    Copy.com is one of the fastest growing Cloud Storage, it provides 15 GB of Storage Space for Free!!, and yes you can use it for Direct/Linking and Hot Linking too, in a similar way as we did with Dropbox.! we just have to remove “www” and “/s”  from the url e.x https://www.copy.com/s/*** making it http://copy.com/*** to make the Shared File URL into downloadable one.! but it consists of some steps, i highly recommend using our CloudLinker v2 tool or refer this post for Copy.com Direct Link Generation


    4.DirectLinkUpload.com

    When you visit this site for the first time please don’t go on the looks, just upload your file through the simple uploader and you’ll get a URL for sharing , Now Go to The File Sharing URL and go to shared folder option, you will see your uploaded files, Now right click on the Copy Link Adddress, it shall be your direct Download Link which you can easily share..or you can click your uploaded file to download it, and copy the URL from which it got downloaded 🙂


    5. Ozibox.com

    Ozibox.com is the newest entry to the Cloud Market, And Provides Free 100GB of Storage Space for everyone!, also it provides Direct Link to the files stored on the Cloud, Steps to generate direct download links from ozibox are Sign-Up for an account on ozibox.com , login and upload your file through the upload button, and download your own file on your browser/IDM .! Now Copy the Recent Downloaded URL from IDM / Google Chrome Downloads tab, and this will be your direct download link for your file /shareable to everyone.!


    Using our CloudLinker v2.0

    As Promised Earlier i have Updated CloudLinker to v2.0 which Now supports all the Five Hosts Mentioned Above, you simply have to enter the Shared /Sharing URL provided by the host and it will generate the Direct Download URL for you, which you can add to your posts/ share with your friends. 🙂

    Update – CloudLinker v3.0 is now Online tool – So no need to Download anything – Click here to Get your Direct Download Links using CloudLinker Online

    Click here to download Cloudlinker v2 from Dropbox
    Click here to download Cloudlinker v2 from Ge.tt
    Click here to download Cloudlinker v2 from Copy.Com
    Click here to download Cloudlinker v2 from DataFileHost.Com
    Click here to download Cloudlinker v2 from Ozibox.Com


  • Easily Create Setup / Installer for any Software using InstallSimple Setup creator

    Easily Create Setup / Installer for any Software using InstallSimple Setup creator

    Hey Guys, we at TechApple, post alot of setups and installers for many softwares, ever wondered how to create setup/installer for any software.? in this post, i am going to cover the same Let’s Check out how to easily create a setup / installer for any software.[Windows] and that too without any scripting involved thus no programming language involved! 🙂

    Prerequisites

    • A simple tool / Portable Software – InstallSimple  , which we are going to use for Creating Packaged Software.
    • The Folder/Software of which you want to create Software.
    • This Tutorial 🙂 that’s it 🙂
    • You can download InstallSimple from here . Click here to download InstallSimple Setup Creator [Just 355kB].

    Method to Create/Setup using InstallSimple

    • Open InstallSimple.exe from the Downloaded zip file, you will be greeted with an image as follows , Click on Next to Continue.
    • After Click on Next you will be shown a window asking you to Enter the Window Title and Project Name, Fill in The Window Title – The text you want to show on title bar and the Name of the Software in Project Name and click on Next.
    • Now a dialog box will appear with a Message Text Label and a textbox , in the textbox enter the Custom Text/Greeting text which you want to show when setup starts and click on next.
    • Now a dialog Box will appear with label License Agreement, enter the type of license agreement for your software and click on next.
    • Now in this window “Graphics” we can specify the splash screen we want to display before the execution of the setup as well as the header image of the setup window, Click the Folder icon as shown in below figure to specify the path., CLick on Next
    • Now a window “Files to Distribute” / asking you to select source folder of your setup and setup path for your setup will appear, in source folder option click on “Browse” and navigate to the software folder of which installation you want to create and click “ok” , its generally the folder which contains your .exe setup file,and .dll files etc.., select the root folder which contains your software for source folder, and for setup path, enter the folder and location where you want to install your software ex “Program Files”,”Local user drive” etc as shown in the figure –>
    • Now a Window Labelled “Shortcuts” will appear, here select the Files of which you want to create shortcuts and the locations where you can place the shortcut can be selected on the right side pane such as “Start Menu”,”Desktop” etc, after you click on the file of which you want to create shortcut , a yellow/green color mark will appear as shown in the next figure –> After selecting the files for shortcut click on Next., select the Windows Versions and .NET framework check if you want to add., click on next..
    • Now a tab “Windows Registry”  will appear , Enter here any regitry changes you want to make e.x adding PATH variable with setup etc and click on next,
    • Now a Window  labelled ‘Build Setup” will appear! , Simply Click on Build and your Setup will be Ready!! 
    • The Build WIndow looks like this — >
    •  Congratulations!! you have successfully created your Setup! The Setup.exe can be used on Any Machine..

    The Setup itself creates the program registry,control panel and uninstaller inbuilt, so no headaches / extra efforts whatsoever!

    I hope you liked this tutorial, Do share it with your friends, and if you have any doubts/queries feel free to comment! Thanks!

  • 3 Ways/Tricks to download Bing image of the day on your PC using Chrome/Firefox/BingDesktop [Bing Background Image]

    3 Ways/Tricks to download Bing image of the day on your PC using Chrome/Firefox/BingDesktop [Bing Background Image]

    Hello guys, most of you might have noticed the background images posted on bing.com ,popularly known as which change on a daily basis and would have wanted to save them on your PC, download  Bing background image and use as a wallpaper . Rejoice its possible in this post i will reveal 3 Ways/Tricks to download the Bing Background Image and Save them on your PC..

    Trick / Method I : Mozilla Firefox — Google Chrome Trick following..

    • Navigate to the Bing Homepage http://www.bing.com in your Firefox Browser.
    • Navigate to the image you want to download using the navigation arrows shown on the Bing homepage at right hand side bottom side, now after you reach the desired image , right click on the “View background image” ,you will get a menu shown like this
    • d
    • Now click on “View Background Image in the Dropdown Menu”  and it will open the Image with its URL , as shown here
    • Now , you can copy the URL and download the image or simply right click on the image and select “Save image as” option to save the Image! and that’s it easy! isn’t it ..?

    Trick / Method 2 : Google Chrome

    • Navigate to Bing Home page and browse to your desired Download Image using the arrow keys.
    • Now when on the image,right click on the image and select the “Inspect Element Option” in the dropdown menu shown here
    • Now, you will see a bottom tab in the google chrome and it will contain the image URL as shown below  –> in the next image, you can copy the image URL and download it using IDM or navigating in chrome and selecting “Save image as”  after opening the Image URL in the image.. here’s a screenshot of the Inspect element –>

    Thus, you can download any Bing Image using these simple steps.. 🙂 But, the drawback of using Browsers for downloading images is that only the Last seven images are available 🙁 in order to browse the entire Bing Image Gallery..and download them we will have to use the Bing Desktop App

    Method / Trick 3 Bing Desktop App

    The previous methods allow to download only last 7 bing images,if we need to download the complete gallery it isn’t possible by prev methods, hence , we use the Bing Desktop app.  to download the gallery, the steps for downloading any wallpaper from bing gallery are as follows

    • Download the Bing desktop app from here, and install it.
    • After installingjust browse from the topbar app and browser for your favourite image and set it any image as wallpaper.. as shown here–>
    • Now your desired bing image is set as wallpaper , if you want to get the Location of the .jpg file just right click on your desktop wallpaper and click on “personalize”
    • Now click on wallpaper/desktop background, a dialog box shown below is showed up on your desktop
    • Now you will get the location where the bing Desktop app saves your download image, you can get it by howering your mouse over it as shown in the above picture 🙂

    Congrats! now thus you can download any image stored on bing as well as save them, share set them up as wallpapers.. and Bing really has an amazing number of pictures which are really classic! so do check it out 🙂 Thanks! if any problems/queries/suggestions feel free to comment 🙂