Category: Linux Tutorials

  • Top 7 Free Video Converters for Linux to convert videos on GNU Linux (Ubuntu / Linux Mint / Fedora)

    Top 7 Free Video Converters for Linux to convert videos on GNU Linux (Ubuntu / Linux Mint / Fedora)

    The inbuilt codec playback support in GNU Linux is limited, many times we need to install codecs just for viewing a single video of a particular format as the video simply won’t play . If you have many videos of different format then installing codecs for all of them becomes a tedious task. Also sometimes, you may need to transfer a video to your handheld device or mobile phone, that too becomes a problem if the codecs mismatch. There’s a simple solution to the aforesaid problems though, why not simply convert them to a particular format which is supported by Operating system/device by using Video converters ? And these Top 7 free video converters for Linux mentioned below will help you on how to convert videos in Linux the easy way –

    App # 1 – VLC

    Using VLC’s video conversion

    Not to get confused, but yes the very powerful VLC media player by VideoLAN, also doubles up as an audio/video converter for Linux. The reason why we placed VLC at the top is its easy availability for almost any GNU Linux distribution, hence installing VLC won’t be a big hiccup for users. Also, many distros such as Linux Mint come with VLC preinstalled anyway, with all the codecs and offcourse it doubles up as a Media player too . The procedure to convert videos using VLC too is pretty easy and is as follows –

    • Go to Media — > Convert/Save — > Now, in the file tab add your source video/audio file which you intend to convert.
    • After Adding your file, click on the small “down arrow” mark on the Convert/Save button and Select “Convert”.
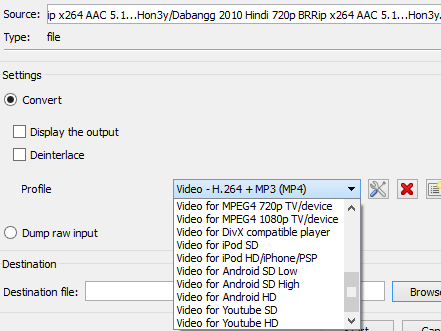
    • Now,specify the conversion format in the “Profile” drop down as shown in the alongside image, Specify the destination file to save the convert file.
    • Click on “Start”, Your video/audio conversion will be started! and after conversion the converted file will be available in the destination source.
    • Click here to download VLC for Linux.

      App # 2 – HandBrake

    HandBrake UI for Linux

    Though, at the time of writing this post Handbrake was available only for Ubuntu, but its rapid development promises its upgrade for other linux distributions too. HandBrake is a feature reach Video converter with exclusive feature of preview window, which can help you to preview videos before converting in addition to supporting various formats and codecs for video conversion.

    Click here to download HandBrake for Ubuntu

    App # 3 – WinFF for Linux

    WinFF

    Not to get confused by its name WinFF is actively developed for and works in Linux too!, its basically a front-end for ffmpeg, and is very powerful. WinFF allows easy conversions from / to desired video formats in Linux. Although, readymade download packages aren’t yet available but you can easily install them from repository depending upon your GNU Linux distribution as mentioned below –

    WinFF for Ubuntu Installation Instructions
    WinFF Video converter for Debian Installation Instructions
    WinFF Video converter for Fedora / RPM (Fedora/Redhat) Installation Instructions


    App # 4 – FF Multi Converter for Linux

    FFMulti Converter for Linux

    True to its name FF Multi Converter is a multipurpose converter which can convert audio, video as well as images in Linux. It can convert from / to between all popular encoding formats and uses ffmpeg for audio/video files, unoconv for document files and ImageMagick for image file conversions. The Front-end is what which makes is standout as it removes the need to remember command line commands for conversions using ffmpeg etc.

    Click here to download FF Multi Converter tar for Linux


    App # 5 – Transmaggedon for Linux

    Transmaggedon

    Transmageddon is a video converter/ transcoder app for Linux and Unix systems built using GStreamer. It supports many formats as its input and can generate a very large host of output files depending upon the User’s choice. Transmaggedon is available in RPM package too which makes it an ideal video converter for Fedora.

    Click here to download Transmaggedon tar package.
    Click here to download Transmaggedon RPM package.

    App # 6 – Format Junkie for Linux

    Though, there has been only a single version of Format Junkie that too in 2012, but its user base remains intact. All because of its hasslefree user interface, and speedy conversions. Expect Format Junkie to perform smooth conversion between video formats released prior to 2012, however it may struggle to perform conversions with newer codecs.

    Click here to download Format Junkie tar for Linux.

    App # 7 – DamnVid for Linux

    DamnVid UI for Linux

    DamnVid ceases to impress us, although its our favorite when it comes to windows but its incompatibility with newer linux versions pushes it upto No.7 in this list of video converters. There’s no looking for other solutions/app for video conversion even for professional users, if you get DamnVid running. Although, the default packages of DamnVid Linux won’t work anymore on newer Linux kernels, but you can always use Wine! to run the windows version of DamnVid on your Linux.

    And , if you don’t wish to install wine for a single app, here’s a Portable compact version of DamnVid for you which works on newer Linux distros too! –

    Click here to download Portable DamnVid for Linux.


    So, these were some of the Best Free Video converters available for Ubuntu/Fedora/Arch and other distributions of Linux, if you know of any other good one or incase you encounter any problems feel free to drop a comment :).

  • How to- Transfer files from Linux to iPhone / iPad by Feem over WiFi

    How to- Transfer files from Linux to iPhone / iPad by Feem over WiFi

    Transfering Files / Music from Linux distributions (Ubuntu / Linux Mint /Fedora) to iPhone/iPad or any other iOS devices isn’t an easy task at all , atleast for beginners . Also , as iTunes isn’t available for Linux OS the options are very limited too.. , here we present you one of the most easiest method , to transfer files between Linux and iPhone or any iOS device. I used this method to transfer files from Linux to iPhone .

    Prerequisites –

    Tutorial to transfer files from Linux to iPhone over WiFi by using Feem – 

    Feem running on Linux Mint 17.1 – iPhone 6
    • First of all download and install Feem app on both devices, by downloading from above mentioned links.
    • Now, connect both the devices to a common/same WiFi network either to a single router or by creating Hotspot on a single device.
    • Open, Feem app on both the devices, now they’ll automatically scan for devices on the same WiFi network which have Feem Running.
    • Now, as shown in alongside figure you will see your device in the list of devices, checkmark the device you want to send the file, and click on the send option (highlighted by spraypaint color in the same figure).
    • Now select the files/folder you want to transfer / send from Linux to iPhone ,and click on OK.
    • That’s it your files will be transferred in a Flash! , with speed and also without using any data connection / NO Internet connection required! .
    • If you are not able to find your devices, click on the [find devices] option to scan for devices again.

    Feem solved much of my prolems, while using Linux. If you encounter any problems or face any issues feel free to comment 🙂 , also we will be glad if you can suggest an app like Feem :).


  • How to convert and install Android apps on ARChon Google Chrome (Browser/Chromebooks)

    How to convert and install Android apps on ARChon Google Chrome (Browser/Chromebooks)

    In my last article I covered the introduction and setup of ARChon Android emulator for Chrome, but it requires a little bit modified Android apps (apks) for running them. So , this article will cover how to convert android Apk apps to compatible Google Chrome apps , before I begin this tutorial for https://techapple.net/2014/09/3-websites-directly-download-apk-google-play-store-pc-mobile-requirement-device-id/ might be handy! So let’s begin..

    Pre-requisites :

    • Google Chrome OS/Browser with ARChon installed .
    • Twerk! Google Chrome extension for converting apps (Click here to Download Extension)
    • Internet Connectivity (if required by the app).

    Procedure :

    • Download the Android apk file of the app you want to run.
    • Now, launch the twerk extension ! You will be shown an image as shown –
    • Here, simply drag and drop your Apk file which you want to run, the next screen will take you to the app configuration page – here, enter the package name(Google Play Market name (e.g com.paisawiz ) and other , its uniwue for each app . and the App name , you can also select other options such as screensize, orientation etc .
    • Once you are done with this click on the pink colored icon at the bottom.
    • Now, it will ask you to select directory for saving the unackaged chrome extension , Please select the folder from where you intend to load it (I highly recommend creating a new folder for each unpackaged app).
    • Once you are done with unpacking the app into a folder Load the app into extensions as unpacked app in developer mode of Google Chrome and Launch it !! :).
    • The tutorial for Loading and launching the app is available here.

    Thanks for reading this 🙂 If you have any doubts/queries feel free to comment 🙂

  • ARChon Android Emulator for Google Chrome OS/Linux/Windows and Mac|Install and Run Android Apps in Chrome

    ARChon Android Emulator for Google Chrome OS/Linux/Windows and Mac|Install and Run Android Apps in Chrome

    ARChon is the first Android Emulator which is supported on Google Chrome OS! It works on Google Chrome browser too and thus can be used on Windows , Linux as well Mac OS too!! It uses the default Android Runtime Package for running the Android apps however, sooner we expect that Google will officially launch support for Android apps on Chrome! till then, we can use ARChon as it does the job pretty decently .Archon Android emulator will also Run Android Apk in Chrome OS / Chromebooks.

    Pre-requisites :

    • Google Chrome browser with an Internet Connection.
    • ARChon Runtime Package/Extension installed on Google Chrome .
    • A Modified .apk Android App package for testing Purpose (e.g we will be using 2048 Game Apk for this purpose , You can download 2048 from here).

    Method : 

    • First of all , download the runtime which is appropriate for your system:
    Runtime Download
    ARChon 1.2 – Intel x86 Chrome 64-bit / Chrome OS 64-bit (OSX: Use this in Chrome Canary) BitBucket :: MirrorMD5:d77b468339cc512e121c003cc97715db
    ARChon 1.2 – Intel x86 Chrome 32-bit / Chrome OS 32-bit (OSX: Use this in Chrome Stable) (Win7 32-bit: Use something like Chrome Beta 38.0.2125.77 beta-m) BitBucket :: MirrorMD5:9c9844e2591a27d952098581011a2bce
    ARChon 1.2 – ARM (i.e ARM-based Chromebooks) BitBucket :: MirrorMD5:3d6955c7702baf1e1d16a000d9f67b10
    • Unzip it into a folder ,Now load it as an unpacked extension, as shown in the image below

     For loading Unpacked extensions you will need to enable Developer Mode in Google Chrome you can do it by going to Settings – > Extensions -> Check mark the Developer Mode And Select the Folder where you just extracted the Archron Engine. (You can check the screenshots in this post 🙂 )

    • Once you have loaded the extension , please enable it by checking the Enable option besides the extension name .
    • Now extract the android Apk package which is converted into Chrome OS compatible into another folder and Load that too as an extension in Google Chrome (You can try with the above linked 2048 Game link).
    • Once you have loaded the game as an unpacked extension, it too will be shown with other extensions, now simply click on launch as shown in the image below-
    • Now once you  have clicked on Launch Your Desired Android App will be loaded! as shown below – Amazing isn’t it ?

    Drawbacks –

    • The Default Android Apk files do not work directly they need to be converted first into Chrome Compatible Apk’s which you can be created by an app mentioned here.
    • This is a proof of concept. You can run up to 4 Android applications right now with the regular runtime. Read the multiple apps manual to load more than one application at a time. To load unlimited number of apps read the ARChon runtime guide.

    I personally found this very unique and interesting , do comment your views and problems which you face while installing / running the apps . I am always happy to help 🙂

  • How to Install Lex-Yacc in Ubuntu / LinuxMint easily! Works on all Versions :)

    How to Install Lex-Yacc in Ubuntu / LinuxMint easily! Works on all Versions 🙂

    Recently, i had to install lex and yacc on quite a few ubuntu/installations because of college practicals exams (15-20 machines approximately) and that really fed me up 🙁 . Installing Lex and Yacc on Ubuntu/LinuxMint isn’t much difficult and is a cake-walk) if you can follow the correct steps as mentioned in this article –

    Procedure to install Lex/Yacc on Ubuntu / LinuxMint

    Pre-requisites :

    • An existing Ubuntu / Linux Mint Installation .
    • A working Internet connection.

    Steps –

    • First of all connect your Ubuntu/LinuxMint to the Internet and Open terminal (you can use the shortcut Ctrl+Alt+t to open the terminal)
    • Now in terminal type the following command. (You can check the above image for the screenshot)
      sudo apt-get update
    • Now, it will ask for your password – Please type the password for your Linux Account and hit Enter. (Note : While typing the password nothing will be visible on terminalit’s normal  simply continue typing your password and hit enter when you are done with it)
    • It may also ask for your permissions to update simply type “y” and hit enter , it will update its repositories through the internet, wait till the complete index update gets completed and it presents you with a terminal screen to enter command .
    • Now , first we will install the Lex package which is called as flex by typing the following command in terminal –
      sudo apt-get install flex
    • Again it will , ask for confirmation , simply respond with “y” and hit enter. Lex will be successfully installed , and you will be presented with the terminal screen .
    • Now, Let’s move on to the installation of Yacc for which we will be using the bison package . Type the following command in the terminal to install yacc –
      sudo apt-get install bison
    • That’s it the Yacc file too will be downloaded and installed , sometimes the Repository servers of bison are down and give errors in such cases you can use any of the following alternatives to install yacc.-

      sudo apt-get install byacc
      sudo apt-get install bison++
      sudo apt-get install byacc -j
    • 
      

      That’s it it was this much simple 🙂 , Happy Lex and Yacc programming.

    If you have any doubts/or want to enquire about any issues/errors feel free to comment, I will be happy to help you 🙂 , also will be adding screenshots to this article once i am done with my practicals.

  • Installation/Setup of Firefox OS Simulator on PC/Mac | Run/Install Firefox OS apps on PC (Windows/Mac OS/Linux) through Firefox Emulator

    Installation/Setup of Firefox OS Simulator on PC/Mac | Run/Install Firefox OS apps on PC (Windows/Mac OS/Linux) through Firefox Emulator

    As soon as Intex and Spice had launched their new feature phones in the Indian Market , I wanted to purchase them for getting my hands on the new Firefox OS but at the same time their limited hardware refrained me from doing so.. hence, I started looking for Firefox OS Emulator for PC , and found that configuring the Firefox OS simulator for testing and checking Firefox OS is really quite Simple! So, in this tutorial I will cover all you need to do for Installation / Setup Firefox OS Simulator on PC , And let me tell you all we require is a Firefox browser for PC – So this tutorial will work for PC as well as Mac , practically any OS – Mac OS, Linux (Ubuntu, Fedora etc) ,Windows XP /7/8/9 all.. 🙂

    Prerequisites –
    Mozilla Firefox 33 (Can work on Previous versions too 26 and later, but its really quite simple to configure and use in 33).

    So , let’s get Started –

    Step 1. Installing Mozilla Firefox 33 on your Default OS

    This will be our ‘base’ for running the Firefox OS Emulator/Simulator , at the time of writing this article Firefox 33 is in beta, but i have tested it and everything works simply fine! also i will update the links as soon as the Final version becomes available. So first let’s Download and install Firefox Browser 33 from these links according to the OS installed –

    Download Firefox 33.0 Beta for Windows
    Download Firefox 33.0 Beta for Linux
    Download Firefox 33.0 Beta for Mac

    Step 2. Navigating to the App Manager

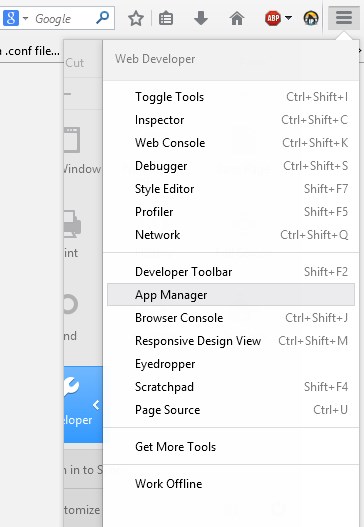
    App Manager is the one-stop destination for Coding  as well as testing Firefox Apps , its been launched from the Firefox Version 33, to Access Manager Perform the Steps below –
    Go to Menu -> Developer -> in the list which appears select App Manager as shown in the alongside image –


    Step 3. Adding a Device (Firefox OS Add-on)

    • Now after going to the App Manager , you will be greeted with a screen , showing apps and devices in the left pane . Here , select devices in the left pane and in the bottom pane click on the “Start Simulator” button as shown below –  Here, in the bottom pane , Click on the “Add” button (you can check the below figure for the add button ,The Firefox OS 1.3 shown in image won’t be visible to you, its shown in my image because i already have the device installed 🙂 for making the tutorial)

    After clicking on the Add button you will be redirected to a webpage , there click on the “Install Simulator” button as shown below –

     After clicking on install Simulator , you will be redirected to the Version select page of App-Manager helper, asking you to select the version of Firefox OS you want to install , here select the Firefox OS version you would like to emulate, in my case i selected v 1.3 as it was the latest Stable release shown in the image below –

    After selecting the OS version it will ask you to allow installation of Add-On , please select “Allow or Install Now”  to allow the installation of Add-On ., Now wait for sometime till the add-on gets installed.

    Step 4 . Going to the App Manager after add-on installed , and running the Emulated device

    • After the installation of Add-On again navigate to the App Manager as mentioned in Step 2.
    • Now , go to Device in the left pane , Select “Start Simulator”  in the bottom pane , now you will see your device name – Firefox OS version in bottom pane alongside the Start Label .
    • Here, Simply click on the Firefox OS x.x (in my case it was Firefox OS  1.3) alongside Start label , to start the device and voila! the Device Emulation will be started and your device will appear in a new Window!

    Step 5 . Done! 🙂

    That’s it you have installed your own Firefox Emulator to run and Install Firefox OS , you can browse through the UI by swiping while pressing the left-mouse click , just as in Android Menu. also the deviee automatically takes the Internet Connection of your Computer, So you can start Installing and Running Firefox OS Apps, right through the Firefox App Marketplace present in the Emulated Device itself 🙂

    Here’s a Screenshot of my Emulated device in action , its in-built Music app,automatically detected Songs from my PC’s Music library and i was able to play them from the device itself – 🙂

     You may also like to install WhatsApp on the Firefox OS Simulator by reading this article

    So, just play around and do tell us What you think about the OS, also if you have any problem in configuring/installing the Firefox OS Simulator feel free to comment 🙂

  • AndroVM Configuration Tutorial

    Here is a small tutorial to help you setting-up AndroVM with hardware accelerated OpenGL rendering, using VirtualBox.
    I will assume that you already have VirtualBox installed and working.

    Step 1 - VBox Network Preferences

    Network Adapter

    To run with hardware acceleration, as for using the ADB with AndroVM, you’ll need an “Host Only” network adapter. To create one, open VirtualBox, get to the “File” menu, “Preferences…”, “Network”.

    Don’t forget to enable DHCP Server for this network adapter.
    Step 2 – Host Only Adapter Configuration

    Importing VM

    Now, you can import the VM into VirtualBox. Just double-click on the OVA file, or use “File” menu, “Import Appliance”.
    It can be a good idea to rename the VM into something more friendly.

    Step 3 - Importing OVA

    Setting-up VM

    Step 4 - VM Parameters

    By default, AndroVM has its first network adapter set to disable. Go to the VM network settings and set it to “Host Only Adapter”

    Step 5 - Network Adapter 1

    Then, start the VM. Now, you’ve got a fully functional software-rendered AndroVM. Now, open the AndroVM Config app, and check the box to enable hardware OpenGL.

    Step 6 - AndroVM Config

    Note that you might see the VM IP on the top off the app. This is the Management IP. You can adb connect this IP.
    If there’s no IP address, then you won’t be able to use hardware OpenGL. Verify your host-only adapter configuration.
    Click on the “Save” button, The VM will restart.

    Spet 7 - VM Reboot

    The VM will stay in that state. Now it’s time to run the AndroVMplayer.

    AndroVMplayer

    The AndroVMplayer is a software used to display the VM content and manage its events. It won’t work if the VM is not running !
    Open a command line interpreter, get to the AndroVMplayer directory, and type :
    AndroVMplayer [width] [height] [density]

    Step 8 - AndroVMplayer

    Wait a few seconds, and the Android boot animation will appear in the AndroVMplayer.

    Typical problems

    STEP 8: THE ANDROVMPLAYER BLOCKS ON “WAITING FOR CONNECTION FROM VM”

    • If the VM shows a Management IP, try to connect to the VM through adb. If it doesn’t work, then turn off your firewall
    • If the VM doesn’t show a Management IP, the your network adapter is not well configured

    THE VM DISPLAYS “INIT: UNTRACKED PID XXXX”

    • It means that the VM is waiting for the AndroVMplayer. Just launch it !
  • Procedure to create Wifi Hotspot on Linux |Creating Wireless Access point on Linux [Ubuntu/LinuxMint/Fedora/OpenSUSE]

    Procedure to create Wifi Hotspot on Linux |Creating Wireless Access point on Linux [Ubuntu/LinuxMint/Fedora/OpenSUSE]

    Many times, we need to share our Internet Connection to our mobile devices/other laptops or gadgets, but we do not have a wifi router or wireless access point at our disposal. In such cases we can use our PC/laptop itself as a wireless access point to share the internet connection to other devices, and its free and doesn’t require any extra hardware too. while Windows OS contains softwares such as connectify.me,virtual router which do the same, Linux on the  other hand has fewer alternatives, one of those alternatives is : hotspotd by prahladyeri@github . Lets have a look on how to create wifi hotspot linux . I have personally tested this on Ubuntu and LinuxMint but it should work on most linux distros.

    Hotspotd is a small daemon to create a wifi hotspot on linux, it works by creating a virtual NAT (Network address transation) table between your connected device and the internet using linux iptables.

    Requirements/Pre-requisites for using hotspotd to create access point

    • dnsmasq (typically pre-installed on most linux distributions).
    • hostapd for AP provisioning.

    hostapd must be installed for hotspotd to be installed, you can install hostapd by running these commands in the terminal —

    For Ubuntu based terminal command issudo apt-get install hostapd

    And for RHEL based distros

    terminal command : yum install hostapd

    hostapd install is quick in process and will get processed in 2 seconds maximum :)shown in the figure below – .

    Now after you have installed hostapd , we need to install our hotspot app – hotspotd

    Installation of hotspotd –

    To install hotspotd, just follow these steps: , type them one by one in the terminal :

    First of all we will download the hotspotd package from wget command –

    wget https://github.com/prahladyeri/hotspotd/raw/master/dist/hotspotd-0.1.tar.gz


    Now,we uncompress the tar file and navigate to the extract directory –

    tar xvf hotspotd-0.1.tar.gz
    cd hotspotd-0.1/
    

    Here, in this installation directory we give the setup command from the terminal by —

    sudo python setup.py install


    If everything goes fine, hotspotd will be installed successfully 🙂

    Using the Hotspot

    To start hotspot:

    sudo hotspotd start

    To stop hotspot:

    sudo hotspotd stop

    The first time you run hotspotd, it will ask you for configuration values for SSID, password, etc. Thus enhancing the security of your hotspot and giving you more customizable options to play with 🙂

    Alternatively, you may also run:

    sudo hotspotd configure

    Precutionary Measures / Troubleshooting

    • Make sure all dependencies (hostapd, dnsmasq and python 2.7) are installed.
    • hotspotd creates the NAT by manipulating iptables rules. So if you have any other firewall software that manipulates the iptables rules (such as the firewalld on fedora), make sure you disable that.
    • To create a hotspot, your wifi must support AP mode. To find that out, use this process:
      • Find your kernel driver module in use by issuing the below command:lspci -k | grep -A 3 -i network(example module: ath9k)
      • Now, use the below command to find out your wifi capabilities (replace ath9k by your kernel driver):modinfo ath9k | grep depend
      • If the above output includes “mac80211” then it means your wifi card will support the AP mode.

    Rejoice, Now you  can use and share your Internet Connection on as many devices as you want  🙂 also, you can create a wifi hub for Gaming too 🙂 , If any doubts/queries/suggestions feel free to comment 🙂

  • Tutorial – Installing/Setup VirtualBox on Linux [Ubuntu/LinuxMint/Fedora/OpenSUSE/ArchLinux etc]

    Tutorial – Installing/Setup VirtualBox on Linux [Ubuntu/LinuxMint/Fedora/OpenSUSE/ArchLinux etc]

    VirtualBox is the most widely used Virtual Machine emulator today, be it Windows or MAC OS or Linux . The Widespread availability of VirtualBox for all Platforms is its plus point , it allows to run and install multiple guest Operating on our base [host] OS without the need of formatting or dual-booting . VirtualBox is also required by loads of third-party tools such as Android Emulators,Machine renderers as the basic dependency layer . The installation process of VirtualBox on Linux can become tedious at times, we will try to simplify it as much as possible in this post.

    Installing VirtualBox on Linux

    •  The easiest method to install virtualBox on linux is by downloading the .deb or .rpm packages available corresponding to your distro from the VirtualBox Downloads page from here –> [LinuxMint users should select Ubuntu based packages as LinuxMint packages are similar to Ubuntu]
    • https://www.virtualbox.org/wiki/Linux_Downloads.
    • If you are facing problems on which distro or build , you should download – Simply Navigate to  – System Settings -> Details and you’ll see the OS type , as shown in the figure –  
    • Now, double click the .deb or .rpm package downloaded.
    • Now depending upon your OS type, it will either open the default package manager of your system, “e.x Ubuntu App Center fot Ubuntu” where in you have to click install or it will directly  start installling !
    • If incase, the default packages provided by VirtualBox don’t work for you, you can even install VirtualBox through terminal by if yum is your default package manager, you can even use terminal to install by typing the command  –
      yum install VirtualBox-4.3
    • Or if you are Ubuntu/LinuxMint/any other Ubuntu based distro user, you can use
      sudo apt-get install virtualbox”  to install VirtualBox.
    • Thus,  you have installed VirtualBox on your Machine, if the above discussed methods don’t work for you, please comment with the error code, we will be happy to help you out! 🙂 and get VirtualBox installed .