Category: Chrome Turorials

  • Top 3 Download Managers for Google Chrome to Increase Downloading Speed [2019]

    Top 3 Download Managers for Google Chrome to Increase Downloading Speed [2019]

    Google Chrome is the most widely used Web Browser across the globe and perhaps the fastest when it comes to browsing websites. But, the downloading speed of any download being done via Google Chrome is slow, and often the number of failed downloads only increase our efforts to re-download the file and time too. A solution to the above problems is using a download manager. Download Managers not only reduce the number of failed downloads, but they also help in increasing the speed and giving more controls over the files we download. So, here are the Top 3 Best Download Managers for Google Chrome Browser and Chrome OS –

    Top 3 Download Managers App for Google Chrome Browser – [ChromeBook Chrome OS Compatible]


    Download Manager # 1 – Chrono Download Manager

    Chrono Download Manager
    Chrono Download Manager

    Chrono Download Manager is a full-fledged Download Manager, which gives you more controls over your downloads.

    It comes in with Multi-threaded supports much like IDM, so that you can download via multiple streams from the server resulting in more download speed. Also, it comes with custom one-click download helper, simply right click on any link and “select the Download Link” option from menu.

    Features – 

    • Multi-threaded download support (Configurable from Download Managers – General Settings option page) – chrome-extension://mciiogijehkdemklbdcbfkefimifhecn/ui/options.htm
    • Custom file renaming to give you better control to rename file names before downloading.
    • Pause and Resume downloading support!
    • Automatically replaces Chrome Default download manager.

    Click here to Download Chrono Download Manager from Chrome App Store


    Download Manager # 2 – Turbo Download Manager

    Turbo Download Manager
    Turbo Download Manager

    Turbo Download Manager is another alternative download manager like Chrono to Google Chrome’s Download. We found out Turbo Download Manager to be more powerful than even Chrono, but it lack of user friendliness kept it on the second position.

    Some of the Unique Features of Turbo Download Manager are –

    • Multi-threading support.
    • Automatic retry of failed downloads! if the fail in between.
    • Console log .

    Turbo Download Manager doesn’t automatically grab downloads/links which is a good thing, to download any link via turbo download add it manually in the app or use the Turbo Download Helper extension to enable right click on any link to download via turbo download manager option.

    Click here to Download Turbo Download Manager App from Google Chrome App Store

    Turbo Download Manager proved to be very useful in Downloading Big Files due to its unique capability of letting Chrome Shut down, or even allowing PC to be shut down in the paused downloading file state as shown in the article – How to Shut down Chrome or PC with Active Download and then Resume it.


    Download Manager # 3 – Chrome Download Manager

    Chrome Download Manager
    Chrome Download Manager

    Unlike the above two Download Managers which increase the functionality and allow tweaks to increase the speeds, Chrome Download Manager makes it easy to manage download.

    Its a lightweight extension, which lets you view your current downloads in the top-hand side corner concealed behind the down button (much like firefox) . So that you can manage your downloads without going to the downloads page, thus saving your time!

    Click here to Download Chrome Download Manager from Chrome Extension Store.


    So, these are the Best 3 Download Managers for Chrome which will give you more control over your downloads, thus increasing the Downloading speed!. This method is exclusively meant for Google Chrome browser for Windows 10/7/8.1/ Mac OS X, Linux (Ubuntu) etc and will not work on the Android Chrome version.

    Geek Alert! – You can also use your Chrome to Download Torrents directly – >  Click here for tutorial to download torrents via Chrome.


  • How to use Kronymous to access Tor Network on Chrome Browser & Google Chrome OS (Chromebooks)

    There is no official Tor bundle released for Google Chrome Operating System or Chromebook, neither does the Tor bundle for Windows, or Mac OS X officially supports Google Chrome Web Browser. Many times we might need to access Tor network either to remain anonymous, or to bypass censorship & access .onion sites. Here’s a simple tutorial on How to use Kronymous to access Tor Network & .onion websites on Google Chrome OS or Google Chrome Web Browser –

    Kronymous Tor Client for Google Chrome OS / Browser
    Kronymous Tor Client for Google Chrome OS / Browser

    Pre-Requisites – 

    Tutorial on How to access Tor on Google Chrome OS / Browser using Kronymous – 

    Step # 1 – Adding a Proxy Profile to Google Chrome for Kronymous

    • After you have installed Kronymous and Proxy Switchy Omega, we must create a proxy profile for Chrome to tunnel through Kronymous. We will be creating a proxy profile using Proxy Switchy Omega for the same –
    • Now , lets create a proxy profile using the following steps –
      1. Click on the “O” icon of “Proxy Switchy Omega” and select “Options” from the drop-down menu as shown in the image below –
        Select Options from the drop down menu
        Select Options from the drop down menu

        Now, in the Proxy options which appears make sure the URL in the address bar is –
        chrome-extension://padekgcemlokbadohgkifijomclgjgif/options.html#/profile/proxy

      2. In the above Proxy Settings profile page, please make the following changes as required –
        1. Change Protocol from “HTTP” to “SOCKS 5”.
        2. Change the server to “127.0.0.1”
        3. Change the Port to “9999″.
        4. Thus, your Proxy settings for Proxy profile must look as shown in below image –
          Proxy Switchy Omega Kronymous Tor Settings for Chrome
          Proxy Switchy Omega Kronymous Settings – Click on Apply Changes


        5. Now Click on “Apply Changes” button as shown in the above image.
      3. Now, the Proxy Part is done. Now lets look onto the Step.2 that is connecting to Kronymous.

    Step # 2 –  Connect to Kronymous

    • Launch the Kronymous app from the Google Chrome App Page or new tab page.
    • It will now show a new window saying “Tor Proxy is not running”etc as shown in the image below – . Click on the “Start Tor Proxy” button to start the Tor Proxy connection as shown below –
      Kronymous - Start Tor Proxy Chrome
      Kronymous – Start Tor Proxy Chrome

      It will now, start connection to the Secure Tor Network.

    • Now, Please wait until the image shows “Bootstrapped 100% : done” as shown in the image below –
      Kronymous Successful Tor Connection
      Kronymous Successful Tor Connection

      The 100% mark indicated that the connection is successfully done.

    Step # 3 – Enabling the Tor Proxy

    • Now, Once you have connected to Tor Network, simply open a new window , Select the “O” Omega  icon as shown in the image below , and select the “proxy” profile which we saved in the Step . 1 –
      Select Proxy profile from Omega icon
      Select Proxy profile from Omega icon

      That’s it , now once you have selected the proxy profile simply enter the website address of any .onion site or you can check the status of your Tor connection by visiting the following URL –
      https://check.torproject.org

    • Voila! you will see the message that you have successfully connected to Tor Network as shown in the image below –
      Successful Tor on Google Chrome OS & Browser
      Successful Tor on Google Chrome OS & Browser

      Thus, you can now securely access .onion websites or bypass censorship while remaining anonymous using Tor on Google Chrome

  • How to Access & open YouTube website in Material Design view!

    How to Access & open YouTube website in Material Design view!

    Google has confirmed that its testing the material design on YouTube. This re-designing of YouTube layout took almost 2 years to come and is currently in Beta. However, You can access this Beta version on your PC or Windows Computer and even Mac OS as well by a few tweaks. Here’s a small guide which will enable you to Access & Open YouTube website in Material Design View .

    Pre-Requisites –

    • Preferably Google Chrome Browser , although We tried and it worked on Chrome & Mozilla Firefox as well.
    • A Simple Extension for editing the Cookies , We recommend Edit this Cookie extension.

    Method to Access YouTube Material Design Website –

    • First of all Download & Install the “Edit This Cookie” extension from Google Chrome Store / Opera Store / Mozilla Add-ons repository from the links below –
      Click here to Download Edit This Cookie extension for Google Chrome
      Click here to Download Edit This Cookie Add-on for Opera.
    • Once you have installed the extension , it will add a cookie icon in the address bar of your browser.
    • Now, either sign-out of all your Google Accounts on your browser, or simply Open a New Incognito Tab.
    • In the incognito window or once signed-out of your account, Navigate to the below YouTube USA URL by clicking the link below.. (The Material design view tweak currently only works on the US URL Below) –
      https://www.youtube.com/?gl=US – Click here to Open the YouTube USA URL
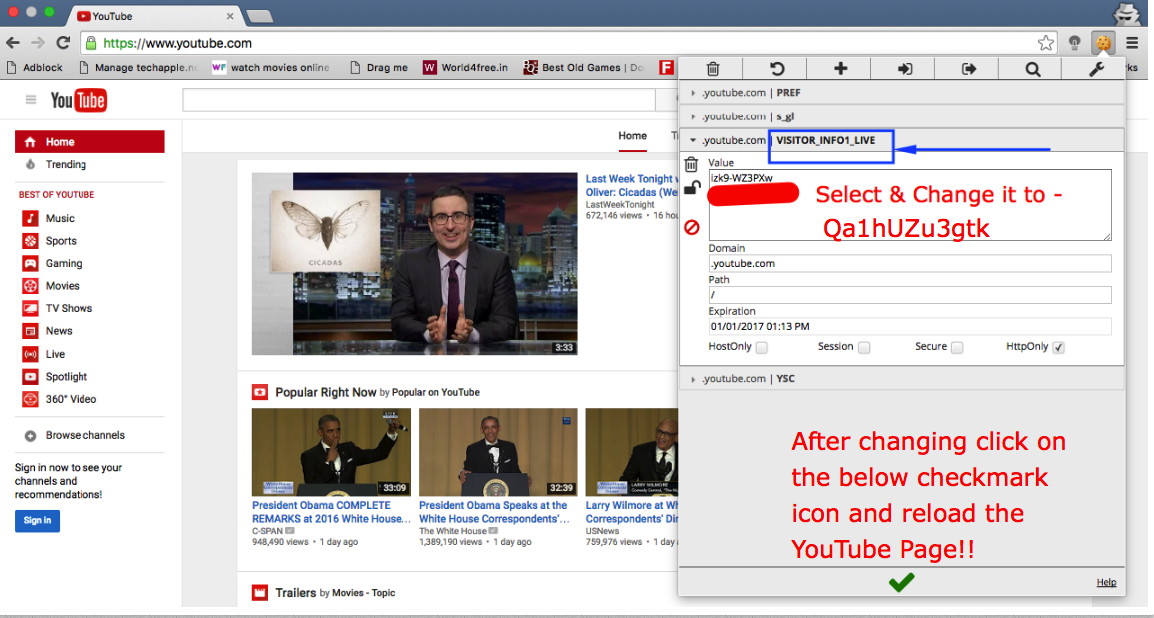
    • Here comes the Main Part.. Once you have opened the YouTube USA Link in incognito window – Click on the “Cookie” button in the right-hand top corner and look for the option labelled “VISITOR_INFO1_LIVE” as shown in the image below –
      YouTube Material design Cookie
      YouTube Material design Cookie

      Here expand the “VISITOR_INFO1_LIVE” option and delete the existing text inside the “Value” box, Replace the text with “Qa1hUZu3gtk” without quotes. It should look like shown in the following image –

    • YouTube VISITOR_INFO1_LIVE
      YouTube VISITOR_INFO1_LIVE

      That’s it ! Now simply “Click on the Checkmark button” at the bottom and reload the YouTube USA Page!

    • Voila! .. You’ll see the New Material Design of YouTube loaded right in your browser.. as shown in the below image –
      YouTube Material Design
      YouTube Material Design

      You can even use options search as search and view the redesigned Channel Pages .. They look absolutely stunning – For example below is the screenshot of IPL 2016 YouTube channel –

      IPL 2016 Material Design Youtube
      IPL 2016 Material Design Youtube


    I Personally, liked the new YouTube design 🙂 , Did you like it ? What are your views ? Do let us know if you face any problems while accessing the new layout.

  • 3 Solutions to How to Download Torrent in Chrome OS / Chrome books

    3 Solutions to How to Download Torrent in Chrome OS / Chrome books

    Considering the rapid rise in number of Chromebook users & Chrome OS plus the load that uTorrent puts on Windows System & the crapware bundled with it, lead us to think on How to Download Torrents in Google Chrome Browser and we got 3 Solutions in Total for the Same. These 3 Solutions will work on Chromebooks & Google Chrome OS too as we are using chrome’s default extensions for downloading torrent thus are recommended torrent client for Chrome OS-

    Solution # 1 – Using JSTorrent Client Extension for Google Chrome OS 

    JSTorrent is a torrent Client for Chrome

    JSTorrent is a torrent client for Google Chrome written purely in JavaScript, Its Speedy, easier to use and works with Magnet Links too! . Though JSTorrent is a paid app on the Google Chrome Store, you can use the Lite Version which is available for Free . Also, If you want to get the Full-feature JSTorrent Version for Free you can get its code from github and directly load as Unpacked app . We have compiled a tutorial which will explain you on loading the github code –

    Click here to know about How to Load JSTorrent Chrome Extension for Free using Github Or else you can Download the Free Lite Version from this link – Click here to Download JSTorrent Lite from Google Chrome Store.

    How to download Torrents Using JSTorrent on Google Chrome Browser –

    • First of all Download & launch the JSTorrent App on your device.
    • Once you have launched the app , We first need to Specify the “Downloads location” where the file is to be saved / Downloaded. Click on “Options” as highlighted in the below image –
      JSTorrent Options
      JSTorrent Options

      Now, Choose the Download location by clicking on the “Choose” button in the pop-up (Specify the location for your torrent downloads) Click here for a sample image .

    • Once, you’ve specified the location, you need to add the torrent to the client, You can add a torrent by either Copy-Pasting the Magnet URl of the torrent, or directly link of the .torrent file  (You can also add your local .torrent file by keeping the option Blank and clicking on the “Add” button . As shown in the image below –If you have pasted the Magnet URL or the link , Click on “Add” to add it to the list, Once your torrent is successfully added it will be added to your list!
    • That’s it! You can also use the Start / Stop or Remove buttons to perform the corresponding actions .


    Solution # 2 – Using Bitford Torrent Client for Google Chrome OS

    Bitford Client

    Bitford is an alternative to JSTorrent client for Chrome OS which is free! . Though, Bitform lacks functionalities in comparison to JSTorrent, but nevertheless it gets the Job of Torrent download done , Besides that Bitford also lets you Play / Stream torrent data so that you can watch videos even while they’re being downloaded at the background.

    Click here to Download Bitford for Chrome from Google Chrome Store

    To Download torrents using Bitform first download the .torrent locally and then launch the Bitform App , Now Click on “Load File” option as shown below –

    BitFord Load torrent option

    Now, select the local .torrent file which you downloaded and it will start downloading the contents! . Its that easy.


    Solution # 3 – Using Torrent Leech Sites

    This Method is different from the methods we discussed above. Unlike the previous two methods we don’t need to continuously power-up our PC nor download any extension or app for Downloading torrents  . We just need to leech torrents online on Torrent Leech Sites and then we can directly download them via simple http connection .

    Click here for Tutorial on How to Use Torrent Leech sites to download Torrents.

    So, These are the 3 methods which can be used to download Torrents on Chromebooks/ Chrome OS . Infact After using JSTorrent you might use it on Windows , Linux and Mac OS too! . Feel free to comment if you face any issues 🙂

  • How to install & load unpacked Extension in Google Chrome Browser & OS / Chromebooks

    How to install & load unpacked Extension in Google Chrome Browser & OS / Chromebooks

    Many times Google Chrome simply blocks some extension and we cannot use them any further or sometimes we need to install extensions which aren’t present on the Store. In such scenarios, we can test the Google Chrome Extension by loading unpacked Extension & Installing it in Google Chrome Developer mode . In our tutorial we’re going to use JSTorrent Extension which is a JavaScript based Torrent Client for Google Chrome & then install it externally –

    Tutorial to Install & Load Unpacked Extensions in Google Chrome Browser / OS

    • First of all download the .zip or .crx file of the Extension you need to install manually on Google Chrome and extract it to a folder –
      As we are using JSTorrent in our example : You can download the JSTorrent Zip for Free from Github using the below URL –
      Click here to Download JSTorrent .zip from GitHub.com
    • Once you have downloaded the Zip file, extract it to a folder (In case of .crx files, rename the files first to .zip and then extract) .
    • Now Return again to Google Chrome, Navigate to Settings – > Extensions .
    • Here Look for the Option “Developer Mode” and enable it as shown in the image below –.
    • Once you’ve enabled the Developer Mode option it will modify the extensions tab from clear one in the previous image to one which looks similar to the image below “It will reveal Load Unpacked Extension” option –
      Google Chrome Load Unpacked Extension
      Google Chrome Load Unpacked Extension

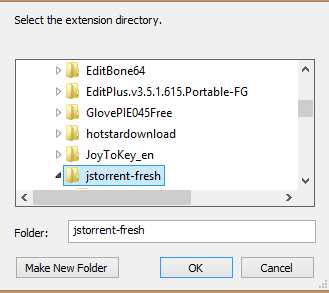
      Now Simply Click on The “Load Unpacked Extension Option” it will ask you for the Directory from where the extension is to be loaded as shown below –

      Extension Directory

      Here Specify the directory to which we extracted the .crx file of extension or .zip file in the First Step and Click on OK.

    • That’s it your Extension will now be added to Google Chrome , Now Scroll down in the “Extensions” tab present inside Chrome Settings, you’ll see Your Extension in the list (In our example JS Torrent ) Now Simply Click on the “Launch” option highlighted to launch your extension ! –
      JSTorrent

      Voila! You’ve installed as well as launched an Unpacked Extension on Google Chrome . We used JSTorrent in our example because it charges users on Google Chrome Store, although its source code is available for Free on Github. If you face any problem’s while loading extensions feel free to comment.

  • Run Python Scripts – Python Programming on Chrome OS / Chromebooks | Python for Chrome Os

    Run Python Scripts – Python Programming on Chrome OS / Chromebooks | Python for Chrome Os

    Chromebooks and Chrome Os is on the trend, due to the lightning fast speeds, ease of use and lower costs . Same is the case with Python by virtue of its vast possibilities of application in fewer lines of Coding & scripting . Hence, here’s a small tutorial by which you will be able to do Python Programming on Chrome Os itself , as well as run Python Shell in chrome Os itself !. I will be covering two python apps/extensions on Python for Chrome OS , you can use anyone which you like –

    App / Extension # 1 – Python

    Python Shell for Chrome

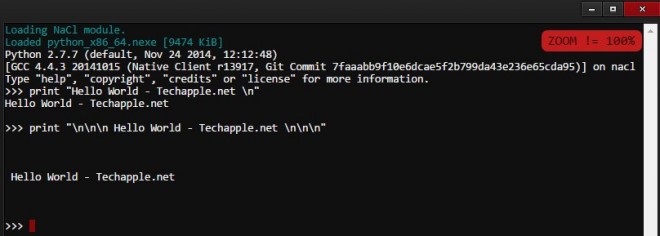
    This is my favorite app/extension for running Python in Chrome as it provides a complete Python Shell for running and executing the apps . Giving a native Linux feel , the shell is based on the famous NaCl module and provides Python 2.7.7 , which gives platform for more productivity without voiding the warranty . After you install the app , simply Run the app through the Chrome App launcher.

    Click here to download Python for Chrome Os / Chromebooks.


    App / Extension # 2 – Skulpt Interpreter

    Skulpt python interpreter

    Skulpt Python interpreter for Chrome Os is yet another extension which enables Python scripting and programming on your Chromebooks. Though Skulpt Interpreter doesn’t provide you the native experience of python shell , but is powerfully built. and is quite handy too!

    Click here to download Skulpt Interpreter for Chrome OS.

    So, these were the Python tools or extensions for Google Chrome OS, if you know of any other such good app/extension for Python on Chrome feel free to comment .

  • Tutorial – How to disable/Stop YouTube Autoplay of Videos and Playlists in Chrome/Firefox

    One of the most annoying thing present in YouTube is its Autoplay – Its starts playing the video as soon as its get opened, or we click on it. Sometimes, we may need to Stop/Disable YouTube autoplay of videos in order to conserve bandwidth or simply in case where we are stacking up videos in different tabs for viewing . So, here’s the easiest method to Stop YouTube auto play

    Method # 1 – Using SmartVideo for Google Chrome / Firefox

    SmartVideo has the option to stop youtube video initialization
      • Though, SmartVideo for YouTube has many customization options for YouTube, as this post is about stopping/disabling the YouTube auto-play , coming straight to the Point –
      • First of all download the SmartVideo addon/extension depending upon your browser –
        Click here to download SmartVideo for YouTube –  Chrome.
        Click here to download SmartVideo for YouTube for Firefox.
      • Once you’re done with installing the SmartVideo extension, browse to its Preferences by entering these URLs in address bar depending upon the Browser you Use –
      • Enter the following URL for Google Chrome –

    chrome-extension://lnkdbjbjpnpjeciipoaflmpcddinpjjp/options.html

    • Enter the following URL for Mozilla Firefox –

      resource://mytube-at-ashishmishra-dot-in/smartvideo_for_youtube/data/options.html

    Now,  checkmark the option highlighted by Red Rectangular box in the alongside image which shows – “Save Bandwidth, Do not initializw video until I click” .

    You can also open the global preferences, or settings for Smart YouTUbe extension by hovering mouse pointer over any YouTube video which is being played and selecting “Global Preferences” in the drop-down menu.

    That’s it, now open any YouTube video you’ll find that its Not auto playing or initializing and thus serving our purpose 🙂

  • 5 Awesome YouTube extensions to enhance YouTube usage/experience! [Chrome/Firefox]

    5 Awesome YouTube extensions to enhance YouTube usage/experience! [Chrome/Firefox]

    Its almost impossible to find an internet user who hasn’t used YouTube! but sometimes YouTube experience isn’t that great because of Ads, Buffering while loading videos , unrelated comments , or autoplay of videos . So here are the 5 Best & Awesome extensions which will enhance your YouTube experience and make a pleasant viewing!

    Extension # 1 – SmartVideo for YouTube

    SmartVideo for YouTube provides a huge customization

    SmartVideo for YouTube stands tall at No.1 position in our article because of the sheer number of customization options and settings (YouTube video optimization) it provides. SmartVideo is free to use and provides a lot of features such as –

    • Ability to decide/fix the video quality permanently so as to you don’t have to change the video quality everytime.
    • Stop the buffering of videos once paused (Uncheck the option highlighted by purple box).
    • Stop/Disable autoplay of YouTube videos until clicked on the play button.
    • It even has options of Smart Buffering to ensure optimum viewing on slower internet connections.
    • It even shows the time remaining for the video to start playing (Time required to resume playback during the starting/mid-way buffers).

    Click here to download SmartVideo extension for Google Chrome.
    Click here to download SmartVideo extension/addon for Mozilla Firefox.


    Extension # 2 –  ImprovedTube 

    ImprovedTube has an option for controlling PlayBack speed

    I had quite a lot of fun while using this extension – especially by using the Playback Speed option! , it was fun watching dance & listening music in slow-motion or in speed-up 🙂 . Besides, this the ImprovedTube extension also has options for –

    • Changing the Player Size – To cover full browser windows, etc.
    • To pre-define/fix the Video Quality.
    • To hide Video Annotations,Description and hide comments.
    • Changing the Playback Speed.
    • and to disable Auto Play in Videos and Playlists to conserve bandwidth.

    The only drawback of this extension is that once you change the settings in ImprovedTube, it won’t work until you reload the YouTube video tab.

    Click here to download ImprovedTube for Google Chrome.
    Firefox users can use the combination of these two addons to get the same functionalities –
    1. Click here to download No Comments – YouTube for Firefox.
    2. Click here to download YouTube enhancer for Firefox.


    Extension # 3 – Floating YouTube extension + app!

    Floating YouTube – a unique experience

    I was spending a lot of time on YouTube decreasing my productivity, until i found the Floating YouTube extension which allowed me to watch my favorite show simultaneously while i was working on blog! And i found it pretty awesome – The only drawback being it couldn’t play Copyright Music videos of India. I hope the developers will resolve this bug soon. Rest assured the app is awesome! . The app only loads the video in the widget once the URL is input onto it,for automatic playback of video in the widget do use the app in combination with the Floating YouTube extension.

    Click here to download Floating YouTube App.
    Click here to download Floating YouTube extension


    Extension # 4 – Magic Actions for YouTube

    MagicActions for YouTube takes YouTube experience to a higher level!

    Magic Actions for YouTube simply takes your YouTube viewing experience to a higher level , it provides a large set of functionalities some of which include –

    • Applying Color filters to the video (Grey Scale , Sepia , etc ) without reloading (By clicking on the blue-colored highlighted box).
    • Control the video volume by Mouse Wheel! .
    • Instant Screen Capture (Clicking on the button high-lighted by yellow box).
    • Changing the Video window/size & YouTube theme by clicking on the button highlighted by Green Color (The most centered button in the newly obtained button-set on installation).
    • Dimming and changing everything to black/white-on click of a switch besides the YouTube logo (highlighted by pink color in the image).

    Thus, you will find Magic Action more and more interesting, the more you use it.!

    Click here to download Magic Actions for  YouTube for Google Chrome.


    Extension # 5 – Stop Video Download extension

    Stop Video button

    Many times we need to quickly shift tabs to do some important work and the YouTube video continues to consume bandwidth even if the pause button is pressed. In cases like this the Stop Video Download extension comes in handy!

    It adds a neat looking Handy “Stop Button” which can be used to stop the video and to preserve the bandwidth which couldnt have been preserved by the conventional pause button!

    Click here to download Stop Video Download extension for Chrome.


    So, these were the 5 most extensions which i found to be most awesome for enhancing YouTube experience. Feel free to comment if you face any problems or if you know of any such awesome extensions like these

  • Use Google Chrome browser as MP3/Audio/Video Player on Android/PC !

    Use Google Chrome browser as MP3/Audio/Video Player on Android/PC !

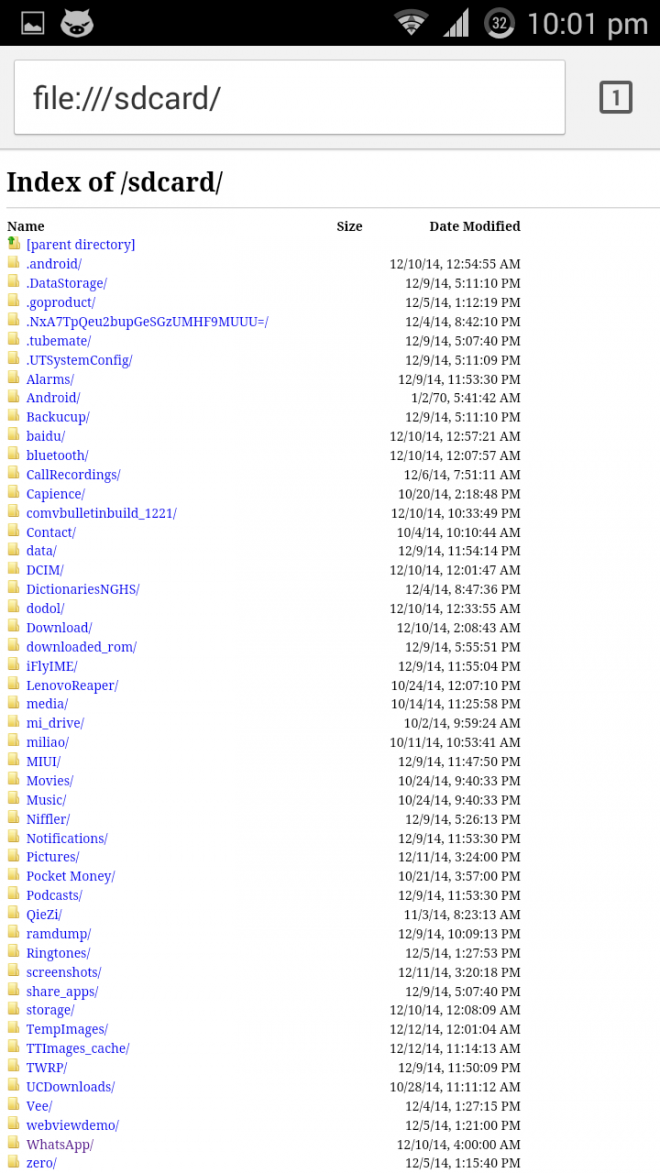
    Recently, i flashed my phone and I was left with literally no external apps , also I didn’t had the apk packages with me and I had to urgently play some MP3 Songs present on my SD Card. I was looking for options, and then i remembered this article which i used to use Google Chrome/Mozilla Firefox as a File explorer cum Media player on PC using “file:///” protocol . So I decided to try my hand with this trick on Android too and it worked! I was able to use Google Chrome as a File explorer + MP3 Player + Video player too! on my Android! . Also this trick works on PC too! so i’ll be mentioning the steps for PC too!

    Google chrome’d File Browser view

    Method to use Google Chrome as MP3/Audio/Video Player on Android

    • First of all Open your Google Chrome browser , you can also use Mozilla Firefox on Android . I tried it and it worked on Firefox too, but other 3rd party browsers like UC browser, Opera Mini and Dolphin browser weren’t able to support our method .
    • Now in the address bar , Type and navigate these locations one – by – one ( Note – I am saying to try all URLs because the File system structure vary from device-to-device depending upon the Android version) .file:///sdcard/
      file://sdcard0/
      file://sdcard1/
      file://storage/

      file://storage/sdcard0/

    • You’ll find that the Browser is able to open / show files on atleast one of these five address locations.
    • Now, click on the folder name to enter it , and browse to the media file you want to open.
    • After reaching the file , Simply Click on it – If its a MP3/Video File it will be played , or if its an image/html file it will be displayed right in your browser!
    • Magical! isn’t it (Check the alongside image for reference) .
    • Note – You can also use this trick to use Google Chrome browser as PDF viewer as Android lacks in-built PDF viewer (Thus, saving your memory required to install PDF viewer on your phone)

    Method for PC Users to use Google Chrome/ Firefox Browser as MP3 / Audio Player on PC (Windows / MAC / Linux )

    • The method is actually the same except you have to enter the URLs like this –

    file://c:/                             (To Access/Open C Drive in windows)

    file://root/                         (For Linux Users)

    file://home/  

    file://Desktop/

    • Now, again one of them will show your folder contents depending upon your OS , Click on the foldername to open the folder and on the media file to play/open it in your Browser 🙂 . It’ll work without any hiccups (You can also use it to view PDF files ).

    The trick is quite simple but I hope, you guys will like it and use it to flaunt your geekiness 🙂 , Signing off with yet another Screenshot of my device using Firefox as the File explorer. If you face any problems or have any doubts/queries feel free to comment 🙂