Author: Chaitanya

  • Bank Swift Code not available-Solution for receiving AdSense Payment in India | Adsense Payment Settings for Swift-BIC

    Recently, Google has launched Adsense payment by Wire transfer in India to Indian Adsense Publisher Accounts, and has completely ditched the old cheque payment system,thus now there’s no need to wait at homes waiting for cheques 🙂 . although the wire transfer or Electronic Fund Transer [EFT] guarantees quick and easy money transfer to publishers , it requires filling of SWIFT-BIC code which is not available for every Bank in India especially the Rural ones and small branches . Thus causing Payment Problems to the Publishers , but we at TechApple have come up with unique solution to the problem of Bank Swift Code Not Available .

    Solution / Settings for receiving Adsense Payment in India even if SWIFT Code Not available

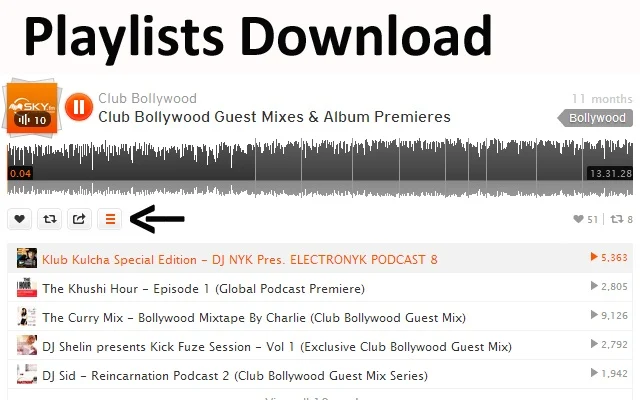
    • First of all , Fill Up all the details in the Payment settings page except Swift code , it consists of simple fields such as Account holder Name , Account Number and IFSC Code, Make sure that you fill in only your branch’s IFSC Code and your Correct Account Number . The Payment settings will look like these —
    • You can use the site MyIFSCCode to find the IFSC Code of your Bank branch . Make sure you copy the correct IFSC Code as each Bank branch in India has its separate and distinct IFSC Code.
    • Now, regarding the SWIFT-BIC ,  First of all Please visit the site http://www.theswiftcodes.com/india/ and find out whether your Bank Branch has SWIFT Code or not , if its present simply enter the Obtained Swift Code , else
    • Simply fill in the Nearest Bigger Branch Swift Code of the Same Parent Bank as that of yours, if the SWIFT-Code of your Branch is not available .. e.g if your Account is in SBI , then look for the Swift Code of  nearest SBI branch only ..
    • Else if you still cannot find the Swift code of your nearest branch , you can use any of these default SWIFT-BIC codes as per your branch
    • Allahabad Bank- ALLAINBBTDM
    • Andhra Bank- ANDBINBB
    • Axis- AXISINBB002
    • Bank of Baroda- BARBINBBXXX
    • Bank of India- BKIDINBBNRI
    • Bank of Maharashtra- MAHBINBB
    • HSBC- HSBCINBB
    • ICICI- ICICINBBCTS
    • Oriental Bank of Commerce- ORBCINBBIBD
    • Punjab National Bank- PUNBINBBISB
    • State Bank of India- SBININBBFXD
    • United Bank of India- UTBIINBBXXX

    Now, some of you might think that using the above method is risky and like that, but in Indian Banking System SWIFT Code is used only to perform Foreign currency to Rupee conversion . and hence using any of the Parent branch SWIFT Code ensures the SWIFT Code bank branch being used as a bridge to convert and transfer money to our Local branch which uses the IFSC Code and then to our Accounts located in the IFSC Code branch , thus ensuring proper funds transfer of our hard earned Money through Adsense 🙂

    Here’s the proof of the same – My Payment received on my Bank Account 🙂

    If you have any doubts/queries feel free to ask us by comments 🙂 Happy Earning!

  • 3 Ways to Download Sound from Soundcloud legally – Easily Download Soundcloud Music,Songs to mp3 on Mobile/PC/Mac Online

    3 Ways to Download Sound from Soundcloud legally – Easily Download Soundcloud Music,Songs to mp3 on Mobile/PC/Mac Online

    Soundcloud has simply revolutionised the way music artists share their work . Soundcloud has enabled easy interaction between music artists and listeners,thus it is used widely for sharing sound,music . By default Soundcloud itself legally supports downloading of sound and music from its site but many are unaware of it , so Let’s have a look on 3 Ways to download Sound from Soundcloud.

    Method 1 . From official/original Soundcloud site

    The Soundcloud site itself has the features of downloading the music/sound if allowed/permitted by the Sound artist or Sound Uploader , The Method for downloading from official site is quite simple, you simply have to click the “Down” button as shown in the images below – There may be two cases depending upon the date when the music was uploaded , the images below cover both the cases

    Case 1 –  Distinct visible downward arrow

    Case 2 – Embedded Downward arrow

    Method 2 . Using Websites to download from soundcloud 

    Sometimes it may happen that the above official method of downloading from soundcloud doesn’t work in such scenarios we can use websites and browser tools to download from soundcloud , one of such site is soundcloud-download.com , using it is very simple .

    • Just copy the unique soundcloud URL for the particular music/sound/song from soundcloud.
    • Now paste the copied soundcloud URL in the URL box of the sound cloud download site .
    • And now click the Download Button .!  and your music will start downloading . The below image shows the example of using soundcloud-download.com to download from Soundcloud


    Besides this, there are soundcloud-download.com alternatives sites like Sounddrain.com and Soundflush.com which too can be used for downloading mp3 from soundcloud. The method from downloading from these sites is same as mentioned earlier .

    Method 3. Using Browser extensions

    If the first method didn’t work for you , or either you feel tired to copy the URLs every time you need to download, you can simply install these Soundcloud Downloader browser extensions , and it will automatically add a download button to each Soundcloud Sound you are browsing too . Just click the button and download will start, making the job easier 🙂

    Soundcloud Downloader extension for Google Chrome

    Install this Soundcloud Download extension for Google Chrome and the download button will be available for tracks which you browse on soundcloud as shown below.This extensions supports Soundcloud Playlist download too , thus saving the time and required to download multiple tracks. Soundcloud downloader Google Chrome extension screenshot


    SoundCloud downloader Firefox Extension

    The Soundcloud downloader extension is available for firefox users too, you can add it to your Firefox from Addons store by Clicking here . Check the below image for the screenshot of the Firefox extension


    So these are the methods to download from Soundcloud, feel free to share this post and if you face any difficulties feel free to comment 🙂

  • 5 Best Android Emulators for Mac OS X to Run Android Apps [2019] | Run and install Android apps on your Mac OS X , Macbook Air/Pro

    5 Best Android Emulators for Mac OS X to Run Android Apps [2019] | Run and install Android apps on your Mac OS X , Macbook Air/Pro

    What are Android Emulators for Mac ? Why do you need them ?

    Android Emulators are software which let you install Android apps and games on your Mac . Thus, enabling you to run apps and play games made for Android on your system. Considering, the vast number of productive apps and great games for Android, it increases the amount of activities you can do on your Mac. As using it, you can even run Android apps in addition to apps made for your Mac OS X system.

    5 Best Android Emulators for Mac OS X –

    1. Bluestacks AppPlayer Android Emulator
      • Bluestacks emulator for Mac OS
        Bluestacks emulator for Mac OS

        Bluestacks AppPlayer is probably the Best Android Emulator for Mac OS because it uses the unique “LayerCake” technology which allows android OS apps to be emulated and run without requiring an external Virtual Desktop Application such as Virtual Box or Vmware.

    Bluestacks for Mac OS X Features & Drawbacks
    Features Drawbacks
    • Inbuilt Manager to browse and install apps inside the Emulator
    • Gaming performance needs to be improved. Some games face lag

    • Double click on any apk file in Mac OS X to install in Bluestacks

    • Snapchat and Pokemon Go do not work

    • Push Notifications support from Bluestacks to Mac, thus enabling use of Chat apps

    • Free version may show some ads

    • Camera support, thus upload live videos to Android app from Mac Camera


    2. Nox Emulator for Mac OS X
    Nox Android Emulator for Mac
    Nox Android Emulator for Mac
      • Nox is a great emulator for Mac and Mac OS X and is the best suited for playing games without fuss.


    Nox Emulator for Mac OS X Features & Drawbacks
    Features Drawbacks
    • Drag and Drop to install APK
    • Difficult to transfer files between Nox and the Mac OS X system

    • Inbuilt Screen Capture and 60Fps Video Recording Support

    • Camera Module doesn’t work , so cannot use Camera based apps (Video Call)

    • Assign Macro and Keyboard mapping to play touch games via Keyboard

    • The Mac version is less frequently updated compared to Windows version

    • Smooth Video Streaming on Streaming Apps


    NOTE – 
    You might want to check out this new emulator which runs directly inside Google Chrome BrowserARChon! Android Emulator., thus it will work on Mac too!

    3. Andy OS
    ANDY Emulator Gameplay
      • Andy OS by Andyroid.net is another great Android Emulator for Mac OS , but it requires Virtual Box to be preinstalled on the MAC. 
      • You can also use your phone as a controller for controlling / playing the games, the picture alongside explains it 🙂


    Andy OS for Mac Pro’s & Cons
    Pros Cons
    • Directly launch the apps installed in Emulator from OS X Launchpad
    • Resource Heavy, long-time usage may heat up your system

    • OpenGL Acceleration for Better Graphics

    • Camera Module doesn’t work , so cannot use Camera based apps (Video Call)

    • Camera & Microphone Supported

    • Uses Old Android Version

    Update : You might love it to check out the New Firefox OS on PC – Click here to Configure Firefox OS Emulator on your Mac


    4. Genymotion
    Genymotion Live on MAC
    • One of the most striking features of Genymotion is unlike other Android Emulators it allows us to change the type of android device as well as android version we are using!!
    • This is a great feature and allows us to select a particular device as well as particular Android version which we want to emulate.
    • It also supports configuring the amount of resources e.g RAM ,harddisk to be allocated to the Android device is possible! Great feature if your are limited on hardware resources.
    • Directly supports networking through ethernet /Wi-Fi , emulates your connected connection directly so you can use internet directly in your emulated android.
    • ADB Support and it also supports OpenGL hardware acceleration so you can use your Android device fullscreen and play Games on your MAC!
    • Also supports drag and drop file transfer to the emulated SD Card 🙂 , supports Gyroscope,Light and accelerometer sensors too.
    • You need an account on Genymotion Cloudto Download and deploy Genymotion android device .


    5. Xamarin Android Player for MAC
    • Xamarin is yet another android emulator with variety of devices supported, it supports OpenGL, and virtualizes a device instead of emulating it. 
    • This Virtualization increases speed of the emulator to a great extent!
    • Click here to download Xamarin Android Player for Mac.
    • The Configuration/installation instructions for Xamarin on Mac OS can be found here .


    So these were the Best 5 Android Emulators for Mac OS , besides these there are other options available too such as the Android SDK (Official) Emulator ,AndroVM , AndroLite but configuring official Android SDK is a tedious task and other two didn’t interest me much , you can check them out too..

    Hope you liked this post, if you have any doubts/queries/suggestions feel free to comment!

  • 5 Best Android Emulators for Linux | Run Android Apps on Linux Ubuntu,LinuxMint,Fedora,ArchLinux,OpenSUSE,Mageia,CentOS etc

    5 Best Android Emulators for Linux | Run Android Apps on Linux Ubuntu,LinuxMint,Fedora,ArchLinux,OpenSUSE,Mageia,CentOS etc

    Hey Guys, as you know the Smartphone market is dominated by Android OS – which itself is an operating system designed / based on the linux kernel , but unfortunately the Android Emulators for Linux itself are quite less as compared to windows counterparts 🙁 . so let’s have a look on the 5 best  Android Emulators for Linux to run android apps and play android games on Linux -Ubuntu,LinuxMint,Fedora,ArchLinux etc

    1. Genymotion 


    Genymotion – This is probably the Best Android emulator when it comes to Linux Platform due to some unique abilities present only in genymotion, Features of Genymotion are —

    • It allows us to easily Download pre-configured Android Images of various Android Versions and various Android device images such as Nexus 7,Galaxy S2,Galaxy S3 etc directly on our emulator.
    • It also allows us to configure the amount of resources e.g RAM ,harddisk to be allocated to the Android device / Emulator. Great feature if  limited on hardware resources.
    • Genymotion directly supports networking through ethernet /Wi-Fi , emulates your connected connection directly so it use internet directly in the emulated android.
    • ADB Support and it also supports OpenGL hardware acceleration so  your Android device works fullscreen and thus enhancing your experience while playing android games on your Linux!
    • It Also supports drag and drop file transfer to the emulated SD Card 🙂 , supports Gyroscope,Light and accelerometer sensors too.
    • You need an account on Genymotion Cloud – to Download and deploy Genymotion android device —
    • Click here to register on Genymotion site and download Genymotion for Linux [32 bit as well as 64bit].Note – Oracle Virtual Box must be installed on your Machine for Genymotion to work! , installing Virtual Box On Linux is covered at the end of this post 🙂
    • Installation instructions for installing Geanymotion on Ubuntu/Archlinux are available here.

    2.Andro VM


    AndroVM is the Parent Project of genymotion – nevertheless it still works and works awesomely! and the best thing about Andro VM is that the android machine is deployed offline on your PC unlike Genymotion where it is deployed on your PC through cloud, thus you can use Andro VM to install Android Emulator on your linux even offline

    • another striking feature of Andro VM is that it supports hardware OpenGL rendering through Virtual Box.
    • Virtual Box must be installed on your Linux OS for Andro VM to run , check end of the post for Virtual Box installation tutorial .
    • AndroVM supports Net Sharing from guest to host , the internet sharing as well as Installation tutorial for Andro VM is available here at their blog — > Click here for AndroVM installation tutorial
    • AndroVM can be downloaded for both 32bit and 64-bit Linux Kernels from here –> Click here to download Andro VM Virtual Box image for Linux.

    3. Andy Android Emulator by Andyroid.net – Andy OS

    • Although, yet in Beta at the time of writing this article – ANDY OS Android Emulator is pretty much exciting and the best Android emulator for Linux ., being a beta tester i have the access to pre-release features of ANDY , hence i have given it the 3rd place, it  could easily been the first one though!
    • Features of ANDY emulator include Google Play Store support inbuilt, none of the emulator has this feature inbuilt even for Windows builds!
    • Multi-Touch support 🙂 the word explains it all !
    • Use your phone as a controller for controlling / playing the games, the picture alongside explains it 🙂
    • Access the installed apps directly from the Desktop environment!
    • OpenGL hardware acceleration, Camera and Microphone all features supported!
    • You can download the beta version for Linux or the Windows build for Andy from here –> The link will automatically redirect you depending on your OS —
    • Click here to download / Get ANDY OS!

    You might want to check out this new emulator which runs directly inside Google Chrome BrowserARChon! Android Emulator.


    4. Official Android SDK – Android Emulator / AVDs

    • The  Official Android SDK/ Android emulator by Google, has a lot of fans though not me 😛 and is used by default by mostly anyone who wants to develop apps for Android
    • This Android emulator supports all the functions including SD Card support, file transfer et
    • It also supports physical keypad which none of the Android emulators support !!
    • Being developed by Google Engineers you are assured of the quality of product and safety!
    • The Setup of this emulator is the thing which doesn’t impress me much though 🙁
    • An easier setup guide to install the Official Android Emulator can be read here .
    • The required SDK / ADT bundle for Android emulator and plugins can be downloaded from this Google’s Official Page .

    5. Jar of Beans – Wine Compatible!

    • Although Jar Of Beans was developed as an Android Emulator which was Portable for Windows ,it can be run through Wine.
    • It has all the basic support such as APK install, SD Card supports and supports installation of Play Store too..
    • but already Wine being a kind of Emulation environment we wont encourage usage of Jar of Beans on Linux
    • For using Jar of beans for Linux, extract the exe contents of the Jar of Beans.exe file which can be downloaded from here –> , and then by runnint the jarofbeans.exefile with wine .
    • Click here to download Jar of Beans from Google Drive

    Installing VirtualBox on Linux

    • As, we mentioned we need to install virtual box on linux before using Genymotion/AndroVM/ANDY , the eaiest method to install virtualBox on linux is
    • Installing the dependencies by executing  “sudo apt-get install dkms”  in terminal , and then by executing
      sudo apt-get install virtualbox-4.3″ in the terminal! that’s it virtual box will be installed !
    • If it doesn”t get installed you may want to check out this Article.

    Update : You might love it to check out the New Firefox OS on PC – Click here to Configure Firefox OS Emulator on your Linux 

    If you have any doubts/queries/suggestions  Feel free to Comment , we will try our Best to Please you Thanks!

  • 4 ways to use Kindle Reader on PC both online as well as offline | Kindle for Linux/Windows/Chrome OS

    4 ways to use Kindle Reader on PC both online as well as offline | Kindle for Linux/Windows/Chrome OS

    Hey guys, recently i started using Amazon Kindle and all the large collection of e-books which come with it, i found the experience very nice of being able to read my favorite books offline too, hence thought of sharing the 4 ways which i use personally for Kindle Reader online as well as offline .

    First Way ! – Google Chrome App / Kindle Cloud Reader Extension

    • Most of you users might be familiar with the Google Chrome Browser and the loads of apps available on the appstore, Kindle too has its own app on the Store which supports reading from the Cloud [online] as well as reading offline from local media/storage.
    • All the Features such as Bookmarks,highlighting,color changes,search,fontsize,etc work fabulously well and nice with the Google Chrome App
    • And to top of it Google Chrome being available for Windows/Linux/as well as Chrome OS , we can synchronise and use the Kindle Reader on Linux and Chrome OS too  as the native Kindle Reader/Client isn’t available for them.
    • Thus, the Kindle Reader Chrome extension which can be run offline too can be downloaded from here ->
      Click here to Download Kindle Cloud Reader Chrome Extension

    Second Way – Online Cloud Reader / URL – read.amazon.com

    • Like, the Google Chrome extension the Online Kindle Cloud Reader as its loaded in the browser itself, can be used on any OS – Windows/Linux/Chrome OS/Windows Phone/Symbian etc
    • The Most recently read book is automatically saved for offline use.
    • All features such as bookmarks and synchronisation , editing effects are supported!
    • Highly recommended if the Chrome app isn’t available.
    • Click here to go to Online Kindle Cloud Reader

    Third Way – Using the Kindle for PC App

    • Amazon had officially released the Kindle for PC app for Windows operating systems, but there’s no reason to why it abruptly stopped its development.
    • The Official Kindle for PC can still be downloaded and used on modern windows versions too such as Windows 7,Windows 8|8.1
    • For Running on Linux, Install the Kindle for PC app using WINE! and selecting the base OS as “Windows 98” in Winecfg.
    • The Official Kindle for PC App can be downloaded from here , Click here to Download Kindle for PC.

    Fourth Way – Using the Official Kindle Windows 8 / Windows 8.1 App

    • This is one of the most elegant way to use Kindle Reader on your PC/Tablet ., The Official Kindle App for Windows 8/8.1 Supports all the features of Kindle Reader.
    • Supports Bookmarking, Offline Reading, Cloud Sync, Editing the Font, Color,Shape , Size,Note taking and much more..
    • It simply makes reading your e-book more worthwhile and more pleasing and cool!
    • The Official Kindle App for Windows 8/8.1 Can be downloaded from here–> Click here to launch Store link for Kindle App

    So, these are the methods which i use personally, if you have any doubts/queries on setting upany method, feel free to comment , also if you have a different method do comment 🙂 so we all can share and  enjoy it 🙂

  • 5 Free File Hosting/Sharing Cloud Storage Sites with Direct/Hot Link Support | CloudLinker v2.0 Direct Link Maker

    5 Free File Hosting/Sharing Cloud Storage Sites with Direct/Hot Link Support | CloudLinker v2.0 Direct Link Maker

    Hey Guys, as you know canonical is shutting down its Ubuntu One Cloud Storage so i was looking for alternative file sharing sites which allowed hot/direct linking and gave permealinks for files and found these 5 Free File Hosting sites with direct linking /hot link support

    1. Dropbox 

    Yes, your favourite Cloud-Storage / Dropbox.com Supports Direct Link / Hot Link on Files Uploaded to it, it can be easily done by modifying the shared / Download URL by tweaking it a bit, Head on to this Post to know the trick in detail, Trick to Obtain Direct Link of Dropbox file in short in this trick we are simply replacing “www.dropbox.com” with “dl.dropboxusercontent.com” and that’s it, and for simpler purposes You can use our all in one multi Direct Link Maker – CloudLinker v2.0 to Generate DirectDownload/Share URLs for hosts.Files stored on Dropbox account remain active as long as the account is not deleted!

    2.Ge.tt

    Ge.tt is a new Entry in the Cloud Storage Family, but its easily and quickly leaving its competitors behind and taking the lead. After you upload your file through drag and drop or by file uploader on ge.tt , or you get a shared download page URL for a file uploaded on ge.tt , simply right click on the highlighted “Download” Link and Copy the URL/Copy Link Address, it will be the direct Download URL for your file,as shown in the figure -> Ge.tt Direct Download Link Trick –>


    3.Copy.Com

    Copy.com is one of the fastest growing Cloud Storage, it provides 15 GB of Storage Space for Free!!, and yes you can use it for Direct/Linking and Hot Linking too, in a similar way as we did with Dropbox.! we just have to remove “www” and “/s”  from the url e.x https://www.copy.com/s/*** making it http://copy.com/*** to make the Shared File URL into downloadable one.! but it consists of some steps, i highly recommend using our CloudLinker v2 tool or refer this post for Copy.com Direct Link Generation


    4.DirectLinkUpload.com

    When you visit this site for the first time please don’t go on the looks, just upload your file through the simple uploader and you’ll get a URL for sharing , Now Go to The File Sharing URL and go to shared folder option, you will see your uploaded files, Now right click on the Copy Link Adddress, it shall be your direct Download Link which you can easily share..or you can click your uploaded file to download it, and copy the URL from which it got downloaded 🙂


    5. Ozibox.com

    Ozibox.com is the newest entry to the Cloud Market, And Provides Free 100GB of Storage Space for everyone!, also it provides Direct Link to the files stored on the Cloud, Steps to generate direct download links from ozibox are Sign-Up for an account on ozibox.com , login and upload your file through the upload button, and download your own file on your browser/IDM .! Now Copy the Recent Downloaded URL from IDM / Google Chrome Downloads tab, and this will be your direct download link for your file /shareable to everyone.!


    Using our CloudLinker v2.0

    As Promised Earlier i have Updated CloudLinker to v2.0 which Now supports all the Five Hosts Mentioned Above, you simply have to enter the Shared /Sharing URL provided by the host and it will generate the Direct Download URL for you, which you can add to your posts/ share with your friends. 🙂

    Update – CloudLinker v3.0 is now Online tool – So no need to Download anything – Click here to Get your Direct Download Links using CloudLinker Online

    Click here to download Cloudlinker v2 from Dropbox
    Click here to download Cloudlinker v2 from Ge.tt
    Click here to download Cloudlinker v2 from Copy.Com
    Click here to download Cloudlinker v2 from DataFileHost.Com
    Click here to download Cloudlinker v2 from Ozibox.Com


  • Easily Create Setup / Installer for any Software using InstallSimple Setup creator

    Easily Create Setup / Installer for any Software using InstallSimple Setup creator

    Hey Guys, we at TechApple, post alot of setups and installers for many softwares, ever wondered how to create setup/installer for any software.? in this post, i am going to cover the same Let’s Check out how to easily create a setup / installer for any software.[Windows] and that too without any scripting involved thus no programming language involved! 🙂

    Prerequisites

    • A simple tool / Portable Software – InstallSimple  , which we are going to use for Creating Packaged Software.
    • The Folder/Software of which you want to create Software.
    • This Tutorial 🙂 that’s it 🙂
    • You can download InstallSimple from here . Click here to download InstallSimple Setup Creator [Just 355kB].

    Method to Create/Setup using InstallSimple

    • Open InstallSimple.exe from the Downloaded zip file, you will be greeted with an image as follows , Click on Next to Continue.
    • After Click on Next you will be shown a window asking you to Enter the Window Title and Project Name, Fill in The Window Title – The text you want to show on title bar and the Name of the Software in Project Name and click on Next.
    • Now a dialog box will appear with a Message Text Label and a textbox , in the textbox enter the Custom Text/Greeting text which you want to show when setup starts and click on next.
    • Now a dialog Box will appear with label License Agreement, enter the type of license agreement for your software and click on next.
    • Now in this window “Graphics” we can specify the splash screen we want to display before the execution of the setup as well as the header image of the setup window, Click the Folder icon as shown in below figure to specify the path., CLick on Next
    • Now a window “Files to Distribute” / asking you to select source folder of your setup and setup path for your setup will appear, in source folder option click on “Browse” and navigate to the software folder of which installation you want to create and click “ok” , its generally the folder which contains your .exe setup file,and .dll files etc.., select the root folder which contains your software for source folder, and for setup path, enter the folder and location where you want to install your software ex “Program Files”,”Local user drive” etc as shown in the figure –>
    • Now a Window Labelled “Shortcuts” will appear, here select the Files of which you want to create shortcuts and the locations where you can place the shortcut can be selected on the right side pane such as “Start Menu”,”Desktop” etc, after you click on the file of which you want to create shortcut , a yellow/green color mark will appear as shown in the next figure –> After selecting the files for shortcut click on Next., select the Windows Versions and .NET framework check if you want to add., click on next..
    • Now a tab “Windows Registry”  will appear , Enter here any regitry changes you want to make e.x adding PATH variable with setup etc and click on next,
    • Now a Window  labelled ‘Build Setup” will appear! , Simply Click on Build and your Setup will be Ready!! 
    • The Build WIndow looks like this — >
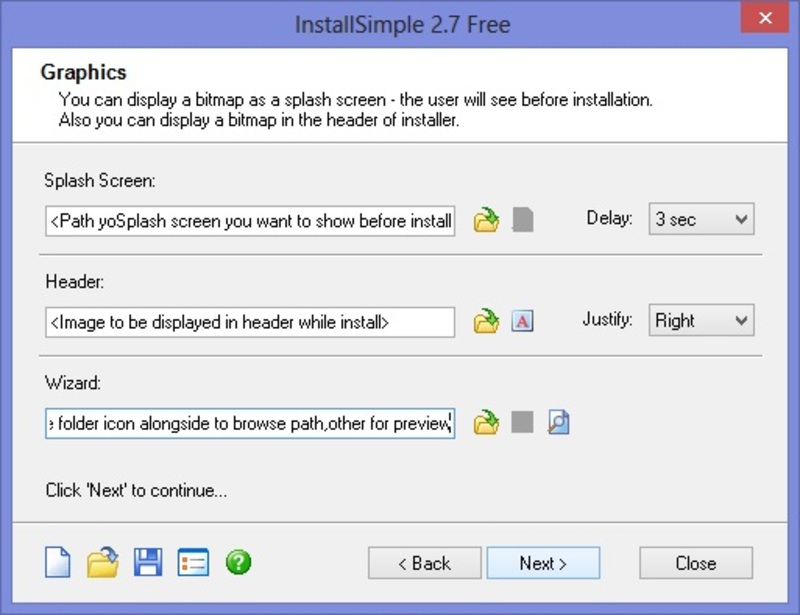
    •  Congratulations!! you have successfully created your Setup! The Setup.exe can be used on Any Machine..

    The Setup itself creates the program registry,control panel and uninstaller inbuilt, so no headaches / extra efforts whatsoever!

    I hope you liked this tutorial, Do share it with your friends, and if you have any doubts/queries feel free to comment! Thanks!

  • Turbo Pascal 7 for Windows 7 /8.1 & Windows 10 [32bit-64bit] FullScreen Single Installer

    Turbo Pascal 7 for Windows 7 /8.1 & Windows 10 [32bit-64bit] FullScreen Single Installer

    Hello Friends, recently while searching on the internet i came across this thing called as Borland Turbo Pascal 7.0 which is an IDE cum Compiler for running and compiling Pascal language .pas files, Although pascal is taken to be one of the dead programming languages, Pascal is still used widely for education purposes due to its similarities with C and easier to understand programming structures and flows.  but as Turbo Pascal 7 doesn’t work on 64bit OS such as Windows 7/8/8.1 and it works small window in 32bit OS , i have created this installer — >  Turbo Pascal 7 for Windows 7|8|8.1 by TechApple.Net

    Salient Features of this installer are

    • Easy to use , and user friendly Borland Turbo Pascal 7 is used and that too runs fullscreen!
    • World’s most preferred Simple Pascal Language Compiler..that too on a single click installer !!
    • Works On All Versions of Windows, Windows 98,Windows 2000,Windows XP,Windows 7 [64 bit as well as 32 bit] As Well as Windows 8 and 8.1 too [both 64bit and 32 bit]
    • No need of installing DoSBoX and configuring or mounting anything! Everything right from DosBox to running turbo Pascal is built-in and the installer processes it automatically!
    • Thus , everything is automatic bundled in a single installer!
    • Useful For Students as well as Teachers and Professionals.
    • You can save the program directly within it,and open it next time From the Software itself for editing/Use.
    • You can Change the Units and TPDU Directories from the IDE if you want to..
    • Easy and Efficient Pascal Programming.

    Download it here –

    Click here to Dowload Turbo Pascal 7 for Windows 7 | Windows 8 |8.1  32bit and 64bit by Techapple.Net

    Mirror Link #1  Click here to Dowload Turbo Pascal 7 for Windows 7 | Windows 8 | 8.1 32bit and 64bit by Techapple.Net

    UPDATE – Now you can even enjoy your favorite Turbo Pascal compiler on your Android phones , check out the below tutorial – Click here to Install & run Turbo Pascal for Android phone or tablet

    Installation Guide :

    Its rather pretty simple,Just Open the installer and simply keep on clicking Next, Just Don’t change the default installation directory “c:\TP7\”

    Screenshots — >

    Successful Installation and Full Screen Working of Turbo Pascal 7 –>


    Successul Compilation of Sample HelloWorld Pascal Program in Turbo Pascal 7 –>


    .


    Support :

    • Double click the Turbo Pascal icon on the Desktop for Execution
    • If it Doesn’t run Full-screen simply give the command “Alt + Enter” To Open in Full-screen
  • 3 Ways/Tricks to download Bing image of the day on your PC using Chrome/Firefox/BingDesktop [Bing Background Image]

    3 Ways/Tricks to download Bing image of the day on your PC using Chrome/Firefox/BingDesktop [Bing Background Image]

    Hello guys, most of you might have noticed the background images posted on bing.com ,popularly known as which change on a daily basis and would have wanted to save them on your PC, download  Bing background image and use as a wallpaper . Rejoice its possible in this post i will reveal 3 Ways/Tricks to download the Bing Background Image and Save them on your PC..

    Trick / Method I : Mozilla Firefox — Google Chrome Trick following..

    • Navigate to the Bing Homepage http://www.bing.com in your Firefox Browser.
    • Navigate to the image you want to download using the navigation arrows shown on the Bing homepage at right hand side bottom side, now after you reach the desired image , right click on the “View background image” ,you will get a menu shown like this
    • d
    • Now click on “View Background Image in the Dropdown Menu”  and it will open the Image with its URL , as shown here
    • Now , you can copy the URL and download the image or simply right click on the image and select “Save image as” option to save the Image! and that’s it easy! isn’t it ..?

    Trick / Method 2 : Google Chrome

    • Navigate to Bing Home page and browse to your desired Download Image using the arrow keys.
    • Now when on the image,right click on the image and select the “Inspect Element Option” in the dropdown menu shown here
    • Now, you will see a bottom tab in the google chrome and it will contain the image URL as shown below  –> in the next image, you can copy the image URL and download it using IDM or navigating in chrome and selecting “Save image as”  after opening the Image URL in the image.. here’s a screenshot of the Inspect element –>

    Thus, you can download any Bing Image using these simple steps.. 🙂 But, the drawback of using Browsers for downloading images is that only the Last seven images are available 🙁 in order to browse the entire Bing Image Gallery..and download them we will have to use the Bing Desktop App

    Method / Trick 3 Bing Desktop App

    The previous methods allow to download only last 7 bing images,if we need to download the complete gallery it isn’t possible by prev methods, hence , we use the Bing Desktop app.  to download the gallery, the steps for downloading any wallpaper from bing gallery are as follows

    • Download the Bing desktop app from here, and install it.
    • After installingjust browse from the topbar app and browser for your favourite image and set it any image as wallpaper.. as shown here–>
    • Now your desired bing image is set as wallpaper , if you want to get the Location of the .jpg file just right click on your desktop wallpaper and click on “personalize”
    • Now click on wallpaper/desktop background, a dialog box shown below is showed up on your desktop
    • Now you will get the location where the bing Desktop app saves your download image, you can get it by howering your mouse over it as shown in the above picture 🙂

    Congrats! now thus you can download any image stored on bing as well as save them, share set them up as wallpapers.. and Bing really has an amazing number of pictures which are really classic! so do check it out 🙂 Thanks! if any problems/queries/suggestions feel free to comment 🙂