Blog

  • How to Block all Jio Recharge Reminder Calls on Android [Spam Calls by Jio]

    How to Block all Jio Recharge Reminder Calls on Android [Spam Calls by Jio]

    Reliance Jio has brought around a revolution when it comes to the data plans and internet usage in India. However,  they have revolutionised spamming the customers too. Incase, if you own multiple Jio numbers and fail to recharge even a single number, they will keep calling you with spammy calls in the morning, noon, evening and other inappropriate times too. Jio also calls you each time with different numbers so that incase, even if you block a single number they have other number calling you . Thus, here’s a tutorial which will help you block all jio reminder spam calls.

    Tutorial to Block Jio Recharge Reminder Calls on Android – 

    • Although, most phones come with a default blocker (MIUI, EUI etc) there is no option to add a custom string prefix. Hence, we need to use TrueCaller for the same, besides trueCaller even lets you see who’s calling you, even if you do not have the phone number saved.
      Click here to Download TrueCaller App from Google Play Store
    • After installing the true caller app launch it, and now open the menu by tapping the “3 horizontal lines” at the top-left hand corner. The menu icon is as shown below –
      Tap on lines to open the Menu
      Tap on lines to open the Menu

      Now, navigate to the “Settings” option in the menu as highlighted in the following screenshot –

      Tap on Settings
      Tap on Settings


    • Once you enter the “Settings” section, tap on the “Block” option as shown –
      Tap on the Block Option under the Settings panel
      Tap on the Block Option under the Settings panel

      Inside , the “Block” panel, please select the “view my black list” option as highlighted  –

      Select the View my block list option
      Select the View my block list option


    • Now, it will display all your blocked contacts. Here, we need to add the prefix or number series of Jio calls in your region. In Maharashtra / Mumbai the calls generally start with “+91 22 3559″ hence, we will add the above string.

      To do so, tap on the “+” “plus” icon as shown below –

      Tap on the Plus icon
      Tap on the Plus icon

      Now, from the next options select the “Block a number series” option as shown in the below image –

      Select the
      Select the “Block a number series option


    • Now, enter the number series of Jio from which you receive Spam calls in the Enter number field and tap on the “Block” button as shown in the following image –
      Note – In our state its + 91 22 3559 , please enter the series of your state of Jio Spam calls.

      Enter the number in the number field and tap on Block
      Enter the number in the number field and tap on Block

      That’s it! .. All those Spammy calls from Jio will be blocked.

    • Pro Tip – Add the Number series “+ 91 140 “ and all tele-marketing callers will be blocked on your phone, who ask for loans, credit cards, insurance etc.
    • Incase, if you have any queries feel free to comment below.


  • How to Play Gamepad Joystick games with Keyboard on Windows 10 / 7 [PC & laptop] | vJoy for PC / Windows 10 Configuration Tutorial

    How to Play Gamepad Joystick games with Keyboard on Windows 10 / 7 [PC & laptop] | vJoy for PC / Windows 10 Configuration Tutorial

    With new gaming hardware coming in each day, the processing capabilities of our PC’s and laptops have reached a new level. So, the gaming graphics experience has increased and this helps to play gaming console games on the Computer. Now, not all of us use Gamepad/Joystick to play games and thus we need a method to emulate joystick input via keyboard. Hence, in this tutorial we will cover How to Play Joystick  or gamepad games with keyboard on Windows 10 , 7 and 8.1 [32-bit & 64-bit]

    Tutorial to Play Joystick games with keyboard on your Computer – 

    Step . 1 – Installing the Joystick emulator Software and virtual Joystick / gamepad 

    • We will use an Open-source software named “vJoy” to map our keyboard inputs to Joystick inputs as required by the game.
    • Please download and install the vJoy app from the link given below –
      Click here to Download vJoy joystick emulator for Windows 10 / 7 / 8.1 [32-bit & 64-bit]
    • Now, we need to install the software. Please note that it might ask you for permissions to install drivers as shown in the figure below –
      Tap on
      Tap on “Install” to install virtual Joystick emulator

      here, click on the “Install” button to install the vJoy software.


    Step . 2 – Enabling the Virtual Joystick 

    • After installing the app, we need to enable the virtual joystick. To do so, launch the vjoy app from the start menu.
    • It will now be minimized by default in Windows 10, hence right click on it and select the open option as shown in the following screenshot to open the vJoy app –
      Open the vJoy App
      Open the vJoy App

      Now, after opening the vJoy app you can see all the gamepad controller or joystick controls which can be emulated by vJoy as shown in the screenshot below . Here “Check” the enabled option to start vjoy emulation.

      Check the enabled option to start virtutal Joystick
      Check the enabled option to start virtutal Joystick


    Step . 3 – Mapping Joystick Input to Keyboard Keys –

    • Now, we need to map the keyboard keys to the joystick inputs required by the game, such as analog and digital controls, x, a, b , y , o,  buttons.
    • To do so, click on the 3 dots icon “…” besides the input you want to emulate as shown below –
      Click on the ... button to assign keyboard key
      Click on the … button to assign keyboard key

      Now, it will ask you to press any key on your keyboard, here tap the button on your mouse or keyboard to assign the function

      Press any key on your keyboard or mouse to emulate the Joystick input
      Press any key on your keyboard or mouse to emulate the Joystick input

      Now once you have pressed the key it will replace the “None” with the key you pressed. Repeat this step until all the controls you want to emulate are done –

      All Joystick Controls Mapped to Keyboard Inputs
      All Joystick Controls Mapped to Keyboard Inputs

      Note – Incase, if you don’t want to waste your time manually assigning keys, you can use my above screenshot mapping “ini” file to load onto the vJoy. Simply, download the below linked “ini” file and use the “Open ini” option to use it on your PC or computer –

    • Click here to Download Pre-configured ini file for vJoy

    Step . 4 – Checking the inputs in Control Panel – Game Controllers

    • Now, once you have configured the virtual joystick . Let’s check the inputs on the control panel Gamepad controller properties.
    • Go to “Control Panel – > Set up USB Controller – > and then select vjoy input and select the “Properties” option as shown in the figure below –
      Select Properties of the vJoy device
      Select Properties of the vJoy device

      Now, simply type or press the mapped keys on keyboard and check whether the buttons are blinked in the “test” tab as shown below –

      If the keys blink the virtual emulation is working!
      If the keys blink the virtual emulation is working!

    If the buttons blink, then the keyboard to virtual joystick emulation is working.

    Congratulations! , you have now successfully emulated virtual joystick using keyboard. Thus, you can now start playing all joystick / gamepad games on your computer or laptop. Incase, if you face any queries feel free to let us know in the comments section.

  • Free Hosting Of App Website Or Any Other Websites Or Blog From 000webhost

    Free Hosting Of App Website Or Any Other Websites Or Blog From 000webhost

    The number of Internet users has increased from past five years, and more than a billion small firm has converted their firm into an online business. Currently, Android applications and iOS applications are on trend because of the user-friendly UI, and you can access services smoothly without accessing your PC.

    How An Android Developer Can Host His App Website For Free

    There are only two main ingredients in building a website, domain and hosting account. You can find millions of services online who are providing you cheap hosting services, and you can acquire a domain in just $4.

    If you are planning to build a basic or informational based Android app, then you need a website.

    Buying a domain is not an issue anymore, but good hosting services come at a high price because of the investment and service they provide. We cannot argue with them because it does cost them thousands of dollars a month to maintain it.

    If your budget is low and you want to add an Android app to the play store, then you need a website because it makes it easy for you host an Android app using a website.

    You can Google the term “Free hosting sites.” You will find thousands of results on the search engine, but the competition is extremely high, and you will be blown away while choosing the ideal hosting site.

    So, what’s the solution?

    We can suggest you twenty free hosting sites, but only few can stand out from the crowd.

    000WebHost is a free hosting provider, where you can host your site without paying an extra penny because they are known for free hosting services.

    Now, what makes them different from the rest and why you should choose it before anything else? Let us answer your question.

    Note: Every free hosting site has its flaws, but 000WebHost has less number of disadvantages compared to others.

    We are going to help you understand the features and help you make the final decision.

    *1- Features

    We are going to list the features, which made 000WebHost what it is today. Do not mistake that it is a cheap hosting site because they are around for a decade in the business.

    Control Panel – For me, the control panel is an important aspect and cPanel is a popular & user-friendly panel available on the market today. You get cPanel as a control panel to access and build a site. The reason why I prefer control panel because it’s user-friendly and when you have an error, there are millions of answers available for cPanel hosting accounts.

    Space – You can host one site on one account, and you cannot complain about it. You get 1000MB (1GB) of space in the hosting account, and that’s the limit.

    Bandwidth – Almost every newbie does not know the meaning of bandwidth, where newbies compromise in bandwidth. If you have a huge audience, then less bandwidth won’t help. What you get from 000WebHost is 10,000MB.

    Uptime – The company is guaranteed 99% uptime, which is a daring claim in the competitive niche. Most of the free hosting services do not have good uptime, but 000WebHost has 99% uptime.

    Website builder & Auto Installer – If you are going to host the site for the app, then you need a website builder and auto installer. The website builder makes it easy for you to set up the site and auto installer helps you to install CMS tools like WordPress.

    Monetisation – it’s amazing that 000WebHost does not have any display advertisements on the control panel or anywhere else because to make enough fund to maintain the site. The companies sign up for Google Adsense program, and you don’t have to worry about annoying advertisements.

    *2 – Real-time usage

    We are going to show you how easy it is to Sign up and use cPanel to host the site for an Android app.

    1 – Go to 000WebHost.com to sign up for a free account.

    000webhost

    2 – You will have all sites added to the hosting account.

    image2

    3 – Click on Manage Website.

    image3

    4 – You will receive an email from the 000WebHosting, and you have to confirm the email address, then you will be able to access it. They made it mandatory to confirm the email to avoid spam.

    image4

    5 – You get latest cPanel to manage and control the site.

    image5

    *3 – Things you need to know

    There are plenty of things you need to know about the free hosting, which we are going to tell you, so you know where you are going to invest your time.

    Customer Support – Unfortunately,  free hosting sites cannot provide you customer support because it already cost them a lot of funds to maintain it. But, 000WebHost added a forum of technical experts & developers.

    Space – As we have already mentioned that you get 1000MB storage space if your requirement is minor and you don’t have much data to upload, then go for it. 1000MB is not enough for a blog or information based app because you cannot add new images, media, and content with just 1000MB, you will run out of storage.

    Read Terms & Conditions – If you have not read the terms and condition’s, then you will regret later. The hosting company deletes your account and the content without your consent, so read the terms carefully.

    No SSL Certificate – Many sites are offering free SSL certificates to secure the connection to HTTPS, but 000WebHost is not offering it. If you are using WordPress, then you can find many plugins that provide you SSL certificates.

    *4 – Pricing Structure

    At any point, if you want to upgrade to the premium account, then the hosting company has premium plans, which is affordable and easy to upgrade the account.

    The free hosting sister company is Hostinger, which is a popular site that offers a free account and premium hosting services online.

    image6

    Conclusion

    If you have not used free hosting before, then you will find this site very useful. Let us know your ideas and experience in the comment section below.

  • Download Bluestacks + N [Nougat] for Windows 10 / 7 / 8.1 PC & Laptop [Full Offline Setup]

    Download Bluestacks + N [Nougat] for Windows 10 / 7 / 8.1 PC & Laptop [Full Offline Setup]

    The major concern of Android emulators is that many new games and apps are unusable on PC due to old android versions of Emulators.  But not anymore Bluestacks has launched – Bluestacks + N (Nougat Emulator) which is an android Nougat based emulator , thus you can now easily install and play android Nougat on your PC / Computer – Windows 10 / 7 /8.1 . Since its a secret beta version, we will cover here the Direct download of Bluestacks + N for PC / laptop which will let you download Bluestacks N for Windows 10 / 7 / 8.1 for free!.

    Bluestacks N Download
    Download Link Download Link
    Operating System : Microsoft Windows 10, 7 & 8.1
    Type of Installer : Full Offline Installer Setup
    License : Free to use

    Bluestacks N for Windows 10 / 7 / 8.1 Download & Installation Steps  – 

    • First of all in order to install Bluestacks Nougat edition , we need to download the Bluestacks N full offline installer from the link given below –
      Click here to Download Bluestacks N for PC – Windows 10 / 7 / 8.1 (Full 32-bit & 64-bit offline Installer)
    • Now, until the download is done, let’s have a look onto the exclusive features of Bluestacks + N –
      • Install latest Android version – Nougat on your System to test apps and ADB
      • Play Android games on PC / laptop with full screen view (for great graphics experience)
      • Use your Keyboard and mouse to simulate touch, this makes gameplay easier and lot of fun
      • Bluestacks N version uses OpenGL hence, it works smoothly even without Graphics cards or dedicated hardware
      • Multi-player and Google Play support! . Hence download and sync your game progress across devices
    • Click here to Download Bluestacks N Beta
      Click here to Download Bluestacks N for PC/laptop

      Once, you have downloaded the setup by clicking the above link / Bluestacks N logo, double-click on the downloaded file to begin the installation process.

    • It will show you a logo of the new “Bluestacks + N” version. Click on the “Install Now” button as shown in the following image –
      Bluestacks + N Install for Windows 10 / 7 / 8.1
      Bluestacks + N Install for Windows 10 / 7 / 8.1

      Now, it will start installing Bluestacks Nougat on your system, by extracting files, copying binaries and other steps.

    • Please wait while the Engine is Installed and the progress bar turns upto 100% . 
      Bluestacks N Download for PC
      Bluestacks N Download for PC / laptop

      Once the installation is finished , it will ask for your input to complete the installation. Here click on the “Complete” button as shown in the following screenshot –

      Bluestacks N emulator for Windows 10 / 7 /8.1
      Bluestacks N emulator Installation complete

      After clicking on the “Complete” button it will automatically auto-start the Bluestacks Nougat edition for the first time . First boot may take some time , so please be patient until the loading is completed.

      Bluestacks N Loading on Windows 10
      Bluestacks N Loading on Windows 10
    • That’s it ! After this step you can now log on to your Google Games and play account to install games , sync progress and play games more easily !
      Bluestacks + N Google Games Sign In
      Bluestacks + N Google Games Sign In

      Besides, you can even use the Play Store and camera based apps for some fun with photo editing or video calling and chats.Also you can install external APK and apps by clicking on the “Install apk” button highlighted in the above image.
    • That’s it ! you can now seamlessly enjoy the latest Android Nougat version by Downloading Bluestacks N for PC / laptop –
    • Click here to Download Bluestacks N for PC – Windows 10 / 7 / 8.1 (Full 32-bit & 64-bit offline Installer)
    • Incase if you face any problems or difficulties , feel free to let us know in the comment section below. 
  • How to Change Font face in Instagram Bio & Posts on Android – ᔕTᗩᑎᗪ ᗩᑭᗩᖇT on Instagram

    How to Change Font face in Instagram Bio & Posts on Android – ᔕTᗩᑎᗪ ᗩᑭᗩᖇT on Instagram

    Instagram is a platform to show uniqueness, be it the photos, the caption with it or be your profile bio. Since, the photographs are always good with the various filters, what about the text on the caption or bio ? . Yes , you can style that too.. In this tutorial we will show you how you can change the font face or font style on Instagram profile and posts . The fancy fonts will only increase your style and reach to your followers.

    Tutorial to Change Font Style or Font Face on Instagram on Android –

    • This tutorial currently works only on Android, since the font changer app we use is only available for Android.
    • First of all, please download and install the Font Changer App from the link below –
      Click here to Download Font Changer Pro for Android from Google Play Store
    • Once you install the app, launch the app and tap on the “Get Started” option as shown in the following image –
      Font Changer Pro Android
      Font Changer Pro Android

      Now, once you have tap on “Get Started” it will show a blank space to type and select the font style .

    • In the blank space , please type the text you want to be in Style or change the font  as shown in the image below –
      Change font face style
      Change font face style

      To change the “Font” tap on the “3 horizontal lines” icon as shown above and select any of the font style as highlighted by the red box in the above image.

    • Now, once you have typed the bio text or caption text in the Font Changer app. Tap on the “Copy” option as highlighted in the below image –

      Tap on Copy to copy text with font style!
      Tap on Copy to copy text with font style!
    • Now, once we have copied the text, we just need to paste it in Instagram photo caption or Instagram Bio as shown below –

      Paste the copied font face text in Instagram bio / Caption
      Paste the copied font face text in Instagram bio / Caption
    • Now, simply post the photo or Save the changes to your profile. And the magic is done! you have now successfully changed the font style on Instagram.
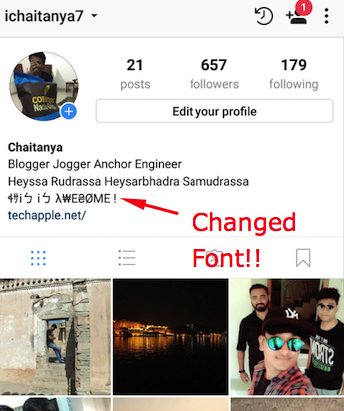
    • This looks great as visible on my Instagram profile  –
      Font style on Instagram! - Changed font on bio
      Font style on Instagram! – Changed font on Instagram bio

      That’s it! feel free to comment your creativity or incase of any doubts do let us know them too in the comment section below. We have tested this method on Android lollipop, marshmallow, Nougat and even Oreo phones and tablets.

  • Hoverwatch Review: What Makes it the Best Device Monitoring & Tracking Software

    Hoverwatch Review: What Makes it the Best Device Monitoring & Tracking Software

    Hoverwatch is the ultimate surveillance application that works in the stealth mode and provides an exclusive range of monitoring features. This renowned application has been installed in 12 million devices, and is widely used by parents and company owners around the globe. Using Hoverwatch, one can gain complete access of the device and can monitor the phone calls, SMS, social media activities, GPS location, web browser history, and much more. Let’s learn more and know why it is the most comprehensive monitoring application.

    Hoverwatch – Topnotch Features

    features

    Hoverwatch is a multitasking phone tracking application that is available for Android smartphones and Windows/Mac OS. It is packed with a wide range of monitoring features. The parents can track the activities of their kids on phone/computer while the company owner can see what his/her employees are doing on their system using this stunning application.

    Hoverwatch for Android

    • GPS Tracking: The app uses the GPS and internet technology for collecting the data on current GPS location of the targeted device. Even if the device owner turns off the Wi-Fi, the app will keep tracking its location using the GSM technology.
    • Call Tracking: It tracks the information about the incoming, outgoing, and missed calls. It can even record the audio files that can be downloaded on your device. You can even monitor the time & date of call, call length and caller name & phone number.
    • Spy on Messages: Hoverwatch even lets you monitor the SMS and MMS conversations done on the targeted device. You can see the entire conversation on your online panel and can even get the details about the message sender/receiver.
    • Spy on IM Apps & Social Media Activities: The app can even monitor the conversations on instant messaging apps like WhatsApp, Telegram, SnapChat, and other social media applications. You can even get the details of media exchanged along with the conversations.
    • Manage the Camera Online: Hoverwatch can capture the photos of the person who unlocks the targeted phone/tablet within few seconds using the front camera and saves it for you.
    • Track the Internet History: You can get the list of titles of the web pages along with the URLs visited by the owner of the targeted device.
    • Detect SIM Card Change: Even if the targeted device user changes the SIM card, Hoverwatch will keep tracking the activities on the device and will also save the phone number of the new SIM card.

    Hoverwatch for Mac

    • Keylogging: This software I capable of detecting all the keys that were pressed on the keyboard while the targeted device user was typing.
    • Track Activities on Social Media: You can track what the device user have done on social media websites like Facebook including the messages, videos, and photos exchanged during the session.
    • Monitor the Websites Visited: Hoverwatch keeps an eye on the URLs of the website visited by the monitored device user.
    • Save Screenshots: It automatically captures of the PC/Laptop’s screen and saves the screenshots. In this way you can track what your employees/child is doing on the targeted device.
    • Record Adium, Skype & iMessage Chats: One can easily track the conversations going on Adium, Skype, or iMessage and gets the details of media exchanges as well.

    Hoverwatch for Windows

    You can access all the features of Hoverwatch available for Mac in Windows version too. Apart from this, it provides some additional features as well for the Windows user.

    • Capture Photos from Webcam: A user can capture the photos through webcam attached to the PC or laptop and save them. This helps them to stay aware about the surroundings.
    • Save Clipboard: The exact history of any clipboard activity on the targeted device is recorded by the app.

    Pricing

    pricing

    • Personal Package: Under this plan you can monitor just one device and it is billed at $8.33/month if you pay for a year.
    • Family Package: Under this plan you can monitor 5 devices and it is billed at $3.33/month per device if you pay for a year.
    • Business Package: Under this plan you can monitor 25 devices and it is billed at $1.67/month per device if you pay for a year.
    Verdict

    Hoverwatch is a stunning spy application that is unfortunately not available for iOS. The Android, Windows, and Mac users can take full advantage of this app and can keep an eye over their kids or employees in the office from just anywhere at any point of time.

  • NordVPN: The Best VPN offering Many Server Locations

    NordVPN: The Best VPN offering Many Server Locations

    free virtual

    A VPN has now become one of the coolest ways to preserve your privacy online. A number of people are going for VPNs these days. But, the internet is flooded with thousands of VPN providers. The major question that troubles most of the people is which VPN service to choose? It might be a daunting task to find the most reliable VPN provider at fixed budget.

    Going with a VPN service that is trusted by thousands of people globally and have more positive reviews on the web should be your first preference. NordVPN can turn out to be the best choice when you talk about the range of features and reliability. Let’s learn more about this stunning VPN provider.

    About NordVPN

    NordVPN is a Panama-based company that was established by a group of friends in the year 2012. It has gained too much popularity since its launch and has made a place in people’s heart. It is one of those VPN providers that have not lost too many customers. All thanks to its reliable services available at affordable price. It is also the PCMag’s Editor Choice Award Winner for two consecutive years.

    NordVPN has a large network of servers spread across 56 countries of the globe. It is the best VPN in United Kingdom, USA, and in Europe region. Let us try to find out why you should be going with NordVPN ditching the other VPN providers.

    Why NordVPN?

    pieces

    Millions of people across the globe trust its services. Moreover, it is the fastest growing VPN network over past few years. Here are some of the reasons to make NordVPN your first choice:

    Wide Network of Blazing Fast Servers

    fast servers

    NordVPN has spread its terrain in 56 nations of the world. It has more than 2200 servers spread across 6 continents on this planet. There are 950+ servers itself in the American continent while UK solely hosts 250+ servers. The entire European region has over 1100 servers while the Asia-Pacific region hosts 145 servers. All its servers are integrated with powerful processors and latest technologies to deliver optimized speed at the user end.

    Access Geo-Restricted Content

    NordVPN masks your original IP and replaces with a random IP when you connect to its server. Once your IP address has been changed, you can access the geo-blocked content without any restrictions. Just make sure that you are connected to a server of the country where accessing that content is not restricted.

    Double VPN with CyberSec

    It is one of the few VPNs that offer Double VPN protection to its users. This means that your internet traffic is routed through two different VPNs for encryption maximizing its privacy. Moreover, the CyberSec technology protects you from falling prey to phishing, malware, adware, DDoS attacks, and several other threats.

    SmartPlay Technology

    If you love to stream a lot of videos online, its SmartPlay technology comes handy for you. You can stream the videos from 400+ websites at blazing fast speed. NordVPN doesn’t throttle your speed even if it experiences too much load from your end. The servers are well optimized to handle the load.

    DNS Leak Protection

    Many users often complain that their browsing history is getting leaked to their ISP despite using a VPN. This is because most of the VPNs are using your ISP’s DNS to route the web traffic. But this is not the case with NordVPN. It makes use of its own DNS servers to route the traffic and ensures that your browsing history is not leaked to your ISP.

    Though NordVPN provides a number of features to its clients around the world, these features make it standout for the crowd.

    Pricing

    NordVPN has smartly tailored different VPN plans soothing the needs of every user. The monthly plan is chargeable at 11.95/month, half-yearly plan is chargeable at $7/month, yearly plan is chargeable at $5.75/month, 2-yearly plan is chargeable at $3.29/month, and the 3-yearly plan is chargeable at $2.75/month. Moreover, it offers a 30-days money back guarantee, just in case you are not happy with its services.

    The Bottom Line

    NordVPN is one of the most trustworthy VPN providers that have millions of users associated with it. Its exclusive features available at affordable price make it the best for your use. If you are worried about your online privacy, trust NordVPN and it will ensure that your trust is kept forever.


  • How to Download Sony Liv Videos on Android | Download Sony Liv TV Shows & Movies on Android by Liv Downloader

    How to Download Sony Liv Videos on Android | Download Sony Liv TV Shows & Movies on Android by Liv Downloader

    Sony Liv is the streaming platform powered by Sony Entertainment Television (SET) and lets you watch tv shows of all Sony channels such as Sony HD, Sony Pal, and Sab TV . However, it may happen that you missed your favourite show or would like to carry the memories of a particular episode or multiple episodes offline in your mobile to watch it later. Here we bring you the Easiest Method to Download Sony Liv Videos on your Android phone / table by using Videoder : Liv Downloader.

    Tutorial to Download Sony LIV TV Shows Videos on your Android –

    • For Downloading sony liv tv shows we will be using the Videoder app which lets you download the videos of any site you visit, in our case it will be Sonyliv.com
    • Videoder is not available on the Google Play Store directly and hence we need to download its apk file separately to use it. Here’s how you can Download & install liv video downloader on your Android –
    • Click here to Download Videoder App Apk for Android
    • Installation of external apps apk is not available by default on most Android devices ,thus we need to enable “Installation from Unknown Sources” first before installing videoder.
    • To enable the feature, please navigate to “Settings – > Security – > Installation from unknown Sources”  and toggle it “ON” as shown in the Screenshot below –

      Enable Installation from Unknown Sources
      Enable Installation from Unknown Sources
      Now, once you have enabled the installation from unknown sources option. Navigate to the “Downloads” folder and tap on the Videoder apk file.
    • It will now prompt you with a window asking you permissions to install the App as shown in the image below –
      Videoder asking for Permissions
      Videoder asking for Permissions

      Here tap on the “Install” option as shown above.

    • Videoder app will now be installed on your device. Once it is successfully installed, it will show a success confirmation screen as shown in the image below –
      Videoder installation Success Screen
      Videoder installation Success Screen

      Here on the installation success , please tap on the “Open” button as highlighted in the above image. or open the Videoder app from the menu drawer.

    • Now, to download Sony liv videos please visit the Sony Liv website – http://sonyliv.com inside the Videoder app.
    • Here in videoder app, start playing the TV Serial or show which you want to download as shown in the image below –
      Tap on the Red Download Icon to Generate Links
      Tap on the Red Download Icon to Generate Links

      Here , once the video is loaded and starts playing – Tap on the “Red” Download button icon as shown in the above image.

    • Once, you tap on the red download icon, please wait until it generates the Download links for your favourite tv serial.

      Sony Liv Download Links generation please wait
      Sony Liv Download Links generation please wait
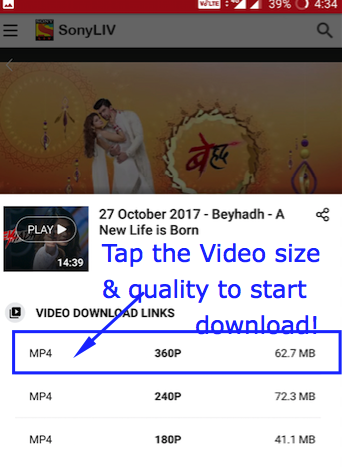
    • Please be patient, until the Download links are generated. Once the Download links are generated , it will show you a menu with the Video quality and video sizes available for download as shown below –
      Download Sony Liv videos on Android
      Download Sony Liv videos on Android

      Simply tap on the video size/quality you intend to download!.

    • Congratulations! you have successfully downloaded your favourite TV Show or Video episodes from Sony Liv on your Android. Incase, if you have any queries or face any difficulties feel free to comment . The method has been successfully tested on Android kitkat, lollipop, marshmallow, Nougat & even Oreo too!.
  • Movavi 360 Video Editor: The Best Video Editing Tool

    Movavi 360 Video Editor: The Best Video Editing Tool

    The modern day technology is improving with every passing. The new innovations are taking place to enhance the quality of products the end users get. A number of tools are coming up in the video editing industry to enhance the overall perception of how people watch the movies and short films. 360 video editing software is a fabulous tool that lets you make a 360 degree video in few minutes. Let’s explore the tool in detail.

    360 video

    About Movavi 360 Video Editor

    This software allows you to create spectacular immersive videos that can definitely impress the viewers. You can enhance the quality of the videos in just few steps or can turn them into something new. Make your own movies using the transitions, multiple filters, and special effects. Use Chroma Key effect to change the background or show multiple videos on single screen with the Picture in Picture effect.

    download pic

    Not only this, you can adjust the video parameters, stabilize the shaky footage, remove defects, enhance movie quality, create tutorial & video presentations, import the videos from different sources, and do much more using this software.

    Topnotch Features of Movavi 360 Video Editor

    Movavi 360 Video Editor is an impressive tool that can even be used to create awesome VR videos. It is packed with some of the most exclusive features, few of which are mentioned alongside.

    • 3D Preview: You can navigate freely inside the preview window in 360 degree mode. You can actually experience the video in three-dimensions.
    • Color Adjustment: You can enhance the quality of movies by tweaking the brightness, saturation, and few other parameters manually or automatically
    • Ultra HD Video Support: You can even upload and export the videos in 4K resolutions without any trouble.
    • Picture in Picture Effect: You can now insert multiple videos inside your original 360 degree footage.
    • Chroma Key Effect: The entire background of the video can be changed with this effect and you can transport the subjects anywhere in the video.
    • Speed Adjustment: You can easily control the speed of your footage for creating the speeded-up or slow motion effects.
    • Audio Editing: You can normalize the sound, add sound effects, and remove the background noise easily.
    • Highlight and Conceal: You can control the focus to make the viewer concentrate on specific subject by simply blurring out the parts of the video.

    Why choose Movavi 360 Video Editor over Other Software Tools?

    There are a number of reasons to go with Movavi 360 video editor over other tools. The extraordinary performance and awesome features make it the first choice for just any user.

    • It supports multiple input and output formats for audio, video, and image files.
    • The videos can be captured from camcorders, TV-tuners, camera, webcams, and VHS as well.
    • You can manage multiple video and audio files on single timeline panel.
    • You can record the audio from the microphone and other electronic sources.
    • The videos can be converted into mobile-ready formats.
    • You can add titles in between the video using different fonts and colors.
    • Make use of some dominating special effects and filters to create a stunning video.

    The Setup: A Brief Tutorial

    You can download and install the software either for free or after making the payments on your device. After you have installed the software, follow the below guide to use it perfectly.

    • Open the software by clicking on its desktop icon and import the movie you wish to edit.

    editing

    • You can different transitions to your video(s) using different transition effects and enhance the quality.

    different

    • Add title to different parts of the video in an innovative manner using different colors and fonts.

    titles

    • Set different filters and make it more eye-pleasing for the viewers.

    eye pleasing

    • Once you are done with the editing, you can start capturing it in desired format.

    format

    Pros

    • Multiple input/output format supported
    • Create VR compatible videos.
    • Free Lifetime version available with few basic features
    • Available in two different languages

    Cons

    • A bit complex to understand
    The Verdict

    Movavi 360 Video Editor is an awesome tool that is tailored for the aspiring video editors. Now, you can edit 360 degree movies/films using this tool and add special effect to them. With this stunning software, anyone can create VR videos, and 3D presentations. You can try out this tool now and enjoy editing the movies and films without much hassle.