Blog

  • iMobie AnyTrans An almighty Data Manager For iOS Users | Review

    iMobie AnyTrans An almighty Data Manager For iOS Users | Review

    Apple biggest creation is an iPhone, which is widely used the gadget and the expensive smartphone in the world right now. It has been ten years since the release of the first Apple iPhone that took over the market within a matter of weeks.

    The consumers around the worldwide use Apple iPhone, iPod, and iPad, but despite years of development in hardware and software, the basic functions are still not available to the people. The limitations of iPhone, iPad, and iPod have inspired many developers and software companies have released various tools to make the life of an Apple user better.

    AnyTrans is an iOS and Android-based program for Windows, and Mac developed to help you manage the data of the smartphone without any hush-hush. Most of the users have to depend on the iTunes to transfer the data like Music, Videos, and Photos, right, and the iTunes has limitations as well.

    What is iMobie AnyTrans?

    iMobie is a software company that has developed AnyTrans Windows and Mac software. AnyTrans is a lightweight program that works as an iOS data manager. The primary reason why many people use data managers because it breaks the limitations that iTunes has in it.

    If you combine the strength of AnyTrans with iTunes, then it becomes an amazing tool to manage, move, copy, import, export, and transfer data in few clicks.

    AnyTrans Features?

    To understand the true purpose of the AnyTrans and it’s importance, you need to learn about its features.

    Migration – Every year new Apple devices launched, then you move on to the next generation Apple device, then you have to move data to the new iPhone, right? Did you know that you could transfer Photos, Videos, Files, Settings, Wallpapers, Custom settings, and more in just one-click.

    Android to iOS – Some of you have friends, or you have purchased your first iPhone, then what about the data on your Android phone? By tapping once, you can transfer all data from Android to iPhone.

    iCloud – The program has an intuitive user interface, which was designed for those who don’t like the complex interface and process of iCloud, which is annoying.

    Wireless Backup – The AnyTrans has a feature that allows you to backup all of your files into your PC wirelessly without worrying about manual work. If you want to know how the wireless backup works, please visit their official website.

    Synchronize Block – The iPhone, iPod, and iPad’s have a security protocol, which blocks Windows or Mac PC until you allow it to connect. It takes time to connect and pass the security, and then the Sync process begins. By combining AnyTrans and iTunes, you do not have to worry about Sync protocol.

    Import & Export – Did you know that you can import and export files to your Windows or Mac PC? By using AnyTrans, you can import data and export data to another PC.

    AnyTrans User Interface?

    It is important for every user to learn about the user interface before downloading it and trying it or else, you will not be able to come to a decision.

    Download the program.

    Dashboard: When you launch the program, the first thing you will see is the dashboard. The top menu is easy to understand, and in the middle, where all main functions are present.

    image1

    Manage: You can manage all files and data from the manager, where you can Add, Delete, To PC, To iPhone, and Refresh button is present in the top left corner.

    image2

    Settings: In the settings, there are not any confusing options, so you do not worry about it. In the settings, you can change various preferences so that you can have more control over the program.

    image3

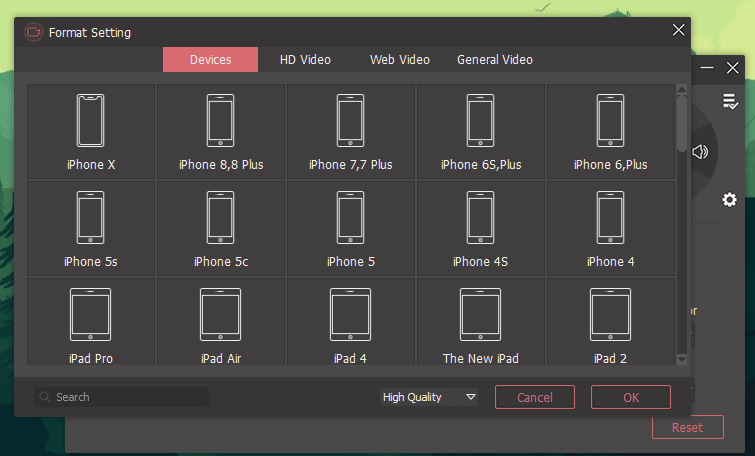
    Files formats: The file formats are one of the important factors here because when you export or import file formats matters to restore. In the settings, you can select the file format for each data that is recoverable, and you can change locations of the import and export files.

    image4

    Here, you and download the latest version of AnyTrans.

    Conclusion

    In case, you do not know how to import photos PC, then just visit their official website. Let us know which feature you liked about AnyTrans in the comment section below.

  • IRIIS: Show your Love to your Dear Ones by Caring for them in Hard Times

    IRIIS: Show your Love to your Dear Ones by Caring for them in Hard Times

    Life doesn’t flow how we think. It is unpredictable and every moment is pre-planned by God. Accidents, injuries, health issues, and other problems may persist in different phases of life. These are really hard times when the patient suffering from such problems needs care from their loved ones. Being a dear one to the patient, you need to provide him/her the best care. At the same time, you need to realize that the responsibilities of a caregiver are not easy. You have a list of never ending tasks that needs to be managed carefully for sake of the caree.

    image1

    So, here comes one of the stunning apps especially tailored for the caregivers. It allows them to manage the huge list of tasks efficiently without any confusion. Let’s explore this app and learn how it works.

    IRIIS – An App for Caregivers

    Developed by MindLight LLC, IRIIS is one of the best applications to have for the caregivers. It keeps them updated, engaged, informed, and aware about the things that should be done at a specific time. The user can create a list of things which can be viewed by every caregiver in his team. The different caregivers can pick up different tasks in the list to relieve the user from workload.

    Close-up of woman's hands with smartphone
    Close-up of woman’s hands with smartphone

    You can easily collaborate with different members in your care-giving team and invite them to share your workload. These invites can be sent via email, text, and within the IRIIS app as well. This application saves your time in assigning different tasks to different people individually. Your teammates can look into the list and take up different tasks by themselves.

    The app user can also make use of the virtual cabinet to collect and store the information required frequently. The important notes, photos, bill receipts, and other important documents can be stored in this virtual cabinet to be used anytime when needed. This further saves the time in retyping the notes again and again.

    How IRIIS Works?

    First of all, you need to download and install the IRIIS app on your Android device. It is available on Google PlayStore for free.

    • Once you have installed the app, sign up to app by entering the required credentials.

    image3

    • After you signup, you will be redirected to the app screen. You can choose to ‘Skip’ the instructions or proceed forward by tapping on ‘Next’ option.
    • Now, you need to fill in your profile details. You can choose to upload your photo as well.

    image4

    • After filling in the details, you can save the changes to get directed to the main dashboard. Tap on ‘Add Caree Profile’ for adding the caree profile. Multiple career profiles can also be added.

    image5

    • Tap on ‘Invite Helpers’ option to invite the helpers. You can even tap of ‘No’ Invite the helpers after adding the caree profile. You can tap on ‘No’ if you don’t want to invite them.

    image6

    • Tap on the ‘Send Invitations’ button to invite the helpers via SMS or email address.

    image7

    • Set up the preferences by tapping on ‘Set Preferences’.

    image8

    • Now, save the settings by tapping on ‘Save’ button.

    image9

    • You can add the task by tapping on ‘Add Task’ button. Do not forget to add the description to the task to give a clear understanding of the duties to the helpers associated with the task.

    image10

    • If you have added the helpers to a specific task, they will be notified automatically.

    image11

    This is how the IRIIS app works and helps the caregivers to manage the list of daunting tasks efficiently with a dedicated team of helpers.

    The Last Words

    IRIIS app is available for both Android and iOS platform. It also has its web interface making it easy for the users to operate this application from their desktops/laptops. The to-do lists can be added from your PC/mobile and the caregivers can be notified about the tasks added to the list. They can pick up different tasks and help the person to recover soon from the illness. So, if you are looking to help your loved ones who are suffering from any health issues or disabilities, IRIIS is one of the best applications to make your life simple.


  • Sagoon Android App Best And Easy Way To Connect And Earn

    Sagoon Android App Best And Easy Way To Connect And Earn

    Google’s biggest contribution is the Android operating system that is available for common people. You can find millions of apps on Google play store, where we have seen plenty of apps as not usable. However, that does not mean all of them are not usable.

    sagoon

    One of the innovative apps, which we came around, is Sagoon, which is quite different from what we have seen over the years and it is important that we help Sagoon reach more people because it does make a change in the respective country you are from.

    What is the concept of Sagoon Android App?

    Sagoon started as a one-stop app for various needs of the users such as sharing content, planning, scheduling, reminders, and chatting. The set of features which makes the Sagoon as a propriety entity isn’t these features.

    Sagoon is more about connections and openness, which is currently lacking in many major companies or social media sites like the Facebook, Twitter, and Reddit. You cannot blame major players because of the government threatening them to block or ban them in countries, which they don’t want to happen.

    The title of the Sagoon is “Sagoon – Connect, Share and Learn”, and original company concept is connections and openness.

    How to signup?

    Sagoon provided very simple sign up a procedure where you can use Google account to login make sure you speed test internet as app need atleast 3G network.

    image1

    Or,

    You can use your email address to sign-up and login; this is what we have selected to use because its kind of super easy

    image2

    How users Utilize Sagoon?

    Majority of the users are not into the planning, scheduling, reminders, and chatting, except for the sharing content.

    Users are using to express their feeling towards their country, personal life, positive, negative things happening in their life, political life, their fair share of experience.

    Let us show you how users are using the app, which is incredible and the reason why we are reviewing it.

    There are six categories, which makes the Sagoon unique and different from the rest of the apps.

    Note: A user, not the company post every word.

    Business: You will find every business related information shared by the users in this category.

    Confessions: Every person has a story to tell, but not in public. However, those who want to share, they come to this app and post their secret.

    image3

    Entertainment: No need an explanation because every information you find is about Movies, Celebs, and more.

    image4

    Politics: We rather find this section more interesting because you get to read about those stories, which are not highlighted by media. Some of them are rather funny.

    image5

    Relationship: Users share ups and downs of their relationship with opposite sex, which gives us information that can be useful to us.

    Sports: An important section that tells us those stories which are not highlighted by mainstream media because they are busy with unnecessary information.

    sports

    Let’s look at PROS:

    One: Sagoon highly supports freedom of speech – This is the only reason why we thought to share it with everyone because in this generation freedom of speech is becoming a MYTH.

    Two: One can share various information about Personal life, Politics, Entertainment, and more.

    Three: It does not force you with notifications like many apps does like Clash Royale, OYORooms, Soundcloud, Saavn, and more.

    Four: It does require good internet speed to view smoothly, but you can browse, post, and chat via 2G as well.

    Five: You can send a PRIVATE text to the users as well.

    Let’s look at CONS:

    We need to wait a bit to see the iOS version of the app.

    Download Sagoon for Android

    Conclusion

    The only function that is bugging us is the permission access because they can sell the information for good money. Let us know your opinion in the comment section below.


  • Download Momo App Player for PC / Windows 10 , 7 & 8.1 [English Version]

    Download Momo App Player for PC / Windows 10 , 7 & 8.1 [English Version]

    Momo App Player is an android emulator, which you can use to run Android apps and games on your Computer. Though there is no dearth of android emulators which we have compiled in our Android emulator collection, Momo app player is a great one for gamers . By default, its in Korean language, but in this article we will cover on How you can use and Download Momo App Player in English.

     Momo App Player Download
    Download Link Download Link
    Operating Systems : Windows 10, 7 & 8.1
    Type of Installer : Full Offline Setup
    License : Free
    Language : English

    Method to Download and Use Momo App Player for PC [ English Version ] – 32-bit & 64-bit –

    • First of all Download the Momo’s App player for PC & laptop from the link below –
      Click here to Download Momo App Player for Laptop-PC (Windows 10, 7 & 8.1)
      Note –  In the screenshots, the default language is Korean, but our installer has English too. We will cover how to easily change the language to English in Momo.
    • Now, after you have downloaded the installer, double click the installer icon to launch the Momo player installation. It will open the installation as shown in the following screenshot –
      Momo App Player for PC Download
      Tap on the Yellow button to Start Installation

      Here tap the Yellow button to start the Momo App player installation. It will now start installing Momo Simulator on your system as shown below –

      Momo App Player Installation
      Momo App Player Installation, please wait until it turns 100%

      Please wait while all the files are copied, and installation reaches 100%.

    • Now, once all the files are copied, and the indicator has reached 100%,  launch Momo app player for PC, by clicking on the yellow button highlighted as shown in the screenshot below – Screenshot_3
    • Now, it will boot Momo on your PC for the first time. It may ask you for network access permissions for internet. Please click on “allow access” to enable internet support for your Android system in Momo.
    • Congratulations! . Momo is now installed on your Windows system. In order to change language to English please perform the following steps in order –
    • Method to change default language to English – 

      • Tap on the “Settings” icon from the right hand side control strip.
      • Select the “second” option from left hand side menu tab, on the settings pop-up.
      • Select “English” from the last drop down option (Shown in the Screenshot below)
      • Click on “Yellow button” to save your default language to English –

        Method to Change Language to English in Momo App Player for PC
        Method to Change Language to English in Momo App Player for PC
    • That’s it! You can now use Playstore, install games , or drag and drop apks to start using your favorite apps and games in Momo App Player.
    • Momo app Player is based on Android Lollipop, thus it can easily run most of modern Android apps and gamesScreenshot_7
    • Click here to Download Momo App Player for Laptop-PC (Windows 10, 7 & 8.1)

    UPDATE –  In case, you are going to use Momo Player to play PUBG Mobile, we highly recommend you to use the following one-click PUBG installer of Bluestacks – Click here to Download Bluestacks PUBG 

  • Here Is How You Can Turn Your WordPress Website to a Social Network For Free

    Here Is How You Can Turn Your WordPress Website to a Social Network For Free

    Have you ever thought of turning your WordPress website into a social network? Of course, many of you might have also tried for the same. But, most of us feel that something is still missing. No matter how many plugins we use, we always find something amiss. This is because none of the WordPress plugin is fully compatible to provide engaging features to the users that an ideal social networking site can provide.

    PeepSo is the solution for all such users who want to convert their WP website into a social network. The things can be managed and done easily. PeepSo allows the users to create a fully functional social network that can compete with the leading social networks of the day. This plugin is empowered with lots of exciting features and super-easy codes. Let’s learn more about this awesome plugin.

    peepso

    Here is how the website looks after using this tool, visit this demo page

    PeepSo – What’s cooking inside?

    image2

    PeepSo is the next generation social networking plugin created for the WordPress users. It is super-light and available for free. Though one can only utilize a few features in its free version, there are add-ons which can be purchased to enhance its functionality. It will convert your WP site into a fully-fledged social network that can compete with modern day social networking websites.

    PeepSo has 5 types of plugins under its tally – Foundation, Core, Extras, Integration, and Monetization plugins. The foundation plugins – PeepSo Core, Location, Moods, and Tags are available free of cost. To download Core, Extras, Integration, and Monetization plugins, you need to pay some amount.

    To save your hard earned money, you can even choose to go with PeepSo Ultimate bundle. You can save a good amount on this purchase and get all the updates for free. The new plugins will be added to the bundle after their launch.

    image3

    Using the PeepSo Core

    Firstly download the PeepSo Core plugin on your WordPress website and move to the plugin settings. Follow the instructions along side.

    • Go to the ‘Members’ option. If some users have registered on your website, you can see their profiles and moderate them as well.

    image4

    • Under every user, you can see different options. Click on ‘Capabilities’ to edit their roles.

    image5

    • It’s up to you what role you want to assign to the user.

    image6

    • Assign the role and click on ‘Update’ option.
    • Move to ‘Profiles’ option to add/delete multiple fields from the user profiles. These fields should be filled by the user while signing up.

    image7

    • The ‘Addons’ option can be browsed and new plugins can be purchased to make your social network more functional. The core is not enough to make a fully-functional social network. You need to get the addons.

    PeepSo Latest Launch – WooCommerce Plugin

    The all new launch of the WooCommerce plugin will help you add a store for your community. You can sell your products or can help the community members to create their own stores for selling their products. This plugin can be a real game changer. If you have purchased the ultimate bundle, you need not pay anything extra. The plugin will be added automatically to the bundle.

    Pricing

    As told earlier the PeepSo Core can function really well if you go for other plugins as well. The cost of an individual plugin starts from $19 and can go up to $99. You can even purchase PeepSo Ultimate Bundle that can save you a lot of money. All current plugins will be made available to you with the bundle and the future plugins will be added to it after the launch. All updates and upgrades will be provided to the user with Single License key.

    image8

    Pros

    • Turn your WordPress website into a social network without touching the code
    • Provides free foundation plugins.
    • Most of the plugins are priced low.

    Cons

    • We think Monetization plugins are bit expensive.
    The Last Words

    PeepSo is the ultimate plugin that can help you turn your WordPress website into a complete social network. It offers you a free core that can make all other paid plugins function nicely. Though you can buy different plugins individually, but it is recommended to go with the PeepSo Ultimate Bundle pack.

  • Joyoshare Screen Recorder for Windows 10,8.1, 8, 7 PC And Laptop Review

    Joyoshare Screen Recorder for Windows 10,8.1, 8, 7 PC And Laptop Review

    You can find hundreds of screen recorder for windows, but only a few of them make the perfect match for your recording requirements. Every single has a different requirement like some of you need screen recorder for YouTube.

    There is numerous screen recorder for PC in the market that comes with many unique features, and they also come at a price, but do they worth their price?

    With that being said we are going to review a screen recorder, which is in the market for a long time. The Joyoshare screen recorder software, which is popular in the market for its performance and feature, but is it worth your time?

    Joyoshare Screen Recorder for Windows OS Users | Review

    Now that we have mentioned Joyoshare screen recorder which is packed with many features and it comes with several unique functions which can get the job done.

    We are going to review the Joyoshare screen recorder, and we will determine whether it adds value to the screen recorder tool list or not.

    To test the features, you have to download the trial version of the program from the official site.

    image1

    Download screen recorder for windows

    Installation of the JoyoShare screen recorder software

    If some of you are assuming that it is difficult to install the program on your PC, then let us show you how easy it is to install.

    Step 1: Run the downloaded program as administrator.

    image2

    Step 2: You have to accept the agreement and click on next.

    image3

    Step 3: You click on few more “next” button and ultimately the installation will begin.

    image4

    Step 4: Now run the program by clicking on the “Finish” button.

    image5

    As you can see that it is extremely easy to install it.

    #1 – Recording & Formats

    image6

    The first feature which we are going to test is the recording. It is more obvious that we look into the screen recorder performance and how stable screen recorder software on Windows.

    The recording features are pretty good on the Joyoshare screen recorder. You get high resolution recording on this tool.

    The first thing, which we would like to point out that it was very easy to understand user interface, so it did not take long for us to understand its functions.

    Note: If you have an active Antivirus system, then you should allow it to make changes in the “Documents folder” because it saves the file in that folder.

    You can adjust the screen size as well, but it starts with the square shaped screen. All you have to do is to click on the “Rec” button, but make sure to select VIDEO RECORDER icon before you record.

    Coming to the video formats Settings > Formats.

    image7

    Quite surprisingly the screen recorder tool comes with various formats such as MP4, M4V, MOV, 4K VIDEO, WMV, and more.

    image8

    If you pay attention to the top menu, you can also browse from devices, HD video formats, web video format, and general video formats.

    image9

    JoyoShare is perfect screen recorder for YouTube and websites because it supports the various format, so you don’t have to covert it to play on your favourite devices as well.

    #2 – Audio Quality & Audio Formats

    It also comes with an audio recorder as well; you will be able to record audio without any visual.

    However, it does not have any enhancer, so the quality of your audio will depend on the MIC you are using. If the Audio quality comes out bad, then you cannot blame this recorder.

    However, it also comes with many Audio formats, which are often neglected by the major screen recording software companies.

    image10

    You have to select audio, then open settings from the gear icon.

    image11

    It supports popular audio formats like MP3, AAC, WAV, WMA, and it supports rare formats like M4A, AC3, AIFF, M4B, and more.

    #3 – Best Recording Settings & Basic Features

    The final thing, which we consider is the ideal settings for various Windows PC and we should also look at the basic features.

    As you can look at the settings, where you can see that you get a lot of basic functions like cursor highlighting, cursor click highlighter, mute microphone audio, mute system audio, and more.

    From what we have understood that there are few basic features are missing, but the recording quality is good, and it is right for YouTubers who usually have tutorials to record.

    Coming to the settings, there isn’t much confusion in using it, which is useful for non-technical people.

    Conclusion

    We have seen many records that comes with advanced features, which is clearly missing in Joyoshare, but if your requirements are for tutorials and you don’t have deeper knowledge in operating the program, then this is for you. Let us know your thoughts in the comment section.

  • Track and Manage your Monthly Expenses with My Business Expenses Manager iPhone App

    Track and Manage your Monthly Expenses with My Business Expenses Manager iPhone App

    Managing the business expenses everyday might seem to be a daunting task. No matter how hard you try to log all the expense records, you miss out on many things. My Business Expenses Manager is one of the ultimate applications available for Android and iOS devices that can help you track your business expenditure in managed way. Let’s go through a brief review of its iOS app and learn more about this intuitive app.

    app

    The Introduction to ‘My Business Expenses Manager’ App For iPhone And iPad

    My Business Expenses Manager is a perceptive application that claims to be the best expense manager for your business and daily expenditure. It helps you log all your expenditure and calculate them at the end of the day/week/month. Though it is not available for free, every penny spent on the purchase is totally a worth.

    You just need to fill in the details like name, country, tax rate, mileage charge, opening mileage, and other info, and then save the settings you have made. Now, you can start adding your spending to the app whenever you spend some money.

    image2image3

    Unlike most of the apps of its type, My Business Expenses Manager does what it promises to do. The users can take full control of their business expenditure and manager it wisely. Not only the business expenses, one can also track the routinely expenses using this application.

    What Tasks can the App Handle?

    My Business Expenses Manager is a robust application that requires minimal resources to help the users efficiently manage their expenditure and configure any setting within the app. It is the perfect business partner for the people on a go. It has got a robust set of tools and calculators to handle the following tasks:

    • Calculate the totals of private and business mileage.
    • Determines the running costs per vehicle.
    • Stores photos and date stamps of all receipts.
    • It lists down various payment methods.
    • Reconcile the credit card transactions.
    • Exports the reports files to the accounting software.
    • Search by supplier name or date.
    • Add notes to certain expenses providing more information.
    • Create the lists of describing services from different suppliers and more.

    Highlighting Features of My Business Expenses Manager App

    It provides you with powerful collection of tools to make your life simpler and faster. It not only turns out handy for the business class people, it is a classic app for the people who wish to manage their house expenses. Let’s have a look at some of its features.

    No Clutter in your Pocket

    You need not search down your pockets to gather the receipts that often get misplaced. This app stores all the receipts for you. Just open the app and look through the receipts you have stored within the app. You can capture the photos of your bills and add them with your expense entry in the app.

    image4

    Export Expenses

    It has got a precise built-in support. The real-time reporting in one of the most overrated features of this app. It records every expense which is then stored in single folder. A user can check every folder before exporting. You can even configure the application to export each new expense or export bulk expenses at regular intervals.

    image5

    Integrates Well with Accounting Software

    The CSV file of your expense can be integrated seamlessly with the standard spreadsheet and accounting software. Moreover, when you export data as PDF file from the app, the date stamped receipts are attached and printed automatically in the resulting report.

    Bulk Erase

    Once the delivery of the exported data is confirmed, you can instruct the application to perform the bulk erase of the redundant saved data for freeing up the space to store future expenses.

    Pros

    • Keep track of daily expenditure.
    • Multiple currencies supported.
    • Export expenses as CSV or PDF file.

    Cons

    • We think there should be a direct option to upload the info to cloud in encrypted form so even when the phone is lost we can restore the date to new one.
    Over to You

    If you are looking to manage your business and personal expenditure well, My Business Expenses Manager can turn out to be the best solution. Keep a good track of all your expenses and manage the receipts well with this stunning application.

  • How to Get Unlimited Free Jio Tunes (Songs as Jio Caller Tunes) on Jio Number!

    How to Get Unlimited Free Jio Tunes (Songs as Jio Caller Tunes) on Jio Number!

    Reliance Jio never ceases to surprise its customers. After giving away free calls for lifetime, ample of Internet data, it has now come up with Unlimited caller tunes for all its customers. Jio tunes plays a song to your caller every time they call, and its completely free of cost. Here’s a simple tutorial which will guide you on how to select any song as your Jio Hello tune for free. You can repeat it unlimited times to get free jio tunes.

    Method to Set up Free Jio Tunes on your Jio Number – 

    • Inorder, to easily browse through the songs and set them as Jio tune by one click . We will use the Jio Music app. Tap and download the Jio Music app from the links below –
      Click here to Download & install Jio Music app for Android from Google Play Store
      iPhone users use the link below – 
      Click here to Download & install Jio Music app for iOS 10, 11 (iPhones) from Apple App Store
    • Now, once you have downloaded the app launch it. Make sure you are connected to Jio Internet, while opening the app to auto sign-in. On the launch screen select the language of your choice and tap on done as shown in the screenshot below –

      Select the language of your song and tap on Done
      Select the language of your song and tap on Done
    • Now, search for your favourite song or movie name, which you want to keep as caller tune as shown in the following image –
      Search for song or movie name to browse to the song to be kept as Jio caller tune (Jio tune)
      Search for song or movie name to browse to the song to be kept as Jio caller tune (Jio tune)

      Now,  tap on the song name to make it play.

    • On the play Screen , tap on the “Set as Jio Tune” option above the play button . Now again confirm your song as Jio caller tune by tapping the “Jio Tune” option as shown in the image below –
      Tap on the Set as Jio Tune Option to set your free Jio Tune
      Tap on the Set as Jio Tune Option to set your free Jio Tune


    • Congratulations! you have now successfully set your Free Jio Tune on your number . You will get a confirmation message on your mobile number. Enjoy your free Jio hello tune!
      Free Jio Tune Confirmation
      Free Jio Tune Confirmation

      Update (Alternative Method)  – You can even set your Jio Tune without playing any song by tapping on the “3 dots” besides song name, and selecting “Set as Jio Tune” option as shown below –

      Alternative method to set free Jio tune
      Alternative method to set free Jio tune
      Tap on Set as Jio tune Option
      Tap on Set as Jio tune Option

      Thus! you have now activated free unlimited Jio tunes on your number. Incase, if you face any problems or have any queries feel free to let us know in the comment section below.


  • How to add Face Unlock in any Android Phone | Use FaceID unlock on Android apps &  lock screen

    How to add Face Unlock in any Android Phone | Use FaceID unlock on Android apps & lock screen

    With iPhone X Apple made the face unlock or FaceID popular. While, the touch id or finger print unlock is now easily integrated into most Android phones, the face unlock feature isn’t. Only a few flagship smartphones have the face unlock feature. Hence, in this tutorial we will cover How to add and use Face ID lock & unlock on any Android phone or tablet. This method works on older android versions such as KitKat, lollipop, marshmallow and Nougat too.

    Tutorial to Add and use Face Unlock on all Android phones and Tablets.

    • Now, since Face ID lock & unlock algorithms are not present in the default lockscreen security or default app locker. We need to install Iobit Applock app which will allow us to use Facelock on Android . Please use the below link to download IoBit face unlock app –
      Click here to Download IObit Applock : Facelock app for Android from Google Play Store
    • Once, you have downloaded the app launch it for the first use. Now, we will configure the face scan and unlock step by step as mentioned below –

    Step . 1 – Set up a Default Pattern or Pin for Unlock

    • After, launching the app for first time. IObit will ask you to set up a default pattern or Pin for unlock. This step is important as it helps to improve the security of lock. Hence, please set up the default pin or pattern to unlock the phone as shown in the screenshot below –
      Set up a Default Pattern Password or Pin
      Set up a Default Pattern Password or Pin for unlock


    Step . 2 – Adding Apps & Lockscreen lock-unlock permissions to IObit

    • Now, in order to lock or unlock your phone IObit app locker needs to have control over the launcher and other apps. So, that it is launched first before opening the other apps.
    • Hence, we will need to add app to be locked under the IObit face lock. Tap on the “Open lock” beside the Screen lock app, and other apps you want to lock with your pin,pattern or face. Once they are locked with Iobit then we can use all the three methods.

      Enable IObit screen lock for main lockscreen and other apps
      Enable IObit screen lock for main lockscreen and other apps
    • Note – Open lock  will turn to Close lock once the app is linked to IObit as shown in the above screenshot. Please enable screen lock and other app lock for Iobit.
    • If it asks for usage access, please toggle it on as shown in the below figure –

      Usage Access IObit Unlock
      Usage Access IObit Unlock


    Step . 3 – Enabling Face Unlock Feature –

    • Here, we will enable the face unlock feature of the IObit app. To do so, navigate to menu by tapping the “3 horizontal lines at top left hand side corner as shown below –
      Tap and Open Menu
      Tap and Open Menu

      Now, from the drop-down menu select “Face lock” feature as shown in the following screenshot –

      Tap on Face lock feature
      Tap on Face lock feature

      It will now start downloading AI database for face lock as shown. Please wait until the bar reaches 100% and complete data is downloaded.

      AI Data for Face Lock - Unlock
      AI Data for Face Lock – Unlock


    Step . 4 – Enabling the Face Unlock Feature and Adding a Scanned Trusted Face – 

    • Once, it has downloaded the database, it will now ask you to move to a well-lighted area for face scan. Here tap on the “Enable Now” button as shown below –
      Tap on the Enable Now button
      Tap on the Enable Now button to scan face

      Now, your face scan screen will open. Here, place your face in the circle highlighted in the screenshot below. It will automatically scan and save your face –

      Place your face in the circle to finish scanning!
      Place your face in the circle to finish scanning!

      That’s it! After scanning your face in the circle it will redirect you to the “Face lock” screen.

    • Here simply tap on the “Grey face box to enable face lock for the corresponding app. If the face is grey = face unlock disabled, if face is coloured = face unlock enabled. It can be easily toggled on or off by tapping as shown in the figure below –
      Tap to disable or enable face lock for the app
      Tap to disable or enable face lock for the app

      That’s it!. It will now ask you to scan your face to unlock the screen or the added apps.

    • Congratulations! you have now successfully integrated iPhone X like Face ID unlock on your Android phone. Incase, if you face any problems or difficulties feel free to comment.