Blog

  • 4 ways to use Kindle Reader on PC both online as well as offline | Kindle for Linux/Windows/Chrome OS

    4 ways to use Kindle Reader on PC both online as well as offline | Kindle for Linux/Windows/Chrome OS

    Hey guys, recently i started using Amazon Kindle and all the large collection of e-books which come with it, i found the experience very nice of being able to read my favorite books offline too, hence thought of sharing the 4 ways which i use personally for Kindle Reader online as well as offline .

    First Way ! – Google Chrome App / Kindle Cloud Reader Extension

    • Most of you users might be familiar with the Google Chrome Browser and the loads of apps available on the appstore, Kindle too has its own app on the Store which supports reading from the Cloud [online] as well as reading offline from local media/storage.
    • All the Features such as Bookmarks,highlighting,color changes,search,fontsize,etc work fabulously well and nice with the Google Chrome App
    • And to top of it Google Chrome being available for Windows/Linux/as well as Chrome OS , we can synchronise and use the Kindle Reader on Linux and Chrome OS too  as the native Kindle Reader/Client isn’t available for them.
    • Thus, the Kindle Reader Chrome extension which can be run offline too can be downloaded from here ->
      Click here to Download Kindle Cloud Reader Chrome Extension

    Second Way – Online Cloud Reader / URL – read.amazon.com

    • Like, the Google Chrome extension the Online Kindle Cloud Reader as its loaded in the browser itself, can be used on any OS – Windows/Linux/Chrome OS/Windows Phone/Symbian etc
    • The Most recently read book is automatically saved for offline use.
    • All features such as bookmarks and synchronisation , editing effects are supported!
    • Highly recommended if the Chrome app isn’t available.
    • Click here to go to Online Kindle Cloud Reader

    Third Way – Using the Kindle for PC App

    • Amazon had officially released the Kindle for PC app for Windows operating systems, but there’s no reason to why it abruptly stopped its development.
    • The Official Kindle for PC can still be downloaded and used on modern windows versions too such as Windows 7,Windows 8|8.1
    • For Running on Linux, Install the Kindle for PC app using WINE! and selecting the base OS as “Windows 98” in Winecfg.
    • The Official Kindle for PC App can be downloaded from here , Click here to Download Kindle for PC.

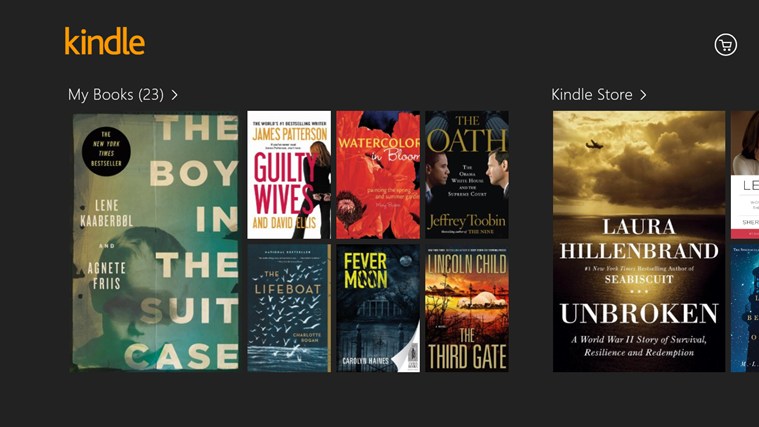
    Fourth Way – Using the Official Kindle Windows 8 / Windows 8.1 App

    • This is one of the most elegant way to use Kindle Reader on your PC/Tablet ., The Official Kindle App for Windows 8/8.1 Supports all the features of Kindle Reader.
    • Supports Bookmarking, Offline Reading, Cloud Sync, Editing the Font, Color,Shape , Size,Note taking and much more..
    • It simply makes reading your e-book more worthwhile and more pleasing and cool!
    • The Official Kindle App for Windows 8/8.1 Can be downloaded from here–> Click here to launch Store link for Kindle App

    So, these are the methods which i use personally, if you have any doubts/queries on setting upany method, feel free to comment , also if you have a different method do comment 🙂 so we all can share and  enjoy it 🙂

  • 5 Free File Hosting/Sharing Cloud Storage Sites with Direct/Hot Link Support | CloudLinker v2.0 Direct Link Maker

    5 Free File Hosting/Sharing Cloud Storage Sites with Direct/Hot Link Support | CloudLinker v2.0 Direct Link Maker

    Hey Guys, as you know canonical is shutting down its Ubuntu One Cloud Storage so i was looking for alternative file sharing sites which allowed hot/direct linking and gave permealinks for files and found these 5 Free File Hosting sites with direct linking /hot link support

    1. Dropbox 

    Yes, your favourite Cloud-Storage / Dropbox.com Supports Direct Link / Hot Link on Files Uploaded to it, it can be easily done by modifying the shared / Download URL by tweaking it a bit, Head on to this Post to know the trick in detail, Trick to Obtain Direct Link of Dropbox file in short in this trick we are simply replacing “www.dropbox.com” with “dl.dropboxusercontent.com” and that’s it, and for simpler purposes You can use our all in one multi Direct Link Maker – CloudLinker v2.0 to Generate DirectDownload/Share URLs for hosts.Files stored on Dropbox account remain active as long as the account is not deleted!

    2.Ge.tt

    Ge.tt is a new Entry in the Cloud Storage Family, but its easily and quickly leaving its competitors behind and taking the lead. After you upload your file through drag and drop or by file uploader on ge.tt , or you get a shared download page URL for a file uploaded on ge.tt , simply right click on the highlighted “Download” Link and Copy the URL/Copy Link Address, it will be the direct Download URL for your file,as shown in the figure -> Ge.tt Direct Download Link Trick –>


    3.Copy.Com

    Copy.com is one of the fastest growing Cloud Storage, it provides 15 GB of Storage Space for Free!!, and yes you can use it for Direct/Linking and Hot Linking too, in a similar way as we did with Dropbox.! we just have to remove “www” and “/s”  from the url e.x https://www.copy.com/s/*** making it http://copy.com/*** to make the Shared File URL into downloadable one.! but it consists of some steps, i highly recommend using our CloudLinker v2 tool or refer this post for Copy.com Direct Link Generation


    4.DirectLinkUpload.com

    When you visit this site for the first time please don’t go on the looks, just upload your file through the simple uploader and you’ll get a URL for sharing , Now Go to The File Sharing URL and go to shared folder option, you will see your uploaded files, Now right click on the Copy Link Adddress, it shall be your direct Download Link which you can easily share..or you can click your uploaded file to download it, and copy the URL from which it got downloaded 🙂


    5. Ozibox.com

    Ozibox.com is the newest entry to the Cloud Market, And Provides Free 100GB of Storage Space for everyone!, also it provides Direct Link to the files stored on the Cloud, Steps to generate direct download links from ozibox are Sign-Up for an account on ozibox.com , login and upload your file through the upload button, and download your own file on your browser/IDM .! Now Copy the Recent Downloaded URL from IDM / Google Chrome Downloads tab, and this will be your direct download link for your file /shareable to everyone.!


    Using our CloudLinker v2.0

    As Promised Earlier i have Updated CloudLinker to v2.0 which Now supports all the Five Hosts Mentioned Above, you simply have to enter the Shared /Sharing URL provided by the host and it will generate the Direct Download URL for you, which you can add to your posts/ share with your friends. 🙂

    Update – CloudLinker v3.0 is now Online tool – So no need to Download anything – Click here to Get your Direct Download Links using CloudLinker Online

    Click here to download Cloudlinker v2 from Dropbox
    Click here to download Cloudlinker v2 from Ge.tt
    Click here to download Cloudlinker v2 from Copy.Com
    Click here to download Cloudlinker v2 from DataFileHost.Com
    Click here to download Cloudlinker v2 from Ozibox.Com


  • Easily Create Setup / Installer for any Software using InstallSimple Setup creator

    Easily Create Setup / Installer for any Software using InstallSimple Setup creator

    Hey Guys, we at TechApple, post alot of setups and installers for many softwares, ever wondered how to create setup/installer for any software.? in this post, i am going to cover the same Let’s Check out how to easily create a setup / installer for any software.[Windows] and that too without any scripting involved thus no programming language involved! 🙂

    Prerequisites

    • A simple tool / Portable Software – InstallSimple  , which we are going to use for Creating Packaged Software.
    • The Folder/Software of which you want to create Software.
    • This Tutorial 🙂 that’s it 🙂
    • You can download InstallSimple from here . Click here to download InstallSimple Setup Creator [Just 355kB].

    Method to Create/Setup using InstallSimple

    • Open InstallSimple.exe from the Downloaded zip file, you will be greeted with an image as follows , Click on Next to Continue.
    • After Click on Next you will be shown a window asking you to Enter the Window Title and Project Name, Fill in The Window Title – The text you want to show on title bar and the Name of the Software in Project Name and click on Next.
    • Now a dialog box will appear with a Message Text Label and a textbox , in the textbox enter the Custom Text/Greeting text which you want to show when setup starts and click on next.
    • Now a dialog Box will appear with label License Agreement, enter the type of license agreement for your software and click on next.
    • Now in this window “Graphics” we can specify the splash screen we want to display before the execution of the setup as well as the header image of the setup window, Click the Folder icon as shown in below figure to specify the path., CLick on Next
    • Now a window “Files to Distribute” / asking you to select source folder of your setup and setup path for your setup will appear, in source folder option click on “Browse” and navigate to the software folder of which installation you want to create and click “ok” , its generally the folder which contains your .exe setup file,and .dll files etc.., select the root folder which contains your software for source folder, and for setup path, enter the folder and location where you want to install your software ex “Program Files”,”Local user drive” etc as shown in the figure –>
    • Now a Window Labelled “Shortcuts” will appear, here select the Files of which you want to create shortcuts and the locations where you can place the shortcut can be selected on the right side pane such as “Start Menu”,”Desktop” etc, after you click on the file of which you want to create shortcut , a yellow/green color mark will appear as shown in the next figure –> After selecting the files for shortcut click on Next., select the Windows Versions and .NET framework check if you want to add., click on next..
    • Now a tab “Windows Registry”  will appear , Enter here any regitry changes you want to make e.x adding PATH variable with setup etc and click on next,
    • Now a Window  labelled ‘Build Setup” will appear! , Simply Click on Build and your Setup will be Ready!! 
    • The Build WIndow looks like this — >
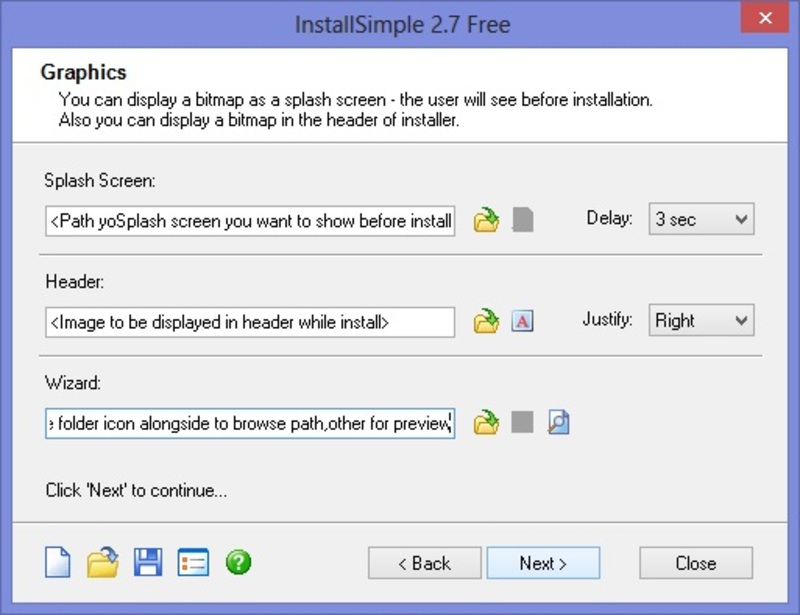
    •  Congratulations!! you have successfully created your Setup! The Setup.exe can be used on Any Machine..

    The Setup itself creates the program registry,control panel and uninstaller inbuilt, so no headaches / extra efforts whatsoever!

    I hope you liked this tutorial, Do share it with your friends, and if you have any doubts/queries feel free to comment! Thanks!

  • Turbo Pascal 7 for Windows 7 /8.1 & Windows 10 [32bit-64bit] FullScreen Single Installer

    Turbo Pascal 7 for Windows 7 /8.1 & Windows 10 [32bit-64bit] FullScreen Single Installer

    Hello Friends, recently while searching on the internet i came across this thing called as Borland Turbo Pascal 7.0 which is an IDE cum Compiler for running and compiling Pascal language .pas files, Although pascal is taken to be one of the dead programming languages, Pascal is still used widely for education purposes due to its similarities with C and easier to understand programming structures and flows.  but as Turbo Pascal 7 doesn’t work on 64bit OS such as Windows 7/8/8.1 and it works small window in 32bit OS , i have created this installer — >  Turbo Pascal 7 for Windows 7|8|8.1 by TechApple.Net

    Salient Features of this installer are

    • Easy to use , and user friendly Borland Turbo Pascal 7 is used and that too runs fullscreen!
    • World’s most preferred Simple Pascal Language Compiler..that too on a single click installer !!
    • Works On All Versions of Windows, Windows 98,Windows 2000,Windows XP,Windows 7 [64 bit as well as 32 bit] As Well as Windows 8 and 8.1 too [both 64bit and 32 bit]
    • No need of installing DoSBoX and configuring or mounting anything! Everything right from DosBox to running turbo Pascal is built-in and the installer processes it automatically!
    • Thus , everything is automatic bundled in a single installer!
    • Useful For Students as well as Teachers and Professionals.
    • You can save the program directly within it,and open it next time From the Software itself for editing/Use.
    • You can Change the Units and TPDU Directories from the IDE if you want to..
    • Easy and Efficient Pascal Programming.

    Download it here –

    Click here to Dowload Turbo Pascal 7 for Windows 7 | Windows 8 |8.1  32bit and 64bit by Techapple.Net

    Mirror Link #1  Click here to Dowload Turbo Pascal 7 for Windows 7 | Windows 8 | 8.1 32bit and 64bit by Techapple.Net

    UPDATE – Now you can even enjoy your favorite Turbo Pascal compiler on your Android phones , check out the below tutorial – Click here to Install & run Turbo Pascal for Android phone or tablet

    Installation Guide :

    Its rather pretty simple,Just Open the installer and simply keep on clicking Next, Just Don’t change the default installation directory “c:\TP7\”

    Screenshots — >

    Successful Installation and Full Screen Working of Turbo Pascal 7 –>


    Successul Compilation of Sample HelloWorld Pascal Program in Turbo Pascal 7 –>


    .


    Support :

    • Double click the Turbo Pascal icon on the Desktop for Execution
    • If it Doesn’t run Full-screen simply give the command “Alt + Enter” To Open in Full-screen
  • 3 Ways/Tricks to download Bing image of the day on your PC using Chrome/Firefox/BingDesktop [Bing Background Image]

    3 Ways/Tricks to download Bing image of the day on your PC using Chrome/Firefox/BingDesktop [Bing Background Image]

    Hello guys, most of you might have noticed the background images posted on bing.com ,popularly known as which change on a daily basis and would have wanted to save them on your PC, download  Bing background image and use as a wallpaper . Rejoice its possible in this post i will reveal 3 Ways/Tricks to download the Bing Background Image and Save them on your PC..

    Trick / Method I : Mozilla Firefox — Google Chrome Trick following..

    • Navigate to the Bing Homepage http://www.bing.com in your Firefox Browser.
    • Navigate to the image you want to download using the navigation arrows shown on the Bing homepage at right hand side bottom side, now after you reach the desired image , right click on the “View background image” ,you will get a menu shown like this
    • d
    • Now click on “View Background Image in the Dropdown Menu”  and it will open the Image with its URL , as shown here
    • Now , you can copy the URL and download the image or simply right click on the image and select “Save image as” option to save the Image! and that’s it easy! isn’t it ..?

    Trick / Method 2 : Google Chrome

    • Navigate to Bing Home page and browse to your desired Download Image using the arrow keys.
    • Now when on the image,right click on the image and select the “Inspect Element Option” in the dropdown menu shown here
    • Now, you will see a bottom tab in the google chrome and it will contain the image URL as shown below  –> in the next image, you can copy the image URL and download it using IDM or navigating in chrome and selecting “Save image as”  after opening the Image URL in the image.. here’s a screenshot of the Inspect element –>

    Thus, you can download any Bing Image using these simple steps.. 🙂 But, the drawback of using Browsers for downloading images is that only the Last seven images are available 🙁 in order to browse the entire Bing Image Gallery..and download them we will have to use the Bing Desktop App

    Method / Trick 3 Bing Desktop App

    The previous methods allow to download only last 7 bing images,if we need to download the complete gallery it isn’t possible by prev methods, hence , we use the Bing Desktop app.  to download the gallery, the steps for downloading any wallpaper from bing gallery are as follows

    • Download the Bing desktop app from here, and install it.
    • After installingjust browse from the topbar app and browser for your favourite image and set it any image as wallpaper.. as shown here–>
    • Now your desired bing image is set as wallpaper , if you want to get the Location of the .jpg file just right click on your desktop wallpaper and click on “personalize”
    • Now click on wallpaper/desktop background, a dialog box shown below is showed up on your desktop
    • Now you will get the location where the bing Desktop app saves your download image, you can get it by howering your mouse over it as shown in the above picture 🙂

    Congrats! now thus you can download any image stored on bing as well as save them, share set them up as wallpapers.. and Bing really has an amazing number of pictures which are really classic! so do check it out 🙂 Thanks! if any problems/queries/suggestions feel free to comment 🙂

  • Trick to Obtain Direct Download Links for Dropbox Files | Dropbox Direct Link maker Tool – CloudLinker

    Trick to Obtain Direct Download Links for Dropbox Files | Dropbox Direct Link maker Tool – CloudLinker

    In my last post i wrote about Generating Direct Download Links for Files from Copy.com Cloud Storage.
    Direct Links are links which you can simply share through email/blogs/websites on clicking which file download begins without any landing Page. UbuntuOne used to provide this feature earlier bydefault [Now its closing down] and as Copy.Com is not as popular and user-friendly as DropBox – World’s No 1 Cloud File Storage . Many readers asked me if such thing was possible for DropBox..? snd the answer is Yes! Its possible to Dropbox Direct Link  and i coded a simple tool – CloudLinker for the same !  well you can even do it manually , Just keep on reading to get this exclusive trick!

    Trick to Generate Direct Download Links of Files stored on Dropbox.com Simply follow the Steps Below –

    • Get the Dropbox Sharing URL of the file/s which you want to share,it would look like this “https://www.dropbox.com/s/…..”  , if you don’t know how to get the sharing URL , refer the following steps below..Step 1 . Right Click on the Filename which you want to share and now a dropdown menu will appear , as shown in the figure below 
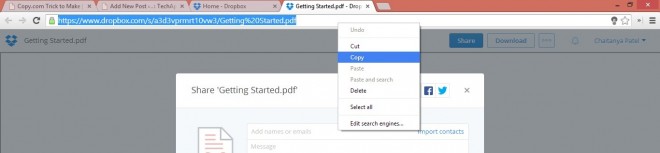
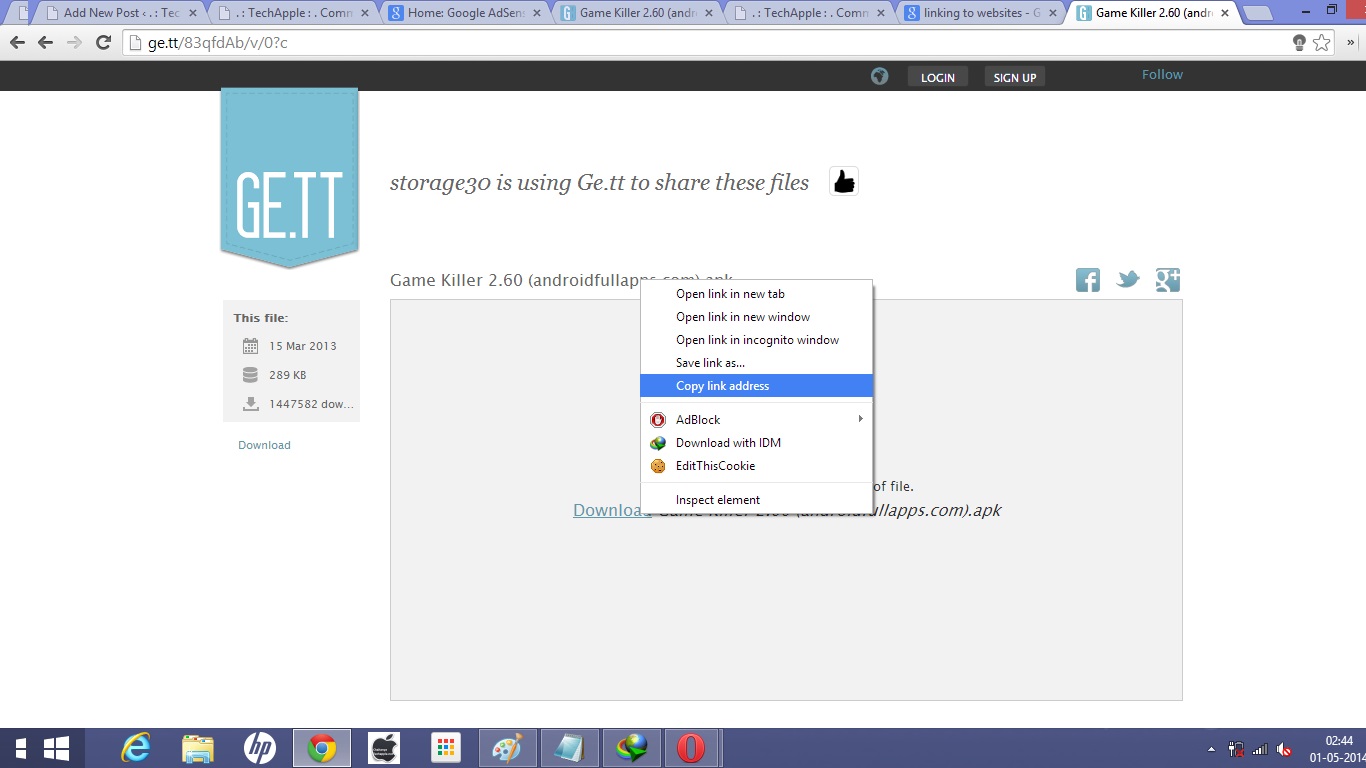
Now Simply Click on “Share Link” Option before the Download Option you’ll get the File Sharing Link which would look like the string discussed above or shown in Picture below –
       This “https://www.dropbox.com/s/…./<filename>” is your sharing URL ..Now Comes the Main Step /Method… 
    • Now , Simply Replace the String “www.dropbox.com” with “dl.dropboxusercontent.com” And your Direct Download Link is Ready!
    • for e.g the Sharing URL looks like “https://www.dropbox.com/s/…../<filename>” now after replacing “www.dropbox.com” with “dl.dropboxusercontent.com” the link becomes “https://dl.dropboxusercontent.com/s/…../<filename>” this link starting with “dl.dropboxusercontent.com” is your direct download link!
    • Pretty Easy isn’t it 🙂

    And For Users who want it readymade, i have created a simple tool – CloudLinker : Direct Link Maker for Copy.com And Dropbox.com
    Features —

    • Simply Enter your Copy.com and Dropbox.com Sharing URL and the Tool Will Provide you / Generate the Direct Download Clickable Links for you.! as shown in the figure —

    CloudLinker Works Nicely and Sound for both – Copy.com as well as DropBox.com Shared URL’s , it will be getting other cloud supported soon

    Update – CloudLinker v3.0 has been launched Online – Click here to Start Generating Direct Download Links using CloudLinker tool

    (The Online Version is based on a new Exploit if you want to use the Old Exploit, you can use the manual method )

    You can Download CloudLinker v1.0 By Clicking this Link


    Do Comment and share your views on this 🙂 and if you liked this post, Please Do Share so that your friends too can enjoy this Awesome Trick!

  • Copy.com Trick to Make | Obtain Direct Download Link of Uploaded content on Copy.Com Cloud Storage

    Copy.com Trick to Make | Obtain Direct Download Link of Uploaded content on Copy.Com Cloud Storage

    Hey Guys, welcome back 🙂 as per the latest news, Canonical has rolled back it Ubuntu One Cloud Storage Service 🙁 which was simply great as it supported Direct Linking Downloads of the Files Uploaded on the Cloud Storage, Naturally after its shutdown i was looking for alternatives and to be honest i found a good i mean great one 😛 — Copy.com

    Salient Features of Copy.com are

    • Speedy Cloud based storage for storage of Personal,Private as well as Corporate Data.
    • Free 15GB Space after registeration, and if you register under my referral you and me both get 5GB extra, so why not we both can benefit. Click here to register under my Ref. to Copy.Com
    • Like UbuntuOne its possible to hotlink/or give Direct Download Link by a Special Trick mentioned here —


    Trick to Obtain Direct Download links for your files uploaded on Copy.com to Share in Public

      1. First of all Upload your files on Cloud.com which you want to share, now navigate to the Folder and then to the file for which you want to generate the Direct Download Link..
      2. Now right Click on the file which you want to get link and click on share, you’ll be shown a dialog box as shown in the figure with short link,


      1. Now , Enter the Short Share URL in your Browser’s address bar you’ll be redirected to a page asking you to download file as shown below

    1. Here Copy the Big URL containing “https://www.copy.com/s/***” and Now HERE Comes the Main Part..
    2. I have Made a specific tool for Making Copy.com Direct Download Links , First of all Download it from here..
      Click here to Download Copy.Com Direct Link Maker [Size : 20kB]
      Update : You can even use the Online Cloud Linker tool if you don’t want to Download the tool Its Way Simpler! – Click here to use Online Cloud Linker tool!
    3. Now Simply enter the big Share URL “https://www.copy.com/s” and click on generate button, you’ll be given Direct Download Link for the Shared URL as shown below 🙂

    Now , you can copy the Direct Download URL and Share it Publicly for Direct Downloads or store them for future use

    Manual Trick Without Using Direct Link Maker

    • Simply Replace “https://www.copy.com/s/***” with “http://copy.com/***” and URL is Direct Downloadable / HotLink enabled 🙂
    • ex. Direct Download Link for “https://www.copy.com/s/xgsjjLci9Gkv/Copy.Com%20Direct%20Link%20Maker.exe” will be “http://copy.com/xgsjjLci9Gkv/Copy.Com%20Direct%20Link%20Maker.exe”
    • Test it , it simply Works!

    Hope you all enjoyed this Post, Do Comment if you find any queries and share the trick if you like it 🙂

    Update!!

    Similar trick is revealead for Dropbox too..! and Our Cloud Direct Link Maker Gets an Update — >Check out this Post ! 🙂

  • 5 Websites/Apps for C/C++/Java/NodeJS/Ruby/Python/PHP Programming/Development on Chrome OS | Browser online

    5 Websites/Apps for C/C++/Java/NodeJS/Ruby/Python/PHP Programming/Development on Chrome OS | Browser online

    Hello Guys, the word is out Google powered Chrome OS Chromebooks have hit the Markets and are quite a great hit among the masses, because of their low cost, sleek design and high performance and a different type or web bases OS 🙂
    But, unfortunately as they are quite new, there are  practically No C/C++/Java/Ruby/Python etc Compilers available 🙁
    but still,we can program and develop in language such as C/C++/Java/NodeJS/Ruby/Python/PHP on Google Chrome OS/Browser by these 5 Google chrome Apps.
    Also as all these apps are cloud based, you can simply visit these sites and directly program on the cloud, inshort you can indirectly use your Web Browser as a Compiler 🙂 . Thus this post can also be called as 5 Web

    1. Codebox.io / Codebox App

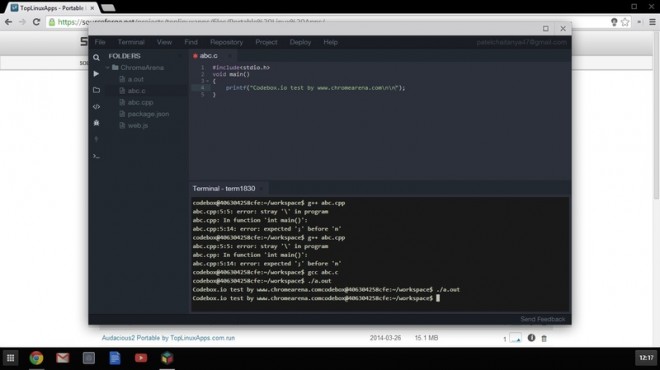
     Personally, i have ranked this app first in my Article because i simply loved it. that’s it! the codebox for chrome app is short and simple without fuss . all we have to do is register an account at codebox.io and we will have to create a virtual vm/workspace and yo! we are ready to Program . Codebox Provides us with an online virtual based VM , an IDE based on ACE, and an all powerful terminal to work upon! which comes preinstalled with gcc,g++,java,python.ruby,no need of installation and configuration!  that’s what generally a programmer demands for!! thus programming on codebox for me was fun, and as all my data is secured and synced on codebox cloud, i felt pretty good and clear while programming hence comes the first ranking. You can download the Codebox.io app from the Chrome Store access the website.

    Click here to download Codebox.io App from the Chrome Store.
    Click here to visit Codebox.io Site.

    2.Nitrous.io / Nitrous.io App

    Nitrous.io is another cloud vm provider that too works on Google Chrome OS / Website Browser. it has all the features of Codebox like pre-installed vm with gcc,g++,java,python etc with Full Terminal access and an ACE based online IDE. it practically doesn’t lose anywhere as compared to Codebox.io and has a good speed too. hence i will highly recommend both this cloud based services for your use 🙂 and i personally found them to be the best after testing 🙂
    also both of them boast of a Native App for Google Chrome OS/Browser in addition to online website access which is a plus-plus and the IDE provided by them can be used when offline too 🙂

    Click here to download Nitrous.io app from Chrome Store
    Click here to go to Nitrous.io Online Web browser Access

    3.Cloud9 IDE | c9.io

    Cloud9 is yet another cloud based development environment, its basically an online IDE with inbuilt support for c/c++/ruby/perl/python/java and php development environments. It provides features such as package and app management and deploying,syntax highlighting,etc..
    It consists of an online terminal as well as output console window which we can use to run our program. Our tests showed the c9.io service a bit lagged as compared to codebox and nitrous hence this ranks third on this list.

    Click here to Download the Web App for Cloud9 / c9.io from Google Chrome Appstore
    Click here to visit c9.io

    4. Codenvy.com

     Codenvy.com is another Cloud based IDE which is quite robust and Powerful.
    It supports various Languages such as HTML,CSS,Groovy,Java, JavaScript,Ruby,PHP,Python.. Unfortunately, it doesn’t support C/C++ 🙁 It supports the Android ,NodeJS,Spring,Ruby on rails framework though.. It has inbuilt PaaS deployment which itself is a very striking and killer feature , and supports provides such as appfog,GoogleAppEngine,AWS etc.
    Although Codenvy doesn’t has its own native Google Chrome app, it does has its web app URL which can be used in any web Browser.

    Click here to get Codenvy App from Chromestore
    Click here to visit Codenvy.com

    5.Koding.com Terminal | Devtools Terminal for Chrome

    Koding is probably using the best and unique concept amongst all these sites, instead of providing all packages inbuilt, a user can add a plugin to his own VM or account through the plugins directory.
    thus saving the site’s time and resources., although the basic components such as Java,C,C++[gcc,g++] are provided inbuilt..
    Koding is really a good site,with unique features and a powerful and speedy Terminal which i liked 🙂
    but it can work on the IDE/part which lags a bit to rank up even  higher, but i personally checked all the 5 sites mentioned in this article are good and you can use anyone you like 🙂 . Koding too provides a WebApp and not a native dektop app like codenvy. Koding is based on Linux OS and provides you complete root access 🙂

    Click here to Download the Devtools Terminal app by Koding for Google Chrome
    Click here to go to Koding.com

    I hope, this article might have solved your problem and still if it didn’t do comment i’ll try to help as much as i can, you can comment if you know any other such good site/trick 🙂
    lastly , do share and like this article if you liked it 🙂

  • Sqlpusw.exe on Oracle 10g XE-Oracle 11g-Oracle 11g Express Edition ,sqlplusw.exe download and installation | running steps

    Sqlpusw.exe on Oracle 10g XE-Oracle 11g-Oracle 11g Express Edition ,sqlplusw.exe download and installation | running steps

    Hey Guys, recently i had to do some dbms part on sql and i had oracle 10g XE installed on my machine, but the college machines had oracle 10g enterprise edition installed. oracle doesn’t provide sqlplusw.exe with Xpress editions of 10g,11g neither does it provide one with oracle 11g enterprise edition. it was necessary for me to run sqlplusw on my machine because –

    • It provided me a clean and graphical user interface for using sql on oracle dbms.
    • it helps in using the “ed” command used for buffer memory or using text editor to send the sql querries.
    • it enabled me to use template queries using “&parameters” so as i could re-execute them using the forward slash “/” keystroke ..
    • Works on all versions of Windows tested on Windows XP,Windows 7, Windows 8 And Windows .1 both 32 bit and 64 bit variants.
    • and many more… 🙂

    So, basically what i did was i copied my college installations sqlplusw.exe into my machine with oracle 10g XE and it started working perfectly 🙂  hence i thaught of sharing the sqlplusw.exe file here so as the file isn’t easily available on the internet and getting oracle enterprise 10g edition is a tough task :(..

    You can Download the individual sqlplusw.exe file from here . Click here to download sqlplusw.exe


    Also,while searching i found that many users wanted to run sqlplusw.exe in oracle 11g too.. so although it doesn’t work directly as in case of oracle 10g XE, you can follow these steps to run sqlplusw.exe on oracle 11g enterprise and oracle 11g XE editions.

    • Copy the sqlplusw.exe file which you are downloading from this post on your machine.
    • Create a copy of oraclient11.dll and rename it to oraclient10.dll  from your oracle installation, you can search for oraclient11.dll in your oracle setup directory where oracle db is installed.

    You can Download the individual sqlplusw.exe file from here . Click here to download sqlplusw.exe

    here’s the working screenshot of Oracle sqlplusw.exe ..