Blog

  • How to Enable/ Activate Whatsapp Voice Call feature Officially On Android

    How to Enable/ Activate Whatsapp Voice Call feature Officially On Android

    Not many users are not aware of the fact that whatsapp has been acquired by facebook founder Mark Zuckerburg, for a certain amount of billion dollars. He is a generous man enough to give out the Whatsapp Voice Call Feature absolutely for free of charge but the investors of whatsapp do not share the same vision as Mark Zuckerburg.

    Innovative visionary man like founder of facebook was preparing to give out the users the next big thing, Recently whatsapp has launched their web version of W

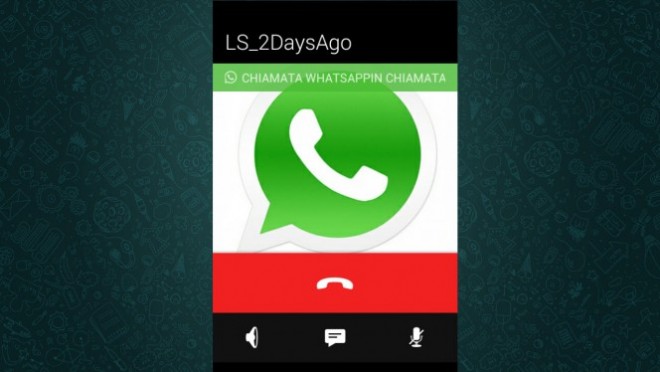
    WhatsApp calling

    hatsapp , where you can use it on your PC directly. Which is why techapple is ready to take on Whatsapp Voice Call Feature. Lets get started without any further due.

    I have tested and found three methods to enable Whatsapp Voice Call Feature on your android device, Each method have its own difficulty and i have divided it into steps.

    Method One :

    • The minimum requirement is to have  v2.11.561 or higher version WhatsApp call feature can only be activated by downloading it from official website, If you’re considering to update it from Google play, I’m sorry, i’m afraid it wont resolve the issue. You can download the official whatsapp from here.
    • After the download finishes install it right after that on you android device, then Re-write th existing file, If any issues occurred during installation, I would recommend you to enable ” UNKNOWN SOURCE” in the settings.
    • If you have any other device, where whatsapp is already being installed try to make a call to your android device to test the feature.
    • Thats it, You will find it working.

    Method TWO :

    • Here comes the difficult part of of the method, This is a little difficult but if you have a bit experience or if you follow the given steps, i can assure you will make WhatsApp call feature work on your device.
    • To begin your android device must be rooted.
    • So lets begin, After rooting your device, Download the latest version of whatsapp directly from the official website itself, Make sure you do not update it from google play store.
    • Go to the given website and download the given emulator, then Install and Open Terminal Emulator for Android.
    • After the emulator opened, write the given code and run it ,su -c am start -n com.whatsapp/com.whatsapp.HomeActivity .
    • Thats it , the next thing you’ll find is Whatsapp Voice Call Feature added to your android device.

    Final Words :

    As of now , whatsapp voice calling feature is not available for IOS and Windows phones. However i will be soon updating with latest methods to make it work on IOS and Windows. One of these days i will sure to upload videos on how to make whatsapp voice call feature work on Android,IOS and Windows. To get such updates like us on social media.
  • 3 Official sites to watch IPL-8 IPL 2015 Live Streaming legally on PC, Android Mobile and iPhone

    Hello everyone the CWC 2015 has already started the Cricket festival in the nation and its now time for IPL , without which the Indian summer / cricket festival is incomplete. But not all of us have TV sets hence use internet streams to watch the IPL. Most of us go to illegal streams which are a threat to not only our PC/mobiles but also to the main event. So here are 3 awesome ways to watch IPL-8 legally – 3 Official Live IPL 2015 Streaming sites which we can use to watch our favorite event —

    Note- The official Youtube Live streaming channel for IPL 2015 is not yet announced, so we haven’t added it yet

    Site # 1 – HotStar.com (App / PC / Mobile) – India Only!

    HotStar

    HotStar has really steamed up the Online Streaming market, and no surprises – Its even providing official Free IPL 2015 live streaming on its website – http://www.hotstar.com as well as the HotStar app for Android as well as iPhones. The Stream quality is crystal clear, and overall its a great experience using the HotStar services.

    Click here to go to HotStar IPL 8 / IPL 2015 Live Streaming.
    Click here to download HotStar Live IPL streaming app for Android.
    Click here to download HotStar Live IPL 2015 streaming app for iPhone / iPad (iOS).

    Site # 2 – CricketGateway.com ( For Rest of World – Not available for USA,UK,India and Europe)

    CricketGateway has a really high quality and ad-free stream

    HotStar and StarSports Streams are available only for Indian users/PRO users. The Other official IPL 2015 online broadcast provider is CricketGateway.com . The Streaming service provided is really good, and Indian users or users from other countries where Cricketgateway isn’t supported can use the VPNs described in the article linked -> (Click here to browse VPNs) , and can enjoy the high-quality, adfree , no delay live streaming of IPL matches on CricketGateway .

    Click here to View live IPL Streaming on CricketGateway.com

    Site # 3. StarSports.com Live Streaming

    IPL 2015 on Star Sports/ Hotstar

    This Official and Legal stream is very widely popular in India , due to of its aggressive marketing by StarSports and free nature .One of the Most striking feature of this stream is Timeline feature of this stream which provides rollback to the entire match in a media player like interface, thus you can even rollback and watch the match moments incase if you missed them 🙂 but however,unlike GoCricket the Official StarSports.com Stream is restricted to specific countries on the Globe ,as well as i found it to be less user friendly as compared to the GoCricket IPL Stream, hence given the second spot.
    Overall the Streaming Quality is really good and recommended –

    Click here to go to watch live Streaming of IPL 2015 on StarSports.com
    Click here to download IPL 2015 Live Streaming app – StarSports for Android.
    Click here to download IPL 8 Live Streaming app for iOS.

    Site # 4. IPLT20.Com – Live Stream

    IPLT20.com Live Moments

    This Stream cannot be described as complete Match Stream, but it provides official streaming of in-match live videos such as wickets,boundaries etc. The Videos provided though may not be realtime, but they are uploaded in real-quick time..
    A recommended site if no other options are available / interested in looking only important highlights of the match!

    Click here to go to IPLT20.Com Streaming

  • Cash Boss App – Trusted app for Free Recharge by CouponDunia

    Cash Boss App – Trusted app for Free Recharge by CouponDunia

    Today there are many incentive providing apps or apps which give incentives or free recharge to users on performing tasks like downloading apps or completing listed offers. But unfortunately with the number, the number of fake apps which lure users and don’t provide promised recharge/incentives too is on the rise . So, among these incentive app platform, we have a new app – Cash Boss app which comes from a branded company and developer – CouponDunia which is a well known website providing free coupons.

    Features of CashBoss App

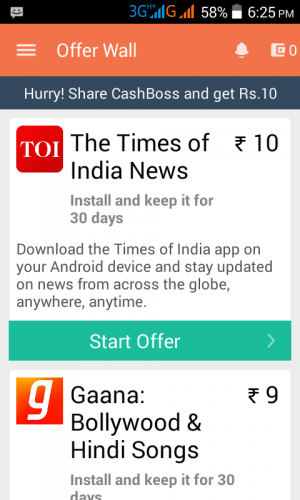
    Cash Boss App has a good payout rate
    • Cash Boss app has a really decent payout rate per downloaded app , which is on the higher scale forpayout per app or completed offers, as compared to other apps.
    • Cash Boss comes from Coupon Dunia, a well-known brand name in coupon industry, and comes from the same app developer.
    • Thus, unlike other developers, who own a solitary app and may run-away with your cash, Cash Boss simply can’t and won’t do it, as it has a brand name to protect among all its users.
    • The credits for downloading apps are credited instantly, while the payout recharges too are instantly done! which is always welcomed .
    • Besides earning by downloading apps,  Cash Boss also has a Friend referral program by which you can earn unlimited recharge by simply referring your friends!
    • As, of now Cash Boss gives you a healthy Rs.10 for each friend you referred who installs the Cash Boss App!.

    Click here to download Cash Boss app from Google Play Store.

    • Personally, I liked the user-interface and speed of the app which also makes it feature, among our collection of 10 best free recharge giving apps .

    We would also like to hear your reviews/problems faced while using Cash Boss app if any..

  • Tutorial- How to play MKV / AVI video files on iPhone & iPad [ Also : VLC for iOS / iPhone / iPad ]

    Tutorial- How to play MKV / AVI video files on iPhone & iPad [ Also : VLC for iOS / iPhone / iPad ]

    The larger and crystal clear screen displays of iPad and iPhone are highly unused when it comes to Video Playback due to the codec limitations of iOS. iOS can only play .mp4,.m4v and .mov files by default, and other formats like avi, mkv, flv etc are not supported by it. But not anymore, you can now play .mkv , .avi , .flv , 3gp , .olv ,.webm and literally any file format by the following three apps – Tutorial to play Mkv and Avi video files on iPhone / iPad –

    Pre-requisite –

    • As, we are playing the mkv , avi files on iPhone / iPad 2 ,3 without converting, hence we need to transfer the files directly to the media players which can play them, and not through iTunes, as iTunes will result in conversion of Video Format.
    • So, in addition to any of the following media players we need the computer or mobile browser to be connected on the same WiFi network (router).
    • The file needs to be transferred by the sender device(movie/video [pc/android/iphone]) to the receiver/playing device ([iphone/ipad]) over wifi by the media player interface (steps mentioned in next section).

    Method or App # 1 – Infuse 3 Media Player for iOS (iPhone / iPad) 

    infuse 3 media player
      • Infuse 3 media player tops our list for Media players for iPhone / iPad or iPod touch which can play mkv / avi / flv etc files due to many reasons, such as –
      • It has very smooth and fluid User Interface.
      • Supports external Sub-titles too!
      • Fully supports DTS, and dts-HD audio.
      • All the 3 Media players discussed in the article require both the devices on the same WiFi ,out of which only Infuse managed to give the Sharing URL if the WiFi network was created using Portable Hotspot on the same iPhone / iPad device!.
    • Steps to play avi / mkv / 3gp or flv files on iPhone / iPad by Infuse 3 –
    • Now, after downloading and installing the Infuse media player , Open it, and tap on the +”  sign on the top-right hand side (which stands for upload).
    • Now, select the transfer method “via browser”.  You will be shown an image as in the alongside figure. Now, enter this URL in either your PC browser, or mobile browser depending upon the other device which is sending videos/movies. Now select the videos, which you want to send and those will be transferred to the Infuse 3 app on your iPhone/iPad.
    • Once, you get the Video or movie in the Infuse  3 app’s library , click on it to start playing! and yo! you can now enjoy your favorite high quality other format videos right on your iPhone / iPad in Fullscreen! .
    • Click here to download Infuse 3 from Apple iTunes App Store. (iPhone / iPad / iPod touch)


    Method or App # 2 – VLC Media Player by VideoLAN (VLC for iOS / iPhone /iPad) 

    VLC for iOS iPhone/iPad
    • You will never come across a person using PC who doesn’t know about VLC, such is the popularity of VLC media player by VideoLAN , though popularity isn’t enough to get you ahead in this race, as VLC for iOS, is a bit slower as compared to its other competitors for video playback at the time of writing this article, hopefully, this can turn anytime!.
    • The procedure to play other video files like mkv, avi on iOS using VLC for iOS on your iPhone / iPad 2 too is pretty same, going to menu – > sharing via WiFi and starting the Video Server .
    • Now, entering the URL in sender web browser, and uploading the video to the receiver’s device. (Explained easily in the next figure).

      Video sharing using WiFI for VLC for iOS and other media players
    • The Received Video will  be available in VLC media library and you can click on it to start the Playback.
    • Besides this, you can also Open Network Streams, or videos / movies uploaded to your Dropbox , Google drive accounts, to start the playback directly.
    • Also, there are additional settings, you can always tweak when using VLC such as playback speed, subtitle synchronisation so that it becomes a pleasing experience.
    • Click here to download VLC Player for iOS iPhone/ iPad / iPod from Apple iTunes App Store.


    Method or App # 3 – PlayerXtreme HD

    Extreme Player for iOS – iPhone
    • Just like Infuse 3 , Extreme Player for iPhone iOS too requires your videos to be downloaded by the WiFi in your device.
    • You can also view movies/videos from your Online cloud storage sites such as Google Drive or Dropbox by extreme Player.
    • To turn on WiFi sharing for extreme player , first connect both of your devices on the same WiFi network
    • In receiver (iOS) device (Go to Menu (Swipe from Left) -> WiFi -> Enable .
    • Now enter the “Web”  URL from receiver device.. in sender device’s web browser and select the files or videos you want to view.
    • Once the file’s are transferred, click on the file in receiver Extreme Player library to start the Playback!
    • All major Video as well as Audio formats are supported!
    • Click here to download PlayerXtreme HDfor iOS (iPhone / iPad) from Apple iTunes App Store.


    I hope, this tutorial will solve all your worries regarding video playback on your iOS devices, still if there are any feel free to comment 🙂 . Happy Watching!

  • Method to transfer data/music from iPhone to Windows Phone or Transfer Photos from iPhone to Lumia [Windows Phone]

    Method to transfer data/music from iPhone to Windows Phone or Transfer Photos from iPhone to Lumia [Windows Phone]

    iOS devices earlier used to be isolated from other devices like Windows Phone , as iPhones couldn’t send to or receive files from Lumia devices. Not anymore though, you can now use ShareIt iOS – Windows Phone app to send/receive or to transfer data/music from Windows Phone to iPhone or how to transfer  data/files send photos from iPhone to Windows Phones by using the following tutorial –

    Tutorial to share files between iPhone/iPad and Windows Phones [Lumia]

    Prerequisites – 

    ShareIt appp for Windows Phone


    • ShareIt app must be installed on both the devices .
    • Both the devices must be connected to the same WiFi . You can connect both the devices to same WiFi router or create a hotspot on one of the devices and connect the other device to the created hotspot.

    Tutorial –

    • First of all download the ShareIt app from the links given below –Click here to download ShareIt app from Windows Phone Store.
      Click here to download ShareIt app for iOS from Apple iTunes Store.
    • Now , before opening the ShareIt app get both the devices connected to the Same WiFi network , (Note : If you’re creating hotspot then no need to worry as the data transfer between devices won’t consume any network data, its just for creating hotspot as iPhone and Windows Phone do not allow to create WiFi hotspot without connecting data)
    • Once both the devices are connected on the same WiFi network , then Open ShareIt on both the Phones , Now on the Receiver phone (Child) tap on “Receive”.

      SHareIt Receiver Radar
    • On the Sender or Parent Phone tap on “Send” and select the data/photos/music you want to send.
    • Now, a network Radar will be shown as shown in below figure , now just tap on the “receiver device icon” with the receiver device name.
    • That’s it ! Your files , photos and music will be transferred from Windows Phone to iPhone or from iPhone to Windows Phone, depending upon the Senders/Receivers you selected!

    I hope the tutorial was easy, if you face any problems/encounter any issues feel free to comment.

  • How to- Transfer files from Linux to iPhone / iPad by Feem over WiFi

    How to- Transfer files from Linux to iPhone / iPad by Feem over WiFi

    Transfering Files / Music from Linux distributions (Ubuntu / Linux Mint /Fedora) to iPhone/iPad or any other iOS devices isn’t an easy task at all , atleast for beginners . Also , as iTunes isn’t available for Linux OS the options are very limited too.. , here we present you one of the most easiest method , to transfer files between Linux and iPhone or any iOS device. I used this method to transfer files from Linux to iPhone .

    Prerequisites –

    Tutorial to transfer files from Linux to iPhone over WiFi by using Feem – 

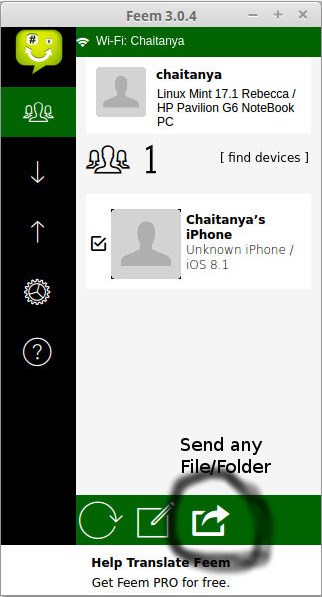
    Feem running on Linux Mint 17.1 – iPhone 6
    • First of all download and install Feem app on both devices, by downloading from above mentioned links.
    • Now, connect both the devices to a common/same WiFi network either to a single router or by creating Hotspot on a single device.
    • Open, Feem app on both the devices, now they’ll automatically scan for devices on the same WiFi network which have Feem Running.
    • Now, as shown in alongside figure you will see your device in the list of devices, checkmark the device you want to send the file, and click on the send option (highlighted by spraypaint color in the same figure).
    • Now select the files/folder you want to transfer / send from Linux to iPhone ,and click on OK.
    • That’s it your files will be transferred in a Flash! , with speed and also without using any data connection / NO Internet connection required! .
    • If you are not able to find your devices, click on the [find devices] option to scan for devices again.

    Feem solved much of my prolems, while using Linux. If you encounter any problems or face any issues feel free to comment 🙂 , also we will be glad if you can suggest an app like Feem :).


  • Get instant Free recharge by Joy App | Earn Rs.10 per Refer!

    Get instant Free recharge by Joy App | Earn Rs.10 per Refer!

    We have a yet another new entry in the free recharge apps giving arena – Joy Free recharge app by Affle! and its really good! . You can earn upto Rs.30 Instant free Recharge in just 30 minutes or even less than that like we did! . Procedure to earn free recharges from Joy app is as follows –

    Features of Joy App

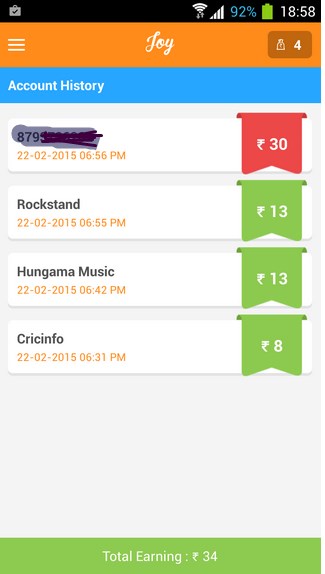
    Joy app for free recharge!
    • First of all download and install Joy app from Google Playstore by Clicking here.
    • Now, after installing the app register your number by verifying the OTP Password.
    • You’ll find some listed offers , in the offers section . One thing I loved about the app that it really provides high payout for downloading apps/ or completing offers as compared to other free recharge apps (You can check the alongside screenshot)
    • As, Joy app doesn’t automatically verify numbers, you can thus earn unlimited recharge by Joy app if you have multiple SIM cards by installing any of these android emulators and getting Joy app in it.
    • Besides giving recharges for completing offers Joy app also gives money for referring your friends and the payout too is good there too! – Rs.10 per friend referred who installs Joy app.
    • Besides, using the money earned for free Mobile recharge you can also use the money for getting Free DTH recharges!
    • Also, the recharge request is processed in real-time and recharge too are sent instantly!
    • Click here to download Joy App from Google Play Store.
  • 3 Free apps to transfer files Android to android/PC over WiFi | Share files from android by WiFi without Internet or Bluetooth!

    3 Free apps to transfer files Android to android/PC over WiFi | Share files from android by WiFi without Internet or Bluetooth!

    Gone are the days when we required Bluetooth for transferring files between phones. Not only Bluetooth file transfer is slow, but its range too is very limited! . And when we can transfer files upto 40MB in just split seconds using WiFi then why waste minutes for the same task ? . Below are the 3 Best Free WiFi transfer apps for Android which can be used to transfer files from Android to either Android or PC over WiFi without requiring Bluetooth or an Internet connection.

    App # 1 – ShareIt by Lenovo

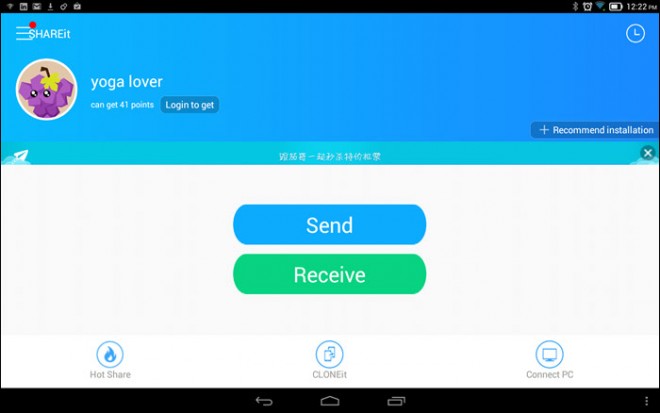
    ShareIt Main Screen

    ShareIt is one of the many WiFi transfer apps present for Android, and tops the list because of its Simple and easy to use – User Interface. Using ShareIt for file transfer from android to android over WiFi is quite easy . Here’s a brief tutorial on how to use ShareIt for transfer –

    • First of all Download , Install and Open the ShareIt App on both the deivces . (This is the only step for which we will be requiring Internet)
    • Now, tap “Receive” on the receiver device (Make sure your Sender as well as Receiver are on the same WiFi connection) . You will see a current network name on the receiver device , Connect to the same mentioned WiFi network on your Sender device.
    • After you are connected to the receiver’s WiFi network on Sender phone, open ShareIt app and tap on “Send”.
    • Now select the files/photos/music/apps you want to send , and tap on “Next”.
    • Now, click on the receiver’s device icon in the network radar .
    • Confirm the transfer on receiver and yo! your transfer will be done within seconds!.
    • Click here to download ShareIt for Android.
    • Click here to download ShareIt for PC

    App # 2 – Xender for Android

    Xender for Android

    Xender is another app for WiFi file transfer , but its even one step ahead than ShareIt. Unlike ShareIt which is for transferring files between one sender/one receiver , Xender enables even group transfer! i.e one sender and multiple receivers . Using Xender too doesn’t require an Internet connection and is quite easy as follows –

    • Download, Install and open the Xender app .
    • After opening Xender app, tap on connect phone .
    • Now we need to create a group in order to facilitate data transfer among the group devices, so on the sender device tap on “create group“. Once your group is created shift to the other receivers.
    • Now on the receiving devices, go to “connect phone” and select “Join Group” option , now select the group created by the sender device.
    • That’s it once you have joined the group simply select apps,photos,music on any of the devices and tap on “Share” it will be shared to all devices in the group!
    • Click here to download Xender app for Android


    App # 3 – Zapya

    Zapya for Android


    There were some contenders like feem, which were vying for the third spot, but it eventually went to Zapya, because of quality as well as due to the fact that feem had annoying ads. Using Zapya too is very easy, as follows –

    • Download Install, and open Zapya app on the Sender device.
    • Browse through the Photos, Music and Files . Simply tap on the file you want to send and click on the “Send” icon highlighted in the alongside figure.
    • Now Zapya app on sender will create a  WiFi group for sending the data.
    • On the receiver device’s WiFi , join the WiFi network created by Sender device , and open Zapya app .
    • Yo! Accept the incoming files and data on your devices with blazing speeds!
    • Click here to download Zapya ap from Google Play Store

    Final Verdict : Though at first these apps may sound a bit too complex and technical to use, but believe me the data transfer speeds is really very fast, and also they don’t require any internet connectivity (You can disable Cellular or Mobile data before using these apps) . Also, once you get used to the User Interface, you’ll love this new concept . Also, if you face or encounter any problems while using any of these apps feel free to comment.

  • Top 5 Best NES Emulators for Android | Play NES games like Mario,Contra on your Android phone!

    Top 5 Best NES Emulators for Android | Play NES games like Mario,Contra on your Android phone!

    Android operating system integrated devices are amongst the most popular throughout the world. Thus, the number of Android users too is very large but not many android users know, that we can experience our old console games like Super Mario Bros, Donkey Kong, Contra , right on our Android devices. This can be done using NES Emulators , and not only can we play the old Nintendo games, but they also take lesser memory and space on our phones giving us even more advantage! . So, let’s have a look onto the current Top 5 Free Nes Emulators for Android devices.

    Note : Only a single emulator  – 64 in 1 comes with in-built NES games (ROMs) , so if you need to play any game of your choice , you may need to download ROM for playing on the emulator . NES games roms are freely available on the following  link – RomHustler.Net and you can search on google too for Nintendo or NES roms.

    Emulator # 1 – Nostalgia.NES (NES Emulator)

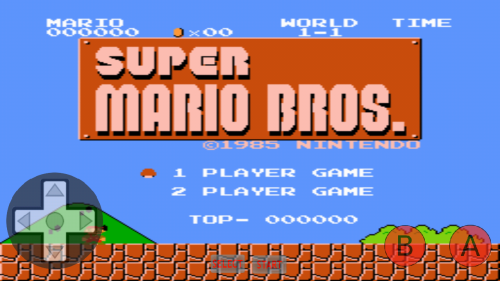
    Nostalgia.Nes running Super Mario Brosulator)
    • Nostalgia.nes is perhaps the best Free Nes emulator for Android.
    • I’ve personally tested the emulator and it simply works superfine! without any hiccups whatsoever!
    • You can save your game progress in inbuilt memory slots, and also rewind it.
    • Nostalgia also allows you to configure graphics and fps options as advanced settings.
    • It also supports zapper gun input support for playing games such as Duckhunt. External hardware Keyboard input too is supported!
    • Click here to Download Nostalgia.NES emulator from Google Play


    Emulator # 2 – SuperRetro16 Lite (SNES)

    Super Retro 16 Android
    • Super Retro 16 is one of the fastest Android emulators around for Android.
    • It auto-detects the game ROM’s and also supports cheat codes!
    • It also boasts of turbo mode for fast forwarding games and even supports multi-player gaming using WiFi or Bluetooth!
    • Click here to download SuperRetro16 Lite from Google Play


    Emulator # 3 – NES Emulator – 64 In 1

    Tanks Game present in 61- in -1 NES emulation
    • If you are a classic player,then Nes emulator is loaded with 60 of the best classic games,such as Super Mario, Battle City,Bomber Man, Tanks 1990 etc.
    • It even has the option of Bluetooth/wifi access for multiplayer purposes.
    • Just download and install and you’ll be playing your favourite Old Games in No time!
    • Click here to Download 64 in 1 PGame NES Emulator


    Emulator # 4 – NES.emu Free

    NES.emu Free Nes Emulator
    • NES.emu is another free NES emulator which automatically saves your Game progress.
    • Thus, even if your phone accidentally switches off or the app is closed , the Game progress is totally saved!
    • NES.emu also supports external controllers throug bluetooth,WiFi and even Xbox controller worked!
    • It doesn’t come with NES ROM’s though you may need to download them for using in the emulator.
    • Click here to download NES.emu Free from Google Play


    Emulator # 5 – John NES Lite Emulator

    John NES lite for Android
    • Though developed by an indie-developer but this emulator doesn’t lack anywhere in functionality!
    • It uses Original NES Engine, is able to scan your SD card for ROM’s.
    • Also , it supports any controller used with it e.g Wiimote/Gametel/MOGA/Bluetooth controllers are supported.
    • Click here to download John NES Lite emulator from Google Play


    Final Word

    These were some of the best NES emulators available on PlayStore, and within no time you will be able to play your old console favourites on your portable android devices. If you face any problems while using/configuring these emulators feel free to comment.  Let’s live our Childhood again! 🙂