Category: Windows Tricks and Tutorials

  • Download TianTian App Player (64-bit Android Emulator) English for Windows 10 / 7 / 8.1 [PC & Laptop]

    Download TianTian App Player (64-bit Android Emulator) English for Windows 10 / 7 / 8.1 [PC & Laptop]

    There are many good Android Emulators for PC / Windows 10  , but none of them have support for 64-bit apps and games. As these emulators lack 64-bit architecture and many new games such as Fortnite for PC have requirements of 64-bit, we need to look for 64-bit android emulators. In this article we will cover TianTian App Player which is essentially a 64-bit Android Emulator for PC / Windows and perhaps has the potential to play Fortnite android game on Computer.

    Method to Download & Install TianTian Android Emulator for Windows 10 / 7 / 8.1 (PC & Laptop) –

    • In order to install TianTian, we need to download the TianTian emulator . Though, the main website of TianTian is present in English, but the emulator isn’t fully in English language.
      Click here to Download TianTian Android Emulator for Windows 10 / 7 / 8.1 (32-bit & 64-bit)
    • While the full offline installer is downloaded, let’s look at some of the salient features of TianTian Android Emulator –
      • Marsmallow 6.0 Android Operating System
      • Fake GPS Location support for GPS based Games
      • One click Shake and Gyroscope simulation
      • 64-bit Architecture to Install & Play 64-bit games
      • One click root enable/disable
      • Inbuilt screenshot and screen recording support
    • Once you have downloaded , the setup file double-click on it to launch the Installer. It will open a dialog box as shown below. Here, click the button highlighted in the screenshot below , to start the installation –
      Click on button to start Installation
      Click on button to start Installation

      Now, the installation will start. Please wait until the progress bar reaches to 100% as shown in the image below –

      Wait until the Progress Bar Reaches 100%
      Wait until the Progress Bar Reaches 100%
    • Once the progress bar reaches 100% , it will take a while to finalize the installation. Once, the installation finishes it will show a successful confirmation screen. Here, click the blue button to launch the TianTian App player –
      Installation Successful Screen
      Installation Successful Screen

      Now, once you click the blue button – It will launch the TianTian Emulator!

    • It may show a loading screen on the first boot, and tutorial screen as shown below. Here, please click on the next button situated at the bottom right corner –
      Click on bottom right corner screen for next step / homescreen
      Click on bottom right corner screen for next step / homescreen

      After all the steps are done. you will be greeted with the Homescreen as below –

      Click on APK icon to Load any app / game APK to TianTian
      Click on APK icon to Load any app / game APK to TianTian


    • Congratulations!! You have now successfully installed and configured TianTian App Player on your Windows 10 / 7 / 8.1 PC or Laptop. On the homescreen shown above, simply click on the APK icon to install and load your favorite game or apk on the TianTian Emulator.


  • [Working] Nintendo 3DS Emulator for PC – Windows 10 / 7 / 8.1 [Download for 32-bit & 64-bit]

    [Working] Nintendo 3DS Emulator for PC – Windows 10 / 7 / 8.1 [Download for 32-bit & 64-bit]

    Nintendo 3DS gaming console is one of the most widely used gaming consoles even today. Its because of its ability to show stereroscopic 3D effects without 3D glasses, as well as Augmented Reality features. Also, since all 3DS can play Nintendo 2DS games, its one of the most sought after consoles.

    But, you can even play Nintendo 3DS games on your PC  – using Nintendo 3DS Emulator for PC. Though, there are many sites and emulators which claim they can run 3DS games, the reality is different. They simply put the users through survey sites. In this article we will cover how you can play Nintendo 3DS games on your Pc or laptop using Citra 3DS emulator for Windows 10 / 7 / 8.1

    Working Nintendo 3DS Emulator for PC / Laptop – 

    • As we covered earlier, there are only a few working Nintendo 3DS emulators for Windows . Those are –
      • Citra 3DS Emulator (Used in this article, latest + constantly updated)
      • TronDS (works only with Homebrew Games & Roms)
      • 3DMoo
      • XDS
    • Thus, Citra-emu is currently the most recommended and trusted 3DS emulator to play 3DS games on Windows systems. You can download the latest Citra Emulator installer from the link below –
      Click here to Download Citra 3DS emulator for Windows 10 / 7 / 8.1 (32-bit & 64-bit)

    How to Play Nintendo 3DS Games on Windows 10 / 7 / 8.1 (PC & Laptop) –

    • Considering, you have downloaded the Citra-emu (3DS emulator), we will cover how you can install Citra and play 3DS games on it.
    • Note – You will also require 3DS or 2DS game ROM you intend to play. We will recommend decrypted ROMs as those work best with the emulator. A simple google search for “citra 3ds roms” will give a lot of ROMs and games which can be played.
    • So, considering you already have downloaded citra-emu for 3DS & have game downloaded. We will proceed to the next step. Incase, if you haven’t downloaded Citra here’s the link again –
      Click here to Download Citra-emu for 3DS (Windows 10 / 7 / 8.1)
    • Once, you have downloaded the Citra emulator setup, double click to open the Citra installer. You will be presented a screen as shown below –
      Citra 3DS emulator for PC Setup

      Here click on the “Next” button to proceed to the next step.  In the next step it will ask you for the installation directory as shown in the below screenshot –

      Citra 3DS Emulator for Windows 10 / 7 / 8.1 Installation Screen
      Citra 3DS Emulator for Windows 10 / 7 / 8.1 Installation Screen

      Here click on “Next” to proceed to the next step.

      On the next step, it will prompt you to select one or more out of Citra Canary, and Citra Nightly versions.

    • Here, on this step select “Citra Nightly” version. The canary version is comparatively ustable and untested as compared to Nightly build. Hence, please select the “Citra Nightly” version as shown in the image below –
      Citra 3DS Emulator Build Select Option
      Citra 3DS Emulator Build Select Option

      Now, after clicking on “Next” , you will be redirected to the License agreement screen. Here select the “I agree and accept the license” option  and click on Next.

    • That’s it . Citra-emu will now start installing on your system. Please wait a while until all the files are downloaded & installed by the emulator as shown below –
      Citra 3D emulator Installation on Windows
      Citra 3D emulator Installation on Windows

      Once, the installation is complete. We will now, look at loading and playing the game on Citra-emu


    Loading & Playing the game on Citra-emu –

    • Once, the installation is complete, launch the Citra emu from the Start menu icon. It will now display a screen as shown below –

      Citra emu first load screen on Windows 10
      Citra emu first load screen on Windows 10
    • Here go to “File – > Load file” option , and now select the game/ROM file of the nintendo 3ds game you want to play.
      Select the 3ds 3dsx or any nintendo 3ds game rom file to load in Emulator
      Select the 3ds 3dsx or any nintendo 3ds game rom file to load in Emulator

      Once, you have selected the .3ds or .3ds game ROM file. Click on “Open”.

    • That’s it! . Citra emulator will now playing the Nintendo 3DS game right on your PC / Computer as shown below .
      Live Nintendo 3DS Game in Action on Citra - 3DS Emulator !
      Live Nintendo 3DS Game in Action on Citra – 3DS Emulator !

      Congratulations! you have successfully installed and launched Nintendo 3DS games on your computer and saved the cost of a console. All the functionalities such as sound, split screen , tags are implemented inside the Citra emulator.

    Commentary

    • Incase, if you face any queries or have any doubts feel free to let us know in the comments section below.


  • Top 5 Free Scanner Software for Windows 10 /  7 / 8.1 | Scanning Apps for PC / Desktop & Laptop

    Top 5 Free Scanner Software for Windows 10 / 7 / 8.1 | Scanning Apps for PC / Desktop & Laptop

    Using a Scanner on Windows gives many advantages, such as the pixels and color quality are maintained, as well as legal documents require them to be scanned by a proper hardware scanner. Though, most of the scanners come with their inbuilt scanner programs, but they like a lot in areas such as OCR (Optical Character Recognition) and wide compatibility with drivers. Thus, in this article we present you the Top 5 Best Scanning apps for Windows which you can use with your scanner to scan documents, photos etc.

    Top 5 Free Scanner Apps & Softwares for Windows 10 / 7 / 8.1 [32-bit & 64-bit] support –

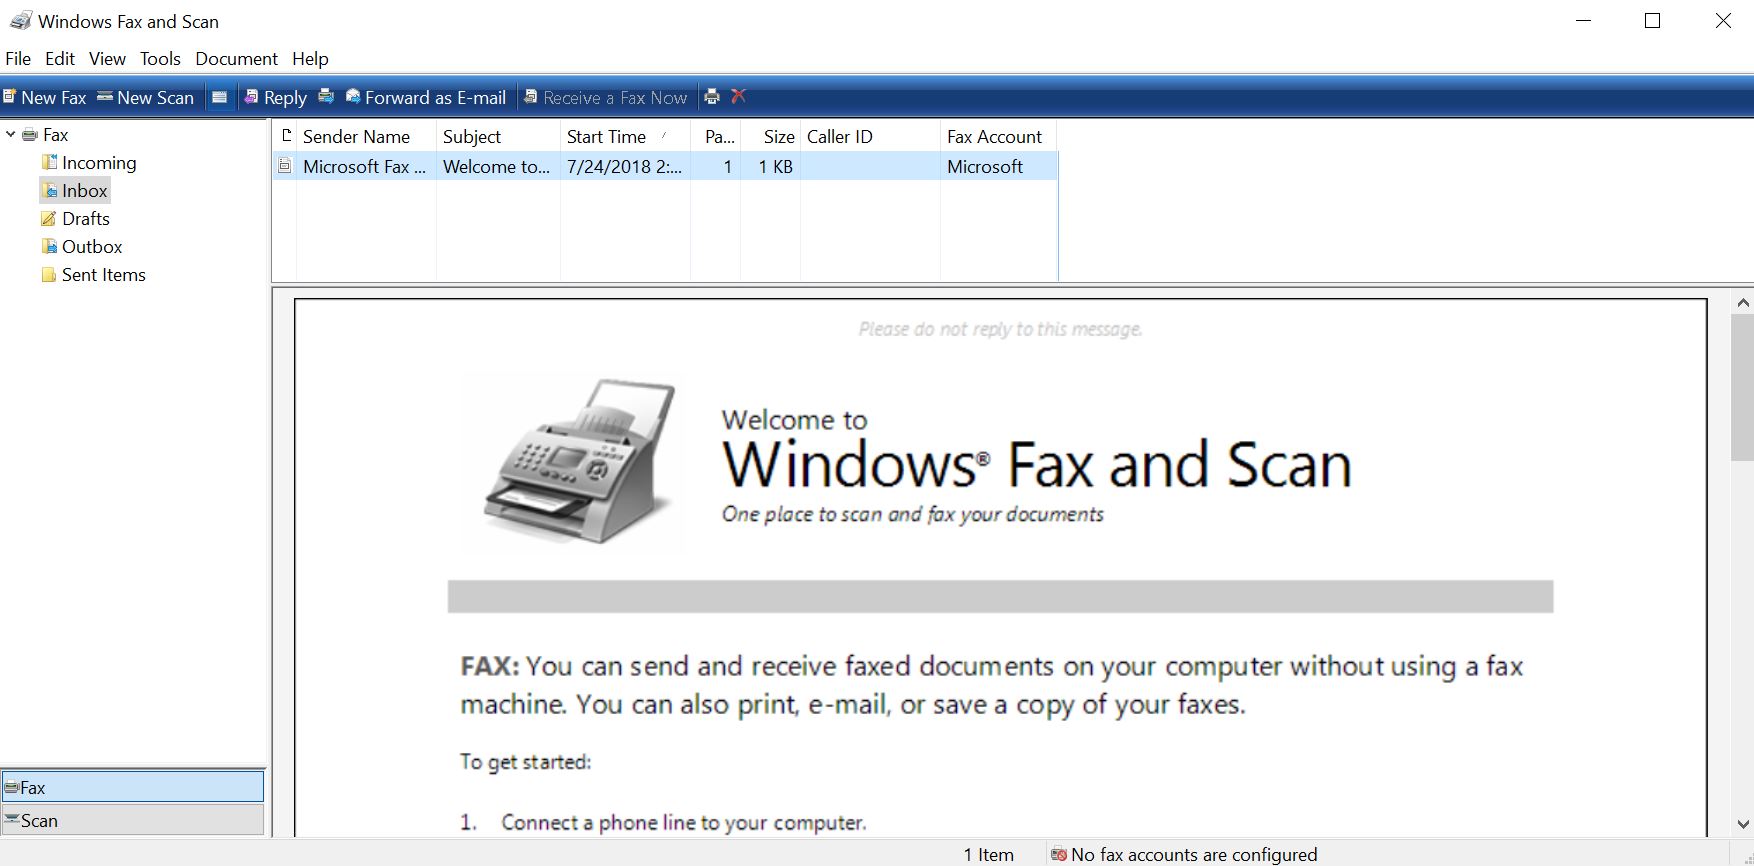
    Scanner Software # 1 – Windows Fax & Scan –

    Windows Fax & Scan Utitlity
    Windows Fax & Scan Utitlity

    Theres no need to use any external app, when the Operating System itself has one .

    And, if you’re looking for a scanner software – Windows Fax & Scan is the one which solves the issue.

    The Windows fax and scan lets you use any TWAIN compatible or any scanner that’s attached to your computer to scan and save documents.

    It has options to scan documents and export them to jpeg(jpg), png, gif, pdf, docx too.

    To launch fax and scan, Open Run (Windows key + R) an type “wfs” or you can go to Control Panel – search fax and scan and launch from there.


    Scanner Software # 2 – NAPS2

    NAPS2 Scanner app for Windows PC & laptop
    NAPS2 Scanner app for Windows PC & laptop

    NAPS stands for Not Another PDF Scanner, which is quite a unique and apt name considering the large number of options this scanning app provides.

    Some of the salient features of NAPS 2 include –

    • Ability to Scan and save into PDF files, Images.
    • Inbuilt OCR Support (Optical Character Recognition) which is very useful for scanning hand-written documents.
    • Ability to set profiling.

    Click here to Download NAPS 2 Scanner app for Windows 10 / 7 / 8.1


    Scanner Software # 3 – PaperScan Free Edition

    PaperScan Free Edition for Windows
    PaperScan Free Edition for Windows

    PaperScan is a great app to scan high quality, detailed resolution documents especially photos on your Windows system.

    Besides, being able to perform the normal functions of a scanning app, Paperscan allows you to –

    • Change or define the colorscale or colortype to be used to scan the photos. e.g RGB, CMY, etc
    • TWAIN & WIA Scanning & Import
    • Duplex Scanning Support
    • Post Image Processing
    • PDF Encryption
    • Flatbed & Document feeder scanners supported!

    Click here to Download PaperScan Free Edition Scanner Software for Windows 10 / 7 / 8.1

    Scanner Software # 4 – Windows Scan

    Windows Scan App Store Scanner app
    Windows Scan App Store Scanner app

    Windows Scan is a modern style Windows Store based app, which lets you scan and save your files into multiple formats.

    As, its a modern style app, the app doesn’t work on Windows 7. But, it works faster and flawlessly on Windows 8, Windows 10 and later versions.

    The app is also optimised for touch-based inputs, hence its really a handy app to use scanner from touch enabled portable tablet PCs.

    Click here to Download and Install Windows Scan app from Windows Store

    Scanner Software # 5 – Easy Scan

    If the previous app wasn’t for Windows 7 and earlier users, this app is exclusively for them. Easy Scan is a handy and light-weight app to use practically any scanner on your Windows 7 and earlier devices. If you’re a Windows 8 or Windows 10 user , you can still use the app by running it in compatibility mode for windows 7. But however, there is absolutely no reason to do so, unless you are using a system with minimum hardware system configuration.

    Click here to Download Easy Scan Scanning app for PC & Laptop

    Thus, these are currently the 3 Best Scanner apps for your Windows 10 , 7 or 8.1 devices. Incase of any queries or issues, feel free to let us know in the comments section below.

  • How to Install Memu Nougat Emulator for PC / Laptop [Windows 10/7/8.1]

    How to Install Memu Nougat Emulator for PC / Laptop [Windows 10/7/8.1]

    Memu is soon becoming the go-to emulator for Playing Android games on PC / laptops with Windows systems. Now, since most of the games for Android are now being made for newer Android versions such as Nougat , Oreo, P . The emulators too need to be updated for feature rich gameplay. Hence, in this tutorial we will cover How you can install Memu 5 Nougat emulator for PC / laptop so that you can play latest games such as PUBG, fortnite on PC with the latest features and without lags .

    Tutorial to Install Memu Nougat Emulator for PC & Laptop – Windows 10 / 7 / 8.1 –

    Pre-Requisites –

    • A PC or a laptop with a decent configuration. Recommended Min.2 GB RAM.
    • Memu 5 Emulator installed on your system, incase if not installed the latest Nougat image (ova) won’t work.
    • You can download the Memu 5 emulator (base for Nougat) from link below if it isn’t installed on your system –
      Click here to Download Memu 5 (Base emulator) to load Nougat (.ova) file

    Tutorial – 

    • In this part, we will apply the Memu Nougat image (.ova) on to our Memu emulator base. Thus, we need to get the latest Nougat system file from the link below –
      Click here to Download Nougat emulator for PC / Windows 10/7/8.1 (32-bit & 64-bit)
      Note — Simply downloading the base file won’t work, Memu 5 must be installed on your system
    • Now, from the “Multi-memu” icon on your desktop, launch the Multi-memu instance as shown below –

      Launch Multi-Memu Instance
      Launch Multi-Memu Instance
    • Once you have launched the Multi-Memu , it will show configuration or start options as shown in the following screenshot –
      Click on the Import button in Memu Instance Manager
      Click on the Import button in Memu Instance Manager

      Here, tap on the “Import” button as shown above image. It will now ask you to select the (.ova) file to load.

    • Now, in the file browser window which opens, browse to the Nougat image we downloaded in this tutorial, select it and click on the “Open” button as shown in the screenshot below –

      Select the Memu Nougat OVA image and click on Open
      Select the Memu Nougat OVA image and click on Open
    • The Instance manager will load the image in its window and list it below the old memu image as shown below.

      Please wait until the image load reaches 100
      Please wait until the image load reaches 100
    • Once, it reaches 100% , simply start the new Memu image by clicking on the “Start”
      button besides it, in the instance manager –

      Click on the Start button to load Memu Nougat Version
      Click on the Start button to load Memu Nougat Version
    • That’s it, Memu will now start with the new android Nougat 7 image. It will now be loaded and you’ll be shown a Memu tutorial screen –

      Memu Tutorial Key Mapping Screen
      Memu Tutorial Key Mapping Screen
    • Simply, close the tutorial screen. Thus, you can now enjoy your Memu Nougat emulator for PC / Laptop.
      Memu Nougat Version loaded successfully!
      Memu Nougat Version loaded successfully!

      That’s it! You have now successfully installed and loaded Memu Nougat emulator on your Windows 10/7/8.1 (32-bit or 64-bit)

    • Incase, if you face any problems or have any queries feel free to let us know in the comments section below.


  • How to Download Movies from Netflix With Subtitles – FlixGrab A Useful Tool For All

    How to Download Movies from Netflix With Subtitles – FlixGrab A Useful Tool For All

    Everybody knows Netflix – an American digital entertainment company. Or to put it simply, it is the best streaming service there is to watch any international, national or regional movie, documentary, TV show or serial. It was founded by Reed Hastings and Marc Randolph in 1997 and now has more than a whopping 125 million subscribers worldwide. And to imagine they started off by distributing DVD by mail to its clientele (they still provide this service). If you are a Netflix user, you will agree that it offers top-quality full HD streaming and almost every show or movie imaginable is available in its enormous database, especially if you are accessing their database from a US VPN server from popular providers like ExpressVPN. The best thing is that everything is available on Netflix within 24 hours of its release or TV premier. If you aren’t a Netflix user yet, these reasons should be enough to convince you to subscribe to one of their affordable plans today!

    image1

    There is one small hitch you might be facing when binge watching on Netflix: the enormous amount of data (megabytes) that you need to watch show after show. Or, if you live in an area with bad network or limited connectivity, each show might take hours to stream. If you’re somebody who likes to watch everything over and over, then you will definitely hate your internet service provider. But fear not, there is a fix! All you do is download everything you want to watch beforehand and you are all set to go. But how do you download? If only Netflix had such a feature. And this is where FlixGrab comes in. Below is an overview of the app and its features:

    FlixGrab

    FlixGrab by FreeGrabApp is a powerful and unique application that will download entire Netflix music tracks, movies, documentaries, TV shows and serials for you at super high speeds while still retaining their quality. If your phone or laptop only supports certain formats, FlixGrab has the option to select what output video format you would like, too! Once you download it to your device, you can watch any Netflix video offline without disrupting Netflix limitations or spending extra internet data. The app, currently only available to Windows users, is only 40 MB and allows you to download unlimited videos in batches, automatically or manually in a variety of resolutions (up to full HD 720p or 1080p) in a variety of formats.

    image2

    Features of FlixGrab

    While basically FlixGrab is a Netflix video downloader, it is actually more than just that. It comes packed with a bunch of features that make the downloading experience hassle-free. In more detail, its top features are:

    * User-friendly, nice and new interface and dashboard.

    * It allows you to download and maintain original video quality (even if it is HD 1080p) or if you would like to save data, you can also choose low quality (240p).

    * You can also download Dolby Digital Surround Audio 5.1 along with it for improved realism and dialogue clarity.

    * A newly added feature is it supports subtitles in TTML format. So you can even watch other language videos with this new subtitle feature.

    * It automatically selects best voice quality and language while downloading.

    * You can load lists from a file.

    * You can resume and start the download at any point and even change the priority order so what you want first gets downloaded first.

    * Best of all – you can download a bunch of videos at the same time in batches.

    * It is easy to use, only four simple steps:

    * Download and install the FlixGrab app on your laptop or PC from its official site (https://www.freegrabapp.com/flixgrab)

    image3

    * Log in to your Netflix account and copy the URL of the video you would like to download.

    image4

    * Now open up FlixGrab and paste this URL by clicking on “Paste” in the top left corner. Give it a while to fetch details and verify the URL.

    image5image6

    * That is all! Once the download button becomes available, click on it to start downloading your Netflix TV show or movie. All settings are automatically detected but you can change them by clicking on the gear icon.

    image7

    * Now you can click the play button to watch the download video.

    image8

    Remember that the download is still under Netflix copyright terms and only for personal use and it would be considered illegal to share the material to a third party.

  • Download Tencent Gaming Buddy (Android Emulator) [English] for Windows 10/7/8.1

    Download Tencent Gaming Buddy (Android Emulator) [English] for Windows 10/7/8.1

    Tencent Games is a leading company in the Mobile gaming industry. Some of its famous gaming titles include Piano King, PUBG Mobile etc. Now, since these games are extensively mobile only. There is no other way to play them on your computer or PC without an Android emulator. But not all third-party emulators support all games, and their functionalities. Thus, Tencent has launched – Tencent Gaming Buddy : An exclusive Android emulator built only for gaming. This will help Windows users to play Android games easily on their devices. Also, since the company developing the games as well as the emulator is same : Tencent. Games like PUBG Mobile will work flawlessly on them.

    Thus, in this article we will cover how to download and use the Tencent Android emulator (Gaming Buddy) in English language to play games on your PC & Computer. The emulator works fine on Windows 10, 7 and windows 8.1 (Both 32-bit and 64-bit) versions –

    Method to Download and install Tencent Emulator in English (Tencent Gaming Buddy) for Windows 10 / 7 / 8.1 –

    • First of all , you need to download the Tencent Gaming buddy Emulator (English) edition from the link given below –
      Click here to Download Tencent Android Emulator (English) for PC / Windows 10 / 7 / 8.1
    • Now, once you have downloaded the installer. Launch it by double-clicking its icon as shown –
      Tencent Gaming Buddy PUBG Edition Icon
      Tencent Gaming Buddy PUBG Edition Icon

      We have linked the PUBG edition as of now, as the core edition is still in chinese language. But you can still play any games on the PUBG Beta edition.

    • Now, once you have double-click on the icon file, it will ask you permission to install. Here click on the “Install” button as shown in the screenshot below –
      Tencent Emulator Installation Screen
      Tencent Emulator Installation Screen

      The Tencent Gaming Buddy will now start to install on your system, please wait until the progress bar reaches 100%.

    • Once the progress bar reaches 100% and the installation is completed, it will show you a launching screen as shown in the below image –
      Tencent Emulator Launch Screen
      Tencent Emulator Launch Screen

      Click on “Start” to launch the Tencent Android Emulator.

    • Congratulations! you have now installed one of the most advanced android emulator for gaming on your PC. Start playing your favourite games on your system.
    • Also, it has a lot of settings and configurations to play with, thus you can use it depending on your hardware specifications to enjoy and tune your gaming experience – Screenshot_15

    • Click here to Download Tencent Android Emulator (English) for PC / Windows 10 / 7 / 8.1

    The tencent emulator is currently in public beta and hence may encounter some bugs. If you face them any in your gameplay, please let us know in the comments section. However, PUBG Mobile works flawlessly as per our tests –

    PUBG Mobile on PC Official Tencent Emulator
    PUBG Mobile on PC Official Tencent Emulator
  • Download Momo App Player for PC / Windows 10 , 7 & 8.1 [English Version]

    Download Momo App Player for PC / Windows 10 , 7 & 8.1 [English Version]

    Momo App Player is an android emulator, which you can use to run Android apps and games on your Computer. Though there is no dearth of android emulators which we have compiled in our Android emulator collection, Momo app player is a great one for gamers . By default, its in Korean language, but in this article we will cover on How you can use and Download Momo App Player in English.

     Momo App Player Download
    Download Link Download Link
    Operating Systems : Windows 10, 7 & 8.1
    Type of Installer : Full Offline Setup
    License : Free
    Language : English

    Method to Download and Use Momo App Player for PC [ English Version ] – 32-bit & 64-bit –

    • First of all Download the Momo’s App player for PC & laptop from the link below –
      Click here to Download Momo App Player for Laptop-PC (Windows 10, 7 & 8.1)
      Note –  In the screenshots, the default language is Korean, but our installer has English too. We will cover how to easily change the language to English in Momo.
    • Now, after you have downloaded the installer, double click the installer icon to launch the Momo player installation. It will open the installation as shown in the following screenshot –
      Momo App Player for PC Download
      Tap on the Yellow button to Start Installation

      Here tap the Yellow button to start the Momo App player installation. It will now start installing Momo Simulator on your system as shown below –

      Momo App Player Installation
      Momo App Player Installation, please wait until it turns 100%

      Please wait while all the files are copied, and installation reaches 100%.

    • Now, once all the files are copied, and the indicator has reached 100%,  launch Momo app player for PC, by clicking on the yellow button highlighted as shown in the screenshot below – Screenshot_3
    • Now, it will boot Momo on your PC for the first time. It may ask you for network access permissions for internet. Please click on “allow access” to enable internet support for your Android system in Momo.
    • Congratulations! . Momo is now installed on your Windows system. In order to change language to English please perform the following steps in order –
    • Method to change default language to English – 

      • Tap on the “Settings” icon from the right hand side control strip.
      • Select the “second” option from left hand side menu tab, on the settings pop-up.
      • Select “English” from the last drop down option (Shown in the Screenshot below)
      • Click on “Yellow button” to save your default language to English –

        Method to Change Language to English in Momo App Player for PC
        Method to Change Language to English in Momo App Player for PC
    • That’s it! You can now use Playstore, install games , or drag and drop apks to start using your favorite apps and games in Momo App Player.
    • Momo app Player is based on Android Lollipop, thus it can easily run most of modern Android apps and gamesScreenshot_7
    • Click here to Download Momo App Player for Laptop-PC (Windows 10, 7 & 8.1)

    UPDATE –  In case, you are going to use Momo Player to play PUBG Mobile, we highly recommend you to use the following one-click PUBG installer of Bluestacks – Click here to Download Bluestacks PUBG 

  • Joyoshare Screen Recorder for Windows 10,8.1, 8, 7 PC And Laptop Review

    Joyoshare Screen Recorder for Windows 10,8.1, 8, 7 PC And Laptop Review

    You can find hundreds of screen recorder for windows, but only a few of them make the perfect match for your recording requirements. Every single has a different requirement like some of you need screen recorder for YouTube.

    There is numerous screen recorder for PC in the market that comes with many unique features, and they also come at a price, but do they worth their price?

    With that being said we are going to review a screen recorder, which is in the market for a long time. The Joyoshare screen recorder software, which is popular in the market for its performance and feature, but is it worth your time?

    Joyoshare Screen Recorder for Windows OS Users | Review

    Now that we have mentioned Joyoshare screen recorder which is packed with many features and it comes with several unique functions which can get the job done.

    We are going to review the Joyoshare screen recorder, and we will determine whether it adds value to the screen recorder tool list or not.

    To test the features, you have to download the trial version of the program from the official site.

    image1

    Download screen recorder for windows

    Installation of the JoyoShare screen recorder software

    If some of you are assuming that it is difficult to install the program on your PC, then let us show you how easy it is to install.

    Step 1: Run the downloaded program as administrator.

    image2

    Step 2: You have to accept the agreement and click on next.

    image3

    Step 3: You click on few more “next” button and ultimately the installation will begin.

    image4

    Step 4: Now run the program by clicking on the “Finish” button.

    image5

    As you can see that it is extremely easy to install it.

    #1 – Recording & Formats

    image6

    The first feature which we are going to test is the recording. It is more obvious that we look into the screen recorder performance and how stable screen recorder software on Windows.

    The recording features are pretty good on the Joyoshare screen recorder. You get high resolution recording on this tool.

    The first thing, which we would like to point out that it was very easy to understand user interface, so it did not take long for us to understand its functions.

    Note: If you have an active Antivirus system, then you should allow it to make changes in the “Documents folder” because it saves the file in that folder.

    You can adjust the screen size as well, but it starts with the square shaped screen. All you have to do is to click on the “Rec” button, but make sure to select VIDEO RECORDER icon before you record.

    Coming to the video formats Settings > Formats.

    image7

    Quite surprisingly the screen recorder tool comes with various formats such as MP4, M4V, MOV, 4K VIDEO, WMV, and more.

    image8

    If you pay attention to the top menu, you can also browse from devices, HD video formats, web video format, and general video formats.

    image9

    JoyoShare is perfect screen recorder for YouTube and websites because it supports the various format, so you don’t have to covert it to play on your favourite devices as well.

    #2 – Audio Quality & Audio Formats

    It also comes with an audio recorder as well; you will be able to record audio without any visual.

    However, it does not have any enhancer, so the quality of your audio will depend on the MIC you are using. If the Audio quality comes out bad, then you cannot blame this recorder.

    However, it also comes with many Audio formats, which are often neglected by the major screen recording software companies.

    image10

    You have to select audio, then open settings from the gear icon.

    image11

    It supports popular audio formats like MP3, AAC, WAV, WMA, and it supports rare formats like M4A, AC3, AIFF, M4B, and more.

    #3 – Best Recording Settings & Basic Features

    The final thing, which we consider is the ideal settings for various Windows PC and we should also look at the basic features.

    As you can look at the settings, where you can see that you get a lot of basic functions like cursor highlighting, cursor click highlighter, mute microphone audio, mute system audio, and more.

    From what we have understood that there are few basic features are missing, but the recording quality is good, and it is right for YouTubers who usually have tutorials to record.

    Coming to the settings, there isn’t much confusion in using it, which is useful for non-technical people.

    Conclusion

    We have seen many records that comes with advanced features, which is clearly missing in Joyoshare, but if your requirements are for tutorials and you don’t have deeper knowledge in operating the program, then this is for you. Let us know your thoughts in the comment section.

  • How to Play Gamepad Joystick games with Keyboard on Windows 10 / 7 [PC & laptop] | vJoy for PC / Windows 10 Configuration Tutorial

    How to Play Gamepad Joystick games with Keyboard on Windows 10 / 7 [PC & laptop] | vJoy for PC / Windows 10 Configuration Tutorial

    With new gaming hardware coming in each day, the processing capabilities of our PC’s and laptops have reached a new level. So, the gaming graphics experience has increased and this helps to play gaming console games on the Computer. Now, not all of us use Gamepad/Joystick to play games and thus we need a method to emulate joystick input via keyboard. Hence, in this tutorial we will cover How to Play Joystick  or gamepad games with keyboard on Windows 10 , 7 and 8.1 [32-bit & 64-bit]

    Tutorial to Play Joystick games with keyboard on your Computer – 

    Step . 1 – Installing the Joystick emulator Software and virtual Joystick / gamepad 

    • We will use an Open-source software named “vJoy” to map our keyboard inputs to Joystick inputs as required by the game.
    • Please download and install the vJoy app from the link given below –
      Click here to Download vJoy joystick emulator for Windows 10 / 7 / 8.1 [32-bit & 64-bit]
    • Now, we need to install the software. Please note that it might ask you for permissions to install drivers as shown in the figure below –
      Tap on
      Tap on “Install” to install virtual Joystick emulator

      here, click on the “Install” button to install the vJoy software.


    Step . 2 – Enabling the Virtual Joystick 

    • After installing the app, we need to enable the virtual joystick. To do so, launch the vjoy app from the start menu.
    • It will now be minimized by default in Windows 10, hence right click on it and select the open option as shown in the following screenshot to open the vJoy app –
      Open the vJoy App
      Open the vJoy App

      Now, after opening the vJoy app you can see all the gamepad controller or joystick controls which can be emulated by vJoy as shown in the screenshot below . Here “Check” the enabled option to start vjoy emulation.

      Check the enabled option to start virtutal Joystick
      Check the enabled option to start virtutal Joystick


    Step . 3 – Mapping Joystick Input to Keyboard Keys –

    • Now, we need to map the keyboard keys to the joystick inputs required by the game, such as analog and digital controls, x, a, b , y , o,  buttons.
    • To do so, click on the 3 dots icon “…” besides the input you want to emulate as shown below –
      Click on the ... button to assign keyboard key
      Click on the … button to assign keyboard key

      Now, it will ask you to press any key on your keyboard, here tap the button on your mouse or keyboard to assign the function

      Press any key on your keyboard or mouse to emulate the Joystick input
      Press any key on your keyboard or mouse to emulate the Joystick input

      Now once you have pressed the key it will replace the “None” with the key you pressed. Repeat this step until all the controls you want to emulate are done –

      All Joystick Controls Mapped to Keyboard Inputs
      All Joystick Controls Mapped to Keyboard Inputs

      Note – Incase, if you don’t want to waste your time manually assigning keys, you can use my above screenshot mapping “ini” file to load onto the vJoy. Simply, download the below linked “ini” file and use the “Open ini” option to use it on your PC or computer –

    • Click here to Download Pre-configured ini file for vJoy

    Step . 4 – Checking the inputs in Control Panel – Game Controllers

    • Now, once you have configured the virtual joystick . Let’s check the inputs on the control panel Gamepad controller properties.
    • Go to “Control Panel – > Set up USB Controller – > and then select vjoy input and select the “Properties” option as shown in the figure below –
      Select Properties of the vJoy device
      Select Properties of the vJoy device

      Now, simply type or press the mapped keys on keyboard and check whether the buttons are blinked in the “test” tab as shown below –

      If the keys blink the virtual emulation is working!
      If the keys blink the virtual emulation is working!

    If the buttons blink, then the keyboard to virtual joystick emulation is working.

    Congratulations! , you have now successfully emulated virtual joystick using keyboard. Thus, you can now start playing all joystick / gamepad games on your computer or laptop. Incase, if you face any queries feel free to let us know in the comments section.