Category: Programming

  • 5 Best Free Apps/Websites to create UML Diagrams Online! – HTML/Web based UML Diagram creation tools

    5 Best Free Apps/Websites to create UML Diagrams Online! – HTML/Web based UML Diagram creation tools

    UML (Uniform Modelling Language) Diagrams are a vital component of Software Engineering/Documentation. I recently came to knew about this thing,as the documentation/UML diagrams presented by me were rejected by the university as they had been hand-made through Paint/MS-Word. After searching around for much time – I came across these online UML diagram tools and created diagrams using them and my diagrams were finally approved!. So, lets check out these Free yet awesome things – 5 Best Websites/Apps to create uml diagrams online.

    App / Website #1 – Cacoo

    Cacoo User Interface

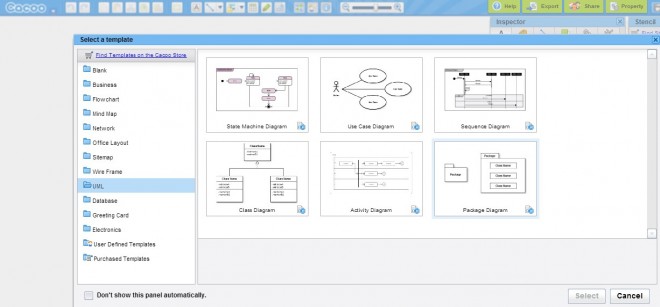
    Cacoo Diagram creator is the website/tool which i liked the most for creating UML diagrams online. Caccoo not only suports

    • UML diagrams, but it also supports
    • Network diagrams,
    • mind maps, site maps and
    • flowcharts too.
    • All UML diagram consituents such as Use Case diagrams, Sequence diagrams, Class diagrams, Activity diagrams, Package diagrams etc are supported by cacoo.
    • You can Export your created diagrams in multiple formats! . (Check this image for export formats supported by cacoo)

    Cacoo’s free account itself got my complete project documentation work done, and cacoo supports educational purposes too! –

    Cacoo provides free Premium account features to Students and tutors/teachers! – > Click here to apply for Cacoo premium – Academic purposes only!

    Cacoo also boasts of an inbuilt store which contains pre-designed templates, icon sets which you can use in your diagrams –

    • Click here to access Cacoo Template Store. (You can use pre-designed templates to make your diagram/map creation even more easier! )
    • Click here to visit Cacoo Store.

    Click here to visit Cacoo UML Diagram creator.


    App/Website #2 – GenMyModel

    GenMyModel

    GenMyModel is yet another free and awesome tool to create flowcharts, UML diagrams online . You can directly skip the sign-up process and login with your G+ account.

    GenMyModel provides inbuilt project management even for Free Users, and it supports major UML modelling features such as

    • Class diagrams.
    • Activity diagrams.
    • Use case diagrams.
    • Object diagrams.
    • Sequence diagrams.

    Its user-interface too is very easy to use and efficient –

    GenMyModel Interface

    Click here to visit GenMyModel.com

    App/Website #3 – Draw.io

    Draw.io – Software Design Templates

    Draw.io is the tool which is perhaps quite-easy to use among all the tools/websites in this article. The only thing is that draw.io takes a time to get a little used-to.

    • There is no explicit “UML diagrams” category in draw.io .
    • UML diagram templates are present in the “Software design” templates in draw.io .
    • You can directly click on the template and start modifying itQ Thus, saving the time required t create UML diagrams
    • This tool was the most-widely used tool in my class, to create UML diagrams.

    Click here to visit Draw.io


    App/Website #4 – Grapholite.com

    Grapholite.com Interface – Most easy of them all!

    Of all the tools mentioned in this article only Grapholite loaded a proper WebApp in the browser, hence its capable of running in Offline mode too!

    But as Grapholite loads a proper Web App it takes the most time for loading amongst all the apps mentioned, thus requires a lot of patience.

    But on the features side-

    • Grapholite supports all UML diagram types – Activity, Class, Use-Case, Collaboration etc.
    • All the default notation/icons featured in UML 2.0, are present in Grapholite!.
    • The only downside is that for saving the diagram you require a Grapholite account and registering for an account too is FREE!. 

    Click here to visit Grapholite.com’s Online designer. (We gave the direct link for online designer as they provide PC software apps too!)

    App/Website #5 – Lucidchart.com

    LucidChart is a wodely-known online diagrams creation site, but only a few know that it can be used to create UML diagrams too!

    • Lucid Chart again provides all the UML diagram features.
    • It has the most largest library of symbols/icons amongst all the tools!
    • And it loaded very quickly in browser as compared to other UML diagram creation Web Apps.
    • Allows directly saving/printing of UML diagrams through the browser!.

    Click here to draw your UML diagram online using LucidChart.

    After navigating to the above page Click on “Try it Now” option to start creating your diagram!

    Bonus – Creately.com

    Creately.com – explained in brief

    Generally Bonus content arent;t that good! but here the Bonus content is perhaps even better than the original article content. Creately is the tool I loved the most, but its free version only allows 5 Public diagrams , and hence had to write it in bonus.

    Creately is very easy to use, efficient and light-yet beautiful User Interface.

    Creately is the only UML tool who provides revison history of diagrams/projects.

    So, if you require less than 5 diagrams/or if you can create multiple accounts – Creately is surely the way to go ahead!

    Click here to start Creately Diagram creator


    These, were the Best 5 Free Online UML diagram creators – Do comment your favourite one, and if you face any problems while using any of these – We will be happy to help you out 🙂

  • Whatsapple – unOfficial Whatsapp Client for PC | Use Whatsapp On PC without Android emulators!

    Whatsapple – unOfficial Whatsapp Client for PC | Use Whatsapp On PC without Android emulators!

    Whatsapp is the most leading app being downloaded on the Apple iStore,Google Play Store and Nokia store , thus its one of the most leading medium of communication and instant messaging. but many people still cannot afford those smartphones or may want to use whatsapp on PC /Windows/Linux/Mac , though there are workarounds such as installing an android emulator (e.x bluestacks,andy) and using whatsapp on it, its quite RAM and resource heavy plus it doesn’t satisfy the ease of PC . hence to overcome all these limitations, We came up with an unOfficial Whatsapp client – Whatsapple!

    Without wasting time, let me pen down the features of Whatsapple

    • Whatsapple is an easy to install and configure unofficial client of whatsapp for PC built on the base of Pidgin Messenger.
    • It provides all the features of Whatsapp,such as file upload/download, Individual Chat as well as GroupChat etc on PC.
    • Now, you can view the shared videos and photos/images directly on your PC.as well as Upload Videos/Photos(Images) to the chats directly from the PC!
    • All the Default Smileys of Official Whatsapp App are Supported, thus you can view the Smileys send as well as send emoticons to the Chat 🙂 .
    • As Whatsapple doesn’t require any Android emulator its blazing fast! and light on your PC 🙂 . Thus, any PC right from Windows XP to the latest Windows 8.1 all can run it :).
    • You can add unlimited contacts, no need of any complex emulator things like bluestacks,andy etc.
    • No limit of bandwidth or memory as is the case with phones, the big memory pool of PC practically ensures you will never run out of Memory for storing messages,logs ,photos,videos anything.
    • The Whatsapple client will never hang in most cases irrespective of how many messages arrive simultaneously.
    • And ya, the Installation size is just 10Mb which is even lesser than the apk file size of Whatsapp 😛

    Prerequisites –

    • Windows OS ,  and .Net Framework 4.0 Installed ( Required for Generation of Password Only )

    Procedure to Install and Use Whatsapple

    First of all Download and Install the Whatsapple Client – Whatsapp for PC from here . , Also get your Whatsapp Password from this link – https://davidgf.net/whatsapp/pwd.html

    We will need an Whatsapp Username and Password , as we all know whatsapp username is the mobile number with the Country Code ,

    • e.x for an mobile number in India , the Username will be  “91XXXXXXXXXX” where XXXXXXXXXX is the 10 digit mobile number .
    • For the password, we will need to Generate it one time as Whatsapp requires one time Registration , So first for Generating the Whatsapp Password Open the “Whatsapp Password Generator” from the Desktop.
    • Now, Enter the Mobile Number and click on “Request Code” button as shown in figure below.
    • Now ,you will receive a confirmation code on the mobile number , Now enter the verification Code received in the text box next to Code and click on “Confirm Code” Button.
    • Now a dialog box appears showing you the Whatsapp Password and asking you to write it down,but don’t write it down, click on ‘OK’ and Now copy the Generated Password from the “Step 3″ Area of the Whatsapp Password Generator /WARP .
    • Now, once you have obtained the Username and Password Launch the main “Whatsapple for PC”  Main exe from the desktop .
    • Here, click on Add and add the Username and Password we generated in the Window, you can tick the “remember password” option while adding so as to there’s no need of generating password everytime . Check the figure shown above for details.
    • Now click on add,after the account is added click on close! and voila! you will be logged in and can use Whatsapp on PC for Chatting.

    Method to Chat with a New Number or add Contact Name –

    • Click on Buddies then select New Instant Message , Now Give your friend’s phone number with country code and  Click on the OK button. And you can Chat with him/her.

    Use WhatsApp on PC laptop free

    To add a Contact Name to a Number

    • Click on Buddies ,Navigate to Add Buddy , Here please enter your friend’s phone number with country code and provide other details > Click on Add button.

    Use WhatsApp on PC laptop free

    To Upload or send a File/Photo/Image/Video : Use the send File / Upload Media option present in the “File” Menu of the Live Chat Window , of the Contact or Group to which you want to send the File .

    Thus, this is i guess by far the most easy,and efficient and Simple way to use Whatsapp on PC .

    Click here to download the Whatsapple Client for PC for Windows (XP/7/8/8.1) all supported.

    If you have any doubts/queries/suggestions feel free to comment 🙂

    Solution to the Server closed the connection Problem – Solved by our reader  Steve

    Login to Whatsapple – Whatsapp for PC than go to > Accounts>Manage Accounts > Click on your accoun.Than Modify Account>than go to Advance tab change on the server instead of “Android-2.11.151-443″ enter “Android-2.31.151-443″   that’s it.

    Update :  People who still cannot get Whatsapp working can try running it on Firefox by referring this article .

  • Easily Create Setup / Installer for any Software using InstallSimple Setup creator

    Easily Create Setup / Installer for any Software using InstallSimple Setup creator

    Hey Guys, we at TechApple, post alot of setups and installers for many softwares, ever wondered how to create setup/installer for any software.? in this post, i am going to cover the same Let’s Check out how to easily create a setup / installer for any software.[Windows] and that too without any scripting involved thus no programming language involved! 🙂

    Prerequisites

    • A simple tool / Portable Software – InstallSimple  , which we are going to use for Creating Packaged Software.
    • The Folder/Software of which you want to create Software.
    • This Tutorial 🙂 that’s it 🙂
    • You can download InstallSimple from here . Click here to download InstallSimple Setup Creator [Just 355kB].

    Method to Create/Setup using InstallSimple

    • Open InstallSimple.exe from the Downloaded zip file, you will be greeted with an image as follows , Click on Next to Continue.
    • After Click on Next you will be shown a window asking you to Enter the Window Title and Project Name, Fill in The Window Title – The text you want to show on title bar and the Name of the Software in Project Name and click on Next.
    • Now a dialog box will appear with a Message Text Label and a textbox , in the textbox enter the Custom Text/Greeting text which you want to show when setup starts and click on next.
    • Now a dialog Box will appear with label License Agreement, enter the type of license agreement for your software and click on next.
    • Now in this window “Graphics” we can specify the splash screen we want to display before the execution of the setup as well as the header image of the setup window, Click the Folder icon as shown in below figure to specify the path., CLick on Next
    • Now a window “Files to Distribute” / asking you to select source folder of your setup and setup path for your setup will appear, in source folder option click on “Browse” and navigate to the software folder of which installation you want to create and click “ok” , its generally the folder which contains your .exe setup file,and .dll files etc.., select the root folder which contains your software for source folder, and for setup path, enter the folder and location where you want to install your software ex “Program Files”,”Local user drive” etc as shown in the figure –>
    • Now a Window Labelled “Shortcuts” will appear, here select the Files of which you want to create shortcuts and the locations where you can place the shortcut can be selected on the right side pane such as “Start Menu”,”Desktop” etc, after you click on the file of which you want to create shortcut , a yellow/green color mark will appear as shown in the next figure –> After selecting the files for shortcut click on Next., select the Windows Versions and .NET framework check if you want to add., click on next..
    • Now a tab “Windows Registry”  will appear , Enter here any regitry changes you want to make e.x adding PATH variable with setup etc and click on next,
    • Now a Window  labelled ‘Build Setup” will appear! , Simply Click on Build and your Setup will be Ready!! 
    • The Build WIndow looks like this — >
    •  Congratulations!! you have successfully created your Setup! The Setup.exe can be used on Any Machine..

    The Setup itself creates the program registry,control panel and uninstaller inbuilt, so no headaches / extra efforts whatsoever!

    I hope you liked this tutorial, Do share it with your friends, and if you have any doubts/queries feel free to comment! Thanks!

  • Turbo Pascal 7 for Windows 7 /8.1 & Windows 10 [32bit-64bit] FullScreen Single Installer

    Turbo Pascal 7 for Windows 7 /8.1 & Windows 10 [32bit-64bit] FullScreen Single Installer

    Hello Friends, recently while searching on the internet i came across this thing called as Borland Turbo Pascal 7.0 which is an IDE cum Compiler for running and compiling Pascal language .pas files, Although pascal is taken to be one of the dead programming languages, Pascal is still used widely for education purposes due to its similarities with C and easier to understand programming structures and flows.  but as Turbo Pascal 7 doesn’t work on 64bit OS such as Windows 7/8/8.1 and it works small window in 32bit OS , i have created this installer — >  Turbo Pascal 7 for Windows 7|8|8.1 by TechApple.Net

    Salient Features of this installer are

    • Easy to use , and user friendly Borland Turbo Pascal 7 is used and that too runs fullscreen!
    • World’s most preferred Simple Pascal Language Compiler..that too on a single click installer !!
    • Works On All Versions of Windows, Windows 98,Windows 2000,Windows XP,Windows 7 [64 bit as well as 32 bit] As Well as Windows 8 and 8.1 too [both 64bit and 32 bit]
    • No need of installing DoSBoX and configuring or mounting anything! Everything right from DosBox to running turbo Pascal is built-in and the installer processes it automatically!
    • Thus , everything is automatic bundled in a single installer!
    • Useful For Students as well as Teachers and Professionals.
    • You can save the program directly within it,and open it next time From the Software itself for editing/Use.
    • You can Change the Units and TPDU Directories from the IDE if you want to..
    • Easy and Efficient Pascal Programming.

    Download it here –

    Click here to Dowload Turbo Pascal 7 for Windows 7 | Windows 8 |8.1  32bit and 64bit by Techapple.Net

    Mirror Link #1  Click here to Dowload Turbo Pascal 7 for Windows 7 | Windows 8 | 8.1 32bit and 64bit by Techapple.Net

    UPDATE – Now you can even enjoy your favorite Turbo Pascal compiler on your Android phones , check out the below tutorial – Click here to Install & run Turbo Pascal for Android phone or tablet

    Installation Guide :

    Its rather pretty simple,Just Open the installer and simply keep on clicking Next, Just Don’t change the default installation directory “c:\TP7\”

    Screenshots — >

    Successful Installation and Full Screen Working of Turbo Pascal 7 –>


    Successul Compilation of Sample HelloWorld Pascal Program in Turbo Pascal 7 –>


    .


    Support :

    • Double click the Turbo Pascal icon on the Desktop for Execution
    • If it Doesn’t run Full-screen simply give the command “Alt + Enter” To Open in Full-screen
  • Sqlpusw.exe on Oracle 10g XE-Oracle 11g-Oracle 11g Express Edition ,sqlplusw.exe download and installation | running steps

    Sqlpusw.exe on Oracle 10g XE-Oracle 11g-Oracle 11g Express Edition ,sqlplusw.exe download and installation | running steps

    Hey Guys, recently i had to do some dbms part on sql and i had oracle 10g XE installed on my machine, but the college machines had oracle 10g enterprise edition installed. oracle doesn’t provide sqlplusw.exe with Xpress editions of 10g,11g neither does it provide one with oracle 11g enterprise edition. it was necessary for me to run sqlplusw on my machine because –

    • It provided me a clean and graphical user interface for using sql on oracle dbms.
    • it helps in using the “ed” command used for buffer memory or using text editor to send the sql querries.
    • it enabled me to use template queries using “&parameters” so as i could re-execute them using the forward slash “/” keystroke ..
    • Works on all versions of Windows tested on Windows XP,Windows 7, Windows 8 And Windows .1 both 32 bit and 64 bit variants.
    • and many more… 🙂

    So, basically what i did was i copied my college installations sqlplusw.exe into my machine with oracle 10g XE and it started working perfectly 🙂  hence i thaught of sharing the sqlplusw.exe file here so as the file isn’t easily available on the internet and getting oracle enterprise 10g edition is a tough task :(..

    You can Download the individual sqlplusw.exe file from here . Click here to download sqlplusw.exe


    Also,while searching i found that many users wanted to run sqlplusw.exe in oracle 11g too.. so although it doesn’t work directly as in case of oracle 10g XE, you can follow these steps to run sqlplusw.exe on oracle 11g enterprise and oracle 11g XE editions.

    • Copy the sqlplusw.exe file which you are downloading from this post on your machine.
    • Create a copy of oraclient11.dll and rename it to oraclient10.dll  from your oracle installation, you can search for oraclient11.dll in your oracle setup directory where oracle db is installed.

    You can Download the individual sqlplusw.exe file from here . Click here to download sqlplusw.exe

    here’s the working screenshot of Oracle sqlplusw.exe ..

  • TiCTeX – All in One LaTeX Bundle-installer with inbuilt Compiler and IDE/Editor | Easy install LateX on Windows/Linux/Ubuntu

    TiCTeX – All in One LaTeX Bundle-installer with inbuilt Compiler and IDE/Editor | Easy install LateX on Windows/Linux/Ubuntu

    Hello Guys, recently i had to submit a seminar report in my college, but it was to be written in LaTeX.. Now what is LaTeX ?

    • LaTeX is a document preparation system and document markup language,used for preparing standard documents,which are preformatted , in an efficient and easy manner..

    So Now for installing LateX on windows it was quite difficult as it required a separate latex compiler,a separate IDE etc,and also the information regarding which compiler to be used,which IDE/editor should be used etc,is very scarce..so using the Best LaTeX Compiler available : MiKTeX,   Best LaTeX editor : TeXMaker  and various other simple tools required for Preparing LateX, we created TiCTeX : An All in One LaTeX Bundle cum installer with inbuilt MiKTeX,TeXMaker IDE/Editor TiCTeX has the following Components inbuilt in it

    • MiKTeX : The Best Compiler with all the Libraries required for LateX Document creation.
    • TeXMaker : The Best,efficient and most widely used editor cum compiler for writing and creation of Latex documents,with inbuilt PDF Viewer.
    • Asymptote : used for photoand diagram related functions and viewing.
    • GhostScript : An Engine for rendering and viewing .ps and .pdf File formats.
    • GSViewer : A viewer for viewing the .ps and .pdf File Types.

    All this have been bundled up in a Single Package cum Bundle :-> TiCTeX so you can just install TiCTeX and start using and creating documents in LaTeX as simple as 1…2…3.. Everything is included in TiCTeX..so it will run on basically any Windows Operating Systems : Windows 98 / XP / as well as Windows 7 / 8 /8.1 that too on both the 32 bit and 64 bit Variants.. as well as on Linux Too!! UPDATE!! Fixed a Critical Bug in the Previous Version which was causing Compilation errors 🙁 Please Download the New Version From Below Links.. Also Launched a Linux Version of TiCTeX LateX at this LInk CLick here to go on Linux Version – TopLinuxApps.com   Click here to Download TiCTeX For Windows ..one click one bundle solution for LaTeX on Windows OSs

    Click here to Download TiCTeX for Windows

    Mirror Link # 1 Click here to Download TicTeX from Mirror 1. Mirror Link # 2 Click here to Download TicTeX from Mirror 2. More Mirror Links will be added soon..! if you have any doubts/queries/request do comment..and if you liked this post Do share 🙂 Thanks!

  • Installing and running Microsoft Visual Basic 6.0 On Windows 7/Windows 8 [x32-x64 : 32bit-64bit] with all features!

    Installing and running Microsoft Visual Basic 6.0 On Windows 7/Windows 8 [x32-x64 : 32bit-64bit] with all features!

    Hello Friends,recently i had to do some college Project in Microsoft Visual basic 6.0 + Oracle SQL Connectivity, but the hell Microsoft Visual Studio wasn’t simply installing on my Lappy, so after a few hit and misses at the goal, i have found the Foolproof Method for installing Microsoft Visual Studio on your Windows 7 and Windows 8,Windows 8.1 installations that too on both the 32 bit and x64:64-bit releases of Windows 7 and Windows 8 There are a lot many reasons which are responsible for installation of Visual Studio/visual basic 6, prominent of which are

    • Compatibility Issues
    • Microsoft Java Machine issues
    • Installer/Setup run-time issues
    • and some problems which ares pecific like unable to use visual Basic components such as ADODC,OLEDB,ADODB,RDO Connection problems etc

    Lets solve each of them one by one in Detail.. 🙂 but before that , there are some prerequisites which we must implement so as our setup will be much smoother… Prerequisites

    • During visual studio 6 Installation, it may ask you to install Microsoft Virtual Machine For Java,etc..and it may restart your computer continuously..so as a fix, simply Download the Following Ms-Java.bat file,and simply right click on it,and “Run it as administrator”,it will ask you for a confirmation,please select yes,it will open a box,and close that’s it!
    • Now,The visual Basic 6 Setup wont prompt you to install virtual machine for Java,thus removing a hurdle!
    • Click here to Download Ms-Java.bat  file for bypassing Microsoft Virtual Machine For Java..
    • Now lets look at the Setup! The link to torrent file of vb6 setup if you do not have it is here..>

    The First Problem which we encounter during setup is compatibility issues

    • This Problem can be solved by running the setup.exe of the visual basic 6 setup,by right click and selecting “Run as Administrator”  option..
    • it may show a dialog box like this — > fortunately,this Problem will Be Solved by simply clicking the Run Program and the Setup Started.. 🙂 , as you are running the setup,its possible that setup might become too very slow on places such as “searching for installed components” , “finishing installation” etc..dont worry its,totally normal! just wait for the setup interface to come up 🙂
    • Now you may simply Enter Serial Number,and Follow Next,Next Method of Installation and install Microsoft Visual Basic/Miscroft Visual Studio on your computer..BUT!!  if you follow this Method your Installation of Visual Studio will work,but on 64-bit (x-64) OS,Windows 7 64 bit,Windows  64-bit when you try to use Visual Basic components such as Data Grid,Active X controls,ADODC Connections,ADODB Connections for VB-SQL Connectivity it will give error..
    • The errors vary to a wide range depending upon the components selected and will be something as — ” failure to initialize provider,error 420,error 482,as well as the printer errors ” blah blah blah
    • So, in order to Make Visual Basic- Oracle SQL Connectivity we must do the following steps..
    • Please Make sure while installation/setup your Visual Basic installation directory is” C:\Program Files\Microsoft Visual Studio 6\common\” or  “C:\Program Files\Microsoft Visual Studio 6\” and NOT“C:\Program Fiiles (x86)\Microsoft Visual Studio 6\common\” or “C:\Program Files (x86)\Microsoft Visual Studio 6\common\”

    Steps for Visual Basic – Oracle SQL Connectivity on Visual Basic 6 For 64 bit OS..!

    • The (x86) suffix at the end of Program files is responsible for the failure of various visual basic components such as data grid,ADODB,ADODC,OLEDB,Active-X,RDO,Printer Connectivity,windows common controls etc..

    you can check this figure–> if it isn’t you may change the installation directory by clicking “Change Folder” or “Change Directory” as shown in the figure –>

    • Thus,we can make it Function Properly By Installing it to Default Program Files Folder..And All the Data bound controls,standard controls,added components to VB such as ADODB,OLEDB,Data bound grid control etc properly,Windows Controls,MAPI Controls Properly..!

    Also if you already installed Visual Basic To Program Files (x86) just dont uninstall Please.. simply Perform the Following steps

    • Copy the Complete Microsoft Visual Studio Directory From c:\Program Files (x86)\ to C:\Program Files\
    • Now Go,to the Folder C:\Program Files\VB98\ andtry to run VB6.exe , it will give error as “Failed to register extension and blah blah”
    • Now simply run the “VB6.exe” from the non-x86 folder in “Run as Administrator” mode,. and voila!! Visual Basic Will Start Working,and all the Default Connectivity,Data Components which can be added from tools->components menu such as ADODB etc will start working!! thus , the VB-SQL Connectivity too will start Working!! 😉

    If you Encounter Sluggishness in IDE do the Following Steps 🙂

    1. Using Windows Explorer, browse the location where you installed VB6. By default, the path is:
      C:\Program Files (x86)\Microsoft Visual Studio\VB98
    2. Right click the VB6.exe program file, and select properties from the context menu.
    3. Click on compatibility tab
    4. Check the following check boxes: For Windows 7:
      • Run this program in compatibility mode for Windows XP (Service Pack 2)
      • Disable Visual Themes
      • Disable Desktop Composition
      • Disable display scaling on high DPI settings

      For Windows 8

      • Run this program in compatibility mode for Windows XP (Service Pack 2)
      • Reduced Color Mode (16-Bit Color)
      • Disable display scaling on high DPI settings
    5. After saving open up VB6, It should work normally

    That’s all! a quite-lengthy tutorial indeed! 🙂 But Totally Working! if any Doubts/Problems Just drop a Comment below 🙂 thanks!

  • ByteBX Zip And Download Trick! Enable Premium Zip And Download Feature your free account using this Script 🙂

    Hello All,

    You Must be Knowing ByteBX, The Online torrent leech/torrent caching,remote url uploading service ,
    its a great service to say,but its free account has some limitations 🙁
    like 100kB/s speed limit,which literally sucks ! 🙁

    so to overcome the same,we launched Bytzo Browser Series,and they are working too perfectly!
    but unfortunately some jealous and unehtical guys copied our script and were re-distributing the same,with changed browser name/rebranding it under their name..that really hurted me 🙁
    so am deciding to publicly share the script atleast the users will come to know what kind of hack it is,as well as they could enjoy it on their own personal browsers google chrome,firefox,internet explorer etc, and you can use them on any os e.g linux,windows,mac unlike bytzo browser which was windows specific…

    Prerequisites :

    Now After you have installed these extensions simply Navigate to this URL of Userscripts.org

    And install the extension ByteBX Premium userscript,

    Now after you install the userscript,simply Go to www.bytebx.com and  log-on to your free account,The Zip and Download Option will be enabled for full-speed on your browser! 😀

    Enjoy This ByteBX Zip and Download trick and do share our page with your friends too,so that they too will Enjoy ! 🙂

  • GNU Octaves Installer For Windows XP/7 And Windows 8/8.1 [32bit and 64bit variants]

    Hello Guys, You must be knowing about GNU Octaves – A High Level Programming Language Generally Used For Numerical Computations, it Provides a Command Line Interface so that Mathematical Functions can easily be performed..
    But Alas! The Recent packages of the gnu octaves are only built For Linux,and when it comes to windows, there isn’t an installer Package available,but Rejoice.! We have Created one Gnu Octaves installer for Windows with Inbuilt MinGW libraries required for the Soft : GNU Octaves For Windows

    You Can Download it Here —>

    Click here to Download GNU Octaves For Windows Installer

    Alternative Link : To Download GNU Octaves For Windows Installer

    Features Of The Installer : – >

    • Works On All Versions of Windows – Windows XP,Windows 7,and Windows 8 too [Both 32 bit and 64 bit Variants of all Windows 🙂 ]
    • All the MinGW Libraries inbuilt 🙂 so no need of any installation of Linux/cygwin to run GNU OCtaves
    • In-built GNU Plotter, so that the you can plot automatically Graphs,Waves And Functions
    • in-built Notepad++ as Default Text Editor 🙂
    • Notepad++ provides a colorful GUI so that you can type the program with ease,and silly mistakes are reduced…
    • Provides Command-Line Interface same as Terminal in Linux 😀


    Instructions For Use :

    •  If You are using Windows 7 or Windows 8  Please run the Executable as “Run as Administrator” by right -clicking on the program icon and selecting run as admininstrator option in the menu,it is shown in below figure
    • Now you will see a black terminal as shown in the below figure,now for writing the program in gnu octaves, simply type as”edit <your program name.m>”
      without quotese.g if i want to create a program ucos.mi will write –> edit ucos.m
    • Now Hit Enter, you’ll see Notepad++ firing Up on your screen, Now You can type your program between the function name and enfunction tag, it as shown below — >

      Writing A Program in GNU Octaves
    • The GNU Plotter too works so that you can view,Graphs And Waveforms of Functions.. it is as shown below –>

      GNU Plotter inbuilt
    • Hope,This Works For you too, It worked For Me on Windows 8!!
      Do Keep Commenting and Sharing this post To Your Friends 😀
    • Any Problems/Doubts Do Comment here 🙂
    • You Can Download it Here —>Click here to Download GNU Octaves For Windows InstallerAlternative Link : To Download GNU Octaves For Windows Installer