There was a dearth of good android emulators when it came to Mac OS , and Windows too had limited options when it came to free good android emulators & simulators. Fortunately, the scene is changing with some new entries and one of them is – Droid4X!. Droid4X is the sort of Android simulator designed for Power! , it provides complete power to the users by virtue of its speed! and things such as Complete Root Access. Also Droid 4X is an ideal android emulator for Windows Tablet esp(Lix Tablet PCs) Let’s have a peek onto some features.
Salient features of Droid4X-
Droid4X Apk installation
Google Play Store comes pre-installed, very few android emulators barely support it without modifications,let alone coming bundled with Google Play. Droid 4X Android emulator support Google Play.
Supports Ctrl + C, Ctrl +V text support between the host Operating System and the guest Android installation (emulator).
Zoom In- Out supported through Central mouse – wheel (Scrollbar Zoom-in/out).
Best Android emulator when it comes to Gaming!, personally i’ve never encountered an emulator which supports Gaming to such an extent, you can use keyboard as a controller for Android games.
Provides in-built app for keyboard mapping, you can map your screen area, actions, touch-gestures etc to your Keyboard keys, which i’ll be explaining later in the article.
That’s it , I personally loved the Droid 4X Android emulator, do comment problems encountered while installation and any such good emulator which you might be knowing!
As, we all know iPhone & iPad both iOS devices pack/store their apps in .ipa file extension. Recently I covered how to backup/extract ipa files of your current iPhone/iPad apps . Now I will cover on how to install these ipa files apps on your iPhone & iPad online as well as offline methods with no Jailbreak required!. However, to install cracked apps on your iPhone or iPod you need to Jailbreak your device, these methods work perfectly for non-cracked apps though
Method # 1 – Using iTunes.
iTunes too provides a functionality to directly install ipa apps on your device. Perform the following steps to install ipa apps through iTunes –
Connect your Phone to computer and launch iTunes.
Drag the app’s .ipa file into iTunes library.
Click on Sync and done, that’s it . If the app was earlier backed up from the same device, it would be installed without any fuss.
Method # 2 – iFunbox
install ipa through iFunbox
iFunbox is yet another easy method to install ipa files/apps on your iPhone. Perform the following steps to install Apps on your iPad/iPhone through ifunbox –
Download and install ifunbox from i-funbox.com if not already installed.
Launch iFunbox and connect your iPhone/iPad/iPod.
Now navigate to the File Browser tab as shown in the figure and select “User Applications” (Highlighted in the same figure).
Now click on “Install App” button, select the ipa or apmx file of app which you want to install and click on Open!
Yo! The app will be installed successfully.
Method # 3 Online Method : Diawi
Diawi is a tool for iOS developers to deploy Development and Ad hociOS applications or install them directly to the device. Here are the steps to follow to install apps through Diawi –
0. Open Diawi.com .
1. Upload the application and its provisioning profile.
2. Send the link to your testers, clients, friends or even use it yourself. (Either by Mail , WhatsApp etc)
3. Open the link in Safari on the iOS device and click on install.
After connecting your phone & launching iTools go to the “Applications” tab on the left hand side.
Now, click on the “Install” button.
Select the ipa file which you want to install, and click on Open.
That’s it your app will be installed successfully!
So, these are some of the methods which i used to deploy/install ipa apps on my iPhone/iPod .If you encounter any problems or know of another such method feel free to comment
As we all know, there are very few options when it comes to using the real alternative to iTunes Software for managing and syncing iOS devices like iPhone and iPad. Though, alternatives like Songbird, Winamp etc provide music library syncing etc, but none of them provides App backup and Restore which iTools provides! that too without the need of Jailbreaking your device (requires No Jailbreak!)
Lets have some look at the features of iTools –
iTools as a file explorer
iTools lets you create backup of your iPhone/iPad applications and even restore them or uninstall them as mentioned in this article.
iTools allows you to sync your music and contacts/messages data right on your PC/Mac (Computer).
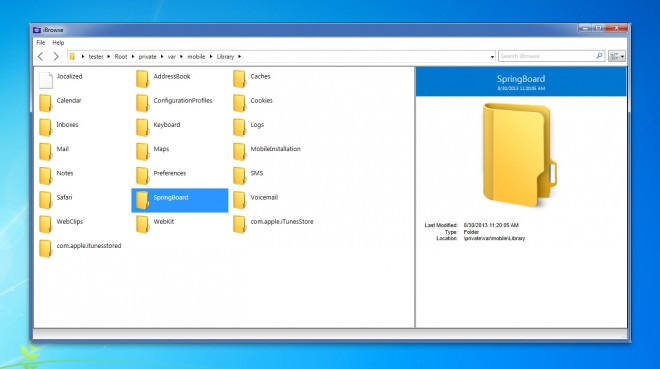
iTools also allows you to browse Apps’ files & folders on your device as shown in the figure alongside.
iTools also allows you to configure iBooks, Media and Photos settings and allow you to take an offline backup.
You can also use iTools to directly install ipa files on your iPhone/iPad.
You can also use iTools to design your HomeScreen look as you can in iTunes.
iTools also features an inbuilt Ringtone maker for iOs so now there’s no need to purchase ringtones for your device, create your own for FREE!
iTools also comes bundled with an in-built PXL to IPA converter, which allows to convert pxl apps into ipa apps as ipa app format is more secure!
iPhone and iPad’s do not support external memory and recently i started facing some storage issues when i got too many apps installed on my devices, i wanted to keep a backup/copy of my apps such that i should be able to restore them whenever i needed them without downloading. Apple stores the apps as ipa packages here’s a tutorial on how to easily backup/extra app ipa from iPhone/iPad, so as installing them becomes easier without downloading,even if you uninstall them.
Tutorial to extract ipa file of an iPhone / iPad / iPod touch App –
First of all i would like to say that this article is only for Mac OS X series and Windows 7/8/8.1/10 users. Currently i didn’t find any alternative for Linux users.
Once you’ve downloaded and installed the iTools, the procedure is really quite easy!,Open the iTools application and connect your iPhone/iPad to your Computer/Mac.
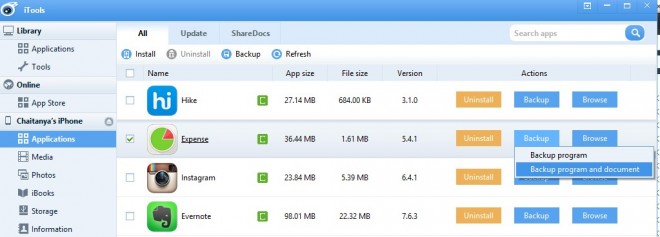
Here select the “Applications” tab as shown in the below image –
iTools on Windows 8
Now you’ll see all your installed applications on your device, simply click on the “Backup” button and select “Backup program and document” option.
In the dialog box which opens up, specify the directory where in you want to save your ipa file and click on “Save”.
That’s it, Now repeat the steps for all apps which you want to create a backup , now after backing up you can safely uninstall the apps without the fear of having it to download again for installation.
Besides, back-up, iTools can also be used to browse app’s files and documents folder of iPhone/iPad iOS apps too!
Apple with its recent iOS 8 update, started supporting external or 3rd party keyboards on iPhone and iPad. Though the iPhone is a fine device,truly of its own class but its Keyboard never satisfied me, not to mention the infinite errors caused by auto-correct. As soon as Apple announced the update – The only name which came to my mind was SwiftKey I installed and really its a welcome addition to our devices! . so, here’s a simple tutorial to help you to install and activate SwiftKey for iPhone & iPad.
Before I start the tutorial here are some unique features of SwiftKey in brief –
Type Lesser – SwiftKey automatically learns your writing style and word usage , so you don’t have to type much once you start using SwiftKey. You’ll type lesser and convey more content as you go on using SwiftKey! . Moreover it automatically inserts spaces for you!.
Type using Swipes – No need to lift your fingers to type anymore, simply swipe across letters and SwiftKey will autoatically type for you!
Type Correctly SwiftKey totally eliminates errors and typos caused due to autocorrect.
Type in up to two languages at once, without changing any settings.
You can even connect to cloud your facebook,twitter accounts so SwiftKey learns even more quickly!
SwiftKey installation steps are as follows –
SwiftKey activation on iPhone
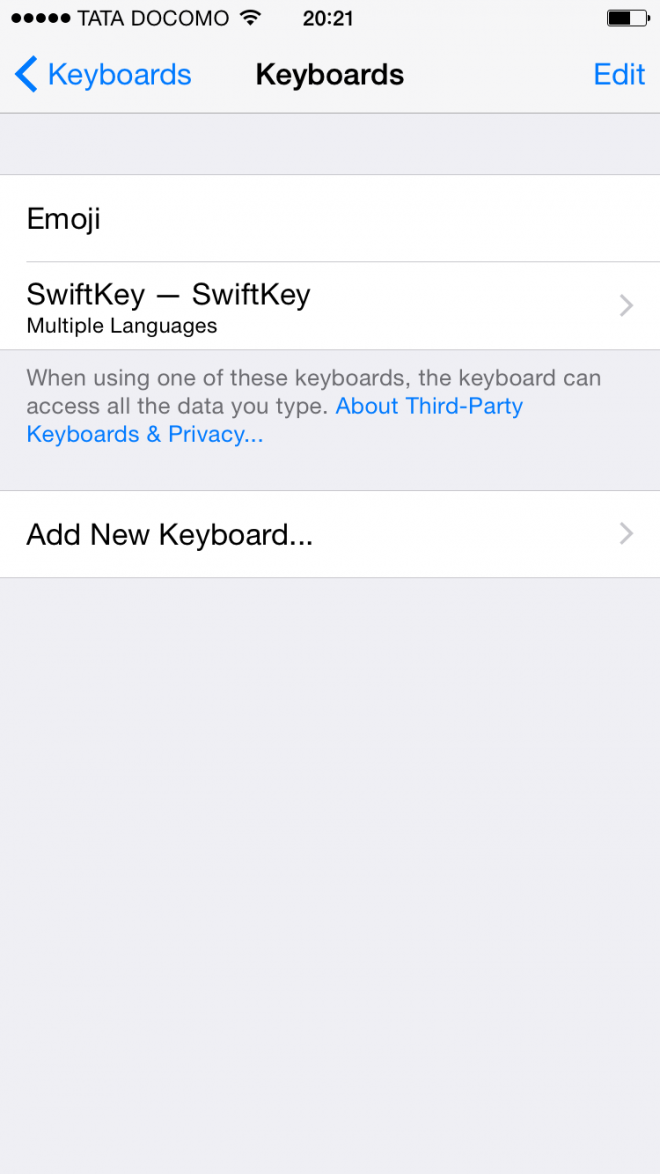
1. Go to System Settings – > General – > Keyboard – > Keyboards
2. Click ‘ SwiftKey Keyboard’ .
3. Allow full-access to it for even more functionalities.
4.Check the alongside screenshot for easy understanding :).
Recently, I had to type some message on an iPhone and it was just a trouble for me as the default iPhone keyboard doesn’t support swipe input and the blunders committed by iPhone Keyboard’s Auto-correct too are very common, there are lots of trolls covering the same. I did a quick search on the Apple App Store but found that the keyboard app which supported swipe input and endorsed by Apple was – Swype which wasn’t free 🙁 . So, here are the 3 Free best Keyboard apps or Keyboard replacements for iPhone / iPad which will enable you to type quickly and correctly and will provide perhaps,even more functionality than Swype for iPhone.
This was the first app which came on my mind when i wanted to replace my default keyboard and it didn’t disappoint me at all! . The installation, as well as configuration was smooth and so its user interface and functionality.[Configuration for all the 3 keyboards mentioned has been covered at the end of the article] I was able to give inputs by swiping my fingers,long-pressing keys and many more! . Here are some unique functions of SwiftKey –
Type Lesser – SwiftKey automatically learns your writing style and word usage , so you don’t have to type much once you start using SwiftKey. You’ll type lesser and convey more content as you go on using SwiftKey! . Moreover it automatically inserts spaces for you!
Type Correctly SwiftKey totally eliminates errors and typos caused due to autocorrect.
Type in up to two languages at once, without changing any settings.
You can even connect to cloud your facebook,twitter accounts so SwiftKey learns even more quickly!
TouchPal is yet another alternative to Swype/SwiftKey for iOS and it too works flawlessly! . TouchPal as per their claim is the first Keyboard ever to support Swipe input on iOS. Here are some unique features of TouchPal –
Swipe-Input Supported.
Supports changing of Keyboard themes and colors.
800+ emojis are inbuilt in the keyboard so you’ll never need to download a separate app for emoji if you’ve TouchPal installed on your device.
FancyKey is not a complete Keyboard replacement unlike the previous two but nevertheless it adds functionalities to your existing Keyboard like never before! . Some, of the unique features of FancyKey are –
Allows changing of themes and colors to your existing Keyboard.
Advanced auto-correct by Adaptxt technology.
Upto 100+ Funkier Fonts are present in the KeyBoard so you can really style your texts!
No full-access required! and hence completely safe and secure!
Hello everyone , one of the biggest visible drawback of the iPhone is its inability to support Bluetooth file transfer . Hence, we face problem while transferring files from iPhone to iPhone – using AirDrop too is an inconvenient option . In this article – I will cover one of the simplest methods to transfer music from iPhone to iPhone without using Computer/PC/Mac by SHAREit App. Not only music, Shareit App by lenovo can also be used to transfer data,documents(PDF, Docx. XLS etc) from iPhone to iPhone. I used it to transfer data from iPhone to iPhone & Android too, however if you need to transfer Music from iPhone to iPhone/Android you will have to use Xender App – Click here for Tutorial on using Xender app.
Though, many tutorials and methods are available on net I am using SHAREit because it doesn’t require an Internet Connection or a Computer/PC at any stage!
The various modes of transfer supported by SHAREit App are –
Transfer Music/Data from iPhone to iPhone. (directly Share music iPhone to iPhone)
Transfer Music/Data from iPhone to iPad.
Transfer Music/Data from iPhone to Computer/PC.
Transfer Music/Data from iPad to iPhone.
Transfer Music/Data from iPad to iPad.
Transfer Music/Data from iPad to Computer/PC.
Instructions/Method to use ShareIt on your iOS Device
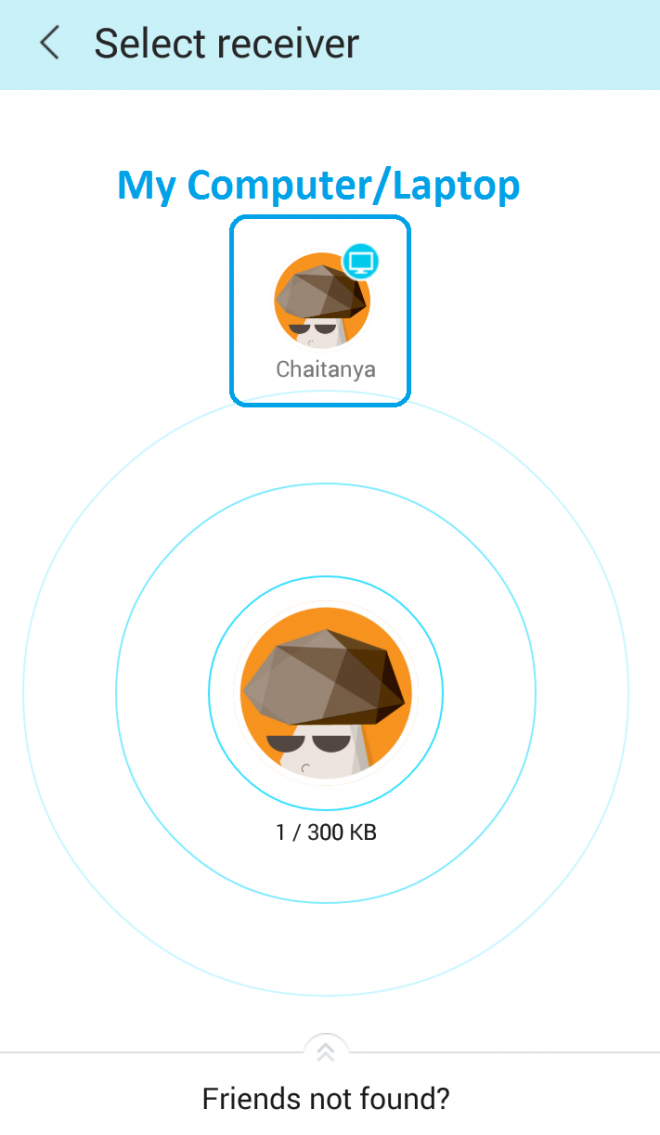
Here I used MyComputer/Laptop as Receiver as i didn’t have a Second iPhone
Note – Make Sure both your parent device (sender) and child device(receiver) are connected to the same Wi-Fi network , else create a personal hotspot on your parent device and connect the child device to the hotspot before opening the SHAREit app.
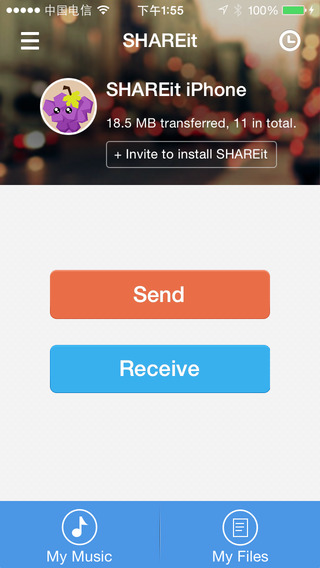
Now, Open ShareIt in the device from which you want to transfer the Data (Parent Device) and tap on “Share”.
Select the data/music which you want to transfer. Once you’re done with selecting the data – Tap on the “Next” option (button).
Open, the device on which you want to Receive the data/Music (Child Device) and tap on “Receive”.
Now, Shift to the sender(parent) device and you’ll see an icon/link in the network radar (As highlighted in the alongside figure) . Simply tap on the device’s Icon to Start the Transfer!
If incase , the Child device asks you to confirm the transfer – Click on “Confirm”.
That’s it ! You have successfully transfer music iphone to iphone without a Computer/PC . And you have completed the iPhone to iPhone music/data transfer without an Internet Connection! (Share data iphone to iphone).
I hope, the tutorial was short and easy , if you face any problems/encounter any issues while transferring or using the app feel free to comment.
Many a time we need to copy data/music stored in our iPad/iPhone to PC , but due to the limited functionality of iTunes its not possible to do that. But in some scenarios it becomes very necessary to have a backup of our favourite songs/music on our Computer , or may be some important data & documents. So, here are the 3 Methods/Ways to Copy or Transfer data/music/songs from iPhone/iPod to Computer/Mac (Transfer Music from iPhone to PC/Computer) . I have personally tested these methods on Windows 7/8.1 but they’ll work on Mac too!
Way # 1 – Using iTools for Windows / Mac OS
Pre-requisites –
This tutorial requires iTunes to be installed on your system, as the newer iOS device drivers can only be installed through iTunes.
Now, to export / copy or to transfer songs from your iPhone to Computer follow these steps –
First of all connect your iPhone / iPad device to your system , If iTunes automatically opens up & start syncing close it.
Now, Open iTools app, you will see your iOS device in the window, there in click on the “Music” icon / media tab under the device menu as shown below –
iTools Music icon shown only after device recongnized by iTools
Here you will see all the music tracks present inside your device here Please Checkmark the songs you want to copy, Now near the menu bar there’s an option labelled “Export“ as shown below –
Click on the “Export” button , It will ask you for path where you want to copy the selected tracks, select the folder and click on “OK”.
That’s it you’ve successfully copied music from your iPhone to your Macbook or Computer-laptop.
Download and install this – ShareIt app for iPhone/iPad by lenovo on your iPhone/iPad (iOS device) ShareIt app now doesn’t support music transfer but however you can transfer other data!.
Now, download and install this ShareIt app for PC on your Windows 7/8/8.1/10.
Now, open the ShareIt app on your device, tap on “Send”. Now, select the files/music/songs/documents you want to transfer/copy and click on ‘Next‘.
After finishing the previous step, Open the ShareIt app on PC – Now, Click on “Receive” option.
Shift again to your device (iPad/iPhone)- It will ask Now you’ll see your PC/Laptop’s WiFi id in the radio network range in the app – “Click on the circle/network id” to start the transfer!.
That’s it! you have successfully transferred your data/music from your iPad to computer.
Way # 3 – Using DropBox
This is the most simple method , but the only constraint is that it requires an Internet Data connection unlike the previous two methods .
Transferring files from an iOS device iPod, iPhone or iPad to PC is a really cumbersome task as iTunes provides support only for PC to iDevice (iPhone/iPad) and not vice versa. Many times we need to copy the files/data from our iPhone/iPad to PC/Mac and it becomes a difficult task as all iTunes allows us to do is sync/create a backup and its very difficult to explore that backup too. Plus due to lack of native file managers for iPhone & iPad – We bring you 5 Free iOS (iPad/iPhone) iPod File explorers for Mac OS/Windows which will allow to do such Device – iPad/iPhone to PC file transfers! that too without Jailbreaking (No Jailbreak) your device,thus not compromising on your device’s warranty. These apps can also be used as default iOS file manager app for iPhone & iPad too –
iBrowse was the first software I tried and it worked with a bang even on iOS 8. I was able to browse all iPhone files and folders on my iPhone and explore even the app data files present on my iPhone like whatsapp images,media etc . To export any file (iPhone/iPad to PC file transfer) all you have to do is –
Navigate to the folder/desired file you want to export . ( believe me this is the most daunting task! ).
Now select it by left-clicking on mouse , now right-click on the selected file .
Select the “export” option , select the destination folder where you want to save the file in the popped-up explorer window.
Hit on “OK” and that’s it! your file will be exported to PC!
Thus, you have successfully completed your iPhone to PC file transfer!
iFunBox is yet another smart File Manager cum App Manager for your iOS device. iFunBox may be defined as an alternative to iBrowse but it has additional features such as App Management –
You can uninstall/remove apps present on your iPhone/iPod/iPad.
You can even install apps from .ipa files to your device from your PC. (The installation is safe as the apps are installed in a safe “sandbox”).
Also you can batch install apps and manage your device apps and games with ease.
iTools is yet another awesome software for iOS users, infact it can be said as the best alternative to iTunes. iTools not only just allows you to Browse and copy files of your Apple device, but it also even allows to backup ipa applications as well as install them directly. It also features an inbuilt iPhone ringtone maker as well. To browse files on your iOS device Simply connect your device to Computer , Open iTools and click on the “FileSystem” option as shown in the figure.
iMazing as the name suggests is an amazing piece of Software , actually it would have been on the first position if this list was prepared based upon functionality, but the list is based upon the free features hence this position.
iMazing allows you to browse and view the contents of your phone in a really easy manner. As shown in the iMazing image you can transfer data from iPhone/iPod/iPad to PC by a simple click – “Copy to PC” option presented after right-clicking on the file.
iMazing also offers the ability to copy data from the apps’ documents folder the folder where apps store their data on the device.
You can also backup your documents,contacts and messages using iMazing.


![3 Best Free Keyboard apps for iPhone / iPad [iOS] with Swipe input support | Free Keyboard replacement apps](https://techapple.net/wp-content/uploads/2014/12/screen322x572.jpeg)