Category: Chrome Turorials

  • 7 Best Free VPNs for Chrome -7 free VPN Apps/Extensions for Chrome OS/Chrome browser/Google Chromebooks

    7 Best Free VPNs for Chrome -7 free VPN Apps/Extensions for Chrome OS/Chrome browser/Google Chromebooks

    Many times, we need to access sites which we don’t have access to.. Or simply we need to bypass the censorship imposed by the network administrator. Also, there are some sites which have restricted region/country access e.g hulu – U.S.A . (hulu is accessible only in USA) . In all the above mentioned scenarios and many more all of these limitations can be bypassed/overcome by VPN services . What’s more ? VPNs also encrypt your traffic and hide your identity , keeping you totally anonymous 🙂 . So, VPNs are really very useful services! and here we present you the Best 7 Free VPN services (apps/extensions) for Google Chrome Browser/Chromebooks i.e VPN for chrome OS.

    Another advantage of using VPN services directly in Chrome is to overcome the technical hurdles faced while configuring the VPN clients such as Open VPN , PPTP etc 🙁

    No.1 – Dot VPN

    Dot VPN is another similar service to ZenMate and provides access to restricted websites as well as VoIP applications, and its free to use too! Some of the unique features of Dot VPN are as mentioned –

    • Anonymous Internet-surfing
    • Access to all websites
    • Virtual change of location
    • High speed connection without connection dropping
    • Safety when accessing public Wi-Fi points (Wi-Fi and Hacker Protection)

    Click here to Download Dot VPN from the Chrome App Store


    No.2 – Gom Web VPN for Chrome

    Gom- Web VPN for Google Chrome is yet another Chrome exclusive VPN service provider, it doesn’t require any 3rd Party application for the VPN services except its Google Chrome extension and is quite effective too!

    The service is free Free for Trial period and features of Gom VPN include –

    • Access blocked content.
    • Surf privately with encryption (even with non-secure sites);
    • Enjoy faster page load times (GOM uses Google’s SPDY technology).
    •  No need for network configuration / 3rd party app install.

    Click here to Download Gom Web VPN from Chrome Store.


    No.3 –  Browsec

    Browsec encrypts your traffic and routes it through Browsec’s secure cloud network. No one will be able to identify, track you or sniff your traffic.

    •  Visit Facebook and twitter from work, read whatever you want.
    •  Privacy. Hide your real location from the sites you visit.
    •  Netflix, Hulu, Spotify, Pandora, SoundCloud and so on — music and video services restricted to a few countries are now accessible to you too.
    • Personally, i found it much speedier as compared to other extensions i tested 🙂

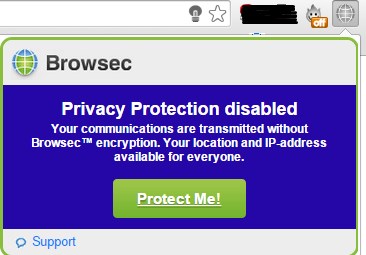
    You can start Browsec by clicking on the tab icon and clicking on “Protect Me” button as shown in the image alongside

    Click here to download Browsec Extension for Chrome.


    No.4 – ZenMate! 

    ZenMate is  was perhaps the best and first Chrome-exclusive VPN , but now it isn’t since it started is premium services. It started it operations on Chrome and was the first app/extension providing VPN services only based on the Chrome Engine and without any OS(Win/Linux/Mac) support. hence, it is able to run on Chrome OS too!.

    Features of ZenMate –

    • Encrypts and protects your browser traffic
    • Hides your real location and activity
    • Access any website from anywhere
    • For free and just a few clicks away!
    • Also it provides Encryption,Speed,Data Compression and blocks Harmful Sites.

    Configuring and using Zenmate too is very easy as 1..2…3… 1.Download….2.Sign-Up….3.Activate by a simple button.. 🙂

    Click here to download ZenMate for Google Chrome from Chrome App Store.

    Note : – You can get a free ZenMate Premium account if you sign-up via our link below –
    Click here to Sign-Up for ZenMate Premium for Free!

    ZenMate premium gives you a higher level of security which is not matched by any other Chrome VPN yet


    No.5 – Hola Engine – Hola Better Internet

    Hola is one of  the most famous unblocking/proxy extensions for Chrome, and it has now added the VPN type services too..

    Hola is easier to use and moderately good in speed! however, you need to install both the hola app as well as the extension to use the hola services on Google Chrome.

    How to use Hola:
    1. Install the extension
    2. Go to a website that is blocked
    3. Press the Hola extension icon (top right of browser)
    4. Choose the country that you would like to browse from
    … and enjoy your liberated Internet!

    Click here to Download Hola! Better Internet from Chrome Store.


    No . 6 – Cyberghost VPN-Proxy for Chrome


    Cyberghost is the leading name when it comes to VPN service providers, especially Free VPN Service Providers. and true to its name, Cyberghost has launched its VPN cum proxy extension for Google chrome.

    Personally, i found the extension to be slower as compared to the other VPNs mentioned in this article , but ocverall the trustworthy name in VPN industry and getting the Job done features Cyberghost in this list.

    Click here to Download Cyberghost VPN extension from Chrome Store.


    No.7 – Breakwall VPN

    Breakwall VPN is perhaps the fastest of all VPNs but its not completely free 🙁 , it offers a Free Trial though, hence it just makes to this list, as this is one such service whose trial service is too  good to be missed .

    You can create a trial account with Breakwall and add the password received in your mailbox to the extension, anc click on connect. that’s it , The speed and the service provided by Breakwall is really awesome except for the trial!

    Also, it consists of BBC- iPlayer mode, by virtue of which you can access BBC iPlayer in countries where its blocked.

    Click here to Download Breakwall VPN from Google Chrome Store.


    So, these were the Best free VPN services among the ones we tested, if you know of any such good services feel free to comment 🙂
  • How to convert and install Android apps on ARChon Google Chrome (Browser/Chromebooks)

    How to convert and install Android apps on ARChon Google Chrome (Browser/Chromebooks)

    In my last article I covered the introduction and setup of ARChon Android emulator for Chrome, but it requires a little bit modified Android apps (apks) for running them. So , this article will cover how to convert android Apk apps to compatible Google Chrome apps , before I begin this tutorial for https://techapple.net/2014/09/3-websites-directly-download-apk-google-play-store-pc-mobile-requirement-device-id/ might be handy! So let’s begin..

    Pre-requisites :

    • Google Chrome OS/Browser with ARChon installed .
    • Twerk! Google Chrome extension for converting apps (Click here to Download Extension)
    • Internet Connectivity (if required by the app).

    Procedure :

    • Download the Android apk file of the app you want to run.
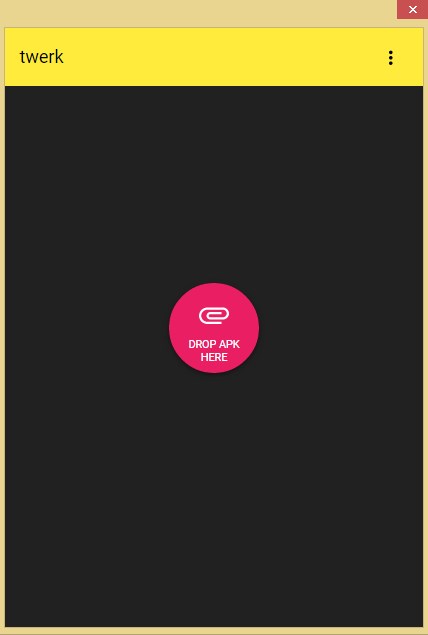
    • Now, launch the twerk extension ! You will be shown an image as shown –
    • Here, simply drag and drop your Apk file which you want to run, the next screen will take you to the app configuration page – here, enter the package name(Google Play Market name (e.g com.paisawiz ) and other , its uniwue for each app . and the App name , you can also select other options such as screensize, orientation etc .
    • Once you are done with this click on the pink colored icon at the bottom.
    • Now, it will ask you to select directory for saving the unackaged chrome extension , Please select the folder from where you intend to load it (I highly recommend creating a new folder for each unpackaged app).
    • Once you are done with unpacking the app into a folder Load the app into extensions as unpacked app in developer mode of Google Chrome and Launch it !! :).
    • The tutorial for Loading and launching the app is available here.

    Thanks for reading this 🙂 If you have any doubts/queries feel free to comment 🙂

  • ARChon Android Emulator for Google Chrome OS/Linux/Windows and Mac|Install and Run Android Apps in Chrome

    ARChon Android Emulator for Google Chrome OS/Linux/Windows and Mac|Install and Run Android Apps in Chrome

    ARChon is the first Android Emulator which is supported on Google Chrome OS! It works on Google Chrome browser too and thus can be used on Windows , Linux as well Mac OS too!! It uses the default Android Runtime Package for running the Android apps however, sooner we expect that Google will officially launch support for Android apps on Chrome! till then, we can use ARChon as it does the job pretty decently .Archon Android emulator will also Run Android Apk in Chrome OS / Chromebooks.

    Pre-requisites :

    • Google Chrome browser with an Internet Connection.
    • ARChon Runtime Package/Extension installed on Google Chrome .
    • A Modified .apk Android App package for testing Purpose (e.g we will be using 2048 Game Apk for this purpose , You can download 2048 from here).

    Method : 

    • First of all , download the runtime which is appropriate for your system:
    Runtime Download
    ARChon 1.2 – Intel x86 Chrome 64-bit / Chrome OS 64-bit (OSX: Use this in Chrome Canary) BitBucket :: MirrorMD5:d77b468339cc512e121c003cc97715db
    ARChon 1.2 – Intel x86 Chrome 32-bit / Chrome OS 32-bit (OSX: Use this in Chrome Stable) (Win7 32-bit: Use something like Chrome Beta 38.0.2125.77 beta-m) BitBucket :: MirrorMD5:9c9844e2591a27d952098581011a2bce
    ARChon 1.2 – ARM (i.e ARM-based Chromebooks) BitBucket :: MirrorMD5:3d6955c7702baf1e1d16a000d9f67b10
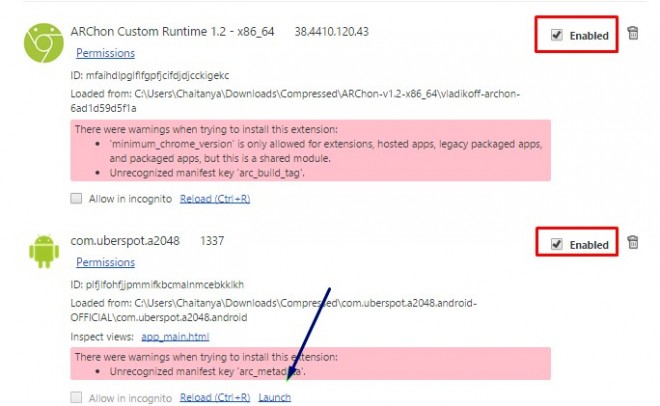
    • Unzip it into a folder ,Now load it as an unpacked extension, as shown in the image below

     For loading Unpacked extensions you will need to enable Developer Mode in Google Chrome you can do it by going to Settings – > Extensions -> Check mark the Developer Mode And Select the Folder where you just extracted the Archron Engine. (You can check the screenshots in this post 🙂 )

    • Once you have loaded the extension , please enable it by checking the Enable option besides the extension name .
    • Now extract the android Apk package which is converted into Chrome OS compatible into another folder and Load that too as an extension in Google Chrome (You can try with the above linked 2048 Game link).
    • Once you have loaded the game as an unpacked extension, it too will be shown with other extensions, now simply click on launch as shown in the image below-
    • Now once you  have clicked on Launch Your Desired Android App will be loaded! as shown below – Amazing isn’t it ?

    Drawbacks –

    • The Default Android Apk files do not work directly they need to be converted first into Chrome Compatible Apk’s which you can be created by an app mentioned here.
    • This is a proof of concept. You can run up to 4 Android applications right now with the regular runtime. Read the multiple apps manual to load more than one application at a time. To load unlimited number of apps read the ARChon runtime guide.

    I personally found this very unique and interesting , do comment your views and problems which you face while installing / running the apps . I am always happy to help 🙂

  • 5 Best Autofill apps for Android to login/fill forms automatically! Works on Default browser/Chrome too

    5 Best Autofill apps for Android to login/fill forms automatically! Works on Default browser/Chrome too

    Typing on an phone is a tiresome process  , moreover when it comes to form-filling and other personal data it becomes even a boring one! , many times we come across sites which always ask us to fill up forms which ask us for oour name,e-mail,address,Date of birth etc.. What if all this data is entered automatically! ? and yes, its possible too ! with these awesome autofill apps for android. You just simply enter the data into the app,and next time the app will automatically fill up forms for you , Thus saving the efforts required to type , as well as time too!  , Let’s have a look on each one of them,one by one

    App # 1 – Google Chrome Browser / Default Browser

    Nothing beats the convenience and usage of android’s Default browser – Google Chrome, and yeah we can even use Chrome for autofilling forms and passwords while browsing, saving the effort .To set Up Google Chrome for Android to autofill perform the following steps –

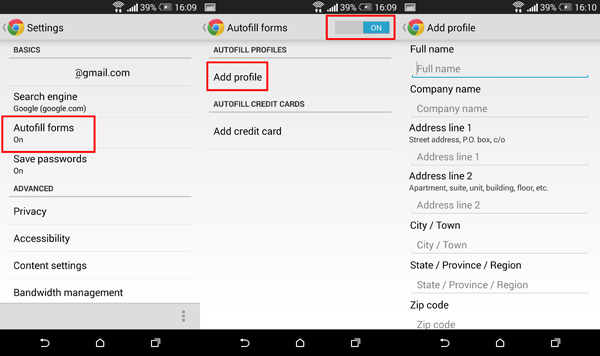
    1. Go to Browser’s settings
    2. In  the General section, activate Form Autofill
    3. Go to Autofill data section
    4. Here fill in each of the following fields which is your default data and which you want to be entered automatically in forms : Name, Company name, Address, City and state, City Code, Country, Phone Number, Email, etc.
    5. After done, tap Save Profile .

    That’s it! Now, whenever you come across any sort of form the browser will automatically fill-in the information for you :)!

    App # 2 – RoboForm Password Manager

    RoboForm is an online auto-form filler and password manager app for android, which allows you to store log-in information and passwords and fill them up automatically when required. It does so with the help of its own browser with quick speed and simple techniques such as one-touch login! however, it currently lacks support for the android default browser 🙁  but it does gets integrated with Firefox 1.62 and later if already installed .Also, the Roboform Plug-in for Dolphin browser is available here! So , the only drawback of  RoboForm- its browser compatibility is never an issue with RoboForm !  You can also add your form details from PC too using RoboForm everywhere account , which you can later use on your devices with the RoboForm app to fill-up logins and forms online automatically! A must have an app if your major work is focused around sign-ups/form-filling!

    Click here to download RoboForm Password from Google Play

    App # 3 – Dashlane Password manager

    Dashlane is yet another great password manager -autofill app for android phones, though the name suggests it as a password manager but it has an inbuilt-form filler too!! . Dashlane sleek and convenient to use ,and the app makes it easy to keep track of passwords and personal info that you use and by Eliminate typing on tiny keyboards with auto-login and form autofill present in built in the app. The Dashlane provides auto-login /auto-form filling features through its inbuilt light-browser and also it provides a dashlane keyboard which can be used to fill up forms quickly across other browsers/apps. It also provides strong AES encryption so that only you can access the stored passwords/and forms!

    The free version of the app itself is very cool and a single dashlane account can be used on cross-platforms such as iOS,Windows,Mac etc to fill up forms and passwords online!

    Click here to Download Dashlane app from Google Play!

    App # 4 – LoginBox Login Manager

    LoginBox is another autofill cum password manager app for android devices . LoginBox comsists of a password manager and a secured browser with a unique autofill form capabilities .It provides unique features such as one-tap log-in to sites so that you never need to remember log-in URLs. also its very convenient to add new sites to the app, The only Downside is that some services of the app are limited in their functionality in the free version and require a subscription.

    Click here to download LoginBox Login manager

    App # 5 – LastPass

    LastPass – the name already must be familier to the PC users, and this one is the mobile version of the same , it provides a hell lot of great features including biometric authentication ! The Built-in browser that will automatically fill your login information for each of your saved LastPass sites. Lastpass also can Automatically fill forms on all sites saved in it. The only downside is that these services are premium and need to be subscribed, but they offer a free 14-day trial too! besides the main app they even provide Dolphin browser Last-Pass Addon .

    Click here to download LastPass

    So,these are the best 5 autofill apps which ypu can use to fill up forms automatically and reduce the effort and time required to type on the small tiny keyboards 🙁 , I hope you will find them useful , if you know of any such app or have any doubts/queries do comment and let me know 🙂


  • Best apps to Record Screen in Chrome OS | Easily Record Screen Videos/Screencasts in Google Chrome/Chromebooks

    Best apps to Record Screen in Chrome OS | Easily Record Screen Videos/Screencasts in Google Chrome/Chromebooks

    Recently,the number of Chrome OS users/ Chromebook users is on the upward trend, and there may be many scenarios where one needs to record screen or screencasts of Chrome OS . As Google Chrome OS is based on the Linux but it doesn’t readily support external apps installation other than those from its Appstore here we  bring you the Best apps to Record Screen Chrome Browser/Chrome OS and works on Chromebooks too .

    App # 1 . Screencastify (Screen Video Recorder)

    Screencastify is a simple video recorder app for Chrome with minimum and easy to use User-Interface . All you need to do is install the App ,and rest can be easily be guessed from the User Interface itself .

    Method to use Screencastify to record videos/Screencasts

    • First of all install the Screencastify app by downloading it from the Google Chrome store from here .
    • Now you will see a filmstrip icon on your browser bar, simply click on it and you will see a box as shown in the figure below –
    • Here you can configure various options such as screensize to be recorded / source of Audio Output which is to be recorded ( You can either use your Microphone or the Speaker Output too! )
    • After you are done after configuring these simple options, Simply hit the “Start Recording” button.
    • When you are done with the recording press the “Stop Recording” button.
    • Now, we can either save this Screencast / Video to Local Disk (Hard disk) for Later viewing or either we can Upload it to youtube/Google drive 🙂 as shown in the figure below. (We have selected “Save to Disk” support , the option on the right is for Uploading online .)
    • That’s it . We have successfully recorded Screencast/Video on our Chrome OS/Browser.


    App # 2 . TechSmith SnagIT

    This is yet another , awesome app for recording Screencasts for Linux and it comes in with an in-built Media Library +Media Player too ! which can be used for playing or viewing the Screencasts!

    Method to use SnagIt to record Screencasts/ Videos

    • First of all download and install the SnagIt app from the Chrome store by clicking here .
    • Now start the App from either the Apps tab or the App Launcher. A window similar to the below image appears on your screen –
    • Select the “New Screen Recording” option, Now a window asking to select the Screen to record appears, you can either select the Desktop or select the tab which is to be recorded. as shown below .
    • Now select the screen and click on share , The Screen will start getting recorded . You can Stop recording/sharing by clicking the Stop Sharing button.
    • Once you , Click on Stop Sharing, your video will be synced, after sync you can either view it in the Media Library of the App or Upload it to Youtube! / Google Drive.
    • Besides, Screencasting SnagIt also adds option for adding Notes,Markers to the Video thus reducing the need of a Video Editor , it also supports adding of Visuals.
    • You can take Screenshots too with this app . proving it to be a Multi-tasker. The Appstore page mentions that it requires the SnagIt extension too to be installed, but it worked fine for me without the extension. If it gives you error while using the Extension can be downloaded from here.
    • Edit : The Extension allows/adds additional facility to the App such as selecting a particular ScreenArea/portion to be recorded , as well as configuring Audio capture / output options . So it’s a plus situation if the extension is installed as shown below – (with an additional browser bar icon) 🙂

    Thus, these are the awesome apps/extensions which help to record screen videos/screen casts in Google Chrome OS . If you encounter any problems/ or know of any other App do let us know by comments 🙂 Thank you!

  • Prevent Google from tracking Search-Using non https Google Search [Non SSL Version]

    Prevent Google from tracking Search-Using non https Google Search [Non SSL Version]

    Many sites today track users without their consent and store data, hence privacy of users is a major concern. Google too does the same way and tracks our previous search queries,visited links to track our usage and improve the search results . But many times it can happen that we may want to hide our search query from google or stop it from tracking our usage. Also sometimes we may want to use the old non-https or non SSL version of Google Search to search our query especially in case of slower network connections. This post covers the very same on How to prevent Google from tracking our search without having to log out or make changes to our Google profile/Account settings , And using non https Google SSL encryption.

    The Method to use Google without https and without traceability is very easy , though there are many users using 3rd party services like ducduckgo or startpage.com but i won’t recommend them,as they themselves are slower and their server processing despite using google results make them even more slower..Let us now browse the methods to prevent google from recording the search results.

    Method I —– Using Google Server IP

    Yeps, this is the most simple Method to use Google and gain access to Google search results without letting google track and using SSL , you can get the Geo-Specific Google Server IP for your location too, The Process is very Simple as follows

    • Open Command Prompt [For Windows users] or Terminal [For Linux and Mac users] and simply type the command “ping google.com” and hit enter, you will get a message as “pinging google.com (google server ip) with xx data” check the below screenshot for information.
    • Here the IP contained in the brackets is the Google Server IP , now simply enter this IP in your browser and hit enter ! and voila !
    • You are now able to access Google without https and without traceability , you can yourself check that even if you are logged on/signed in on “google.com” you are logged off/signed out on the Google Server IP Page :). Thus preventing the Google Server from tracking you and your search 🙂
    • Also, you can check for previously searched queries, they always disappear 🙂 Check the below Screenshot for live demo of the same –>
    • As you can see in the above Screenshot i have used the Google IP from the ping command and using it for searching , The Google Server IP which i used was 173.194.36.38 , you can obtain yourself IP or can use anyone from the range 173.194.36.1 to 173.194.116.255 , tested by me i.e total 80*255 IPS but may be the number is even more  🙂 You can try urself and get your own Google Server IP  for personal use 😛

    Method 2 – Appending ?nord=1 at end of Google Search

    • This is yet another method for using non https version of Google Search but unlike the previous method it doesn’t completely prevent Google from tracking your results.
    • But this method is quite useful especially in slower network connections or restricted networks where https doesn’t work properly . You can visit the non-https version of ?nord by Visiting here – http://www.google.com/?nord=1

    So ,these are some tweaks of the World’s Number 1 Ranked site, which many and many of them might not know and which can be used to enjoy the Google Search experience 🙂 , If you have any doubts/queries/suggestions feel free to contact us or comment below 🙂

  • 5 Websites/Apps for C/C++/Java/NodeJS/Ruby/Python/PHP Programming/Development on Chrome OS | Browser online

    5 Websites/Apps for C/C++/Java/NodeJS/Ruby/Python/PHP Programming/Development on Chrome OS | Browser online

    Hello Guys, the word is out Google powered Chrome OS Chromebooks have hit the Markets and are quite a great hit among the masses, because of their low cost, sleek design and high performance and a different type or web bases OS 🙂
    But, unfortunately as they are quite new, there are  practically No C/C++/Java/Ruby/Python etc Compilers available 🙁
    but still,we can program and develop in language such as C/C++/Java/NodeJS/Ruby/Python/PHP on Google Chrome OS/Browser by these 5 Google chrome Apps.
    Also as all these apps are cloud based, you can simply visit these sites and directly program on the cloud, inshort you can indirectly use your Web Browser as a Compiler 🙂 . Thus this post can also be called as 5 Web

    1. Codebox.io / Codebox App

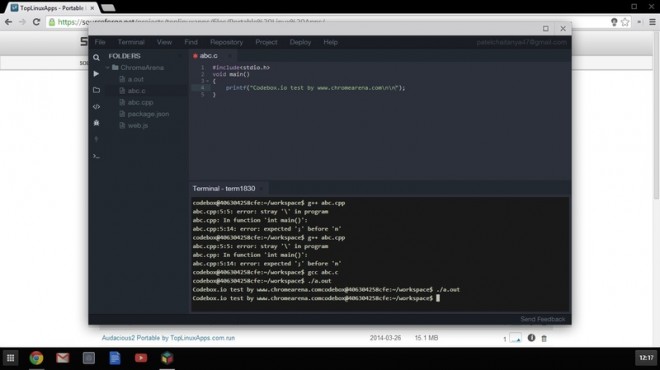
     Personally, i have ranked this app first in my Article because i simply loved it. that’s it! the codebox for chrome app is short and simple without fuss . all we have to do is register an account at codebox.io and we will have to create a virtual vm/workspace and yo! we are ready to Program . Codebox Provides us with an online virtual based VM , an IDE based on ACE, and an all powerful terminal to work upon! which comes preinstalled with gcc,g++,java,python.ruby,no need of installation and configuration!  that’s what generally a programmer demands for!! thus programming on codebox for me was fun, and as all my data is secured and synced on codebox cloud, i felt pretty good and clear while programming hence comes the first ranking. You can download the Codebox.io app from the Chrome Store access the website.

    Click here to download Codebox.io App from the Chrome Store.
    Click here to visit Codebox.io Site.

    2.Nitrous.io / Nitrous.io App

    Nitrous.io is another cloud vm provider that too works on Google Chrome OS / Website Browser. it has all the features of Codebox like pre-installed vm with gcc,g++,java,python etc with Full Terminal access and an ACE based online IDE. it practically doesn’t lose anywhere as compared to Codebox.io and has a good speed too. hence i will highly recommend both this cloud based services for your use 🙂 and i personally found them to be the best after testing 🙂
    also both of them boast of a Native App for Google Chrome OS/Browser in addition to online website access which is a plus-plus and the IDE provided by them can be used when offline too 🙂

    Click here to download Nitrous.io app from Chrome Store
    Click here to go to Nitrous.io Online Web browser Access

    3.Cloud9 IDE | c9.io

    Cloud9 is yet another cloud based development environment, its basically an online IDE with inbuilt support for c/c++/ruby/perl/python/java and php development environments. It provides features such as package and app management and deploying,syntax highlighting,etc..
    It consists of an online terminal as well as output console window which we can use to run our program. Our tests showed the c9.io service a bit lagged as compared to codebox and nitrous hence this ranks third on this list.

    Click here to Download the Web App for Cloud9 / c9.io from Google Chrome Appstore
    Click here to visit c9.io

    4. Codenvy.com

     Codenvy.com is another Cloud based IDE which is quite robust and Powerful.
    It supports various Languages such as HTML,CSS,Groovy,Java, JavaScript,Ruby,PHP,Python.. Unfortunately, it doesn’t support C/C++ 🙁 It supports the Android ,NodeJS,Spring,Ruby on rails framework though.. It has inbuilt PaaS deployment which itself is a very striking and killer feature , and supports provides such as appfog,GoogleAppEngine,AWS etc.
    Although Codenvy doesn’t has its own native Google Chrome app, it does has its web app URL which can be used in any web Browser.

    Click here to get Codenvy App from Chromestore
    Click here to visit Codenvy.com

    5.Koding.com Terminal | Devtools Terminal for Chrome

    Koding is probably using the best and unique concept amongst all these sites, instead of providing all packages inbuilt, a user can add a plugin to his own VM or account through the plugins directory.
    thus saving the site’s time and resources., although the basic components such as Java,C,C++[gcc,g++] are provided inbuilt..
    Koding is really a good site,with unique features and a powerful and speedy Terminal which i liked 🙂
    but it can work on the IDE/part which lags a bit to rank up even  higher, but i personally checked all the 5 sites mentioned in this article are good and you can use anyone you like 🙂 . Koding too provides a WebApp and not a native dektop app like codenvy. Koding is based on Linux OS and provides you complete root access 🙂

    Click here to Download the Devtools Terminal app by Koding for Google Chrome
    Click here to go to Koding.com

    I hope, this article might have solved your problem and still if it didn’t do comment i’ll try to help as much as i can, you can comment if you know any other such good site/trick 🙂
    lastly , do share and like this article if you liked it 🙂