Category: Android Arena

  • BonkLive Review: Free Social Streaming App For Your Android And iOS Mobile

    BonkLive Review: Free Social Streaming App For Your Android And iOS Mobile

    If you love to do online live video chatting sessions with your followers, then you are going to love BonkLive as through it you can earn while doing your favorite thing. Through it, you can make money just by run ads commercials on your live video sessions, or you can also earn while reading out some ads related phase. BonkLive is one of those few platforms which gives its users a chance to earn while doing social networking. Anyone can join it for free using his/her email account or other social networks account through any iOS and Android based device, and it is also available for desktop.

    Concept of BonkLive

    bonklive

    Before moving on to features, part let us clear the concept of BonkLive here. Let us tell our readers how they can earn from it and how it is a better option.

    1)    As we mentioned above users can earn money just by running ads on their live videos. They can also earn just reading some jingles or some lines regarding any brand. Only Bonkified users are eligible to do so, and for that, ordinary users have to clear some levels to become a Bonkified user.

    2)    It is the best way for an influencer to cash his/her popularity.

    3)    As influencers are earning through it, they will spend more time on it, and because of it, followers will get a chance to know more about their favorite star.

    4)    BonkLive uses the concept of virtual money( BonkLive coins, Diamonds) instead of real cash. These coins can be bought from an online BonkLive shop.

    5)    Followers can send virtual gifts to their favorite star to grab special attentions, and these gifts can be exchanged for real money.

    6)    Users with get the virtual debit card with MasterCard facilities.

    Features of BonkLive

    If we leave the concept of money making behind the BonkLive comes with plenty of exciting features which are as follow:

    1)    Through it, users can connect with his/her followers with live features and some amazing filters and stickers options are also available to make live sessions more engaging.

    2)    To increase interaction levels with fans chatting option is also available through which broadcaster can interact with his/her viewers through the chat box.

    3)    Users can buy virtual gifts to their favorite star while the live session is taking place and can grab special attentions like special mentions, etc.

    4)    Followers can connect with their favorite stars through direct message option available in the app.

    Close View

    Let us give a quick close look to the interface of the BonkLive android app.

    1) Here is the snap of login screen have a look at below snap to get an idea about the various login options available.

    login screens

    2)    And from the home screen only you can start the live session to entertain your followers.

    followersfollowers

    3)    You can also follow other users if you want. You can search for your favorite broadcaster from easy search option available.

     broadcasting

    4)    If you want to check total diamonds, coins, etc, then you have to check your profile option. You will get something like this.

    users

    Final Words

    Let us wrap up here with some pros and cons which we noticed while using it, read the below pros and cons carefully and take action accordingly.

    Pros:

    1)    The concept of the BonkLive is very good, it is beneficial for both celebrities and their followers.

    2)    The idea of the virtual gift is also outstanding as by paying a small amount a person can get a chance to talk with his/her ideal.

    3)    Users can share their live session on other platforms which is also a very good thing.

    4)    The interface of Android app is very interactive and smooth.

    Cons:

    The only thing which we didn’t like is that there is no desktop client app for Windows 10 laptop and PC users, its desktop client tool should be available so that its users can use it smoothly from their desktop.

    We hope you have read all the above points carefully and will take action accordingly. As it is a free app which doesn’t ask for any bank info, there is no harm in using it. Try it and earn from it.

  • [Guaranteed] Download & Install Jio TV for PC / Windows 10 / 7 / 8.1 [Laptop & Desktop]

    [Guaranteed] Download & Install Jio TV for PC / Windows 10 / 7 / 8.1 [Laptop & Desktop]

    Reliance Jio TV has changed the way we use our mobile phones. Jio TV lets you use your mobile phone as a live TV without requiring a DTH Connection. In addition to streaming live Indian channels , Jio TV also lets you watch catch-ups or previous episodes of your favorite TV Serial (series) and live sports channels too. Now, using your mobile phone as TV has few issues such as inability to chat and watch live TV together, or the small screen issues which don’t give the feel of a TV. But not anymore, in this tutorial we will show you How to Download & install Jio TV for PC / Windows 10 / 8.1 / 7 so you can watch your favorite Jio TV on Laptop / Desktop.

    How to Download and Install Jio TV for Laptop / Desktop –

    Update – Incase if you do not have a Jio Sim or Jio Username / Password – You can even use Nush TV as its perhaps the best alternative to Jio TV – Click here to Download Nush TV App

    Tutorial –

    • First of all, install the Nox App player by double-clicking the installer file. Click on “Install” as shown in the image below –
      Click on Install to install Nox
      Click on Install to install Nox

      Now, after we have installed the Nox Player, we need to install / add Jio TV to it as it is not pre-built. To install Jio TV there are 2 methods –

    • Method 1 – 
      • Click on the “APK” icon in the right hand side menu of the Nox Player , and in the dialog box – select the Jio TV Apk we downloaded before and click on OK. If you haven’t downloaded the APK , you can download it here –
        Click to download Jio TV apk for Nox.

        Jio TV Apk Install on Nox
        Jio TV Apk Install on Nox

        After selecting the APK file , click on Open to install Jio TV as shown in the above image.


    • Method – 2 – This method will work only when No Other Android Emulator is Installed except Nox (incase if you already followed Method 1 skip this step –
      • Simply drag and drop the Jio TV Apk onto Nox Player window, or double-click the “.apk” file to automatically install it in Nox App Player as shown below –
        Double APK or Drag and Drop inside Nox Player to Install Jio TV
        Double APK or Drag and Drop inside Nox Player to Install Jio TV


    • Once, you have finished installing Jio TV , it will automatically launch as shown in the image below –
      Jio TV Sign in on PC / Windows
      Jio TV Sign in on PC / Windows

      Jio TV will now ask you to sign-in to use Jio TV App . Here enter the details as follows –
      “Jio ID” field  – enter your Jio Number without + 91
      Password” field – enter your My Jio account password.
      Skip Sign In won’t work even if you’re on Jio Network.

      Click on “Sign In” button, to log-on to Jio TV.

    • Incase, if you don’t remember the password, or have forgotten it. Simply use the “Forgot Password” option to get a new password for your jio mobile number.
    • Now, it will redirect you to Jio TV interface, simply tap on any channel icon to start your live stream of channel as shown –
      Jio TV for PC Menu
      Jio TV for PC Menu

      You can watch streaming of your favorite live channel or serial in either Portrait mode –

      Jio TV Live Streaming on computer Vertical Portrait mode
      Jio TV Live Streaming on computer Vertical Portrait mode

      Or you can even Go Full Screen as shown in the image below –

      Jio TV Fullscreen live on PC / Laptop
      Jio TV Fullscreen live on PC / Laptop

      Congratulations! You have now successfully Run Jio TV fullscreen on your PC / Laptop or Computer. In case of any queries/difficulties feel free to comment below.

    • Click here to Download Nox Android Emulator (Jio TV for PC / Laptop) Offline Installer
    • Click here to Download Jio TV Apk for PC / Windows (Nox Installation Required)


  • How to Sniff URLs or Capture Network Packets on Android without Root

    How to Sniff URLs or Capture Network Packets on Android without Root

    Capturing Packets or Sniffing URLs may sound a bit of hacking related stuff, but it isn’t. Capturing Network Packets may help you analyze why is your Data Pack running out, or which apps keep sending data in the background without your consent so that you can stop using them and enhance your Phone Security. Besides, Capturing packets will also help you get that streaming link of a stream, download links which again open up more possibilities to optimize your Cellular or Wifi data usage on your phone. So in this tutorial, we will show you How you can Sniff URLs or Capture Packet Data on your Android with No Root Priveledges required.

    How to Capture Packet Data  Network Packets on Android

    Pre-Requisites :

    Tutorial :

    • After downloading the Packet Capture App from the above Play Store link, install and Open it.
    • It will now ask you for permission to install SSL Certificate as shown in the image below –
      Packet Capture Install Certificate SSL
      Packet Capture Install Certificate SSL

      Here tap on “Install Certificate” option, it will now ask you permissions to save the certificate . Click on the “OK” button in the pop-up box that prompts out as shown in the following image –

      Click on OK Button
      Click on OK Button


    • Now, the SSL capture Certificate will be successfully installed to your Phone. It will now redirect you to the main app screen.
      Note – The Certificate Installation is only a one-time step required, until you uninstall the app. So no need to install certificates multiple times!
    • To start the Packet capture, Simply launch Packet Capture app and tap on the “Triangle (green) icon” as shown below –
      Tap the icon to Start Packet Capture on Android
      Tap the icon to Start Packet Capture on Android

      Now, it will ask you to set-up a VPN (If its your first capture), here simply tap on “OK” to allow it to create a VPN connection –

      Allow VPN Connection to Packet Capture Android
      Allow VPN Connection to Packet Capture Android

      It will now start capturing Packets in a date_time format on the main screen. To stop capturing packets simply tap on the “Stop” red square icon as shown –

      Press to Stop Packet Captures
      Press to Stop Packet Captures

      Phew! You can now access the captured packets data by tapping on the filename on mainscreen –

      Listing out the Captured Packets Data
      Listing out the Captured Packets Data

      Simply tap on the file name to reveal the packet data. It will show you a list of all the packets data sent or received by your device.

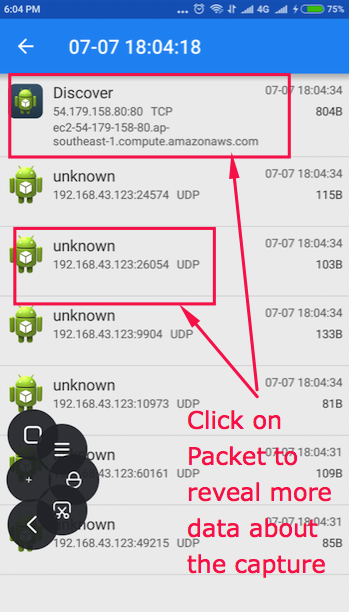
    • To reveal more information about the data e.g URL, type of request, Hex etc click on the logged packets as shown in the image below –

      Packet Capture Logs Android
      Packet Capture Logs Android
    • Thus, you can now successfully capture packet data, sniff URLs on your Android phone . Plus, it will also help you keep a track whether the recently installed apps are causing more data usage etc.
  • PIN Genie Locker-Screen Lock & Applock Review

    PIN Genie Locker-Screen Lock & Applock Review

    More than hundreds of apps are available on PlayStore on App locking. However, the majority of them are not good as they say because they all have few essential features along with other additional functions, which are not relevant to the Screen lock or App Lock system.

    But this time, I have tested an app for several hours, and it has replaced my old stock ROM screen lock. The functions are unique, and I can assure that you have never seen such features on any other Android smartphone.

    PIN Genie Locker-Screen Lock & Applock Free Android Application | Review

    The Genie locker sounds old school and looks more like an ordinary screen lock app, but that’s not true at all.

    It comes with features and options that will leave you surprised, and you will be more excited to use it on all of your smartphones. So let me show, what the app can do.

    #1 – Download & Installation

    The PIN Genie Locker-Screen Lock & Applock has passed both Android & Apple policy, which indicates that the app is safe to use and it does not contain any malware. You can download Android and Apple version of the app from the respective stores.

    downloading

    The file size of the app is only 5.1MB, which does not consume much of your space.

    #2 – Setup and Process

    Once the application is installed on your smartphone, launch it.

    Step 1: The app will ask you to complete the two task first before you start things up.

    Step 2: You have to give access to the “Access Application Usage data,” Select the app and tap on “OK.”

    allow access

    Step 3: The second phase will be to “Allow Notification Access,” tap on the app, then tap on “OK.”

    notification access

    #3 – Basic Lock Screen

    When completing the above process then the Lock Screen will appear on your screen. You have to remove all Pattern and Swipe lock screens from the smartphone before you use it.

    Feature 1: You get options such as iOS function, where you can turn on the Flashlight to WiFi, or you can select any app to open from the lock screen, which is useful.

    wifi connection

    Feature 2: You can open Camera from the Screen lock, which is an iPhone feature and even Samsung S7 edge has it.

    camera protection

    #4 – Setting up the Lock Screen

    Unlock the screen with simple SWIPE and launch the app from the MENU.

    Step 1: Launch the app.

    Step 2: You can see that there is an option called “Set Now.”

    set now

    Step 3: You have to tap on it.

    tapper

    Step 4: You have five options here, four types of the lock screen and the last one is a simple swipe, which you already saw.

    lockers available

    Step 5: You have to set a Security Question to the lock screen.

    around the pin

    Step 6: I have selected “Set my Security.”

    answering

    Step 7: Read the instructions correctly to understand the process.

    user guide

    Step 8: Now you have to set the password.

    new passwords

    Step 9: You have to confirm the password.

    Step 10: The pop will appear asking you to Enter the Email, and it will also highlight the current password you have selected.

    email secure

    #5 – Intruder Selfie

    What do I like the most about the “Intruder Selfie” feature? I have tested the app feature more than once, and it works like a charm.

    Step 1: Launch the app.

    Step 2: Locate and tap on the Intruder Selfie to open it.

    intruder

    Step 3: The function will be turned off, you can turn it on by tapping on “OFF button.

    off button

    Step 4: If you are unable to understand then take a look at the snapshot I have taken, and I have also highlighted the area.

    correction

    #6 – App Lock

    The feature has all basic functions, so make sure to check it.

    application locker

    #7 – Test & Performance

    To test the app, I have my friend to bypass the passcode, and the results were as expected.

    disabled

    Lock Screen: The Lock screen disabled for few seconds as you can see in the below snapshot.

    photo

    Intruder Photo: After so many failed test, he wasn’t able to bypass the security pin. If you are wondering about the image quality, then It depends on your front camera.

    PIN Pad : To access this feature just swipe from left to right of the app and hit “Magic” and from there you can set a number or PIN from the Pad, do note these numbers will be shown in a dynamic pattern when the screen is locked (which means the number position always changes when compared to the stock locks). Additionally you can set a custom app on the screen as shown in the screen below.

    padslocker dynamicAlternatively you can also add old screen from the apps “Magic” option , just swipe to see the old one, as shown below.

    old locks

    Wallpapers : With this option you can set different pics for the lock or home screens from a huge collection of gallery of pics like shown below.

    wallpapers

    Themes : This is something that android phone manufactured stopped a long ago, but from the themes option you can customize the look of your screen

    #9 – iOS App

    iPhone’s are extremely popular, and the developers know that the Apple Store is all about quality. Apple Store team has inspected the app, and they have approved it, which is a big deal. The PIN Genie Locker works smoothly on the iPhone smartphone, and iPad. Since the file size is small, you will never feel like the app is consuming space on your iPhone.

    ios app

    For iOS devices you can get end to end encryption, that is all the files are encrypted within the users device and the receiver of the file need to enter a key to unlock the files.

    Conclusion

    The best thing about the app is that no peeping Tom will be able to figure out the four-digit passcode unless he has sharp observation skills. There is no doubt that the screen lock is unique and it does keep the peeping tom away. Shoot your Opinions and Experience in the comment section below.


  • How to Post & Upload 360 Photos to Facebook from Mobile [Android & iOS]

    How to Post & Upload 360 Photos to Facebook from Mobile [Android & iOS]

    360 Degree photos or Full Panoramas is the new trend in the Market. 360 Photos capture the complete view of you, and your surroundings and thus make a good post of sharing your location and photo gang on Social Media. The good news is Facebook does support 360 Photos and has an inbuilt 360 photo viewer through which your friends can view the complete photo by either moving fingers or by rotating their phone. Here’s a tutorial which will let you Upload 360 Photos to Facebook from your mobile [Android as well as iPhone (iOS) ] so that you can reveal the complete beauty and scenario of the Photo –

    Tutorial on How to Upload 360 Photos to Facebook –

    Pre-Requisites :

    • A 360 Degree Photo (Panorama Photo), Copy the Photo from your Camera to your Phone Storage (This step is necessary , for example, I copied my 360 Photo to Phone Storage via WiFi (Theta S 360 Camera).
    • Facebook App (Installed on your Phone). You can even upload photo without Facebook app, but it won’t let you select the Start Screen of the photo hence, using app is highly recommended.
    • Since, we are using the Facebook App, the procedure is common for both Android and iPhone (we will be using Android in our tutorial)

    Tutorial –

    • Once, you have copied the Photo to your Phone Storage. Open the Facebook App, and navigate to Profile.
    • Here, Select “Photo” option as shown in the image below –
      Select Photo Option in the Facebook App
      Select Photo Option in the Facebook App

      It will now open all the Photos in your Phone Gallery, as shown in the image below –

      All Photos in Phone Gallery (Globe Icon in photo thumbnail means 360 Photo)
      All Photos in Phone Gallery (Globe Icon in photo thumbnail means 360 Photo)

      Now, check for the presence of circular “globe” icon inside the thumbnails of the photo (the 360 degree photo you intend to upload – As Facebook automatically detects photo type – Globe icon in thumbnail indicates 360 photo)

    • Now, if you can see the globe icon in thumbnail, its very easy. Simply select the 360 photos you want to upload (Photos with Globe icon) and click on “Done”.
    • The photos will now be uploaded onto the Facebook server , and it will now ask you to swipe to select the sharing or first screen Starting View as shown in the following image –
      Swipe to Select First screen 360 Facebook
      Swipe to Select First screen Starting View 360 Facebook

      Note – First Screen or Starting View is the first thumbnail which is shown in your profile, so make sure you select the best view inside the 360 Photo, so that your friends will be interested in viewing it!!

      (Swipe using your finger inside the photo up, down , left, right to select the best view as first screen.

    • I swiped around the photo and selected the first screen as shown below –
      New First Screen of the Photo!
      New First Screen of the 360 degree Photo!

      Now, type in any caption, text for the photo and tag location and your friends inside it and Once everything is done, we are ready to post.

    • To Upload or Post it on to Facebook, simply tap on the “Post” button in top right hand side corner.
    • Phew! You have successfully uploaded, tagged people and location in a 360 Degree photo on Facebook!.
    • Here’s how it looks like – Check out the below embedded snippet from our Facebook Page and get a feel of our workplace! 🙂

    Note – Currently Facebook Embed doesn’t has a 360 support, click on the post to go to page and view the complete 360 Photo and browse our workplace. Feel free to comment below incase of any problems or difficulties while uploading 360 degree content to Facebook!

  • Sticker Market Free Android And iPhone App For GIFs, Emojis, Stickers

    Sticker Market Free Android And iPhone App For GIFs, Emojis, Stickers

    Android is something, which I would choose over an iPhone because most of the Apple users like to go with the iPhone so that they can show off the Apple logo but in my case, Android is known for customization, which Apple iPhone does not have and won’t be in the distant future.

    Android is the most powerful weapon in the world, the experts had admitted it. There are thousands of apps available on the app store. The Google has allowed the developers to use Android Codes to customize and build something awesome to the users. Where many Developers have launched their innovative apps, which changed the whole world such as “Whatsapp“.

    Sticker Market: Emoji keyboard

    sticker market

    Today we are going to take a brief look at the Emoji Keyboard, which will change the way you communicate. The emojis can explain things which normally text cannot describe it in few mere words.

    Download Links For Android And iOS

    Android

    iPhone/iPad

    Official Website

    File Size: 47.45MB

    downloading

    Registration

    You might find it odd but the keyboard app as you to register before you can use any of the features. The developers have allowed you to log in using three options,

    • Facebook,
    • Google,
    • Sign up with an email.

    registration

    I have selected to go with the email options.

    Step 1: Tap once on the Sign up using an email and fill the empty blanks.

    fill blanks

    Step 2: Register.

    register

    Step 3: A verification email will be sent to your email id.

    noreply

    Step 4: Verify it by tapping once on the verification link.

    tapping

    Step 5: Go back to the app and tap on the “Enable in Settings“.

    settings

    Step 6: Then the app will take you to the Language and Input then tap on “Sticker Market Keyboard“.

    selection

    Step 7:  Tap on OK.

    ok

    Step 8: Tap on the “Select Input Method“.

    input method

    Step 9: Select “Sticker Market Keyboard“.

    market

    Step 10: You will be redirected to the Dashboard.

    dashboard

    Keyboard User Interface

    The keyboard is responsive and doesn’t slow down your smartphone at all. If you are using a mid-range smartphone, then you won’t have any problem. However, if you are using a low-range smartphone, then you might face a little lag, here and there.

    layout

    As you can see in the image below, the keyboard has all similar keyboard functions, which we get in the traditional keyboard of Google or Samsung.

    samsung

    What makes the keyboard app different from the rest is coming next.

    Quick Look at the Features

    • Themes and customizations.
    • Comes with eight languages (Russian, English, Spanish, Armenian, Ukrainian, German
      Georgian, and French.)
    • Face Masks and Emojis.
    • GIF keyboard.

    Emojis

    In the bottom, you can see that there are options available, which helps you take advantage of the keyboard functionality, You can access a world of favorite emojis, which will help you express your message way better than the text.

    emoji

    That’s not all you get from the Sticker Market: Emoji keyboard comes with a variety of emojis, which will keep you and your friends entertained.

    frineds

    Unique emojis can see on the Sticker Market: Emoji keyboard only.

    GIF’s World

    When you want to convey your message in motion image called GIF, then you can do directly from the keyboard. All you have to do is to tap once on the “GIF” icon > My GIF then you can access saved gifs on your smartphone.

    gifs

    In case, if you don’t have any then you can even download and send it to your friends and family in one click.

    FaceMask or EmojiFace

    If you like to surprise your family and friends then you can use your smartphone camera to click a photo and add cool effects and face mask to your image then turn them into an emoji.

    golf emoji

    Your own photo can make a huge difference in the conversations, which is a unique feature.

    Sticker Market

    If you don’t have a cool sticker then you can use the inbuilt market to pick up few cool Stickers, Templates, and gifts.

    market

    You can browse from the market and find the Trending stickers. You can even select different types of templates to shine the conversation.

    trending

    Not only that, you have already seen GIFs from the keyboard are coming from the trending page of Stickers Market.

    gif market

    Note: The market has both free and paid content in it.

    Conclusion

    Remember, you need an active internet connection to use the Market and the app content Sticker Market: Emoji keyboard supports all major social networking sites. Shoot your opinions and experience in the comment section below.

  • How to Install MEmu Android Lollipop Emulator on PC [Windows 10/7/8.1 32-Bit & 64-Bit]

    How to Install MEmu Android Lollipop Emulator on PC [Windows 10/7/8.1 32-Bit & 64-Bit]

    Most of the Android emulators in the market come with either Android Kitkat or JellyBean, but since both the Android versions are now obsolete most newer games and apps don’t run on them. Now, we can’t simply use official Android Device manager’s emulator to run our custom apps or games so there remain very few alternatives. We bring you, one such method by using MEmu Emulator. Read on below for the complete tutorial on How to install Lollipop Android Emulator on PC or Laptop (Windows 10/8/7 64-bit & 32-bit.

    Tutorial to Install MEmu Lollipop Emulator for PC on Windows 10 / 7 /8.1

    Pre-Requisites –

    • A Windows PC or Laptop with a decent configuration 2GB RAM & above.
    • Now, MEmu lollipop OVA requires Old MEmu 4.4 based emulator already installed on your system. So, if in case your system doesn’t have MEmu installed. Download the Old MEmu emulator and install it from the download link given below –
      Click here to Download MEmu 3.0.7 full Installer [Android 4.4 Base].

    Tutorial –

    • In this step, we will apply the Android lollipop over the MEmu Base we have already installed.  The Android Lollipop emulator ova is separate and hence must be separately downloaded and applied over the base, we will require this file  –
      Click here to Download Lollipop Android Emulator for PC / Laptop (Windows 7 / 8.1 /10)Note – Please note that simply downloading the Lollipop ova won’t work, MEmu base MUST be already installed.
    • Once, you have downloaded the above Lollipop patch, double click & Open it. You will see a message of Successfully Updated”.
    • Now from either the Start menu or Desktop shortcut, launch “Multi-MEmu” App. (Not the default MEmu) It will open a window as shown in the image below
      Multi-MEmu HomeScreen
      Multi-MEmu HomeScreen

      Here select the “Create Android 5.1 emulator” option.

    • It will now start creating your Android Lollipop image as shown below, please wait until the process is completed.
      Android Lollipop Emulator installation
      Android Lollipop Emulator installation


    • Once, the creation process is complete you will now see option to start the new MEmu1 “new lollipop image as shown in the image below –
      Click on Start to launch MEmu Lollipop Emulator for Windows
      Click on Start to launch MEmu Lollipop Emulator for Windows

      Click on “Start” to launch the MEmu Lollipop emulator. It will now show a loading screen, please allow the loading to complete.

    • After the loading is complete , it will boot you onto your default Android lollipop homescreen as shown –
      Android Lollipop Emulator homescreen & Notification Drawer
      Android Lollipop Emulator homescreen & Notification Drawer

      You can even use Playstore to install apps & use Google services.

    • Besides, you can even use your Keyboard to simulate touch, play games via your keyboard & mouse , use rooted apps on your MEmu lollipop emulator.
    • Here’s a screenshot showing the Android version, incase if you face any problems while installing MEmu or the Lollipop patch feel free to comment below .

      Android Lollipop Emulator for PC - Windows 10 / 8 / 7
      Android Lollipop Emulator for PC – Windows 10 / 8 / 7
  • How to Install Turbo Pascal on your Android Phone or Tablet

    How to Install Turbo Pascal on your Android Phone or Tablet

    Turbo Pascal is one of the most used Pascal being used today, despite it being the oldest one. Now, Turbo Pascal was originally meant to be run on DOS PCs , but today’s Smartphones are no less than PCs and can even get DOS running without any lags. So, in article we will show you – How to easily install & use Turbo Pascal on your Android phone or tablet so you can code & execute programs on the run.

    Tutorial to install & use Turbo Pasca; on Android KitKat , lollipop, Marshmallow & Nougat (4.4 , 5.1 ,6.0 , 7.0)

    Pre-requisites –

    Tutorial – 

    Step . 1 – Configuring Dos Box & Turbo Pascal (Only a one-time setup process) – 

    • First of all download & extract the turbo pascal binary zip files into a folder on your device as shown in the image below –
      Turbo Pascal Directory
      Turbo Pascal Directory

      Now as we extracted the zip files into Internal Storage – > Download. The Tp Directory files are accessible at “Internal Storage\Download\Tp” . Thus, the “internalstorage\download\” is our path

    • Now, once you have downloaded & installed Magic Doxbox free app, launch the app it will show a welcome screen, click on ‘x’ to close the message screen.
    • In the next black screen – click on the “+” icon to add new game, then select the “New game” option as shown in the image below –
      Magic DosBox add New Game
      Magic DosBox add New Game


    • The Configuration screen will now ask for the title, and the path of the game (which is Turbo Pascal in our case). Here, we need to specify the path where we have kept our binaries. On this screen Click on “choose” as shown on the following photo –
      Path for Turbo Pascal Android
      Path for Turbo Pascal Android

      Now, navigate using the folder view until the choose folder option shows the folder “TP in the location where you extracted the TP.zip files.

    • Once you see the folder “TP” as shown in the below image , simply tap on “Checkmark” or “✓” sign. Do not click or open the TP folder, as shown below –
    • The Turbo Pascal icon will now be shown in the black screen as shown below – That’s it you have now completed the one-time set up process .
      One time process completed
      One time process completed


    Step.2 – Running Turbo Pascal & launching directly for subsequent uses –

    • Now, for running Turbo Pascal for subsequent uses , simply click on the Turbo Pascal icon inside Magic Doxbox app. Here, you will seeDOSBoxosbox black screen as shown in the image below .
    • Here, we need to type the Turbo pascal binary path to execute turbo pascal, incase if your keyboard doesn’t appear – Please press the back key of your Phone! & select the keyboard as shown in the image below –
      Select Keyboard after back-button if keyboard doesn't appear automatically
      Select Keyboard after back-button if keyboard doesn’t appear automatically


    • Now, on the black screen we need to type in the Turbo C path to execute it , to execute Turbo C file please enter the following commands one by one on the black screen –
      1. Type in “cd tp”  (hit the enter or return / new line key on keyboard)
      2. Now type in “cd bin” (hit the enter or return / new line key on keyboard)
      3. type “turbo” (hit the enter or return / new line key on keyboard)
      4. It will look like below –
        Commands to Open Turbo Pascal on Dosbox Black Screen
        Commands to Open Turbo Pascal on Dosbox Black Screen


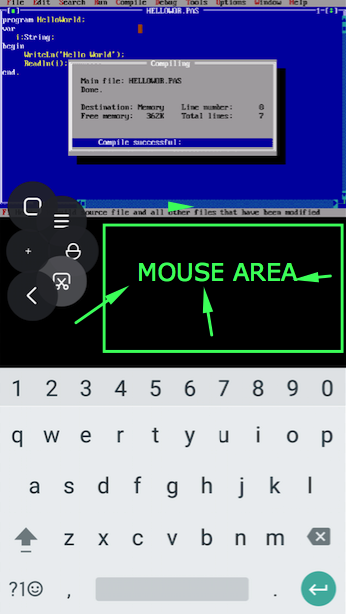
    • That’s it!! your Turbo Pascal will now be launched & opened! 🙂 .. You can now access all functions of keyboard, mouse & start programming of Pascal right on your android device as shown below –
      Turbo Pascal on Android with Mouse & Keyboard
      Turbo Pascal on Android with Mouse & Keyboard

      It feels really awesome & geeky to do programming on your android, and is pretty smooth too! , especially the mouse pointer area and mouse movement as shown in the image above Also the best part is that this works totally without SD card or memory card, so will work on all android phones!

    • Rest all functions of Turbo Pascal work really smoothly. In case if you face any issues or encounter any errors feel free to contact us! Happy Programming!
  • Best Free Android VPN Platform | Rocket VPN

    Best Free Android VPN Platform | Rocket VPN

    If you want to surf geographically blocked content, then you should use VPN and if you want to use the internet without exploring your identity then in that case also you should use Virtual Private Network. There are lots of free Android apps that provides nothing in the name of free VPN service most of these apps either serve ads or fewer usage data in the name of free service. But Rocket VPN is different from all other free VPN apps as it provides monthly 250 MBs of data without charging a single penny. Now let us explore more about it below part of the post.

    Rocket VPN Introduction

    maxresdefaultRocket VPN is a free VPN platform which is developed by the Liquidum Limited, and it is available for both Android and iOS based devices. Rocket VPN is one of the most downloaded VPN app available in the PlayStore (more than 1 million downloads). Beside monthly free data limit, there are many things which make Rocket VPN so much famous among users and let us find out why it is so by reading some of its features have a look.

    Quick Download Links

    Android

    iOS

    1) Basic VPN Features: Rocket VPN provides some basic and necessary VPN features like:

    a) Data Encryption is done while sending and receiving data through Rocket VPN. This is done to provide full security and confidentiality to users private data. Data Encryption is very helpful for those who often use public Wi-Fi, etc. As the public Wifi are highly prone to the hackers.

    b) Large numbers of servers are used in Rocket VPN so that users can easily access geographically blocked content by using servers from different countries all over the world.

    c) Rocket VPN protects its users from any other type of tracking, or we can say spying agencies so that its users can access the internet with full freedom.

    2) Inbuilt Secure Browser: Rocket VPN comes with more secure and reliable browser through which users can surf internet free without any fear of spying eyes.

    3) Quick Launch: Rocket VPN makes its users access other apps directly from it. It allows its users to create a shortcut for each app with preferred location. Hence users can launch any app through it with selected location.

    Introduction to the Interface

    Let us give a quick introduction to the interface of the Rocket VPN Android app. We are providing some snaps which we took while using the app so that you can get a much better idea about the app.

    1) Here is the home screen of the app. As you all can see we are not connected yet.

    connection

    2) You can select the location from various available servers. Here is a snap of available servers in the free version.

    server locations

    3) Rocket VPN comes with the inbuilt browser which can be to surf net more securely and as you can see we can securely connected to the internet.

    connected securely

    4) You can also access other apps directly from the Rocket VPN and can select the separate location for each. Here is a snap of screen in which we have to choose location.

    location as per apps

    Final Words

    We are wrapping up the post here only and before saying bye lets us highlight some positive and negative points about it so that our readers can take action accordingly.

    Positive

    1) Monthly free 250 MBs of data is very big plus point associated with Rocket VPN as most of the free VPN services providers provide one-time usable data.
    2) The interface of the app is very attractive and features like apps shortcut, secure browsers are adding more feathers to the crown of the Rocket VPN.
    3) The browsing speed is also very good. We didn’t notice any buffering problem while watching online video through it. Also there are apps for both iOS and Android.
    4) A Large number of servers are available even in the free version which is also very good.

    Negative

    This VPN app is free on the cost of ads and you can upgrade to remove those plus more bandwidth.

    Final Thought

    We hope you all have read all of the above points carefully and will take action accordingly. Go for Rocket VPN free version or go for paid, it all depends upon on your needs and budget. Try it share your valuable thoughts on it with like, comments and share.