Category: Android Arena

  • How to Open & Extract – Unrar Rar Files on Android | Unlock Rar Archives on Android

    How to Open & Extract – Unrar Rar Files on Android | Unlock Rar Archives on Android

    Rar file archives are now widely used to send across multiple documents in a single file. Though, zip archives also do the same thing. RAR archives can save more space by higher compression levels, ability to split big files into multiple ones and so on. Android OS by default, doesn’t support extraction of RAR files, and hence we need to use other app. Here’s an easy tutorial on How to extract Rar files on Android.

    Tutorial to Open Rar archives on Android | Unrar Rar files on Android Phones & Tablets –

    • We need to install RAR app developed by RARlab – the official owners of Rar compression algorithm. We can use other apps but since the app is official, plus is free, we will go with the official one.
      Click here to Download RAR app from Google Play Store
    • After the app is installed, launch the app. Then it may ask you a one time permission to access files depending on your Android version. Tap on “Allow” as shown in the below image –
      Tap on Allow to give file storage access
      Tap on Allow to give file storage access


    • Now, navigate to the downloaded / stored RAR file location which you want to Extract or Open.
    • Here, we have two options – Either to extract all files of the Rar archive or to extract specific components. Thus, we will cover both the parts .
      • To extract all files – Select the Rar file by marking the arrow next to Rar files and click on the “upward arrow” extraction icon as shown in the below image –
        To extract complete RAR Archive
        To extract complete RAR Archive

        Next you will be redirected to extraction options screen.

      • To Extract only selected or Particular file of the Rar Archive –  First of all tap on the file name of Rar archive. Then it will show all files present inside the Rar Archive as shown below
        Files present in the Rar Archive select the files to extract
        Files present in the Rar Archive select the files to extract

        Now, here select all the files you want to extract and tap on the “Upward Arrow” / extract button. You will be directed to extraction options screen.

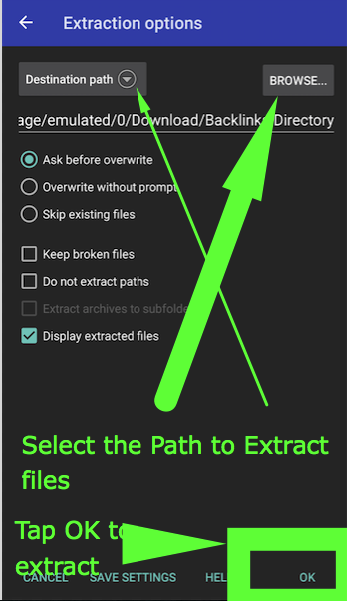
    • In the extraction options screen as shown below, Select the destination path or location where you want to extract files. Then Tap on “OK” button .
      Select the Path to Extract Files and tap on OK Button
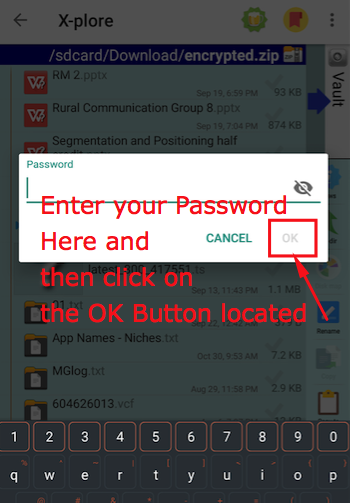
      Select the Path to Extract Files and tap on OK Button

      That’s it! . You have now successfully extracted and unlock password protected Rar Archives on Android. If the Rar file has password it will prompt you to enter at screen during extraction. Incase, if you face any problems or have any queries feel free to comment!.

    • We have tested the app on Android KitKat, Lollipop, Marshmallow, Nougat and even Oreo. The app works perfectly fine, and with speed. Incase, if you find any other good RAR extractor we will like to know about it.


  • How to Extract & Unlock Password Protected Zip File on Android | Open Password locked Zip file on Android

    How to Extract & Unlock Password Protected Zip File on Android | Open Password locked Zip file on Android

    Zip files are a great way to send across multiple files easily and via mail and other media. But, with the recent advent of Data Sniffers and security threats coming up, sometimes zip files are encrypted with a Password so that only the intended recipient can access and open the file. The bad thing is that Android natively doesn’t support extraction but it can be easily enabled by an app. So, in this tutorial we will cover How to unlock Password Protected zip files for extraction on Android so that you can open the files inside them.

    Tutorial – How to Open & Extract password protected Zip files on Android

    • Considering, that you have already downloaded the zip file, we will start with the first step of installing Xplore. Xplore is a file manager app for Android (5 Mb in size) which can easily extract any password protected zip file. Thus, essentially a two in one app.
      Click here to Download & Install Xplore app from Google Play Store.
    • Now, depending on your Android version it may ask you permission to access your Storage, here tap on “Allow” as shown in the image below –
      Xplore Permission tap on Allow
      Xplore Permission tap on Allow

      Now, navigate to the directory where you have stored your zip file. Generally it will be the “Download” directory in the “Internal Storage”

    • Once you have located your downloaded zip file, simply double tap on the filename as shown below –
      Double tap on password protected zip file
      Double tap on password protected zip file


    • Now, it will prompt you a text field to enter the zip file password as shown in the next screenshot. Here, enter your Zip file password and tap on the OK button highlighted below –
    • Enter Password & tap on the OK Button
      Enter Password & tap on the OK Button

      Now, after entering the password. Your Zip file will be easily unlocked!. Thus, you can now copy, move, open, edit , unlock the contents of the password protected zip files as shown in the following image –

      Successful Unlock of Password Zip File on Android
      Successful Unlock of Password Zip File on Android

      That’s it you have now successfully unlocked an encrypted zip file on your Android device. This method works on all Android versions right from Kitkat, Lollipop, Marshmallow, Nougat and even Oreo too.

  • Best Place To Host Android App Website SiteGround Review

    Best Place To Host Android App Website SiteGround Review

    A reliable web hosting is an important part of building a website. After all, it’s what determines the overall performance and accessibility of your website! When you create a website, you always want users to access it without any downtime or interruptions. And for this, it is necessary that your hosting is in the right hands.

    Today, I am going to review a popular web hosting company – SiteGround, which has set up its own place in the web hosting industry in a very limited time. SiteGround came into existence in the year 2004 at Sofia, Bulgaria. Started by few university friends, SiteGround has more than 400 employees today. At present, the company hosts 5,00,000 domains across the globe for different types of clients and industries. In addition to this, the company has servers in three continents (United States, Europe, Asia, making it more prompt and customer-friendly web hosting company.

    Regardless of the competitiveness of web hosting industry, Siteground’s user ratings stay atop with all other big players such as Hostinger, BlueHost and GoDaddy.

    Let’s review different services from SiteGround and get to know how worthy they are.

    Services:

    SiteGround provides various kinds of web hosting services. The major ones are:

    • Shared web hosting
    • Cloud hosting
    • VPS hosting
    • Dedicated hosting
    • Reseller hosting
    • Domain names

    SiteGround is one-stop-shop for various web hosting requirements. Along with the affordable shared hosting, there are plenty of other options people can look into. SiteGround has implemented cloud infrastructure along with both dedicated and virtual servers. And, if you own a big database portal or site, they can provide you custom-made bespoke server as well. Coming to their domain registration, it is good to find that you can order unlimited numbers of domains through your account. Domains are available for all popular extensions such as .com .net .org .biz. Info .us, etc.

    Uptime:

    It was on my priority list to test the Uptime of SiteGround. And the results I got were really amazing.  To track uptime, I used ‘Uptime Robot’ that tracked my website for a month.  The tool helped me to check host’s overall availability and it observed 100% uptime for the entire one month. With SiteGround’s server, I didn’t experience any downtime even for a single second.

    Speed:

    The response time is always very important with a web hosting. People will able to blaze through your site only if your hosting partner provides lightning fast speed.

    Coming to the SiteGround’s speed test, I tested its speed for my simple HTML site and the response time I observed was 81 ms. (US server). Even I find the same result (81 ms.) with the website developed by SiteGround website builder.

    Although the speed of your site may vary depending upon your location and type of server you have setup with your account yet I can say SiteGround will not disappoint you in terms of speed. Another thing I would like to add is that SiteGround uses NGINX web server technology that loads website much faster.

    Customer Support-

    For me, bad customer support is a deal breaker. Therefore, I decided to test all three support platforms of SiteGround i.e. Phone Support, Live Chat, and Tickets.

    Phone Support- When I accessed their phone support, it took 40 seconds to describe my opening options on IVR and hardly 15 seconds to connect. That I think is pretty good. The representative I was hooked up with was prompt and enough knowledgeable.

    Live Chat – Live Chat- SiteGround has 24/7 Live chat support system, which can be easily accessed through the home page of their official website. You just need to fill few details related to your account and your query and you are ready for it.

    It took less than 1 minute to me to connect with their support system which is reasonable.

    Tickets –  Speaking of Ticket support, one of the important things to test in is – the response time. The quicker it is the more suitable it is to use. Otherwise, Live Chat and Phone Support can be better options. I had very good experience with their Ticket Support System. It took  just 2 minutes that was pretty good than their advertised 10 minute response time.

    Anti-Theft Protection-

    It is one of the most advanced features given by SiteGround. If someone tries to access your website and enters the password incorrectly, it automatically detects the situation and prevents your personal and payment information from hacking.

    Final Take –

    All and all, Siteground sure sounds like a promising web hosting. Its services are definitely worth checking out.

  • How to use Split Screen for Apps which doesn’t Support it in Android Nougat & Oreo without Root

    How to use Split Screen for Apps which doesn’t Support it in Android Nougat & Oreo without Root

    One of the best features of Android Nougat and Oreo is that they support Apps to be split into two screens thus enabling you to use two apps simultaneously. However, not all apps support Split-screen mode by default, here’s a simple tutorial which will let you use Apps into Split Screen mode if the app doesn’t support Split Screen.

    Tutorial to Use any App into Split-Screen Mode even if the App doesn’t support it –

    • For our tutorial, we will be using “Instagram” app which doesn’t support Split Screen and the Chrome browser.
    • Now, as we aren’t changing any Developer options or are neither rooting the phone. We will need to “Clone” the non-split screen app into “Parallel Space” app.

    Step 1 –  Clone the Non-Split supported app into Parallel Space –

    • First, we need to install Parallel Space app which lets you use 2 instances of any app on the same phone.
      Click here to Download Parallel Space app for Android from Google Play Store
    • Once you have downloaded the Parallel Space, it will ask you to Clone app, here select the “non-split supported app”, in our case we selected “Instagram” as shown in the image below –
      Select the Non Split Support app and Add to Parallel Space
      Select the Non Split Support app and Add to Parallel Space

      That’s it, now you can add more apps which you may want to use in Split screen and which doesn’t support if required.

    Step 2 – Using the Split Screen –

    • Now first launch , the app which supports split screen . In our example it will be “Chrome” . Once you launch the app. Now, long press the “Intents” or “the recent apps” button as its know.
    • The Chrome will now collapse into a half-screen as shown in the following image –
      Chrome in Split Screen Mode
      Chrome in Split Screen Mode


    • Now, launch the Parallel Space app , from the launcher or menu visible below. It will load itself into the lower half as shown below
      Parallel Space & Chrome Split Screen
      Parallel Space & Chrome Split Screen

      Now, in the bottom Parallel Space menu, tap on the app you want to launch in split screen which wasn’t supported earlier. i.e “Instagram” in our case –

      Tap or Add any non split supported app into Parallel Space
      Tap or Add any non split supported app into Parallel Space


    • Wow! , earlier non-supported split screen app. Will now load and work flawlessly with Split Screen mode too as we can confirm from the image below –
      Instagram in Split Screen View even if it doesn't support it
      Instagram in Split Screen View even if it doesn’t support it

      Thus, you can now use any app or play any game in Split screen such as Clash of Clans, Pokemon Go even if they don’t support it by default.

    • Incase, if you face any issues or have some queries feel free to let us know in the comment section.
  • 3 Ways to Block Youtube Ads in Android (Remove Non-Skippable Ads & Skippable Ads)

    3 Ways to Block Youtube Ads in Android (Remove Non-Skippable Ads & Skippable Ads)

    Youtube is one of the most-used web services and is the single-largest video consumption platform across the World. One of the only bad things about Youtube are its inappropriate ads, sometimes they are totally irrelevant or sometimes they ruin your Video or Music experience. Here we share you 3 Simple Methods which will block all youtube ads on Android, be it Youtube app or Website in Chrome.

    Top 3 Ways to Block Youtube Ads in Android (Remove Skippable as well as non-skippable ads)

    Method # 1 – Use an Adblock enabled Browser

    Adblock Browser can block Ads on Youtube too!
    Adblock Browser can block Ads on Youtube too!

    This is one of the most favourite and simple methods to block ads in Youtube. Incase, if you are not loyal to the Youtube app, you can simply install an adblock enabled browser and browse the Youtube mobile site through it.

    This will help you not only save your data, but it will automatically Block Youtube ads.

    This Method is the most simple to use, and can be easily used by anyone.

    To know more about the Browsers which have Adblock Support and can block Youtube ads. Look at our Best Adblock Browsers for Android Article here .


    Method # 2 – Use an External Ad-Blocking App 

    Video Playback on Youtube App without Ads!
    Video Playback on Youtube App without Ads!

    This method is more suitable for more advanced users, or users who like viewing Youtube videos inside the Youtube App.

    The Process is fairly simple, but gives more control over all the ads in all the apps in your Phone. Thus, allowing you to block all ads inside all apps in your Phone.

    It consists, of installing DNS 66 – A DNS Based Adblocker, Configuring it. And starting it before your Youtube session.

    A Detailed tutorial for the full procedure to Block All Ads in Youtube App for Android is present here.


    Method # 3 – Using External Modified APK’s

    This is the most riskiest of the methods, as this involves installing external Youtube Modded APKs which may hamper your device.

    Since, the app apk can malicious we won’t recommend you to try this method. However, if you are still curious to try it. You can refer this XDA Thread or install third-party Youtube apks such as OG Youtube.

    That’s it! We have covered all the 3 methods to block Youtube ads in your Phone, incase if you encounter any issues or have another cool method, we will like to hear you 🙂

  • RetouchMe – Body & Face Photo Editor for Selfie Review: Photo Editing Made Easy

    RetouchMe – Body & Face Photo Editor for Selfie Review: Photo Editing Made Easy

    There are millions of photo addicts who thrive to add beauty to their photos. Though there are a number of apps that can be used to beautify a photo, there are hardly any application that can beautify every part of your body. If you want to retouch your photo perfectly then RetouchMe App is a powerful application that has gone popular in recent times. Let’s have a brief insight about this stunning application.

    magic touch

    RetouchMe – A Brief Knowhow

    RetouchMe is a handy photo correction app that helps you to get a perfect body and face processing without any image editing skills. It will turn your snaps into a model portfolio just in few minutes. Over 5 million people are associated with this app. It lets you improve your looks in the photo without having any professional photo-editing knowledge.

    RetouchMe has a skilled team of designers that will edit your photos with perfection. They can easily resize, reshape, slim, or lengthen any part of the body. You just need to choose what things you need to adjust in the photo and the professionals will help you out in slimming the waist, enlarging breasts, removing belly fat, removing acne, wrinkles, pimples, increasing lips size, whitening the teeth, reducing the nose, removing fat folds, and just anything you want to.

    compare

    Ultimate Features of RetouchMe

    RetouchMe is a powerful solution to edit your photos without having any professional image-editing knowledge. All your images are processed by a skilled team of professionals who are backing up the app 24X7. The ultimate aim of RetouchMe’s designers is to retouch the photo in such a way that the viewer could not understand that the image was ever retouched. Some of the greatest features of this app are as follows:

    • Perfect Body Editing: The photo body reshaping was never been easier as it is with RetouchMe. You can easily slim, increase, or emphasize on any area of the body using this stunning app.
    • Make your Skin Flawless: The scars, the blemishes, unwanted spots, uneven skin tone, wrinkles, and many other things can ruin even a perfect photograph. You can achieve perfection by airbrushing your skin with RetouchMe.
    • Face Retouching: You can easily eliminate the dark circles under your eyes, whiten your teeth, get rid of red eye effect, reshape your face, or shape up your nose with RetouchMe to make your photo look stunning.
    • Background: The background of your image can be changed with its background changer option. This will help you in removing the unwanted objects from the background or correcting the background to achieve optimal image quality.
    • Get Photos for Social Sharing: You can easily edit the photographs for your Facebook profile or Instagram account using RetouchMe app. Make your selfies look gorgeous with this new photo editing app and make them look awesome.
    • Retouch by Editor Choice: If you are not sure about the areas for correction, you can leave it to the team of RetouchMe’s designers. The image-retouch and color correction with complete touch up to face and body features will surely amaze you.

    body building

    Guide to Use RetouchMe App

    • Before using the app, you need to download the install it on your device. After the installation is complete, open the app.
    • You need to buy some credits in order get your photo retouched by the professionals. The credits can be earned by downloading the apps, RetouchMe suggests you.

    credits

    • Allow, the app to access your phone’s Gallery. It will help you to select the photo you want to edit directly from the Gallery. Choose a photo you want to edit from the phone’s Gallery.

    gallery

    • Remember that the minimum order you can make is of 20 credits.
    • Choose the changes you want to make in the photo.

    designer

    • Now, press ‘Send to Designer for *Credits’ options. The photo will be sent to the professional for editing. You will get back the photos after editing in few minutes.
    The Bottom Line

    RetouchMe is an awesome application developed for the crazy photo lovers who want perfection in just everything. This app lets the enthusiasts to get their photos retouched by the professionals and make their face and body look stunning. Try it now!

  • How to Block Pop-Up & In-app Ads in all Apps on Android Without Root

    How to Block Pop-Up & In-app Ads in all Apps on Android Without Root

    In-app & Pop-up ads are a necessary evil, as they sponsor the free price of any app. But, sometimes the app ads are very much overdone and the pop-up ads are followed by vibration ads, and then sticky ads and the ads never seem to end. Also, the extra data consumed by the ads and malware advertised put our phone’s security at high risk. So, in order to avoid all this We bring you How to Block Popup and Inapp ads in all Apps on Android so that you can enjoy your favorite games and apps without ads.

    How to Block and Stop Pop Up & In App Ads on All apps in Android Phone (No Root Required)  –

    Pre-Requisites – 

    • An Android phone which allows “Installation from Unknown Sources” To enable it navigate to “Settings – > Security – > Installation from unknown Sources”  and toggle it “ON” as shown in the Screenshot below –
      Enable Installation from Unknown Sources
      Enable Installation from Unknown Sources


    • Now, We will need to install an Adblocker app – We will use “DNS 66″ for this purpose because its Free, based on DNS and hence doesn’t consume more battery either. Unlike Other VPN based adblockers such as AdGuard which consume a lot of battery .
      Click here to Download DNS 66 .Apk file for installing the DNS 66 App.


    Tutorial to Set-Up DNS 66 App in Android (One-time Procedure) –


    • Considering, that you have installed the DNS 66 App from the link given above. Launch the DNS 66 App. It will show you a screen as shown below –
      First Screen of DNS 66
      First Screen of DNS 66

      Now “Toggle On” watch Connection and “Toggle Off” iPv6 support section from the above screen. And Navigate to the “Hosts” Tab as shown below –

    • In the “Hosts” tab – “Turn On” Filter Hosts and “hp Hosts Ad & Tracking Servers” as shown in the following image .
      Turn On hp Hosts Ad & Tracking Server
      Turn On hp Hosts Ad & Tracking Server

      Once you turn on hp Hosts ad servers , it will show a shield as opposed to blank shield. The enabled shield is shown below –

      Ad Blocking Active
      Ad Blocking Active

      Now again navigate to “Start” tab and click on the “Start” button as shown in the below image –

    • Click on the Start Button to Start AdBlock
      Click on the Start Button to Start AdBlock

      It may ask you for permission to start AdBlocking. Do not worry this is just a dummy VPN connection and your Speed won’t be compromised at all. infact, it will be faster since the Ad servers DNS won’t be resolved. (Its only a one-time process)

    • Click on OK (One-time Process)
      Click on OK (One-time Process)
    • That’s it ! Your DNS 66 App Setup is Complete ! .
    • From , next time Simply Start or Stop your Pop-up & In-apps Adblocker from the “Green Start or Stop” button on start screen. No need of repeating full procedure again 🙂

      Start or Stop System Adblock by Single Button
      Start or Stop System Adblock by Single Button

    Blocked Ads in all Apps on Android –

    • Once you’re VPN is up and running , You can now Open any app, and browse anything . No Ads will be shown anywhere ever!.
      Ad free experience on Google Chrome!
      Ad free experience on Google Chrome!


      Enjoy the Ad-free experience across all apps on your Android.

    • Incase if you face missing Hosts file error, please refresh the app by clicking on the reload icon as shown –
      Reload Icon for Hosts
      Reload Icon for Hosts

      Feel free to Comment any issues or Queries if the Ads aren’t blocked in the comment section below .

  • 5 Best Adblock Browsers for Android in 2019 to Browse Faster! & Save Data Usage

    5 Best Adblock Browsers for Android in 2019 to Browse Faster! & Save Data Usage

    With the growing number of Android smartphone users, the internet usage on Smartphone is on the rise. One bad aspect of Google’s Android Operating System is that the default browser chrome doesn’t block ads and this causes a lot of issues such as slow speeds, website pop-ups with adult ads, phone vibrations etc. Thus, these ads not only hinder your browsing experience but also can steal sensitive information using tracking cookies. In this article, we bring you the Best 5 Free Adblock browsers for Android which will not only enhance your browsing experience by not loading ads-making browsing faster but also protect your data and keep you more secure.

    Top 5 Best Free Adblock Browsers for Android Phones and Tablets –

    Browser # 1 – Firefox Focus

    Firefox Focus on Android with Adblocker
    Firefox Focus on Android with Adblocker

    Firefox is our favourite browser when it comes to PCs and considering it has an Android version available that too with inbuilt ad-block it made sense to test it out. We have kept Firefox Focus on the first position due to the host of features it has viz –

    • Inbuilt ad block and tracking protection
    • Ability to clear history each time you exit
    • Its a privacy focussed browser so no data is sent about your previous visits.
    • Completely open-source and comes from Mozilla!
    • Besides, it has so much privacy options that we couldn’t even take a screenshot so this is the most secure browser ever we tested on Android that too with Adblock

    Click here to Download Firefox Focus from Google Play Store


    Browser # 2 – Orbitum

    Orbitum Browser for Android
    Orbitum Browser for Android

    Though, we love firefox and Chrome. We have purposely kept Orbitum browser before Chrome-based Brave just due to the sheer functionalities it has.

    Orbitum is not a popular browser but its a neat browser which surely deserves a space in your phone due to its salient features such as –

    • Inbuilt Adblocker
    • Desktop View Support
    • Ability to change the color and themes!
    • And the best part is Torrent Downloading support! . Yes , Orbitum comes with an in-built torrent downloader so that you do not need to download a separate torrent client for downloading p2p files. Saving not just data , but also disk space too!

    Click here to Download Orbitum Browser for Android from Play Store


    Browser # 3 – Brave

    Brave Adblock browser based on Chrome
    Brave Adblock browser based on Chrome

    Incase you are a Google Chrome user and using any other browser is inconvenient for you, then you can use Brave Browser.

    Brave browser is based on Google Chrome engine with the same User interface and comes inbuilt with a “Brave Shield” which can –

    • Block Ads and Trackers
    • Block External Scripts such as Anti-adblockers
    • Block 3rd Party cookies
    • Also, you can use force HTTPS , which will force open the https version of any site you’re visiting to ensure you’re data cannot be seized and tracked by any other hijackers. (Very Useful for Online Payments & transactions)

    Click here to Download Brave Browser with Adblock for Android from Google Play


    Browser # 4 – Adblock Browser

    Adblock Browser for Android (Non-Extension)
    Adblock Browser for Android (Non-Extension)

    Adblock the de-facto Ad blocker for Chrome has a standard alone browser for Android users. The Adblock browser is developed by the same company that has built the Adblock extension and is also speedy to use.

    Though, it has less features as compared to other browsers featured in this article. It does what it says and blocks those annoying vibrating ads on your Android.

    Click here to Download Adblock Browser from Google Play


    Browser # 5 – Opera Mini

    Opera Mini with Adblock Inbuilt
    Opera Mini with Adblock Inbuilt

    It is for the 5th position in this list that we really had to stretch and select a particular browser as there was a healthy competition between Maxthon, Ghostery, Opera Mini, Dolphin, Halo etc just to name a few.

    We selected Opera Mini purely based on the way it transformed browsing by its Server and its lightning speed on 2g Networks.

    Combined with the compression, and Adblock Opera Mini does blocks ads and help you really save data and loads page faster.

    But the revamped news section, does take away the old charm of Opera Mini which now has a bit of commercial money making touch. But still Opera mini, is the browser which can be used on any 2g or 3g networks where speeds are low.

    Click here to Download Opera Mini from Google Play Store

    Thus, these are the Best Adblock Browsers which are Free. We have tested over 16 Different browsers before finalising on these. Still, if you face any issues or would like to recommend any other browser feel free to comment below!

  • How to Shoot Background Blur(Bokeh) on Single Camera Phone Android

    How to Shoot Background Blur(Bokeh) on Single Camera Phone Android

    Bokeh Mode or Background blur got more popular with the iPhone 7 Plus which allowed users to focus on the subject with a blur on the background in its Portrait mode. With the New Dual Camera lens Smartphones coming around like Honor 8 Pro, OnePlus 5, the bokeh effect is becoming even more popular. There’s literally no need to purchase a new phone just for the sake of getting the Background Blur effect, in this tutorial we will show How you can Capture Dual Camera-like Bokeh effect photos with Background Blur on your existing single lens / single camera Smartphone.

    Tutorial to Capture Bokeh Effect / Dual Camera like Photos on Single Camera Phones Android –

    • To simulate Bokeh effect or lens blur, we will be using the Google Camera App for Android. We cannot capture Background blur or Portrait mode photos with the Stock camera app.
    • To Install, Google Camera app on your Smartphone you can install it from the links given below –
      Click here to Download & Install Google Camera app from Play Store
      or
      Click here to Download Google Camera Apk for Android
    • Once you have installed the Google Camera app from the above links, launch the app. It will now show a shoot mode screen as shown below –
      Swipe from left to right to bring the Options panel
      Swipe from left to right to bring the Options panel

      Here Swipe from left to right to show all the shooting options available, as shown in the image above. In the options, available Tap and select the “Lens Blur” option as shown in the image below –

      Select the Lens Blur Option in Google Camera
      Select the Lens Blur Option in Google Camera
    • Once, you select the Lens Blur Option , it will show you a small tutorial on How to use the Lens Blur option to capture Bokeh effect photos as shown in the following image – Google Camera Lens Blur Tutorial
    • Here click on the “OK, Got It” button. Thus, basically all you need to do is select the Lens Blur Options, and then shoot the “Object” you want to focus on while raising your phone in an angle. Let’s see how it works –
    • In the Lens Blur capture screen, first tap the capture button as shown in the figure below –
      Click on the Capture Button
      Click on the Capture Button

      Now , Keep on raising your phone until the indicator shown below is full. Be as slow as possible while raising the phone, so that your focus on the object remains constant. Try not to be too fast neither too slow . Check the below screenshot for Indicator –

      Indicator Box of Google Camera Lens Blur
      Indicator Box of Google Camera Lens Blur

      Slowly raise the phone until the above image highlighted box goes upwards as shown in the next image –

      Indicator Box going upwards
      Indicator Box going upwards

      This takes a lot of time to get used to, hence we recommend practicing it on a stationary object before moving onto moving objects. We tried this on our Deodorant can and once we finished the tilt mode. It started focusing our captured photo as shown below –

    • Processing the Captured Tilt Image
      Processing the Captured Tilt Image

      At first, you might think that it hasn’t captured the bokeh background blur, but please wait until the image has been processed. Wait until the “Processing image” marker finishes.

    • Wow! You’re in for a surprise, the Google Camera will now display your captured Bokeh and it will look absolutely stunning as shown in the following image
      Bokeh Effect on Single Lens Redmi Note 3 ? Done!!
      Bokeh Effect on Single Lens Redmi Note 3 ? Done!!

      As seen in the above image the image looks stunningly beautiful and at par with the OnePlus 5 Depth effect or iPhone 7 Plus mode! . Besides, you can even change the refocus by the highlighted option.

    • So, this is how your Normal Single camera phone also can take beautiful bokeh background blur pictures just like Dual lens camera phones. Incase, if you have any queries or are unable to use the app feel free to comment below!