Category: Android Tips N Tricks

  • Get Instant Free Rs.500 for Downloading Piggy App | Earn Unlimited Money from Piggy Mutual Funds App

    Get Instant Free Rs.500 for Downloading Piggy App | Earn Unlimited Money from Piggy Mutual Funds App

    What if you could get Instant Rs.500 just to download and app and create a profile ? . The Piggy App does exactly that, It provides you Instant Free Rs.500 on Downloading & Registering on the Mutual Fund app. Also it gives you a chance to redeem your money within 24 hours. Here’s a complete tutorial on How you can earn the Rs.500 on sign-up, Redeem it and even a trick to earn unlimited money!

    Tutorial To get Free Instant Rs.500 from Piggy Mutual Fund App –

    • First of all , you need to Download & Install the Piggy App from the Link given below to activate the offer! –
      Click here to Download Piggy Mutual Fund App from Google Play Store
    • Piggy is a Direct Mutual Fund Investing app where you can invest in Direct Mutual Funds free for lifetime! . Besides these, you can invest in ELSS (Tax Saving Funds) funds too.
    • The Free Rs.500 is given to you for FREE, and you can redeem it instantly after verification . To claim your Rs.500 , Tap on “Get Started”  as shown in the image below –

      Tap on Get Started
      Tap on Get Started
    • Now , on the next screen – You will see your “Welcome Gift” of Rs.500 which can be used to invest in any Mutual fund. Here select the fund of your choice or follow their recommendation . The Welcome Gift is only available if you download it from our link –
      Click here to Download Piggy Mutual Fund App from Google Play Store & get Rs.500

      Free Rs.500 Welcome Gift (Redeemable)
      Free Rs.500 Welcome Gift (Redeemable)

      We are anyways going to redeem it after the profile is verified 😛

    • Now, in the next screen use “Pay by Piggy Credits” option. That’s it! You have received your free Rs.500 worth Mutual fund, now simply Complete your profile to redeem your Mutual fund money 🙂

      Rs.500 Credited to your Account!
      Rs.500 Credited to your Account!
    • You can now redeem it after the profile is complete, or you can even let it remain as it is to gain free experience of How Investing works!
    • If you’re already investing in Mutual funds, we recommend you to use Piggy in future, as it will earn you extra 1% returns, as their is no commission involved as is the case with offline investments.
    • Also, Piggy app has “Smart Save” where you earn interest of 7% which is double as compared to bank account. The Money depositied in smart save can be withdrawn 24 x 7 (including on holidays) , in 5 minutes. Thus, you earn double on money putting it over here instead of bank accounts.
    • You can even check our comparison of the Best Direct Mutual Fund Investment Apps in India for more such apps.

    UPDATE! – You can increase your effective salary , just by using a better Salary account. Besides, giving you more offers, cashback, a better salary account can help your money grow by less bank charges and better interest rates – Read on How you can increase your salary by just opening an account!

  • How to Install and Run Chrome Apps & Extensions on Android [Full Tutorial]

    How to Install and Run Chrome Apps & Extensions on Android [Full Tutorial]

    Google Chrome is the leader in most used web browsers of the world. The Apps and Extensions present on the Google Chrome App Store make it even more useful and functional. Though, the Chrome App Store supports Chrome browser Desktop version, it doesn’t support installing apps on Google Chrome Android. Hence, in this tutorial we will cover – How you can install and Run your favourite Chrome Extensions on Android –

    Tutorial to Run Chrome Extensions & Apps on Android Phones , Tablets and TV-

    • We, all know that the default Chrome on Android doesn’t support extensions. Hence, we will be using Yandex browser for the same. Yandex is also based on Chromium code(like Google Chrome) and thus can directly install apps & games from Google Chrome Store.
    • Thus, first of all – we need to Download and install Yandex browser from the Google Play Store –
      Click here to Download & install Yandex Browser from the Google Play Store.
    • Once, you have installed Yandex browser, launch it from the apps launcher. It will now open a address bar browser page as shown below  –
      Yandex Browser Title Page
      Yandex Browser Title Page

      Now, either search for your desired Chrome extension, in the address bar. or use the following URL (in Yandex Browser) to open the Chrome Apps Store section to navigate to the app or extension you intend to install – https://chrome.google.com/webstore/

      Navigate to the Extension page on Chrome App Store
      Navigate to the Extension page on Chrome App Store
    • On the extension, page. Click on the “Add to Chrome” button as highlighted on the image above. The Extension will now ask you for permissions as shown in the following screenshot-
      Chrome Extensions permission dialog on Android
      Chrome Extensions permission dialog on Android

      Here, in the permission dialog , tap or select the “Add Extension” option.

    • That’s it!. The extension will now be downloaded and added to your Yandex browser . On confirmation, it will now show a green added to chrome button as highlighted below –
      Chrome Extension installation on Android Successful
      Chrome Extension installation on Android Successful

      Note –  if you want to individually see, the extension as you would on a Desktop browser, do the following steps .

    • Open the URL or site where you want to check or see the results . Now tap on the “3 dots” at the right hand side of the address bar. It will open a menu as shown in the following image –
      Access App or Extension Individually
      Access App or Extension Individually


    • Now , you will see all the extensions installed by you on your browser. Simply tap on the extension icon, and it will execute on the screen as shown below. We used Alexa Rank extension to show the Alexa Rank of our website as follows – img6
      Alexa Rank Extension running on Android
      Alexa Rank Extension running on Android

      That’s it , thus you can n0w run any of your Google Chrome extension on Android phones and tablets. Incase, if you face any queries feel free to let us know in the comment section.


  • How to add Face Unlock in any Android Phone | Use FaceID unlock on Android apps &  lock screen

    How to add Face Unlock in any Android Phone | Use FaceID unlock on Android apps & lock screen

    With iPhone X Apple made the face unlock or FaceID popular. While, the touch id or finger print unlock is now easily integrated into most Android phones, the face unlock feature isn’t. Only a few flagship smartphones have the face unlock feature. Hence, in this tutorial we will cover How to add and use Face ID lock & unlock on any Android phone or tablet. This method works on older android versions such as KitKat, lollipop, marshmallow and Nougat too.

    Tutorial to Add and use Face Unlock on all Android phones and Tablets.

    • Now, since Face ID lock & unlock algorithms are not present in the default lockscreen security or default app locker. We need to install Iobit Applock app which will allow us to use Facelock on Android . Please use the below link to download IoBit face unlock app –
      Click here to Download IObit Applock : Facelock app for Android from Google Play Store
    • Once, you have downloaded the app launch it for the first use. Now, we will configure the face scan and unlock step by step as mentioned below –

    Step . 1 – Set up a Default Pattern or Pin for Unlock

    • After, launching the app for first time. IObit will ask you to set up a default pattern or Pin for unlock. This step is important as it helps to improve the security of lock. Hence, please set up the default pin or pattern to unlock the phone as shown in the screenshot below –
      Set up a Default Pattern Password or Pin
      Set up a Default Pattern Password or Pin for unlock


    Step . 2 – Adding Apps & Lockscreen lock-unlock permissions to IObit

    • Now, in order to lock or unlock your phone IObit app locker needs to have control over the launcher and other apps. So, that it is launched first before opening the other apps.
    • Hence, we will need to add app to be locked under the IObit face lock. Tap on the “Open lock” beside the Screen lock app, and other apps you want to lock with your pin,pattern or face. Once they are locked with Iobit then we can use all the three methods.

      Enable IObit screen lock for main lockscreen and other apps
      Enable IObit screen lock for main lockscreen and other apps
    • Note – Open lock  will turn to Close lock once the app is linked to IObit as shown in the above screenshot. Please enable screen lock and other app lock for Iobit.
    • If it asks for usage access, please toggle it on as shown in the below figure –

      Usage Access IObit Unlock
      Usage Access IObit Unlock


    Step . 3 – Enabling Face Unlock Feature –

    • Here, we will enable the face unlock feature of the IObit app. To do so, navigate to menu by tapping the “3 horizontal lines at top left hand side corner as shown below –
      Tap and Open Menu
      Tap and Open Menu

      Now, from the drop-down menu select “Face lock” feature as shown in the following screenshot –

      Tap on Face lock feature
      Tap on Face lock feature

      It will now start downloading AI database for face lock as shown. Please wait until the bar reaches 100% and complete data is downloaded.

      AI Data for Face Lock - Unlock
      AI Data for Face Lock – Unlock


    Step . 4 – Enabling the Face Unlock Feature and Adding a Scanned Trusted Face – 

    • Once, it has downloaded the database, it will now ask you to move to a well-lighted area for face scan. Here tap on the “Enable Now” button as shown below –
      Tap on the Enable Now button
      Tap on the Enable Now button to scan face

      Now, your face scan screen will open. Here, place your face in the circle highlighted in the screenshot below. It will automatically scan and save your face –

      Place your face in the circle to finish scanning!
      Place your face in the circle to finish scanning!

      That’s it! After scanning your face in the circle it will redirect you to the “Face lock” screen.

    • Here simply tap on the “Grey face box to enable face lock for the corresponding app. If the face is grey = face unlock disabled, if face is coloured = face unlock enabled. It can be easily toggled on or off by tapping as shown in the figure below –
      Tap to disable or enable face lock for the app
      Tap to disable or enable face lock for the app

      That’s it!. It will now ask you to scan your face to unlock the screen or the added apps.

    • Congratulations! you have now successfully integrated iPhone X like Face ID unlock on your Android phone. Incase, if you face any problems or difficulties feel free to comment.
  • How to Change Font face in Instagram Bio & Posts on Android – ᔕTᗩᑎᗪ ᗩᑭᗩᖇT on Instagram

    How to Change Font face in Instagram Bio & Posts on Android – ᔕTᗩᑎᗪ ᗩᑭᗩᖇT on Instagram

    Instagram is a platform to show uniqueness, be it the photos, the caption with it or be your profile bio. Since, the photographs are always good with the various filters, what about the text on the caption or bio ? . Yes , you can style that too.. In this tutorial we will show you how you can change the font face or font style on Instagram profile and posts . The fancy fonts will only increase your style and reach to your followers.

    Tutorial to Change Font Style or Font Face on Instagram on Android –

    • This tutorial currently works only on Android, since the font changer app we use is only available for Android.
    • First of all, please download and install the Font Changer App from the link below –
      Click here to Download Font Changer Pro for Android from Google Play Store
    • Once you install the app, launch the app and tap on the “Get Started” option as shown in the following image –
      Font Changer Pro Android
      Font Changer Pro Android

      Now, once you have tap on “Get Started” it will show a blank space to type and select the font style .

    • In the blank space , please type the text you want to be in Style or change the font  as shown in the image below –
      Change font face style
      Change font face style

      To change the “Font” tap on the “3 horizontal lines” icon as shown above and select any of the font style as highlighted by the red box in the above image.

    • Now, once you have typed the bio text or caption text in the Font Changer app. Tap on the “Copy” option as highlighted in the below image –

      Tap on Copy to copy text with font style!
      Tap on Copy to copy text with font style!
    • Now, once we have copied the text, we just need to paste it in Instagram photo caption or Instagram Bio as shown below –

      Paste the copied font face text in Instagram bio / Caption
      Paste the copied font face text in Instagram bio / Caption
    • Now, simply post the photo or Save the changes to your profile. And the magic is done! you have now successfully changed the font style on Instagram.
    • This looks great as visible on my Instagram profile  –
      Font style on Instagram! - Changed font on bio
      Font style on Instagram! – Changed font on Instagram bio

      That’s it! feel free to comment your creativity or incase of any doubts do let us know them too in the comment section below. We have tested this method on Android lollipop, marshmallow, Nougat and even Oreo phones and tablets.

  • How to Download Sony Liv Videos on Android | Download Sony Liv TV Shows & Movies on Android by Liv Downloader

    How to Download Sony Liv Videos on Android | Download Sony Liv TV Shows & Movies on Android by Liv Downloader

    Sony Liv is the streaming platform powered by Sony Entertainment Television (SET) and lets you watch tv shows of all Sony channels such as Sony HD, Sony Pal, and Sab TV . However, it may happen that you missed your favourite show or would like to carry the memories of a particular episode or multiple episodes offline in your mobile to watch it later. Here we bring you the Easiest Method to Download Sony Liv Videos on your Android phone / table by using Videoder : Liv Downloader.

    Tutorial to Download Sony LIV TV Shows Videos on your Android –

    • For Downloading sony liv tv shows we will be using the Videoder app which lets you download the videos of any site you visit, in our case it will be Sonyliv.com
    • Videoder is not available on the Google Play Store directly and hence we need to download its apk file separately to use it. Here’s how you can Download & install liv video downloader on your Android –
    • Click here to Download Videoder App Apk for Android
    • Installation of external apps apk is not available by default on most Android devices ,thus we need to enable “Installation from Unknown Sources” first before installing videoder.
    • To enable the feature, please navigate to “Settings – > Security – > Installation from unknown Sources”  and toggle it “ON” as shown in the Screenshot below –

      Enable Installation from Unknown Sources
      Enable Installation from Unknown Sources
      Now, once you have enabled the installation from unknown sources option. Navigate to the “Downloads” folder and tap on the Videoder apk file.
    • It will now prompt you with a window asking you permissions to install the App as shown in the image below –
      Videoder asking for Permissions
      Videoder asking for Permissions

      Here tap on the “Install” option as shown above.

    • Videoder app will now be installed on your device. Once it is successfully installed, it will show a success confirmation screen as shown in the image below –
      Videoder installation Success Screen
      Videoder installation Success Screen

      Here on the installation success , please tap on the “Open” button as highlighted in the above image. or open the Videoder app from the menu drawer.

    • Now, to download Sony liv videos please visit the Sony Liv website – http://sonyliv.com inside the Videoder app.
    • Here in videoder app, start playing the TV Serial or show which you want to download as shown in the image below –
      Tap on the Red Download Icon to Generate Links
      Tap on the Red Download Icon to Generate Links

      Here , once the video is loaded and starts playing – Tap on the “Red” Download button icon as shown in the above image.

    • Once, you tap on the red download icon, please wait until it generates the Download links for your favourite tv serial.

      Sony Liv Download Links generation please wait
      Sony Liv Download Links generation please wait
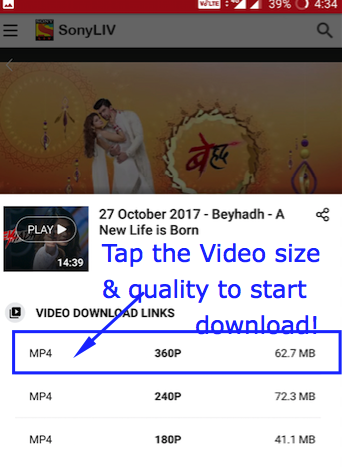
    • Please be patient, until the Download links are generated. Once the Download links are generated , it will show you a menu with the Video quality and video sizes available for download as shown below –
      Download Sony Liv videos on Android
      Download Sony Liv videos on Android

      Simply tap on the video size/quality you intend to download!.

    • Congratulations! you have successfully downloaded your favourite TV Show or Video episodes from Sony Liv on your Android. Incase, if you have any queries or face any difficulties feel free to comment . The method has been successfully tested on Android kitkat, lollipop, marshmallow, Nougat & even Oreo too!.
  • How to Do Reverse Image Search from your Mobile [ Android & iPhone ] | Perform Google Photo Upload Search Solution

    How to Do Reverse Image Search from your Mobile [ Android & iPhone ] | Perform Google Photo Upload Search Solution

    Reverse Image Search is one of the best features of Google Image Search which lets you find the source/origin of photo, or other similar images. The Reverse Image Search option is easily visible on the Google desktop site, but is absent on the mobile site.

    There are various third party sites such as http://reverse.photos which let you perform Reverse image search on mobile. But these sites are less secure as they store your photos on their own servers thus vulnerable to misuse. Hence, to keep your search more secure we will cover – How to Perform Google Reverse Image search on Official Google Site on Mobile.

    Tutorial to Perform Reverse Image Search on Mobile (Android + iPhone + Tablet)

    • We will be using Google Chrome Web browser for this purpose as its more speedy while accessing Google Services.
      Now , in order to perform reverse image or photo upload search perform the following steps-
    • First, of all Navigate to the Google Images site on your Chrome browser –
      Click here to Open Google Images site in a New tab – http://images.google.com .
    • Now, after the Site is loaded – Click on the “3 Dot icon” at the top-right hand side corner of your Screen as shown in the image below –
      Tap on the 3 Dots Icon
      Tap on the 3 Dots Icon

      Now, it will open a menu as shown in the following image .

      Google Chrome Menu - Tap on Request Desktop Site
      Google Chrome Menu – Tap on Request Desktop Site
    • Now , Tap and select the “Request Desktop Site” option as highlighted in the above image.
    • It , will now load the Google Images website in its full Desktop view as shown below.
      Google Images Desktop Site - Tap on the Camera Icon
      Google Images Desktop Site – Tap on the Camera Icon

      Here tap on the “Camera” icon as highlighted in the above image to enter Reverse image search.

    • Here you can either enter the image URL you want to search or “Upload an Image” by using the “Choose File” button. After clicking on the “Choose file” button it will ask you to upload image from camera/files gallery.
    • Once you click and select the image , it will be uploaded to Google server and you can access the search results as shown
      Successful Google Reverse Image Search on Mobile Android & iPhone
      Successful Google Reverse Image Search on Mobile Android & iPhone

      We hope you found the tutorial easy & useful . Incase of any doubts or difficulties feel free to comment below.

  • How to Open & Extract – Unrar Rar Files on Android | Unlock Rar Archives on Android

    How to Open & Extract – Unrar Rar Files on Android | Unlock Rar Archives on Android

    Rar file archives are now widely used to send across multiple documents in a single file. Though, zip archives also do the same thing. RAR archives can save more space by higher compression levels, ability to split big files into multiple ones and so on. Android OS by default, doesn’t support extraction of RAR files, and hence we need to use other app. Here’s an easy tutorial on How to extract Rar files on Android.

    Tutorial to Open Rar archives on Android | Unrar Rar files on Android Phones & Tablets –

    • We need to install RAR app developed by RARlab – the official owners of Rar compression algorithm. We can use other apps but since the app is official, plus is free, we will go with the official one.
      Click here to Download RAR app from Google Play Store
    • After the app is installed, launch the app. Then it may ask you a one time permission to access files depending on your Android version. Tap on “Allow” as shown in the below image –
      Tap on Allow to give file storage access
      Tap on Allow to give file storage access


    • Now, navigate to the downloaded / stored RAR file location which you want to Extract or Open.
    • Here, we have two options – Either to extract all files of the Rar archive or to extract specific components. Thus, we will cover both the parts .
      • To extract all files – Select the Rar file by marking the arrow next to Rar files and click on the “upward arrow” extraction icon as shown in the below image –
        To extract complete RAR Archive
        To extract complete RAR Archive

        Next you will be redirected to extraction options screen.

      • To Extract only selected or Particular file of the Rar Archive –  First of all tap on the file name of Rar archive. Then it will show all files present inside the Rar Archive as shown below
        Files present in the Rar Archive select the files to extract
        Files present in the Rar Archive select the files to extract

        Now, here select all the files you want to extract and tap on the “Upward Arrow” / extract button. You will be directed to extraction options screen.

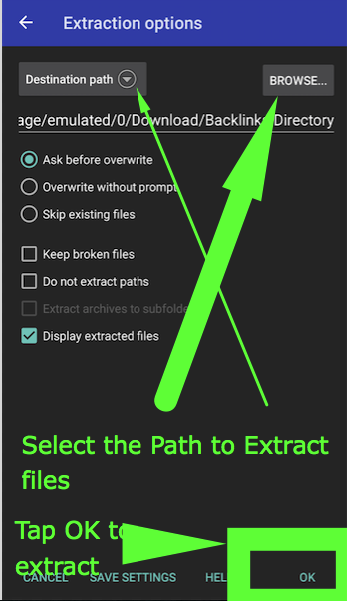
    • In the extraction options screen as shown below, Select the destination path or location where you want to extract files. Then Tap on “OK” button .
      Select the Path to Extract Files and tap on OK Button
      Select the Path to Extract Files and tap on OK Button

      That’s it! . You have now successfully extracted and unlock password protected Rar Archives on Android. If the Rar file has password it will prompt you to enter at screen during extraction. Incase, if you face any problems or have any queries feel free to comment!.

    • We have tested the app on Android KitKat, Lollipop, Marshmallow, Nougat and even Oreo. The app works perfectly fine, and with speed. Incase, if you find any other good RAR extractor we will like to know about it.


  • How to Extract & Unlock Password Protected Zip File on Android | Open Password locked Zip file on Android

    How to Extract & Unlock Password Protected Zip File on Android | Open Password locked Zip file on Android

    Zip files are a great way to send across multiple files easily and via mail and other media. But, with the recent advent of Data Sniffers and security threats coming up, sometimes zip files are encrypted with a Password so that only the intended recipient can access and open the file. The bad thing is that Android natively doesn’t support extraction but it can be easily enabled by an app. So, in this tutorial we will cover How to unlock Password Protected zip files for extraction on Android so that you can open the files inside them.

    Tutorial – How to Open & Extract password protected Zip files on Android

    • Considering, that you have already downloaded the zip file, we will start with the first step of installing Xplore. Xplore is a file manager app for Android (5 Mb in size) which can easily extract any password protected zip file. Thus, essentially a two in one app.
      Click here to Download & Install Xplore app from Google Play Store.
    • Now, depending on your Android version it may ask you permission to access your Storage, here tap on “Allow” as shown in the image below –
      Xplore Permission tap on Allow
      Xplore Permission tap on Allow

      Now, navigate to the directory where you have stored your zip file. Generally it will be the “Download” directory in the “Internal Storage”

    • Once you have located your downloaded zip file, simply double tap on the filename as shown below –
      Double tap on password protected zip file
      Double tap on password protected zip file


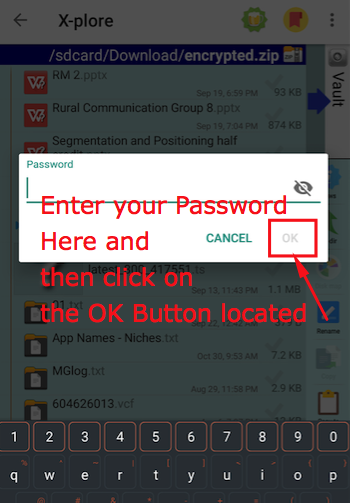
    • Now, it will prompt you a text field to enter the zip file password as shown in the next screenshot. Here, enter your Zip file password and tap on the OK button highlighted below –
    • Enter Password & tap on the OK Button
      Enter Password & tap on the OK Button

      Now, after entering the password. Your Zip file will be easily unlocked!. Thus, you can now copy, move, open, edit , unlock the contents of the password protected zip files as shown in the following image –

      Successful Unlock of Password Zip File on Android
      Successful Unlock of Password Zip File on Android

      That’s it you have now successfully unlocked an encrypted zip file on your Android device. This method works on all Android versions right from Kitkat, Lollipop, Marshmallow, Nougat and even Oreo too.

  • Best Place To Host Android App Website SiteGround Review

    Best Place To Host Android App Website SiteGround Review

    A reliable web hosting is an important part of building a website. After all, it’s what determines the overall performance and accessibility of your website! When you create a website, you always want users to access it without any downtime or interruptions. And for this, it is necessary that your hosting is in the right hands.

    Today, I am going to review a popular web hosting company – SiteGround, which has set up its own place in the web hosting industry in a very limited time. SiteGround came into existence in the year 2004 at Sofia, Bulgaria. Started by few university friends, SiteGround has more than 400 employees today. At present, the company hosts 5,00,000 domains across the globe for different types of clients and industries. In addition to this, the company has servers in three continents (United States, Europe, Asia, making it more prompt and customer-friendly web hosting company.

    Regardless of the competitiveness of web hosting industry, Siteground’s user ratings stay atop with all other big players such as Hostinger, BlueHost and GoDaddy.

    Let’s review different services from SiteGround and get to know how worthy they are.

    Services:

    SiteGround provides various kinds of web hosting services. The major ones are:

    • Shared web hosting
    • Cloud hosting
    • VPS hosting
    • Dedicated hosting
    • Reseller hosting
    • Domain names

    SiteGround is one-stop-shop for various web hosting requirements. Along with the affordable shared hosting, there are plenty of other options people can look into. SiteGround has implemented cloud infrastructure along with both dedicated and virtual servers. And, if you own a big database portal or site, they can provide you custom-made bespoke server as well. Coming to their domain registration, it is good to find that you can order unlimited numbers of domains through your account. Domains are available for all popular extensions such as .com .net .org .biz. Info .us, etc.

    Uptime:

    It was on my priority list to test the Uptime of SiteGround. And the results I got were really amazing.  To track uptime, I used ‘Uptime Robot’ that tracked my website for a month.  The tool helped me to check host’s overall availability and it observed 100% uptime for the entire one month. With SiteGround’s server, I didn’t experience any downtime even for a single second.

    Speed:

    The response time is always very important with a web hosting. People will able to blaze through your site only if your hosting partner provides lightning fast speed.

    Coming to the SiteGround’s speed test, I tested its speed for my simple HTML site and the response time I observed was 81 ms. (US server). Even I find the same result (81 ms.) with the website developed by SiteGround website builder.

    Although the speed of your site may vary depending upon your location and type of server you have setup with your account yet I can say SiteGround will not disappoint you in terms of speed. Another thing I would like to add is that SiteGround uses NGINX web server technology that loads website much faster.

    Customer Support-

    For me, bad customer support is a deal breaker. Therefore, I decided to test all three support platforms of SiteGround i.e. Phone Support, Live Chat, and Tickets.

    Phone Support- When I accessed their phone support, it took 40 seconds to describe my opening options on IVR and hardly 15 seconds to connect. That I think is pretty good. The representative I was hooked up with was prompt and enough knowledgeable.

    Live Chat – Live Chat- SiteGround has 24/7 Live chat support system, which can be easily accessed through the home page of their official website. You just need to fill few details related to your account and your query and you are ready for it.

    It took less than 1 minute to me to connect with their support system which is reasonable.

    Tickets –  Speaking of Ticket support, one of the important things to test in is – the response time. The quicker it is the more suitable it is to use. Otherwise, Live Chat and Phone Support can be better options. I had very good experience with their Ticket Support System. It took  just 2 minutes that was pretty good than their advertised 10 minute response time.

    Anti-Theft Protection-

    It is one of the most advanced features given by SiteGround. If someone tries to access your website and enters the password incorrectly, it automatically detects the situation and prevents your personal and payment information from hacking.

    Final Take –

    All and all, Siteground sure sounds like a promising web hosting. Its services are definitely worth checking out.