Category: Android Apps

  • How to Change Font face in Instagram Bio & Posts on Android – ᔕTᗩᑎᗪ ᗩᑭᗩᖇT on Instagram

    How to Change Font face in Instagram Bio & Posts on Android – ᔕTᗩᑎᗪ ᗩᑭᗩᖇT on Instagram

    Instagram is a platform to show uniqueness, be it the photos, the caption with it or be your profile bio. Since, the photographs are always good with the various filters, what about the text on the caption or bio ? . Yes , you can style that too.. In this tutorial we will show you how you can change the font face or font style on Instagram profile and posts . The fancy fonts will only increase your style and reach to your followers.

    Tutorial to Change Font Style or Font Face on Instagram on Android –

    • This tutorial currently works only on Android, since the font changer app we use is only available for Android.
    • First of all, please download and install the Font Changer App from the link below –
      Click here to Download Font Changer Pro for Android from Google Play Store
    • Once you install the app, launch the app and tap on the “Get Started” option as shown in the following image –
      Font Changer Pro Android
      Font Changer Pro Android

      Now, once you have tap on “Get Started” it will show a blank space to type and select the font style .

    • In the blank space , please type the text you want to be in Style or change the font  as shown in the image below –
      Change font face style
      Change font face style

      To change the “Font” tap on the “3 horizontal lines” icon as shown above and select any of the font style as highlighted by the red box in the above image.

    • Now, once you have typed the bio text or caption text in the Font Changer app. Tap on the “Copy” option as highlighted in the below image –

      Tap on Copy to copy text with font style!
      Tap on Copy to copy text with font style!
    • Now, once we have copied the text, we just need to paste it in Instagram photo caption or Instagram Bio as shown below –

      Paste the copied font face text in Instagram bio / Caption
      Paste the copied font face text in Instagram bio / Caption
    • Now, simply post the photo or Save the changes to your profile. And the magic is done! you have now successfully changed the font style on Instagram.
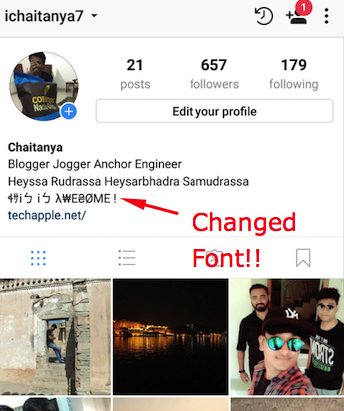
    • This looks great as visible on my Instagram profile  –
      Font style on Instagram! - Changed font on bio
      Font style on Instagram! – Changed font on Instagram bio

      That’s it! feel free to comment your creativity or incase of any doubts do let us know them too in the comment section below. We have tested this method on Android lollipop, marshmallow, Nougat and even Oreo phones and tablets.

  • How to Download Ozee Videos on Android by Ozee Video Downloader : Videoder for Android

    How to Download Ozee Videos on Android by Ozee Video Downloader : Videoder for Android

    Ozee is the Streaming service powered by Zee entertainment, and lets you watch your favourite Zee Channel TV Shows online. It consists of popular shows, videos and movies produced by Zee Network. However, since the TV Serials are streamed online, Ozee doesn’t allow for offline viewing, or downloading. Also, you might want to download the show, for your collection or to watch during travelling. For the same purpose, we bring you a tutorial on downloading Ozee videos on Android phone without Rooting by using Ozee Video Downloader : Videoder.

    How to Download Ozee TV Shows & Videos on your Android Phone & Tablet 

    • Videoder (Ozee Downloader) is not available on the playstore, and hence we need to externally download the Videoder APK and install it on the phone.
      Click here to Download Videoder App Apk for Android
    • Since, Installation of external app apk is disabled by default on Android , we need to enable “Installation from Unknown Sources” first before installing videoder.
    • To enable it navigate to “Settings – > Security – > Installation from unknown Sources”  and toggle it “ON” as shown in the Screenshot below –

      Enable Installation from Unknown Sources
      Enable Installation from Unknown Sources
      Now, once you have enabled the installation from unknown sources option. Navigate to the “Downloads” folder and tap on the Videoder apk file.
    • It will now prompt you with a window asking you permissions as shown in the image below –
      Videoder asking for Permissions
      Videoder asking for Permissions

      Here tap on the “Install” option as shown above.

    • Videoder app will now be installed on your device. Once it is successfully installed, it will show a success confirmation screen as shown in the image below –
      Videoder installation Success Screen
      Videoder installation Success Screen

      Here on the Success Screen , please tap on the “Open” button as highlighted in the above image.

    • Now Navigate to the Ozee site – http://ozee.com inside the Videoder app.  Here, browse to the video you want to download on your Mobile.
    • Once the video screen is loaded, now simply tap on “Red Down button” at bottom right hand side corner as shown in the image below –
      Tap on the Red Download Icon
      Tap on the Red Download Icon

      Now, once you have tap / click on the Red download icon. It will start generating Ozee video download links on your phone as shown below. Please wait until the links are generated.

      Ozee video download links Generating Process
      Ozee video download links Generating Process

      It will show you direct download links as soon as it is generated

    • Once, the process is over it will automatically show you different download links and their size as shown in the image below –
      Ozee video download quality links
      Ozee video download quality links

      Here simply select the type / quality of video you would like to download. It will start downloading automatically in the background.

    • Congratulations!. You have now successfully downloaded Ozee Videos on your Android mobile without rooting, by single app. Incase if you have any problems or face difficulties feel free to comment below.
  • Download Videoder App for Android [ Latest Apk v14.0 Free Download ] 2019

    Download Videoder App for Android [ Latest Apk v14.0 Free Download ] 2019

    Videoder is an essential app for Android when it comes to download media such as videos and MP3 audio files, as its downloaded media quality is the Best. We say so because it has lots of great features such as ability to Download Youtube videos, convert videos to mp3. Also besides Youtube, videoder can even download videos from sites such as Vimeo, dailymotion, Instagram, twitter, vk, 9gag, ted etc. Thus, we present you the latest videoder App APK link which will let you download & install Videoder app on your Android phone & tablet.

    Videoder App APK Download
    Download Link Download Link
    Operating Systems : Android 4.4, 5.1, 7 & Oreo
    Type of Installer : Full APK
    License : Free


    Videoder App for Android (Kitkat, Marshmallow, Lollipop, Nougat / Oreo) Download & Installation Steps – 

    • Since, Videoder is not available on the Playstore , we need to Download its apk separately from the links below & Install it.
      Click here to Download Videoder App Apk for Android
    • Since, Installation of external app apk is disabled on Android , we need to enable “Installation from Unknown Sources” first before installing videoder.
    • To enable it navigate to “Settings – > Security – > Installation from unknown Sources”  and toggle it “ON” as shown in the Screenshot below –

      Enable Installation from Unknown Sources
      Enable Installation from Unknown Sources
      Now, once you have enabled the installation from unknown sources option. Navigate to the “Downloads” folder and tap on the Videoder apk file.
    • It will now prompt you with a window asking you permissions as shown in the image below –
      Videoder asking for Permissions
      Videoder asking for Permissions

      Here tap on the “Install” option as shown above.

    • Videoder app will now be installed on your device. Once it is successfully installed, it will show a success confirmation screen as shown in the image below –
      Videoder installation Success Screen
      Videoder installation Success Screen

      Here on the Success Screen , please tap on the “Open” button as highlighted in the above image.

    • Videoder app will now load on your phone, please allow sometime until the loading process is completed.
      Videoder App APK Download Loading
      Videoder App APK Download Loading

      Now, simply select the service from which you want to Download videos or music from the various options shown in the following image .

      Videoder Supported Services
      Videoder Supported Services
    • Now, simply use the app as a browser, and once you come across video or audio you want to download . Simply tap on the “Red” Download icon as shown below.

      Tap on Red Download Icon to start Downloading
      Tap on Red Download Icon to start Downloading
    • That’s it !. Thus you can now download videos from any popular websites using the Videoder app.
  • RetouchMe – Body & Face Photo Editor for Selfie Review: Photo Editing Made Easy

    RetouchMe – Body & Face Photo Editor for Selfie Review: Photo Editing Made Easy

    There are millions of photo addicts who thrive to add beauty to their photos. Though there are a number of apps that can be used to beautify a photo, there are hardly any application that can beautify every part of your body. If you want to retouch your photo perfectly then RetouchMe App is a powerful application that has gone popular in recent times. Let’s have a brief insight about this stunning application.

    magic touch

    RetouchMe – A Brief Knowhow

    RetouchMe is a handy photo correction app that helps you to get a perfect body and face processing without any image editing skills. It will turn your snaps into a model portfolio just in few minutes. Over 5 million people are associated with this app. It lets you improve your looks in the photo without having any professional photo-editing knowledge.

    RetouchMe has a skilled team of designers that will edit your photos with perfection. They can easily resize, reshape, slim, or lengthen any part of the body. You just need to choose what things you need to adjust in the photo and the professionals will help you out in slimming the waist, enlarging breasts, removing belly fat, removing acne, wrinkles, pimples, increasing lips size, whitening the teeth, reducing the nose, removing fat folds, and just anything you want to.

    compare

    Ultimate Features of RetouchMe

    RetouchMe is a powerful solution to edit your photos without having any professional image-editing knowledge. All your images are processed by a skilled team of professionals who are backing up the app 24X7. The ultimate aim of RetouchMe’s designers is to retouch the photo in such a way that the viewer could not understand that the image was ever retouched. Some of the greatest features of this app are as follows:

    • Perfect Body Editing: The photo body reshaping was never been easier as it is with RetouchMe. You can easily slim, increase, or emphasize on any area of the body using this stunning app.
    • Make your Skin Flawless: The scars, the blemishes, unwanted spots, uneven skin tone, wrinkles, and many other things can ruin even a perfect photograph. You can achieve perfection by airbrushing your skin with RetouchMe.
    • Face Retouching: You can easily eliminate the dark circles under your eyes, whiten your teeth, get rid of red eye effect, reshape your face, or shape up your nose with RetouchMe to make your photo look stunning.
    • Background: The background of your image can be changed with its background changer option. This will help you in removing the unwanted objects from the background or correcting the background to achieve optimal image quality.
    • Get Photos for Social Sharing: You can easily edit the photographs for your Facebook profile or Instagram account using RetouchMe app. Make your selfies look gorgeous with this new photo editing app and make them look awesome.
    • Retouch by Editor Choice: If you are not sure about the areas for correction, you can leave it to the team of RetouchMe’s designers. The image-retouch and color correction with complete touch up to face and body features will surely amaze you.

    body building

    Guide to Use RetouchMe App

    • Before using the app, you need to download the install it on your device. After the installation is complete, open the app.
    • You need to buy some credits in order get your photo retouched by the professionals. The credits can be earned by downloading the apps, RetouchMe suggests you.

    credits

    • Allow, the app to access your phone’s Gallery. It will help you to select the photo you want to edit directly from the Gallery. Choose a photo you want to edit from the phone’s Gallery.

    gallery

    • Remember that the minimum order you can make is of 20 credits.
    • Choose the changes you want to make in the photo.

    designer

    • Now, press ‘Send to Designer for *Credits’ options. The photo will be sent to the professional for editing. You will get back the photos after editing in few minutes.
    The Bottom Line

    RetouchMe is an awesome application developed for the crazy photo lovers who want perfection in just everything. This app lets the enthusiasts to get their photos retouched by the professionals and make their face and body look stunning. Try it now!

  • 5 Best Adblock Browsers for Android in 2019 to Browse Faster! & Save Data Usage

    5 Best Adblock Browsers for Android in 2019 to Browse Faster! & Save Data Usage

    With the growing number of Android smartphone users, the internet usage on Smartphone is on the rise. One bad aspect of Google’s Android Operating System is that the default browser chrome doesn’t block ads and this causes a lot of issues such as slow speeds, website pop-ups with adult ads, phone vibrations etc. Thus, these ads not only hinder your browsing experience but also can steal sensitive information using tracking cookies. In this article, we bring you the Best 5 Free Adblock browsers for Android which will not only enhance your browsing experience by not loading ads-making browsing faster but also protect your data and keep you more secure.

    Top 5 Best Free Adblock Browsers for Android Phones and Tablets –

    Browser # 1 – Firefox Focus

    Firefox Focus on Android with Adblocker
    Firefox Focus on Android with Adblocker

    Firefox is our favourite browser when it comes to PCs and considering it has an Android version available that too with inbuilt ad-block it made sense to test it out. We have kept Firefox Focus on the first position due to the host of features it has viz –

    • Inbuilt ad block and tracking protection
    • Ability to clear history each time you exit
    • Its a privacy focussed browser so no data is sent about your previous visits.
    • Completely open-source and comes from Mozilla!
    • Besides, it has so much privacy options that we couldn’t even take a screenshot so this is the most secure browser ever we tested on Android that too with Adblock

    Click here to Download Firefox Focus from Google Play Store


    Browser # 2 – Orbitum

    Orbitum Browser for Android
    Orbitum Browser for Android

    Though, we love firefox and Chrome. We have purposely kept Orbitum browser before Chrome-based Brave just due to the sheer functionalities it has.

    Orbitum is not a popular browser but its a neat browser which surely deserves a space in your phone due to its salient features such as –

    • Inbuilt Adblocker
    • Desktop View Support
    • Ability to change the color and themes!
    • And the best part is Torrent Downloading support! . Yes , Orbitum comes with an in-built torrent downloader so that you do not need to download a separate torrent client for downloading p2p files. Saving not just data , but also disk space too!

    Click here to Download Orbitum Browser for Android from Play Store


    Browser # 3 – Brave

    Brave Adblock browser based on Chrome
    Brave Adblock browser based on Chrome

    Incase you are a Google Chrome user and using any other browser is inconvenient for you, then you can use Brave Browser.

    Brave browser is based on Google Chrome engine with the same User interface and comes inbuilt with a “Brave Shield” which can –

    • Block Ads and Trackers
    • Block External Scripts such as Anti-adblockers
    • Block 3rd Party cookies
    • Also, you can use force HTTPS , which will force open the https version of any site you’re visiting to ensure you’re data cannot be seized and tracked by any other hijackers. (Very Useful for Online Payments & transactions)

    Click here to Download Brave Browser with Adblock for Android from Google Play


    Browser # 4 – Adblock Browser

    Adblock Browser for Android (Non-Extension)
    Adblock Browser for Android (Non-Extension)

    Adblock the de-facto Ad blocker for Chrome has a standard alone browser for Android users. The Adblock browser is developed by the same company that has built the Adblock extension and is also speedy to use.

    Though, it has less features as compared to other browsers featured in this article. It does what it says and blocks those annoying vibrating ads on your Android.

    Click here to Download Adblock Browser from Google Play


    Browser # 5 – Opera Mini

    Opera Mini with Adblock Inbuilt
    Opera Mini with Adblock Inbuilt

    It is for the 5th position in this list that we really had to stretch and select a particular browser as there was a healthy competition between Maxthon, Ghostery, Opera Mini, Dolphin, Halo etc just to name a few.

    We selected Opera Mini purely based on the way it transformed browsing by its Server and its lightning speed on 2g Networks.

    Combined with the compression, and Adblock Opera Mini does blocks ads and help you really save data and loads page faster.

    But the revamped news section, does take away the old charm of Opera Mini which now has a bit of commercial money making touch. But still Opera mini, is the browser which can be used on any 2g or 3g networks where speeds are low.

    Click here to Download Opera Mini from Google Play Store

    Thus, these are the Best Adblock Browsers which are Free. We have tested over 16 Different browsers before finalising on these. Still, if you face any issues or would like to recommend any other browser feel free to comment below!

  • How to Shoot Background Blur(Bokeh) on Single Camera Phone Android

    How to Shoot Background Blur(Bokeh) on Single Camera Phone Android

    Bokeh Mode or Background blur got more popular with the iPhone 7 Plus which allowed users to focus on the subject with a blur on the background in its Portrait mode. With the New Dual Camera lens Smartphones coming around like Honor 8 Pro, OnePlus 5, the bokeh effect is becoming even more popular. There’s literally no need to purchase a new phone just for the sake of getting the Background Blur effect, in this tutorial we will show How you can Capture Dual Camera-like Bokeh effect photos with Background Blur on your existing single lens / single camera Smartphone.

    Tutorial to Capture Bokeh Effect / Dual Camera like Photos on Single Camera Phones Android –

    • To simulate Bokeh effect or lens blur, we will be using the Google Camera App for Android. We cannot capture Background blur or Portrait mode photos with the Stock camera app.
    • To Install, Google Camera app on your Smartphone you can install it from the links given below –
      Click here to Download & Install Google Camera app from Play Store
      or
      Click here to Download Google Camera Apk for Android
    • Once you have installed the Google Camera app from the above links, launch the app. It will now show a shoot mode screen as shown below –
      Swipe from left to right to bring the Options panel
      Swipe from left to right to bring the Options panel

      Here Swipe from left to right to show all the shooting options available, as shown in the image above. In the options, available Tap and select the “Lens Blur” option as shown in the image below –

      Select the Lens Blur Option in Google Camera
      Select the Lens Blur Option in Google Camera
    • Once, you select the Lens Blur Option , it will show you a small tutorial on How to use the Lens Blur option to capture Bokeh effect photos as shown in the following image – Google Camera Lens Blur Tutorial
    • Here click on the “OK, Got It” button. Thus, basically all you need to do is select the Lens Blur Options, and then shoot the “Object” you want to focus on while raising your phone in an angle. Let’s see how it works –
    • In the Lens Blur capture screen, first tap the capture button as shown in the figure below –
      Click on the Capture Button
      Click on the Capture Button

      Now , Keep on raising your phone until the indicator shown below is full. Be as slow as possible while raising the phone, so that your focus on the object remains constant. Try not to be too fast neither too slow . Check the below screenshot for Indicator –

      Indicator Box of Google Camera Lens Blur
      Indicator Box of Google Camera Lens Blur

      Slowly raise the phone until the above image highlighted box goes upwards as shown in the next image –

      Indicator Box going upwards
      Indicator Box going upwards

      This takes a lot of time to get used to, hence we recommend practicing it on a stationary object before moving onto moving objects. We tried this on our Deodorant can and once we finished the tilt mode. It started focusing our captured photo as shown below –

    • Processing the Captured Tilt Image
      Processing the Captured Tilt Image

      At first, you might think that it hasn’t captured the bokeh background blur, but please wait until the image has been processed. Wait until the “Processing image” marker finishes.

    • Wow! You’re in for a surprise, the Google Camera will now display your captured Bokeh and it will look absolutely stunning as shown in the following image
      Bokeh Effect on Single Lens Redmi Note 3 ? Done!!
      Bokeh Effect on Single Lens Redmi Note 3 ? Done!!

      As seen in the above image the image looks stunningly beautiful and at par with the OnePlus 5 Depth effect or iPhone 7 Plus mode! . Besides, you can even change the refocus by the highlighted option.

    • So, this is how your Normal Single camera phone also can take beautiful bokeh background blur pictures just like Dual lens camera phones. Incase, if you have any queries or are unable to use the app feel free to comment below!
  • BonkLive Review: Free Social Streaming App For Your Android And iOS Mobile

    BonkLive Review: Free Social Streaming App For Your Android And iOS Mobile

    If you love to do online live video chatting sessions with your followers, then you are going to love BonkLive as through it you can earn while doing your favorite thing. Through it, you can make money just by run ads commercials on your live video sessions, or you can also earn while reading out some ads related phase. BonkLive is one of those few platforms which gives its users a chance to earn while doing social networking. Anyone can join it for free using his/her email account or other social networks account through any iOS and Android based device, and it is also available for desktop.

    Concept of BonkLive

    bonklive

    Before moving on to features, part let us clear the concept of BonkLive here. Let us tell our readers how they can earn from it and how it is a better option.

    1)    As we mentioned above users can earn money just by running ads on their live videos. They can also earn just reading some jingles or some lines regarding any brand. Only Bonkified users are eligible to do so, and for that, ordinary users have to clear some levels to become a Bonkified user.

    2)    It is the best way for an influencer to cash his/her popularity.

    3)    As influencers are earning through it, they will spend more time on it, and because of it, followers will get a chance to know more about their favorite star.

    4)    BonkLive uses the concept of virtual money( BonkLive coins, Diamonds) instead of real cash. These coins can be bought from an online BonkLive shop.

    5)    Followers can send virtual gifts to their favorite star to grab special attentions, and these gifts can be exchanged for real money.

    6)    Users with get the virtual debit card with MasterCard facilities.

    Features of BonkLive

    If we leave the concept of money making behind the BonkLive comes with plenty of exciting features which are as follow:

    1)    Through it, users can connect with his/her followers with live features and some amazing filters and stickers options are also available to make live sessions more engaging.

    2)    To increase interaction levels with fans chatting option is also available through which broadcaster can interact with his/her viewers through the chat box.

    3)    Users can buy virtual gifts to their favorite star while the live session is taking place and can grab special attentions like special mentions, etc.

    4)    Followers can connect with their favorite stars through direct message option available in the app.

    Close View

    Let us give a quick close look to the interface of the BonkLive android app.

    1) Here is the snap of login screen have a look at below snap to get an idea about the various login options available.

    login screens

    2)    And from the home screen only you can start the live session to entertain your followers.

    followersfollowers

    3)    You can also follow other users if you want. You can search for your favorite broadcaster from easy search option available.

     broadcasting

    4)    If you want to check total diamonds, coins, etc, then you have to check your profile option. You will get something like this.

    users

    Final Words

    Let us wrap up here with some pros and cons which we noticed while using it, read the below pros and cons carefully and take action accordingly.

    Pros:

    1)    The concept of the BonkLive is very good, it is beneficial for both celebrities and their followers.

    2)    The idea of the virtual gift is also outstanding as by paying a small amount a person can get a chance to talk with his/her ideal.

    3)    Users can share their live session on other platforms which is also a very good thing.

    4)    The interface of Android app is very interactive and smooth.

    Cons:

    The only thing which we didn’t like is that there is no desktop client app for Windows 10 laptop and PC users, its desktop client tool should be available so that its users can use it smoothly from their desktop.

    We hope you have read all the above points carefully and will take action accordingly. As it is a free app which doesn’t ask for any bank info, there is no harm in using it. Try it and earn from it.

  • [Guaranteed] Download & Install Jio TV for PC / Windows 10 / 7 / 8.1 [Laptop & Desktop]

    [Guaranteed] Download & Install Jio TV for PC / Windows 10 / 7 / 8.1 [Laptop & Desktop]

    Reliance Jio TV has changed the way we use our mobile phones. Jio TV lets you use your mobile phone as a live TV without requiring a DTH Connection. In addition to streaming live Indian channels , Jio TV also lets you watch catch-ups or previous episodes of your favorite TV Serial (series) and live sports channels too. Now, using your mobile phone as TV has few issues such as inability to chat and watch live TV together, or the small screen issues which don’t give the feel of a TV. But not anymore, in this tutorial we will show you How to Download & install Jio TV for PC / Windows 10 / 8.1 / 7 so you can watch your favorite Jio TV on Laptop / Desktop.

    How to Download and Install Jio TV for Laptop / Desktop –

    Update – Incase if you do not have a Jio Sim or Jio Username / Password – You can even use Nush TV as its perhaps the best alternative to Jio TV – Click here to Download Nush TV App

    Tutorial –

    • First of all, install the Nox App player by double-clicking the installer file. Click on “Install” as shown in the image below –
      Click on Install to install Nox
      Click on Install to install Nox

      Now, after we have installed the Nox Player, we need to install / add Jio TV to it as it is not pre-built. To install Jio TV there are 2 methods –

    • Method 1 – 
      • Click on the “APK” icon in the right hand side menu of the Nox Player , and in the dialog box – select the Jio TV Apk we downloaded before and click on OK. If you haven’t downloaded the APK , you can download it here –
        Click to download Jio TV apk for Nox.

        Jio TV Apk Install on Nox
        Jio TV Apk Install on Nox

        After selecting the APK file , click on Open to install Jio TV as shown in the above image.


    • Method – 2 – This method will work only when No Other Android Emulator is Installed except Nox (incase if you already followed Method 1 skip this step –
      • Simply drag and drop the Jio TV Apk onto Nox Player window, or double-click the “.apk” file to automatically install it in Nox App Player as shown below –
        Double APK or Drag and Drop inside Nox Player to Install Jio TV
        Double APK or Drag and Drop inside Nox Player to Install Jio TV


    • Once, you have finished installing Jio TV , it will automatically launch as shown in the image below –
      Jio TV Sign in on PC / Windows
      Jio TV Sign in on PC / Windows

      Jio TV will now ask you to sign-in to use Jio TV App . Here enter the details as follows –
      “Jio ID” field  – enter your Jio Number without + 91
      Password” field – enter your My Jio account password.
      Skip Sign In won’t work even if you’re on Jio Network.

      Click on “Sign In” button, to log-on to Jio TV.

    • Incase, if you don’t remember the password, or have forgotten it. Simply use the “Forgot Password” option to get a new password for your jio mobile number.
    • Now, it will redirect you to Jio TV interface, simply tap on any channel icon to start your live stream of channel as shown –
      Jio TV for PC Menu
      Jio TV for PC Menu

      You can watch streaming of your favorite live channel or serial in either Portrait mode –

      Jio TV Live Streaming on computer Vertical Portrait mode
      Jio TV Live Streaming on computer Vertical Portrait mode

      Or you can even Go Full Screen as shown in the image below –

      Jio TV Fullscreen live on PC / Laptop
      Jio TV Fullscreen live on PC / Laptop

      Congratulations! You have now successfully Run Jio TV fullscreen on your PC / Laptop or Computer. In case of any queries/difficulties feel free to comment below.

    • Click here to Download Nox Android Emulator (Jio TV for PC / Laptop) Offline Installer
    • Click here to Download Jio TV Apk for PC / Windows (Nox Installation Required)


  • Top 5 Free PSP Emulators for Android to Play PlayStation Portable Games on Android

    Top 5 Free PSP Emulators for Android to Play PlayStation Portable Games on Android

    PSP or Play Station Portable is one of the best portable gaming consoles manufactured by Sony. Though PSP is now replaced by PlayStation Vita which supports PSP games; we can still play PlayStation Portable games on Android by using PSP Emulators. All you need to do is get an iso / CSO dump ROM of the game you want to play, and load it via the PSP emulators mentioned in this article and that’s it! The emulators start playing any PSP game of your choice on your Android!

    Top 5 Free PSP Emulators for Android to Play PSP Games on Android Phones –

    PSP Emulator # 1 – PPSSPP

    PPSPP PSP Emulator for Android
    PPSPP PSP Emulator for Android

    PPSPP is perhaps the first-ever PSP or the original Play Station Portable emulator for Android. Considering PPSPP is there around for two years now, it has gone many development & bug-fixing stages and has some salient features such as –

    • Full Speed boosted emulation for PSP games on almost Any Android device (S7 Not supported yet)
    • USB Controller & Gamepad support with no root required
    • Efficient Keyboard & Mouse mapping so that you can even play-game without even touching the screen.
    • Negligible Touchscreen latency for smooth gameplay

    Click here to Download PPSSPP Emulator for Android from Google Play


    PSP Emulator # 2 – AwePSP

    AwePSP PSP Emulator for Android
    AwePSP PSP Emulator for Android

    AwePSP is another alternative to PPSPP for Android and is very similar to PPSPP. AwePSP has a UI / Skin which is very similar to that of PPSPP, but the on-screen controller is perhaps one of the best in all the PSP emulators we have tried out.

    Besides, these AwePSP supports –

    • Networked PSP Gaming
    • Loading as well as saving of game states is quick
    • It Supports multiple PSP game ROM file formats such as .iso/.cso/.elf/.ISO/.CSO/.ELF

    Click here to Download AwePSP from Google Play Store


    PSP Emulator # 3 – OxPSP

    OxPSP PSP Emulator for Android
    OxPSP PSP Emulator for Android

    OxPSP is comparatively a different PSP Emulator as it works efficiently for larger games as well, but with small games, it hangs up a bit.

    Also, we found out that it is a bit different on frontiers such as –

    • High-Quality sound which doesn’t stutter
    • Game Cheats are supported too!

    Click here to Download OxPSP Play Station Portable Emulator from Play Store 


    PSP Emulator # 4 – Emulator Pro for PSP 2016

    Emulator Pro PSP for Android 2016
    Emulator Pro PSP for Android 2016

    Though the name looks odd, Emulator Pro for PSP 2016 is one PSP emulator which can be used in 2017 too. The best thing about PSP emulator we found out was –

    • Display of FPS in top-right hand side
    • Display of Game Speed

    These above two features alone help us in checking how the game is playing on your Android phone or check whether the lagging is due to graphics or processor slowness.

    Besides, various popular PSP games such as Dragon Ball Z, Persona 2, 3 & Fifa 14 were found out to be working smoothly with the emulator.

    Click here to Download Emulator Pro for PSP – Android from Google Play


    PSP Emulator # 5 – Ultra PSP

    Ultra PSP Emulator for Android
    Ultra PSP Emulator for Android

    Ultra PSP Emulator for Android may be classified as a simple clone of PPSSPP with a bit of custom skinning. Even it shares the same game slots as that of PPSSPP, but it works on S7 too whereas PPSSPP doesn’t.

    The Bad thing about Ultra PSP is that it has way more ads than to be liking, agreed that it’s a free emulator, but the ads are sometimes way too annoying.

    Games such as Tekken 6 & Naruto worked flawlessly, though, except for the ads.

    Click here to Download Ultra PSP Emulator for Android from Play Store.

    So, these are currently the Best PSP emulators for Android in 2017 as all of the above are being actively developed & updated. As these are updated ones these work on all Android versions such as Nougat, Marshmallow , Lollipop and even provide backward compatibility upto Android 4.4 Kitkat. Incase, if you find any better emulator or face any issues while using any of the above feel free to comment.