Blog

  • How to Download Ozee Videos on Android by Ozee Video Downloader : Videoder for Android

    How to Download Ozee Videos on Android by Ozee Video Downloader : Videoder for Android

    Ozee is the Streaming service powered by Zee entertainment, and lets you watch your favourite Zee Channel TV Shows online. It consists of popular shows, videos and movies produced by Zee Network. However, since the TV Serials are streamed online, Ozee doesn’t allow for offline viewing, or downloading. Also, you might want to download the show, for your collection or to watch during travelling. For the same purpose, we bring you a tutorial on downloading Ozee videos on Android phone without Rooting by using Ozee Video Downloader : Videoder.

    How to Download Ozee TV Shows & Videos on your Android Phone & Tablet 

    • Videoder (Ozee Downloader) is not available on the playstore, and hence we need to externally download the Videoder APK and install it on the phone.
      Click here to Download Videoder App Apk for Android
    • Since, Installation of external app apk is disabled by default on Android , we need to enable “Installation from Unknown Sources” first before installing videoder.
    • To enable it navigate to “Settings – > Security – > Installation from unknown Sources”  and toggle it “ON” as shown in the Screenshot below –

      Enable Installation from Unknown Sources
      Enable Installation from Unknown Sources
      Now, once you have enabled the installation from unknown sources option. Navigate to the “Downloads” folder and tap on the Videoder apk file.
    • It will now prompt you with a window asking you permissions as shown in the image below –
      Videoder asking for Permissions
      Videoder asking for Permissions

      Here tap on the “Install” option as shown above.

    • Videoder app will now be installed on your device. Once it is successfully installed, it will show a success confirmation screen as shown in the image below –
      Videoder installation Success Screen
      Videoder installation Success Screen

      Here on the Success Screen , please tap on the “Open” button as highlighted in the above image.

    • Now Navigate to the Ozee site – http://ozee.com inside the Videoder app.  Here, browse to the video you want to download on your Mobile.
    • Once the video screen is loaded, now simply tap on “Red Down button” at bottom right hand side corner as shown in the image below –
      Tap on the Red Download Icon
      Tap on the Red Download Icon

      Now, once you have tap / click on the Red download icon. It will start generating Ozee video download links on your phone as shown below. Please wait until the links are generated.

      Ozee video download links Generating Process
      Ozee video download links Generating Process

      It will show you direct download links as soon as it is generated

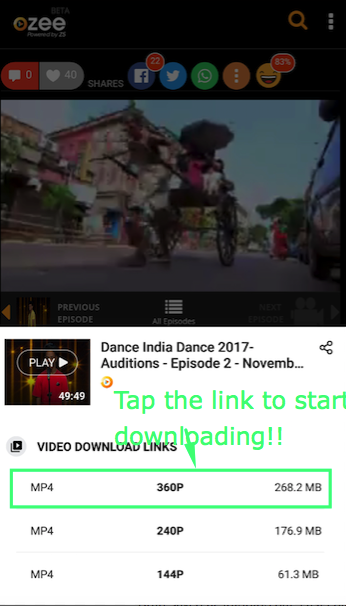
    • Once, the process is over it will automatically show you different download links and their size as shown in the image below –
      Ozee video download quality links
      Ozee video download quality links

      Here simply select the type / quality of video you would like to download. It will start downloading automatically in the background.

    • Congratulations!. You have now successfully downloaded Ozee Videos on your Android mobile without rooting, by single app. Incase if you have any problems or face difficulties feel free to comment below.
  • Download Videoder App for Android [ Latest Apk v14.0 Free Download ] 2019

    Download Videoder App for Android [ Latest Apk v14.0 Free Download ] 2019

    Videoder is an essential app for Android when it comes to download media such as videos and MP3 audio files, as its downloaded media quality is the Best. We say so because it has lots of great features such as ability to Download Youtube videos, convert videos to mp3. Also besides Youtube, videoder can even download videos from sites such as Vimeo, dailymotion, Instagram, twitter, vk, 9gag, ted etc. Thus, we present you the latest videoder App APK link which will let you download & install Videoder app on your Android phone & tablet.

    Videoder App APK Download
    Download Link Download Link
    Operating Systems : Android 4.4, 5.1, 7 & Oreo
    Type of Installer : Full APK
    License : Free


    Videoder App for Android (Kitkat, Marshmallow, Lollipop, Nougat / Oreo) Download & Installation Steps – 

    • Since, Videoder is not available on the Playstore , we need to Download its apk separately from the links below & Install it.
      Click here to Download Videoder App Apk for Android
    • Since, Installation of external app apk is disabled on Android , we need to enable “Installation from Unknown Sources” first before installing videoder.
    • To enable it navigate to “Settings – > Security – > Installation from unknown Sources”  and toggle it “ON” as shown in the Screenshot below –

      Enable Installation from Unknown Sources
      Enable Installation from Unknown Sources
      Now, once you have enabled the installation from unknown sources option. Navigate to the “Downloads” folder and tap on the Videoder apk file.
    • It will now prompt you with a window asking you permissions as shown in the image below –
      Videoder asking for Permissions
      Videoder asking for Permissions

      Here tap on the “Install” option as shown above.

    • Videoder app will now be installed on your device. Once it is successfully installed, it will show a success confirmation screen as shown in the image below –
      Videoder installation Success Screen
      Videoder installation Success Screen

      Here on the Success Screen , please tap on the “Open” button as highlighted in the above image.

    • Videoder app will now load on your phone, please allow sometime until the loading process is completed.
      Videoder App APK Download Loading
      Videoder App APK Download Loading

      Now, simply select the service from which you want to Download videos or music from the various options shown in the following image .

      Videoder Supported Services
      Videoder Supported Services
    • Now, simply use the app as a browser, and once you come across video or audio you want to download . Simply tap on the “Red” Download icon as shown below.

      Tap on Red Download Icon to start Downloading
      Tap on Red Download Icon to start Downloading
    • That’s it !. Thus you can now download videos from any popular websites using the Videoder app.
  • How to Check Jio Data, SMS & Call Balance without My Jio App by SMS

    Jio has become India’s leading Mobile service provider by its extensive use of high-speed data network and the latest 4G LTE technology. Though, this technology has good benefits when it comes to high-quality HD calls by VoLTE (Voice Over Long Term Evolution). It has a few drawbacks too, such as we cannot dial USSD codes example *123# type numbers by phone. Thus, we need to be dependent on My Jio App to track our Data usage.

    But My Jio App also has drawbacks such as the Data remaining isn’t shown instantly, as well as the app is too slow to load. Hence, in this tutorial, we will cover How to easily check Jio Data Balance, (Internet), SMS and Call balance without My Jio app by sending a simple SMS. This method is also helpful if your My Jio app isn’t working or gets hang.

    Tutorial to check Jio Internet balance (data), call minutes without using App [ My Jio ]

    • We just need to send a free SMS to check the Balance on Jio.
    • Go to Messages and Create a New Message.
    • In the Sender field, the number to whom we need to send SMS is “199”. i.e We need to message 199
    • The Text to get Balance details is “BAL” .
    • Thus, you need to type the message as shown in the following image
      SMS Text to Send to Jio to check balance Validity
      SMS Text to Send to Jio to check balance Validity

      Once you have typed the message “BAL” in the capital letters. Simply Tap on the Send button.

    • You will soon receive a SMS showing your Balance validity, and Data Remaining for the day as shown –
      Jio Data Balance Message
      Jio Data Balance Message

      Note – Unlike My Jio app, the data remaining shown here is instant and thus you can effectively track your data usage better.

  • How to Do Reverse Image Search from your Mobile [ Android & iPhone ] | Perform Google Photo Upload Search Solution

    How to Do Reverse Image Search from your Mobile [ Android & iPhone ] | Perform Google Photo Upload Search Solution

    Reverse Image Search is one of the best features of Google Image Search which lets you find the source/origin of photo, or other similar images. The Reverse Image Search option is easily visible on the Google desktop site, but is absent on the mobile site.

    There are various third party sites such as http://reverse.photos which let you perform Reverse image search on mobile. But these sites are less secure as they store your photos on their own servers thus vulnerable to misuse. Hence, to keep your search more secure we will cover – How to Perform Google Reverse Image search on Official Google Site on Mobile.

    Tutorial to Perform Reverse Image Search on Mobile (Android + iPhone + Tablet)

    • We will be using Google Chrome Web browser for this purpose as its more speedy while accessing Google Services.
      Now , in order to perform reverse image or photo upload search perform the following steps-
    • First, of all Navigate to the Google Images site on your Chrome browser –
      Click here to Open Google Images site in a New tab – http://images.google.com .
    • Now, after the Site is loaded – Click on the “3 Dot icon” at the top-right hand side corner of your Screen as shown in the image below –
      Tap on the 3 Dots Icon
      Tap on the 3 Dots Icon

      Now, it will open a menu as shown in the following image .

      Google Chrome Menu - Tap on Request Desktop Site
      Google Chrome Menu – Tap on Request Desktop Site
    • Now , Tap and select the “Request Desktop Site” option as highlighted in the above image.
    • It , will now load the Google Images website in its full Desktop view as shown below.
      Google Images Desktop Site - Tap on the Camera Icon
      Google Images Desktop Site – Tap on the Camera Icon

      Here tap on the “Camera” icon as highlighted in the above image to enter Reverse image search.

    • Here you can either enter the image URL you want to search or “Upload an Image” by using the “Choose File” button. After clicking on the “Choose file” button it will ask you to upload image from camera/files gallery.
    • Once you click and select the image , it will be uploaded to Google server and you can access the search results as shown
      Successful Google Reverse Image Search on Mobile Android & iPhone
      Successful Google Reverse Image Search on Mobile Android & iPhone

      We hope you found the tutorial easy & useful . Incase of any doubts or difficulties feel free to comment below.

  • NordVPN – Enjoy Complete Internet Freedom with Tightest Level of Security

    NordVPN – Enjoy Complete Internet Freedom with Tightest Level of Security

    Internet Privacy is a myth and it would be better for you to stop believing in this myth. You are often tracked by a number of government agencies, your ISP, and a number of spies & hackers trying to bypass your network security. You are at a great risk of leaking your private information on the internet. However, this problem has been solved by the most reliable VPN provider of the world – NordVPN. Let’s learn more about this all-time favorite VPN provider.

    About NordVPN

    internet security

    NordVPN is a Panama-based company that was started by a group of friends in the year 2012 and just in a span of 5 years it has spread its terrain in 60+ nations with a network of 1000+ servers around the globe. Its name has been inspired from the Nordic Ideals of – Trust, Freedom, Confidence, and Innovation. The company has witnessed a significant year in just 5years and has even won the PCMag’s Editor Choice Award two-years in a row.

    NordVPN – Topnotch Features

    features

    NordVPN is the most reliable & trustworthy VPN provider across the globe that have won a place in the heart of its customers. It has been made possible because of the quality features it provides to its customers.

    Double VPN with CyberSec

    It is one of the fewest VPNs that offer ‘Double VPN’ protection to all its users. To provide maximum online security, NordVPN integrates the benefits of VPN with the Onion Router. Moreover, its CyberSec technology prevents the phishing attempts, DDoS attacks, adware, malware, and other threats.

    Large Network of Superfast Servers

    NordVPN offers blazing fast servers to all its clients making streaming and browsing really quick. Moreover, it has a large network of over 1000 servers in 60+ nations of the globe. It doesn’t throttle your internet speed, so you can upstream and downstream without any restrictions.

    Strict No-Logs Policy

    When you connect to NordVPN’s servers, it gives you complete assurance that no logs will be stored in its servers. This means that none of your browsing sessions or private information will be logged on its servers.

    Automatic Kill Switch Technology

    The automatic kill switch technology comes handy during the connection lost situations. At times when you are experiencing slow internet speed and the connection is disconnected; all the current sessions will be terminated there and then by NordVPN to avoid leakage of sensitive data.

    DNS Leak Resolver

    Sometimes, your DNS might start leaking the information about your browsing sessions to your ISP. But with NordVPN, you are connected to its DNS servers and there is no risk of any leakage. All your internet traffic is handled by NordVPN’s DNS servers.

    SmartPlay Technology

    Its SmartPlay technology allows you to stream 400+ streaming websites from just anywhere across the globe. With its SmartPlay technology, the streaming becomes much quicker than your imagination.

    Available for Multiple Platforms

    devices

    NordVPN is available for iOS and Android users. Even the Windows and Mac users can enjoy using this VPN on their devices. Moreover, you can connect to NordVPN from 6 devices simultaneously.

    Pricing & Plans

    pricing

    NordVPN offers 3 different plans catering the needs of different users and offers 30-Days money back guarantee to all its users opting for its plans.

    • Monthly Plan: If you opt for monthly plan, you need to pay $11.95/month to enjoy its services. This plan is good for the first0time testers.
    • Half Yearly Plan: You can avail its half-yearly plan at $7/month billed for 6 months. It can come handy for individuals and small business owners.
    • Yearly Plan: You can opt for yearly plan at $5.75/month billed annually. This plan is best suited for the people who are regular VPN users and wish to save money.

    Pros

    • Double VPN protection
    • No P2P throttling
    • Unlimited Bandwidth
    • DNS Leak Resolver
    • 6-Simultaenous Connection supported

    Cons

    • Green address bar or EV SSL not there, this is not a big issue for 99% of users.
    The Bottom Line

    NordVPN is one of the most reputed and trusted VPN provider in the entire VPN fraternity. It is bit expensive as compared to its competitors, but the extraordinary features cover up for its cost. You will surely enjoy using this VPN. Try it now!

  • How to Open & Extract – Unrar Rar Files on Android | Unlock Rar Archives on Android

    How to Open & Extract – Unrar Rar Files on Android | Unlock Rar Archives on Android

    Rar file archives are now widely used to send across multiple documents in a single file. Though, zip archives also do the same thing. RAR archives can save more space by higher compression levels, ability to split big files into multiple ones and so on. Android OS by default, doesn’t support extraction of RAR files, and hence we need to use other app. Here’s an easy tutorial on How to extract Rar files on Android.

    Tutorial to Open Rar archives on Android | Unrar Rar files on Android Phones & Tablets –

    • We need to install RAR app developed by RARlab – the official owners of Rar compression algorithm. We can use other apps but since the app is official, plus is free, we will go with the official one.
      Click here to Download RAR app from Google Play Store
    • After the app is installed, launch the app. Then it may ask you a one time permission to access files depending on your Android version. Tap on “Allow” as shown in the below image –
      Tap on Allow to give file storage access
      Tap on Allow to give file storage access


    • Now, navigate to the downloaded / stored RAR file location which you want to Extract or Open.
    • Here, we have two options – Either to extract all files of the Rar archive or to extract specific components. Thus, we will cover both the parts .
      • To extract all files – Select the Rar file by marking the arrow next to Rar files and click on the “upward arrow” extraction icon as shown in the below image –
        To extract complete RAR Archive
        To extract complete RAR Archive

        Next you will be redirected to extraction options screen.

      • To Extract only selected or Particular file of the Rar Archive –  First of all tap on the file name of Rar archive. Then it will show all files present inside the Rar Archive as shown below
        Files present in the Rar Archive select the files to extract
        Files present in the Rar Archive select the files to extract

        Now, here select all the files you want to extract and tap on the “Upward Arrow” / extract button. You will be directed to extraction options screen.

    • In the extraction options screen as shown below, Select the destination path or location where you want to extract files. Then Tap on “OK” button .
      Select the Path to Extract Files and tap on OK Button
      Select the Path to Extract Files and tap on OK Button

      That’s it! . You have now successfully extracted and unlock password protected Rar Archives on Android. If the Rar file has password it will prompt you to enter at screen during extraction. Incase, if you face any problems or have any queries feel free to comment!.

    • We have tested the app on Android KitKat, Lollipop, Marshmallow, Nougat and even Oreo. The app works perfectly fine, and with speed. Incase, if you find any other good RAR extractor we will like to know about it.


  • How to Extract & Unlock Password Protected Zip File on Android | Open Password locked Zip file on Android

    How to Extract & Unlock Password Protected Zip File on Android | Open Password locked Zip file on Android

    Zip files are a great way to send across multiple files easily and via mail and other media. But, with the recent advent of Data Sniffers and security threats coming up, sometimes zip files are encrypted with a Password so that only the intended recipient can access and open the file. The bad thing is that Android natively doesn’t support extraction but it can be easily enabled by an app. So, in this tutorial we will cover How to unlock Password Protected zip files for extraction on Android so that you can open the files inside them.

    Tutorial – How to Open & Extract password protected Zip files on Android

    • Considering, that you have already downloaded the zip file, we will start with the first step of installing Xplore. Xplore is a file manager app for Android (5 Mb in size) which can easily extract any password protected zip file. Thus, essentially a two in one app.
      Click here to Download & Install Xplore app from Google Play Store.
    • Now, depending on your Android version it may ask you permission to access your Storage, here tap on “Allow” as shown in the image below –
      Xplore Permission tap on Allow
      Xplore Permission tap on Allow

      Now, navigate to the directory where you have stored your zip file. Generally it will be the “Download” directory in the “Internal Storage”

    • Once you have located your downloaded zip file, simply double tap on the filename as shown below –
      Double tap on password protected zip file
      Double tap on password protected zip file


    • Now, it will prompt you a text field to enter the zip file password as shown in the next screenshot. Here, enter your Zip file password and tap on the OK button highlighted below –
    • Enter Password & tap on the OK Button
      Enter Password & tap on the OK Button

      Now, after entering the password. Your Zip file will be easily unlocked!. Thus, you can now copy, move, open, edit , unlock the contents of the password protected zip files as shown in the following image –

      Successful Unlock of Password Zip File on Android
      Successful Unlock of Password Zip File on Android

      That’s it you have now successfully unlocked an encrypted zip file on your Android device. This method works on all Android versions right from Kitkat, Lollipop, Marshmallow, Nougat and even Oreo too.

  • How to remove iTunes DRM protection with Tuneskit DRM Media Converter for Mac

    How to remove iTunes DRM protection with Tuneskit DRM Media Converter for Mac

    Apple has created a lot of products in the past, which has an impact in the market because of the innovation and the quality they offer in their products. However, even the most expensive version has its flaws, but the world has developers who come up.

    Entertainment is a space where the Apple has control over the media that you Listen, Watch, and Save, where Apple makes millions of dollars every year in this sector. Apple has added DRM, which is pretty much a limitation tool that is impenetrable for a standard user.

    iTunes DRM Removal Tool from Tuneskit Review

    DRMS

    There is no doubt that the DRM removal tool is necessary for us to convert M4V to Mp4, doesn’t this sound great to you? There are several programs and solutions out there who promise you multiple things, but we are going to review DRM Media Converter for Mac by TunesKit. Is this program reliable or just a waste of money? Read further to find out.

    First, we are going to explain the features to you readers to understand what the program is capable of doing.

    *1 Converts All iTunes Videos

    TunesKit is a developing team that works on innovative and useful applications like “DRM Converter,” which enables the users to get rid of the DRM protection added by the iTunes movies and other media provided by the iTunes.

    itunes

    TunesKit iTunes DRM converter converts the M4V (protected) file to Mp4 within a matter of minutes. Let me remind you that the original file of the movie will remain untouched by the program, which means you don’t have to worry about the loss in quality.

    Notable Point: Only the DRM protection file will be removed.

    *2 Removes DRM Losslessly

    We have already mentioned that you don’t have to compromise on the quality of the video. You can convert the file into any given file format like,

    • MP4, AVI, M4V, MOV, MPG, FLV, MPEG-1, MPEG-2, 3GP, 3G2, SWF, MP3,  and AA.

    Remember, the original file format of the iTunes rental movies is M4V.

    losslessNotable Point: You have nothing to worry about the loss in quality.

    *3 Compatibility

    files versionApple creators are smart, and they have developed their products in such a way that no other models are supported, regarding Audio, Video, and Hardware.

    However, that shouldn’t be the case for the TunesKit solution. When you have purchased a movie legally from iTunes, then you should have the right to watch on any platform, but it has been restricted by the Apple. The DRM converter tool enables you to convert the file in several formats, which are more than enough to support 90% of the current devices available in the market. From smartphones to Android T.V. Here are the some of the recommended devices which will give you enough idea.

    • Apple products – iPhone 6 or above, TV, iPad, etc.
    • Play station 4.
    • Samsung S-series and N-series.
    • HTC smartphones.
    • Xbox 360.
    • Nexus devices.
    • Sony Xperia-smartphones.

    These are some of many devices which the program formats will support.

    Notable Point: You can run converted movies on any latest Smartphone, TV, and other devices.

    *4 Audio

    Many of you have this question in your mind, which we will answer to it. iTunes offers Dolby 5.1 sound in the movies, will the conversion of the file disrupt it? Entirely no, MP4 is a capable format and highly used format because the file format is immeasurable. MP4 is famous for that sole reason. No loss in audio quality, you will get more customizations with the MP$ format.

    Notable Point: Dolby 5.1 sound will be present after conversion.

    *5 Crack DRM at 30X Faster Speed

    Let’s count the number of DRM converters available in the market, more than just many, right? Movies file is size always big, which takes plenty of time in conversion. However, the developers of TunesKit DRM Removal Tool was designed to work 30x times faster than any other similar program in the market.

    Notable Point: The 30x speed is a big deal, the number makes a huge difference.

    About the version in which we conducted the tests : Please check the pic below.

    about version

    Conclusion

    The iTunes DRM Removal Tool by Tuneskit is priced at $44.95, which is worth your money. The program runs on Mac with low-spec hardware and it does a fair job compared to other similar solutions. We would love to know your opinion and experience in the comment section.


  • Best Place To Host Android App Website SiteGround Review

    Best Place To Host Android App Website SiteGround Review

    A reliable web hosting is an important part of building a website. After all, it’s what determines the overall performance and accessibility of your website! When you create a website, you always want users to access it without any downtime or interruptions. And for this, it is necessary that your hosting is in the right hands.

    Today, I am going to review a popular web hosting company – SiteGround, which has set up its own place in the web hosting industry in a very limited time. SiteGround came into existence in the year 2004 at Sofia, Bulgaria. Started by few university friends, SiteGround has more than 400 employees today. At present, the company hosts 5,00,000 domains across the globe for different types of clients and industries. In addition to this, the company has servers in three continents (United States, Europe, Asia, making it more prompt and customer-friendly web hosting company.

    Regardless of the competitiveness of web hosting industry, Siteground’s user ratings stay atop with all other big players such as Hostinger, BlueHost and GoDaddy.

    Let’s review different services from SiteGround and get to know how worthy they are.

    Services:

    SiteGround provides various kinds of web hosting services. The major ones are:

    • Shared web hosting
    • Cloud hosting
    • VPS hosting
    • Dedicated hosting
    • Reseller hosting
    • Domain names

    SiteGround is one-stop-shop for various web hosting requirements. Along with the affordable shared hosting, there are plenty of other options people can look into. SiteGround has implemented cloud infrastructure along with both dedicated and virtual servers. And, if you own a big database portal or site, they can provide you custom-made bespoke server as well. Coming to their domain registration, it is good to find that you can order unlimited numbers of domains through your account. Domains are available for all popular extensions such as .com .net .org .biz. Info .us, etc.

    Uptime:

    It was on my priority list to test the Uptime of SiteGround. And the results I got were really amazing.  To track uptime, I used ‘Uptime Robot’ that tracked my website for a month.  The tool helped me to check host’s overall availability and it observed 100% uptime for the entire one month. With SiteGround’s server, I didn’t experience any downtime even for a single second.

    Speed:

    The response time is always very important with a web hosting. People will able to blaze through your site only if your hosting partner provides lightning fast speed.

    Coming to the SiteGround’s speed test, I tested its speed for my simple HTML site and the response time I observed was 81 ms. (US server). Even I find the same result (81 ms.) with the website developed by SiteGround website builder.

    Although the speed of your site may vary depending upon your location and type of server you have setup with your account yet I can say SiteGround will not disappoint you in terms of speed. Another thing I would like to add is that SiteGround uses NGINX web server technology that loads website much faster.

    Customer Support-

    For me, bad customer support is a deal breaker. Therefore, I decided to test all three support platforms of SiteGround i.e. Phone Support, Live Chat, and Tickets.

    Phone Support- When I accessed their phone support, it took 40 seconds to describe my opening options on IVR and hardly 15 seconds to connect. That I think is pretty good. The representative I was hooked up with was prompt and enough knowledgeable.

    Live Chat – Live Chat- SiteGround has 24/7 Live chat support system, which can be easily accessed through the home page of their official website. You just need to fill few details related to your account and your query and you are ready for it.

    It took less than 1 minute to me to connect with their support system which is reasonable.

    Tickets –  Speaking of Ticket support, one of the important things to test in is – the response time. The quicker it is the more suitable it is to use. Otherwise, Live Chat and Phone Support can be better options. I had very good experience with their Ticket Support System. It took  just 2 minutes that was pretty good than their advertised 10 minute response time.

    Anti-Theft Protection-

    It is one of the most advanced features given by SiteGround. If someone tries to access your website and enters the password incorrectly, it automatically detects the situation and prevents your personal and payment information from hacking.

    Final Take –

    All and all, Siteground sure sounds like a promising web hosting. Its services are definitely worth checking out.