Blog

  • Awario | Helps You To Monitor Your Brand Online

    Awario | Helps You To Monitor Your Brand Online

    Most of the time almost everyone including you and me find it very difficult to search for the most suitable piece of information related to our search keywords or keyphrase, especially when the phrase or keyword we are searching is of less competition and less value.

    Have you ever wished to have a software tool that can help you find the most relevant piece of information for your keyword, no matter how popular it is? Well, then your wish has been granted, thanks to the Awario tool. If you are not aware of the Awario software tool, then today we are here with a detailed review of the same to give more useful insight to the software.

    What is Awario?

    Awario is a software solution that checks for almost every corner in the web, including social medias and search engines, to find the most relevant information and mentions that relate to your keyword. All of the pieces of information from the web related to your keywords or phrases are gathered in real time, thus ensuring that you always get the most latest and updated information for your searches.

    Why Awario?

    Awario is best for business and website owners alike as the tools allows you to instantly view the instant reactions on specific keywords thus giving you an edge over competitors by allowing you to reach and adopt to the latest changes around you to reach a more targeted set of audience. All new social media interactions and other related news to the keyword you give as input is displayed by the tool.

    Features of Awario:

    • Brand name monitoring is one of the key features of Awario. This tool, with its super-fast monitoring and tracking algorithms allow you to track the latest updates, releases and other news from almost all the popular brands out there.

    track mentions

    • You can track the latest reactions for keywords on any language using this online tool.

    languages

    • You can also add negative keywords so as to completely focus on the keywords that will bring only positive results for your business or website.
    • All the data related to all the keywords you search for are grouped as folders so as to give you a more organized view. This helps you in focusing on one keyword at a time and not be confused by all the data from all the keywords you track for at once. You can also mark separate folders for posts or reactions that you would like to view at some later point of time or also for posts that are unread.
    • The analytics of the the social media tracker tool lets you track the increase/decrease in the reach of the keyword you are searching for.

    analytics

    • Awario can also let you find the most influential people targeting the keyword on all popular social media networks.
    • You can also share the stats and reports with your clients or colleagues with the instant share link that can be generated from within the tool itself.
    • You can manage your account across devices and always focus on the data that matters the most to you, no matter whether you are trying to access the tool from your laptop or Smartphone.
    • You can also set Awario to send you daily or even weekly email based alerts of summaries on the latest mentions so that you do not lose track anytime.

    How to Subscribe and Start Using Awario?aw pricing

    To know about the full potential and the full set of features of the Awario tool, then the best way is to find it out yourself. You can opt anytime to check out the Awario tool for free for 14 days by just registering with your email address and without even having to put your credit card information in.

    Once you are satisfied with the product, then you can check for their paid subscription plans that begin at just $19 per month and extends to $299 per month depending on the features you can get. In case you are looking for a customized feature set specific for your business, then you even have the option to get in touch with the Awario team to let them create a plan that suits your need.

    Final Words:

    Hope this article helped you to know in detail about the Awario online tool. If you found this article interesting, then do share it with your friends to spread the word.

  • Two apps from Gismart make into the final of Appy Awards in music category

    Two apps from Gismart make into the final of Appy Awards in music category

    Getting into the final of Appy Award, a prestigious annual competition for mobile apps, is good enough. Gismart, a music app developer based in London, managed to appear in the list of finalists twice with their Piano and Beat Maker Go! apps. Both mobile apps made into Top 3 in Music category and will compete for Best Music App title with GHQ app made by Futuri Media.

    awards

    Gismart was founded in London as music app maker. With over 160 million downloads and 11 million MAU, Gismart continues to work on developing new music games and gamifying social music-making apps where music lovers across the world can connect, collaborate and enjoy playing music together.

    Believing that anyone has a creative gene, Gismart aims to give people an opportunity to express themselves through music creation on mobile devices. Both Appy Awards finalists from Gismart prove that creating music is fun. Piano by Gismart allows music lovers to learn piano basics and play favorite songs without having any musical skills. The app has three play options: realistic piano simulator, Magic Keys game and Magic Tiles game. The gaming aspect makes learning something new not so intimidating. To mix things up, musicians can make the piano sound like an electric guitar or organ, among others. Piano by Gismart was named the 4th most downloaded game title in the world in February 2017, outrunning Pokemon Go! and Candy Crash Saga.

    pianoAnother Appy Awards’ finalist from Gismart is Beat Maker Go!. The app let’s electronic dance music lovers and wannabe DJs create their own beats. The developer partners with DJs and sound producers globally to add unique content in various genres like trap, dubstep, drum-and-bass, hip hop and more. The app has 32 pads to perform on and each sound pack has predefined loops and a built-in metronome to help users stay on pace with the rhythm. Users can record and share tracks and save money by working their own house party.

    itunesAppy Awards Final will take place on May 17, 2017 in NYC. Some of the previous winners of Appy Award included Spotify and Shazam in Best Music App, Angry Birds in Best Game App, Facebook and YouTube in Best Time Waster. Good luck to all 2017 finalists!

  • Bitdefender Internet Security 2017 – A Complete Security Suite for your Device

    Bitdefender Internet Security 2017 – A Complete Security Suite for your Device

    Bitdefender is not a new player in the world of internet security solutions. It has been providing the best security solutions since 2001. If you are in search of the best security suite for your device then Bitdefender Internet Security 2017 is the one to come to your rescue. It is the latest security solution developed by Bitdefender to protect your system against malware, ransomware, and other aggressive attacks by third-party applications. Let us explore more about it below.

    About Bitdefender Internet Security 2017

    From the antivirus protection and internet security to the total security of multi-devices, Bitdefender has never disappointed its users. It is using the same malware scanning technology, sharing a compact interface, and has a minimal impact on the system’s performance. Bitdefender Internet Security 2017 is the latest security suite launched by Bitdefender for its old and new users. It can turn out to be a cost-effective solution for the users looking to aid their devices with a trusted security shield.

    internet security

    Learning about the Features of Bitdefender Internet Security 2017

    You first need to download and install the software on your device to discover what’s new in this security solution by Bitdefender.

    secure

    After the installation is completed, you will be asked to create an account with Bitdefender. Fill in the details carefully and signup for the account.

    protected

    Quick Scan

    You can click on the ‘Quick Scan’ option for scanning your device against any malware quickly. It will detect any active threats and help you in resolving any issues.

    scanning 1scanning 2

    Vulnerability Scan

    It will find all the vulnerabilities that might let malware to infect your system. It checks for the files that need update and are at risk to be attacked by malware.

    vulnerabilities

    • You can click on ‘View Modules’ to discover more options.

    view modemode 2

    Firewall

    Bitdefender Internet Security 2017 has an inbuilt firewall to provide extra protection to your network from any intruders trying to enter into your system through your network.

    • Go to Firewall settings and turn on the ‘Block Port Scans in Network’ option.

    network options

    • Go to ‘Adapters’ and turn on the Stealth Mode and Generic. This might slow down your internet speed a bit.

    speed bit

    Antivirus

    Bitdefender Internet Security 2017 has integrated the antivirus along it to provide an added protection to your device.

    • Click on ‘Antivirus’ option.

    options to check

    • The on-access scanning and active threat control is switched to ‘on’ by default.

    switched on

    • You can add the list of files and folders that you want to exclude from the scanning process in the ‘Exclusions’ option.

    exclude option

    • The ‘Drives and Devices’ option helps you to manage the scanning of CD/DVD devices, USB devices, and other devices mapped to your network drives.

    auto scan

    • You can add the files/folders that you want to be rescanned after the virus definitions have been updated. Go to ‘Quarantine’ option and add the desired files/folders to it. Do not forget to turn on the option. Quarantined files can be resubmitted for further analysis.

    shield

    Ransomware Protection

    The ransomware protection makes it easy to place your sensitive documents under a special protection from malicious encryption programs which may demand the ransom on the personal files.

    • Click on ‘Ransomware Protection’ option.

    trusted option

    • It is ‘off’ by default. You need to turn it on.

    shield

    • Now, you can choose to add or remove the files/folders from the list. In this way, you can easily protect the personal files from getting encrypted and held for the ransom.

    Safepay & Parental Advisor

    Bitdefender’s secure Safepay browser is optimized to deliver a good browsing, shopping, and banking experience. Its password manager comes handy at times of filling the credit card details automatically.

    • Go to ‘Privacy’ option.

    privacy

    • Click on ‘Safepay’ option to proceed with secure browsing.
    • The ‘Parental Advisor’ option is tailored for the parents who want to keep an eye over the activity of their kids.

    Monitor the Activities on your Device

    You can click on ‘Activity’ option to monitor the things happening on your device. Bitdefender will be activated as soon as you turn on your device and will keep a track of all the activities on your device, protecting it from malware and viruses.

    devicesprotection

    You can click on ‘Security report’ to get the reports for whole week.

    reports

    Pricing

    Bitdefender Internet Security 2017 is the most affordable security suite that helps you to stay safe and keep your device malware free. You can use it simultaneously on 3 devices under one subscription plan.

    Pros

    • Added Ransomware protection & in-built firewall
    • Low impact on the system
    • Affordable Pricing

    Cons

    • No online storage or VPN
    The Bottom Line

    Bitdefender Internet Security 2017 is surely the most secure and most powerful antivirus suite one can use for different devices. The effective malware protection, ransomware protection, secure-browsing, in-built firewall, and a number of exclusive features ensure that your devices and privacy are in good hands. You must try it today!

  • Top 5 Best GBA Game Boy Advance Emulators for PC Windows 10 / 8.1/7 [Computer / Laptop]

    Top 5 Best GBA Game Boy Advance Emulators for PC Windows 10 / 8.1/7 [Computer / Laptop]

    Game Boy Advance or GBA is one of the best Retro Gaming consoles and has some great games such as Pokemon Red (Standard Edition), The Legend of Zelda, Super Mario Kart etc. Now you can enjoy and play your favorite or any of the Game Boy Advance games on PC / Laptop using Game Boy Advance emulators. Many of the emulators do not support newer versions of Windows such as Windows 10, 8.1 and even Windows 7. So, here are the Top 5 Best GBA Emulators for PC / Computer or laptop with Windows 10, 8.1, 7 compatibility and sound support.

    Top 5 Best GBA Emulators for PC – Computer or Laptop

    GBA Emulator # 1 – mGBA

    mGBA GBA Emulator for PC Windows 10
    mGBA GBA Emulator for PC Windows 10

    mGBA is one of the fastest lag-free GBA emulators for Windows and will let you play you your favorite Game Boy Advance game on your PC or laptop.

    Besides emulating GBA game ROMs mGBA has some salient features such as –

    • Multi-player multi-window support.
    • Solar Sensors support
    • Game overrides and ROM patch support
    • Cheat code support

    Click here to Download mGBA Game Boy Advance Emulator for PC / Windows 10 / 8.1 /7


    GBA Emulator # 2 – VisualBoy Advance

    VisualBoy Advance GBA Emulator for Windows 10 / 7 / 8.1
    VisualBoy Advance GBA Emulator for Windows 10 / 7 / 8.1

    VisualBoy advance is another great GBA emulator for Windows PCs or Laptop and works flawlessly on Windows 10 , 7  or Windows 8.1 [all 32-bit & 64-bit] variants.

    VisualBoy Advance has some unique features such as –

    • JoyPad or Gamepad support (Play GBA games on PC with Joystick)
    • Cheats support.
    • Save & loading game support.
    • Ability to record Gameplay into videos or screenshots

    Click here to Download Visual Boy Advance GBA Emulator for Computer or Laptop 


    GBA Emulator # 3 – No$GBA Emulator

    No$GBA Emulator for Windows 7/8.1/10
    No$GBA Emulator for Windows 7/8.1/10

    No$GBA or No Cash GBA as it is known is another powerful GBA Emulator for Windows 10 / 8.1 /7.  Besides GBA it can even emulate NDS games thus enabling it to use it as a two in one emulator.

    To play Game Boy Advance game on Windows via No$GBA , navigate to File – > Cartridge menu (Files.lst) and here select the NDS game ROM which you want to play.

    Besides, No Cash GBA also has gamepad or Joystick support to play Game Boy Advance games.

    Click here to Download No$ Cash GBA Emulator for Windows 10 / 8.1 / 7


    GBA Emulator # 4 – Higan GBA Emulator

    Higan GBA Emulator for Laptop / Computer
    Higan GBA Emulator for Laptop / Computer

    Higan is a multi-emulator system which has support for Nintendo famicom, super famicom, game boy color as well game boy Advance emulation support.

    Besides emulating the gaming console, you can even specify custom BIOS rom so that you can even emulate Sega Master System, Mega Drive and even Game Gear.

    The GBA emulation game color reproduction is really good, however the sound is a bit laggy.

    Click here to Download Higan GBA Emulator for Laptop Computer or PC


    GBA Emulator # 5 – BoyCott Advance 

    Unlike the above mentioned GBA emulators which work on Windows 10 , 7 or newer versions,Boycott Advance is GBA Emulator for Windows XP , Vista and older versions .

    We managed to play it on new Windows using Compatibility settings, however it freezed on a number of occassions e.g while entering a Pokecenter in pokemon.

    Click here to Download BoyCott Advance Game Boy Advance Emulator

    Thus , these are the Best Game Boy Advance or GBA emulators for PC / Computer with Gamepad or Joystick support. To Play Game Boy Advance games, you will need Game ROMs which you can download from sites like Romhustler.net as these do not come with any game packaged. Incase if you face any problems feel free to comment.

  • Audials Radio iOS App Review| One Stop for your Entertainment

    Audials Radio iOS App Review| One Stop for your Entertainment

    If you are a music freak, then keep on reading this post and if not then also keep on reading this post as in this post we are going to tell about very interesting music app called Audials Radio. Audials Radio is online radio app which covers thousands of radios (more than 80k) stations of different genres ( more than 120 ) from all over the world, and beside radio stations, Audials Radio also maintains the huge database of various collections of videos and podcasts. If we talk about the availability Audials Radio is available for almost all type of devices it is available for Windows PC and Android and iOS based smartphones and tablet. Now let us explore more about it in below part of the post.

    Exploring Audials Radio App

    audials

    As mentioned above Auidals Radios is a free online radio app which allows its users to access thousands of stations of hundreds of genres. Now let us explore some features of it in details in below part of the post.

    1) Your Choice: Audials Radio focuses on its users requirements and allows them to search for a radio station but entering a name of the station, artist name, language, country, etc. Or users can also search for the top list of radio stations. It also shows location based local radio stations for more convenience of its users.

    2) Your Convenience: Beside search option, Audial Radios comes up with several others features like:

    1. It makes its users see songs lists, artist, albums network information, etc. before listening so that they can choose radio station accordingly.
    2. It makes its users record any song so that they can enjoy it later.
    3. It also shows location based local radio stations for more convenience of its users.
    4. For more users convenience it also comes with car mode which makes it very easy to use while driving a car.
    5. Its tracks down users listening habits and suggests stations accorindigly.

    3) More Personalization: You can personalize your Audials app according to yourself like you can mark your favorite radio stations and can organize them in a proper manner so that you can access them later in one go. You can also pin your favorite genres, artists, or countries to your home screen.

    4) Videos and Podcasts: More than 120k Videos and Podcasts are there covering almost all types of genres like News, previews for video games, comedy, science, movies, sports, language, etc.

    Quick View to the Interface

    In this part of the post, we are going to give a quick view to the interface of the Auidals Radio app for the iOS device.

    1) Opening the app for the very first time, you will get the following screen have a look at it.

    opening the app2) Now you can search for your favorite country or artist or anything. Below we searched for the USA and after that, we have selected our favorite music radio station.

    radio stations3) You can also mark any station as your favorite and can also pin that station.

    PIN stations4) Here is a snap of Podcasts screen have a look. As you all can see you can search for your favorite videos or podcasts. And it covers almost all types of genres.

    business

    Final Thoughts

    Before ending up the post, we are going to share our thoughts on this music app. Read the following points carefully and take action accordingly.

    Pros

    1) The app is free with no annoying ads. This is probably the best point associated with it, as most of the apps of same types are either very expensive or contain hundreds of annoying ads.

    2) The availability of Audials Radio app is also are very big plus point as it is available for almost all types of devices.

    3) The interface of the app is super responsive, and yes it is very attractive also. Both light and black themes are very attractive.

    4) Super responsive customer support is also plus point with it, and Audials Radio team brings updates very frequently, which is also very good.

    Cons

    Sorry, we didn’t find any drawback while using it, everything is just perfect the sound quality of stations played were awesome, video quality was also very good, and we also didn’t notice any streaming issue. If you noticed any drawback while using it, please let us know.

  • Top 3 Nintendo DS / NDS Emulators for PC – Windows 10 / 7 to Play NDS Games on Computer

    Top 3 Nintendo DS / NDS Emulators for PC – Windows 10 / 7 to Play NDS Games on Computer

    Nintendo DS or NDS is one of the best selling handheld gaming consoles ever by Nintendo. Some of its game titles such as Mario Kart, Pokemon Black are still worth a decent gaming session due to their attractive gameplay. For the solution of How to play Nintendo DS Games on PC – We bring you the Top 3 Free Nintendo DS / NDS Emulators for PC .

    3 Best Nintendo DS / NDS Emulators for PC (Working on Windows 10 too) 

    NDS Emulator # 1 – DeSmuME

    DeSmuME NDS Emulator for PC
    DeSmuME NDS Emulator for PC

    DeSmuME is perhaps the best Nintendo DS emulator for your PC or Laptop. It can emulate and play Nintendo NDS games at ease, with microphone and sound emulation. Amongst all the emulators we tried our hand at DeSmuME had the best sound reproduction for ROMs & games.

    Besides, these DeSmuME has some great features such as –

    • Ability to Save games & load saved game states.
    • Cheat codes support.
    • External Gamepad and Joystick support.

    Click here to Download DeSmuME NDS emulator for Windows 10 / 7 / 8.1 (64-bit)

    Click here to Download DeSmuME NDS emulator for Windows 10 / 7 / 8.1 (32-bit)


    NDS Emulator # 2 – No$GBA (No Cash GBA)

    No$GBA Nintendo DS Emulation on Windows 10
    No$GBA Nintendo DS Emulation on Windows 10

    Not to be confused by its name, No$GBA is a really capable DS emulator for windows. Though primarily made for GBA it can run NDS games like Pokemon Black with ease..

    The only concern about No$GBA is its loading of ROM which isn’t visible at first.

    To play Nintendo DS game on Windows via No$GBA , navigate to File – > Cartridge menu (Files.lst) and here select the NDS game ROM which you want to play.

    The Emulator is very quick and supports gamepad too, its just sometimes the audio becomes unfiltered on switching between other apps to Nocash GBA.

    Click here to Download No$GBA Nintendo DS emulator for Windows 7/8.1 & Windows 10


    NDS Emulator # 3 – DuoS DSEMU

    DuoS DSEMU NDS Emulator for PC
    DuoS DSEMU NDS Emulator for PC

    DuoS DSEMU is altogether a different and very easy to use DS emulator. It has no User interface to open or load a ROM in order to save memory. All you need to do is right click on your games .nds ROM file and open with the DuoS DSEMU , or you can set file associations for the same.

    So , next time whenever you double click on the ROM it will instantly load inside the emulator.

    Unlike the above two emulators, DuoS doesn’t support gamepad or joysticks, but its really very fast and compatible with almost all Windows versions .

    Click here to Download DuoS DSEMU NDS emulator for PC / Windows 10 / 8.1 /7 


    So, these are the best NDS Emulators to play Nintendo DS games on your Pc or computer without owning the console, however you need to own the game or ROM for the Nintendo DS game you wish to play inside the emulator. A simple google search for NDS ROM plus game or sites like romhustler.net can help you get your desired NDS game.


  • How to Install Turbo Pascal on your Android Phone or Tablet

    How to Install Turbo Pascal on your Android Phone or Tablet

    Turbo Pascal is one of the most used Pascal being used today, despite it being the oldest one. Now, Turbo Pascal was originally meant to be run on DOS PCs , but today’s Smartphones are no less than PCs and can even get DOS running without any lags. So, in article we will show you – How to easily install & use Turbo Pascal on your Android phone or tablet so you can code & execute programs on the run.

    Tutorial to install & use Turbo Pasca; on Android KitKat , lollipop, Marshmallow & Nougat (4.4 , 5.1 ,6.0 , 7.0)

    Pre-requisites –

    Tutorial – 

    Step . 1 – Configuring Dos Box & Turbo Pascal (Only a one-time setup process) – 

    • First of all download & extract the turbo pascal binary zip files into a folder on your device as shown in the image below –
      Turbo Pascal Directory
      Turbo Pascal Directory

      Now as we extracted the zip files into Internal Storage – > Download. The Tp Directory files are accessible at “Internal Storage\Download\Tp” . Thus, the “internalstorage\download\” is our path

    • Now, once you have downloaded & installed Magic Doxbox free app, launch the app it will show a welcome screen, click on ‘x’ to close the message screen.
    • In the next black screen – click on the “+” icon to add new game, then select the “New game” option as shown in the image below –
      Magic DosBox add New Game
      Magic DosBox add New Game


    • The Configuration screen will now ask for the title, and the path of the game (which is Turbo Pascal in our case). Here, we need to specify the path where we have kept our binaries. On this screen Click on “choose” as shown on the following photo –
      Path for Turbo Pascal Android
      Path for Turbo Pascal Android

      Now, navigate using the folder view until the choose folder option shows the folder “TP in the location where you extracted the TP.zip files.

    • Once you see the folder “TP” as shown in the below image , simply tap on “Checkmark” or “✓” sign. Do not click or open the TP folder, as shown below –
    • The Turbo Pascal icon will now be shown in the black screen as shown below – That’s it you have now completed the one-time set up process .
      One time process completed
      One time process completed


    Step.2 – Running Turbo Pascal & launching directly for subsequent uses –

    • Now, for running Turbo Pascal for subsequent uses , simply click on the Turbo Pascal icon inside Magic Doxbox app. Here, you will seeDOSBoxosbox black screen as shown in the image below .
    • Here, we need to type the Turbo pascal binary path to execute turbo pascal, incase if your keyboard doesn’t appear – Please press the back key of your Phone! & select the keyboard as shown in the image below –
      Select Keyboard after back-button if keyboard doesn't appear automatically
      Select Keyboard after back-button if keyboard doesn’t appear automatically


    • Now, on the black screen we need to type in the Turbo C path to execute it , to execute Turbo C file please enter the following commands one by one on the black screen –
      1. Type in “cd tp”  (hit the enter or return / new line key on keyboard)
      2. Now type in “cd bin” (hit the enter or return / new line key on keyboard)
      3. type “turbo” (hit the enter or return / new line key on keyboard)
      4. It will look like below –
        Commands to Open Turbo Pascal on Dosbox Black Screen
        Commands to Open Turbo Pascal on Dosbox Black Screen


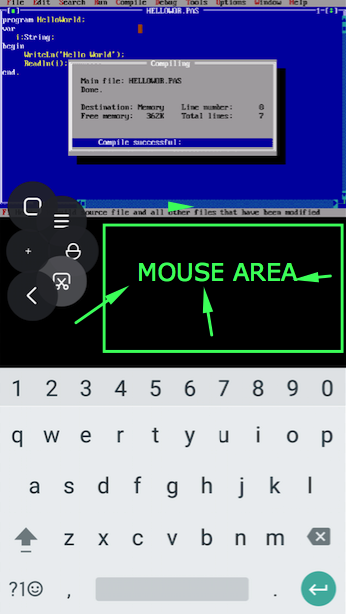
    • That’s it!! your Turbo Pascal will now be launched & opened! 🙂 .. You can now access all functions of keyboard, mouse & start programming of Pascal right on your android device as shown below –
      Turbo Pascal on Android with Mouse & Keyboard
      Turbo Pascal on Android with Mouse & Keyboard

      It feels really awesome & geeky to do programming on your android, and is pretty smooth too! , especially the mouse pointer area and mouse movement as shown in the image above Also the best part is that this works totally without SD card or memory card, so will work on all android phones!

    • Rest all functions of Turbo Pascal work really smoothly. In case if you face any issues or encounter any errors feel free to contact us! Happy Programming!
  • Top 3 Download Managers for Google Chrome to Increase Downloading Speed [2019]

    Top 3 Download Managers for Google Chrome to Increase Downloading Speed [2019]

    Google Chrome is the most widely used Web Browser across the globe and perhaps the fastest when it comes to browsing websites. But, the downloading speed of any download being done via Google Chrome is slow, and often the number of failed downloads only increase our efforts to re-download the file and time too. A solution to the above problems is using a download manager. Download Managers not only reduce the number of failed downloads, but they also help in increasing the speed and giving more controls over the files we download. So, here are the Top 3 Best Download Managers for Google Chrome Browser and Chrome OS –

    Top 3 Download Managers App for Google Chrome Browser – [ChromeBook Chrome OS Compatible]


    Download Manager # 1 – Chrono Download Manager

    Chrono Download Manager
    Chrono Download Manager

    Chrono Download Manager is a full-fledged Download Manager, which gives you more controls over your downloads.

    It comes in with Multi-threaded supports much like IDM, so that you can download via multiple streams from the server resulting in more download speed. Also, it comes with custom one-click download helper, simply right click on any link and “select the Download Link” option from menu.

    Features – 

    • Multi-threaded download support (Configurable from Download Managers – General Settings option page) – chrome-extension://mciiogijehkdemklbdcbfkefimifhecn/ui/options.htm
    • Custom file renaming to give you better control to rename file names before downloading.
    • Pause and Resume downloading support!
    • Automatically replaces Chrome Default download manager.

    Click here to Download Chrono Download Manager from Chrome App Store


    Download Manager # 2 – Turbo Download Manager

    Turbo Download Manager
    Turbo Download Manager

    Turbo Download Manager is another alternative download manager like Chrono to Google Chrome’s Download. We found out Turbo Download Manager to be more powerful than even Chrono, but it lack of user friendliness kept it on the second position.

    Some of the Unique Features of Turbo Download Manager are –

    • Multi-threading support.
    • Automatic retry of failed downloads! if the fail in between.
    • Console log .

    Turbo Download Manager doesn’t automatically grab downloads/links which is a good thing, to download any link via turbo download add it manually in the app or use the Turbo Download Helper extension to enable right click on any link to download via turbo download manager option.

    Click here to Download Turbo Download Manager App from Google Chrome App Store

    Turbo Download Manager proved to be very useful in Downloading Big Files due to its unique capability of letting Chrome Shut down, or even allowing PC to be shut down in the paused downloading file state as shown in the article – How to Shut down Chrome or PC with Active Download and then Resume it.


    Download Manager # 3 – Chrome Download Manager

    Chrome Download Manager
    Chrome Download Manager

    Unlike the above two Download Managers which increase the functionality and allow tweaks to increase the speeds, Chrome Download Manager makes it easy to manage download.

    Its a lightweight extension, which lets you view your current downloads in the top-hand side corner concealed behind the down button (much like firefox) . So that you can manage your downloads without going to the downloads page, thus saving your time!

    Click here to Download Chrome Download Manager from Chrome Extension Store.


    So, these are the Best 3 Download Managers for Chrome which will give you more control over your downloads, thus increasing the Downloading speed!. This method is exclusively meant for Google Chrome browser for Windows 10/7/8.1/ Mac OS X, Linux (Ubuntu) etc and will not work on the Android Chrome version.

    Geek Alert! – You can also use your Chrome to Download Torrents directly – >  Click here for tutorial to download torrents via Chrome.


  • Best Free Android VPN Platform | Rocket VPN

    Best Free Android VPN Platform | Rocket VPN

    If you want to surf geographically blocked content, then you should use VPN and if you want to use the internet without exploring your identity then in that case also you should use Virtual Private Network. There are lots of free Android apps that provides nothing in the name of free VPN service most of these apps either serve ads or fewer usage data in the name of free service. But Rocket VPN is different from all other free VPN apps as it provides monthly 250 MBs of data without charging a single penny. Now let us explore more about it below part of the post.

    Rocket VPN Introduction

    maxresdefaultRocket VPN is a free VPN platform which is developed by the Liquidum Limited, and it is available for both Android and iOS based devices. Rocket VPN is one of the most downloaded VPN app available in the PlayStore (more than 1 million downloads). Beside monthly free data limit, there are many things which make Rocket VPN so much famous among users and let us find out why it is so by reading some of its features have a look.

    Quick Download Links

    Android

    iOS

    1) Basic VPN Features: Rocket VPN provides some basic and necessary VPN features like:

    a) Data Encryption is done while sending and receiving data through Rocket VPN. This is done to provide full security and confidentiality to users private data. Data Encryption is very helpful for those who often use public Wi-Fi, etc. As the public Wifi are highly prone to the hackers.

    b) Large numbers of servers are used in Rocket VPN so that users can easily access geographically blocked content by using servers from different countries all over the world.

    c) Rocket VPN protects its users from any other type of tracking, or we can say spying agencies so that its users can access the internet with full freedom.

    2) Inbuilt Secure Browser: Rocket VPN comes with more secure and reliable browser through which users can surf internet free without any fear of spying eyes.

    3) Quick Launch: Rocket VPN makes its users access other apps directly from it. It allows its users to create a shortcut for each app with preferred location. Hence users can launch any app through it with selected location.

    Introduction to the Interface

    Let us give a quick introduction to the interface of the Rocket VPN Android app. We are providing some snaps which we took while using the app so that you can get a much better idea about the app.

    1) Here is the home screen of the app. As you all can see we are not connected yet.

    connection

    2) You can select the location from various available servers. Here is a snap of available servers in the free version.

    server locations

    3) Rocket VPN comes with the inbuilt browser which can be to surf net more securely and as you can see we can securely connected to the internet.

    connected securely

    4) You can also access other apps directly from the Rocket VPN and can select the separate location for each. Here is a snap of screen in which we have to choose location.

    location as per apps

    Final Words

    We are wrapping up the post here only and before saying bye lets us highlight some positive and negative points about it so that our readers can take action accordingly.

    Positive

    1) Monthly free 250 MBs of data is very big plus point associated with Rocket VPN as most of the free VPN services providers provide one-time usable data.
    2) The interface of the app is very attractive and features like apps shortcut, secure browsers are adding more feathers to the crown of the Rocket VPN.
    3) The browsing speed is also very good. We didn’t notice any buffering problem while watching online video through it. Also there are apps for both iOS and Android.
    4) A Large number of servers are available even in the free version which is also very good.

    Negative

    This VPN app is free on the cost of ads and you can upgrade to remove those plus more bandwidth.

    Final Thought

    We hope you all have read all of the above points carefully and will take action accordingly. Go for Rocket VPN free version or go for paid, it all depends upon on your needs and budget. Try it share your valuable thoughts on it with like, comments and share.