Category: Uncategorized

  • mysimpleshow: Best Explainer Video Creator

    mysimpleshow: Best Explainer Video Creator

    The video creation is always a big hassle. For creating something really out of the box, you need to be a master in this field. But with the advent of technology, it has become really easier for the people to create their own illustrative videos without any prior knowledge. A number of software tools are made available to the people these days which have made the things simpler. If you are looking for an extraordinary tool to create illustrative videos then mysimpleshow can turn out to be the best option available. Let’s put a brief insight over this tool.

    simple video

    About mysimpleshow

    mysimpleshow is an awesome tool that allows you to create bizarre explainer videos using few video editing tools. You can make use of inbuilt storyline templates to create your own script and depict its using the video maker tool. Its powerful Explainer Engine comes handy in suggesting you different illustrations to conceptualize the story. You can start creating your first video with just a single click.

    Creating Explainer Videos – The 4-Step Guide

    mysimpleshow has made video creation really simple. You can easily start with your first explainer video with these 4 easy steps.

    • Draft: It suggests you the best storyline for your video on the basis of your answers to few questions asked by this tool.
    • Write: A user can practice different examples and utilize the practical advice to create a marvelous script for your first explainer video.
    • Visualize: Its Explainer Engine automatically generates the Storyboard for the user so that the user can easily fine tune with his/her story.
    • Finalize: Once you have done everything, it is the time to select the voiceover and the video speed. After this step, you are ready to publish your first explainer video on YouTube.

    final cut

    Creating Video with mysimpleshow

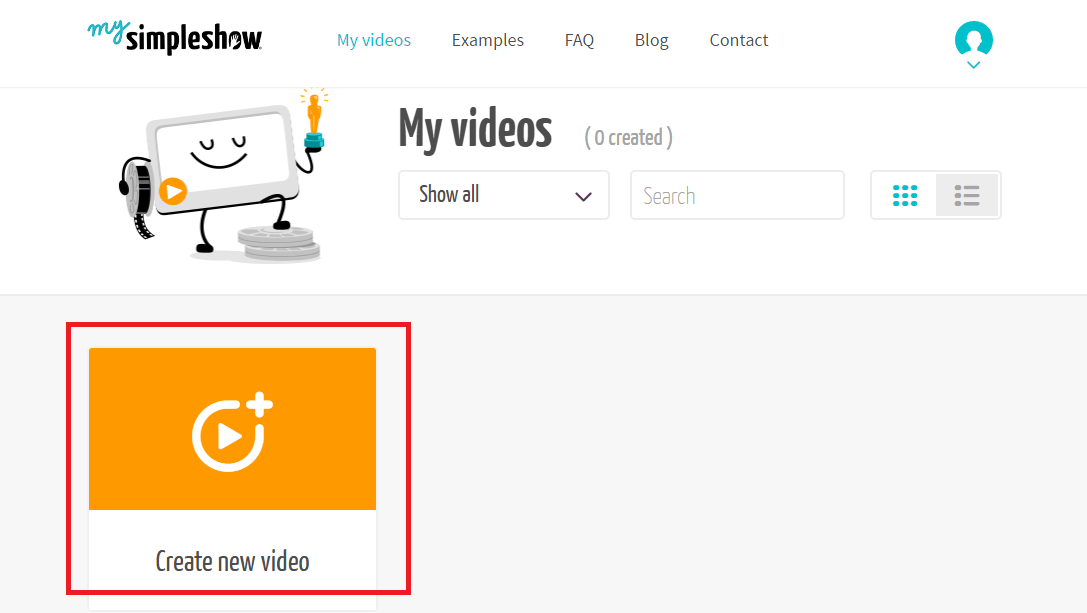
    • Firstly, open the tool interface using the login id and password details and then click ‘Create New Video’ option.

    video creation

    • You can either upload the PowerPoint presentation or can choose the script by your own. It’s totally your choice. Here, we have chosen ‘Write your own Script’ option.

    script option

    • Now, click the ‘Let’s Start’ option.

    start option

    • The storyline will appear on the screen which appears next. Find it according to your subject.

    story line

    • Click on the ‘Type Away’ option.

    typing option

    • Now, you have to enter the desired script to impress your audience through your video. Fill in the details with utmost care.

    filler details

    • Click the ‘Choose Visuals’ option below.

    visuals option

    • Click on the ‘Sounds Great’ option.

    sounds great option

    • mysimpleshow’s Explainer Engine will suggest you the pictures/images according to the script decided by you. If you have your own images, you can upload them as well.

    explainer engine

    • To select the voiceover, click on the ‘Choose Audio’ option.

    audio option

    • You can either select the voiceover from mysimpleshow’s interface or can even upload it by your own. Click on the ‘Alright’ option to move to next step.

    alright

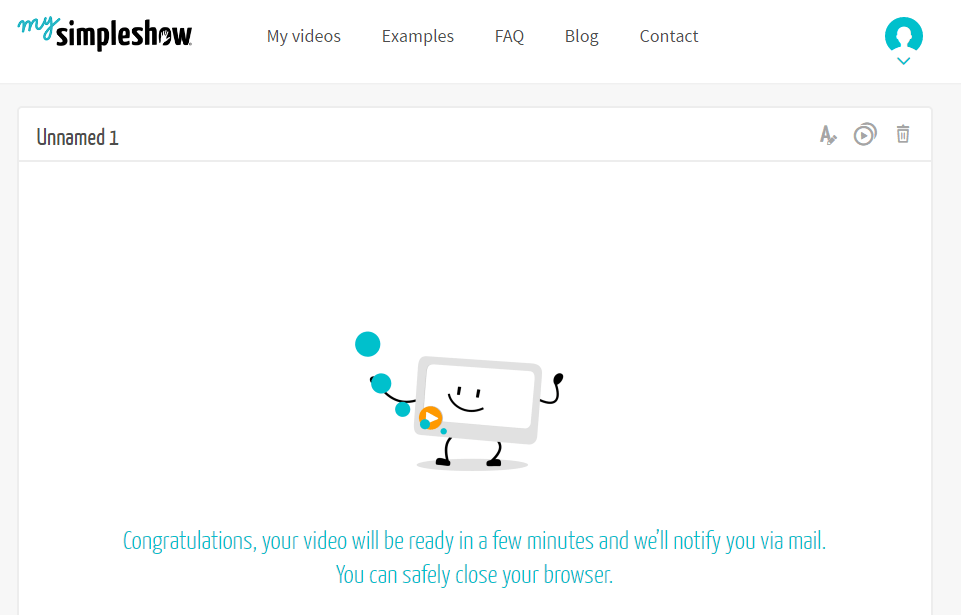
    • You must play the video to check if everything is working fine. Click on the ‘Finalize Video’ option, once you are satisfied with the video.

    video rendering

    • An email will be sent to your registered mail id after this tool has completed creating the video. You are allowed to share, edit, or delete the video once it has been created.

    video done

    This is how a user can create the stunning illustrator videos with mysimpleshow. Its user-friendly interface helps the users to make videos in minimal time adding the best features to it.

    Pricing

    pricing option

    It offers a number of different plans to the users along with the free plan. Each plan comes with unique features along with a few common ones. A user gets enhanced features with a higher-valued plan.

    Pros

    • Thousands of illustrations are provided by this tool.
    • Videos can be previewed.
    • User-friendly.
    • Share videos with your YouTube audience.
    • Both male and female text to speech voices are available.

    Cons

    • Lacks emotions in text to speech.
    The Last Words

    mysimpleshow makes it really easy for this tool to create stunning looking videos. It has a great collection of images and storylines providing plethora of choices to the users to pick the best one. Its easy to use interface helps the users to customize their video proficiently. Go for it!

  • ShadeYouVPN Review – A New Way to Access the Internet Anonymously

    ShadeYouVPN Review – A New Way to Access the Internet Anonymously

    Looking for a VPN? Finding it hard to choose the best one among a number of choices available to you? Don’t Worry? We have done a good research for you. ShadeYouVPN is an affordable VPN provider that lets you to carry anonymous browsing on the internet. It has the most secured network of servers making it nearly impossible for the intruders to get its access. Let’s go through a brief insight about this tool.

    shadeyouvpn

    ShadeYouVPN – The Introduction

    ShadeYouVPN is a UK based company operating from Scotland. It incorporates a high-standard of built-in security blocking the intruders from gaining access of your network or system. The people looking to access the internet anonymously can trust its services and browse through the web without a fear of being caught secret agencies, hackers, or other intruders.

    Best Features of ShadeYouVPN

    The billions of users around the web are accessing every day. More than 236 million identities are leaked every year and about 600k users fall in trap to cyber crime every day. But if you are using ShadeYouVPN, your security will not be at risk. Let us learn about some of its versatile features.

    Highly Secured Servers

    ShadeYouVPN has 25 highly secured servers in 15 nations including Canada, UK, USA, Ukraine, France, Netherlands, Sweden, Germany, Hong Kong, Russia, Romania, Singapore, Finland, Australia, and Spain. You can switch between different servers in seconds.

    secured servers

    Smooth User Interface

    The users can easily navigate through different options through its dashboard. Get connected to the VPN servers instantly and configure the settings accordingly.

    Offers Unlimited Bandwidth

    You can stream unlimited videos from anywhere around the world utilizing the unlimited bandwidth. Your speed will not be throttled even if the server is receiving high traffic. The bandwidth will never get exhausted.

    Bypass the Geo-Restrictions without Revealing your Identity

    ShadeYouVPN doesn’t store the user logs. It means that your browsing sessions remain completely anonymous. You can easily surf through the web anonymously without the risk of getting caught by your Internet Service Provider (ISP) or any intruder. Your original IP is replaced with a dynamic IP on its server. Your activities become untraceable on the internet while using this VPN.

    Different Protocols

    The protocols like PPTP, LLTP, and OpenVPN ensures the server security. LLTP is a universal protocol which is used by different VPN providers around the world. On other hand, the OpenVPN is the most stable protocol that adds extra security layer.

    DNS Leak Protection + Kill Switch

    It ensures that your DNS don’t leak data to your ISP. A secure connection is established between ShadeYouVPN’s servers and you. All the traffic will be directed through its servers. Its kill switch technology ensures that the browsing sessions is terminated instantly if the connection is lost in between.

    2048/4096-Bit Encryption

    ShadeYouVPN makes sure that the data transfer takes place safely. It uses the 2048-bit/4096-bit encryption key for the data transfer. This means if anyone has got the access to your network, it will takes millions of years to break the security key with different combinations. It is nearly impossible to decode the data being transferred without knowing the private key.

    Compatibility

    Its VPN client can run on operating systems like Windows XP/Vista/7/8, Mac OS, Linux, iOS, and Android. You can run it on mobile, tablet, and PC too.

    ShadeYouVPN Setup

    • Download the ShadeYouVPN’s VPN client and install it on your device. Click on its icon to open it.

    login info

    • Enter your username and password to login.

    pptp protocol

    • The connection will be established soon.

    torrent

    • Once you are connected, the server location can be changed instantly with just few clicks.

    country list

    • You can go to the ‘Settings’ option and manage different settings accordingly. Click on the ‘Safe’ option to save the settings.

    settings

    • Now, browse the web anonymously.

    Pricing

    pricing details

    ShadeYouVPN offers 9-days free trial pack to every user. You can upgrade to its premium plans if you are happy with its services.

    Pros

    • It can handle unlimited traffic.
    • It supports PPTP, LLTP, and OpenVPN protocols.
    • Provides 2048-bit/4096-bit protection.
    • DNS Leaks Protection + Kill Switch

    Cons

    • No Phone Support.
    Over to You

    ShadeYouVPN is a powerful VPN provider that is gaining popularity around the world. The power encryption technology makes the data transfer process totally secure. Moreover, you can browse through the web anonymously without any worries. Try this VPN now and enjoy anonymous browsing.

  • Top 3 Nintendo DS / NDS Emulators for PC – Windows 10 / 7 to Play NDS Games on Computer

    Top 3 Nintendo DS / NDS Emulators for PC – Windows 10 / 7 to Play NDS Games on Computer

    Nintendo DS or NDS is one of the best selling handheld gaming consoles ever by Nintendo. Some of its game titles such as Mario Kart, Pokemon Black are still worth a decent gaming session due to their attractive gameplay. For the solution of How to play Nintendo DS Games on PC – We bring you the Top 3 Free Nintendo DS / NDS Emulators for PC .

    3 Best Nintendo DS / NDS Emulators for PC (Working on Windows 10 too) 

    NDS Emulator # 1 – DeSmuME

    DeSmuME NDS Emulator for PC
    DeSmuME NDS Emulator for PC

    DeSmuME is perhaps the best Nintendo DS emulator for your PC or Laptop. It can emulate and play Nintendo NDS games at ease, with microphone and sound emulation. Amongst all the emulators we tried our hand at DeSmuME had the best sound reproduction for ROMs & games.

    Besides, these DeSmuME has some great features such as –

    • Ability to Save games & load saved game states.
    • Cheat codes support.
    • External Gamepad and Joystick support.

    Click here to Download DeSmuME NDS emulator for Windows 10 / 7 / 8.1 (64-bit)

    Click here to Download DeSmuME NDS emulator for Windows 10 / 7 / 8.1 (32-bit)


    NDS Emulator # 2 – No$GBA (No Cash GBA)

    No$GBA Nintendo DS Emulation on Windows 10
    No$GBA Nintendo DS Emulation on Windows 10

    Not to be confused by its name, No$GBA is a really capable DS emulator for windows. Though primarily made for GBA it can run NDS games like Pokemon Black with ease..

    The only concern about No$GBA is its loading of ROM which isn’t visible at first.

    To play Nintendo DS game on Windows via No$GBA , navigate to File – > Cartridge menu (Files.lst) and here select the NDS game ROM which you want to play.

    The Emulator is very quick and supports gamepad too, its just sometimes the audio becomes unfiltered on switching between other apps to Nocash GBA.

    Click here to Download No$GBA Nintendo DS emulator for Windows 7/8.1 & Windows 10


    NDS Emulator # 3 – DuoS DSEMU

    DuoS DSEMU NDS Emulator for PC
    DuoS DSEMU NDS Emulator for PC

    DuoS DSEMU is altogether a different and very easy to use DS emulator. It has no User interface to open or load a ROM in order to save memory. All you need to do is right click on your games .nds ROM file and open with the DuoS DSEMU , or you can set file associations for the same.

    So , next time whenever you double click on the ROM it will instantly load inside the emulator.

    Unlike the above two emulators, DuoS doesn’t support gamepad or joysticks, but its really very fast and compatible with almost all Windows versions .

    Click here to Download DuoS DSEMU NDS emulator for PC / Windows 10 / 8.1 /7 


    So, these are the best NDS Emulators to play Nintendo DS games on your Pc or computer without owning the console, however you need to own the game or ROM for the Nintendo DS game you wish to play inside the emulator. A simple google search for NDS ROM plus game or sites like romhustler.net can help you get your desired NDS game.


  • How Does an Editor Think And Feel?

    [vc_row][vc_column][vc_column_text wrap_with_class=”no”]

    We look our best in subdued colors, sophisticated cuts, and a general air of sleek understatement. When I was young, I lived like an old woman, and when I got old, I had to live like a young person.

    [/vc_column_text][vc_column_text wrap_with_class=”no”]Men have got more of a discerning eye. They appreciate cut and details, things that aren’t so obvious. They like things that have cachet and gentlemanliness. Elegance is not the prerogative of those who have just escaped from adolescence, but of those who have already taken possession of their future. My shows are about the complete woman who swallows it all. It’s a question of survival. We look our best in subdued colors, sophisticated cuts, and a general air sleek understatement. There is always an emotional element to anything that you make.[/vc_column_text][rs_blockquote cite=”Elliot Forson”]I like the things around me to be beautiful & slightly dreamy, with a feeling of worldliness.[/rs_blockquote][vc_column_text wrap_with_class=”no”]

    1. MagPlus supports everything

    [/vc_column_text][rs_image_block align=”left” image=”250″ photo_credit=”Designlazy.com”][vc_column_text wrap_with_class=”no”]

    Nova was the magplus that we all wanted to read in the Sixties because every issue brought something new and relevant to our lives: extraordinary fashion by Molly Parkin; innovative layouts and photographs by Harri Peccinotti; articles about the Pill and our new sexual freedom and a different take on beauty, fashion and celebrity – for one incredibly complicated story, we revamped the Queen. Our editor, Dennis Hackett, always thought outside the box always thought outside the – he once wanted to print the magplus back-to-front because he noticed women always started reading it at the end, but the bosses wouldn’t let him.

    [/vc_column_text][vc_column_text wrap_with_class=”no”]

    Nova was the magplus that we all wanted to read in the Sixties because every issue brought something new and relevant to our lives: extraordinary fashion by Molly Parkin; innovative

    [/vc_column_text][vc_column_text wrap_with_class=”no”]

    2. Video Embed

    [/vc_column_text][rs_video_block video_url=”https://player.vimeo.com/video/171807697?color=f561af&badge=0″][vc_column_text wrap_with_class=”no”]

    You can embed your/others youtube videos that go along with the blog post. MagPlus supports this.

    [/vc_column_text][vc_column_text wrap_with_class=”no”]

    3. Gallery Showcase

    [/vc_column_text][rs_gallery_showcase images=”246,251″][vc_column_text wrap_with_class=”no”]

    As you can see, you can embed showcase you post images in a gallery. This works like a charm in a lookbook or who wore what type post.

    [/vc_column_text][vc_column_text wrap_with_class=”no”]

    4. Soundcloud Embed

    [/vc_column_text][rs_sound_cloud_embed src=”“https://w.soundcloud.com/player/?url=https%3A//api.soundcloud.com/tracks/302683451&auto_play=false&hide_related=false&show_comments=true&show_user=true&show_reposts=false&visual=true“” width=”“100%“” height=”“450“” frameborder=”“no“” sound_cloud_url=”https://w.soundcloud.com/player/?url=https%3A//api.soundcloud.com/tracks/302683451&auto_play=false”][vc_column_text wrap_with_class=”no”]

    As you can see, you can embed your/others Souncloud podcasts that go along with the blog post. MagPlus supports this.

    [/vc_column_text][vc_column_text wrap_with_class=”no”]

    5. GIF Showcase

    [/vc_column_text][rs_gif_showcase gif_url=”http://giphy.com/embed/yrSgmpUSWgRyg”][vc_column_text wrap_with_class=”no”]

    As you can see, you can embed GIFs in theme theme. This works like a charm in any post type. Enjoy that!

    [/vc_column_text][/vc_column][/vc_row]

  • How to add Sound Equalizer on Windows 10/7 (PC & Laptop)

    How to add Sound Equalizer on Windows 10/7 (PC & Laptop)

    Equalizer is one of the essentials when it comes to Music lovers and audiophiles , but sadly Windows 10 or be it any Windows 7 , or 8.1 none of them comes with an inbuilt Equalizer. Many times you might want to use Equalizer on YouTube, Spotify or be it any game or application on Windows. So, here’s an easy method which will add a default system-wide Sound equalizer so that the direct audio stream is equalizer enabled thus adding Sound equalizer to Windows 10 & iTunes or any app installed in it.

     Tutorial – Method on How to add Sound Equalizer on Windows 10 , Windows 8.1 & 7 (System-wide)

    Pre-Requisites – 

    1. Your Computer or laptop must have audio drivers installed & working.
    2. A Working internet connection.
    3. A user account to install apps with administrator priveledges.

    Method to install the Equalizer and front end for it –

    • We are going to use “Equalizer APO” for installing the system-wide equalizer and then a front end to control the equalizer presets.
    • So, first of all Download & Install Equalizer APO according to your System OS from the links below –

      Click here to Download Equalizer APO for Windows 10 / 7 / 8.1 (32-bit Variants)
        

      Click here to Download Equalizer APO for Windows 10 / 7 /8.1 (64-bit Variants)

    • After you have downloaded the above software, while installing it will ask you to select the Playback devices as shown in the image below –
      Selecting Playback devices on Equalizer APO Windows 10
      Selecting Playback devices on Equalizer APO Windows 10

      here select the audio playback devices where in you want to use Equalizer , Headphones / Speakers etc (You can even select all of them)

    • After selecting the playback devices , Click on the “OK” button.
    • Equalizer APO will now be installed on your System and it will be rebooted (restart the windows operating system)
    • Once , you computer or laptop is restarted, we will now control the Equalizer by a front-end named as “PC Equalizer – GUI” . So you need to Download & Install PC Equalizer GUI from the link below –Click here to Download PC Equalizer GUI for Windows 7/8.1/10 
    • Now, once you have installed PC Equalizer GUI it will ask you permissions to write to configuration file, allow it by “Click Yes”.-
      PC Equalizer GUI for Windows 7/8.1/10
      PC Equalizer GUI for Windows 7/8.1/10


    • Now, in PC Equalizer you can easily change the default Equalizer presets , such as “Bass, Party , Jazz , Rock , Soft, Classical , noise-reduction ” from the drop-down menu as shown in the image below –
    • Changing Equalizer in Windows 10
      Changing Equalizer in Windows 10

      Thus, you have now successfully changed the default audio output Equalizer in your Windows 10 / 7 / 8.1 computer or laptop.

    • Besides, changing equalizer treble, vocals you can even change the audio output stream to mono or stereo adjust highs and lows. Also boost sound output using the app!
    • Thus, you can enjoy replica franck muller watches equalizer enabled sound on any app iTunes, Spotify, Chrome directly on Windows 10 or 7 or 8.1 using this tutorial.

    If you face any issues feel free to comment.

  • Bing Rewards India – get Free Rs.100 Recharge each Month for searching on Bing!

    Bing Rewards India – get Free Rs.100 Recharge each Month for searching on Bing!

    The amount of recharge which can be earned by using Free Recharge giving apps is reducing, but rejoice! not anymore now you can easily earn Rs.100 recharge per month without downloading any apps whatsoever by Bing. Bing is a search engine just like Google , which can be used to search stuffs on the Internet. Bing is powered by Microsoft , thus Microsoft’s Bing rewards in India can easily earn Rs.100 for you! Read on below to know more..

    How to Earn Free Recharge Using Bing Rewards ?

    • First of all navigate to the below Bing Rewards India URL by clickiing on the Link below –
      Click here to Navigate to Bing Rewards Link – https://www.bing.com/rewardsintl/explore/
    • Now, once you navigate to the above URL, it will ask you to either “Log In” to your Microsoft (Outlook/Hotmail) account or “create” (new Microsoft account) as shown in the below image –

      Microsoft Bing Rewards India
      Microsoft Bing Rewards India
    • Sign in to your microsoft account or create a new account if you don’t have one.
    • Once you have signed into your account, simply start searching on Bing – http://www.bing.com/
    • You Can earn 10 Daily Credits daily simply by searching on Bing and you don’t need to do anything.
    • That’s it! You can now redeem your credits for FreeCharge coupons with the redeem rates of 3 Credits = 1 Rupee.. thus you can easily earn Rs.3.33 per day! which equals Rs.100 per month.
    • You can see the redemption Dashboard as shown in the image below –
      Bing Rewards India Redemption on FreeCharge Recharge
      Bing Rewards Redemption on FreeCharge


    • Thus, this is one of the most easiest way to earn recharge that too without downloading any apps!. Also, your earned Credits are always shown on Bing.com while searching as shown –
      Bing Credits


    • Well, this is just another small free recharge trick from TechApple which will help our readers. Do let us know in comments if you face or encounter any issues in bing rewards India.
  • 3 Different Ways to Share Files from Android to Mac OS X

    3 Different Ways to Share Files from Android to Mac OS X

    Mac OS X series have limited support for Android , and hence it becomes difficult to Share Files from Android to Mac OS X devices. Its due to the fact that all the OS X series – Mountain Lion, Mavericks, Yosemite & even El Capitano have no support for Android MTP drivers. Thus, the normal methods which work for Windows do not work for Mac OS X, but not anymore we bring you the 3 Different ways to Share or Transfer Files from Android to Mac OS X.

    3 Different Methods to Share Files from Android to Mac OS X 

    Note – Since Combining all these methods in a single post will make the article more confusing, we will describe each method in short and will provide a detailed tutorial link for each method.

    Method . 1 – Transferring Files from Android MTP to Mac OS X via Android File Transfer : 

    By Default Mac OS X doesn’t support Android MTP , but here’s how you can use Android MTP on your Mac OS X –

    1. Download & Install the Android File Transfer App from the below link –
      Click here to Download the Android File Transfer App for Mac OS X.
    2. After you have installed the app on your Mac device, Connect your Android device to your Mac device in USB MTP Mode via USB Cable
    3. Now, after you have connected your Android device , Launch the Android File Transfer App.
    4. Open a New Finder Window and navigate to the directory where you want to either copy files to Android device or paste files from Android Device.
    5. Now, for Sharing Files from Android to Mac OS X –  Select & Drag files from Android file transfer to the Finder App.
    6. If you want to share or copy files from Mac OS X to Android – Simply select the files you want to copy in Finder and drag & drop them to Android File Transfer app Window.
    7. Click here for the Detailed tutorial on How to Transfer files between Mac OS & Android via MTP USB along with Screenshots


    Method . 2  – Transferring Files from Android to Mac OS X or vice versa by using USB Storage Mode – 

    Select USB Storage on Android

    Though the default USB connection type for Android phones is MTP, most phones also have the option to select default connection type as “USB Storage”.

    The reason being MTP is not supported by Windows XP , but the same mode is very helpful even for Mac OS X users. As your phone can be easily browsed using Finder as below –

    • Change the default USB Connection type in your Android Phone Settings to “USB Storage”.
    • Now connect your Android Phone to Mac OS X using USB Cable.
    • You will instantly see one or two icons on your Desktop depending your phone’s storage options –
      If external SD Card supported – 2 icons.
      No external SD Card support – 1 icon.

    as shown below –

    Icons on Desktop Double click to Open
    • Double click on any icon, it will open in Finder!
    • Voila! now you can browse your Android Phone’s contents right inside Finder as shown in the image below –

      Android Phone Contents right inside Finder
    • Now, simply use the normal Copy-Paste methods to transfer & share files to & from your Android device to your Mac Device.


    Method . 3 – Sharing Files from Android to Mac OS X over WiFi by Share It App.

    This method is really very big to be summarized, we highly recommend it reading over it on the below link –

    Click here for Detailed tutorial to Share files from Android to Mac OS X over WiFi

  • 3 Free Apps to take Animated GIF Screenshots on Windows 7/8.1/10 | Capture Moving Screenshots

    3 Free Apps to take Animated GIF Screenshots on Windows 7/8.1/10 | Capture Moving Screenshots

    GIFs are back again! Their ability of being able to animate like videos & to be less in size like normal static photos always make them useful for conveying information, plus their ability to loop-continuously makes them even more usable for tutorials. Basically, Windows Operating Systems capture screenshots in normal image (jpg/png) format, and there arise questions such as How to Capture Animated GIFs Screenshots on Windows? So, as a answer – Here are 3 Best Free apps which will help you capture Animated GIF Screenshots on Windows 7 / 8.1 & even Windows 10 (32-bit as well as 54-bit support)

    Top  3 Free Apps to Capture Moving GIFs Screenshots on Windows –

    App No.1 – Gyazo

    Gyazo Icon

    Gyazo  tops our list due to multiple features – It not only allows you to create or creates GIFs but it even instantly uploads them to the Gyazo Server, this helps in saving the time required to save the GIF Screenshot and uploading them separately – improving productivity. Besides this, Gyazo has the rare ability to record complete screen into GIF format which is perhaps the missing feature in the other two apps present in this article.

    How to Record Screen in GIF using Gyazo –

    • First of all Download & Install Gyazo from the below Download Link –
      Click here to Download Gyazo for Windows 7 / 8.1  & Windows 10 .
    • Now, Once you have installed Gyazo simply navigate to your Taskbar and look for the Gyazo icon as shown in the alongside image.
    • This shows that Gyazo is running now to capture GIF simply “right click” and select “Capture GIF” option , else you can press the keys “ctrl+shift+g” to capture GIF anytime.
    • Now, once you press the Key combination, it will show you a plus ‘+’ sign, asking you to select the area to capture – Now select the rectangular area whose GIF is to be recorded, by clicking the left mouse button until you draw the rectangle as show below –
      Selecting Rectangle for GIF

      Now, it will start recording the selected area for actions (moving pointers,images etc) as shown below –

      Gyazo Recording

      Once the blue bar is filled, it means that your GIF is ready and it will start uploading your GIF to their server.

    • That’s it! Now once the upload is done (5 seconds)  it will open a URL with your recorded GIF link which is ready to be used anywhere. Congratulations! You have successfully uploaded your Animated GIF Screenshot.


    App No.2 ScreenToGIF

    ScreenToGIF

    ScreenToGIF is a very easy, neat and simple to use utility to capture your Screenshot in GIF format in the most efficient & easy way. It also provides functionality to apply various filters to the GIF like Sepia etc, as well as it even lets you add text to the GIF . Following is the method to record GIF using ScreenToGIF –

    • First of all Download & Install ScreenToGIF from the below link –
      Click here to Download ScreenToGIF for Windows.
    • Now, its a single .exe file, which on execution directly gives you a window with a transparent body as shown below –
      ScreenToGIF Window (Drag to place) and resize using Corners

      Here, drag the window to the location you want to record into GIF using the Title bar, you can also re-size the recording window using the “maximize” button or by extending the window by its edges.

    • Once, you are onto the area you want to record simply hit on the “Record” button as highlighted by blue box in the previous image, the app will now start recording the screen within the app’s frame into GIF. Once you are done with taking the Screencast simply click on the “Stop” button to stop the Recording. It will now show you a preview window as shown below –
      Screen To GIF Editor Window

      You can now Play your GIF Preview, or simply Click on “Done” as highlighted by the blue box to save your GIF! .

    • That’s it, you have successfully captured another Animated GIF Screenshot on your Windows PC ( Computer) or Laptop.


    App No.3 LICEcap

    LICEcap is just 220kB in size, but packs a big punch in it features. The method to use LICEcap is similar to that of Screen To GIF and their UI too are similar. Inorder to capture Moving GIF Screencasts using LICEcap you need to perform the following actions –

    • Download & Install the LICEcap app from the below link –
       Click here to Download LICEcap for Windws 7 / 8.1 /10.
    • After installing, execute LICEcap , now it will show you a window similar to that as we saw in S To GIF as shown below –
      LICEcap app window

      Simply resize the window to the portion of Screen you want to record into the GIF and click on “Record” button.

    • Once you click on “Record”, the buttons will change to “Pause” & “Stop” as shown below . Now click on “Stop” once you’re done with the recording. 
    • Now, in the File-Explorer box, it will ask you to input name for the GIF file, simply type here the name for the GF and click on “Save”.
    • That’s it you have successfully recorded your screen into GIF.

    So, these are the best free apps to Record / Capture  Screen into GIF format on Windows . If you have any queries or suggestions feel free to comment .

  • Top 5 Websites to Book Cheap Flight Tickets in India! (Book Domestic Flights at cheapest rates)

    Top 5 Websites to Book Cheap Flight Tickets in India! (Book Domestic Flights at cheapest rates)

    There are many Online Flight ticket booking providers in India which makes it confusing for a Customer so as to which service should be used for Booking their flights. Many times, the initial prices shown in the search are later on increased with attributes such as extra taxes, convenience fees etc and then the rates simply don’t remain and in many cases are even higher than other flight ticket providers. So, here is the collection of Top  5 Websites to Book Cheap flight Tickers in India along with their reviews of – ClearTrip, MakeMyTrip , Via , Expedia , Yatra / GoIbibo & a word on Musafir as well . We made a large sample of queries on the operators for rates on holiday days, weekdays, weekends, festivals etc of domestic flights before writing these reviews .

    Website # 1 – ClearTrip.com

    ClearTrip

    ClearTrip stays true to its name which itself its greatest virtue. Unlike many major Flights ticket providers which levy hidden extra charges on the search fare – ClearTrip imposes no extra charges in the name of such hidden costs, and the flight ticket Insurance too is an optional add-on which the passenger can remove to reduce the ticket costs . Some, of the Unique features of cleartrip are –

    • No hidden extra charges / convenience fee on Flight Bookings.
    • While booking for SpiceJet tickets we found that their rates were the lowest! Infact they were lower than the rates on Official SpiceJet website too , and it seems they have some sort of tie-up with them.
    • So, we highly recommend to check the rates first on ClearTrip.com for any flight booking and if its SpiceJet look for no other operators!

    Click here to Visit Cleartrip.com now & book your Domestic Flights!.
    Click here to Download ClearTrip App & Get even more discounts on flights.


    Website # 2 – MakeMyTrip.com

    MakeMyTrip.Com Review

    MakeMyTrip is one of our favorite Domestic flights booking service providers due to its partnership with Payback! & a large number of banks . Now, the rates on MakeMyTrip may not always be lesser than that on Cleartrip, but the Cashbacks provided by virtue of their tie-ups with banks + Payback sometimes make it an even better deal than ClearTrip. And like cleartrip, makemytrip also doesn’t has any convenience charges and thus you can get the ticket at the same rate shown in search provided you unselect the travel insurance which is present on the payment page whose cost is around (Rs.249). Below are some of the Salient features of MakeMyTrip –

    • No hidden convenience fees on Flight Bookings (What you see in search is what you pay).
    • Tie-Ups with major bank’s credit cards & payback enables you to get Extra Cashbacks!
    • You can also get Free Rs.500 in your MakeMyTrip Wallet which you can use for booking flight tickets / hotels if you Download the MakeMyTrip app from our article – Click here to get Free Rs.500 in your MakeMyTrip wallet.
    • We would recommend to use MakeMyTrip for booking flights of GoAir & JetAirways as we found best deals for these two carriers.

    Click here to Visit MakeMyTrip to book Flight tickets.
    Click here to Download the MakeMyTrip.com app.


    Website # 3 – Via.Com

    Via.Com

    Via.com simply surprised us by its booking rates and its ease of use. Not to be mistaken by its Websites and a little out-of-date UI , Via.com has some of the best flight booking rates especially if your flight is from either GoAir or JetAirways. Besides, lower rates Via also leads on –

    • No additional convenience fee charges whatsoever.
    • No automatic addition of Insurance.
    • Easy availability of coupon codes which are valid on all books without any minimum fare or minimum booking policy.
    • We used Via.com coupon code – VIADOM to get discounts on even the lowest flight fares amongst its competitors.

    Click here to Visit Via.com to book your flight tickets.
    Click here to Download Via app and get additional Rs.200 Off!.


    Website # 4 – Expedia.co.in

    Expedia.co.in Review

    Expedia.co.in is the Indian part of the Global travel services provider – Expedia . The flight rates on Expedia were on par with all the operators especially in the economy flights but the additional Convenience Fees charges of Rs.200 on each booking imposed by Expedia harms the ticket fare in the economy flights. But in the Business class flights the Cashback offers provided by Expedia steal the show. We recommend Expedia if you’re looking to Book IndiGo Air Tickets. Though, they give Best Price guarantee else get double the difference as refund, no one simply has the time to claim refunds after the travel.

    Click here to Visit Expedia.co.in & book Flights!


    Website # 5 – Yatra & GoIbibo (Balloon Publicity)

    Yatra = ?

    Now, we would purposely club Yatra & GoIbibo in a single review as there’s literally very little to differentiate between the two. Considering the amount of hype & promotions they do, we expected better deals from both of them, But it seems, they spend more on promotion instead of satisfying the passengers by giving best rates. Coming to the point, both Yatra as well as GoCash may give the same rates as any other travel agency but they again levy the Rs.200 Convenience fee on all the tickets .

    GoIbibo = ?

    And to fool the users come up with offers of Yatra eCash cashback & GoCash cashbacks – Both of the virtual cash being completely useless when it comes to domestic flights bookings.. You can just use a meagre 5% of booking amount to pay via eCash or Rs.500 limit (whichever is lower) , When it comes to economy class bookings the rates of 5% virtual cash carry no value as simply it cuts off the convenience fee which itself was additional  charges levied by these two. Incase of Business class tickets, their extra bloated fares on the sites along with kinda forcing users to buy hotels leaves a Bad Taste. We would highly recommend you to use the previous options before considering these. However, we would gladly change our reviews if the fares & services improve.

    Update – You can even get additional CashBacks from CashKaro.com if you are trying to Book either via ClearTrip, MakeMyTrip or Expedia (This Cashback is sponsored by CashKaro and is above and is extra cashback exclusive of coupon discounts , credit card & wallet discounts! . Thus making your travel even sweeter! – Check out this tutorial on How to use CashKaro for getting Flight Discounts.

    So, here’s a table which would help you to Book Cheapest Domestic Flights in India

    Service Provider Recommended For Carriers App Link
    Cleartrip.com SpiceJet preferred &  others  Download
    MakeMyTrip.com JetAirways , GoAir preferred & others  Download
    Via.com AirIndia recommended & others  Download
    Expedia.co.in IndiGo recommended & others  Download