Category: Tech News And Updates

Latest Tech News And Updates

  • Use Google Chrome as Calculator,Metric Converter | Hidden Functions of Google Chrome Browser still widely unknown

    Use Google Chrome as Calculator,Metric Converter | Hidden Functions of Google Chrome Browser still widely unknown

    I was just casually browsing on the Internet, then instead of typing ‘.’ in an IP address i accidentally tped ‘*’ and to my astonishment,i was much shocked on the Result, Google Chrome quickly generated the Product of the two numbers for me 🙂 . On further trial and error experiments i found out Google Chrome could be used as a really quick Calculator and Metric Converter . which can be used to save and simplify our work , Let’s check it out how –

    Procedure to Use Google Chrome as a Calculator 

    • Its really quite simple, simply type in your desired expression using the normal ‘+’ , ‘*’ ,’-‘ etc operators in the address bar and it shall return you the results . I have tested the operators (+,-,/,*,%) you can try more of them and tell me the results.
    • Here’s an example operation( “85*48/8+6-2”) and with the result(“514”) it returned in the below image – 

    Similarly Google Chrome Browser can also be used as a Metric Converter too as follows

    • Simply type in your Unit in address bar as shown below – (I typed in “5 feet” in address bar and it showed me the equivalent metres in Output)
    • Also it supports conversions from one Metric to other metric Systems too as shown in the figure I typed (“5 feet in inches”) in address bar and it rightly returned me the Corresponding inches

    Thus , Google Chrome contains this awesome functionality of an inbuilt-calculator cum Metric converter which can be pretty much time saving,especially in cases such as analytics saving the time required to navigate from one window to other . Also this trick is also quite good to show-off or impress folks with your geeky knowledge 🙂 .

    And before i conclude, here’s one more –

    we have explored a widely unknown dimensioon of Google Chrome,if you know more of such dimensions, do let us know by the comments 🙂 . Thank you!

  • Prevent Google from tracking Search-Using non https Google Search [Non SSL Version]

    Prevent Google from tracking Search-Using non https Google Search [Non SSL Version]

    Many sites today track users without their consent and store data, hence privacy of users is a major concern. Google too does the same way and tracks our previous search queries,visited links to track our usage and improve the search results . But many times it can happen that we may want to hide our search query from google or stop it from tracking our usage. Also sometimes we may want to use the old non-https or non SSL version of Google Search to search our query especially in case of slower network connections. This post covers the very same on How to prevent Google from tracking our search without having to log out or make changes to our Google profile/Account settings , And using non https Google SSL encryption.

    The Method to use Google without https and without traceability is very easy , though there are many users using 3rd party services like ducduckgo or startpage.com but i won’t recommend them,as they themselves are slower and their server processing despite using google results make them even more slower..Let us now browse the methods to prevent google from recording the search results.

    Method I —– Using Google Server IP

    Yeps, this is the most simple Method to use Google and gain access to Google search results without letting google track and using SSL , you can get the Geo-Specific Google Server IP for your location too, The Process is very Simple as follows

    • Open Command Prompt [For Windows users] or Terminal [For Linux and Mac users] and simply type the command “ping google.com” and hit enter, you will get a message as “pinging google.com (google server ip) with xx data” check the below screenshot for information.
    • Here the IP contained in the brackets is the Google Server IP , now simply enter this IP in your browser and hit enter ! and voila !
    • You are now able to access Google without https and without traceability , you can yourself check that even if you are logged on/signed in on “google.com” you are logged off/signed out on the Google Server IP Page :). Thus preventing the Google Server from tracking you and your search 🙂
    • Also, you can check for previously searched queries, they always disappear 🙂 Check the below Screenshot for live demo of the same –>
    • As you can see in the above Screenshot i have used the Google IP from the ping command and using it for searching , The Google Server IP which i used was 173.194.36.38 , you can obtain yourself IP or can use anyone from the range 173.194.36.1 to 173.194.116.255 , tested by me i.e total 80*255 IPS but may be the number is even more  🙂 You can try urself and get your own Google Server IP  for personal use 😛

    Method 2 – Appending ?nord=1 at end of Google Search

    • This is yet another method for using non https version of Google Search but unlike the previous method it doesn’t completely prevent Google from tracking your results.
    • But this method is quite useful especially in slower network connections or restricted networks where https doesn’t work properly . You can visit the non-https version of ?nord by Visiting here – http://www.google.com/?nord=1

    So ,these are some tweaks of the World’s Number 1 Ranked site, which many and many of them might not know and which can be used to enjoy the Google Search experience 🙂 , If you have any doubts/queries/suggestions feel free to contact us or comment below 🙂

  • Bank Swift Code not available-Solution for receiving AdSense Payment in India | Adsense Payment Settings for Swift-BIC

    Recently, Google has launched Adsense payment by Wire transfer in India to Indian Adsense Publisher Accounts, and has completely ditched the old cheque payment system,thus now there’s no need to wait at homes waiting for cheques 🙂 . although the wire transfer or Electronic Fund Transer [EFT] guarantees quick and easy money transfer to publishers , it requires filling of SWIFT-BIC code which is not available for every Bank in India especially the Rural ones and small branches . Thus causing Payment Problems to the Publishers , but we at TechApple have come up with unique solution to the problem of Bank Swift Code Not Available .

    Solution / Settings for receiving Adsense Payment in India even if SWIFT Code Not available

    • First of all , Fill Up all the details in the Payment settings page except Swift code , it consists of simple fields such as Account holder Name , Account Number and IFSC Code, Make sure that you fill in only your branch’s IFSC Code and your Correct Account Number . The Payment settings will look like these —
    • You can use the site MyIFSCCode to find the IFSC Code of your Bank branch . Make sure you copy the correct IFSC Code as each Bank branch in India has its separate and distinct IFSC Code.
    • Now, regarding the SWIFT-BIC ,  First of all Please visit the site http://www.theswiftcodes.com/india/ and find out whether your Bank Branch has SWIFT Code or not , if its present simply enter the Obtained Swift Code , else
    • Simply fill in the Nearest Bigger Branch Swift Code of the Same Parent Bank as that of yours, if the SWIFT-Code of your Branch is not available .. e.g if your Account is in SBI , then look for the Swift Code of  nearest SBI branch only ..
    • Else if you still cannot find the Swift code of your nearest branch , you can use any of these default SWIFT-BIC codes as per your branch
    • Allahabad Bank- ALLAINBBTDM
    • Andhra Bank- ANDBINBB
    • Axis- AXISINBB002
    • Bank of Baroda- BARBINBBXXX
    • Bank of India- BKIDINBBNRI
    • Bank of Maharashtra- MAHBINBB
    • HSBC- HSBCINBB
    • ICICI- ICICINBBCTS
    • Oriental Bank of Commerce- ORBCINBBIBD
    • Punjab National Bank- PUNBINBBISB
    • State Bank of India- SBININBBFXD
    • United Bank of India- UTBIINBBXXX

    Now, some of you might think that using the above method is risky and like that, but in Indian Banking System SWIFT Code is used only to perform Foreign currency to Rupee conversion . and hence using any of the Parent branch SWIFT Code ensures the SWIFT Code bank branch being used as a bridge to convert and transfer money to our Local branch which uses the IFSC Code and then to our Accounts located in the IFSC Code branch , thus ensuring proper funds transfer of our hard earned Money through Adsense 🙂

    Here’s the proof of the same – My Payment received on my Bank Account 🙂

    If you have any doubts/queries feel free to ask us by comments 🙂 Happy Earning!

  • 4 ways to use Kindle Reader on PC both online as well as offline | Kindle for Linux/Windows/Chrome OS

    4 ways to use Kindle Reader on PC both online as well as offline | Kindle for Linux/Windows/Chrome OS

    Hey guys, recently i started using Amazon Kindle and all the large collection of e-books which come with it, i found the experience very nice of being able to read my favorite books offline too, hence thought of sharing the 4 ways which i use personally for Kindle Reader online as well as offline .

    First Way ! – Google Chrome App / Kindle Cloud Reader Extension

    • Most of you users might be familiar with the Google Chrome Browser and the loads of apps available on the appstore, Kindle too has its own app on the Store which supports reading from the Cloud [online] as well as reading offline from local media/storage.
    • All the Features such as Bookmarks,highlighting,color changes,search,fontsize,etc work fabulously well and nice with the Google Chrome App
    • And to top of it Google Chrome being available for Windows/Linux/as well as Chrome OS , we can synchronise and use the Kindle Reader on Linux and Chrome OS too  as the native Kindle Reader/Client isn’t available for them.
    • Thus, the Kindle Reader Chrome extension which can be run offline too can be downloaded from here ->
      Click here to Download Kindle Cloud Reader Chrome Extension

    Second Way – Online Cloud Reader / URL – read.amazon.com

    • Like, the Google Chrome extension the Online Kindle Cloud Reader as its loaded in the browser itself, can be used on any OS – Windows/Linux/Chrome OS/Windows Phone/Symbian etc
    • The Most recently read book is automatically saved for offline use.
    • All features such as bookmarks and synchronisation , editing effects are supported!
    • Highly recommended if the Chrome app isn’t available.
    • Click here to go to Online Kindle Cloud Reader

    Third Way – Using the Kindle for PC App

    • Amazon had officially released the Kindle for PC app for Windows operating systems, but there’s no reason to why it abruptly stopped its development.
    • The Official Kindle for PC can still be downloaded and used on modern windows versions too such as Windows 7,Windows 8|8.1
    • For Running on Linux, Install the Kindle for PC app using WINE! and selecting the base OS as “Windows 98” in Winecfg.
    • The Official Kindle for PC App can be downloaded from here , Click here to Download Kindle for PC.

    Fourth Way – Using the Official Kindle Windows 8 / Windows 8.1 App

    • This is one of the most elegant way to use Kindle Reader on your PC/Tablet ., The Official Kindle App for Windows 8/8.1 Supports all the features of Kindle Reader.
    • Supports Bookmarking, Offline Reading, Cloud Sync, Editing the Font, Color,Shape , Size,Note taking and much more..
    • It simply makes reading your e-book more worthwhile and more pleasing and cool!
    • The Official Kindle App for Windows 8/8.1 Can be downloaded from here–> Click here to launch Store link for Kindle App

    So, these are the methods which i use personally, if you have any doubts/queries on setting upany method, feel free to comment , also if you have a different method do comment 🙂 so we all can share and  enjoy it 🙂

  • 5 Free File Hosting/Sharing Cloud Storage Sites with Direct/Hot Link Support | CloudLinker v2.0 Direct Link Maker

    5 Free File Hosting/Sharing Cloud Storage Sites with Direct/Hot Link Support | CloudLinker v2.0 Direct Link Maker

    Hey Guys, as you know canonical is shutting down its Ubuntu One Cloud Storage so i was looking for alternative file sharing sites which allowed hot/direct linking and gave permealinks for files and found these 5 Free File Hosting sites with direct linking /hot link support

    1. Dropbox 

    Yes, your favourite Cloud-Storage / Dropbox.com Supports Direct Link / Hot Link on Files Uploaded to it, it can be easily done by modifying the shared / Download URL by tweaking it a bit, Head on to this Post to know the trick in detail, Trick to Obtain Direct Link of Dropbox file in short in this trick we are simply replacing “www.dropbox.com” with “dl.dropboxusercontent.com” and that’s it, and for simpler purposes You can use our all in one multi Direct Link Maker – CloudLinker v2.0 to Generate DirectDownload/Share URLs for hosts.Files stored on Dropbox account remain active as long as the account is not deleted!

    2.Ge.tt

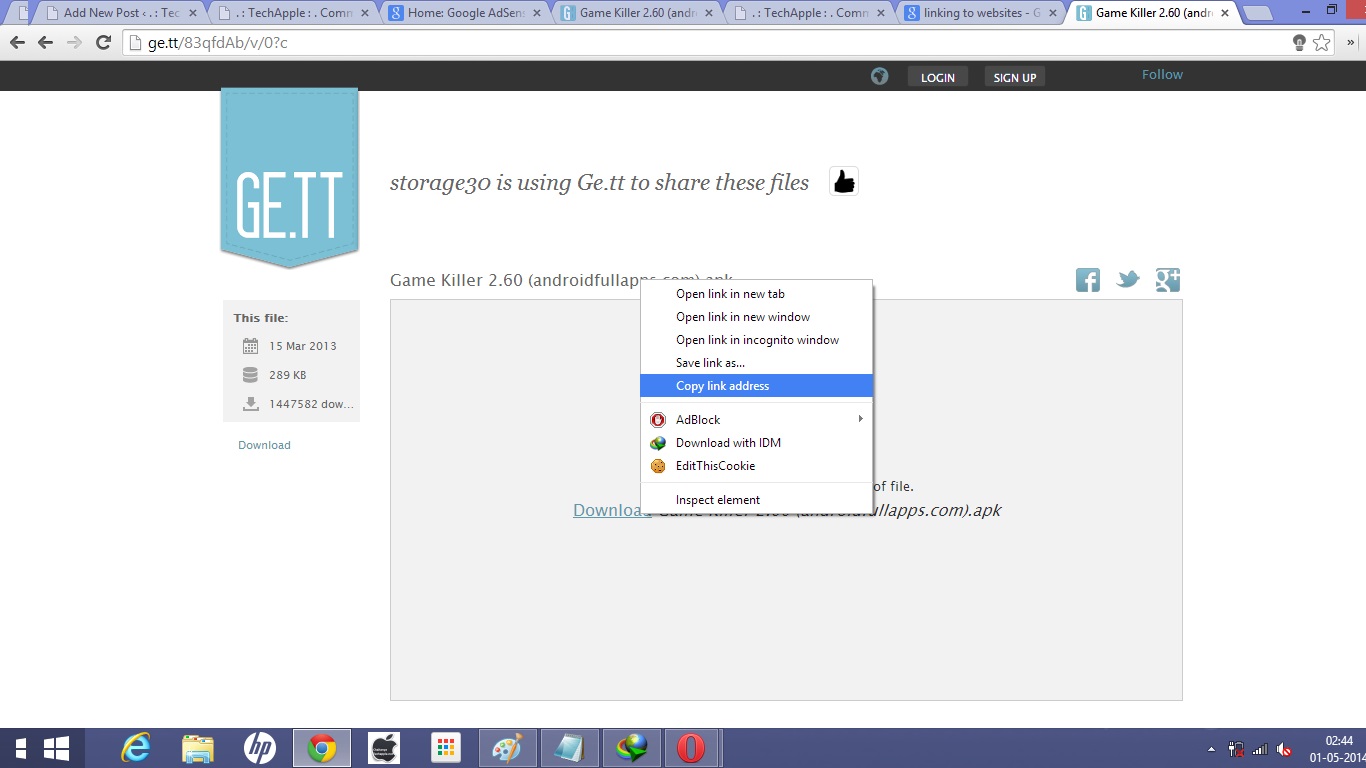
    Ge.tt is a new Entry in the Cloud Storage Family, but its easily and quickly leaving its competitors behind and taking the lead. After you upload your file through drag and drop or by file uploader on ge.tt , or you get a shared download page URL for a file uploaded on ge.tt , simply right click on the highlighted “Download” Link and Copy the URL/Copy Link Address, it will be the direct Download URL for your file,as shown in the figure -> Ge.tt Direct Download Link Trick –>


    3.Copy.Com

    Copy.com is one of the fastest growing Cloud Storage, it provides 15 GB of Storage Space for Free!!, and yes you can use it for Direct/Linking and Hot Linking too, in a similar way as we did with Dropbox.! we just have to remove “www” and “/s”  from the url e.x https://www.copy.com/s/*** making it http://copy.com/*** to make the Shared File URL into downloadable one.! but it consists of some steps, i highly recommend using our CloudLinker v2 tool or refer this post for Copy.com Direct Link Generation


    4.DirectLinkUpload.com

    When you visit this site for the first time please don’t go on the looks, just upload your file through the simple uploader and you’ll get a URL for sharing , Now Go to The File Sharing URL and go to shared folder option, you will see your uploaded files, Now right click on the Copy Link Adddress, it shall be your direct Download Link which you can easily share..or you can click your uploaded file to download it, and copy the URL from which it got downloaded 🙂


    5. Ozibox.com

    Ozibox.com is the newest entry to the Cloud Market, And Provides Free 100GB of Storage Space for everyone!, also it provides Direct Link to the files stored on the Cloud, Steps to generate direct download links from ozibox are Sign-Up for an account on ozibox.com , login and upload your file through the upload button, and download your own file on your browser/IDM .! Now Copy the Recent Downloaded URL from IDM / Google Chrome Downloads tab, and this will be your direct download link for your file /shareable to everyone.!


    Using our CloudLinker v2.0

    As Promised Earlier i have Updated CloudLinker to v2.0 which Now supports all the Five Hosts Mentioned Above, you simply have to enter the Shared /Sharing URL provided by the host and it will generate the Direct Download URL for you, which you can add to your posts/ share with your friends. 🙂

    Update – CloudLinker v3.0 is now Online tool – So no need to Download anything – Click here to Get your Direct Download Links using CloudLinker Online

    Click here to download Cloudlinker v2 from Dropbox
    Click here to download Cloudlinker v2 from Ge.tt
    Click here to download Cloudlinker v2 from Copy.Com
    Click here to download Cloudlinker v2 from DataFileHost.Com
    Click here to download Cloudlinker v2 from Ozibox.Com


  • 3 Ways/Tricks to download Bing image of the day on your PC using Chrome/Firefox/BingDesktop [Bing Background Image]

    3 Ways/Tricks to download Bing image of the day on your PC using Chrome/Firefox/BingDesktop [Bing Background Image]

    Hello guys, most of you might have noticed the background images posted on bing.com ,popularly known as which change on a daily basis and would have wanted to save them on your PC, download  Bing background image and use as a wallpaper . Rejoice its possible in this post i will reveal 3 Ways/Tricks to download the Bing Background Image and Save them on your PC..

    Trick / Method I : Mozilla Firefox — Google Chrome Trick following..

    • Navigate to the Bing Homepage http://www.bing.com in your Firefox Browser.
    • Navigate to the image you want to download using the navigation arrows shown on the Bing homepage at right hand side bottom side, now after you reach the desired image , right click on the “View background image” ,you will get a menu shown like this
    • d
    • Now click on “View Background Image in the Dropdown Menu”  and it will open the Image with its URL , as shown here
    • Now , you can copy the URL and download the image or simply right click on the image and select “Save image as” option to save the Image! and that’s it easy! isn’t it ..?

    Trick / Method 2 : Google Chrome

    • Navigate to Bing Home page and browse to your desired Download Image using the arrow keys.
    • Now when on the image,right click on the image and select the “Inspect Element Option” in the dropdown menu shown here
    • Now, you will see a bottom tab in the google chrome and it will contain the image URL as shown below  –> in the next image, you can copy the image URL and download it using IDM or navigating in chrome and selecting “Save image as”  after opening the Image URL in the image.. here’s a screenshot of the Inspect element –>

    Thus, you can download any Bing Image using these simple steps.. 🙂 But, the drawback of using Browsers for downloading images is that only the Last seven images are available 🙁 in order to browse the entire Bing Image Gallery..and download them we will have to use the Bing Desktop App

    Method / Trick 3 Bing Desktop App

    The previous methods allow to download only last 7 bing images,if we need to download the complete gallery it isn’t possible by prev methods, hence , we use the Bing Desktop app.  to download the gallery, the steps for downloading any wallpaper from bing gallery are as follows

    • Download the Bing desktop app from here, and install it.
    • After installingjust browse from the topbar app and browser for your favourite image and set it any image as wallpaper.. as shown here–>
    • Now your desired bing image is set as wallpaper , if you want to get the Location of the .jpg file just right click on your desktop wallpaper and click on “personalize”
    • Now click on wallpaper/desktop background, a dialog box shown below is showed up on your desktop
    • Now you will get the location where the bing Desktop app saves your download image, you can get it by howering your mouse over it as shown in the above picture 🙂

    Congrats! now thus you can download any image stored on bing as well as save them, share set them up as wallpapers.. and Bing really has an amazing number of pictures which are really classic! so do check it out 🙂 Thanks! if any problems/queries/suggestions feel free to comment 🙂

  • StarCron Browser v1.0 For Windows – Free Unlimited StarSports.Com Streaming !!

    StarCron Browser v1.0 For Windows – Free Unlimited StarSports.Com Streaming !!

    Hello Guys,
    well most of you must have heard about starsports.com : the leading online service for worldwide Sports Streams, well it provides an Official Free Preview of its Streams to the Users for First Ten Minutes Only 🙁  later on,to view the streams we either have to subscribe premium packages or have to go for unofficial and risky streams which may contain malware and such things 🙁

    So,in order to overcome these limitations of StarSports.com We introduce the StarCron Browser for Windows..!!

    Now, lets have a look on the features of StarCron Browser –

    Features

    • In Built Ad-Blocker to Fight and Block those Nasty Ads.! you don’t love them,we don’t love them either 😀
    • ‘Unlimited Sports Events Streaming through StarSports.Com such as
    1. Cricket
    2. Football
    3. Hockey
    4. Lawn Tennis
    5. Table Tennis
    6. Golf
    7. and Many more through StarSports.Com
    • Can,be perfectly used as a Normal Browser too,thus serving the purpose of 2-in-1 🙂

    You can Download The StarCron Browser v1.0 from here–>

    Click here to Download StarCron Browser v1.0 For Windows

    Procedure / Method for using Unlimited StarSports.com Streaming Matches

    • Install StarCron Browser v1.0 For Windows
    • Now Navigate to The site www.StarSports.com and select the live stream which you want to view. [Note : The stream must be available in your country for you to view,if it ain’t available try changing your IP address to get your desired stream]
    • Now once you start with your live stream you will be Given “FREE PREVIEW OF 10 MINUTES” We are Going to increase these 10 minutes to unlimited using StarCron Browser..!
    • Now,after your free preview of 10 minutes is end,or done over with simply right click in any blank area of the WebPage of your Stream and select the option “Apply hack for StarSports.com by TechApple.Net” which is the fourth option as shown in figure..

    starcron

    • After clicking it will display a message “Hack Successfully Applied”,in bottom left corner of your screen..!
    • Now Simply Reload the Page!! and voila!! 🙂 Your Free Preview has been Extended !! 🙂 😉
    • Repeat these steps to get Unlimited High Quality Streaming of your Favourite Sports Videos! on starsports.com!

    You can Download The StarCron Browser v1.0 from here–>

    rp_large-downloadnow.png

    Click here to Download StarCron Browser v1.0 For Windows

    Mirror Link #1 Click here to Download StarCron Browser v1.0 from Mirror #1

    Mirror Link #2 Click here to Download StarCron Browser v1.0 from Mirror # 2

  • Turbo C/C++ For Windows 10 / 8.1 & Windows 7 [32bit/64bit] FullScreen Installer [PC & Laptop]

    Turbo C/C++ For Windows 10 / 8.1 & Windows 7 [32bit/64bit] FullScreen Installer [PC & Laptop]

    Hello Friends In my last article , I had Published Tasm or Turbo Assembler For Windows 7 / Windows 8, Full Screen 64bit, then after that I received many requests from our Users to Prepare an installer for TurboC/C++ too on that algorithm, so here it is.. TurboC/C++ By Borland is a Popular C/C++ Compiler,but finding its installer is a headache plus it doesn’t directly work on Windows 7/Windows 8.1 & Windows 10 64 bit..so here is the Modified TurboC/C++ 4.0 Installer For All Windows Versions

    Salient Features of Turbo C by TechApple

    • World’s most preferred Simple C/C++ Language Compiler..that too on a single click installer !!
    • Works On All Versions of Windows, Windows 98,Windows 2000,Windows XP,Windows 7 [64 bit as well as 32 bit] As Well as Windows 8,8.1 and Windows 10 too [both 64bit and 32 bit]
    • Works Full-screen even on Windows 7 ,8 and Windows 10..!!
    • C/C++ Graphics[graphics.h] supported .. even on Windows 7 and Windows 8 again fullscreen..!!
    • Header files Snap.h and dos.h also supported for Screen-capture and Delay timer, again full screen..
    • Single installer,no Need of Configuring anything.. even a single line 😛
    • No Need Of Mounting anything on DosBoX , everything is already mounted 😀
    • Alt+F9 Key For Compilation and Ctrl +F9 Key for execution both Combinations Supported, No other DosBox Turbo C++ supports this..!!
    • Very Much Stable Operation. Same installer works for all Windows OS’s 32 bit as well as 64 bit

    You can Download it from here

    Updated : Click here To Download Turbo C/C++ 4.0 For Windows XP/7/8.1/10 [64bit/32bit] Fullscreen Single Installer

    Mirror Link # 1 Click here To Download Turbo C/C++ 4.0 For Windows XP/7/8.1/10 [64bit/32bit] Fullscreen Single Installer Updated..


    Installation Guide :
    Its rather pretty simple, Just Open the installer and simply keep on clicking Next.

    Just Don’t change the default installation
    directory “c:\TurboC4\”


    Screenshots – >

    Successfull Compilation using the alt + f9 key combination Successful Use of Graphics- Graphics.h and ScreenCapture – > snap.h in TurboC

    Support –

    • Double click the Turbo C/C++ icon on the Desktop for Execution
    • If it Doesn’t run Full-screen simply give the commandAlt + Enter” To Open in Full-screen
    • We have also launched Turbo C for Android – You can download & use Turbo C for Android by following tutorial .

    Mirror Link No2
    Click here to Download from Mirror : TurboC/C++ For Windows XP/Windows 7/Windows 8 64bit-32bit Edition Updated 4.0

    Please do let us know if there are any problems while installing the package – Turbo C for Windows 10 in the comments section below.