Category: PC Tricks

  • Tutorial – How to disable/Stop YouTube Autoplay of Videos and Playlists in Chrome/Firefox

    One of the most annoying thing present in YouTube is its Autoplay – Its starts playing the video as soon as its get opened, or we click on it. Sometimes, we may need to Stop/Disable YouTube autoplay of videos in order to conserve bandwidth or simply in case where we are stacking up videos in different tabs for viewing . So, here’s the easiest method to Stop YouTube auto play

    Method # 1 – Using SmartVideo for Google Chrome / Firefox

    SmartVideo has the option to stop youtube video initialization
      • Though, SmartVideo for YouTube has many customization options for YouTube, as this post is about stopping/disabling the YouTube auto-play , coming straight to the Point –
      • First of all download the SmartVideo addon/extension depending upon your browser –
        Click here to download SmartVideo for YouTube –  Chrome.
        Click here to download SmartVideo for YouTube for Firefox.
      • Once you’re done with installing the SmartVideo extension, browse to its Preferences by entering these URLs in address bar depending upon the Browser you Use –
      • Enter the following URL for Google Chrome –

    chrome-extension://lnkdbjbjpnpjeciipoaflmpcddinpjjp/options.html

    • Enter the following URL for Mozilla Firefox –

      resource://mytube-at-ashishmishra-dot-in/smartvideo_for_youtube/data/options.html

    Now,  checkmark the option highlighted by Red Rectangular box in the alongside image which shows – “Save Bandwidth, Do not initializw video until I click” .

    You can also open the global preferences, or settings for Smart YouTUbe extension by hovering mouse pointer over any YouTube video which is being played and selecting “Global Preferences” in the drop-down menu.

    That’s it, now open any YouTube video you’ll find that its Not auto playing or initializing and thus serving our purpose 🙂

  • Yosapp – WhatsApp Web client to use WhatsApp directly on browser – Whatsapp Website UI to access through Web Browser (Chrome/Firefox/Safari/Opera Mini/UC Browser)

    Yosapp – WhatsApp Web client to use WhatsApp directly on browser – Whatsapp Website UI to access through Web Browser (Chrome/Firefox/Safari/Opera Mini/UC Browser)

    My obsession with WhatsApp simply never seems to end, After writing about WhatsApple – WhatsApp client for PC , and 5 WhatsApp protocol supported apps for Firefox OS Phones , i looked around for even more Simpler and unique solutions and came across – Yosapp! and I simply loved this concept ! Its unique and pretty much what i am looking for! –  WhatsApp Web UI! (Use Whatsapp through Website)  .  Yosapp enables a user to use WhatsApp Protocol directly through the Browser 🙂 , it means that, to access WhatsApp through Yosapp there’s no need to download any WhatsApp App/Client whatsoever! All you need to do is Register your account and mobile number on Yosapp site and you’re ready to use it! (You can use WhatsApp on Opera Mini and UC Browser(Ucweb) too! 😛 )

    UPDATE – Yosapp is now DEAD 🙁 , but WhatsApp has now launched its official WhatsApp Web Client – Read about it here.

    Features of Yosapp!

    • WhatsApp Web UI (No need to Download Any WhatsApp Client!).
    • You can Access your WhatsApp account and use it for chatting from literally anywhere, e.g Net cafes,Web-browsers,Mobile browsers etc.
    • You can use it to access Whatsapp for Accessing on Public Computers such as school and college labs 😛
    • Easy Contacts Management – once you add your contacts in the Yosapp site, you can chat with them directly! So, in case you change your mobile Phone or lose your contacts, you have an all-time backup of the contacts.
    • Works on all browsers and accessible from anywhere , its pretty much like GMail, you sign in to your WhatsApp account, check and reply to the chats sent when you were offline, as well as Chat with the friends who are online too :).
    • Attachments sent by users to you can also be viewed and forwarded .
    • OS Independent : As its web-based you can practically use it on any Web-browser IE/Chrome/Firefox/Safari/Opera Mini/UCBrowser and any OS you want Windows/Linux/Android/Mac/Firefox OS/tizen etc and the list goes on and on…
    • Supports Desktop Notifications too 🙂 , if supported by the Browser e.g Chrome.

      UPDATE – Yosapp is now DEAD 🙁 , but WhatsApp has now launched its official WhatsApp Web Client – Read about it here.

    Configuring and using Yosapp too is very easy , simply perform the following steps to Configure and use Yosapp!

    1. Visit the Yosapp site by Clicking here.
    2. Click on the Sign-Up account icon in the Right hand side top corner as shown in below image –
    3. Now you will be shown a Sign-Up Form as shown below – , Please fill in the 10-digit mobile Number and other details and Click on the “Sign-Up” button.
    4. Now , login to your registered account by clicking the “Y” icon , shown at the centre of screen, on left hand-side of Sign-Up form , and click on “Login” button.
    5. As you have registered for first time on Yosapp , it will ask for one-time verification of your Mobile Number either through SMS or by Call, as shown below , here select the Verification method and click on forward arrow button or  “>” (see figure)
    6. Now in the next Step, Enter the Six – digit verification number received on your Mobile, and click Next
    7. Voila! You are ready to use WhatsApp! on your browser, Simply Add a contact through “Add Contact” icon or through “Settings” icon as shown in below figure and start chatting ! 🙂 [ Check the below figure for all Controls and Options 🙂 ]
    8. Note : While adding New Contact, you will see a “CC” option CC stands for Country Code, in that field Enter the Country Code of the Contact

    That’s it 🙂 , you can now log-off and Sign-in again to your Whatsapp/Yosapp account from anywhere PC/Mobile to use WhatsApp! and it won’t ask for Verification too! 🙂

    UPDATE – Yosapp is now DEAD 🙁 , but WhatsApp has now launched its official WhatsApp Web Client – Read about it here.

    Thus, you can now access, your WhatsApp account from anywhere through your Yosapp account, Click here to go to Yosapp! If you have any doubts/queries/suggestions feel free to comment 🙂


  • 3 Ways to find & Detect Font of Website or in a Webpage

    3 Ways to find & Detect Font of Website or in a Webpage

    Recently I was browsing through the Line friendconverter site and i really liked the font name, and wanted to add it to my PC . but i had to search around a bit hence thought of writing an article on finding the font of website so as TechApple blog users need not to roam around for doing the same. so here are the Best 3 Methods to find font of website which i found better 🙂 .

    Method I : WhatFont Chrome Extension

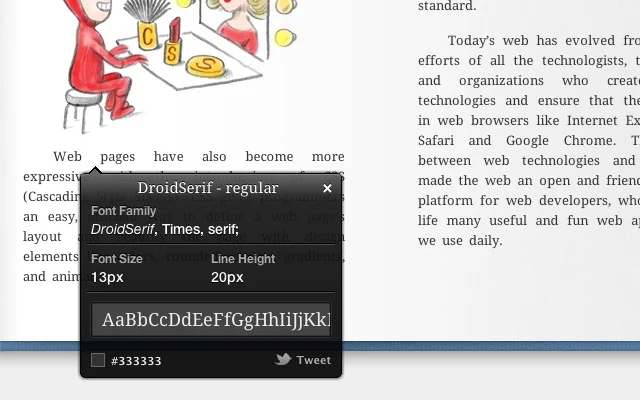
    This is my most preferred method and me being lazy loved it . All you need to do for finding the font of website is –

    • First of all, install the WhatFont Chrome extension and hover the mouse pointer over the text part of the website whose Font you want to find .
    • Whatfont will display a box showing the Fontface name, Family,  Size as shown in the alongside Image.
    • Incase if it doesn’t show up Simply click on the “f?” button on the addon – bar and perform the Hover method . Easiest way !

    Click here to download the WhatFont Chrome Extension


    Method II : Using Font Finder Add-On for Firefox
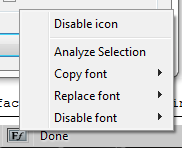
    Not all users will be using Google Chrome, Firefox users too have an addon for Firefox – Font finder which can be used to detect Fonts on the Website which is currently visited. For detecting font using Font Finder

    • Select the text of which Font is to be found and right click on it.
    • An image similar to one shown alongside appears , select the option “Analyze Selection” and you will be shown a dialog box showing the Font Name, Size, details etc that too in flash seconds.

    Click here to download the Font Finder Add-On for Firefox


    Method III : Using the Bookmarklet – Fount by Artequalswork

    The above discussed methods work for either Chrome or Firefox, it may happen that you are a Safari or IE or any other Browser user and you want to detect the font of the website, so there’s a solution available for other browser users too – A bookmark is provided by Artequalswork – Fount which will help in finding the font.

    All you have to do is add their bookmarklet to the bookmark bar, navigate to the website of which font is to be detected or determined , and click on the Fount bookmark , and magic! it will show the Font face name,family as well as the size! and it works on all Browsers – Safari, Google Chrome, Mozilla Firefox, IE 8+ .

    Click here to visit the add Bookmarklet page of Fount

    Note : In-case if you want to detect / Identify font present in an image, you can read the postMethods to detect font from Image 

    These were the easy methods to detect the Fonts used on a website , while most of the time these tools will work , if however if they don’t work we can use the methods used by developers for Font detection purpose – Firebug and Webkit. I will be writing an article with detailed instructions on using the same , but mostly the above tools will save the day ! 🙂 . If you have any doubts/queries do comment also if you know of any other such tool or method feel free to comment, we will really appreciate it 🙂

  • Install/Run Old 16-bit/32-bit Software on 64-bit PC/OS | Compatibility Guide – Install Windows 7 Software on Windows 8/8.1

    Install/Run Old 16-bit/32-bit Software on 64-bit PC/OS | Compatibility Guide – Install Windows 7 Software on Windows 8/8.1

    Many times we come across scenarios where we look for backward compatibility in order to run Legacy/Old Software’s on our Newer PCs or OSs . or may be we need to Run the 32-bit or 16-bit Software’s on our Newer Machines . e.g Installing Windows 7 Software on Windows 8, Installing Windows Xp Software on Windows 8.1 etc,installing 32 bit software on 64 bit os . This Compatibility Guide will cover all these Compatibility issues.

    Compatibility Issue 1 : 16-bit Softwares on 64-bit OS (e.x Old Dos Games and Softwares on New Windows 7/8/8.1 64bit OS)

    This Compatibility constraint is the most widely experienced and most searched after Compatibility issue , while running the Old Native DOS based games and apps, on 64bit OS these app simply do not get executed and display a warning message such as “This app can’t run on your PC” . The solution / fix to this problem is pretty simple – Using DosBox to mount and run these old 16bit apps, infact the apps Run as smoothly as if they were Running on Native environment e.x Windows 95/98, such is the high quality emulation provided by Dosbox. I searched and searched throughout the Internet for DosBox alternatives, but the closest thing i found similar to DosBox is DosBox Itself! . To run your Software through Dosbox, simply install the Turbo C installer from this Post ,Now drag and drop your .exe which is to be opened on the DosBox.exe icon present in the “C:\TurboC4\Techapple.Net” folder, and your 16bit app will directly Run in 64 bit Windows!

    Compatibility Issue 2 :  Older Operating System Software on Newer OS (Windows XP or Windows 7 software installation on Windows 8/8.1)

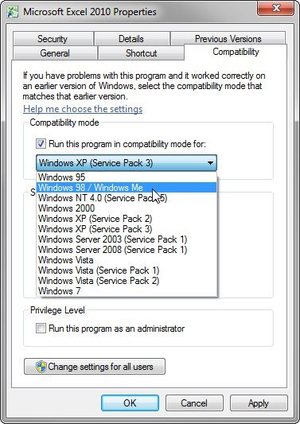
    This is another big Compatibility issue faced by most of Us, and the Solution too is quite Simply according to the Problem . If you are facing the error while launching the setup file, simply Right-click the .exe file, or a shortcut to the .exe file, and select Properties. Click the Compatibility tab. Then check Run this program in compatibility mode for and select an appropriate option according to the OS it was built for. Then try launching the Setup again , it should get installed 🙂  Check the alongside image for more details. Or if it’s giving the problems after installing try the above mentioned Compatibility method along with the “Run as Administrator” which appears after right clicking on the Icon . i.e Executing the program as Administrator. You can also add the tick in the Checkbox in the Compatibility tab to enable “Run as Administrator” Option.

    Compatibility Issue 3 : Installing Running 32-bit Software in 64 bit

    Generally, all the 32-bit software work well by default in 64-bit Operating Systems , but some legacy Softwares give errors, or simply won’t function properly 🙁 . The reason behind one is quite trivial One – All the 32-bit Softwares are installed in the directory “Program Files(x86)” And they are simply tuned and designed to work with their directory as “Program Files”  so the solution here is quite simple, At the installation time simply change/edit the installation directory to “Program Files” along with the generated installation directory and as i found out here while installing VB6 on windows 8.1 , It will work like magic! along with the above mentioned Run as Administrator/Compatibilty Tweak 🙂


    I was able to solve all my Compatibility issues using the above 3 Tweaks, and yes if the Old Beast can still run on Newer Machines so why should we replace it 🙂 ? .And if even all the above 3 fail we always have the Option of Virtual Machine and installing OS on it which though lengthy always works, so Enjoy your favourite legacy and Old Softwares with the above mentioned tricks, and if in case Some Software still doesn’t run simply Comment, we would be glad to help!

  • Prevent Google from tracking Search-Using non https Google Search [Non SSL Version]

    Prevent Google from tracking Search-Using non https Google Search [Non SSL Version]

    Many sites today track users without their consent and store data, hence privacy of users is a major concern. Google too does the same way and tracks our previous search queries,visited links to track our usage and improve the search results . But many times it can happen that we may want to hide our search query from google or stop it from tracking our usage. Also sometimes we may want to use the old non-https or non SSL version of Google Search to search our query especially in case of slower network connections. This post covers the very same on How to prevent Google from tracking our search without having to log out or make changes to our Google profile/Account settings , And using non https Google SSL encryption.

    The Method to use Google without https and without traceability is very easy , though there are many users using 3rd party services like ducduckgo or startpage.com but i won’t recommend them,as they themselves are slower and their server processing despite using google results make them even more slower..Let us now browse the methods to prevent google from recording the search results.

    Method I —– Using Google Server IP

    Yeps, this is the most simple Method to use Google and gain access to Google search results without letting google track and using SSL , you can get the Geo-Specific Google Server IP for your location too, The Process is very Simple as follows

    • Open Command Prompt [For Windows users] or Terminal [For Linux and Mac users] and simply type the command “ping google.com” and hit enter, you will get a message as “pinging google.com (google server ip) with xx data” check the below screenshot for information.
    • Here the IP contained in the brackets is the Google Server IP , now simply enter this IP in your browser and hit enter ! and voila !
    • You are now able to access Google without https and without traceability , you can yourself check that even if you are logged on/signed in on “google.com” you are logged off/signed out on the Google Server IP Page :). Thus preventing the Google Server from tracking you and your search 🙂
    • Also, you can check for previously searched queries, they always disappear 🙂 Check the below Screenshot for live demo of the same –>
    • As you can see in the above Screenshot i have used the Google IP from the ping command and using it for searching , The Google Server IP which i used was 173.194.36.38 , you can obtain yourself IP or can use anyone from the range 173.194.36.1 to 173.194.116.255 , tested by me i.e total 80*255 IPS but may be the number is even more  🙂 You can try urself and get your own Google Server IP  for personal use 😛

    Method 2 – Appending ?nord=1 at end of Google Search

    • This is yet another method for using non https version of Google Search but unlike the previous method it doesn’t completely prevent Google from tracking your results.
    • But this method is quite useful especially in slower network connections or restricted networks where https doesn’t work properly . You can visit the non-https version of ?nord by Visiting here – http://www.google.com/?nord=1

    So ,these are some tweaks of the World’s Number 1 Ranked site, which many and many of them might not know and which can be used to enjoy the Google Search experience 🙂 , If you have any doubts/queries/suggestions feel free to contact us or comment below 🙂

  • Bank Swift Code not available-Solution for receiving AdSense Payment in India | Adsense Payment Settings for Swift-BIC

    Recently, Google has launched Adsense payment by Wire transfer in India to Indian Adsense Publisher Accounts, and has completely ditched the old cheque payment system,thus now there’s no need to wait at homes waiting for cheques 🙂 . although the wire transfer or Electronic Fund Transer [EFT] guarantees quick and easy money transfer to publishers , it requires filling of SWIFT-BIC code which is not available for every Bank in India especially the Rural ones and small branches . Thus causing Payment Problems to the Publishers , but we at TechApple have come up with unique solution to the problem of Bank Swift Code Not Available .

    Solution / Settings for receiving Adsense Payment in India even if SWIFT Code Not available

    • First of all , Fill Up all the details in the Payment settings page except Swift code , it consists of simple fields such as Account holder Name , Account Number and IFSC Code, Make sure that you fill in only your branch’s IFSC Code and your Correct Account Number . The Payment settings will look like these —
    • You can use the site MyIFSCCode to find the IFSC Code of your Bank branch . Make sure you copy the correct IFSC Code as each Bank branch in India has its separate and distinct IFSC Code.
    • Now, regarding the SWIFT-BIC ,  First of all Please visit the site http://www.theswiftcodes.com/india/ and find out whether your Bank Branch has SWIFT Code or not , if its present simply enter the Obtained Swift Code , else
    • Simply fill in the Nearest Bigger Branch Swift Code of the Same Parent Bank as that of yours, if the SWIFT-Code of your Branch is not available .. e.g if your Account is in SBI , then look for the Swift Code of  nearest SBI branch only ..
    • Else if you still cannot find the Swift code of your nearest branch , you can use any of these default SWIFT-BIC codes as per your branch
    • Allahabad Bank- ALLAINBBTDM
    • Andhra Bank- ANDBINBB
    • Axis- AXISINBB002
    • Bank of Baroda- BARBINBBXXX
    • Bank of India- BKIDINBBNRI
    • Bank of Maharashtra- MAHBINBB
    • HSBC- HSBCINBB
    • ICICI- ICICINBBCTS
    • Oriental Bank of Commerce- ORBCINBBIBD
    • Punjab National Bank- PUNBINBBISB
    • State Bank of India- SBININBBFXD
    • United Bank of India- UTBIINBBXXX

    Now, some of you might think that using the above method is risky and like that, but in Indian Banking System SWIFT Code is used only to perform Foreign currency to Rupee conversion . and hence using any of the Parent branch SWIFT Code ensures the SWIFT Code bank branch being used as a bridge to convert and transfer money to our Local branch which uses the IFSC Code and then to our Accounts located in the IFSC Code branch , thus ensuring proper funds transfer of our hard earned Money through Adsense 🙂

    Here’s the proof of the same – My Payment received on my Bank Account 🙂

    If you have any doubts/queries feel free to ask us by comments 🙂 Happy Earning!

  • 3 Ways to Download Sound from Soundcloud legally – Easily Download Soundcloud Music,Songs to mp3 on Mobile/PC/Mac Online

    3 Ways to Download Sound from Soundcloud legally – Easily Download Soundcloud Music,Songs to mp3 on Mobile/PC/Mac Online

    Soundcloud has simply revolutionised the way music artists share their work . Soundcloud has enabled easy interaction between music artists and listeners,thus it is used widely for sharing sound,music . By default Soundcloud itself legally supports downloading of sound and music from its site but many are unaware of it , so Let’s have a look on 3 Ways to download Sound from Soundcloud.

    Method 1 . From official/original Soundcloud site

    The Soundcloud site itself has the features of downloading the music/sound if allowed/permitted by the Sound artist or Sound Uploader , The Method for downloading from official site is quite simple, you simply have to click the “Down” button as shown in the images below – There may be two cases depending upon the date when the music was uploaded , the images below cover both the cases

    Case 1 –  Distinct visible downward arrow

    Case 2 – Embedded Downward arrow

    Method 2 . Using Websites to download from soundcloud 

    Sometimes it may happen that the above official method of downloading from soundcloud doesn’t work in such scenarios we can use websites and browser tools to download from soundcloud , one of such site is soundcloud-download.com , using it is very simple .

    • Just copy the unique soundcloud URL for the particular music/sound/song from soundcloud.
    • Now paste the copied soundcloud URL in the URL box of the sound cloud download site .
    • And now click the Download Button .!  and your music will start downloading . The below image shows the example of using soundcloud-download.com to download from Soundcloud


    Besides this, there are soundcloud-download.com alternatives sites like Sounddrain.com and Soundflush.com which too can be used for downloading mp3 from soundcloud. The method from downloading from these sites is same as mentioned earlier .

    Method 3. Using Browser extensions

    If the first method didn’t work for you , or either you feel tired to copy the URLs every time you need to download, you can simply install these Soundcloud Downloader browser extensions , and it will automatically add a download button to each Soundcloud Sound you are browsing too . Just click the button and download will start, making the job easier 🙂

    Soundcloud Downloader extension for Google Chrome

    Install this Soundcloud Download extension for Google Chrome and the download button will be available for tracks which you browse on soundcloud as shown below.This extensions supports Soundcloud Playlist download too , thus saving the time and required to download multiple tracks. Soundcloud downloader Google Chrome extension screenshot


    SoundCloud downloader Firefox Extension

    The Soundcloud downloader extension is available for firefox users too, you can add it to your Firefox from Addons store by Clicking here . Check the below image for the screenshot of the Firefox extension


    So these are the methods to download from Soundcloud, feel free to share this post and if you face any difficulties feel free to comment 🙂

  • 5 Free File Hosting/Sharing Cloud Storage Sites with Direct/Hot Link Support | CloudLinker v2.0 Direct Link Maker

    5 Free File Hosting/Sharing Cloud Storage Sites with Direct/Hot Link Support | CloudLinker v2.0 Direct Link Maker

    Hey Guys, as you know canonical is shutting down its Ubuntu One Cloud Storage so i was looking for alternative file sharing sites which allowed hot/direct linking and gave permealinks for files and found these 5 Free File Hosting sites with direct linking /hot link support

    1. Dropbox 

    Yes, your favourite Cloud-Storage / Dropbox.com Supports Direct Link / Hot Link on Files Uploaded to it, it can be easily done by modifying the shared / Download URL by tweaking it a bit, Head on to this Post to know the trick in detail, Trick to Obtain Direct Link of Dropbox file in short in this trick we are simply replacing “www.dropbox.com” with “dl.dropboxusercontent.com” and that’s it, and for simpler purposes You can use our all in one multi Direct Link Maker – CloudLinker v2.0 to Generate DirectDownload/Share URLs for hosts.Files stored on Dropbox account remain active as long as the account is not deleted!

    2.Ge.tt

    Ge.tt is a new Entry in the Cloud Storage Family, but its easily and quickly leaving its competitors behind and taking the lead. After you upload your file through drag and drop or by file uploader on ge.tt , or you get a shared download page URL for a file uploaded on ge.tt , simply right click on the highlighted “Download” Link and Copy the URL/Copy Link Address, it will be the direct Download URL for your file,as shown in the figure -> Ge.tt Direct Download Link Trick –>


    3.Copy.Com

    Copy.com is one of the fastest growing Cloud Storage, it provides 15 GB of Storage Space for Free!!, and yes you can use it for Direct/Linking and Hot Linking too, in a similar way as we did with Dropbox.! we just have to remove “www” and “/s”  from the url e.x https://www.copy.com/s/*** making it http://copy.com/*** to make the Shared File URL into downloadable one.! but it consists of some steps, i highly recommend using our CloudLinker v2 tool or refer this post for Copy.com Direct Link Generation


    4.DirectLinkUpload.com

    When you visit this site for the first time please don’t go on the looks, just upload your file through the simple uploader and you’ll get a URL for sharing , Now Go to The File Sharing URL and go to shared folder option, you will see your uploaded files, Now right click on the Copy Link Adddress, it shall be your direct Download Link which you can easily share..or you can click your uploaded file to download it, and copy the URL from which it got downloaded 🙂


    5. Ozibox.com

    Ozibox.com is the newest entry to the Cloud Market, And Provides Free 100GB of Storage Space for everyone!, also it provides Direct Link to the files stored on the Cloud, Steps to generate direct download links from ozibox are Sign-Up for an account on ozibox.com , login and upload your file through the upload button, and download your own file on your browser/IDM .! Now Copy the Recent Downloaded URL from IDM / Google Chrome Downloads tab, and this will be your direct download link for your file /shareable to everyone.!


    Using our CloudLinker v2.0

    As Promised Earlier i have Updated CloudLinker to v2.0 which Now supports all the Five Hosts Mentioned Above, you simply have to enter the Shared /Sharing URL provided by the host and it will generate the Direct Download URL for you, which you can add to your posts/ share with your friends. 🙂

    Update – CloudLinker v3.0 is now Online tool – So no need to Download anything – Click here to Get your Direct Download Links using CloudLinker Online

    Click here to download Cloudlinker v2 from Dropbox
    Click here to download Cloudlinker v2 from Ge.tt
    Click here to download Cloudlinker v2 from Copy.Com
    Click here to download Cloudlinker v2 from DataFileHost.Com
    Click here to download Cloudlinker v2 from Ozibox.Com


  • 3 Ways/Tricks to download Bing image of the day on your PC using Chrome/Firefox/BingDesktop [Bing Background Image]

    3 Ways/Tricks to download Bing image of the day on your PC using Chrome/Firefox/BingDesktop [Bing Background Image]

    Hello guys, most of you might have noticed the background images posted on bing.com ,popularly known as which change on a daily basis and would have wanted to save them on your PC, download  Bing background image and use as a wallpaper . Rejoice its possible in this post i will reveal 3 Ways/Tricks to download the Bing Background Image and Save them on your PC..

    Trick / Method I : Mozilla Firefox — Google Chrome Trick following..

    • Navigate to the Bing Homepage http://www.bing.com in your Firefox Browser.
    • Navigate to the image you want to download using the navigation arrows shown on the Bing homepage at right hand side bottom side, now after you reach the desired image , right click on the “View background image” ,you will get a menu shown like this
    • d
    • Now click on “View Background Image in the Dropdown Menu”  and it will open the Image with its URL , as shown here
    • Now , you can copy the URL and download the image or simply right click on the image and select “Save image as” option to save the Image! and that’s it easy! isn’t it ..?

    Trick / Method 2 : Google Chrome

    • Navigate to Bing Home page and browse to your desired Download Image using the arrow keys.
    • Now when on the image,right click on the image and select the “Inspect Element Option” in the dropdown menu shown here
    • Now, you will see a bottom tab in the google chrome and it will contain the image URL as shown below  –> in the next image, you can copy the image URL and download it using IDM or navigating in chrome and selecting “Save image as”  after opening the Image URL in the image.. here’s a screenshot of the Inspect element –>

    Thus, you can download any Bing Image using these simple steps.. 🙂 But, the drawback of using Browsers for downloading images is that only the Last seven images are available 🙁 in order to browse the entire Bing Image Gallery..and download them we will have to use the Bing Desktop App

    Method / Trick 3 Bing Desktop App

    The previous methods allow to download only last 7 bing images,if we need to download the complete gallery it isn’t possible by prev methods, hence , we use the Bing Desktop app.  to download the gallery, the steps for downloading any wallpaper from bing gallery are as follows

    • Download the Bing desktop app from here, and install it.
    • After installingjust browse from the topbar app and browser for your favourite image and set it any image as wallpaper.. as shown here–>
    • Now your desired bing image is set as wallpaper , if you want to get the Location of the .jpg file just right click on your desktop wallpaper and click on “personalize”
    • Now click on wallpaper/desktop background, a dialog box shown below is showed up on your desktop
    • Now you will get the location where the bing Desktop app saves your download image, you can get it by howering your mouse over it as shown in the above picture 🙂

    Congrats! now thus you can download any image stored on bing as well as save them, share set them up as wallpapers.. and Bing really has an amazing number of pictures which are really classic! so do check it out 🙂 Thanks! if any problems/queries/suggestions feel free to comment 🙂